设置
Basic settings
INFO
For information about the GenAuth user pool version that supports the various benefits of the "Settings" function, please check the official website "Pricing" page. If your version does not support this benefit and you want to try it, you can activate the trial period. For an introduction to the trial period and how to activate it, please check Trial Period.
Basic information
Path: Settings->Basic Settings->Basic Information
Administrators can modify the basic information of the user pool, configure the user pool authentication address, delete the user pool, and other operations on the Basic Information tab.
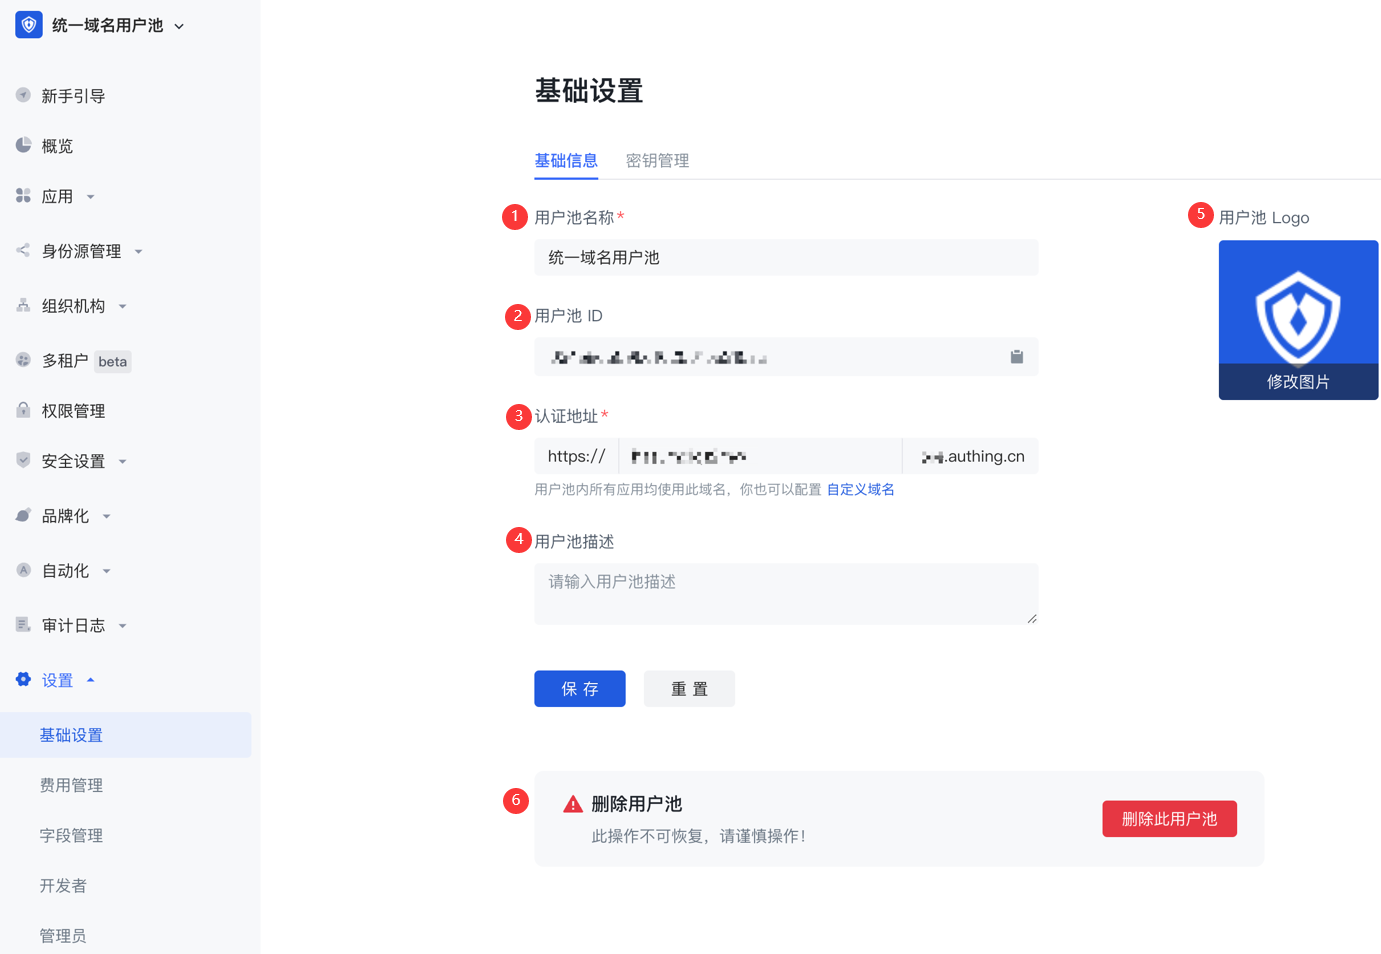
| Serial number | Field | Description |
|---|---|---|
| 1 | User pool name | You can modify the user pool name in this field. |
| 2 | User pool ID | The system automatically generates the ID when creating a user pool. You can click the copy button after the input box to copy the ID for configuring single sign-on and other scenarios. |
| 3 | Authentication address | GenAuth The default user pool does not use a unified third-level domain name. If you need to modify the third-level domain name of some applications in your user pool, you can go to the Application Configuration page of the application to modify it. Note: If you use a user pool with a unified domain name, you can modify the third-level domain names of all applications (self-built applications, integrated applications, and application panels) in the user pool at one time. |
| 4 | User Pool Description | You can enter a brief user pool description here, which should accurately describe the user pool's business information and purpose of use to distinguish it from other user pools. |
| 5 | User Pool Logo | Administrators can click the user pool logo to upload and replace the current system default logo image locally. |
| 6 | Delete User Pool | You can delete a user pool here. Note: "Delete User Pool" is a high-risk operation. Once a user pool is deleted, it cannot be recovered. GenAuth will delete all user information and configuration information in this user pool from the database in real time after you make the "Delete User Pool" operation. |
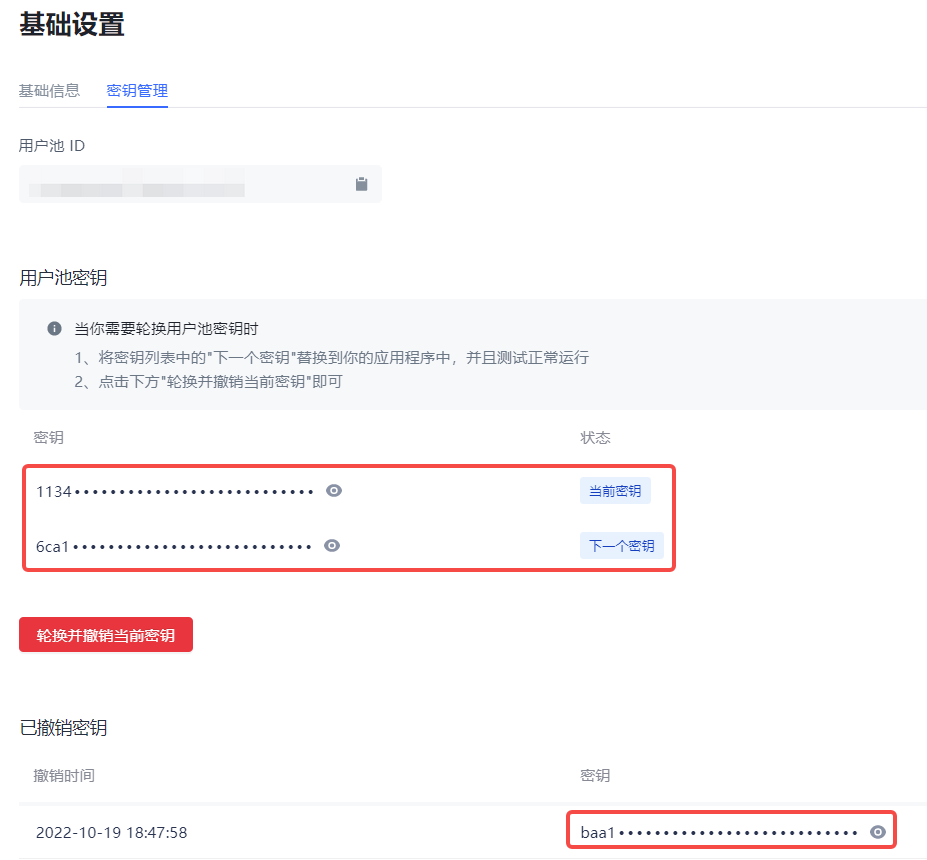
Key Management
Path: Settings->Basic Settings->Key Management
The user pool key can be used in multiple scenarios such as using tickets to exchange for user information. You can obtain the User Pool ID (UserPoolId) and User Pool Key (UserPool Secret) on the Key Management page of the console.
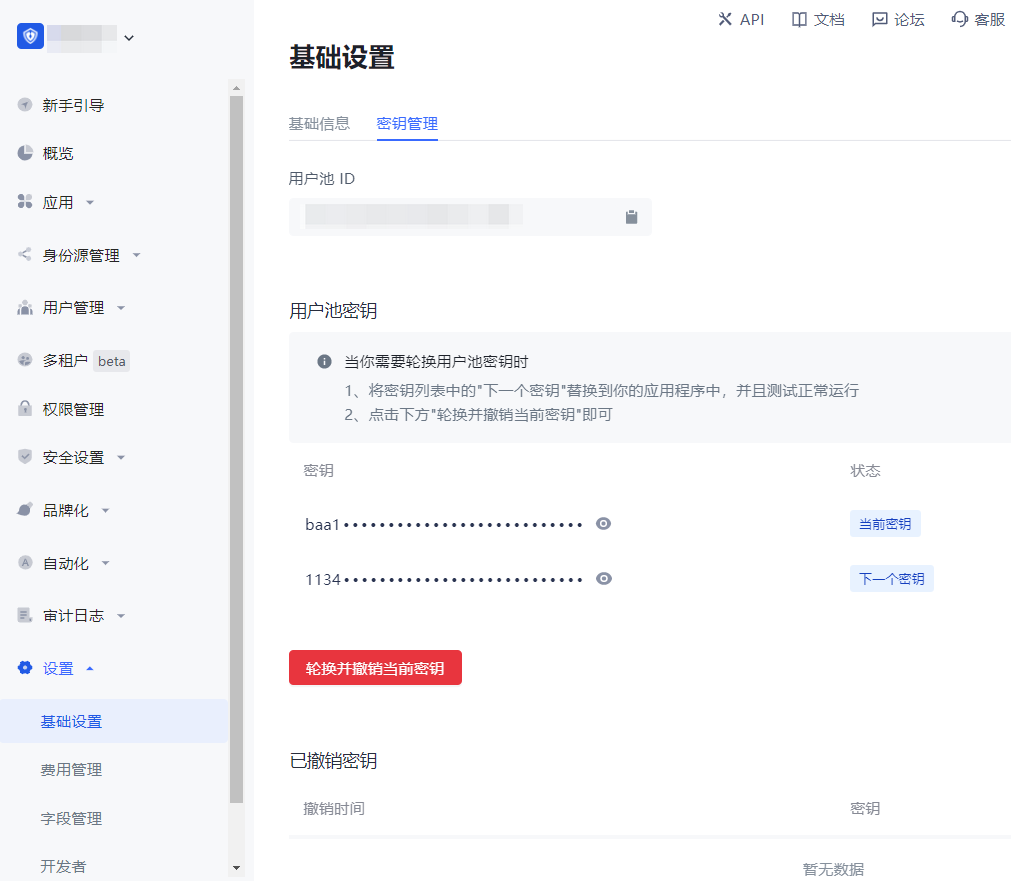
One user pool ID automatically generates two corresponding user pool keys:
Current key: It is the key provided to customers for online use requests.
Next key: It is a backup key automatically created in advance when customers are ready to change the key.
Currently, the user pool key of GenAuth supports refresh rotation. To refresh and rotate the user pool key, perform the following steps:
Click the Rotate and revoke current key button.
Check the prompt information in the pop-up window and click Rotate and revoke current key to confirm.
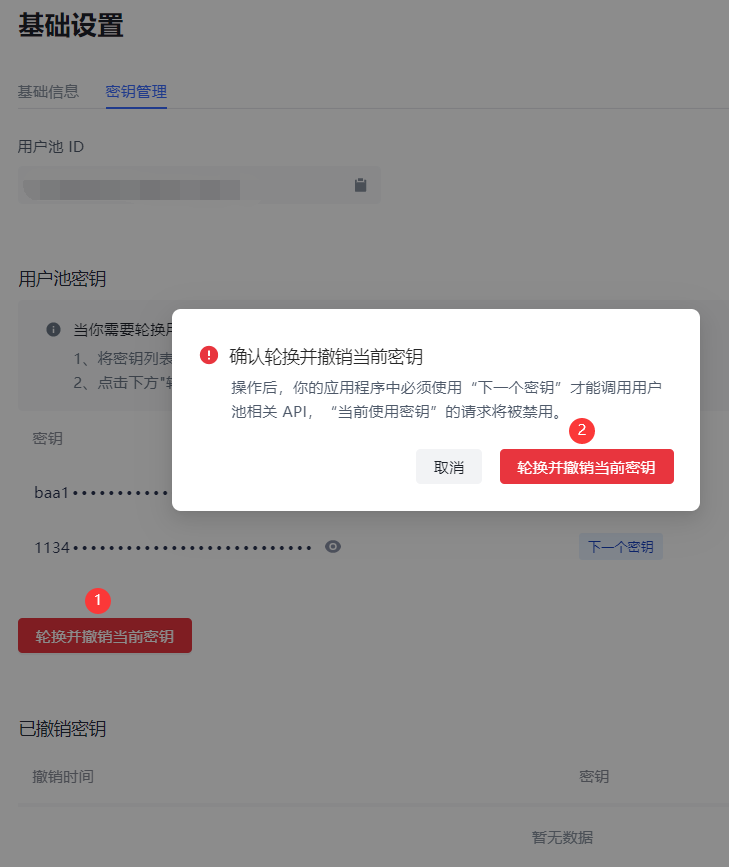
- The prompt "Rotation key successful" will be displayed, Current key will be disabled and enter the Revoked keys list, the status of Next key will be changed to Current key, and a new Next key will be automatically created.
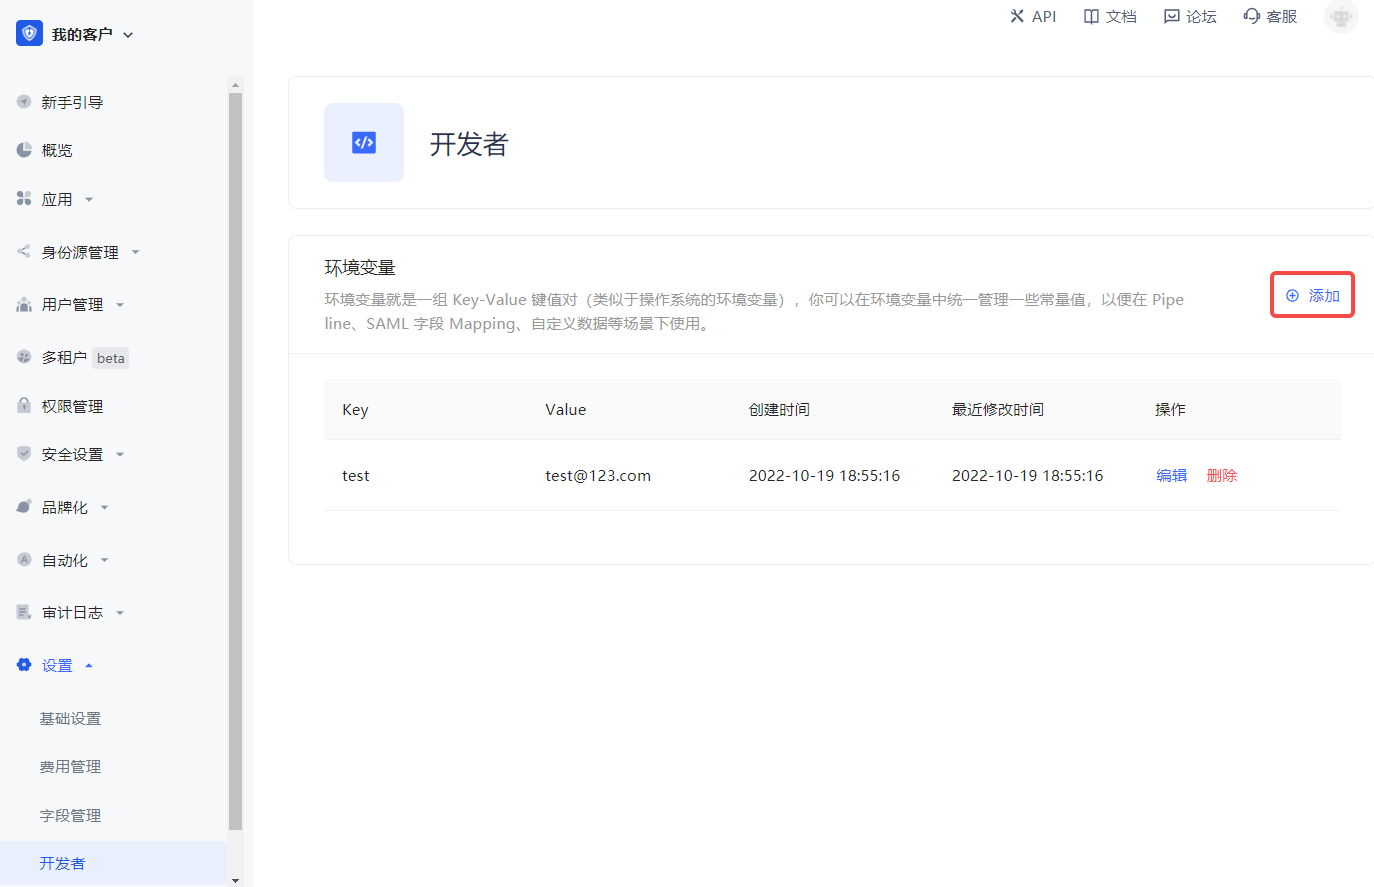
Developer
Path: Settings->Developer
Developers can configure environment variables. Environment variables are a set of key-value pairs (similar to operating system environment variables). You can manage some constant values in environment variables for use in scenarios such as Pipeline, SAML field mapping, and custom data.
On the Developer page, click the Add button to add environment variables.
Administrators
Path: Settings->Administrators
Administrator sources
There are two sources of administrators: external administrators (including the owner of the user pool and its collaborative administrators) and internal administrators.
All external administrators are concentrated in the GenAuth official user pool as the owners of their respective user pools. An external administrator A can authorize the user pool resources he is responsible for to B, the owner of another user pool in the GenAuth official user pool, to assist A in managing his user pool. The authorized owner B will see the user pool that A is responsible for in the user pool list of the GenAuth official user pool.
External administrator A can also designate a user in his user pool as an internal administrator and assign permissions to him.
Administrator level
According to the permission level, administrators can be divided into user pool-level administrators and application-level administrators. All internal and external administrators can be either user pool-level administrators or application-level administrators.
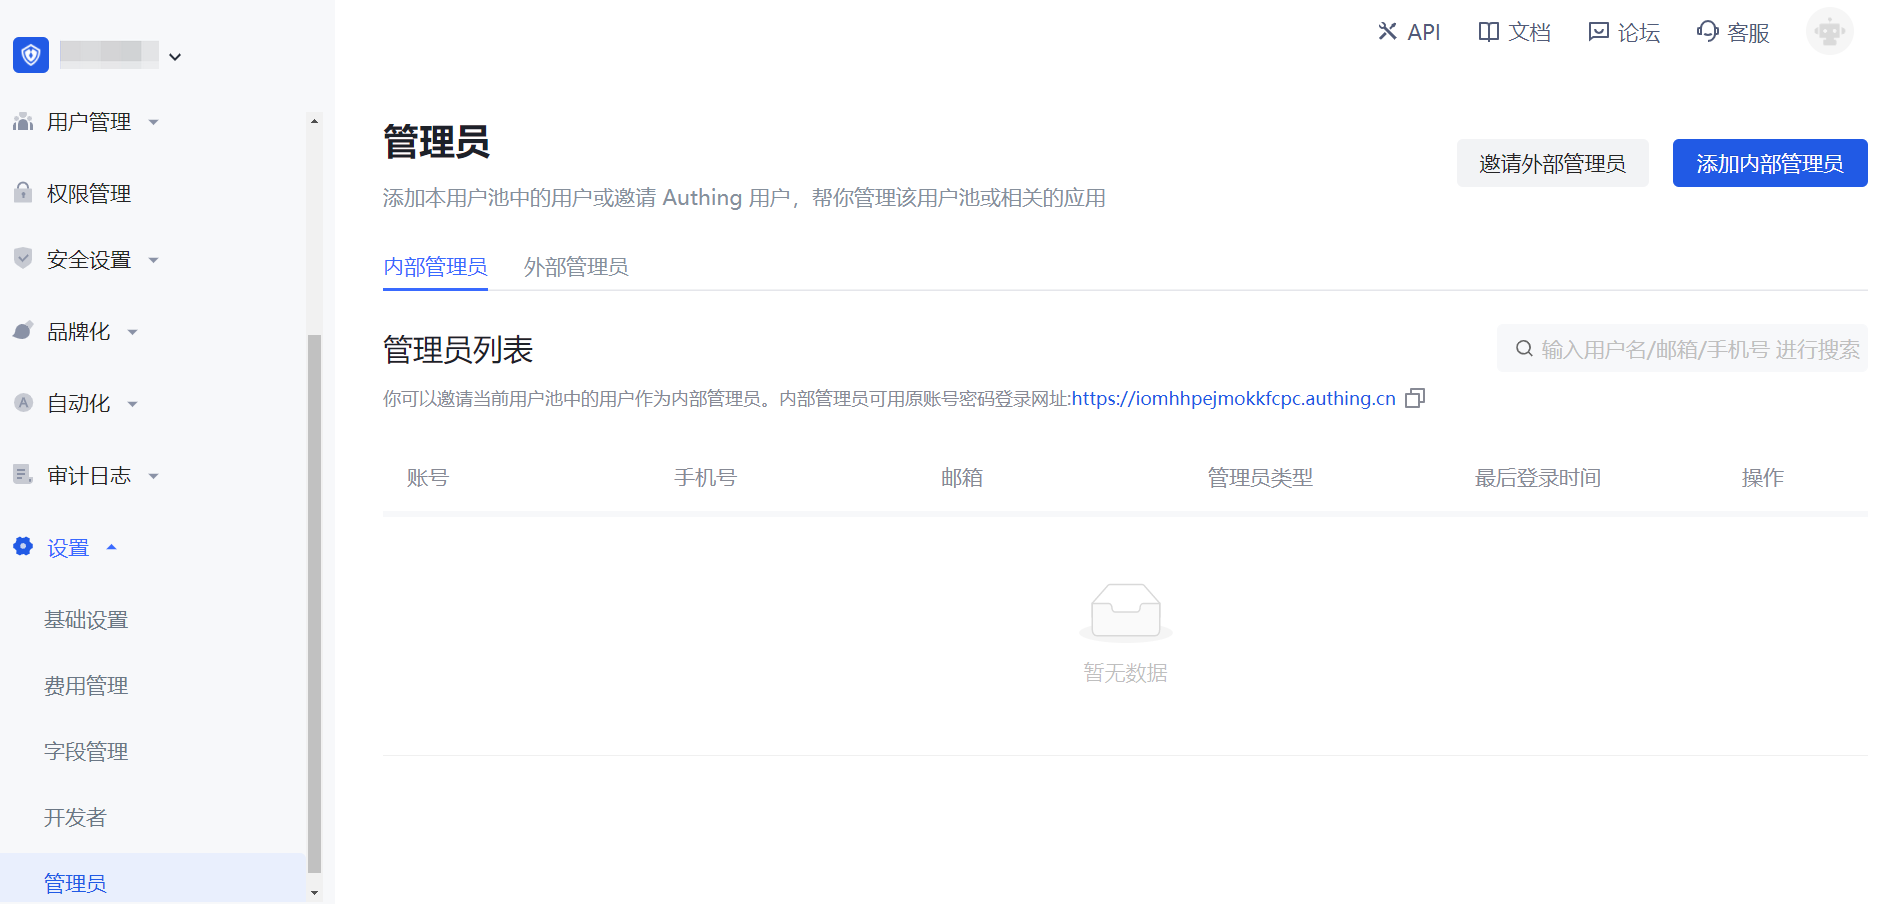
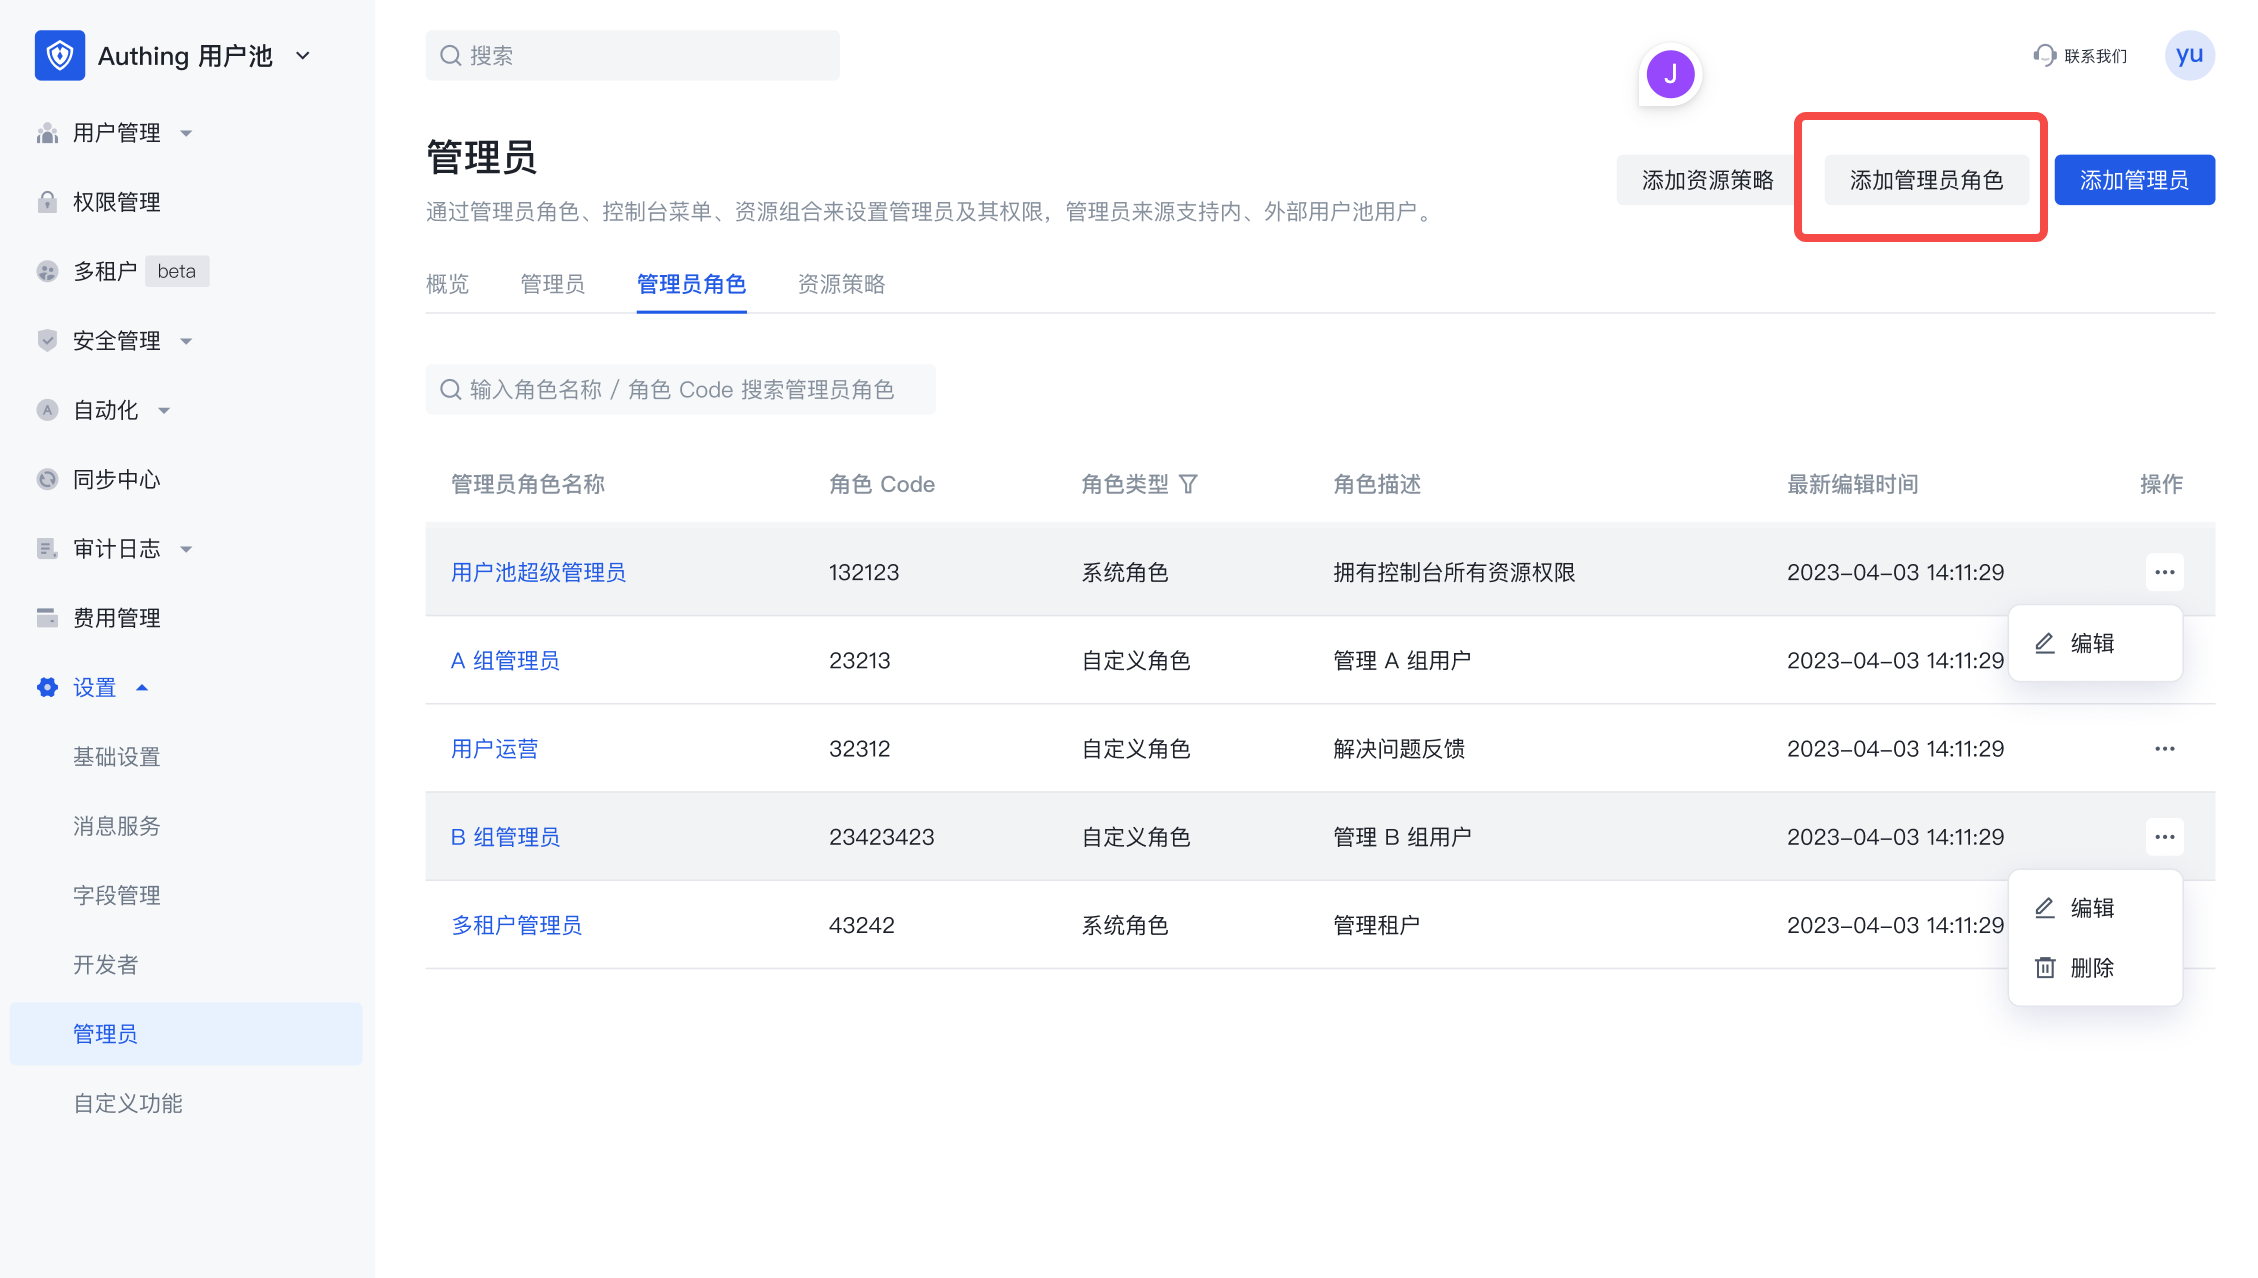
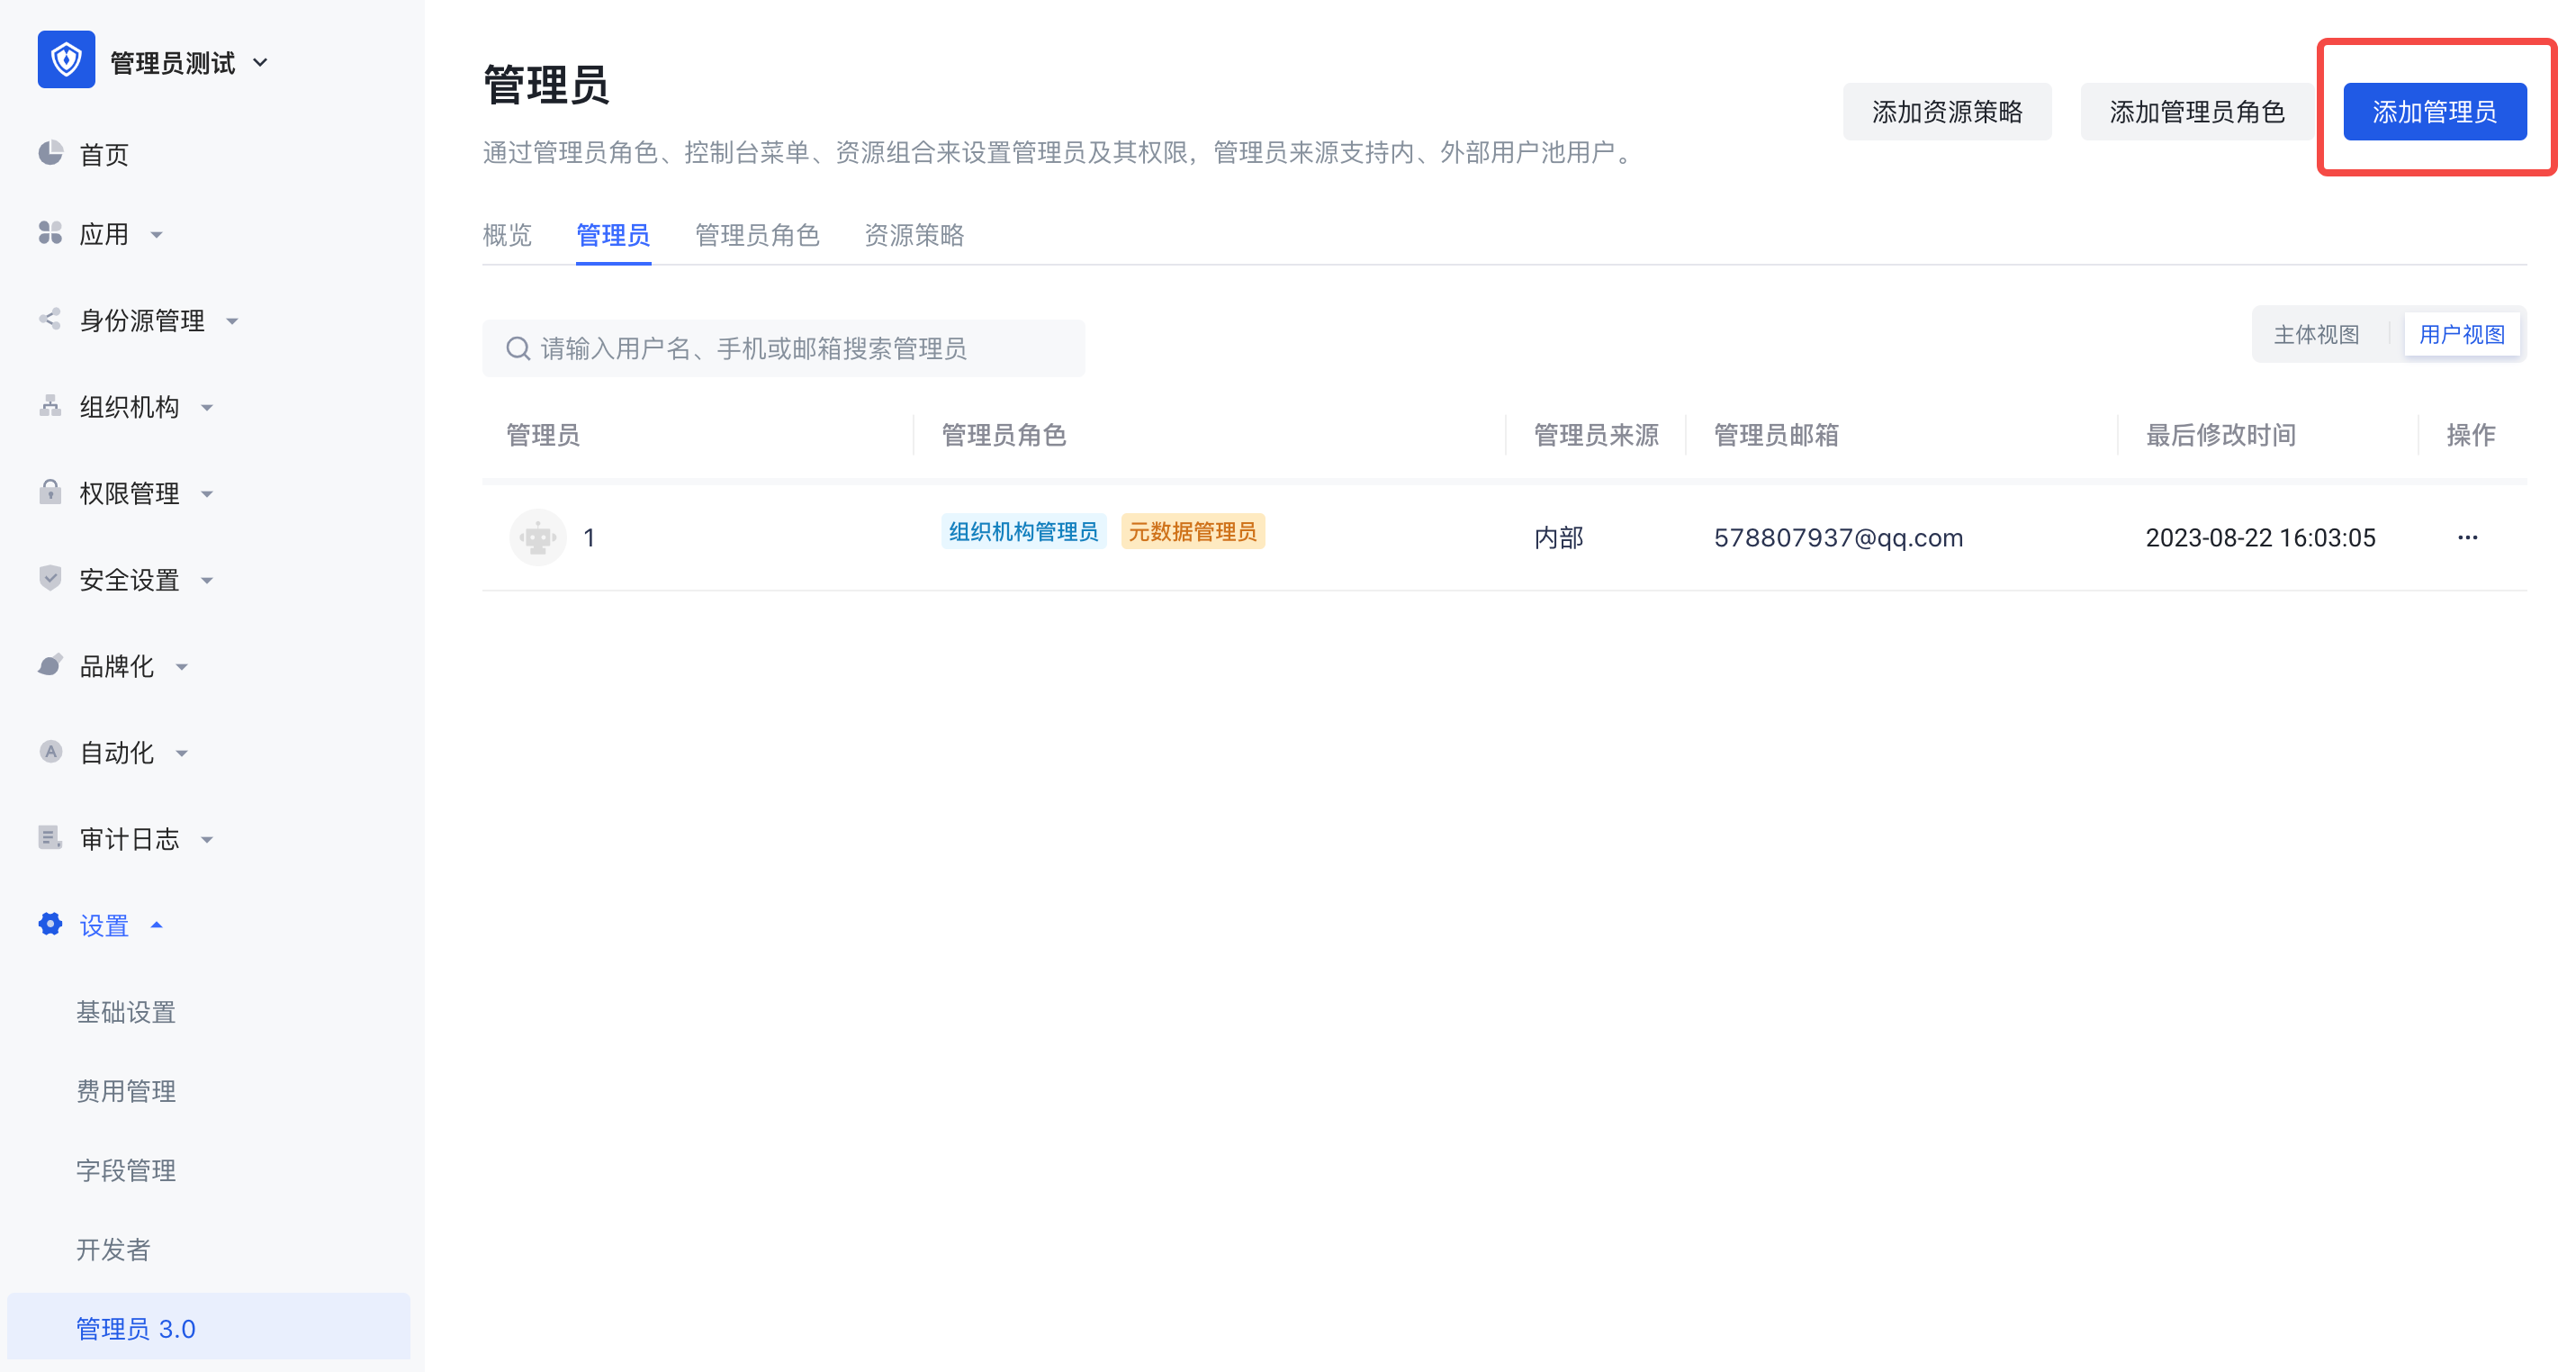
Administrator list
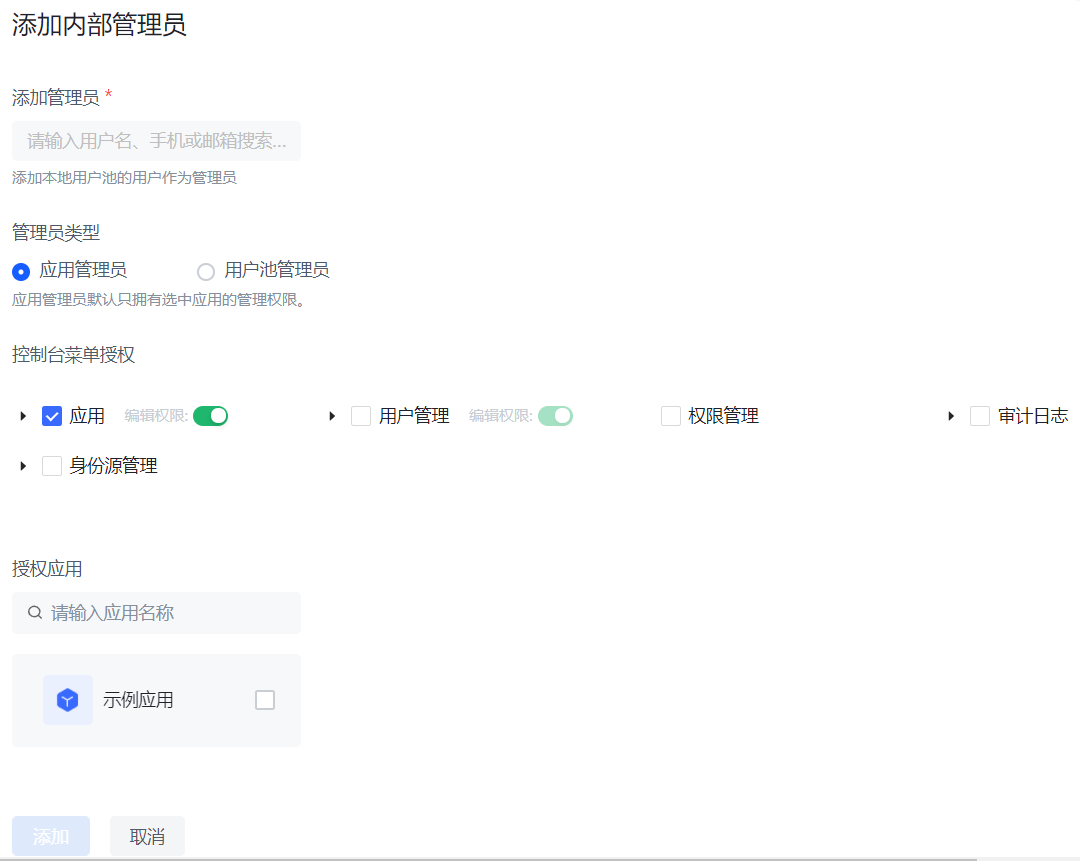
Add internal administrator
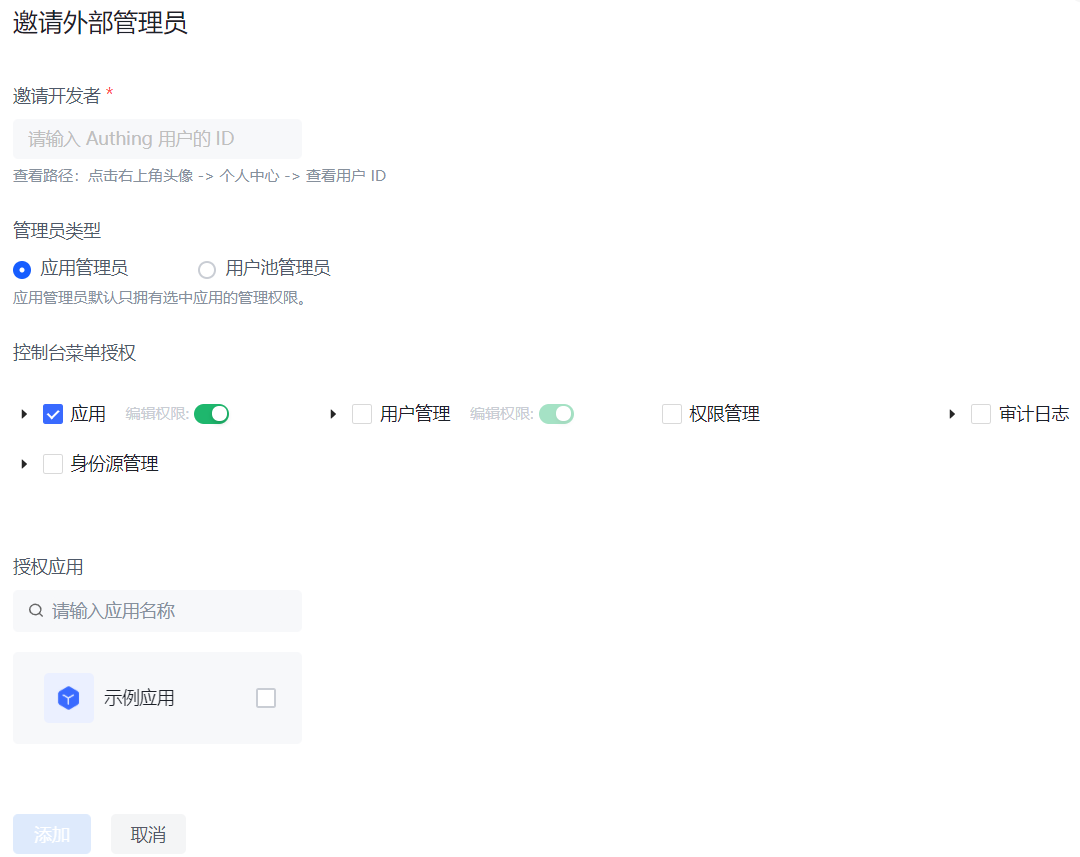
Invite external administrator
Administrator Permissions Documentation
GenAuth's new version of administrator permissions can provide administrators with flexible and more granular permission management capabilities, supporting out-of-the-box administrator roles and policies.
Concept Explanation
| Concept | Explanation |
|---|---|
| Administrator | Administrator: is a general term for a class of subjects with administrator roles. After users and user groups are granted administrator roles as subjects, they become administrators in the user pool, so this class of subjects is collectively referred to as administrators. |
| Administrator role | Administrator role: The administrator role is a bridge connecting users and resources. By associating resources with administrator roles and then granting administrator roles to subjects such as users and organizational departments, role-based permission management can be achieved. Enterprises can assign permissions based on administrator roles, which helps administrators perform their duties and greatly reduces the cost of permission management and enterprise management. 1. System administrator role GenAuth has three built-in system administrator roles, namely: super administrator (usually refers to the creator of the user pool, the only subject), application administrator, and system organization administrator. - Super administrators have all permissions in the GenAuth console, while other system administrator roles have partial permissions. - Super administrators can create custom administrator roles, such as "Organizational Structure Administrator", "Audit Log Administrator", etc. Administrators in the same role have the same permissions. - The super administrator role is preset by the system. You do not need to create it yourself. You can directly add members as super administrators. 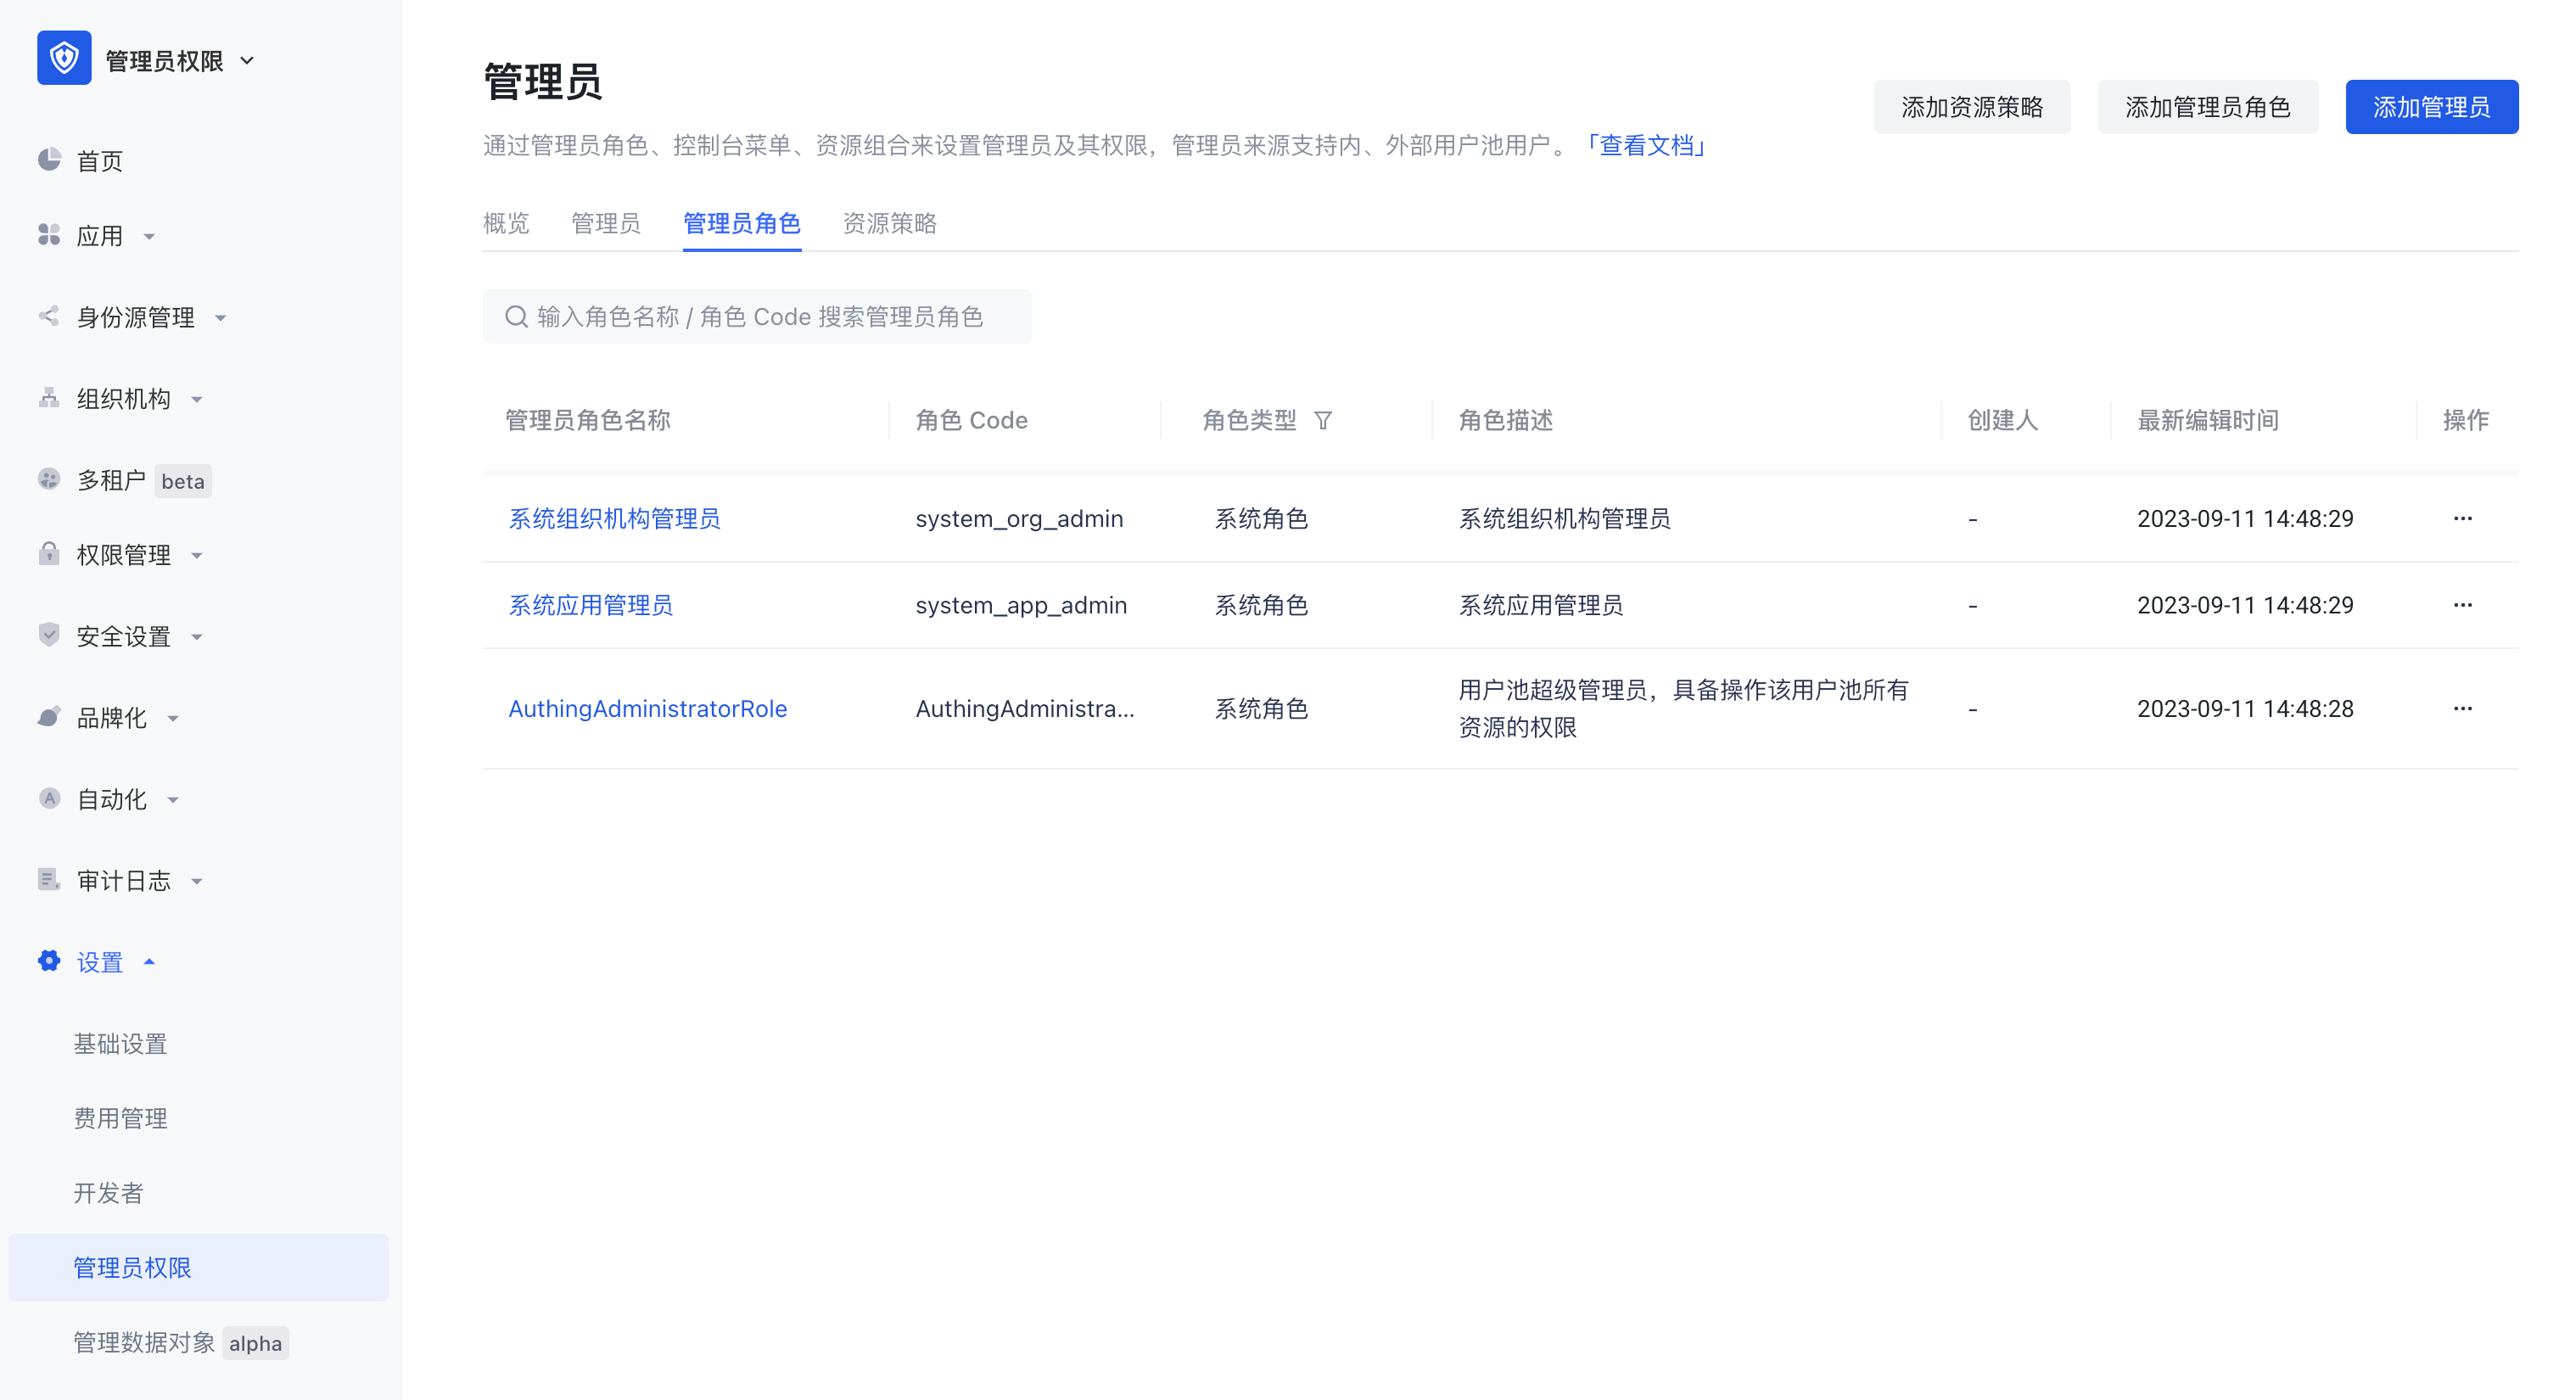 2. Custom Administrator Roles Super administrators can create custom administrator roles, grant partial management backend permissions to each role, and add administrator subjects to each role. |
| Internal Administrator | Users in the current user pool who are granted the administrator role become internal administrators. |
| External Administrator | Users who have registered GenAuth and are not in the current user pool become external administrators after being granted the administrator role. |
| Resource Strategy | Console menu resources or API/SDK resources are packaged and combined with certain conditions to become resource strategies. |
Typical usage scenarios
Scenario 1
Super administrators can allocate resources and permissions based on user roles or functions to ensure that only authorized personnel have permission to operate, so that administrators can perform their duties and maintain different resources.
- Organizational structure administrators have the authority to manage users and organizational structures in the user pool. Through the organizational structure administrator role, permission management capabilities such as creating new organizations, editing department information, and deleting departments can be implemented to achieve organizational structure adjustment, department setting and management; permission management capabilities such as setting member entry, user affiliation, and removing users can be implemented.
- Application administrators have the authority to manage applications and application access control in the user pool. Application administrators can control user access levels and functions to ensure that only authorized personnel can access the system.
- Security-related administrators can set password security policies, login and registration security rules, application access control measures, etc. to protect the system from malicious attacks and unauthorized access. Administrator accounts can monitor and detect potential security threats and take necessary measures to deal with and respond to emergencies.
Scenario 2
In addition to the menu module permission management that can be implemented in scenario 1, more fine-grained decentralized management can also be performed on specific data resource scopes.
- Super administrators can assign different organizational departments to organizational administrators to implement a one-department-one-administrator management model.
- Super administrators can assign different applications to application administrators to implement a one-application-one-administrator management model.
Scenario 3
The new version of the administrator is not only limited to the permission allocation and management of the super administrator, but also supports collaborative administrators to continue to authorize their own permissions, achieving a layer-by-layer authorization effect, and realizing flexible and rigorous permission management capabilities. The user journey is shown in the figure:
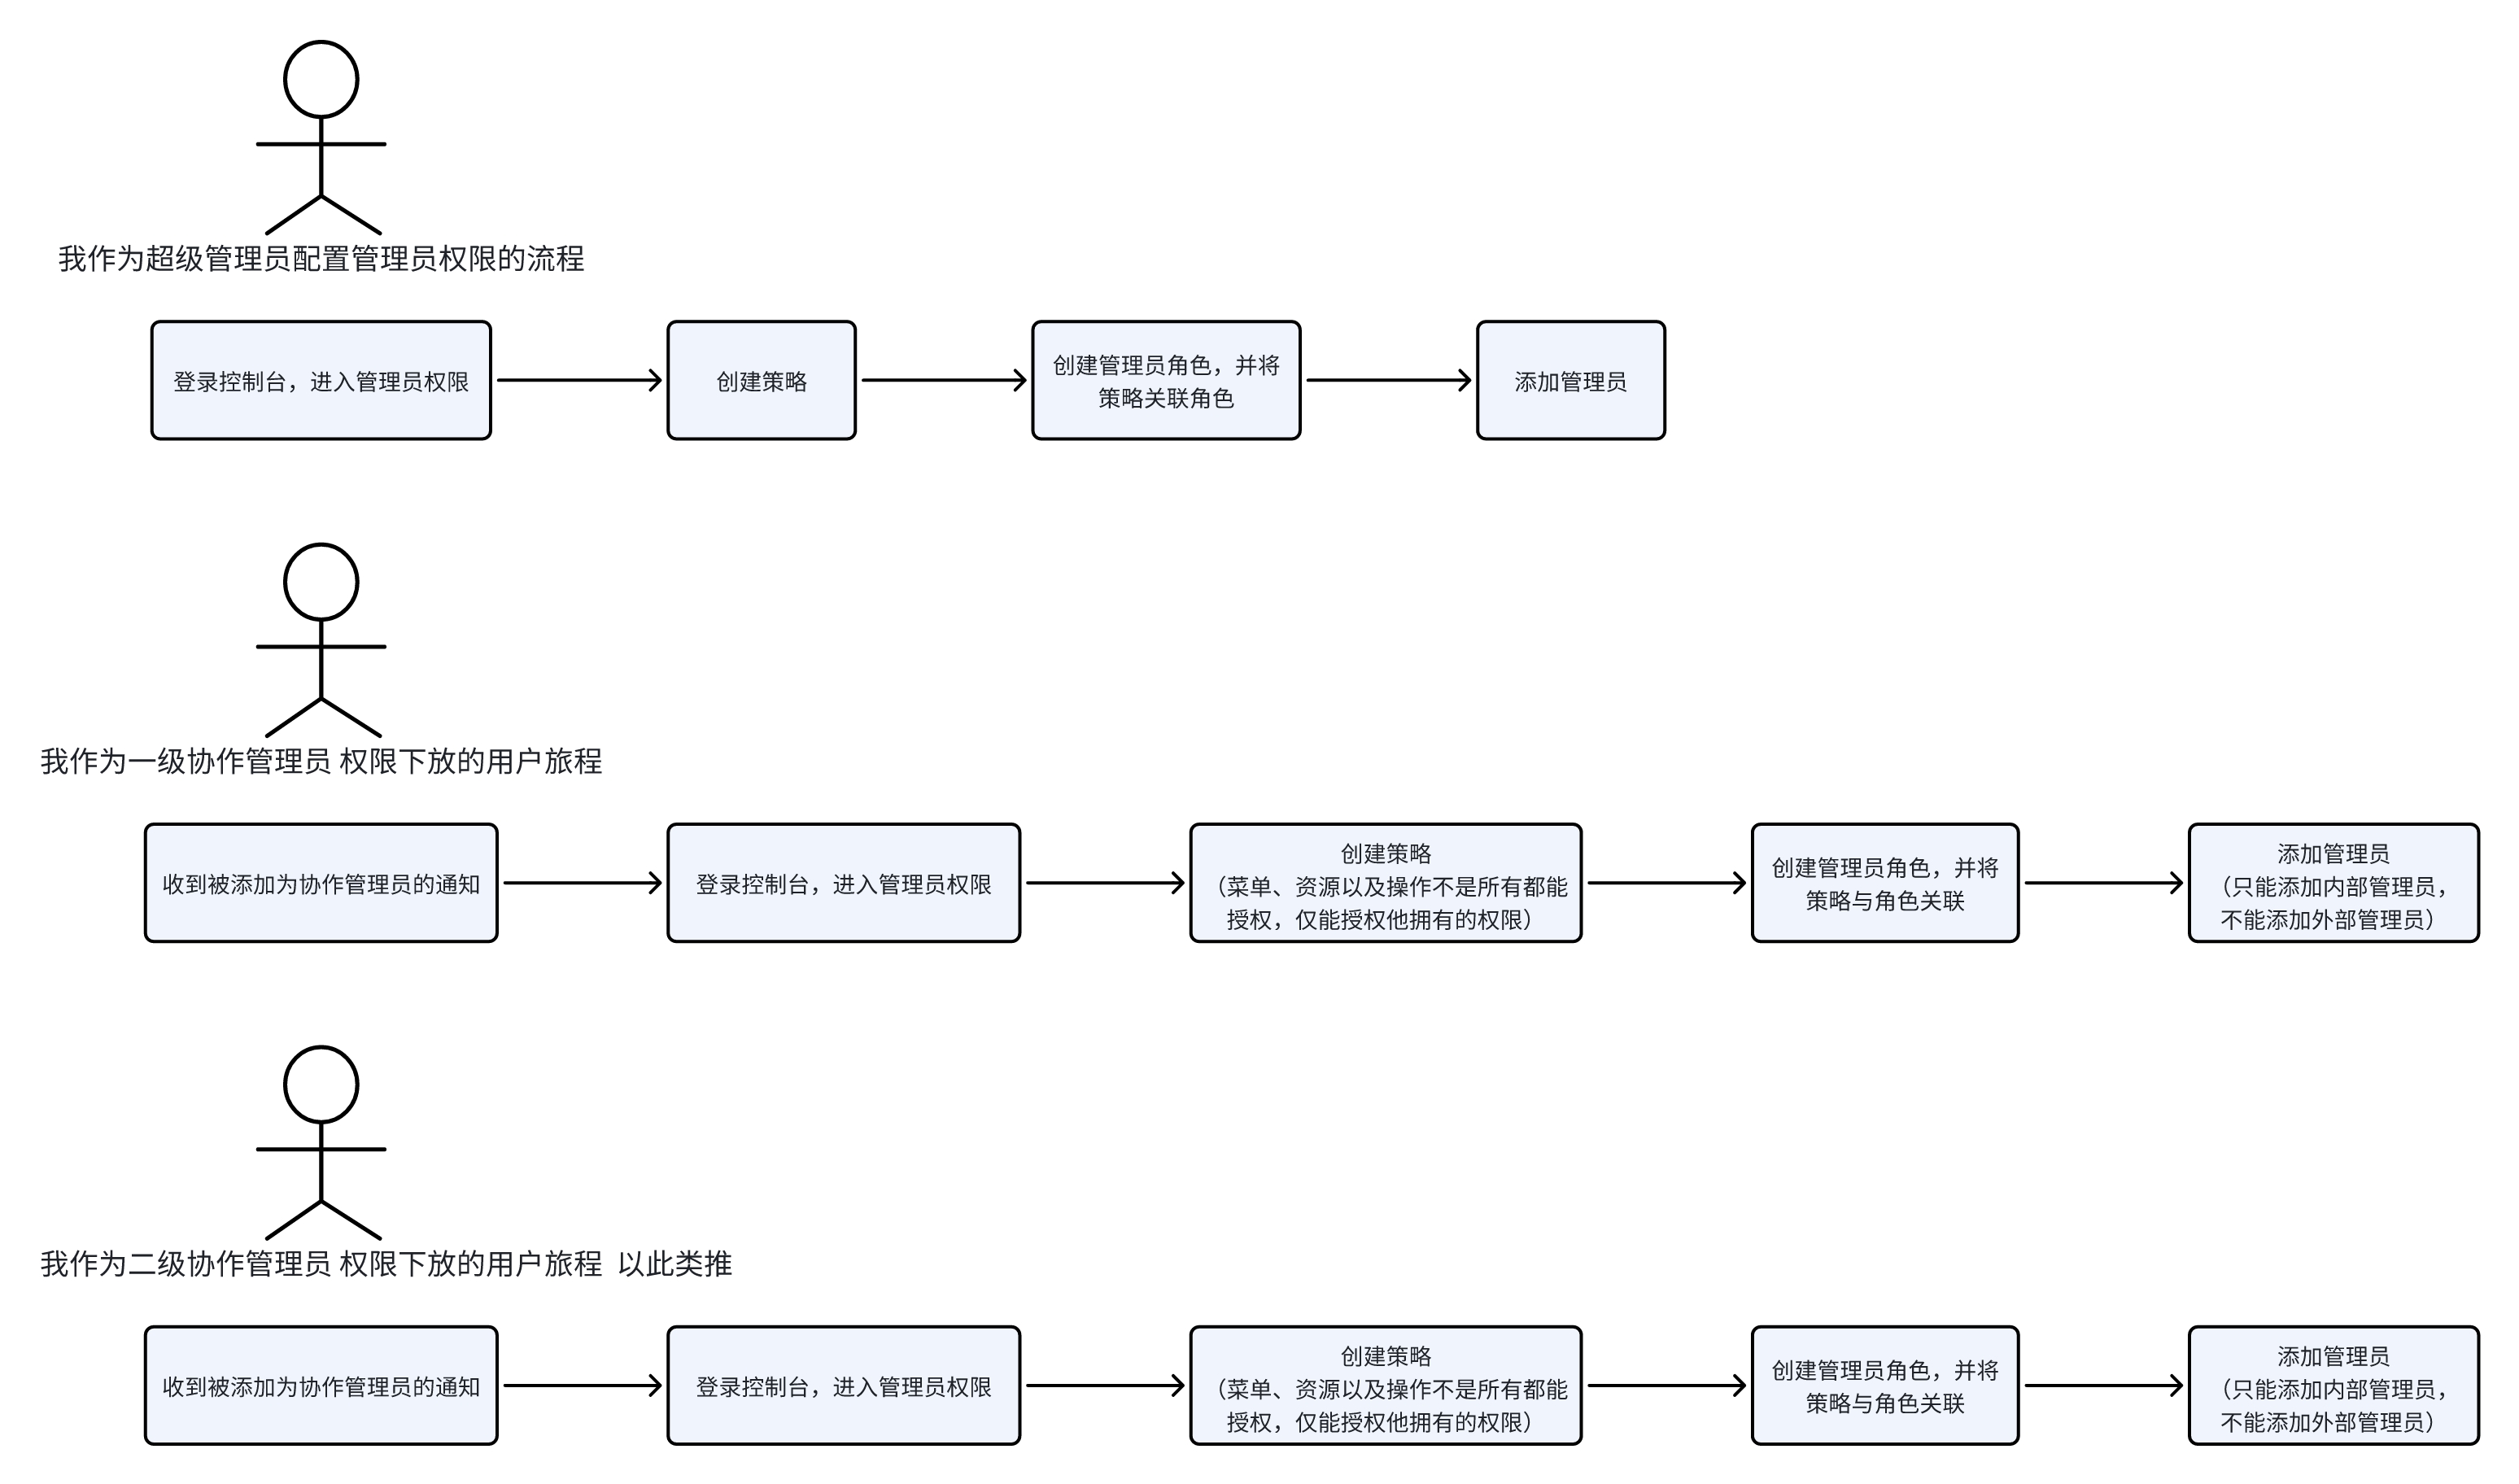
Super Administrator Configuration Process
Step 1: Select/Create a Suitable Administrator Role
- Differentiate Scenarios
Scenario 1:
If the system administrator role can meet the requirements, jump to step 4.
Scenario 2:
If the system role cannot meet the requirements, you need to create a custom administrator role.
- Create a custom administrator role
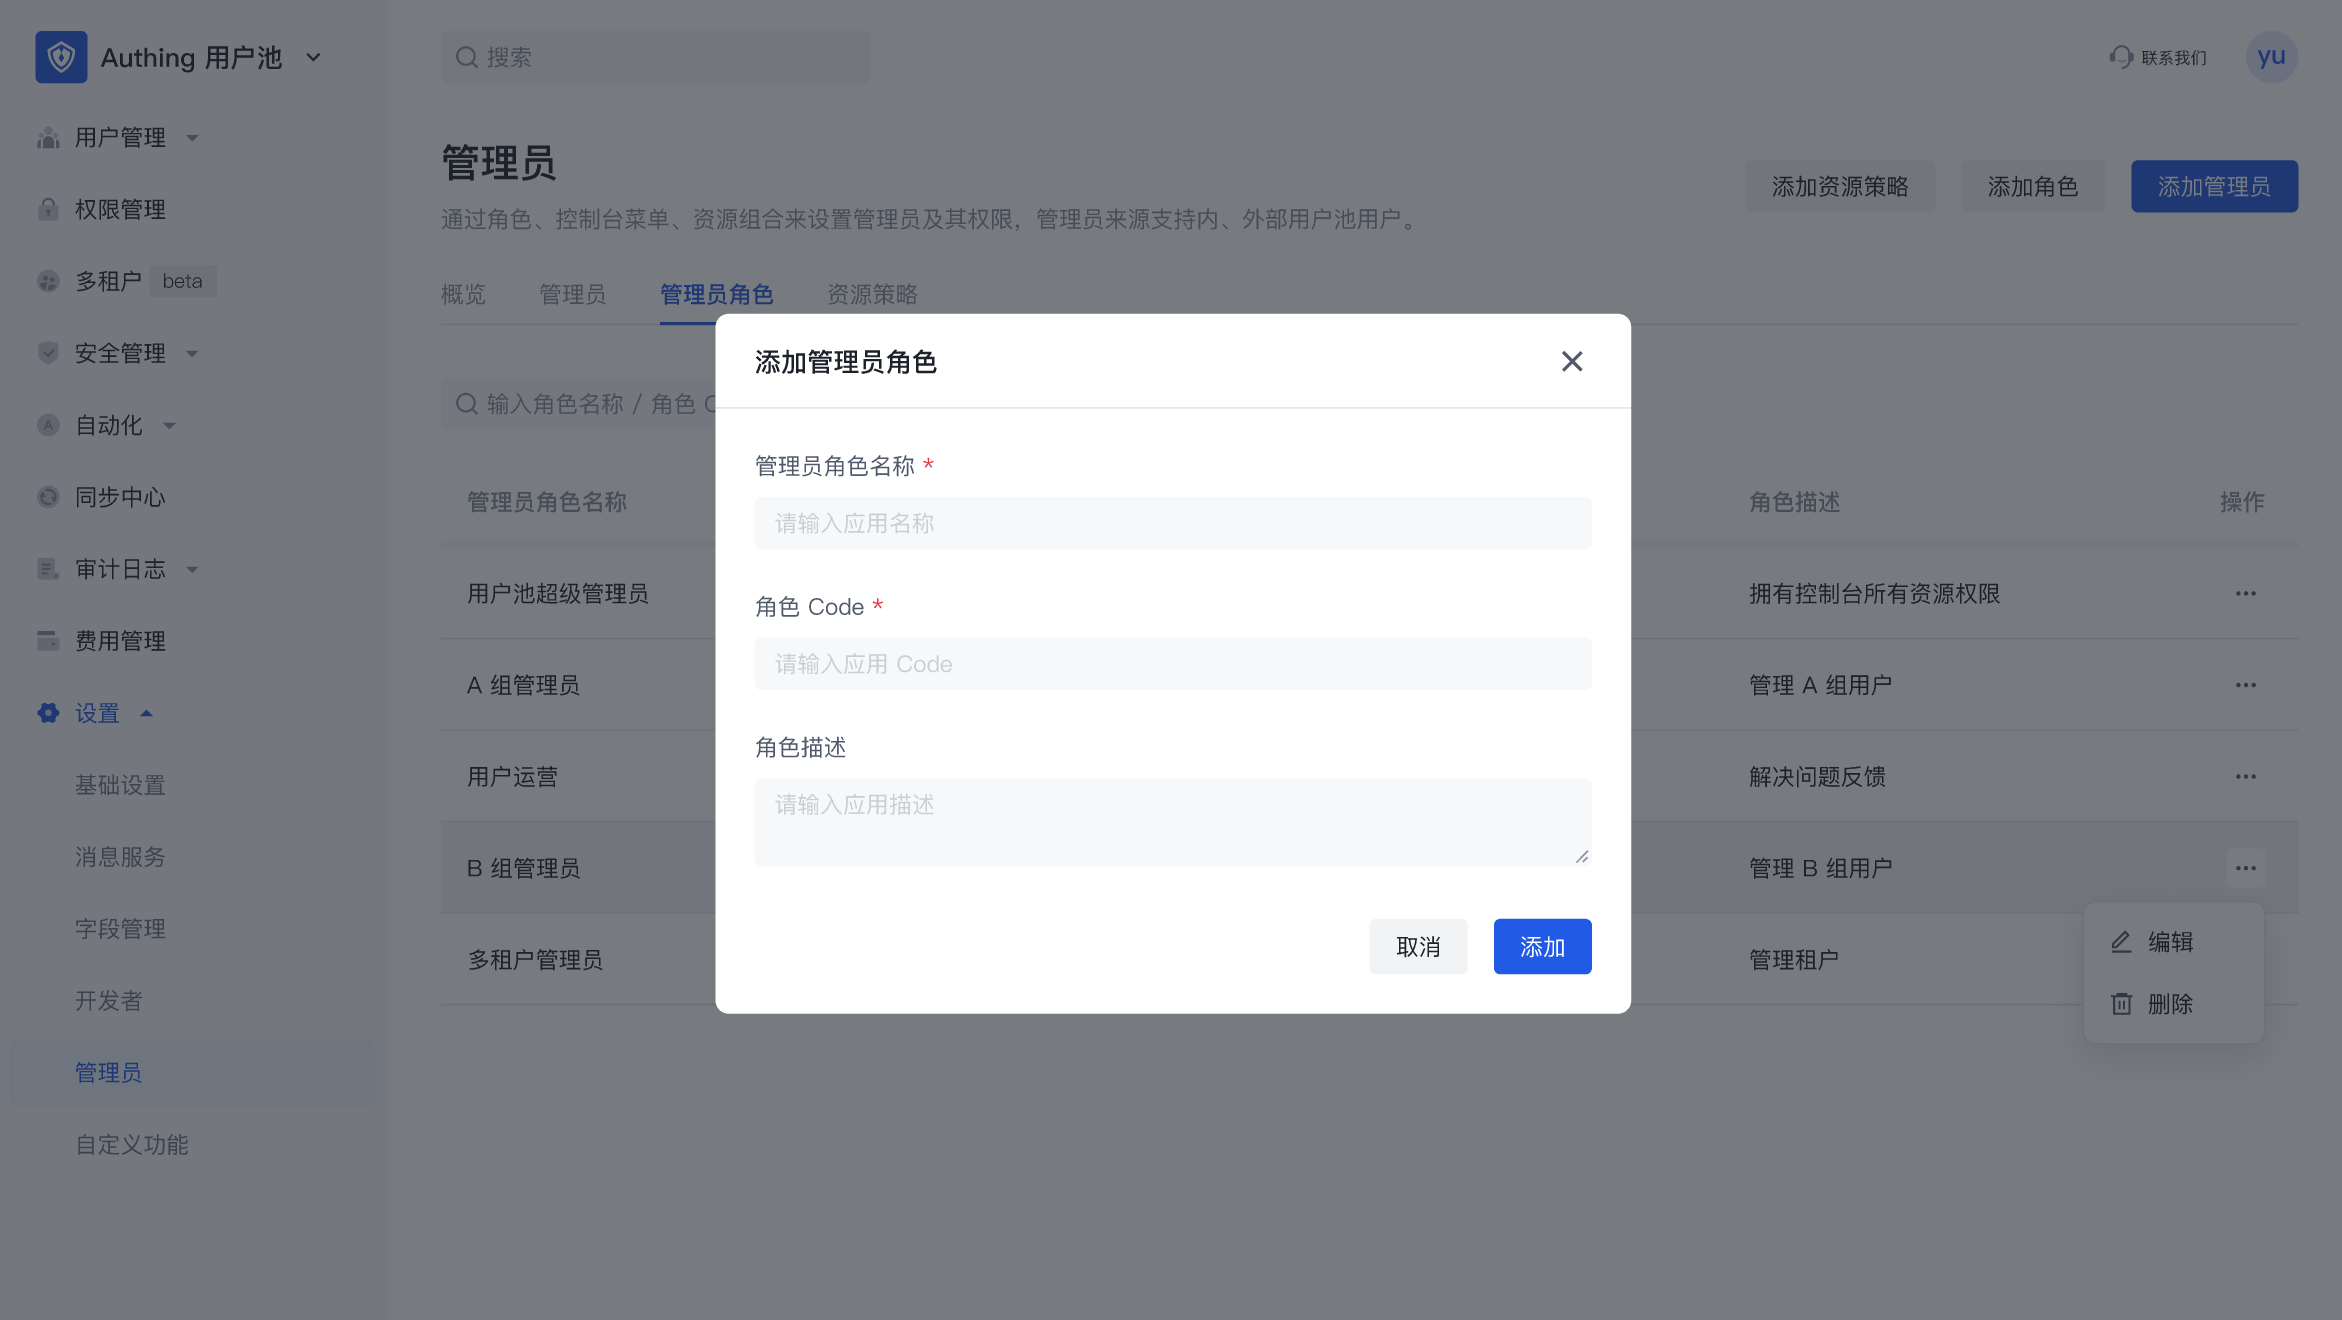
- Edit the custom administrator role
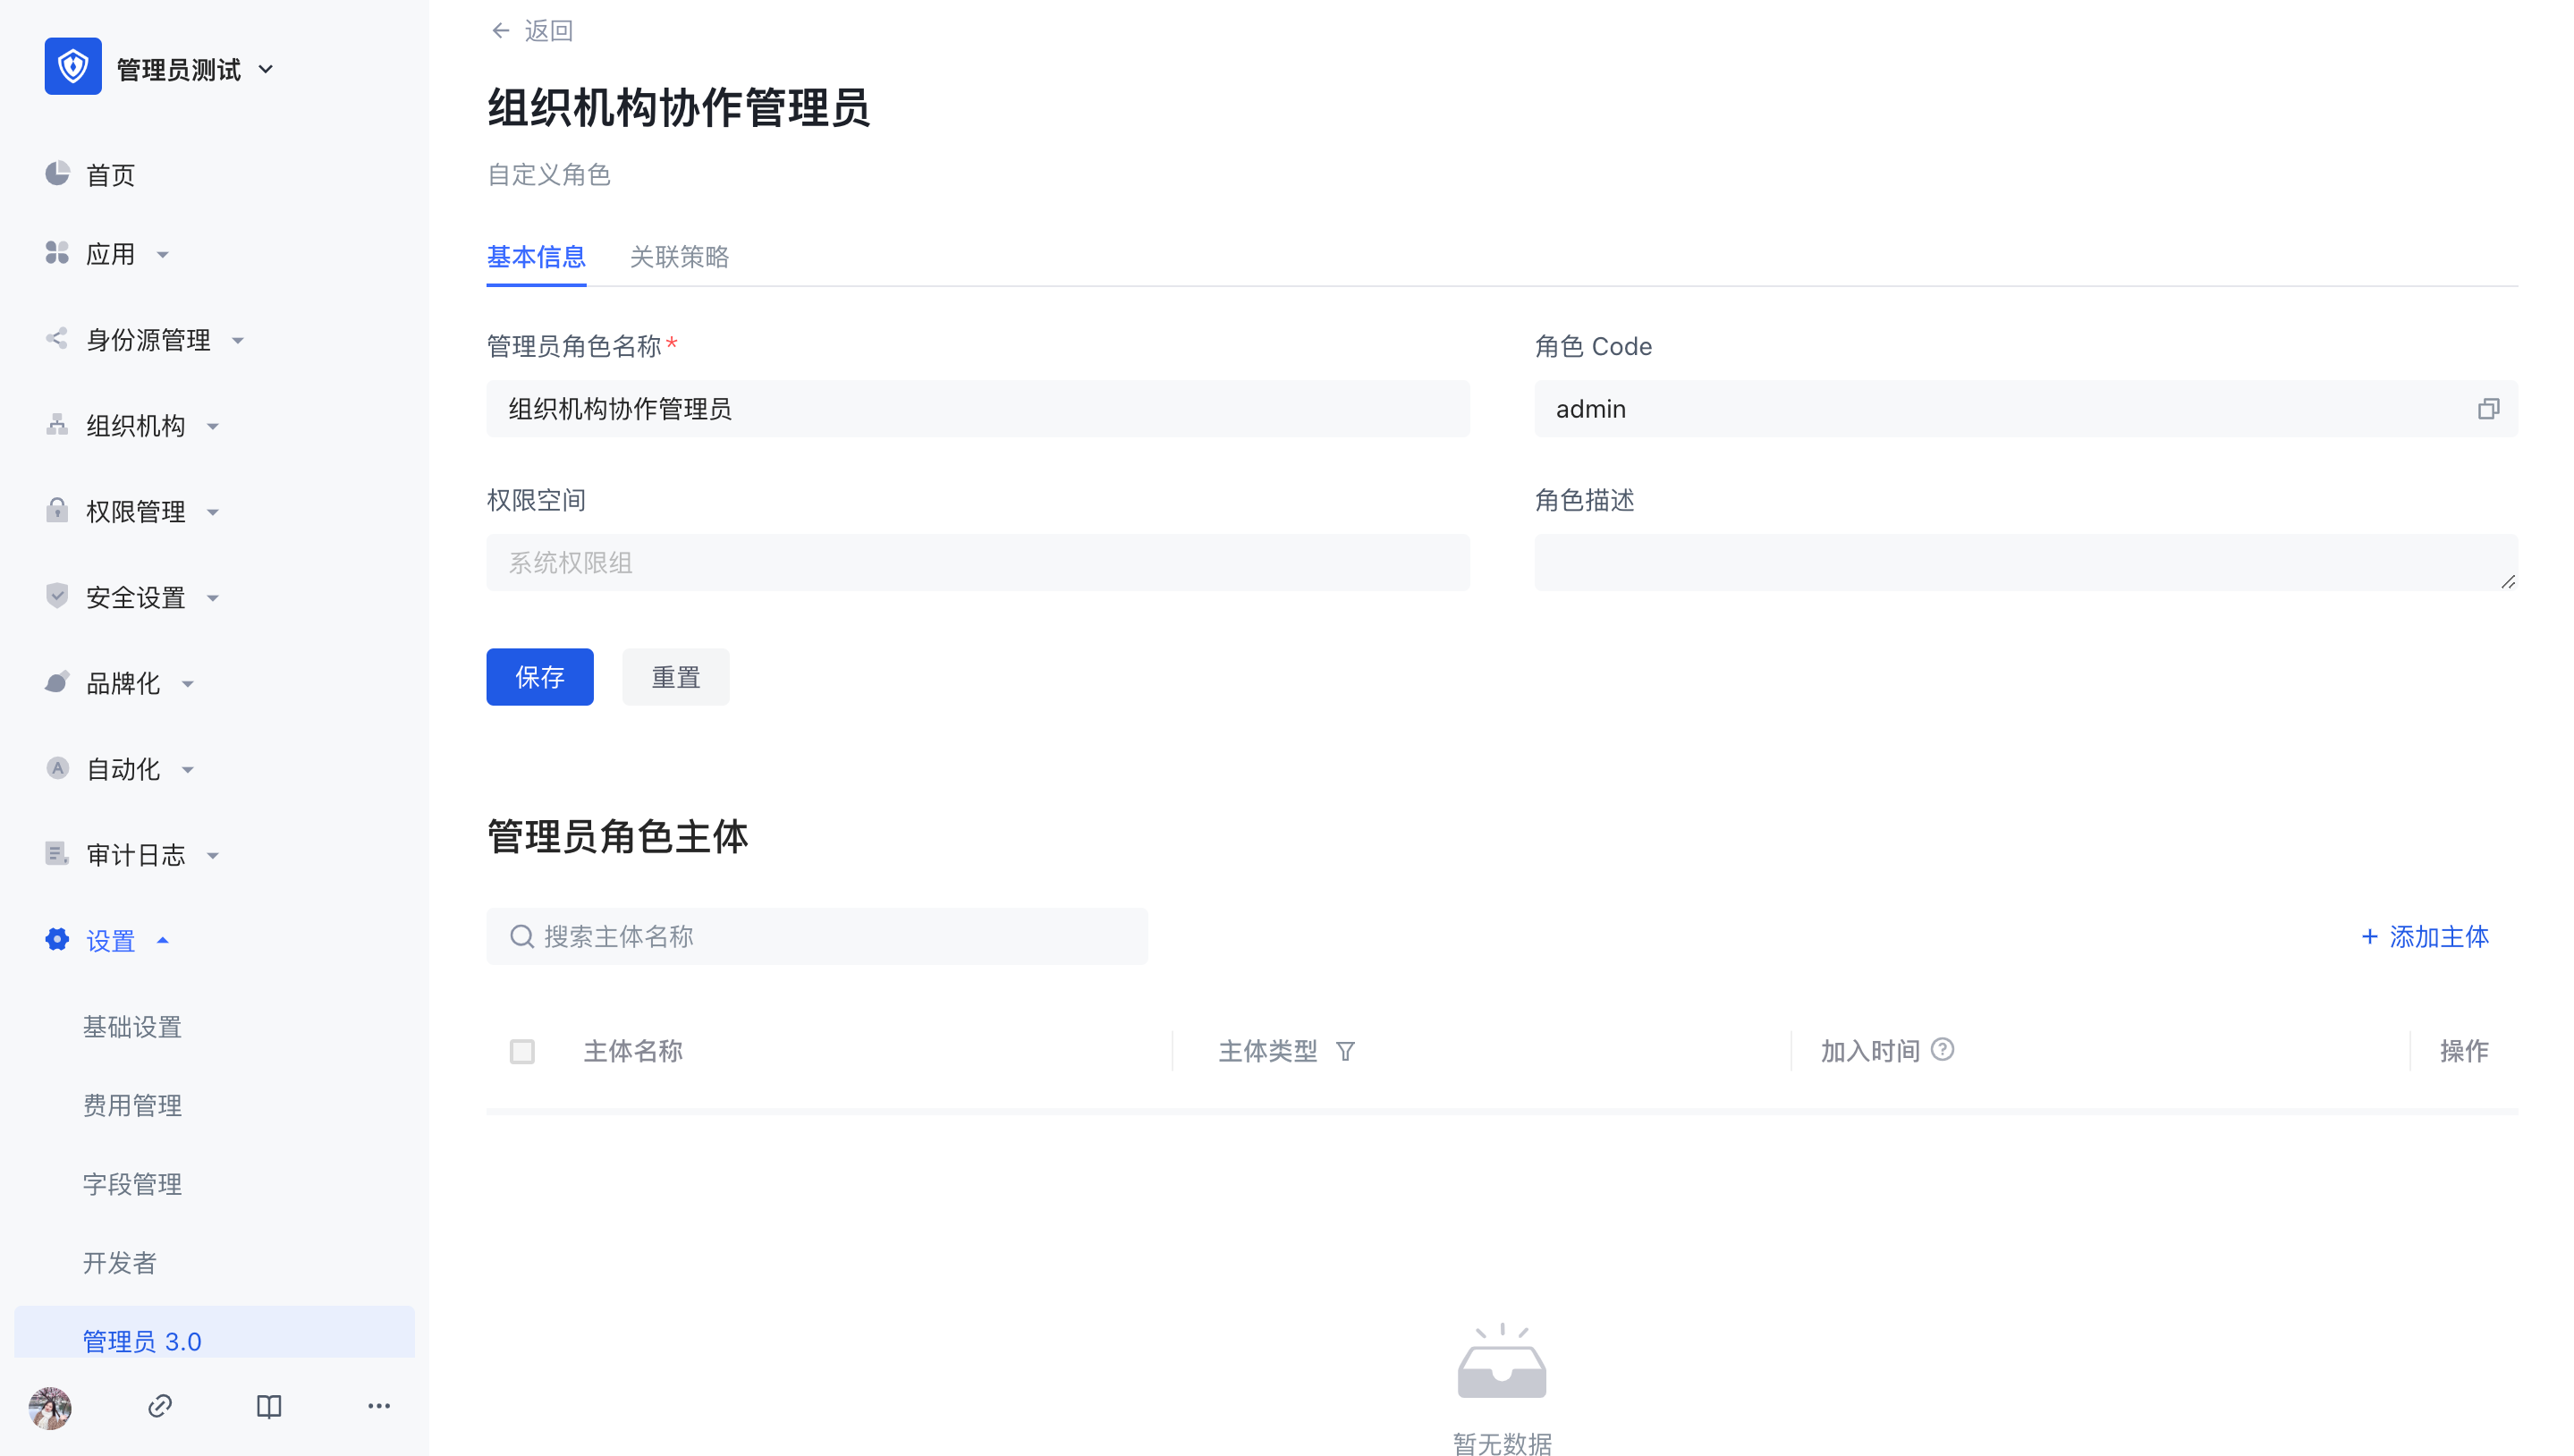
Next, you can add a subject and associated policies to the custom administrator role.
Step 2: Create a resource policy
- Differentiate Scenarios
Scenario 1:
If the system built-in policy can meet the requirements, or a policy has been created before, then you need to associate the existing policy with the administrator role and jump to step 3.
Scenario 2:
If the system built-in policy cannot meet the requirements, or if no policy has been created before, proceed to the next step.
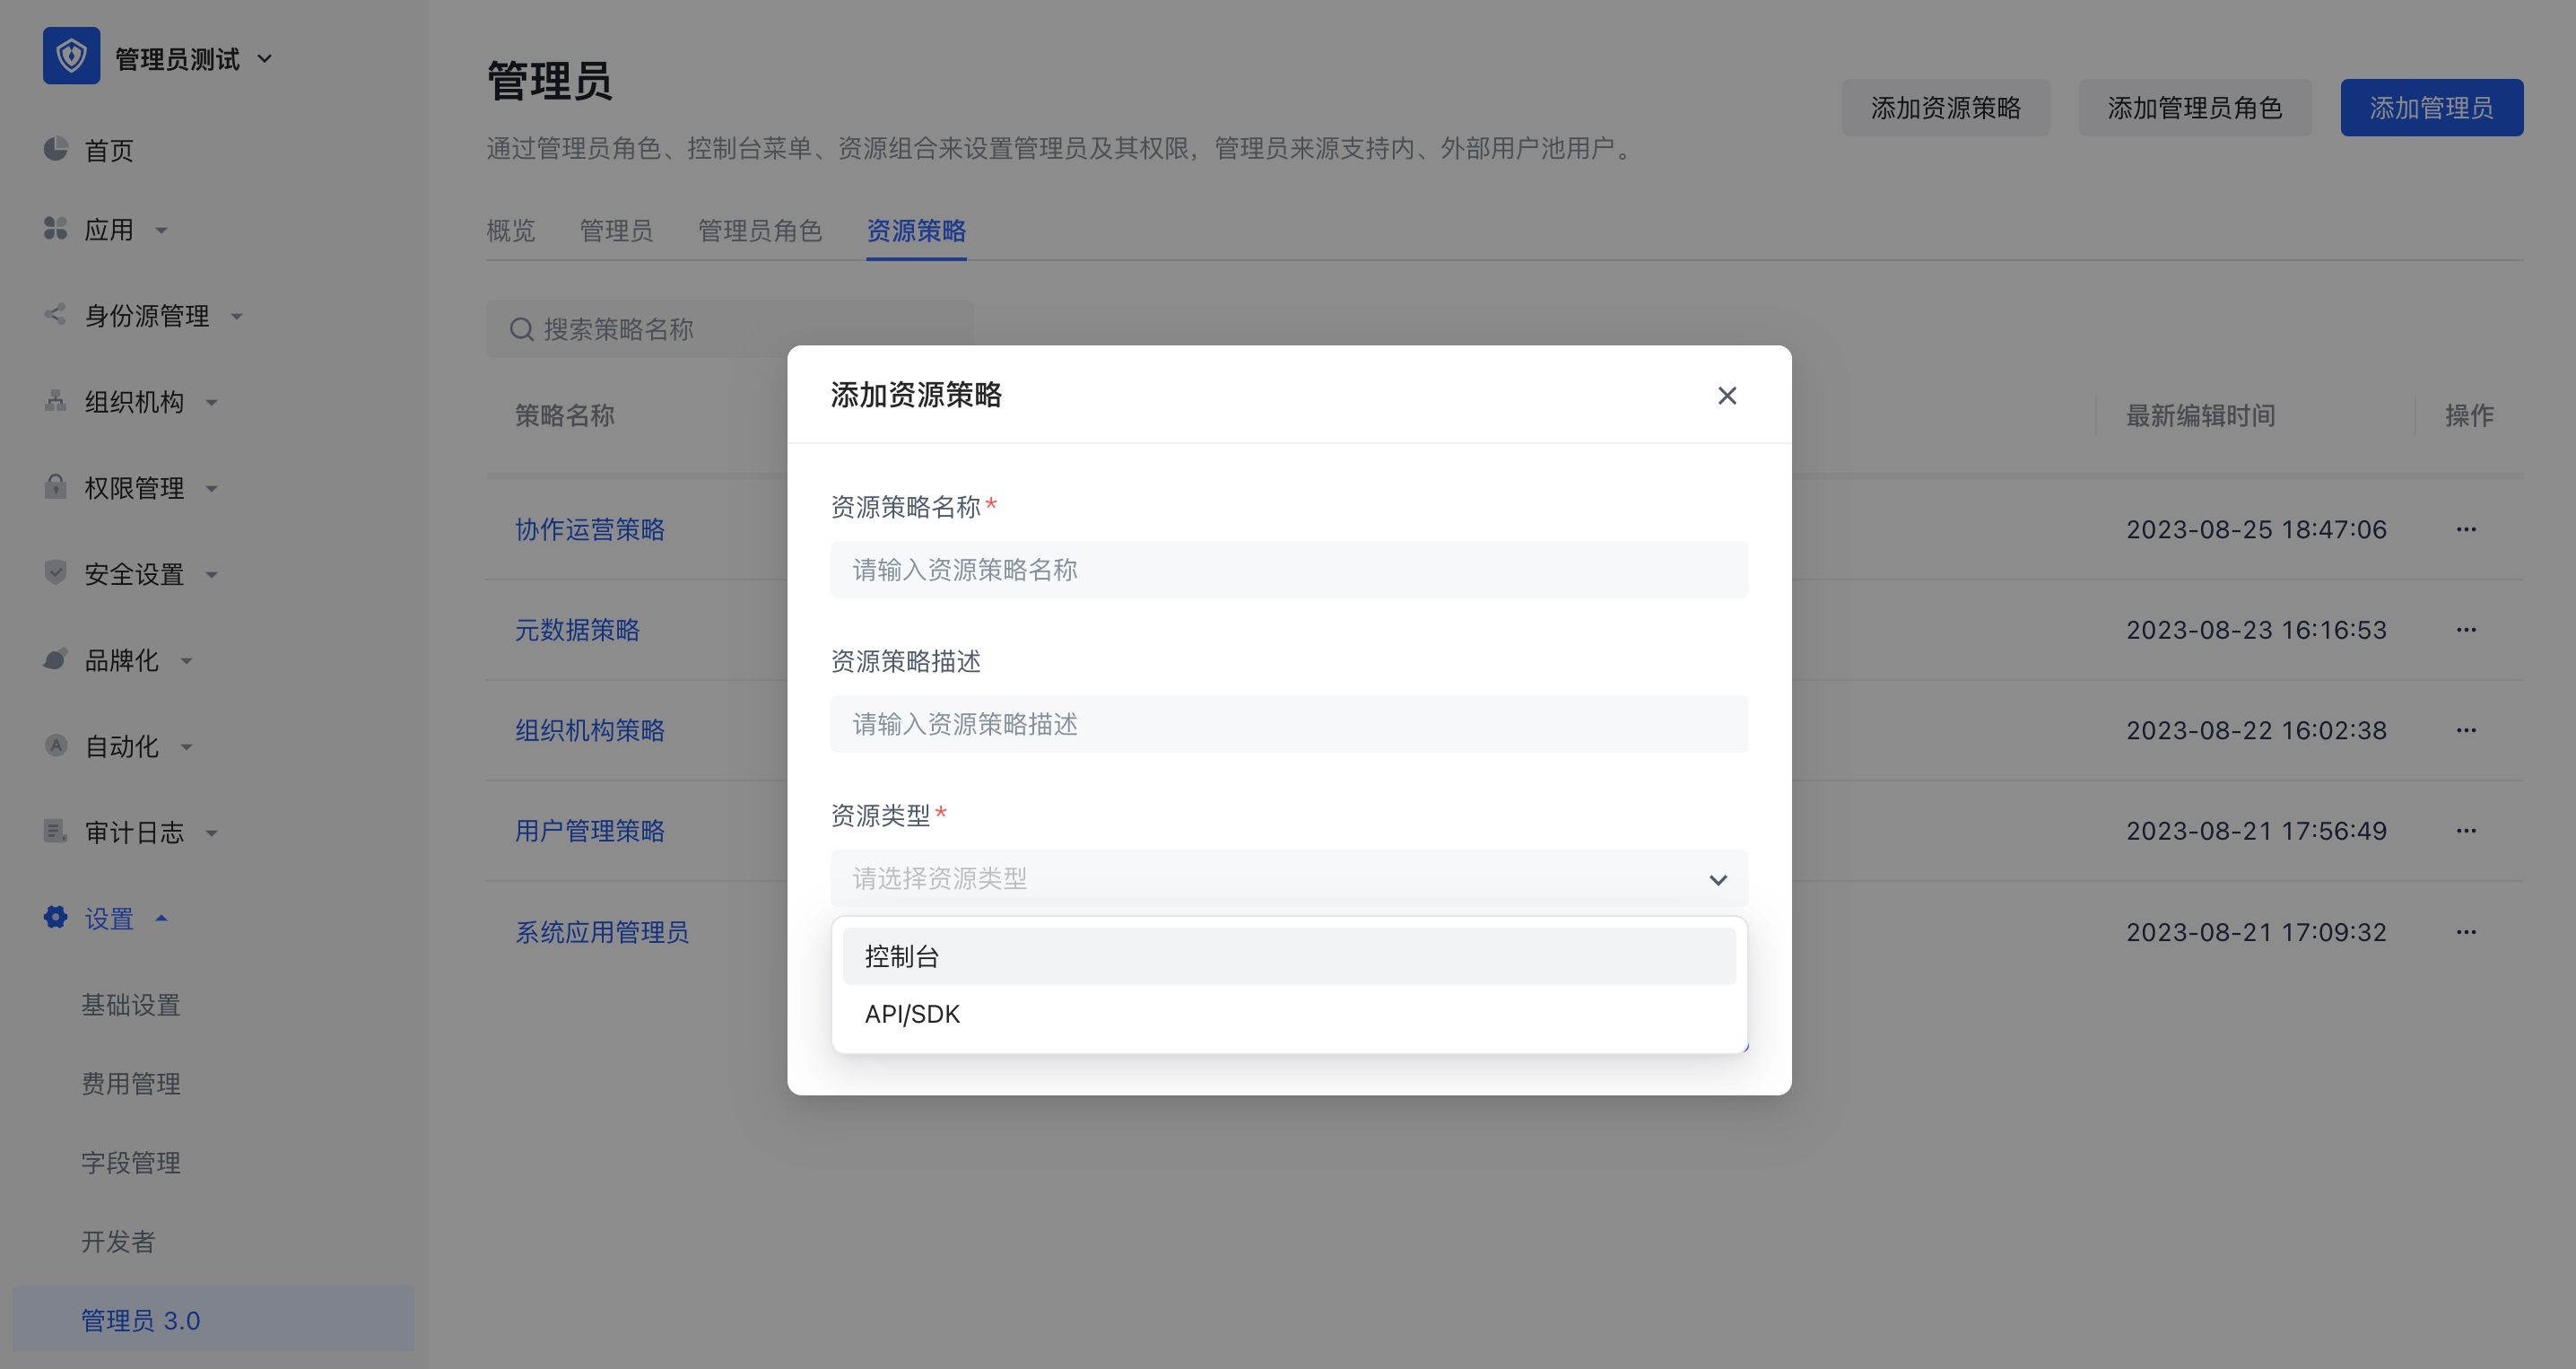
Create a policy
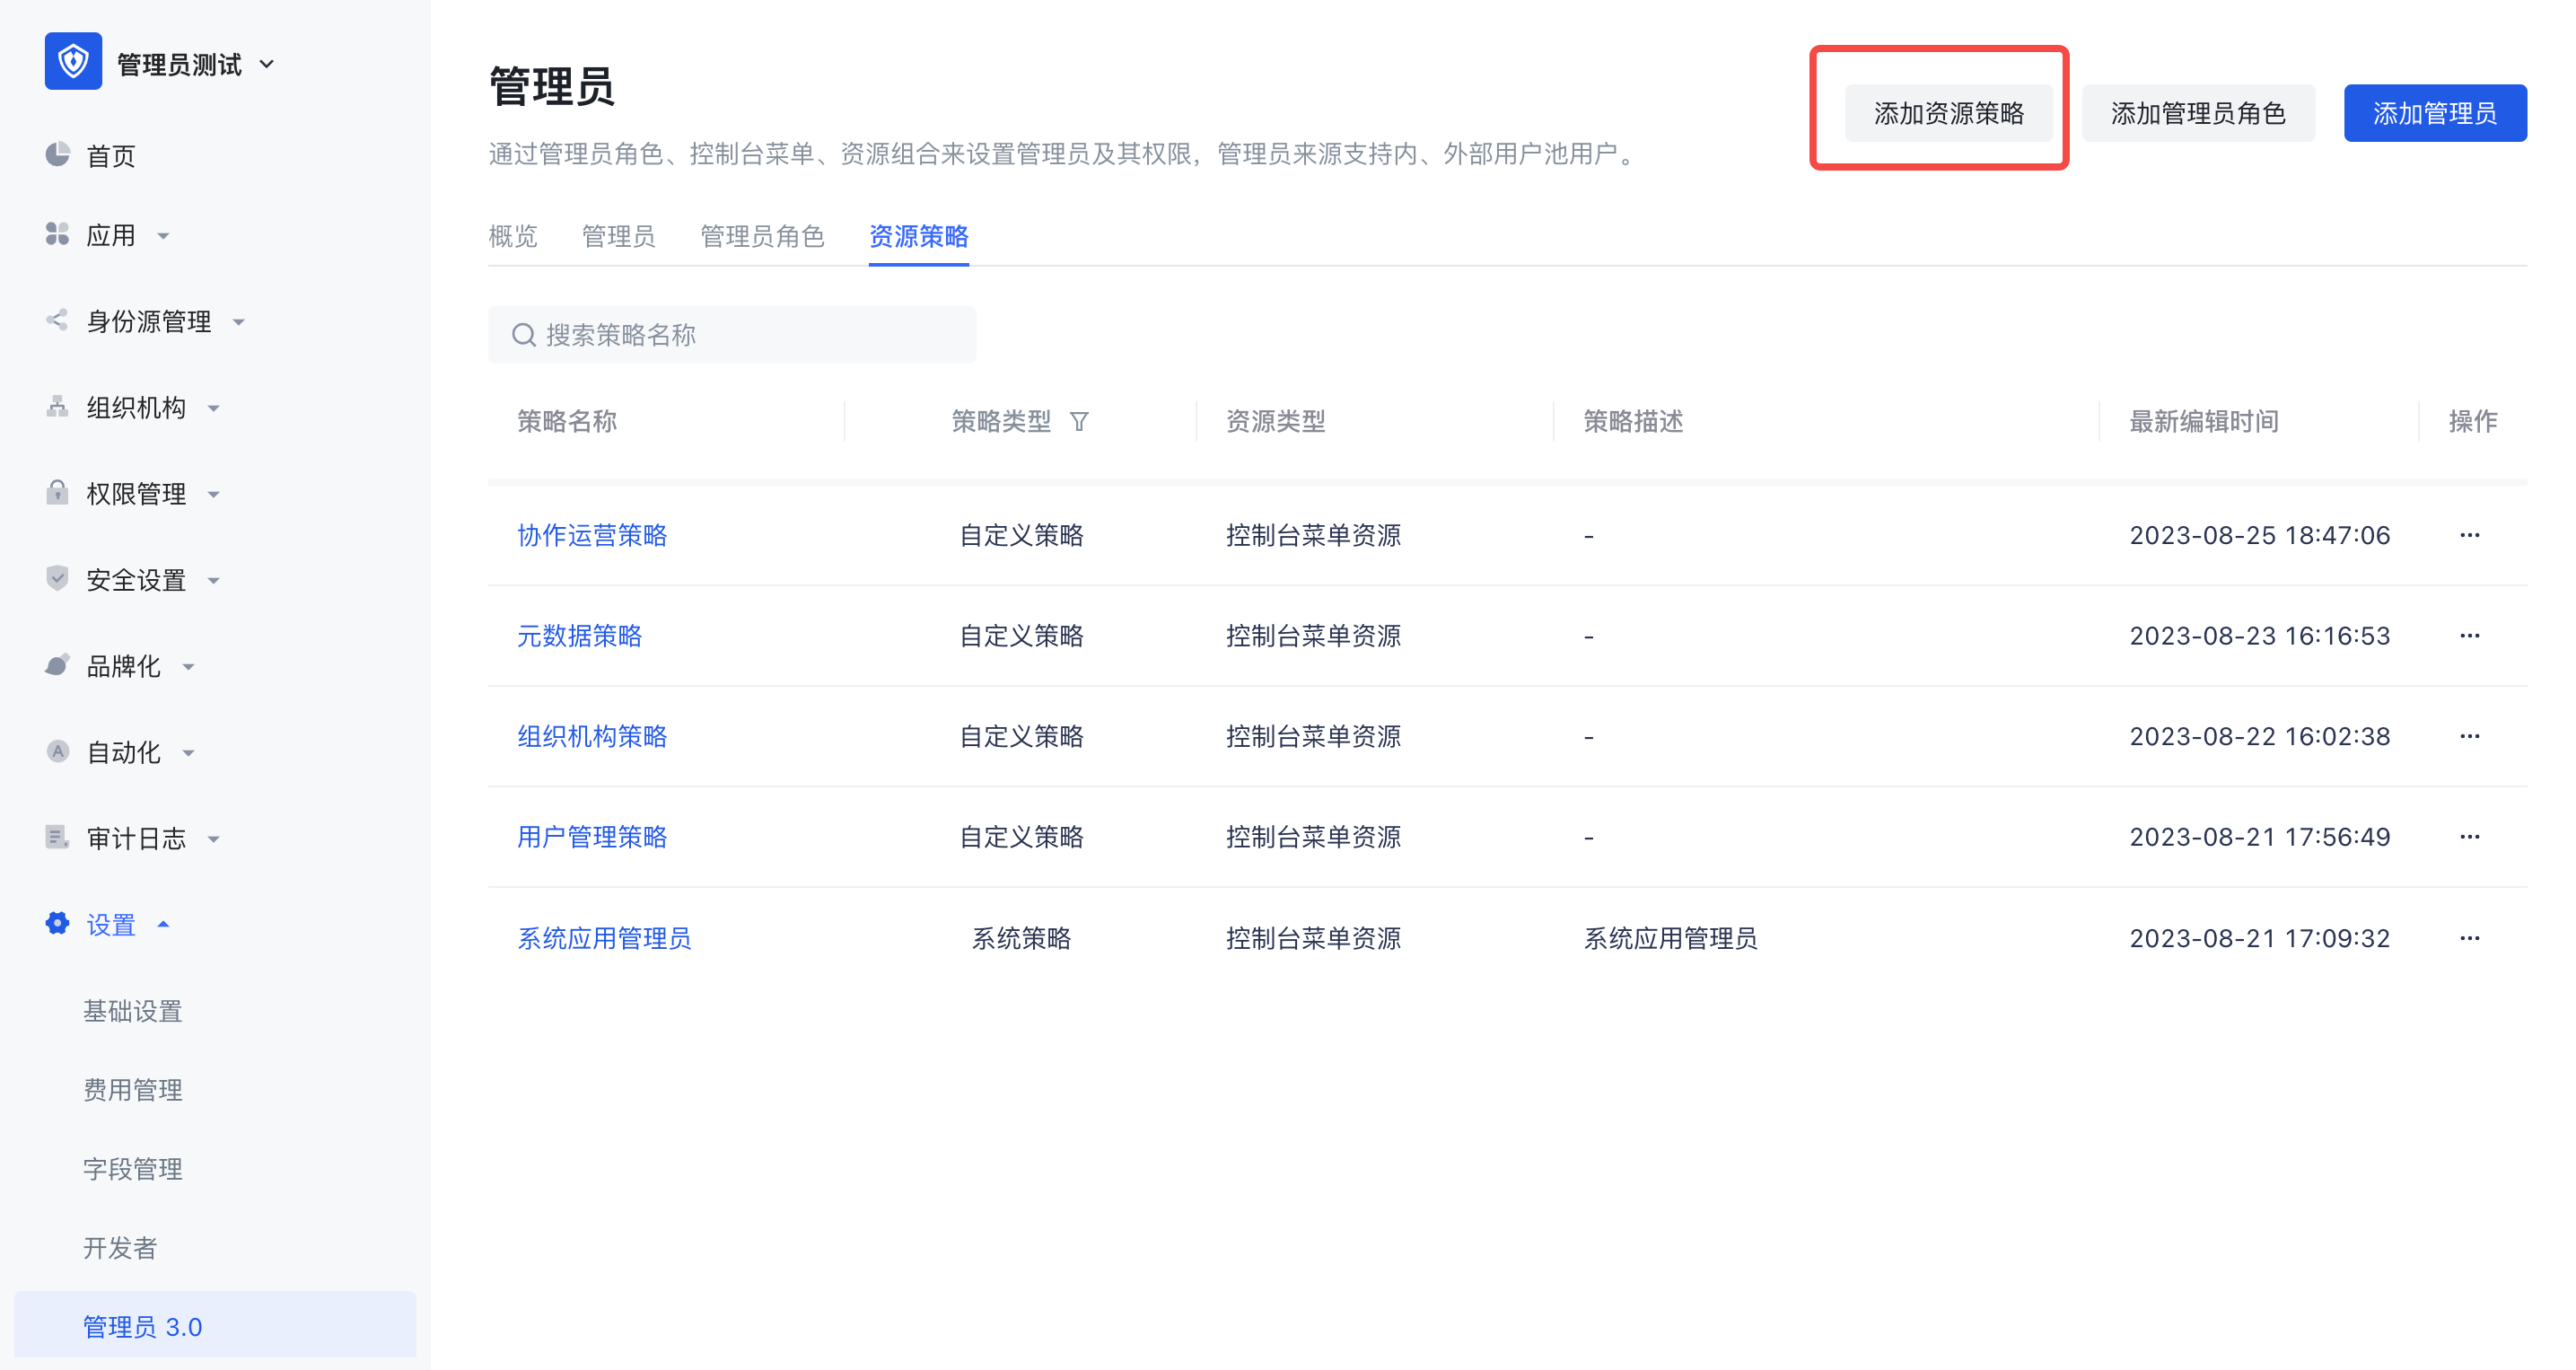
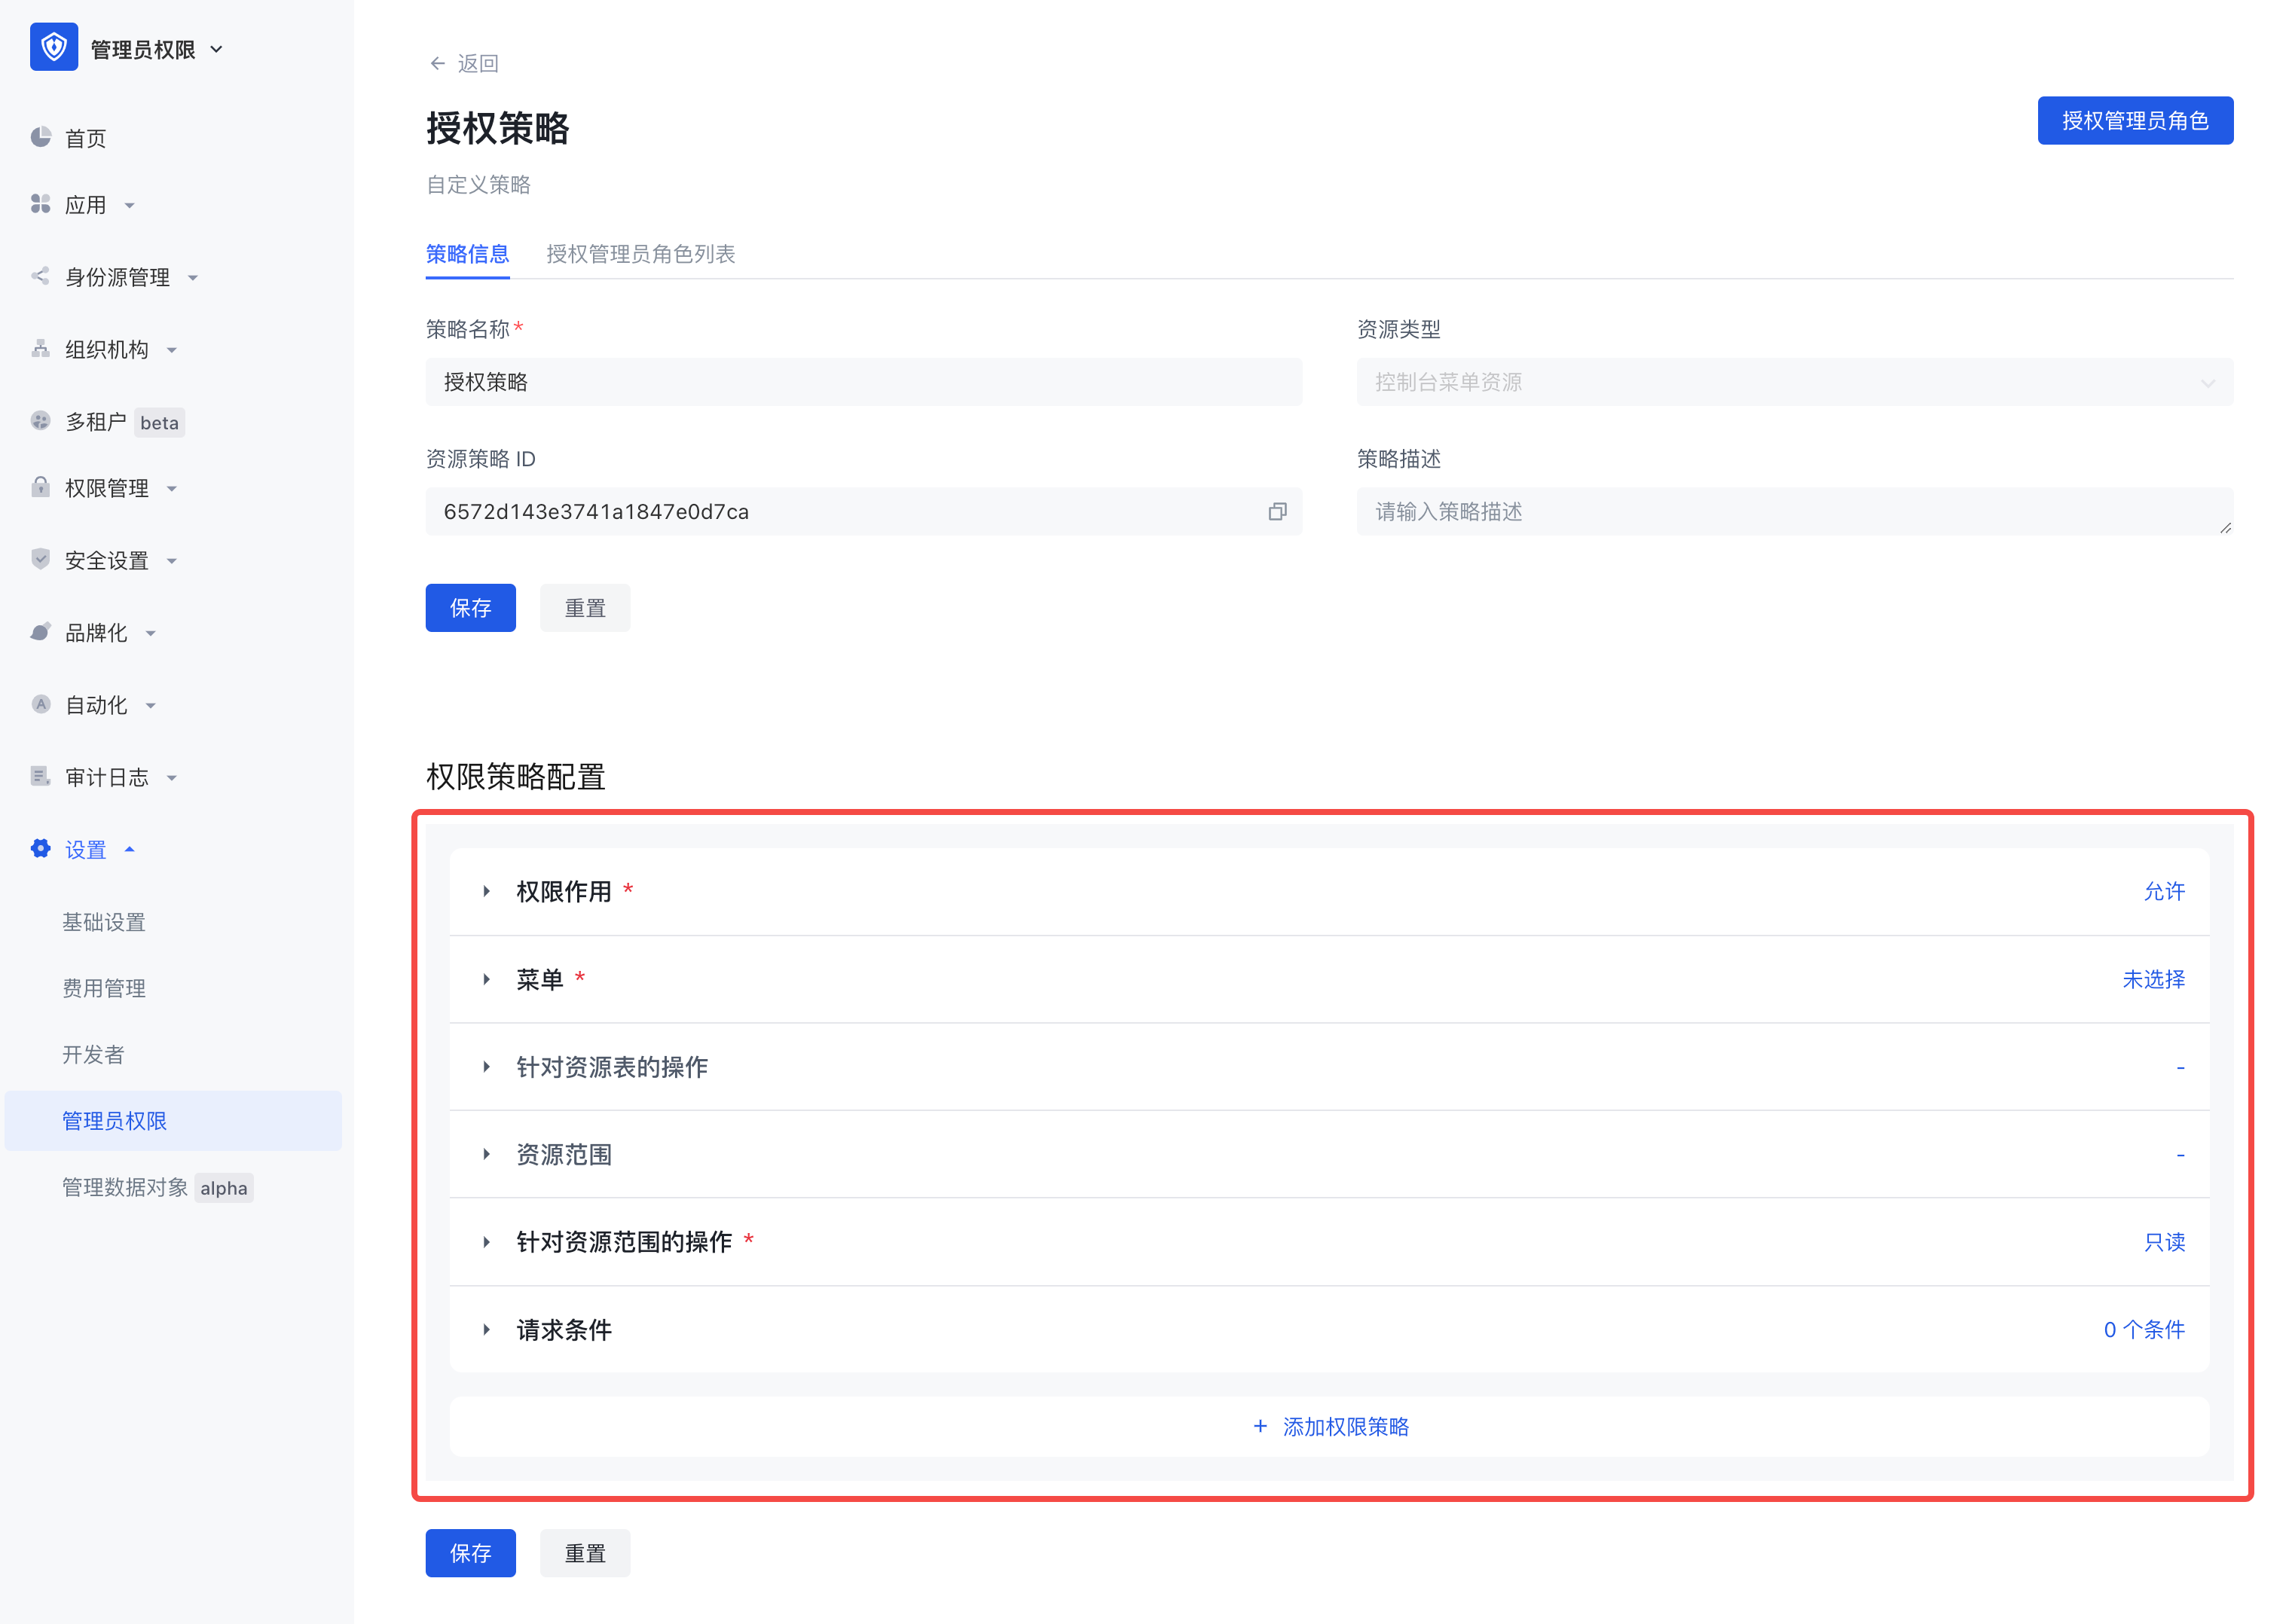
When creating a policy, you must fill in the resource policy name and resource type.
Resource type: console menu resource or API/SDK resource. You can select the appropriate resource type according to the actual administrator permission management requirement scenario. Different resource types reflect different resource permission management methods.
- Edit the policy
On the policy details page, the policy configuration pages corresponding to different resource types are also different.
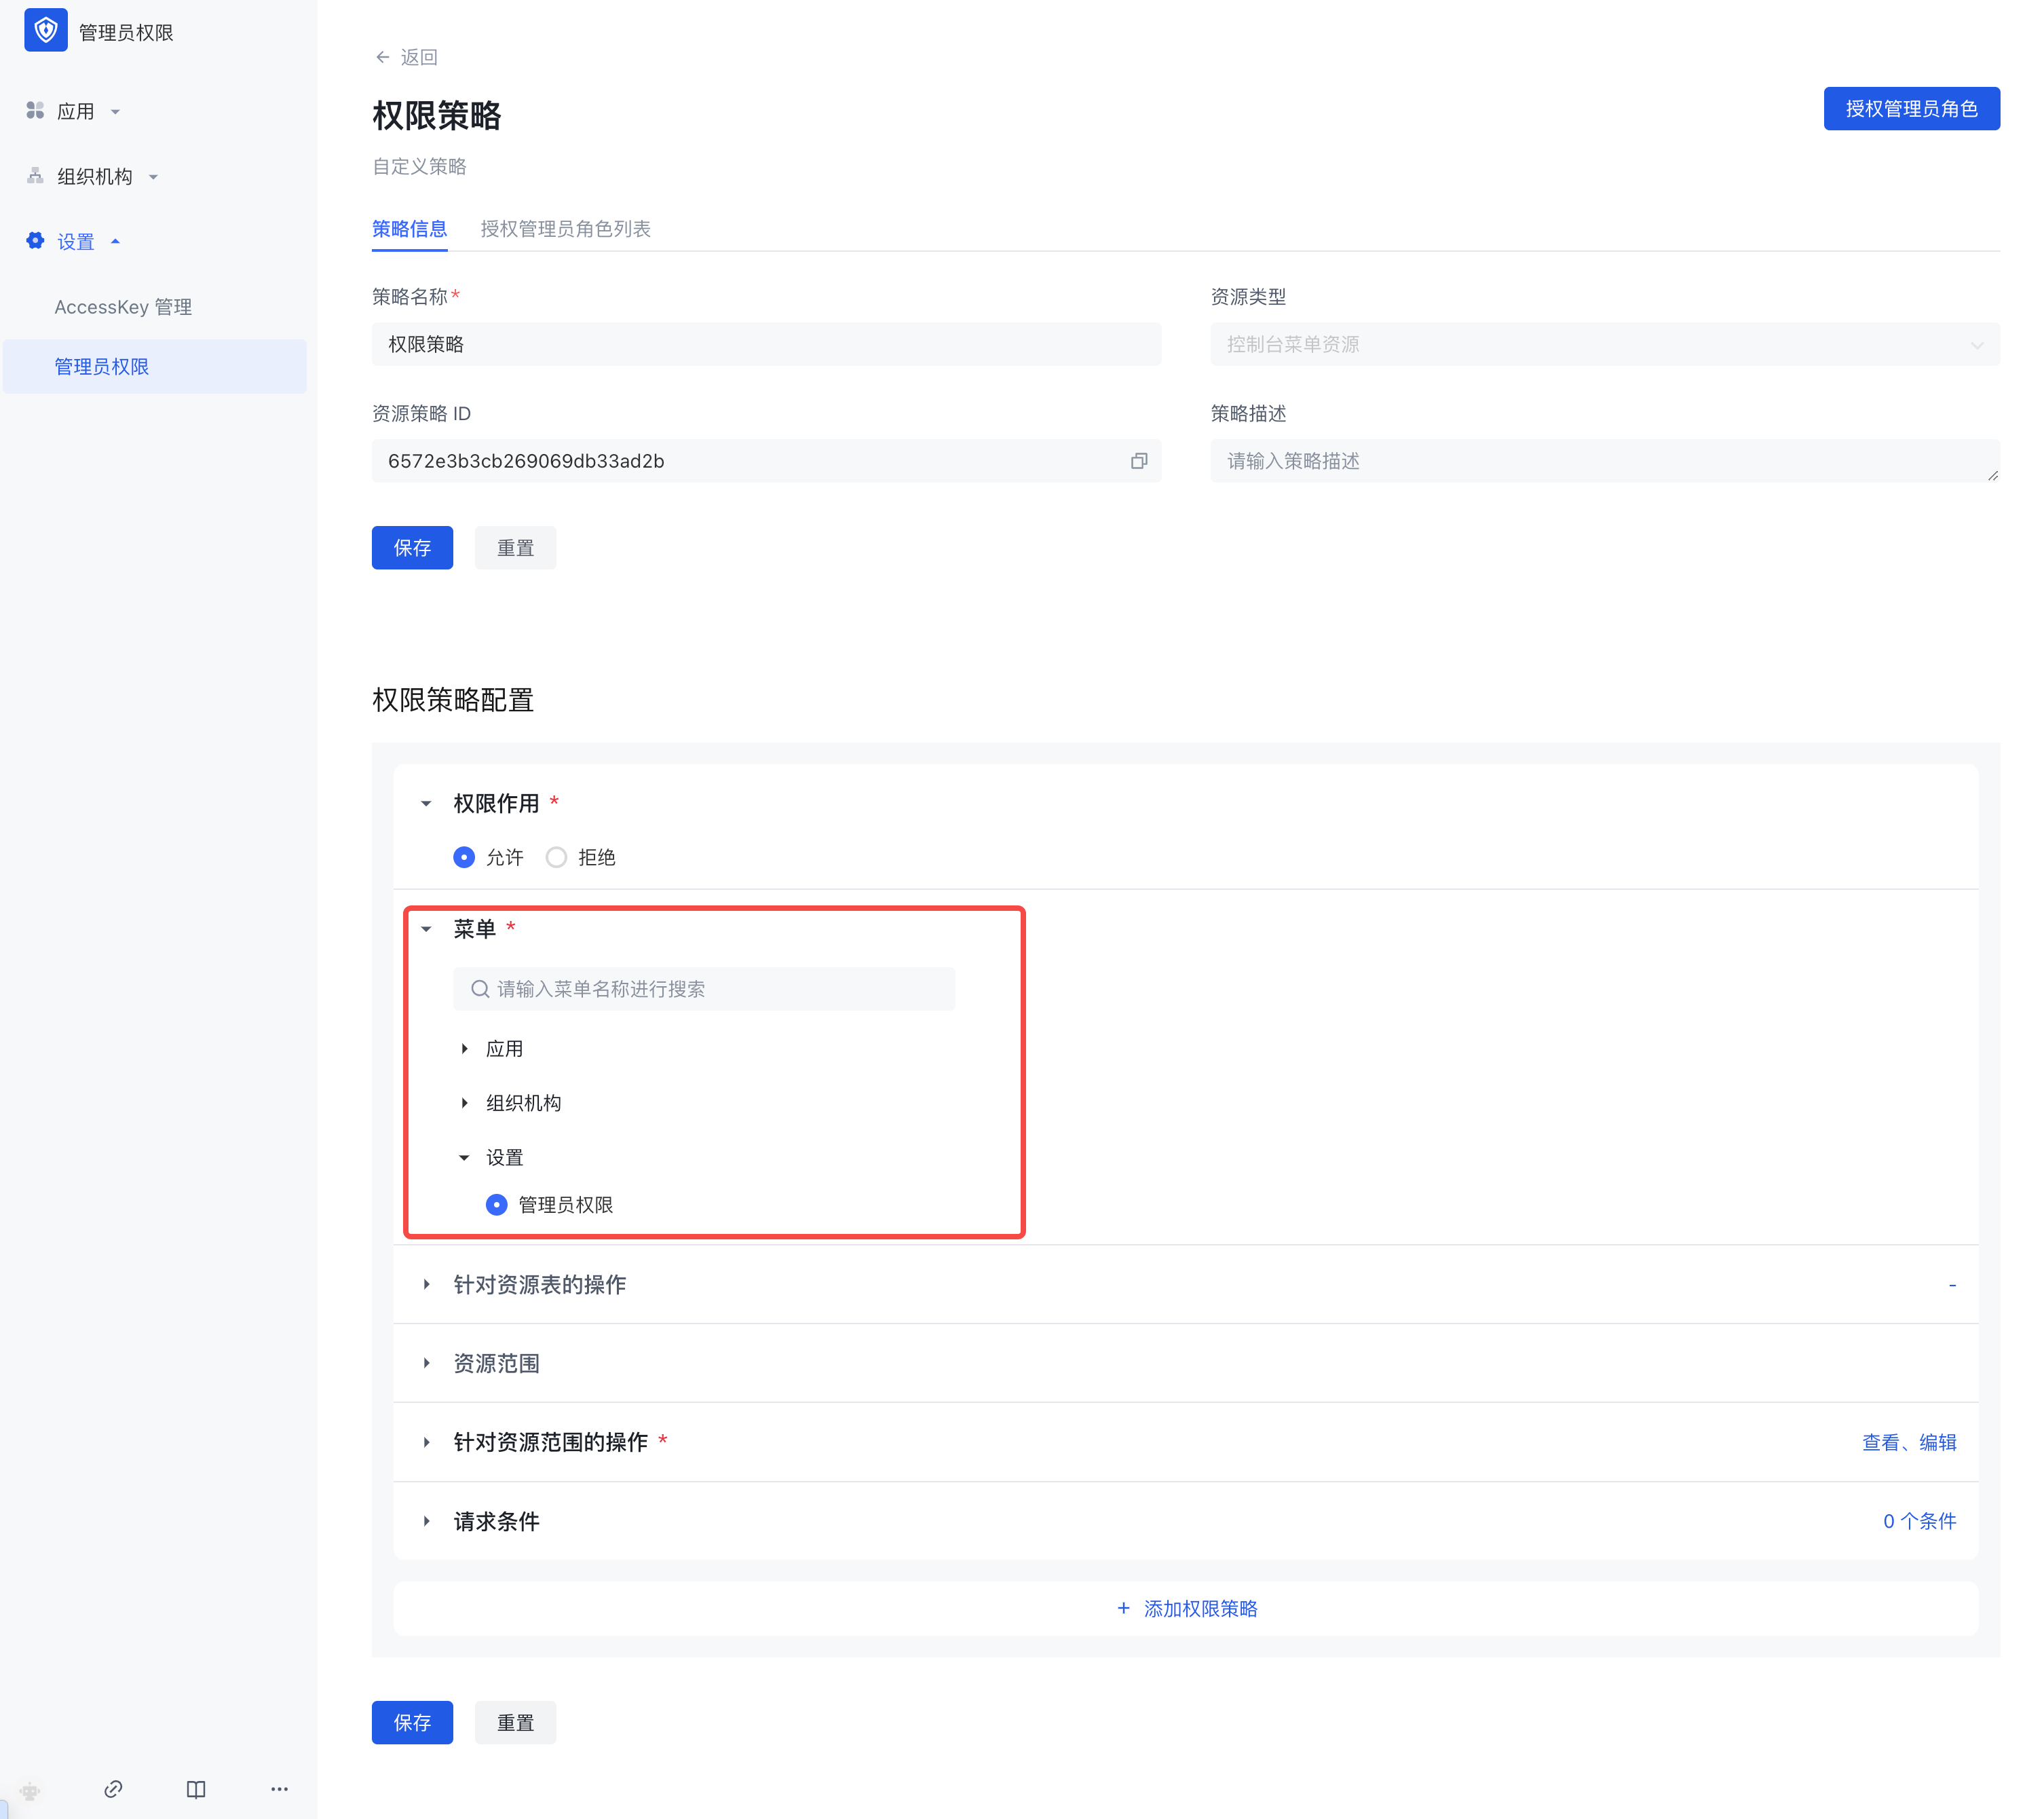
3.1 Resource type is Console menu
There are six configuration items in the permission policy configuration:
Permission effect
Menu
Operations on resource tables
Resource scope
Operations on resource scope
Request conditions
3.2 Resource type is API/SDK
There are also five configuration items in the permission policy configuration: permission effect, API/SDK operation scope, request conditions, and the configuration process is consistent with the menu type policy.

Step 3: Authorize the policy to the administrator role
There are two ways to authorize the policy to the administrator role, see below for details:
Click [Authorize Administrator Role] in the policy details page
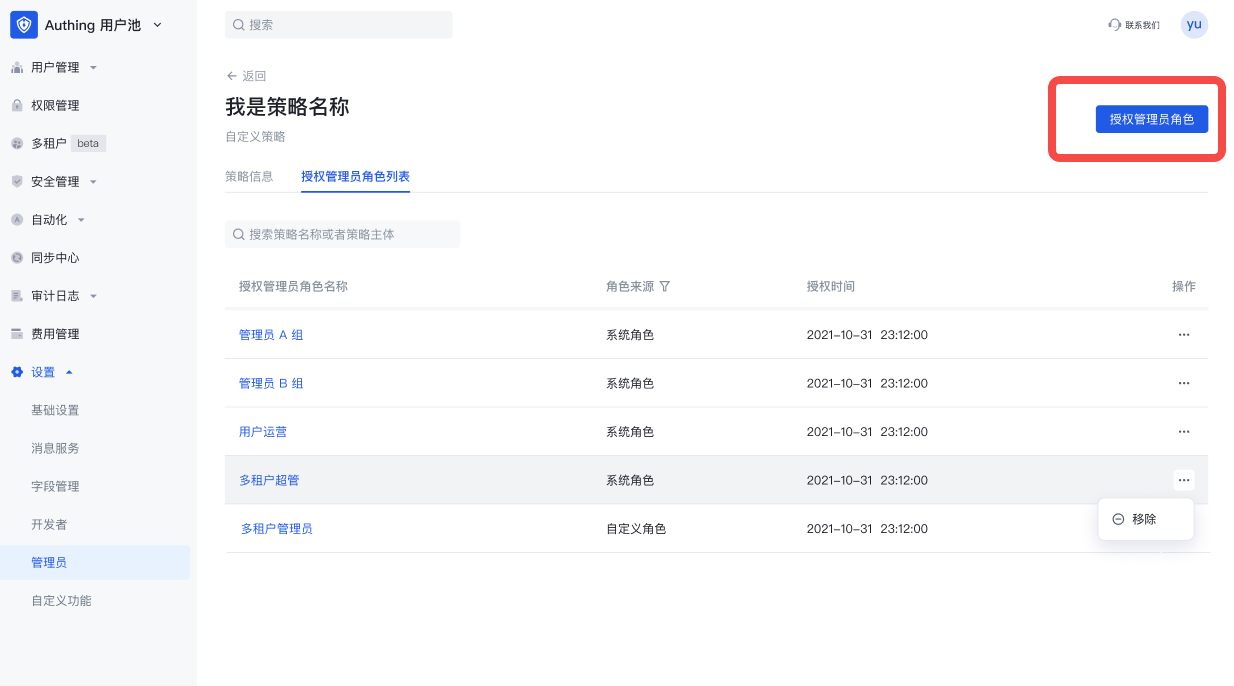
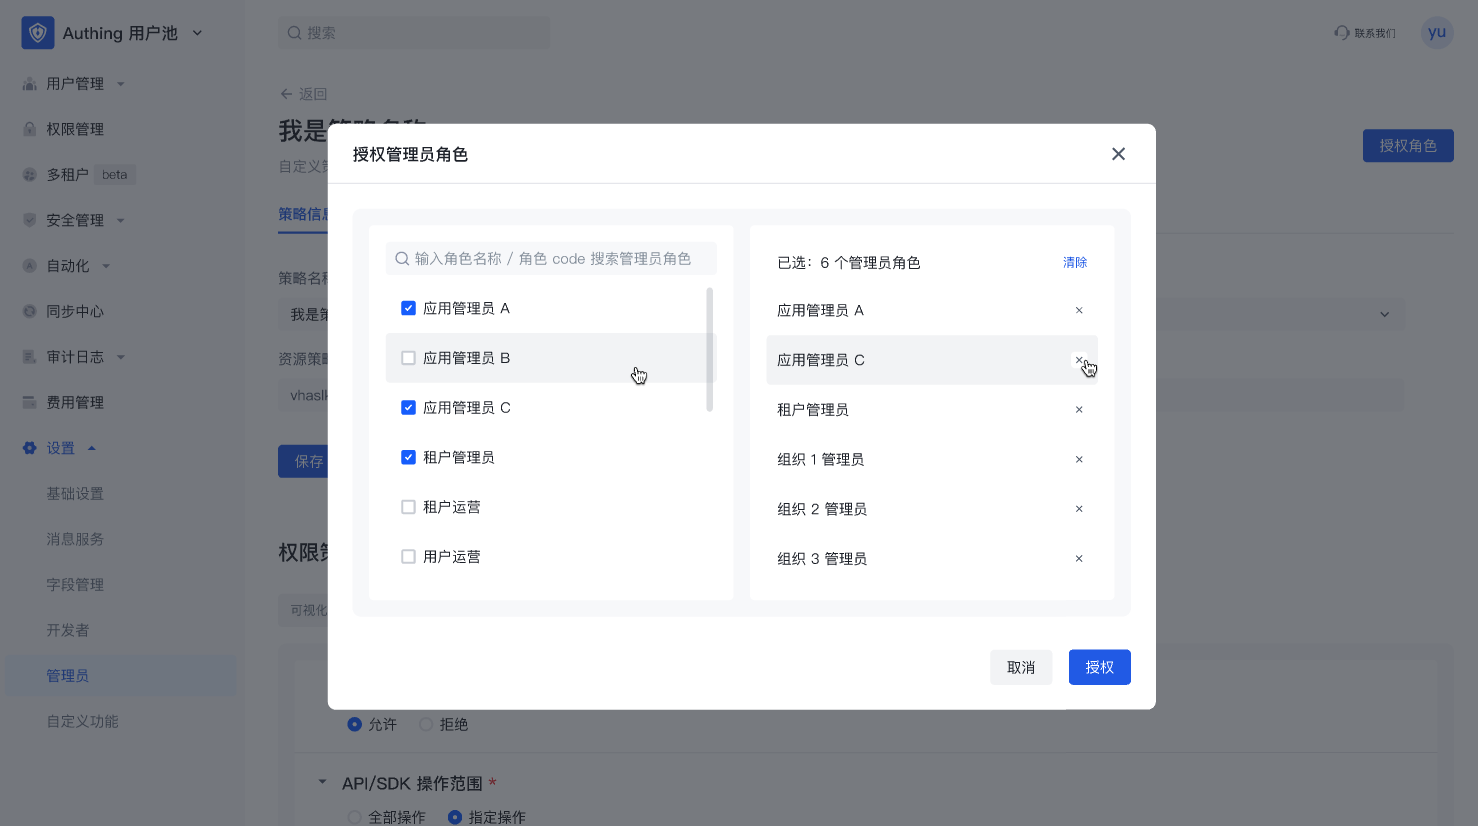
Supports multiple selection of administrator roles. In the policy details page-authorized administrator role list, you can view, edit, and remove the administrator roles authorized by the policy.
In the administrator role details page, add a resource policy
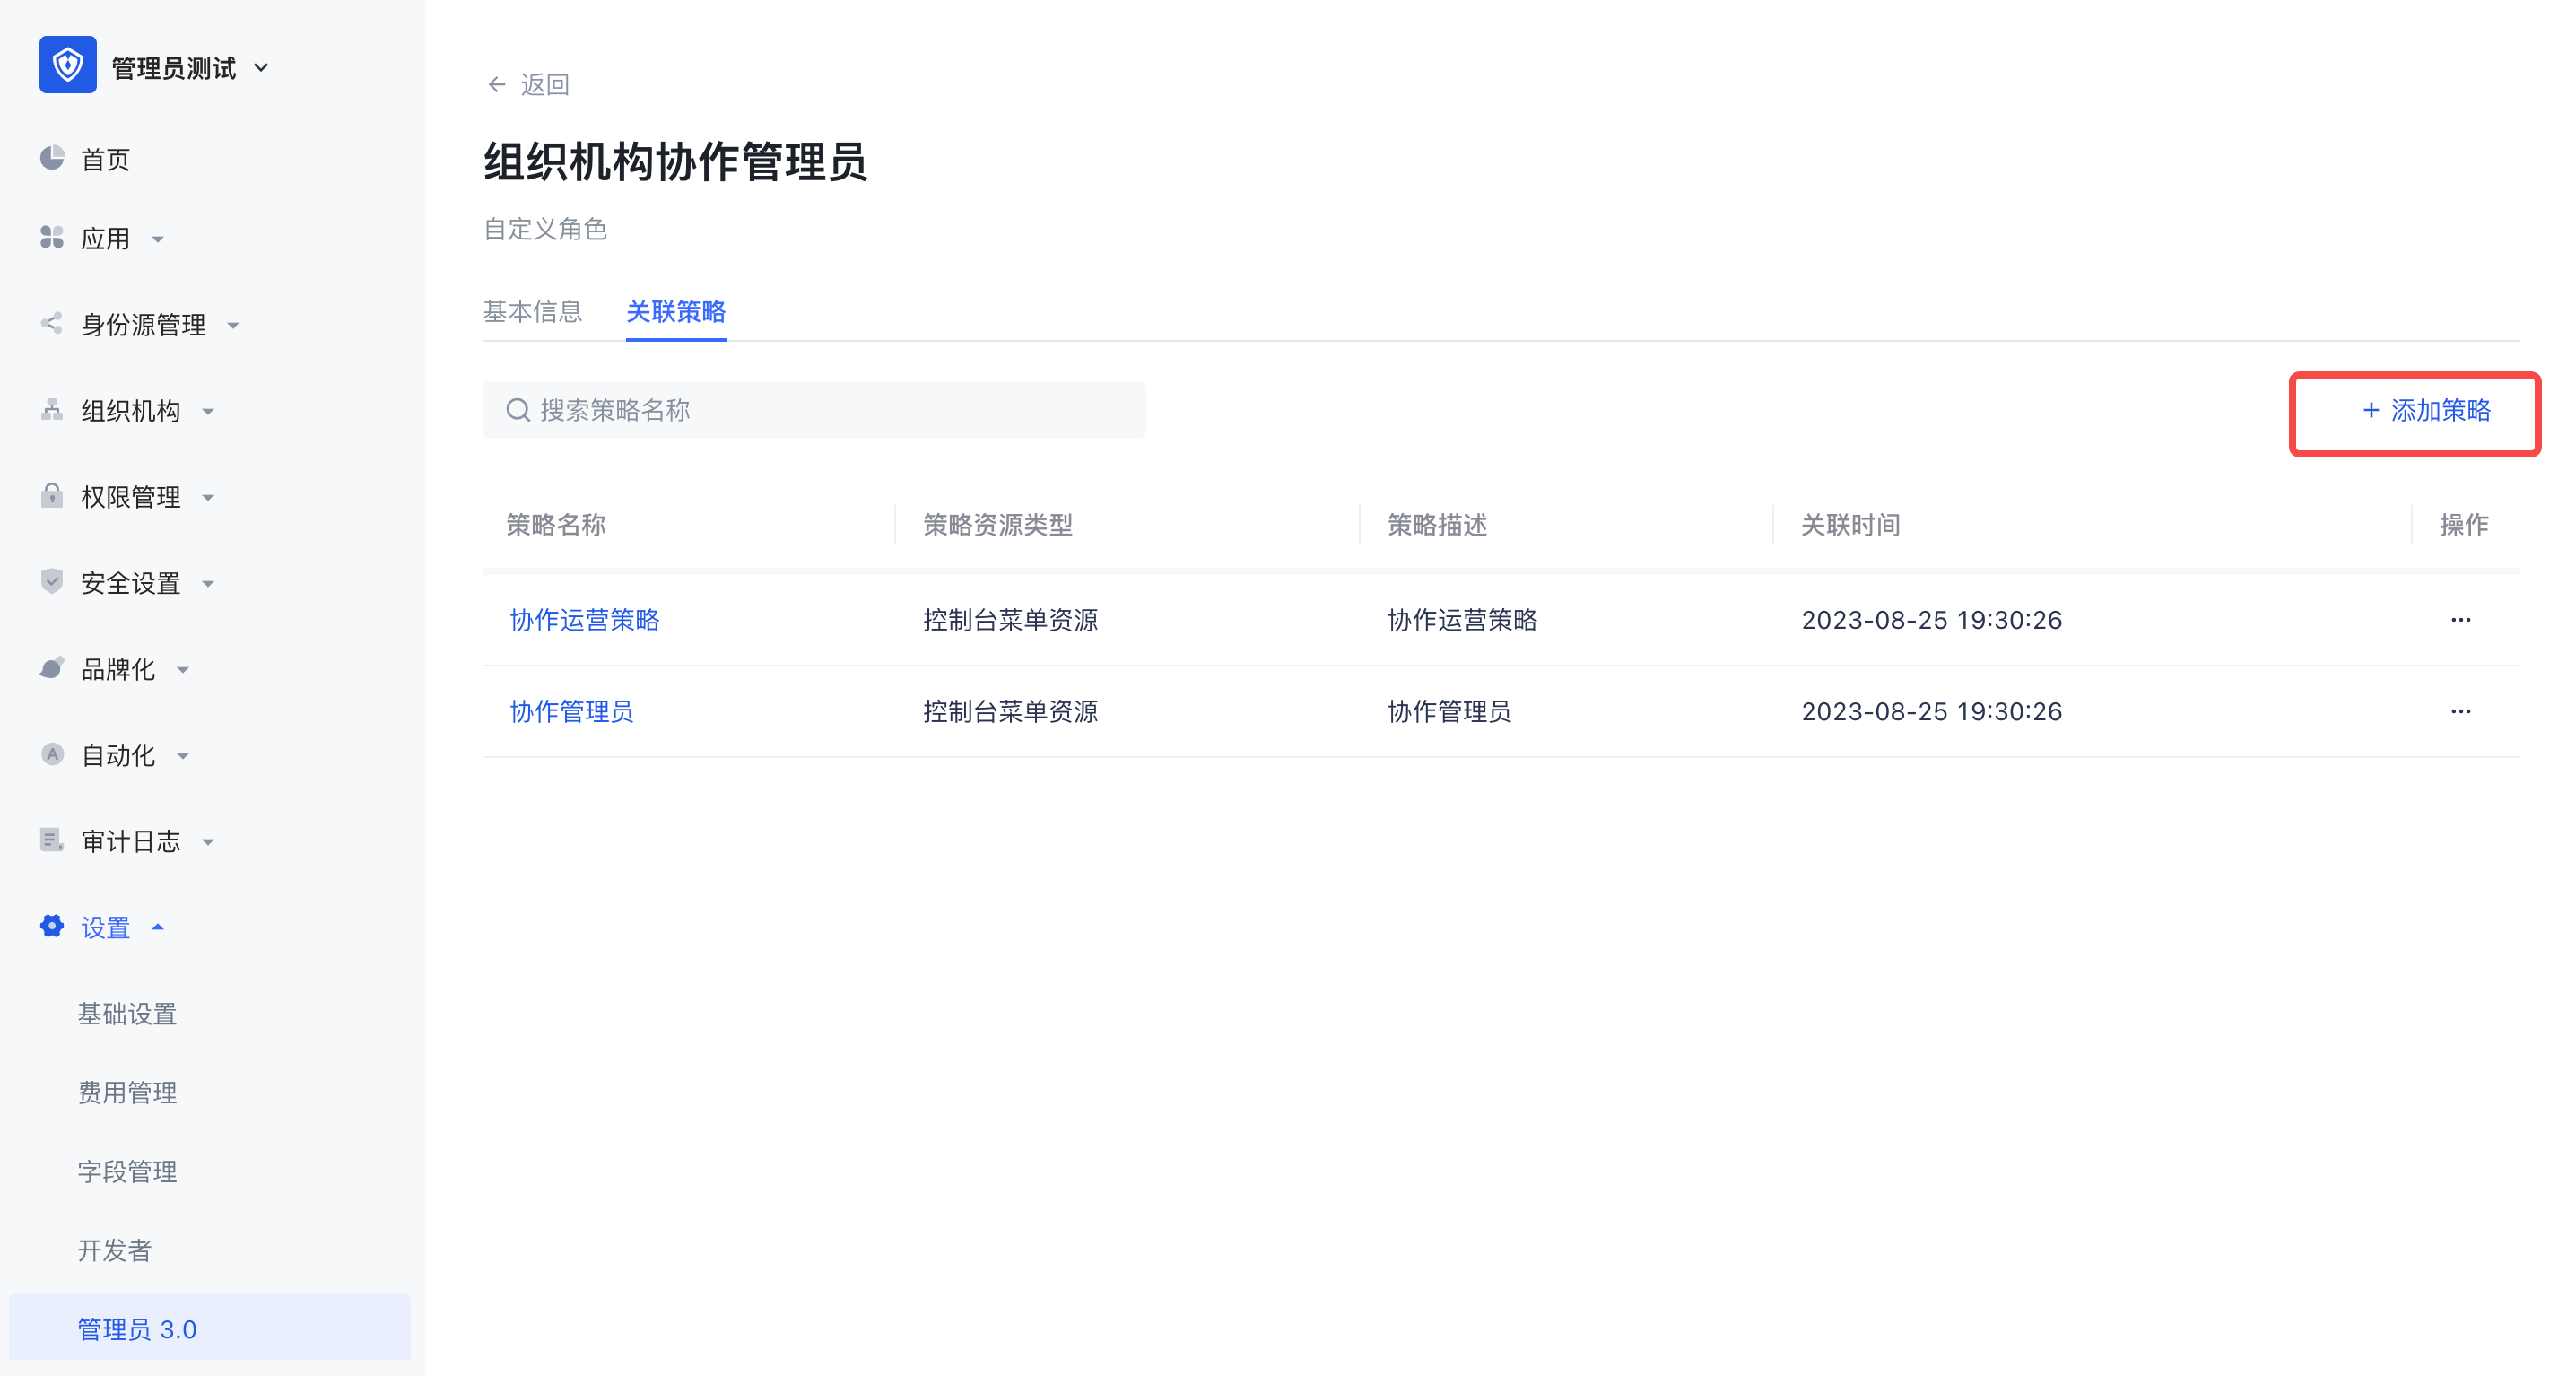
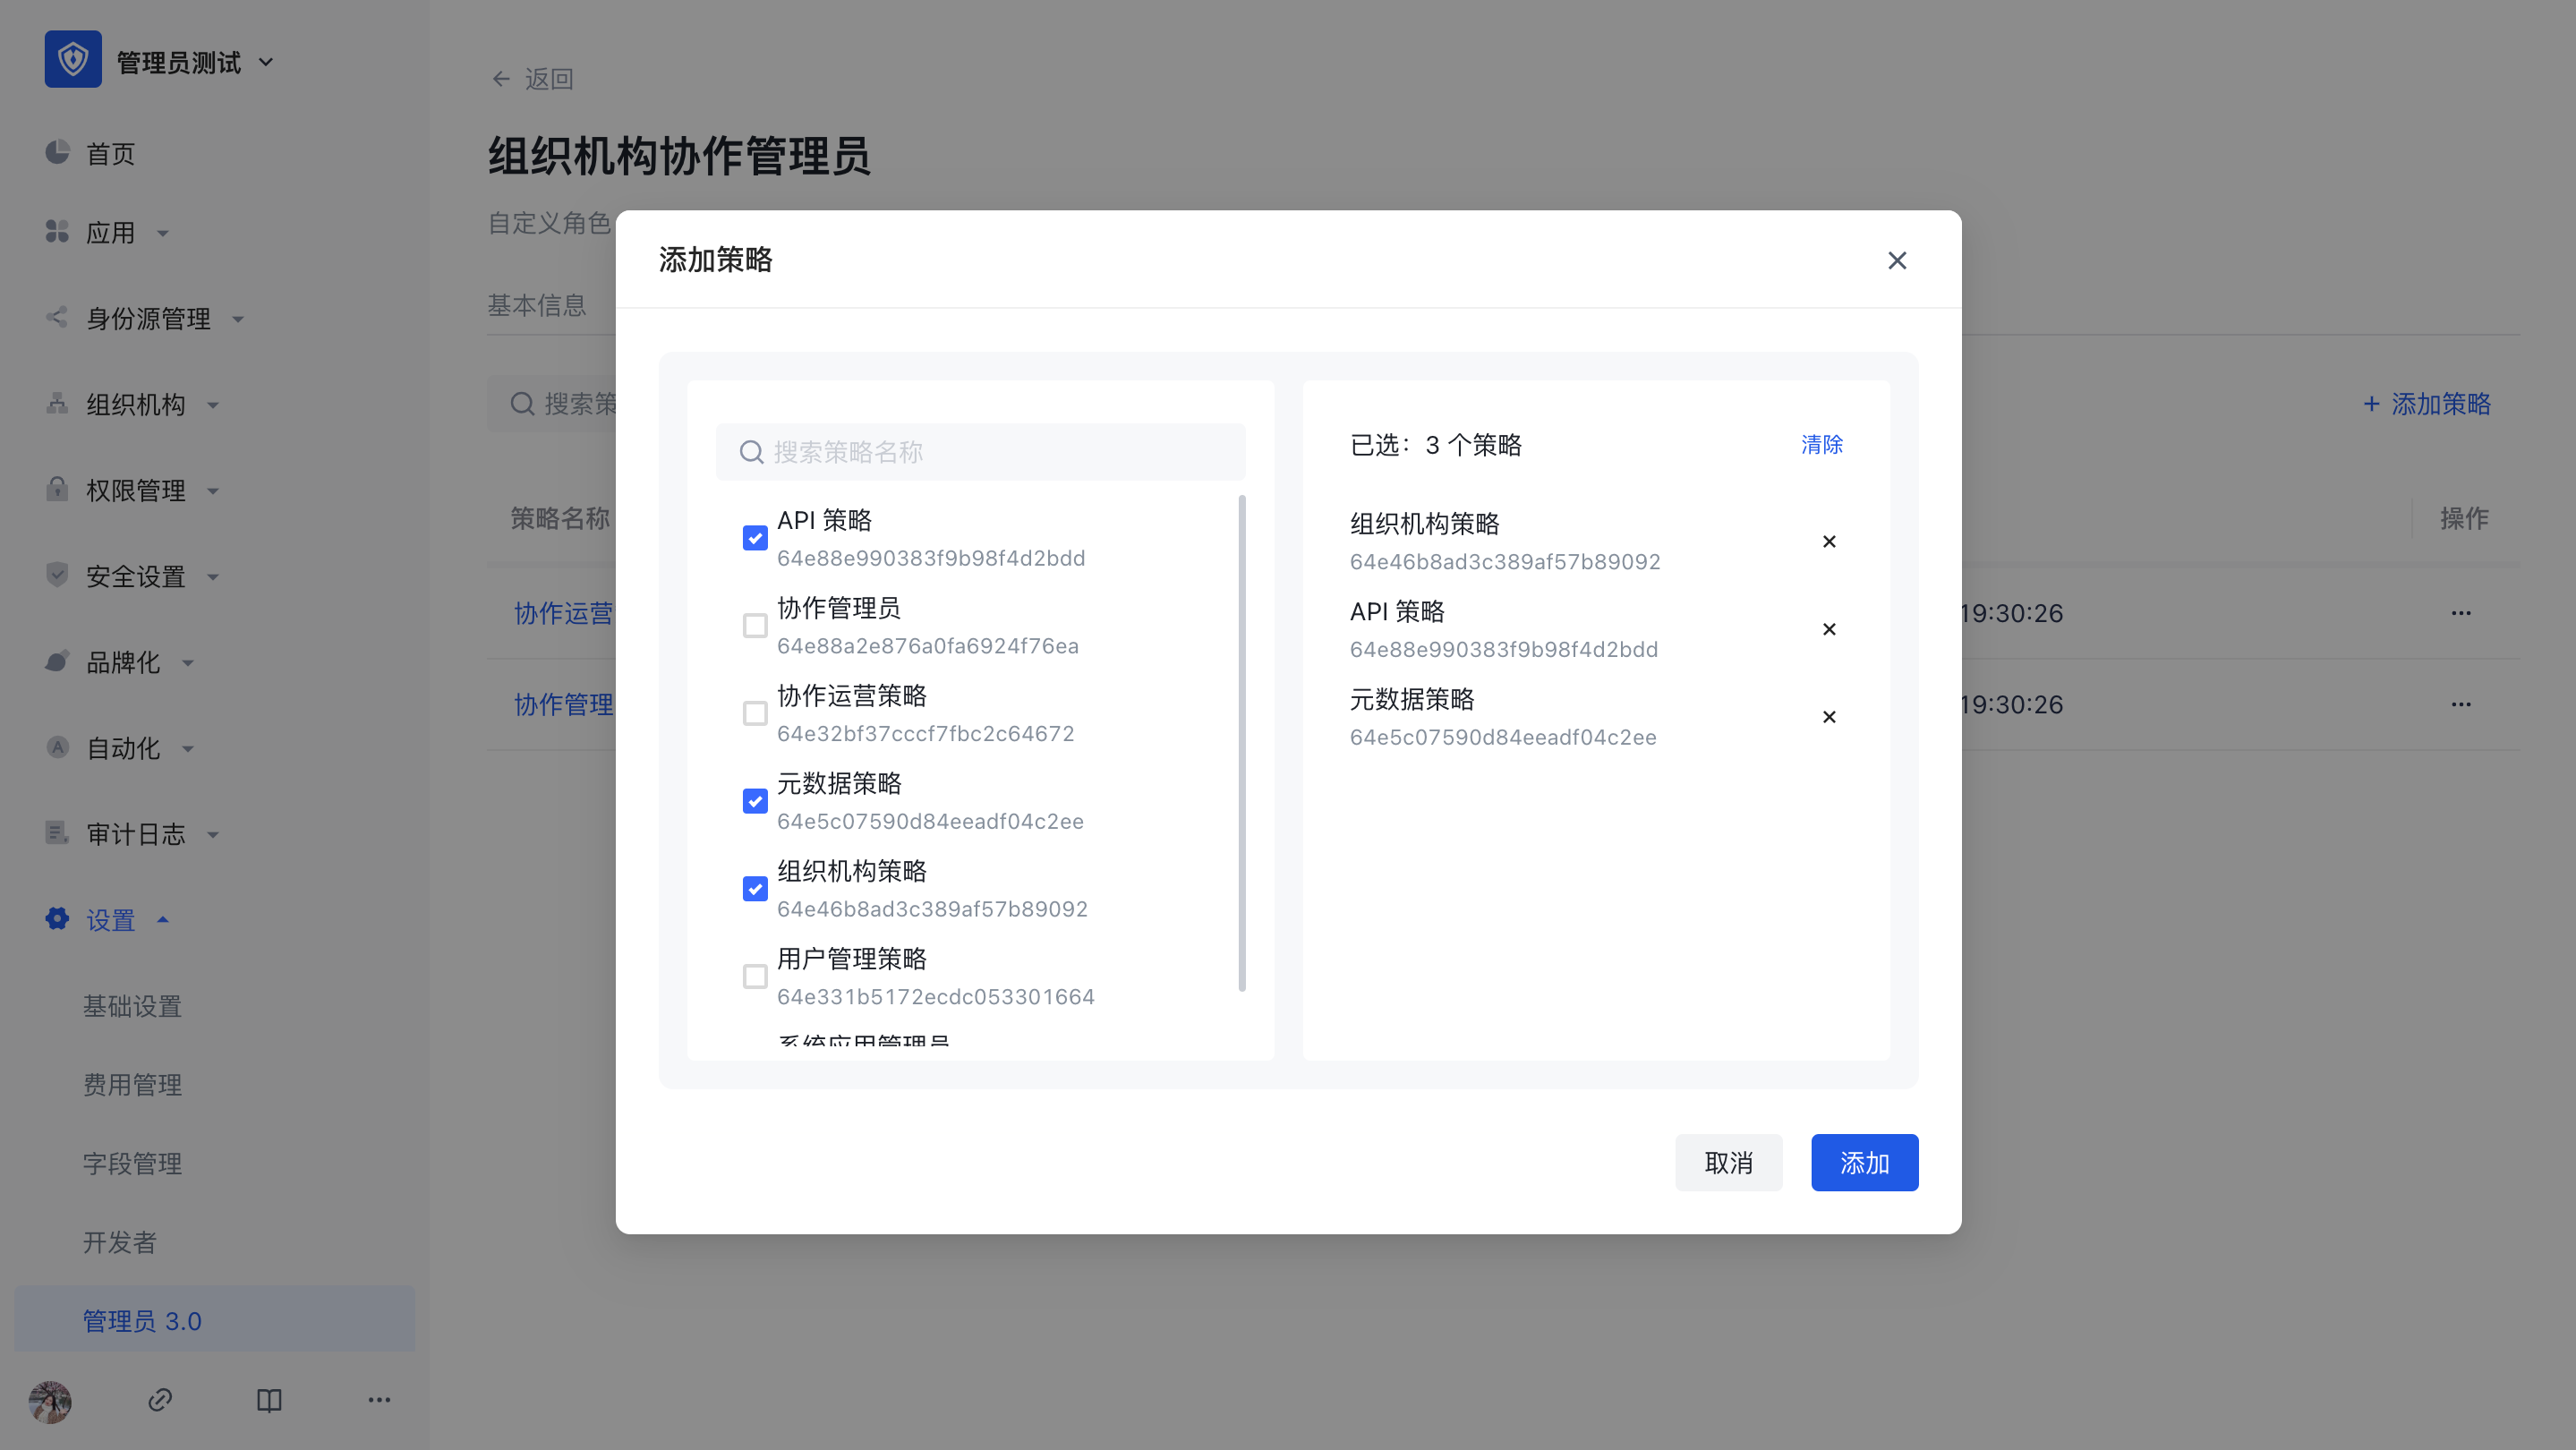
Supports multiple selection of policies. In the administrator role details page-associated policy list, you can view, edit, and remove associated policies.
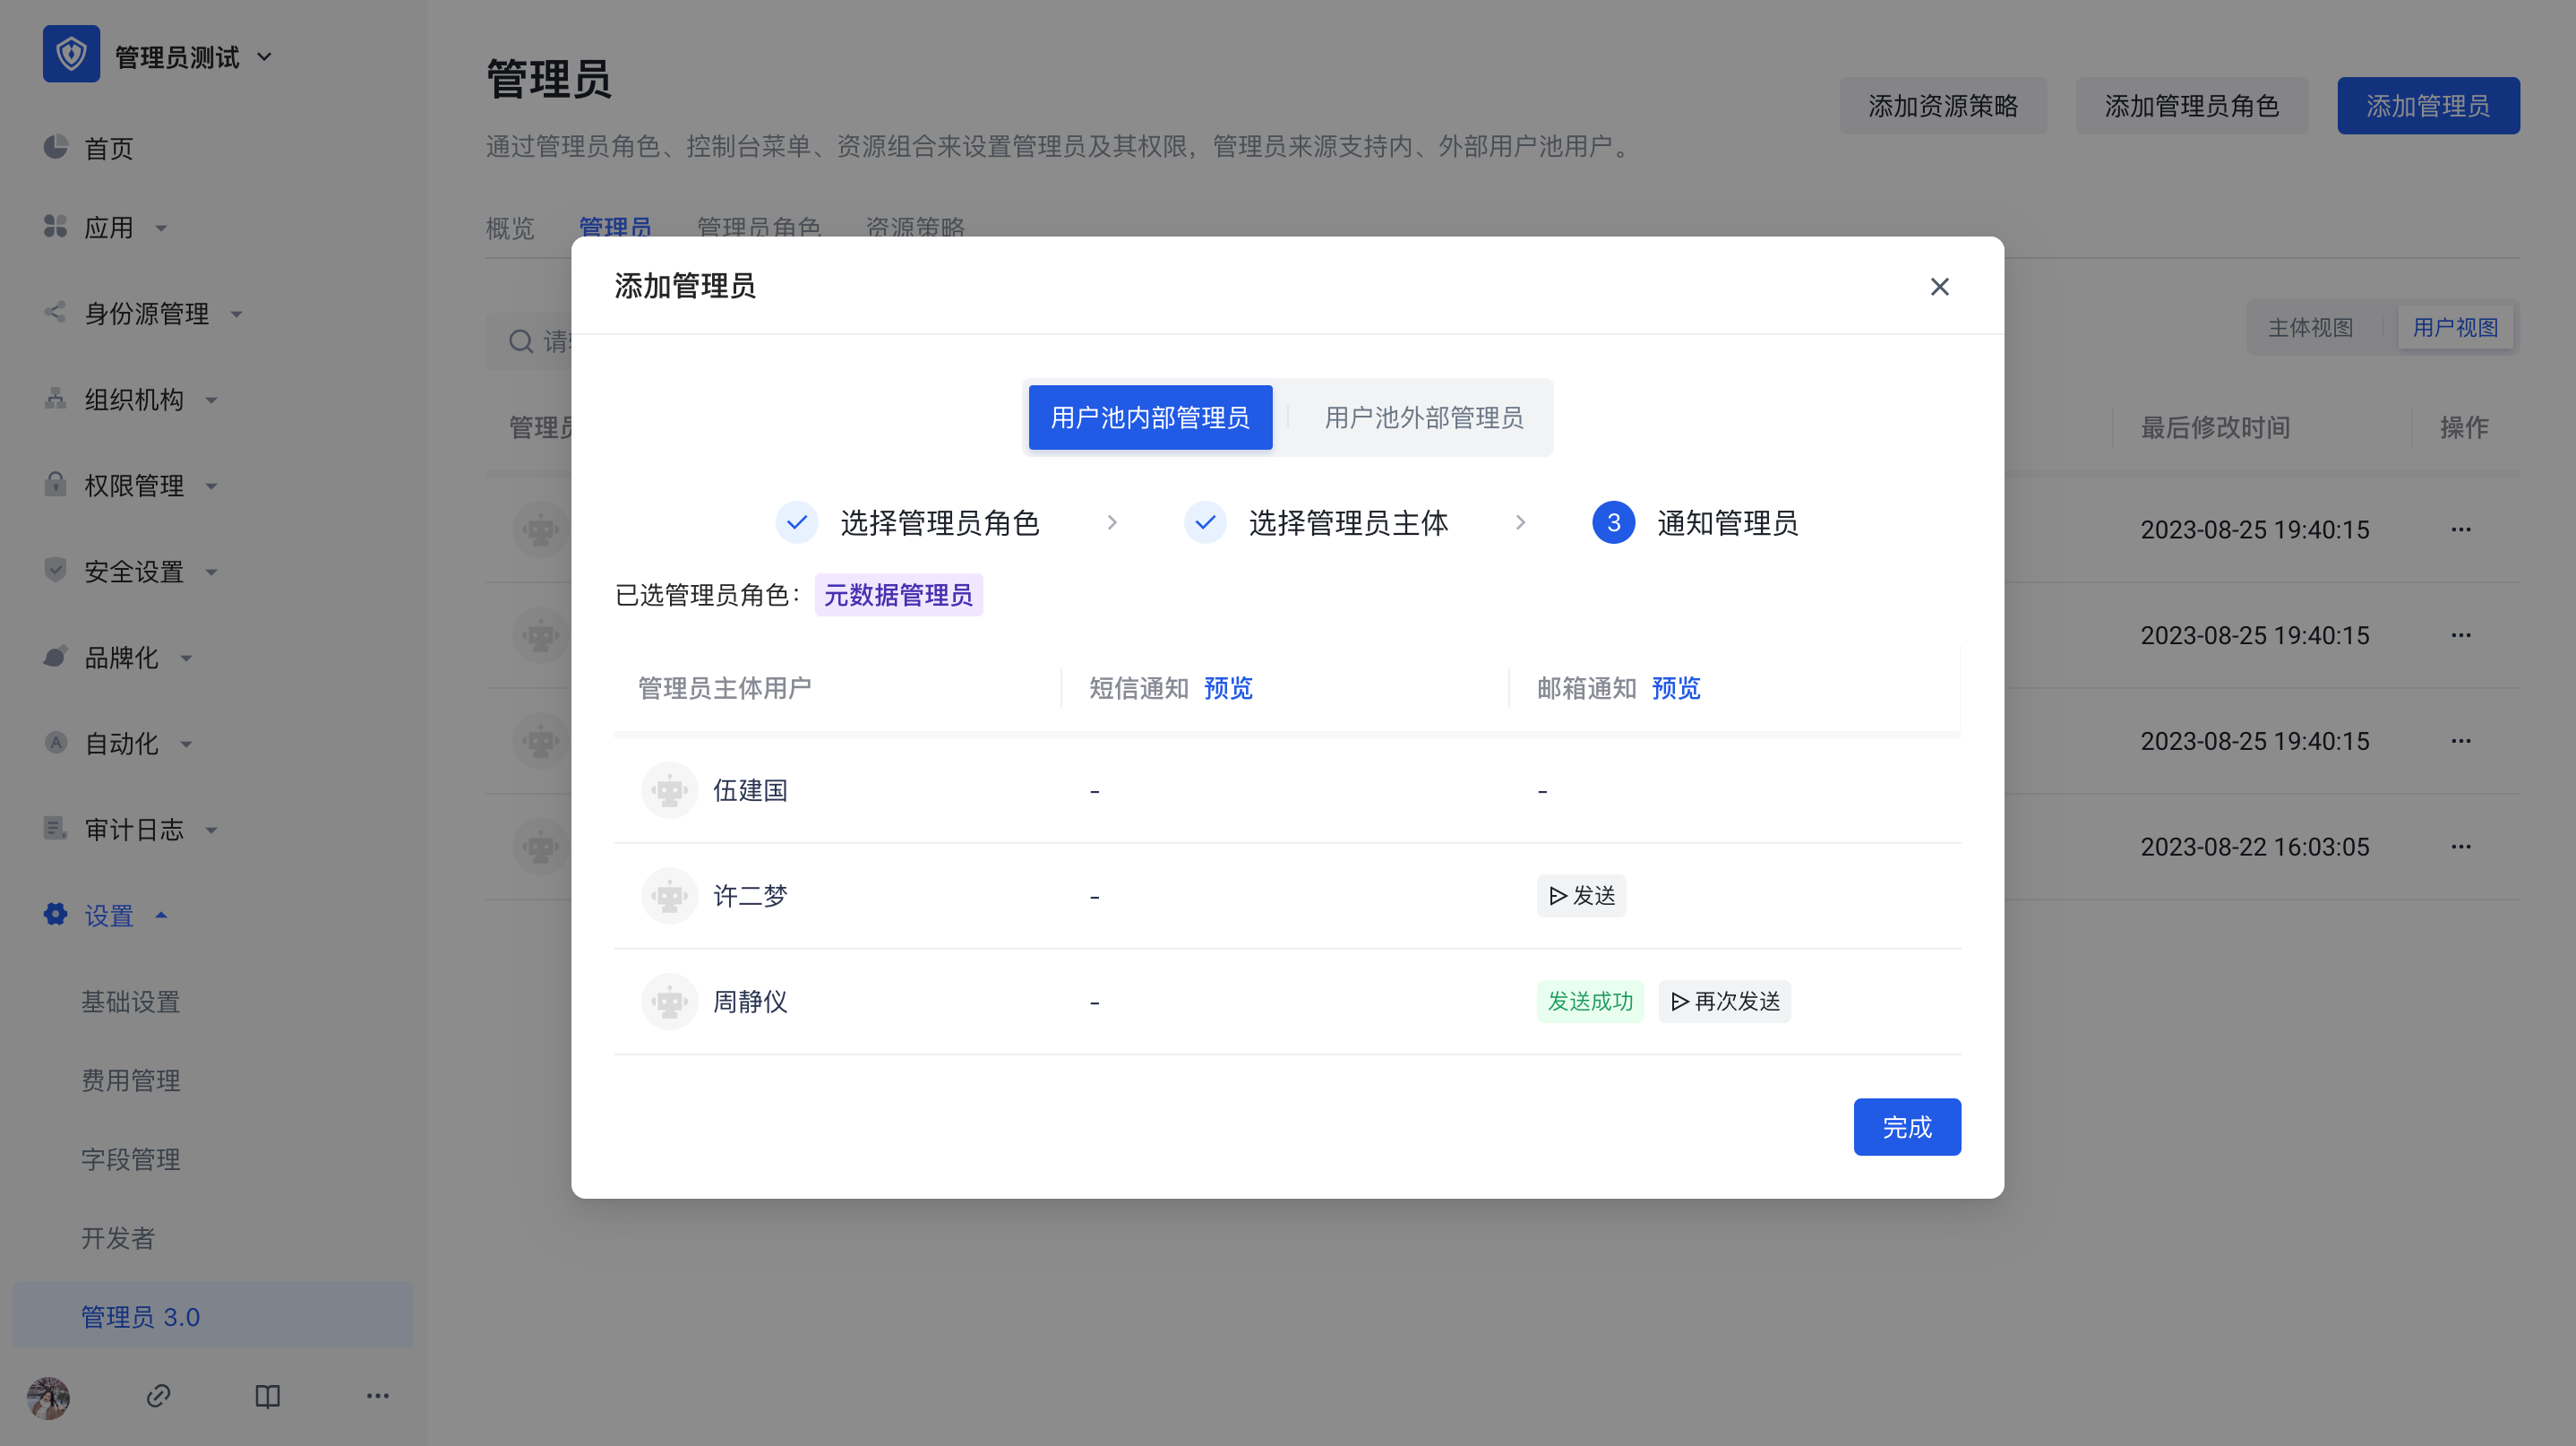
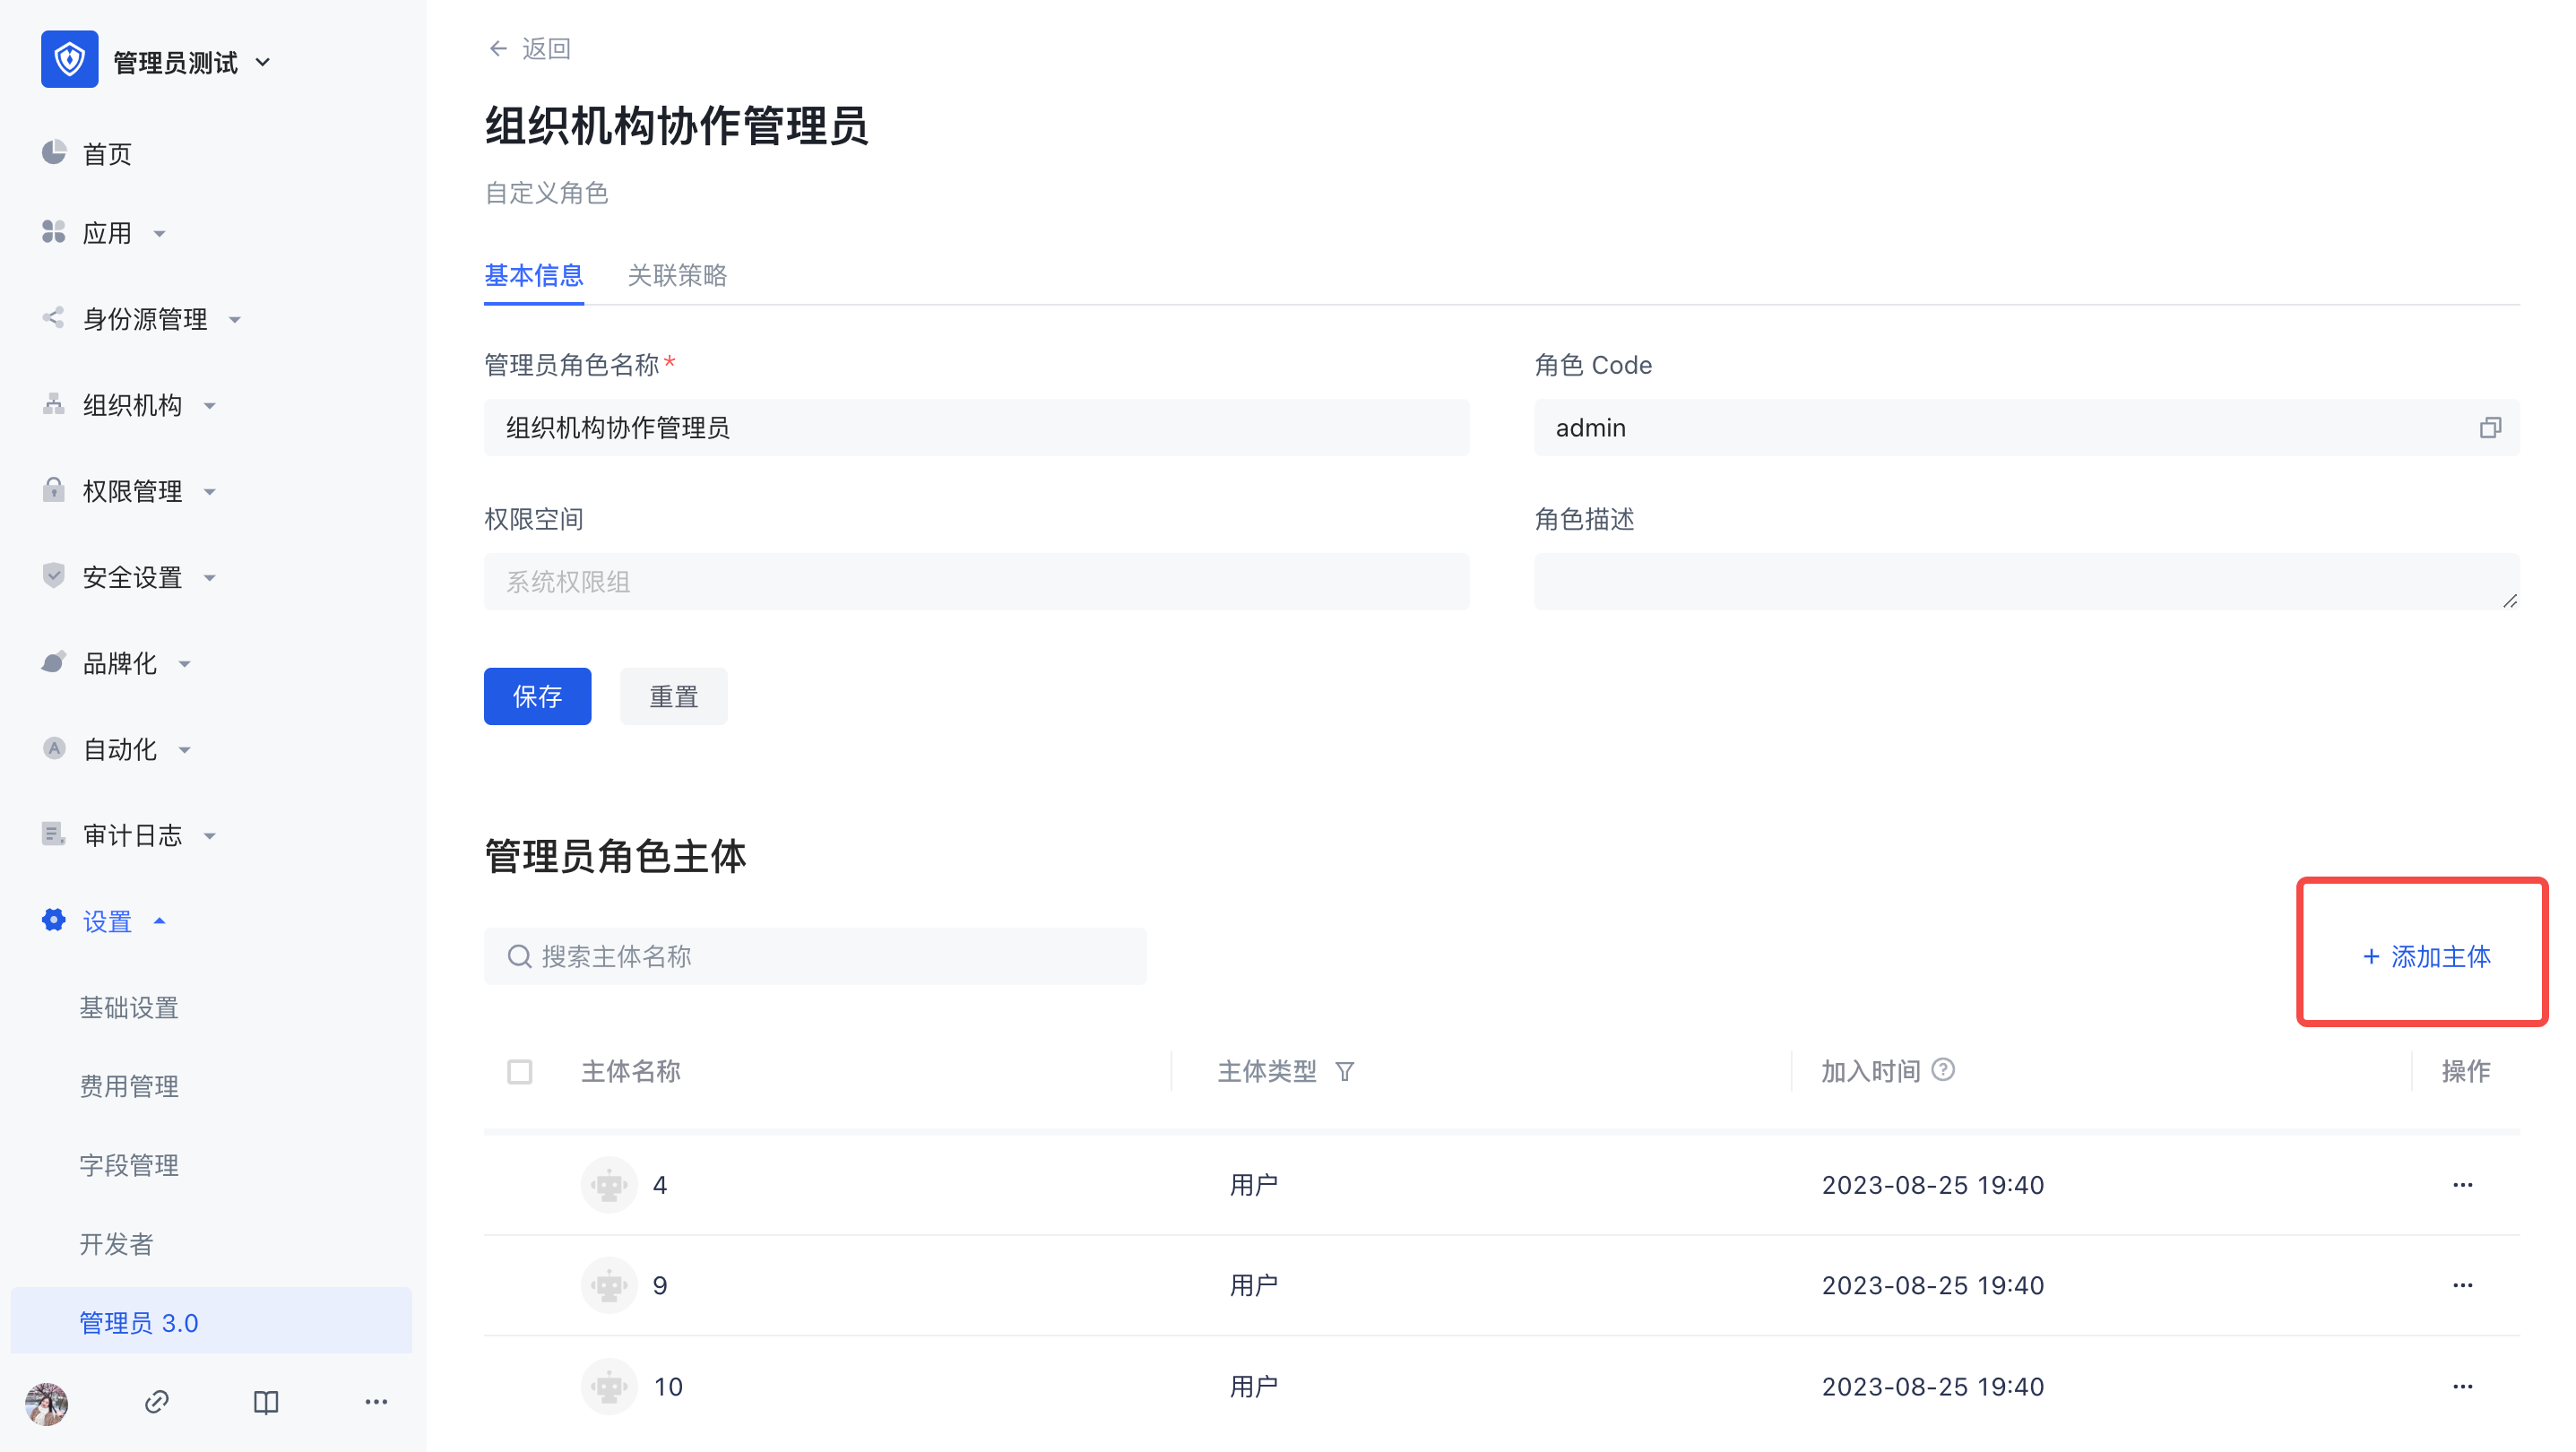
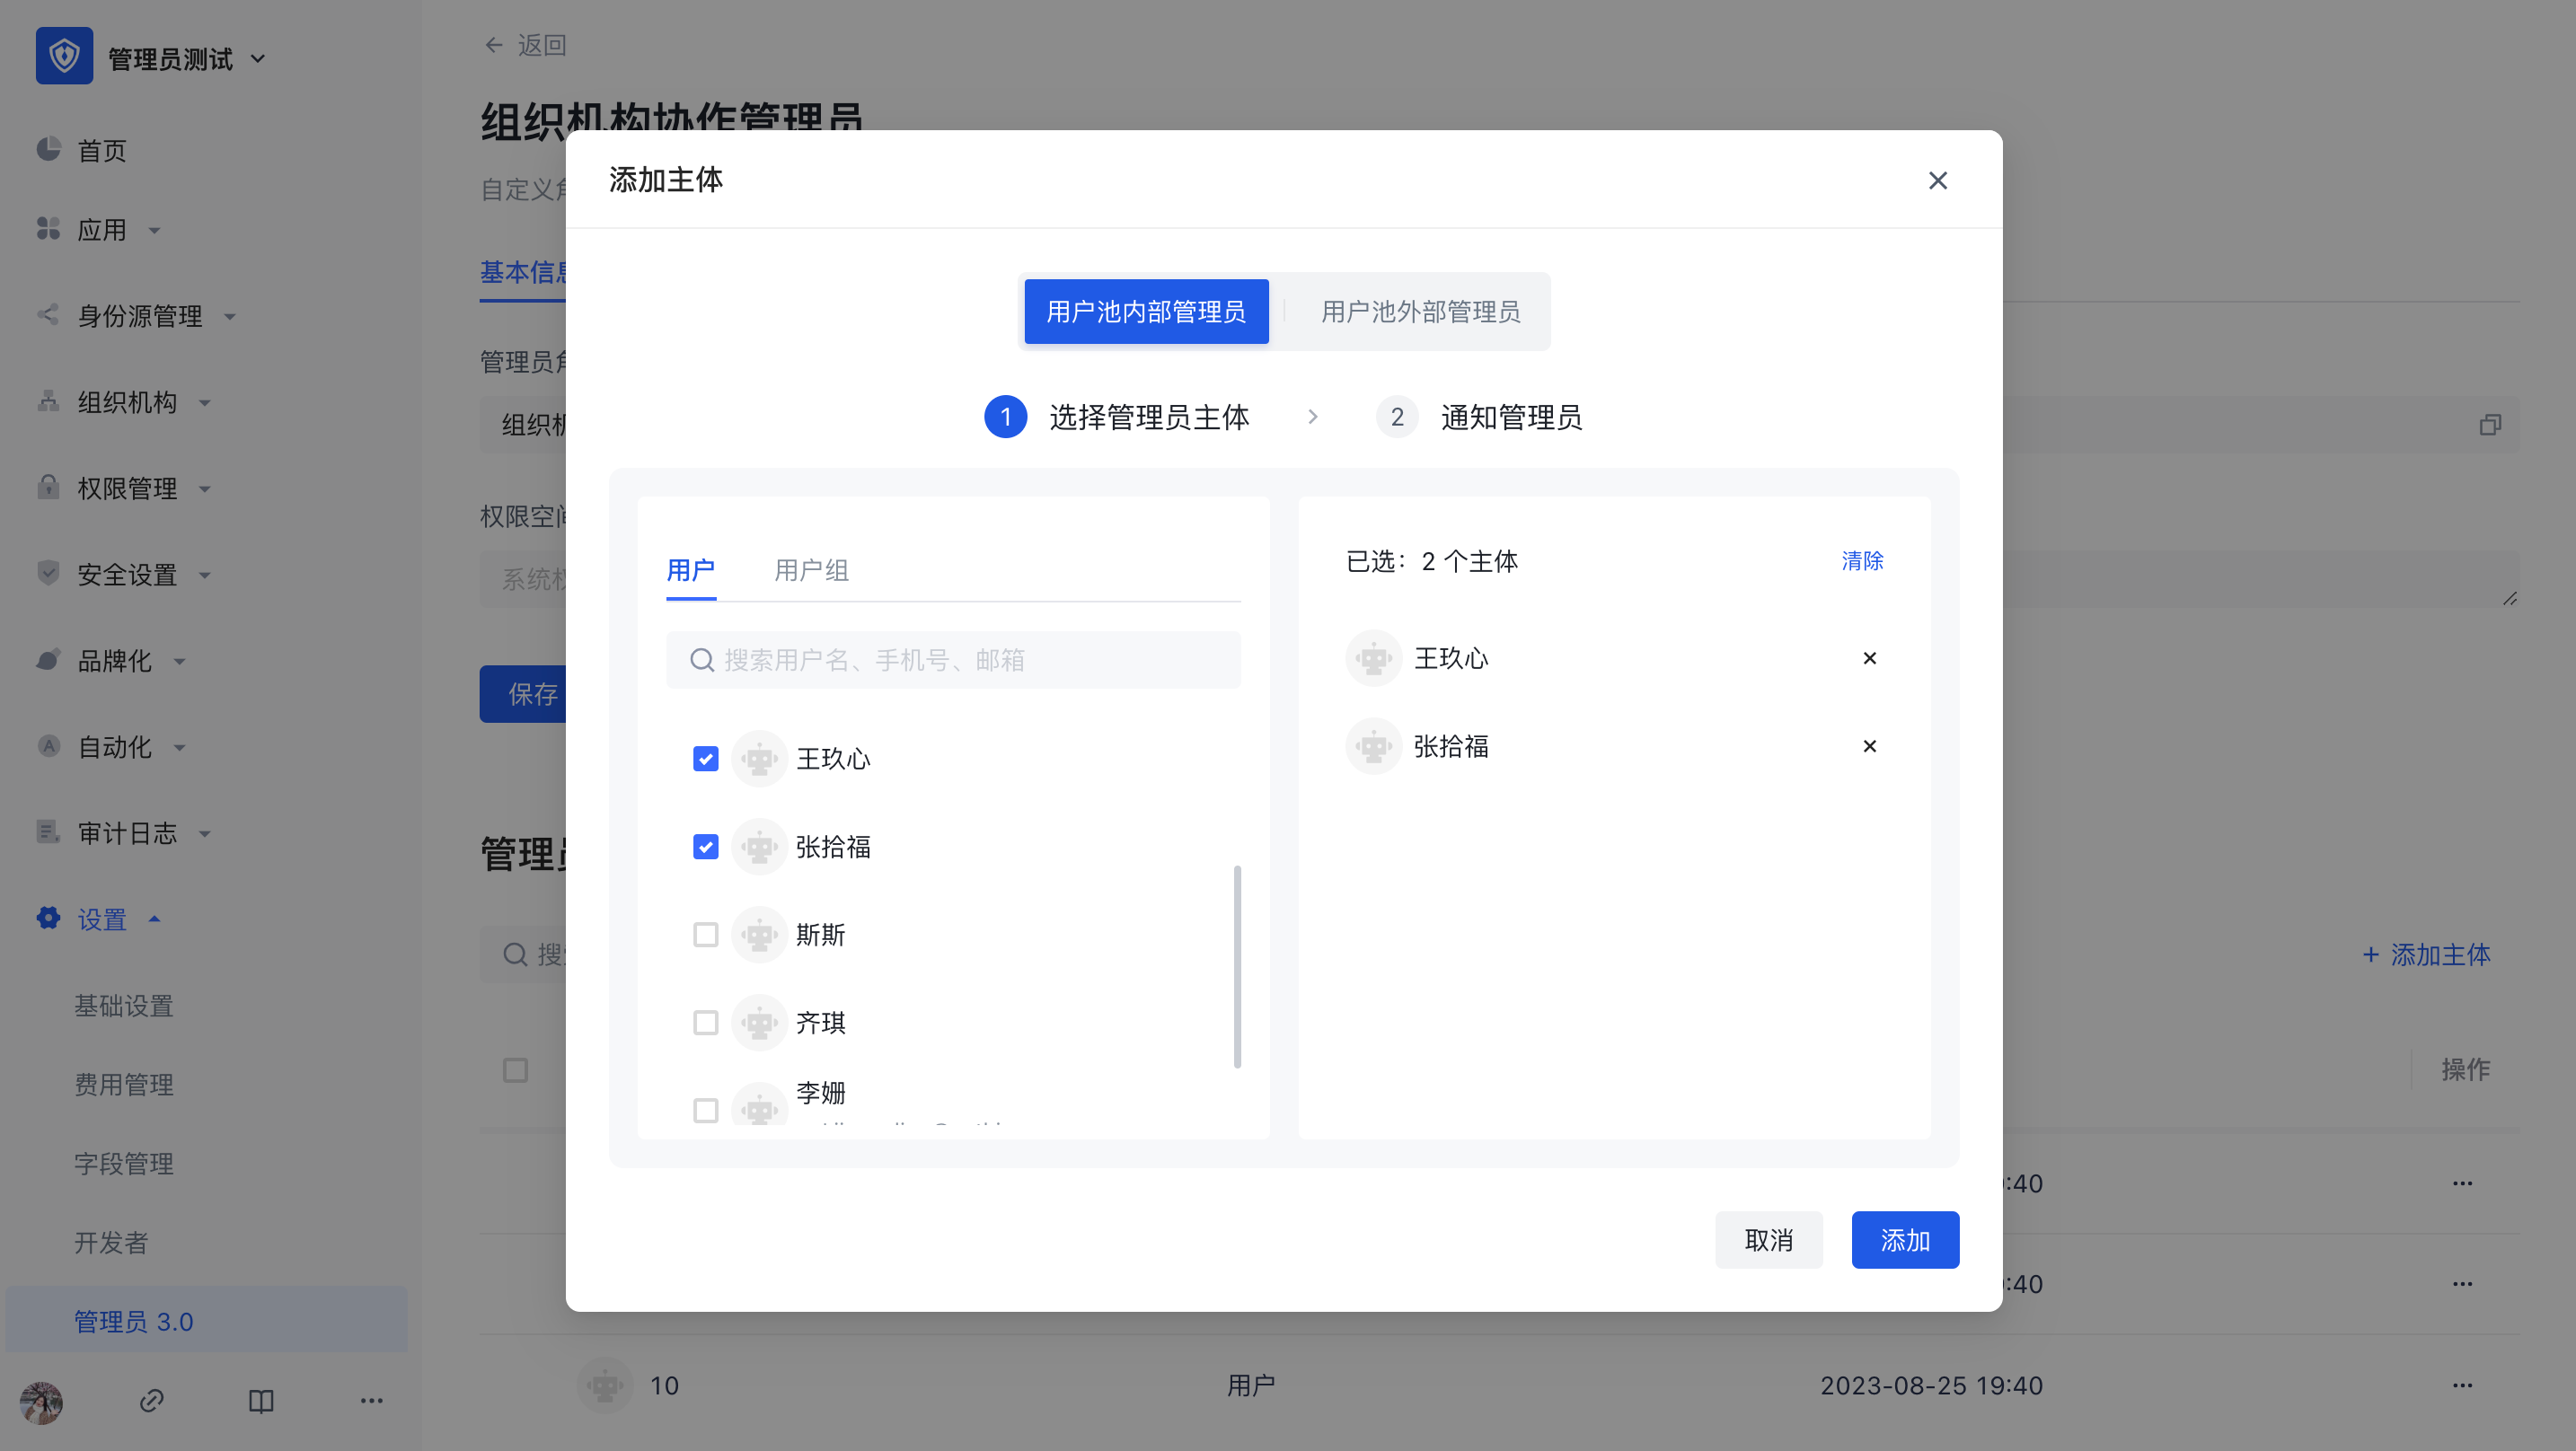
Step 4: Assign roles to users and other subjects
There are two ways to assign roles to administrator subjects, see below for details:
Add administrators through the public button in the upper right corner of the administrator, and send notifications to users with contact information.
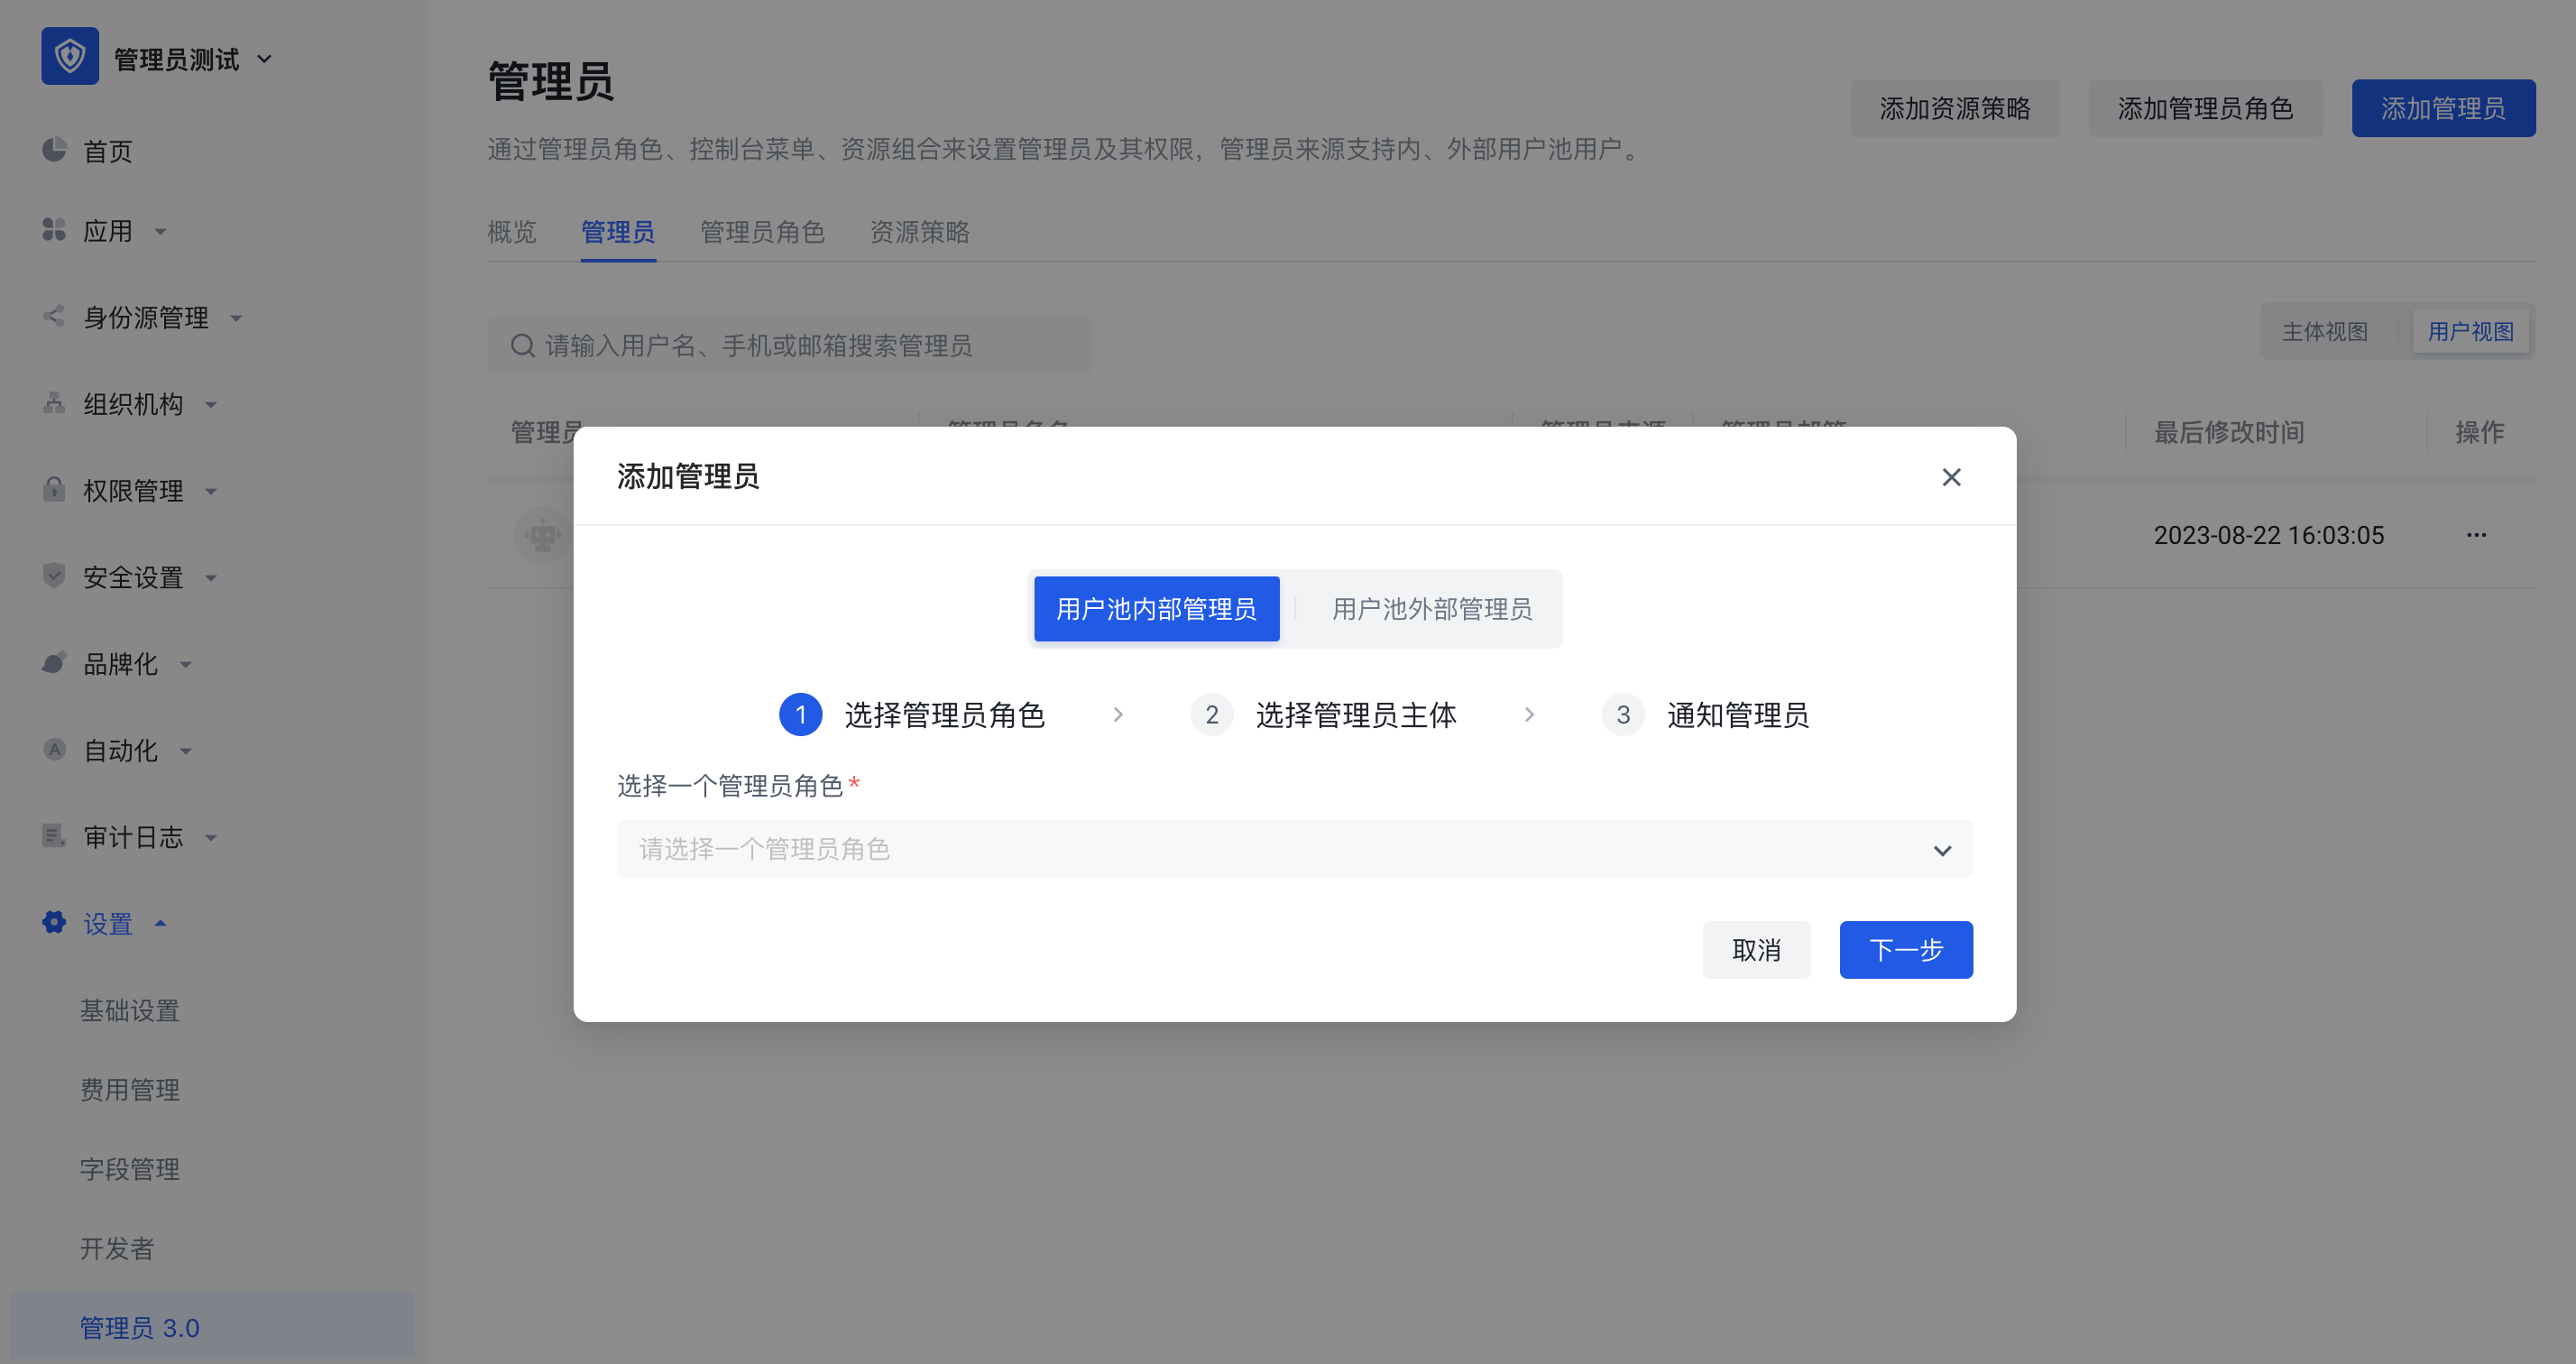

In the administrator role details page, click Add Subject, which supports batch addition of multiple selected users or user groups.
Collaboration Administrator User Journey
- Receive notification of being added as a collaboration administrator;
- Log in to the user pool console and enter the authorized menu for configuration and management;
- If the co-administrator is authorized to the administrator authority menu, the collaboration administrator can continue to further assign the authority he has to other collaboration administrators.