Understanding OIDC and OAuth2.0 Protocol
Overview of OIDC and OAuth2.0
Before choosing an authentication and authorization mode, it is recommended to first understand the OAuth 2.0 and OpenID Connect protocols, which will help you choose the authorization mode that best suits your application.
Basic Authentication vs OAuth 2.0 vs OpenID Connect
Currently, GenAuth has three authentication methods to choose from:
Basic Authentication is based on the API interface, and user authentication is completed directly by sending the account password and mobile phone verification code to the GenAuth backend. It provides MFA, forgotten password and other functions. GenAuth's Guard component and SDK are based on these APIs.
OAuth 2.0 protocol is mainly used for resource authorization.
OpenID Connect protocol, abbreviated as OIDC, is a superset of the OAuth 2.0 protocol, which can authenticate users and complete resource authorization. In the case where OIDC can be selected, OIDC should be selected.
If you want to directly authenticate your users through the API, you can view the interface documentation and SDK documentation in the Development Integration section.
If you want to implement single sign-on or first authenticate users and then return resources, it is recommended to use OIDC protocol.
OAuth 2.0
OAuth 2.0 is a standard authorization protocol. If you want to securely authorize the data of your application to the caller, it is recommended to use OAuth 2.0.
According to the OAuth 2.0 protocol specification, there are mainly four subjects:
Authorization server, responsible for issuing Access Token, GenAuth is the authorization server.
Resource owner, the user of your application is the owner of the resource, authorizing others to access his resources.
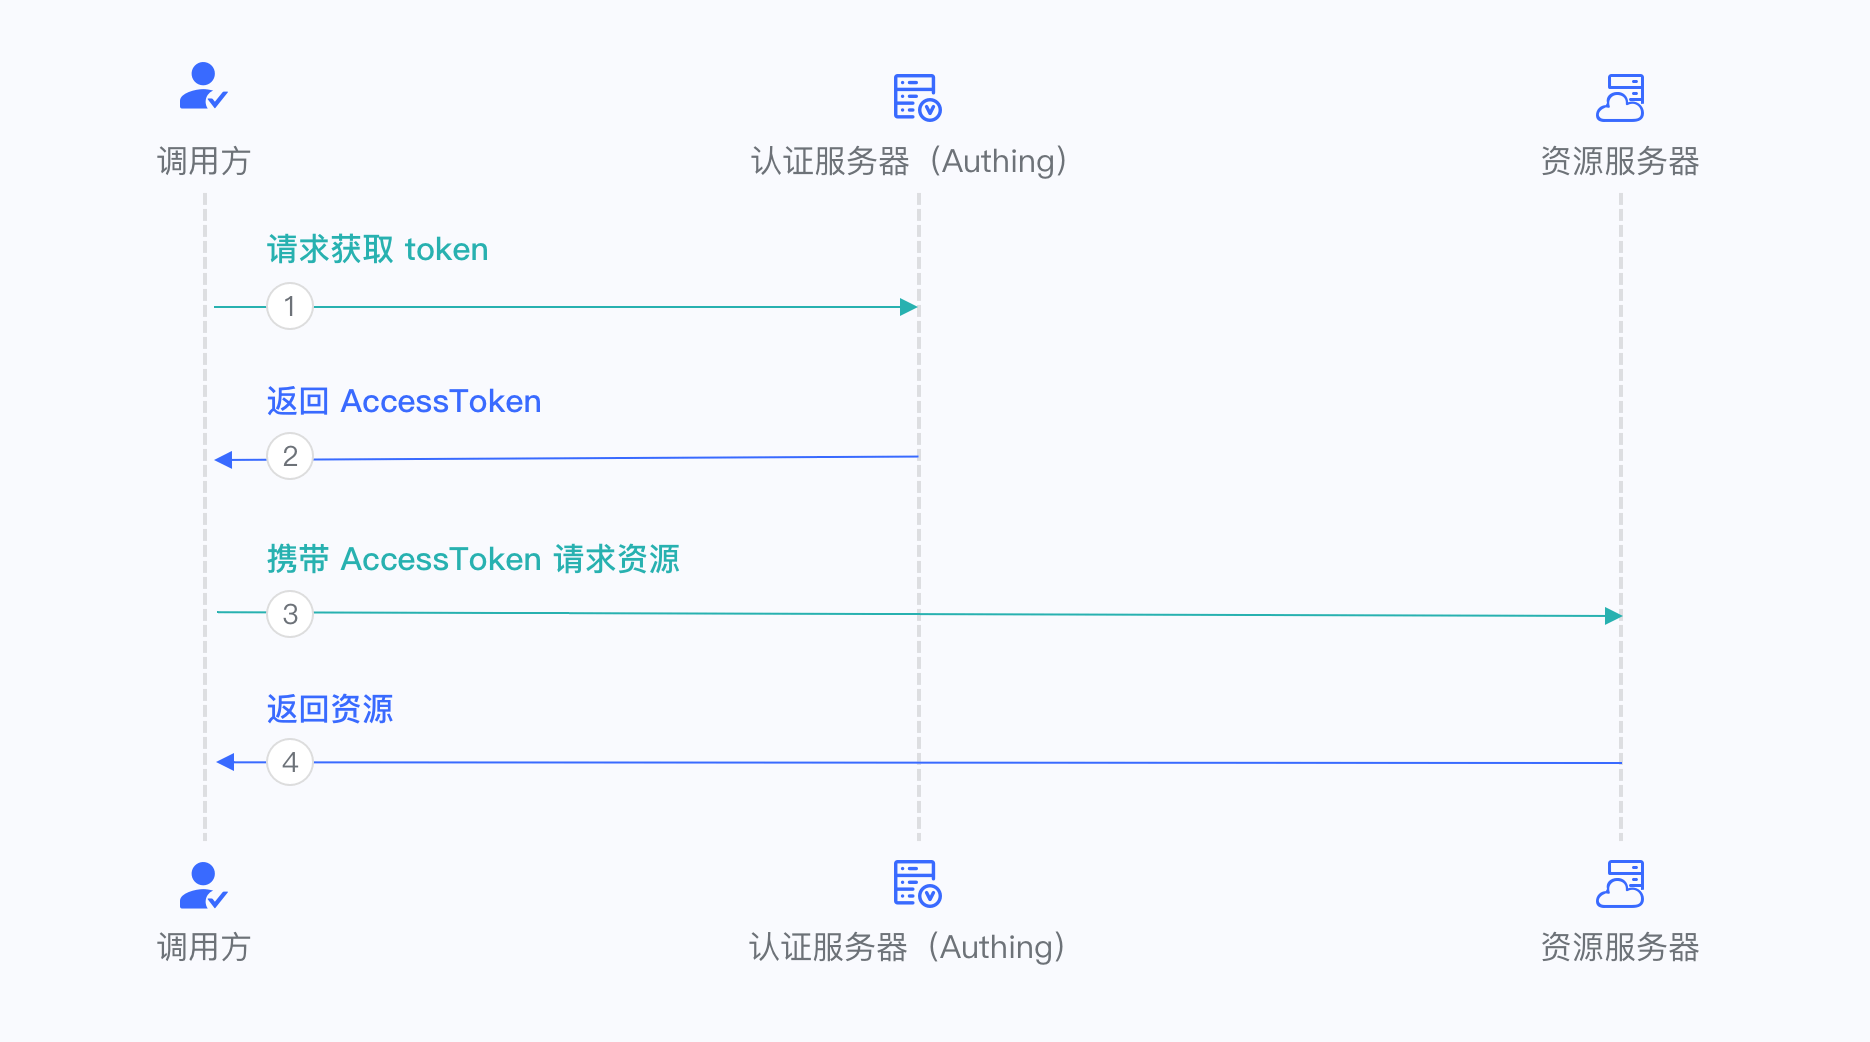
Caller, the caller requests to obtain Access Token, and after user authorization, GenAuth issues Access Token to it. The caller can carry Access Token to the resource server to access the user's resources.
Resource server, accepts Access Token, then verifies its granted permissions, and finally returns the resources.
Other important concepts:
- An OAuth 2.0 authorization means that the user authorizes the caller to have relevant permissions.
- Code authorization code is issued by the authorization server GenAuth, and is used by the caller to exchange the Code for Token.
- Access Token is issued by the authorization server GenAuth, and holding Access Token indicates that user authorization is completed.
- Refresh Token is an optional token used to obtain a new Access Token after the Access Token expires.
The common OAuth 2.0 authorization process is as follows:
- In your application, let the user visit the login link, the browser jumps to GenAuth, and the user completes authentication in GenAuth.
- The browser receives an authorization code from the GenAuth server.
- The browser redirects the authorization code to your application backend.
- Your application service sends the authorization code to GenAuth to get an AccessToken, and returns a refresh token if necessary.
- Your application backend now knows the user's identity, and can save user information, redirect to other pages on the frontend, use the AccessToken to call other APIs on the resource side, and so on.
INFO
If you want to learn more about OAuth 2.0, you can read the protocol specification.
The core of OAuth 2.0 and OIDC is the authorization server. The authorization server is used to issue Access Tokens. Each authorization server has a unique Issuer URI and a signing key. In GenAuth, each application is an authorization server.
OpenID Connect
OpenID Connect is an authentication protocol based on OAuth 2.0, adding Id Token. OIDC also defines specifications for parts not defined in OAuth 2.0, such as scope, service discovery, user information fields, etc. GenAuth supports OIDC.
In the OIDC specification, some terms are different from OAuth 2.0:
OpenID Provider, refers to the authorization server, responsible for issuing Id Token. GenAuth is the OpenID Provider.
End user, the information of the Id Token will contain the information of the end user.
Caller, the application requesting the Id Token.
Id Token is issued by the OpenID Provider and contains information fields about the end user.
Claim refers to the end user information field.
The authorization process of OIDC is the same as that of OAuth 2.0. The main difference is that the Id Token is additionally returned in the OIDC authorization process.
Choose OIDC authorization mode
You need to choose a suitable authentication and authorization mode according to your scenario and the type of application you develop. This article will help you choose the appropriate OIDC authorization mode.
Recommended authorization mode
Different types of applications require different authorization modes. The following table shows the modes we recommend:
| Application type | Authorization mode |
|---|---|
| With backend scenario | Authorization code mode |
| SPA, no backend | Implicit mode |
| Between servers | Client Credentials |
Does your application need an ID Token?
| Authorization Mode | Access Token | Id Token |
|---|---|---|
| Authorization Code Mode | ✅ | ✅ |
| Implicit Mode | ✅ | ✅ |
| Password Mode | ✅ | ✅ |
| Client Credentials Mode | ✅ | ❌ |
What type of application is yours?
How to choose the OIDC authorization mode depends on what type of application you are developing. Refer to the following flow chart to choose the authorization mode you need:
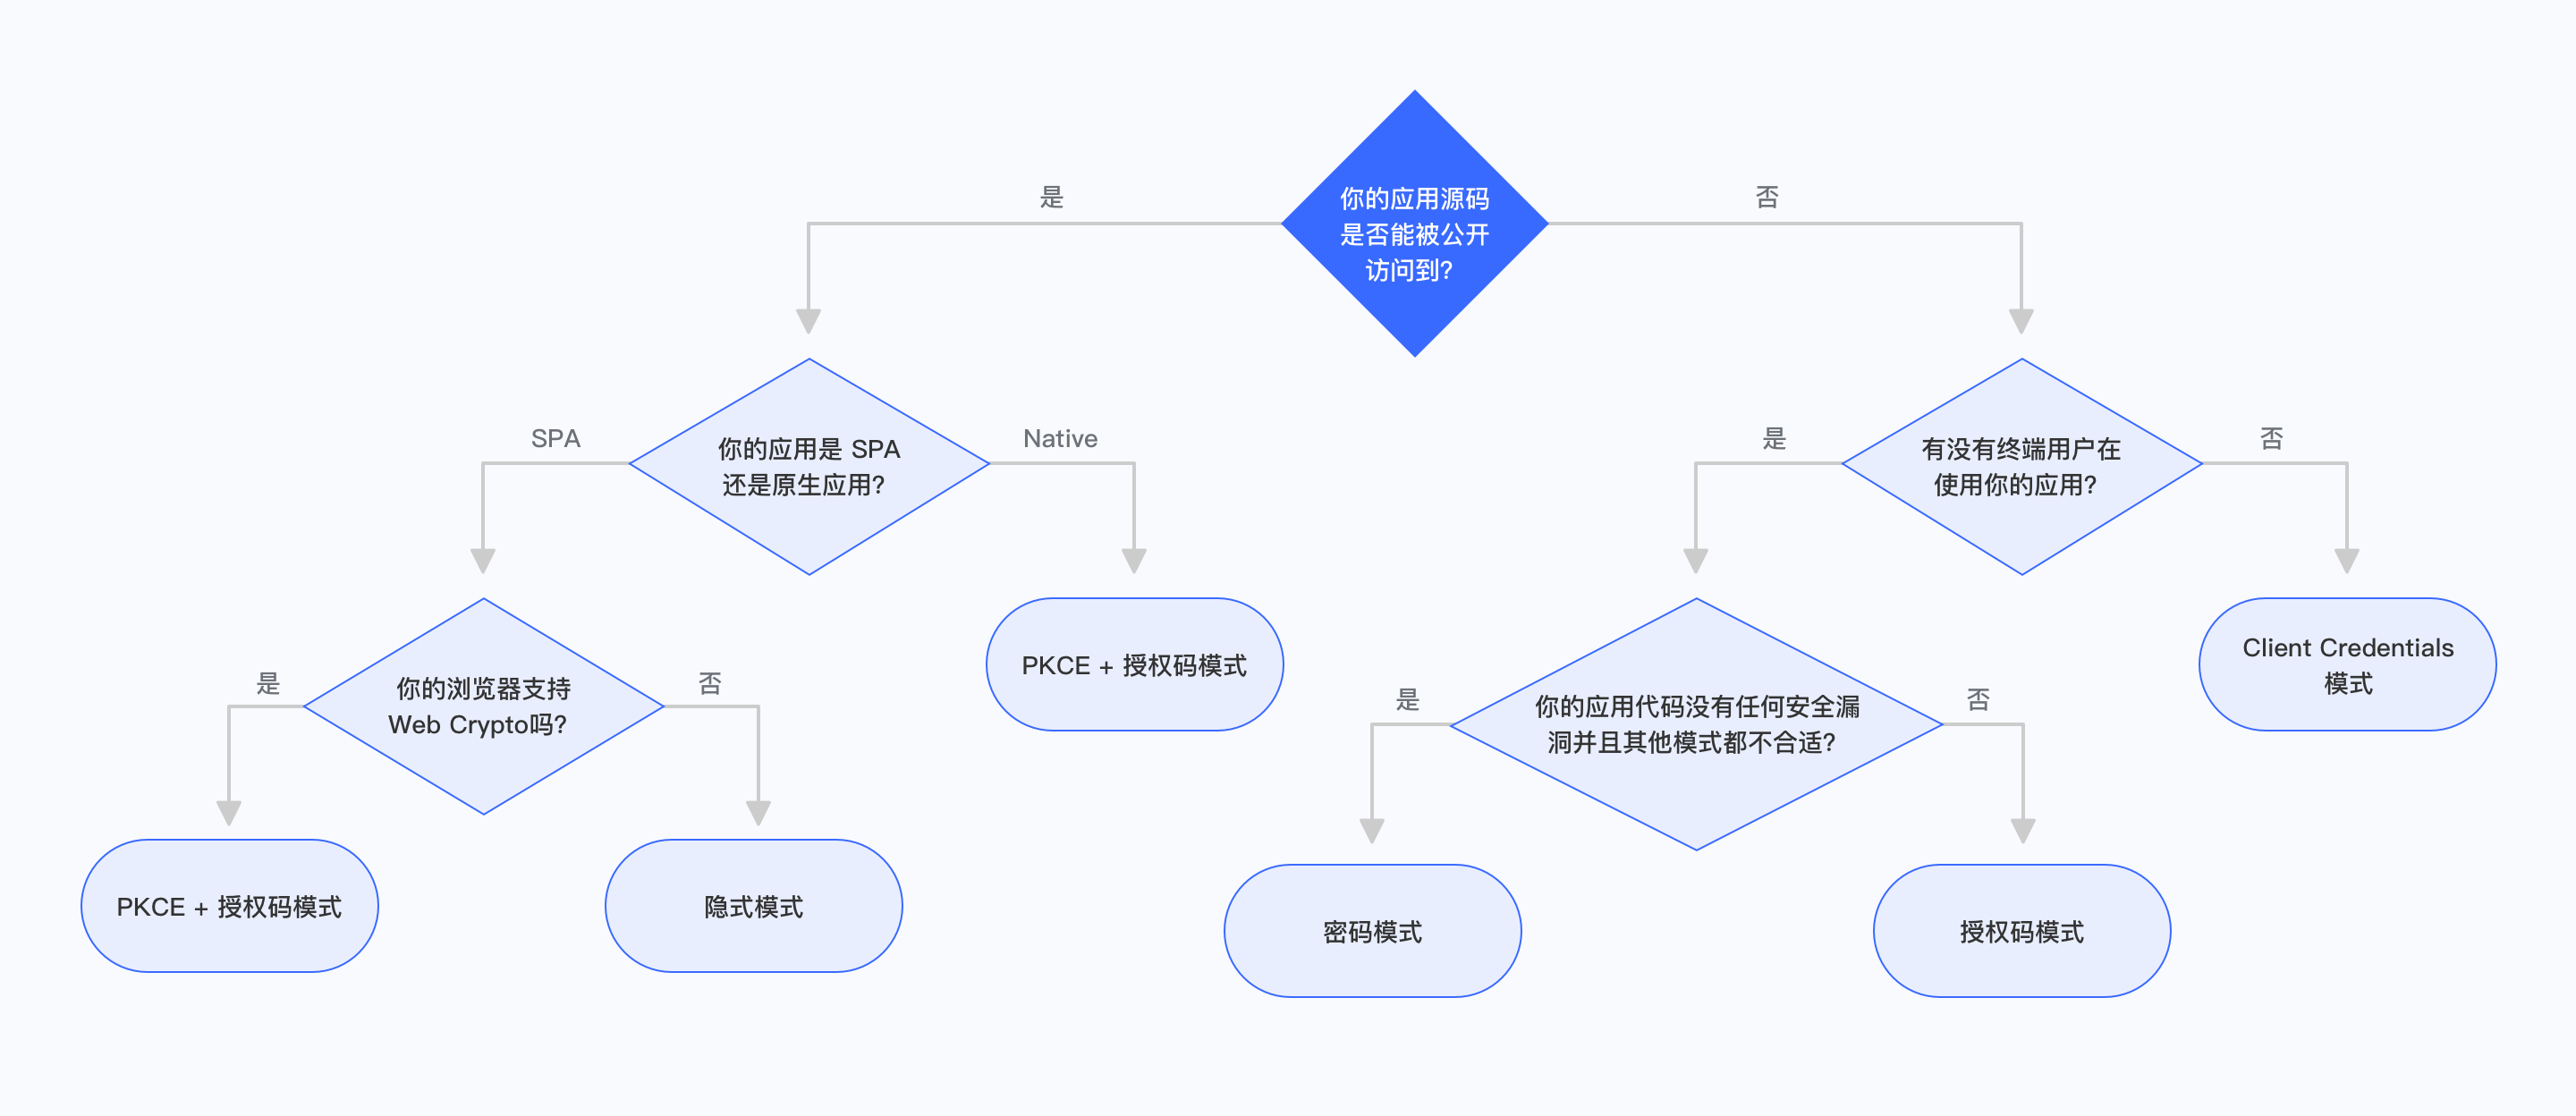
Is your application code publicly accessible?
If your end users can see and modify your application code, then the application is publicly accessible. This includes SPA (single page web application) and mobile applications. In this scenario, the application cannot store keys securely.
Is your application a SPA or a native application?
If your application is a single-page web application, running in a new version of the browser, and the browser supports Web Crypto, you should use PKCE + authorization code mode. If your application runs in an old version of the browser, the browser does not support Web Crypto, you should use implicit mode. Implicit mode is only suitable for scenarios where the application cannot store keys securely. You should only consider using implicit mode if other modes are not available.
If your application is a native application, you should use PKCE + authorization code mode.
Are there any end users using your application?
If your application runs on the server side, is not directly used by end users, and is only interacting between servers, you should use Client Credentials mode.
Are the application and resources owned by the same party?
If your application and the resources that the application needs to access are all controlled by you, and your application can securely store user accounts and passwords, the code logic is secure enough. When other authorization modes are not suitable, you can choose password mode.
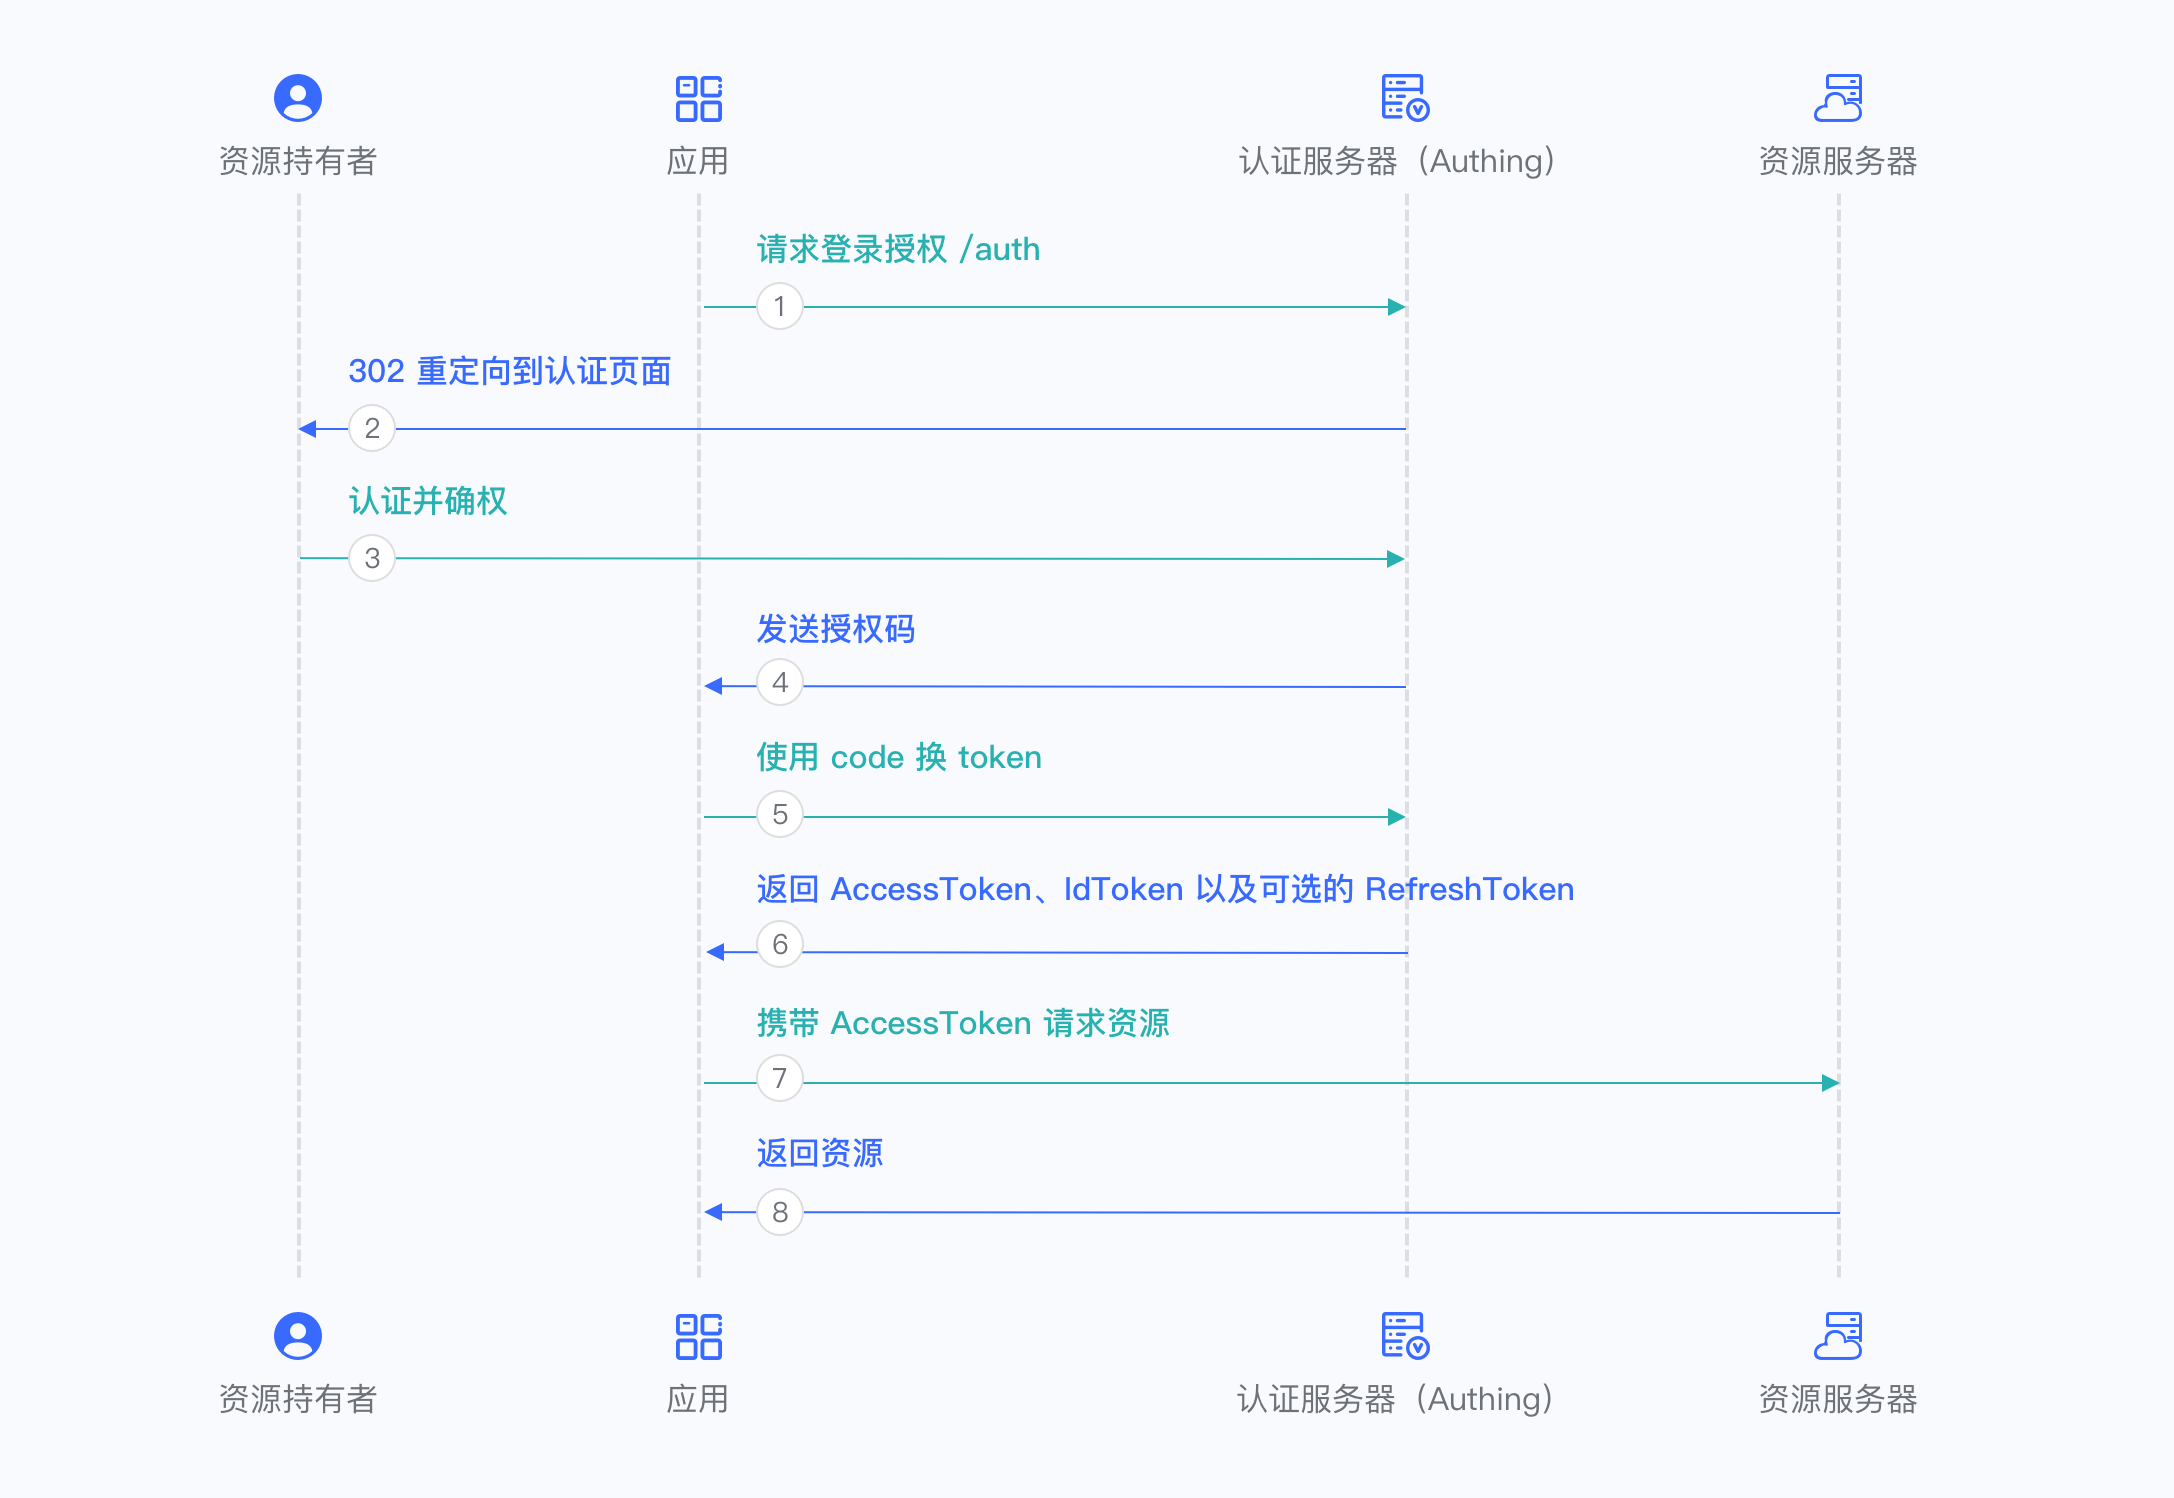
Authorization code mode
The authorization code mode is suitable for scenarios where the application has a backend server. The authorization code mode requires that the application must be able to securely store keys for subsequent use of authorization codes to exchange for Access Tokens. The authorization code mode requires the browser to interact with the end user to complete the authentication and authorization, and then send the authorization code to the backend service through browser redirection, and then exchange the authorization code for token and token for user information.
For more information, please refer to Using the Authorization Code Mode.
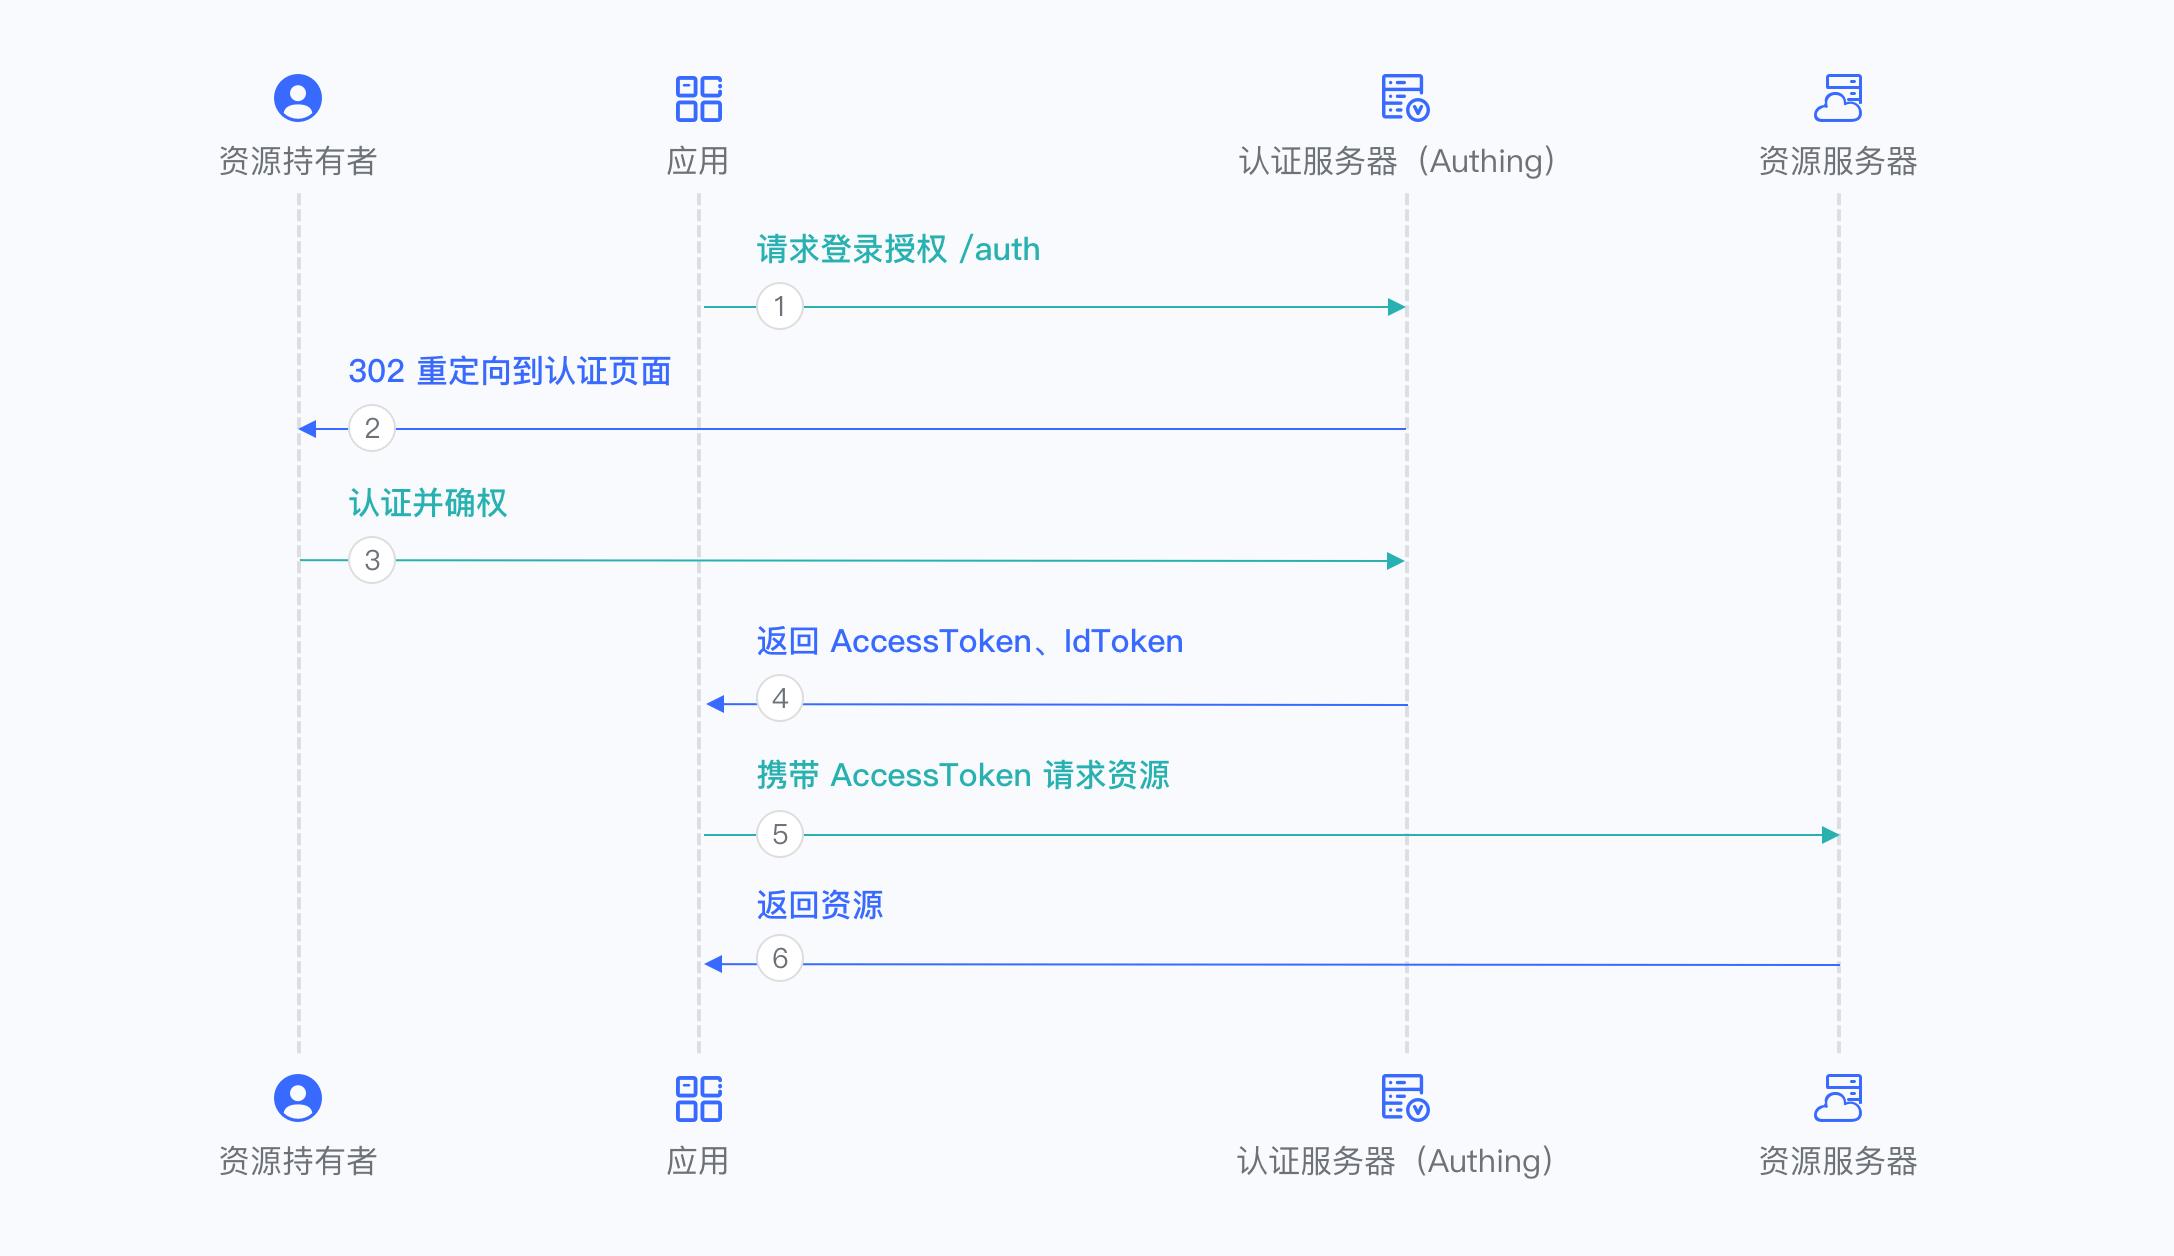
Implicit Mode
The implicit mode is suitable for scenarios where keys cannot be stored securely (such as front-end browsers). In implicit mode, the application does not need to use code to exchange tokens, and does not need to request the /token endpoint. AccessToken and IdToken will be returned directly from the authentication endpoint.
INFO
Because the implicit mode is used in scenarios where keys cannot be stored securely, the implicit mode does not support obtaining Refresh Token.
For more information, please refer to Using Implicit Mode.
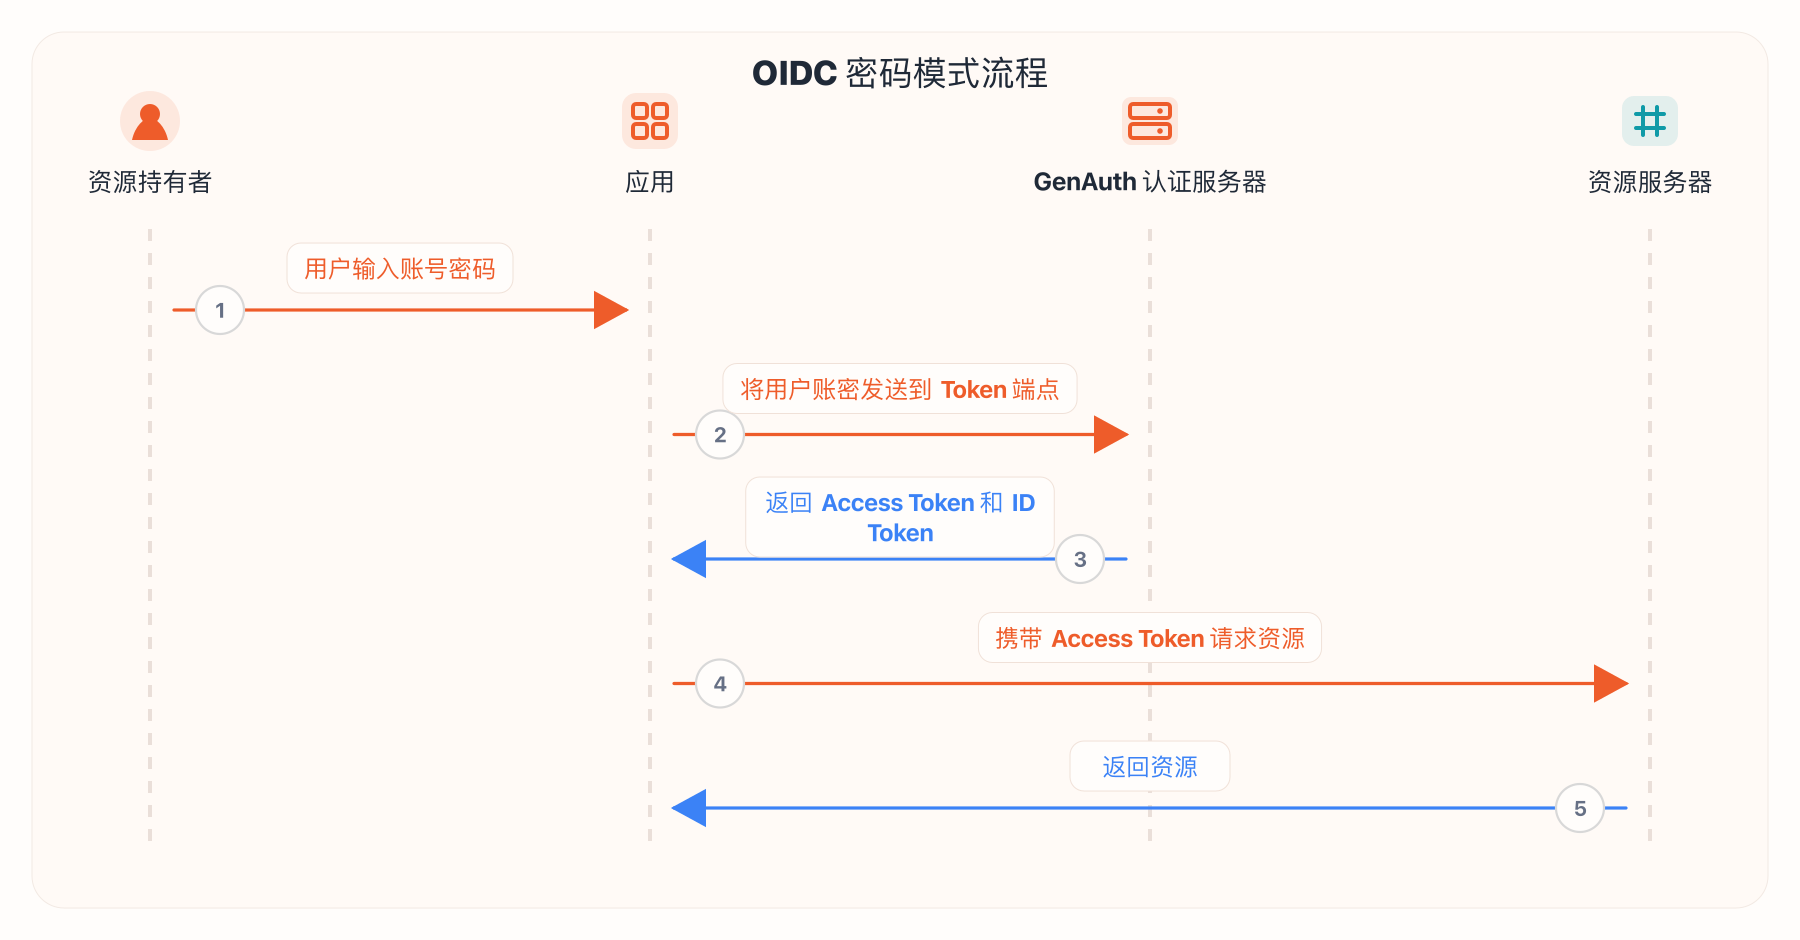
Password Mode
Password mode is suitable for scenarios where you control both the application and the resources required by the application. Password mode requires the application to store keys securely and to be trusted to store the account and password of the resource owner. It is generally common in self-owned applications using their own resources. Password mode does not require redirection jumps, only the user account and password need to be carried to access the Token endpoint.
For more information, please refer to Using Password Mode.
Client Credentials Mode
Client Credentials mode is used for server-to-server authorization (M2M authorization) without user participation. You need to create a programmatic access account and give the AK and SK key pairs to your resource caller.
INFO
Client Credentials mode does not support Refresh Token.
For more information, refer to Using Client Credentials Mode.
OIDC FAQ
OIDC stands for OpenID Connect, a lightweight authentication + authorization protocol based on OAuth 2.0, and a superset of OAuth 2.0. It specifies how other applications, such as application A (XX mail system), application B (XX chat system), and application C (XX document system) you develop, retrieve user data from your central data table, and stipulates interaction methods, security specifications, etc., ensuring that your users only need to log in once when accessing all applications, instead of repeatedly entering passwords. In addition, following these specifications, your user authentication process will be very secure.
How to handle OIDC in the backend
Please refer to the example on GitHub: example-spring-boot-oidc
Comparison of the characteristics of the three authentication flows of OIDC
| Features | Authorization code mode | Implicit mode | Hybrid mode |
|---|---|---|---|
| All tokens are returned from the authorization endpoint | no | yes | no |
| All tokens are returned from the token endpoint | yes | no | no |
| Tokens are not exposed to the frontend | yes | no | no |
| Clients can be authenticated by OP | yes | no | yes |
| Tokens can be refreshed | yes | no | yes |
| One interaction | no | yes | no |
| Server-to-server communication is required | yes | no | varies |
Authorization flows corresponding to different response-types
| "response_type" value | Flow |
|---|---|
| code | Authorization Code Flow |
| id_token | Implicit Flow |
| id_token token | Implicit Flow |
| code id_token | Hybrid Flow |
| code token | Hybrid Flow |
| code id_token token | Hybrid Flow |
How to verify the legitimacy of the token
Please refer to:
/guides/basics/authenticate-first-user/how-to-validate-user-token.md
User information corresponding to the scope parameter
| scope name | Corresponding information |
|---|---|
| username | username |
| address | address |
| email, email_verified | |
| phone | phone_number, phone_number_verified |
| profile | birthdate, family_name, gender, given_name, locale, middle_name, name, nickname, picture, preferred_username, profile, updated_at, website, zoneinfo |
| offline_access | If this parameter exists, the token interface will return the refresh_token field |
| roles | The user's role list corresponding to the role information |
| unionid | The user's unionid field |
| openid | The user's openid field |
| external_id | The user's user ID in the original system |
| extended_fields | The user's extended field information, the content is an object, the key is the extended field name, and the value is the extended field value |
The above are the default supported by GenAuth Scope, you can also configure "Custom OIDC Scope" in the "Protocol Configuration" area of the application.
Meaning of OIDC user information fields
| Field name | Translation | | :-------------------- | :---------------------------------------------------------- | ---------- | | sub | Abbreviation of subject, unique identifier, usually user ID | | name | given_name | given name | | family_name | surname | | middle_name | middle name | | nickname | nickname | | preferred_username | preferred name | | profile | basic information | | picture | avatar | | website | website link | | email | email | | email_verified | whether the email is verified | | gender | gender | | birthdate | birthday | | zoneinfo | time zone | | locale | region | | phone_number | mobile number | | phone_number_verified | verified mobile number | | address | address | | formatted | detailed address | | street_address | street address | | locality | city | | region | Province | | postal_code | Postal code | | country | Country | | updated_at | Information update time |
Difference between IdToken and AccessToken
IdToken is equivalent to the user's ID card. The developer's front-end should carry IdToken when accessing the back-end interface. Developer server should verify the user's IdToken. After verification, the relevant resources are returned. The OIDC application key or OIDC application public key can be used to verify the signature, and then the user ID and basic information corresponding to this token can be obtained. For example code, see: [Use application key to verify Token](/en/genauth/guides/faqs/#merged-guides-faqs-how-to-validate-user-token application key to verify-hs256-algorithm-signed-token).
AccessToken is used to request the resources held by the user on the GenAuth server. Your request to access the GenAuth server needs to carry this AccessToken in the Authorization request header. The sample code is as follows:
const axios = require("axios");
axios
  .get({
    url: "https://core.genauth.ai/api/your/resources",
    headers: {
      Authorization: "Bearer YOUR_OIDC_ACCESS_TOKEN",
    },
  })
  .then((res) => {
    // custom codes
  });
Why does the OIDC authorization code process need to change the code to token and then to user information?
The authentication process of the OIDC authorization code mode involves three parties: the user, the OIDC server (OIDC Provider, referred to as OP), and the application business server (Service Provider, referred to as SP).
The purpose of interaction between SP, user, and OP is as follows:
SP hopes to get a credible identity assertion so that the user can log in.
SP initiates login and jumps to the OP's authentication page. OP asks the user to log in and authorizes his or her own information, and then OP sends an authorization code to SP. In fact, this is passing user information by reference.
After receiving the authorization code, SP combines the Client ID and Client Secret to OP in exchange for the user's
access_token.SP uses
access_tokento get relevant information about the user from OP, thereby obtaining a credible identity assertion and allowing the user to log in.
In the OIDC protocol, after the user successfully logs in, the OIDC authentication server will call back the user's browser to a callback address with an authorization code (code). This authorization code is generally valid for ten minutes and once, and becomes invalid after use. This avoids the risk of exposing the access_token or user information on the front end. The validity period of the access_token is relatively long, generally 1~2 hours. If it is leaked, it will have a certain impact on the user.
After the back end receives this code, it needs to use the Client Id + Client Secret + Code to exchange the user's access_token from the OIDC authentication server. In this step, the OIDC Server actually authenticates the OAuth Client to ensure that the machine that comes to the OIDC authentication server to obtain the access_token is trustworthy, not that anyone can come to the OIDC authentication server to exchange the code for a token after getting the code.
If the code is obtained by a hacker, he cannot use it if he does not have the Client Id + Client Secret. Even if he has it, he has to compete with the real application server, because the code is valid once and becomes invalid after use, which increases the difficulty of attack. On the contrary, if the access_token or user information is returned directly without the code, it will affect the user once it is leaked.