常见问题 FAQ
How to get the UserPool ID and UserPool Secret?
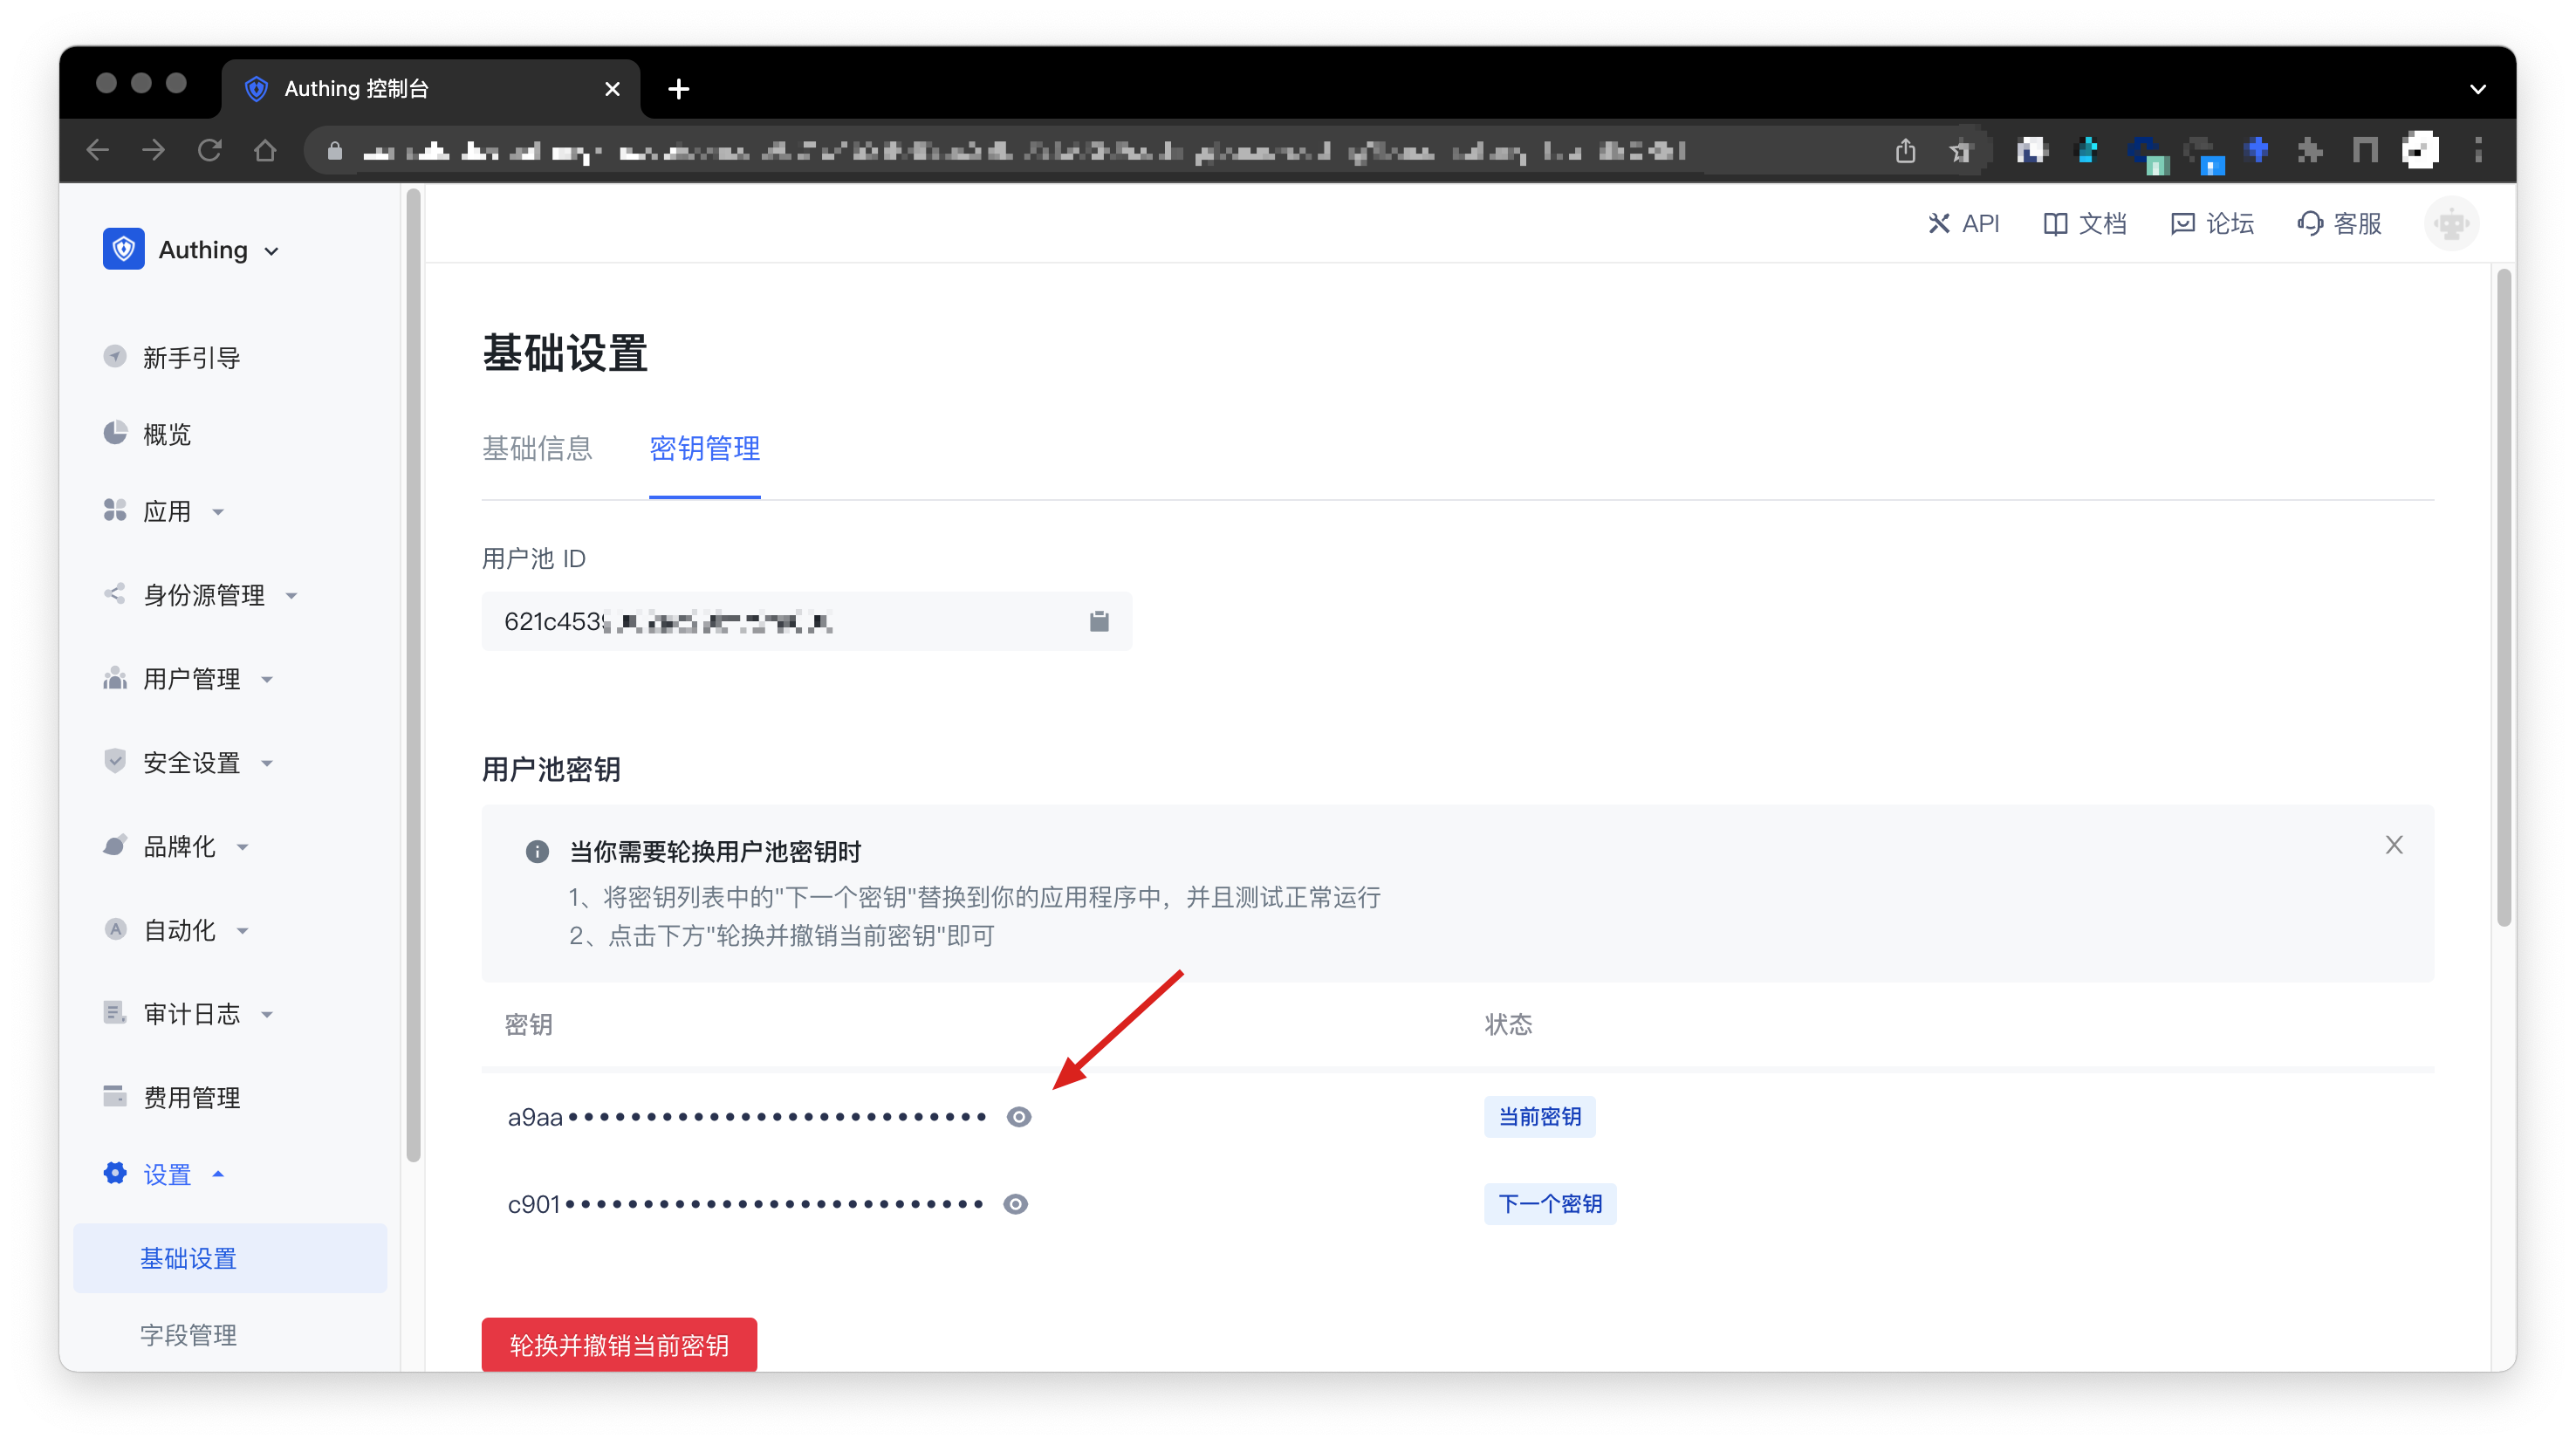
In the Settings -> Basic Settings -> Key Management page of the console, you can get the UserPool ID and UserPool Secret, as shown in the following figure:
How to get the application ID (AppID) and application secret (AppSecret)
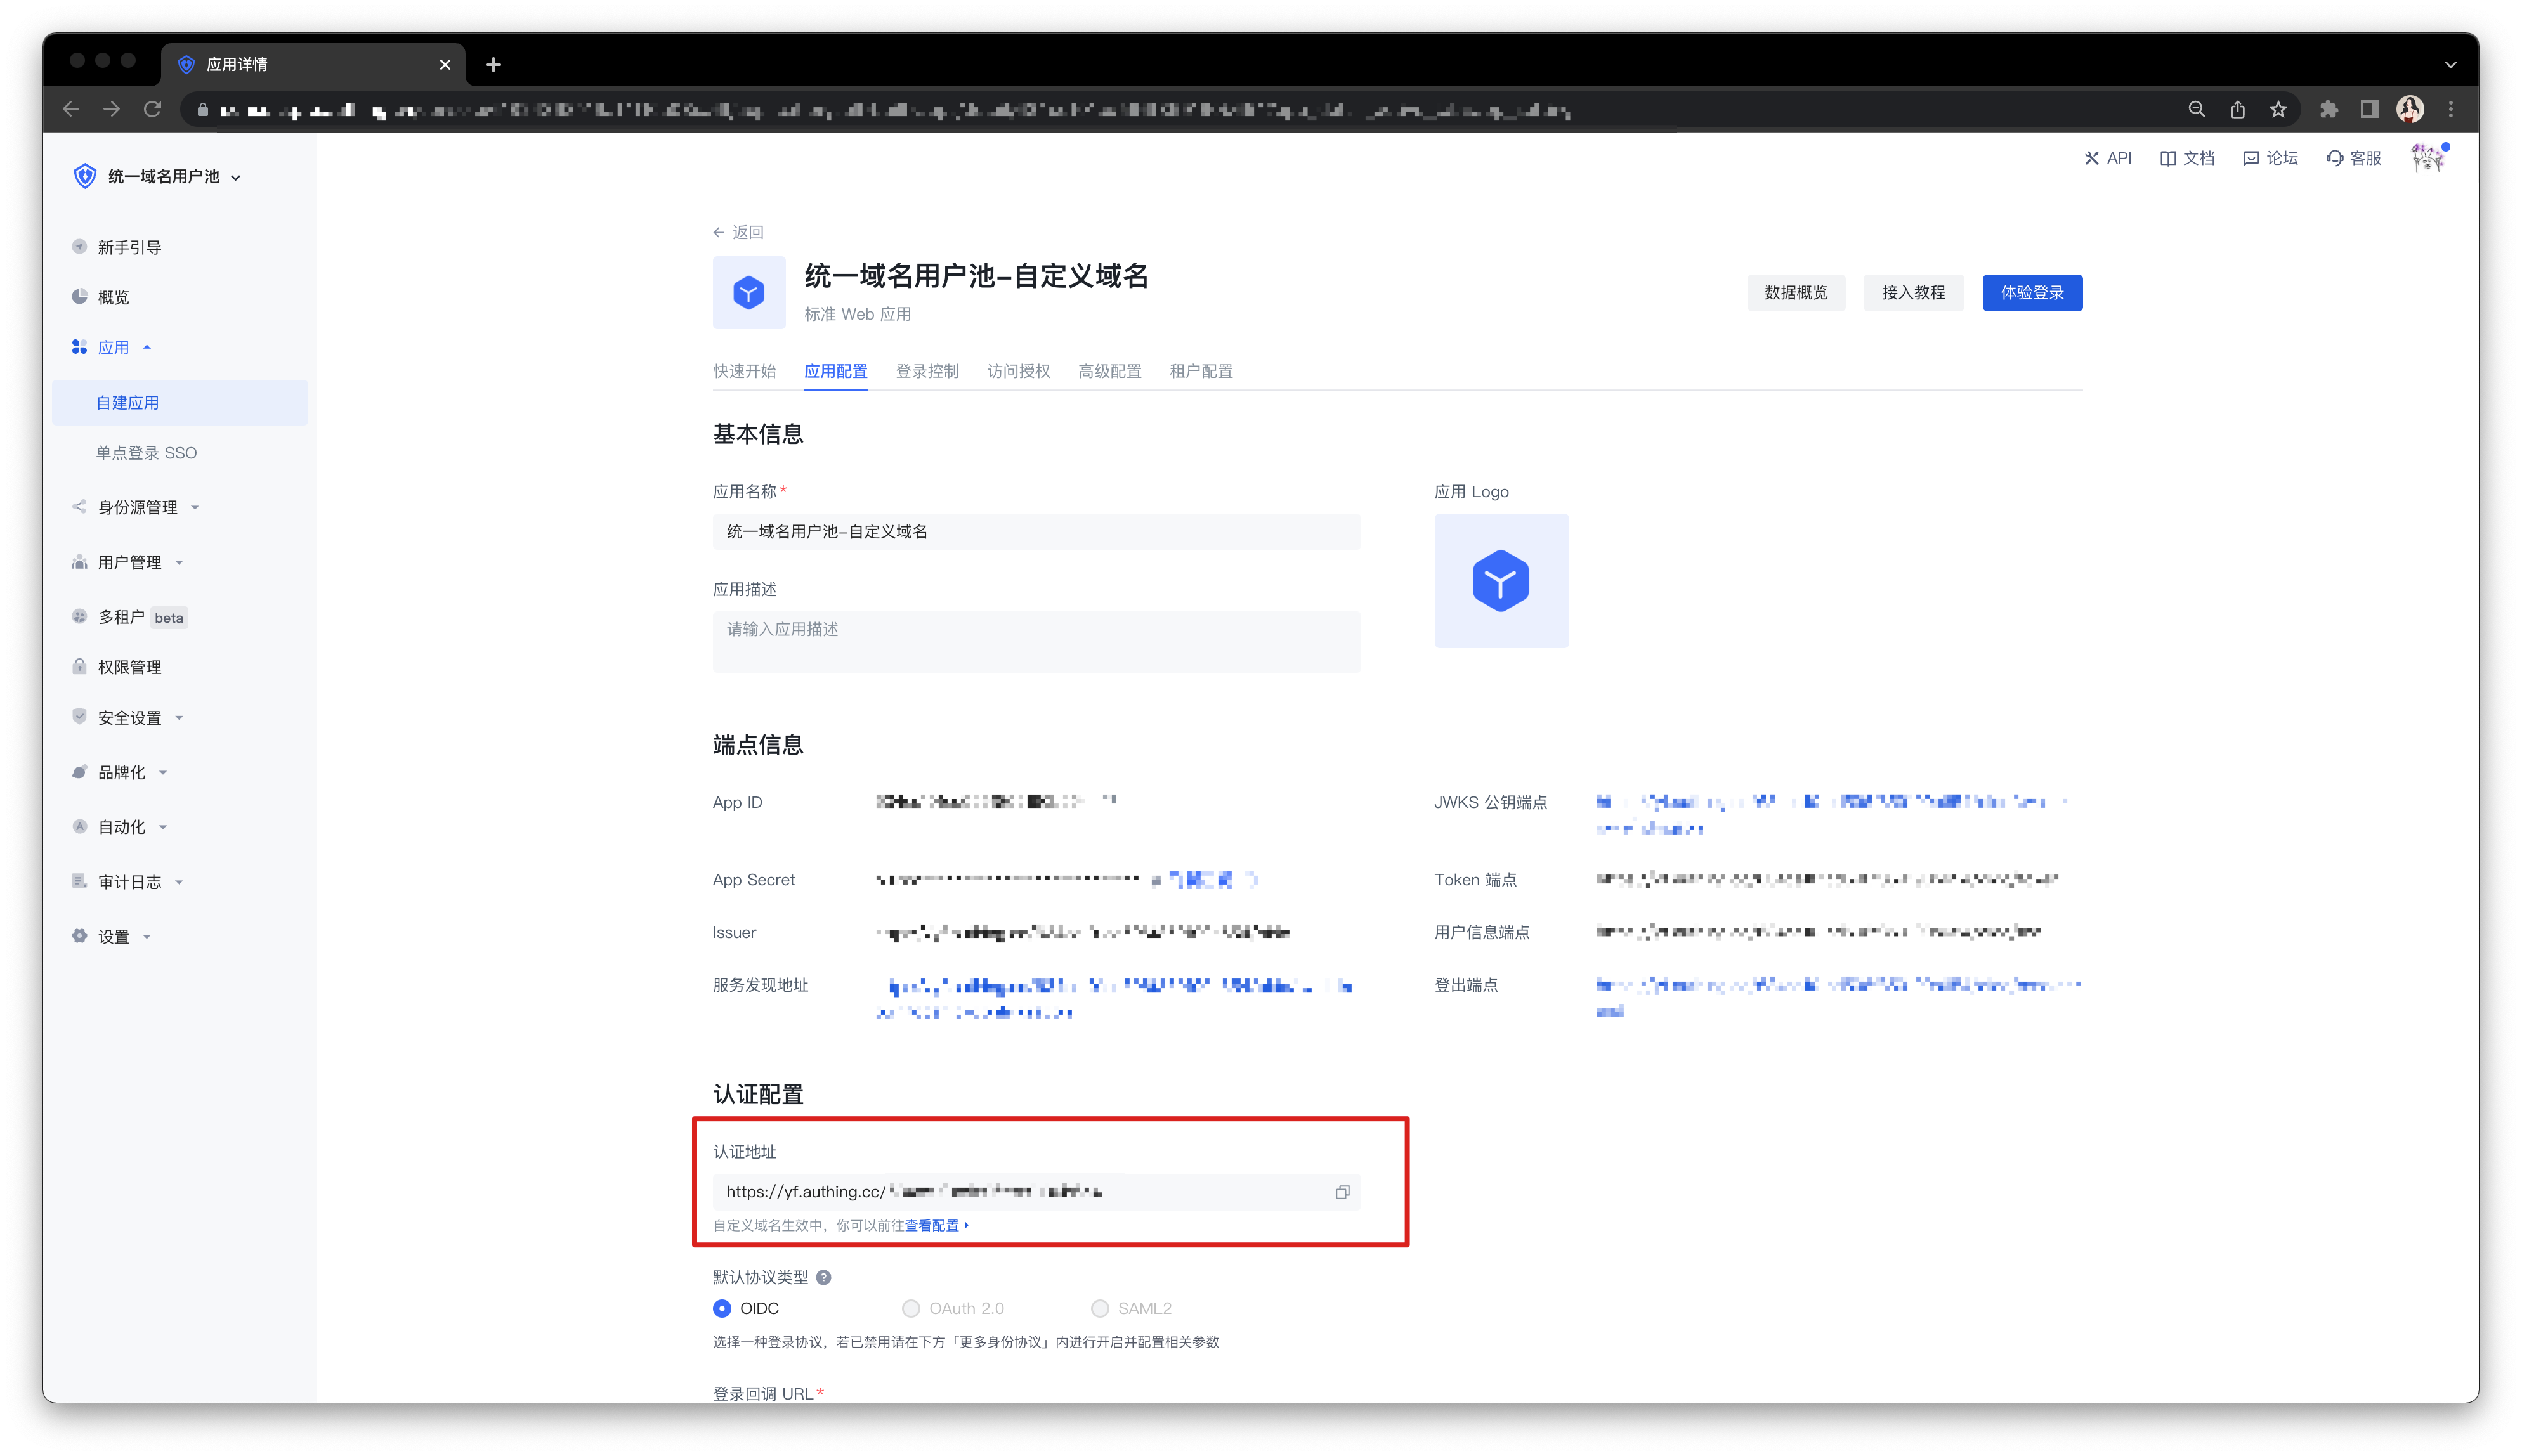
In the Console > Application > Self-built Application page, you can view all your applications. Click an application card to enter the application details. As shown in the figure, you can find the APP ID and APP Secret in the "Endpoint Information" card:

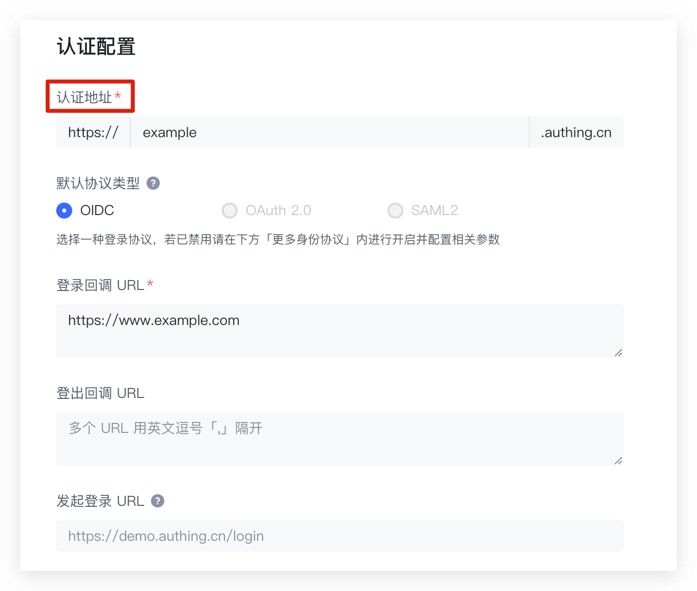
Scroll down to find the "Authentication Configuration" card. In the Authentication Address column, you can find the domain name (AppHost) of the application, as shown in the figure:
How to verify user credentials (token)
Token verification is divided into two modes: local verification and online verification using GenAuth. We recommend local verification of JWT Token, because it can save your server bandwidth and speed up verification. You can also choose to send the token to GenAuth's verification interface for GenAuth to verify and return the result, but this will cause network delays and may have slow requests when the network is congested.
The following is a comparison of the advantages and disadvantages of local verification and online verification:
| Verification speed | Code complexity | Reliability | |
|---|---|---|---|
| Online verification | Slow 🐢 | Simple | Single point of failure risk |
| Local verification | Fast 🐇 | General | Distributed |
Local verification
Verify HS256 algorithm-signed Token using application key
If you directly call login methods (loginByEmail, loginByPhone, loginByUsername) or use OIDC authorization, and the IdToken signature algorithm type is set to HS256, please use this method to verify the Token.
You can get the key in Console > Application > Application Details, as shown in the figure below:

The following code for verifying legitimacy takes Node as an example (JSON Web Token needs to be installed).
const jwt = require("jsonwebtoken");
try {
  let decoded = jwt.verify("JSON Web Token from client", "your_secret"),
    expired = Date.parse(new Date()) / 1000 > decoded.exp;
  if (expired) {
    // Expired
  } else {
    // Legal and not expired, normal release
  }
} catch (error) {
  // Illegal
}
To avoid exposing the application key on the client, verify the legitimacy of id_token through the application key on the server.
Use the application public key to verify the RS256 signature of the IdToken
If you use the RS256 signature algorithm, you need to use the public key to verify the signature. GenAuth will be signed with the application's private key. Please use the public key in https://<app domain name>.genauth.ai/oidc/.well-known/jwks.json to verify the signature. Both the access_token and id_token issued by GenAuth can be verified using the above public key.
If you use javascript, you can use the jose library to verify the RS256 signature:
Please use the jose library of version v2.x.x or below. The new version of the jose library is not compatible with this code example.
const jose = require("jose");
// The following parameters are copied from https://<application domain name>.genauth.ai/oidc/.well-known/jwks.json
const keystore = jose.JWKS.asKeyStore({
  keys: [
    {
      e: "AQAB",
      n: "o8iCY52uBPOCnBSRCr3YtlZ0UTuQQ4NCeVMzV7JBtH-7Vuv0hwGJTb_hG-BeYOPz8i6YG_o367smV2r2mnXbC1cz_tBfHD4hA5vnJ1eCpKRWX-l6fYuS0UMti-Bmg0Su2IZxXF9T1Cu-AOlpgXFC1LlPABL4E0haHO8OwQ6QyEfiUIs0byAdf5zeEHFHseVHLjsM2pzWOvh5e_xt9NOJY4vB6iLtD5EIak04i1ND_O0Lz0OYbuV0KjluxaxoiexJ8kGo9W1SNza_2TqUAR6hsPkeOwwh-oHnNwZg8OEnwXFmNg-bW4KiBrQEG4yUVdFGENW6vAQaRa2bJX7obn4xCw",
      kty: "RSA",
      alg: "RS256",
      use: "sig",
      kid: "TfLOt3Lbn8_a8pRMuessamqj-o3DBCs1-owHLQ-VMqQ",
    },
  ],
});
// The issuer in the options is https://<application domain name>.genauth.ai/oidc, and the audience is the application ID
// id_token is very long, please slide to the right ->
const res = jose.JWT.IdToken.verify(
  "eyJhbGciOiJSUzI1NiIsInR5cCI6IkpXVCIsImtpZCI6IlRmTE90M0xibjhfYThwUk11ZXNzYW1xai1vM0RCQ3MxLW93SExRLVZNcVEifQ.eyJzdWIiOiI1ZjcxOTk0NjUyNGVlMTA5OTIyOTQ5NmIiLCJiaXJ0aGRhdGUiOm51bGwsImZhbWlseV9uYW1lIjpudWxsLCJnZW5kZXIiOiJVIiwiZ2l2ZW5fbmFtZSI6bnVsbCwibG9jYWxlIjpudWxsLCJtaWRkbGVfbmFtZSI6bnVsbCwibmFtZSI6bnVsbCwibmlja25hbWUiOm51bGwsInBpY3R1cmUiOiJodHRwczovL2ZpbGVzLmF1dGhpbmcuY28vdXNlci1jb250ZW50cy9waG90b3MvOWE5ZGM0ZDctZTc1Ni00NWIxLTgxZDgtMDk1YTI4ZTQ3NmM2LmpwZyIsInByZWZlcnJlZF91c2VybmFtZSI6InRlc3QxIiwicHJvZmlsZSI6bnVsbCwidXBkYXRlZF9hdCI6IjIwMjAtMDktMzBUMDc6MTI6MTkuNDAxWiIsIndlYnNpdGUiOm51bGwsInpvbmVpbmZvIjpudWxsLCJlbWFpbCI6InRlc3QxQDEyMy5jb20iLCJlbWFpbF92ZXJpZmllZCI6ZmFsc2UsInBob25lX251bWJlciI6bnVsbCwicGhvbmVfbnVtYmVyX3ZlcmlmaWVkIjpmYWxzZSwibm9uY2UiOiJFNjViMVFvVVl0IiwiYXRfaGFzaCI6IkIzSWdPWUREYTBQejh2MV85cVpyQXciLCJhdWQiOiI1ZjE3YTUyOWY2NGZiMDA5Yjc5NGEyZmYiLCJleHAiOjE2MDE0NTM1NTgsImlhdCI6MTYwMTQ0OTk1OSwiaXNzIjoiaHR0cHM6Ly9vaWRjMS5hdXRoaW5nLmNuL29pZGMifQ.Z0TweYr9bCdYNJREVdvbJYcjXSfSsSNHBMqxTJeW-bnza0IIpBpEEVxlDG0Res6FZbcVzsQZzfJ9pj_nFgLjZxUUxv7Tpd13Sq_Ykg2JKepPf3-uoFqbORym07QEj4Uln0Quuh094MTb7z6bZZBEOYBac46zuj4uVp4vqk5HtCUSB4ASOAxwi7CeB1tKghISHz6PDcf6XJe_btHdzX1dparxtML-KvPxjpcHlt5emN88lpTAOX7Iq0EhsVE3PKrIDfCkG8XlL5y9TIW2Dz2iekcZ5PV17M35G6Dg2Q07Y_Apr18_oowOiQM5m_EbI90ist8CiqO9kBKreCOLMzub4Q",
  keystore,
  {
    issuer: "https://oidc1.genauth.ai/oidc",
    audience: "5f17a529f64fb009b794a2ff",
  }
);
console.log(res);
Output:
{
  sub: '5f719946524ee1099229496b', // Abbreviation of subject, which is the user ID
  birthdate: null,
  family_name: null,
  gender: 'U',
  given_name: null,
  locale: null,
  middle_name: null,
  name: null,
  nickname: null,
  picture: 'https://files.authing.co/user-contents/photos/9a9dc4d7-e756-45b1-81d8-095a28e476c6.jpg',
  preferred_username: 'test1',
  profile: null,
  updated_at: '2020-09-30T07:12:19.401Z',
  website: null,
  zoneinfo: null,
  email: 'test1@123.com',
  email_verified: false,
  phone_number: null,
  phone_number_verified: false,
  nonce: 'E65b1QoUYt',
  at_hash: 'B3IgOYDDa0Pz8v1_9qZrAw',
  aud: '5f17a529f64fb009b794a2ff',
  exp: 1601453558,
  iat: 1601449959,
  iss: 'https://oidc1.genauth.ai/oidc'
}
Online Verification
Online Verification of OIDC AccessToken
Only access_token and refresh_token can detect the status, id_token cannot.
- Interface Description: Check the validity status of the issued
access_tokenorrefresh_token. - Interface address:
POSThttps://<your application domain name>.genauth.ai/oidc/token/introspection - Request header:
| Parameter | Type | Is it required | Description |
|---|---|---|---|
| Content-Type | string | Yes | application/x-www-form-urlencoded |
- Request parameters:
| Parameter | Type | Is it required | Description |
|---|---|---|---|
| token | string | Yes | The token value to be verified. |
| token_type_hint | string | Yes | The token type to be verified. The optional values are access_token and refresh_token. |
| client_id | string | no | Application ID, required when the console configuration verification token authentication method is client_secret_post and none. |
| client_secret | string | no | Application Secret, required when the console configuration verification token authentication method is client_secret_post. |
- Return data:
When the token is valid, the following format is returned
{
  "active": true,
  "sub": "5f623f30d85f84c58f141777", // abbreviation of subject, which is the user ID
  "client_id": "5d01e389985f81c6c1dd31de",
  "exp": 1600634105,
  "iat": 1600274405,
  "iss": "https://oidc1.genauth.ai",
  "jti": "hoV44FPNR-_EfxTP7s7vw",
  "scope": "openid profile email phone offline_access",
  "token_type": "Bearer"
}
When the token is invalid (expired, error, revoked), the following format is returned
{
  "active": false
}
Verify OIDC IdToken online
This interface can detect the validity of access_token and id_token, but refresh_token cannot.
- Interface description: Check the validity status of the issued
access_tokenorid_token. - Interface address:
GEThttps://<your application domain name>.genauth.ai/api/oidc/validate_token - Request parameters:
| Parameter | Type | Required | Description |
|---|---|---|---|
| access_token | string | No | AccessToken content. |
| id_token | string | No | IdToken content. |
- Return data:
When access_token or id_token is valid, return the decoded content of access_token / id_token
// Result returned after access_token verification:
{
    "jti": "K5TYewNhvdGBdHiRifMyW",
    "sub": "5f64afd1ad501364e3b43c1e", // abbreviation of subject, which is user ID
    "iat": 1601456894,
    "exp": 1601460494,
    "scope": "openid profile email phone",
    "iss": "https://oidc1.genauth.ai/oidc",
    "aud": "5f17a529f64fb009b794a2ff"
}

// Result returned after id_token verification:
{
    "sub": "5f64afd1ad501364e3b43c1e", // The abbreviation of subject, which is the user ID "birthdate": null, "family_name": null, "gender": "U", "given_name": null, "locale": null, "middle_name": null, "name": null, "nickname": null, "picture": "https://usercontents.genauth.ai/authing-avatar.png", "preferred_username": "test1", "profile": null, "updated_at": "2020-09-27T06:06:29.853Z", "website": null, "zoneinfo": null, "email": "test1@123.com", "email_verified": false, "phone_number": null, "phone_number_verified": false, "nonce": "CQsguqUdl7",
    "birthdate": null,
    "family_name": null,
    "gender": "U",
    "given_name": null,
    "locale": null,
    "middle_name": null,
    "name": null,
    "nickname": null,
    "picture": "https://usercontents.genauth.ai/authing-avatar.png",
    "preferred_username": "test1",
    "profile": null,
    "updated_at": "2020-09-27T06:06:29.853Z",
    "website": null,
    "zoneinfo": null,
    "email": "test1@123.com",
    "email_verified": false,
    "phone_number": null,
    "phone_number_verified": false,
    "nonce": "CQsguqUdl7",
    "at_hash": "10iOtwuTNtyQLzlNYXAHeg",
    "aud": "5f17a529f64fb009b794a2ff",
    "exp": 1601460494,
    "iat": 1601456894,
    "iss": "https://oidc1.genauth.ai/oidc",
}
When access_token or id_token is invalid, the following error message is returned
{
  code: 400,
  message: 'id_token is invalid',
}

{
  code: 400,
  message: 'access_token is invalid',
}
Verify OAuth2 AccessToken online
- Interface description: can verify
access_tokenandrefresh_token - Interface address:
POSThttps://<your application domain name>.genauth.ai/oauth/token/introspection - Request header:
| Parameter | Type | Is it required | Description |
|---|---|---|---|
| Content-Type | string | Yes | application/x-www-form-urlencoded |
| Authorization | string | No | In the console application configuration details, in the "Configure OAuth2.0 Identity Provider" tab, configure the verification token authentication method to client_secret_basic. It is required to fill in the form: Basic base64 (application ID + ':' + application Secret) |
- Request parameters:
| Parameter | Type | Is it required | Description |
|---|---|---|---|
| token | string | yes | The token value to be verified. |
| token_type_hint | string | yes | The token type to be verified. The optional value is access_token |
| client_id | string | no | Application ID. In the console application configuration details, "Configure OAuth2.0 Identity Provider" tab, it is required when the verification token authentication method is configured as client_secret_post and none. |
| client_secret | string | no | Application Secret. In the console application configuration details, "Configure OAuth2.0 Identity Provider" tab, it is required when the withdrawal token authentication method is configured as client_secret_post. |
- Return data:
When the token is valid, the following format is returned
{
  "active": true,
  "sub": "5dc10851ebafee30ce3fd5e9", // abbreviation of subject, which is the user ID
  "client_id": "5cded22b4efab31716fa665f",
  "exp": 1602423020,
  "iat": 1602419420,
  "iss": "https://core.genauth.ai/oauth",
  "jti": "SaPg48dbO66T77xkT8wy0",
  "scope": "user",
  "token_type": "Bearer"
}
When the token is invalid (expired, error, revoked), the following format is returned
{
  "active": false
}
User pool with unified domain name
By default, the user pool created in GenAuth does not use a unified third-level domain name. However, in some special scenarios, you may need to use a unified domain name for the entire user pool (that is, all applications in the user pool use a unified, user pool-level domain name).
To clarify the actual needs of this feature, please follow the steps below to compare your usage scenarios and make a choice:
Step 1: Understand what a unified domain name is
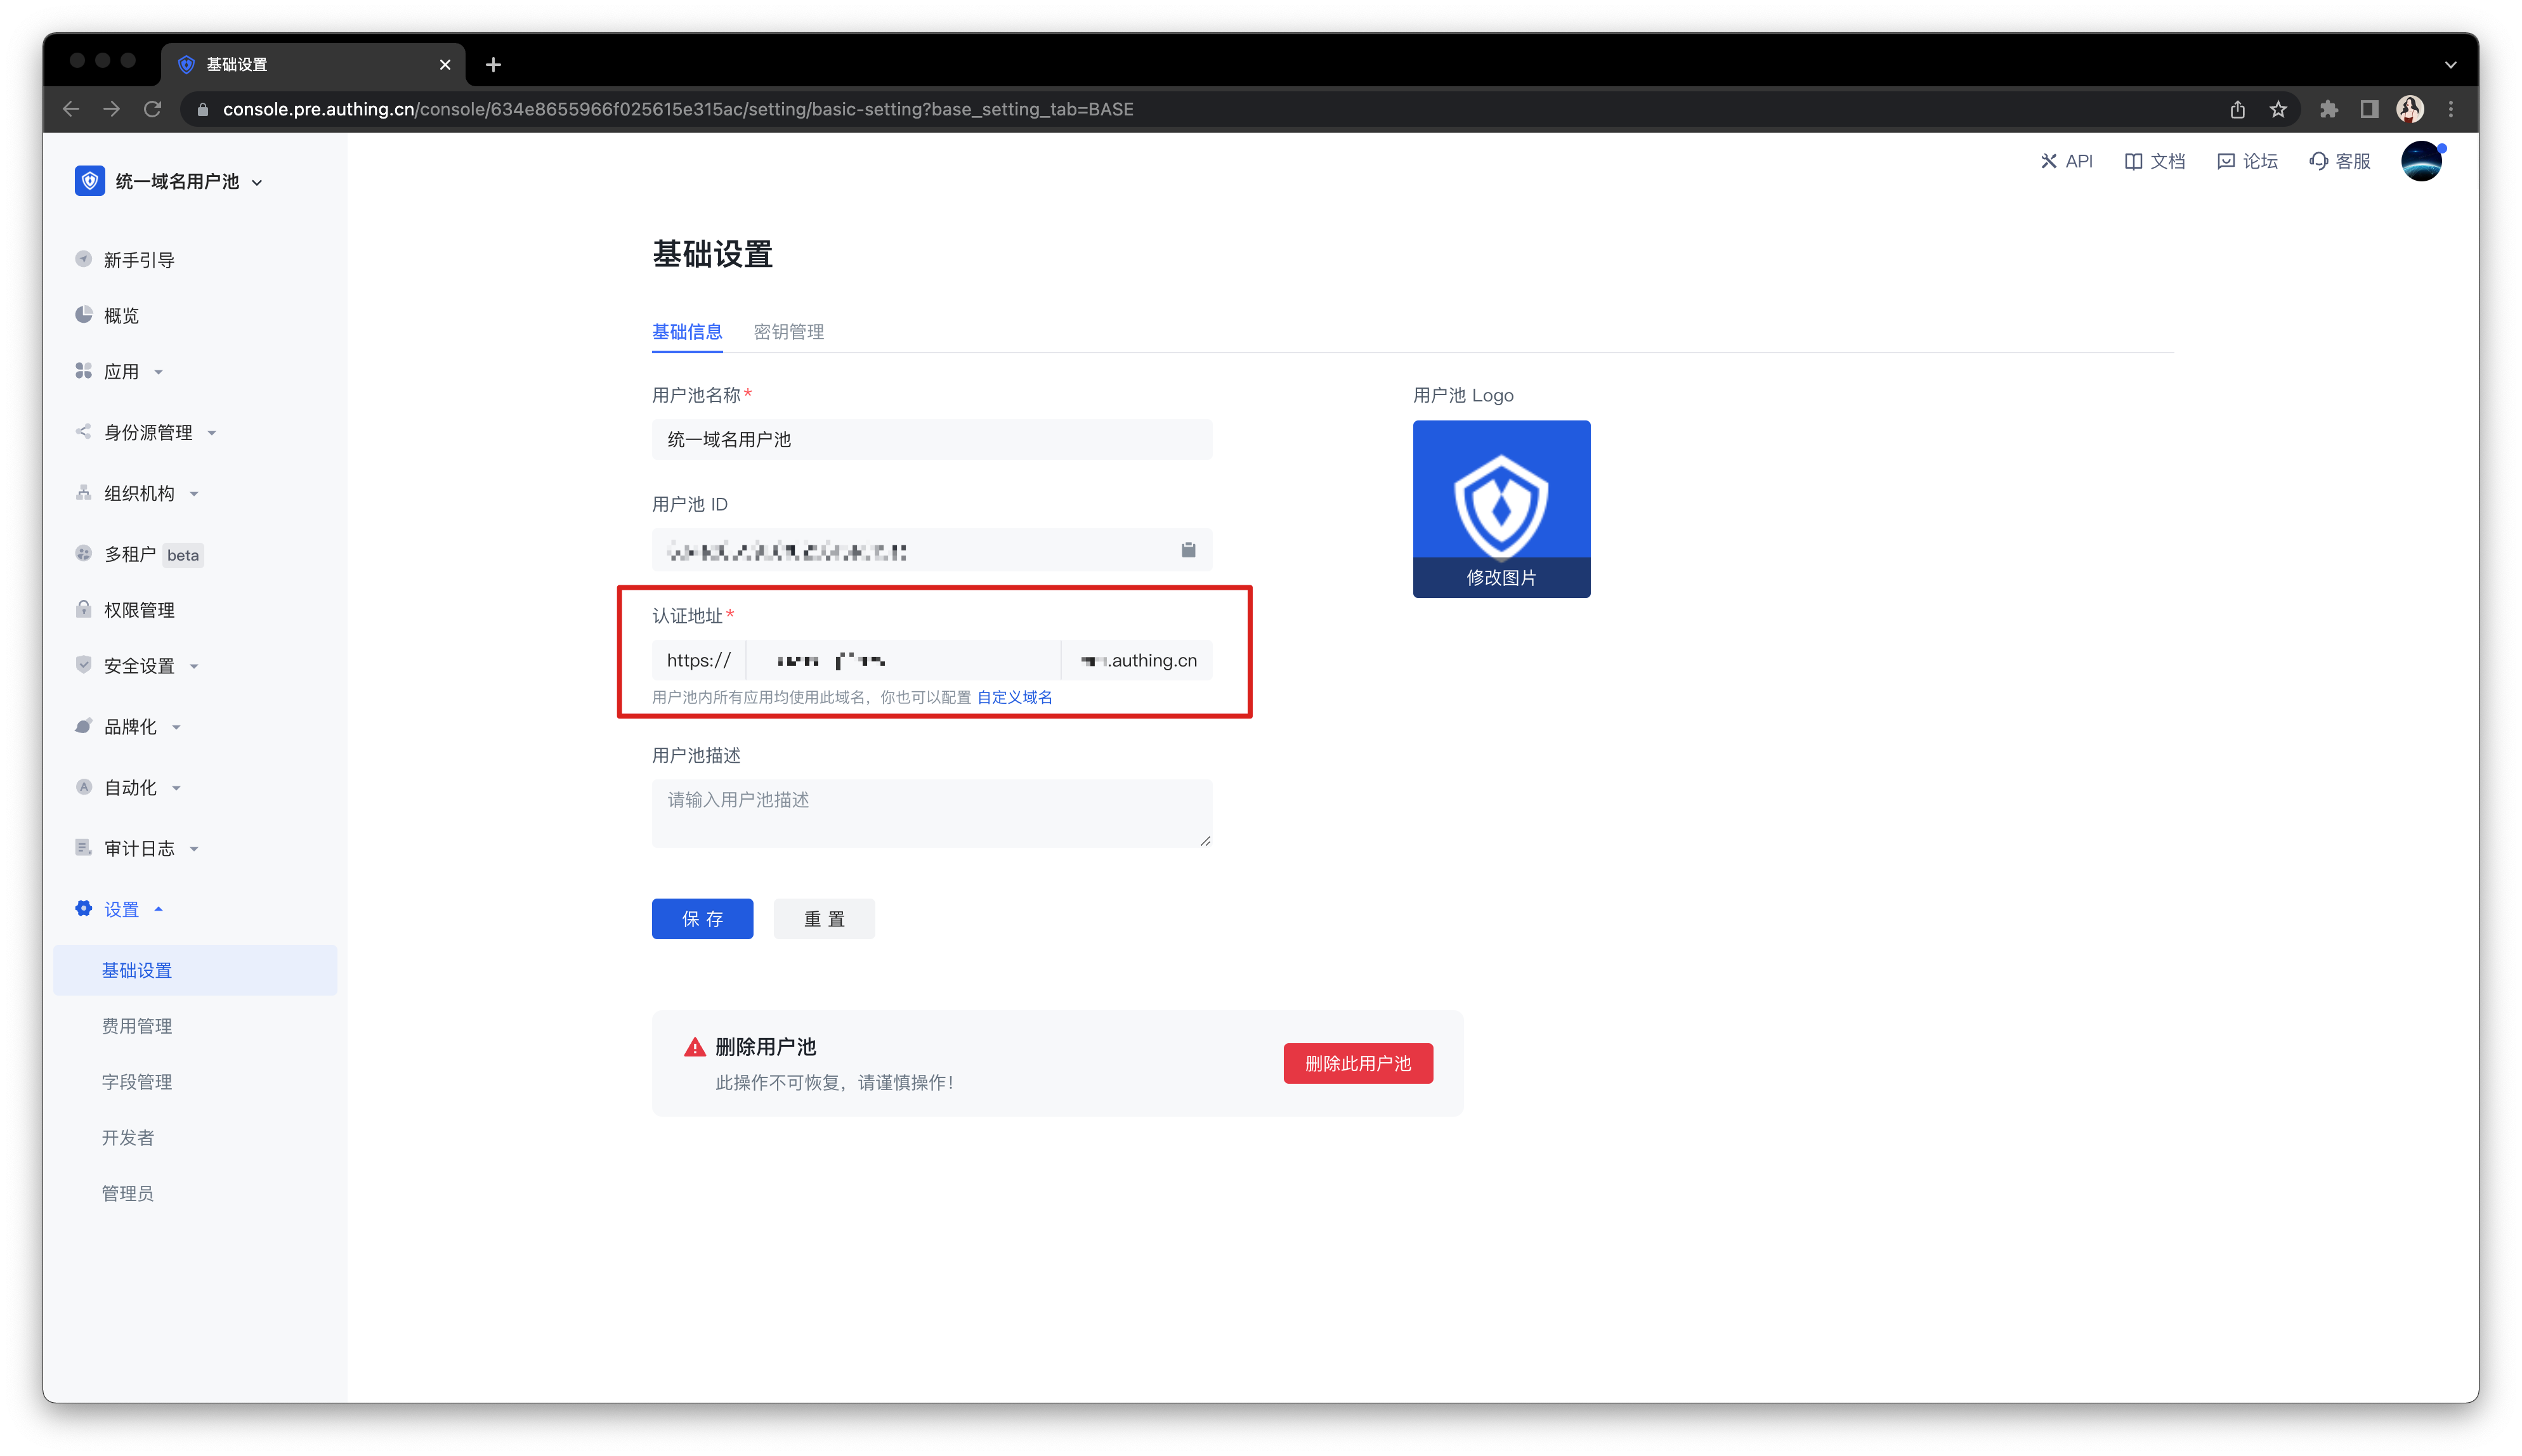
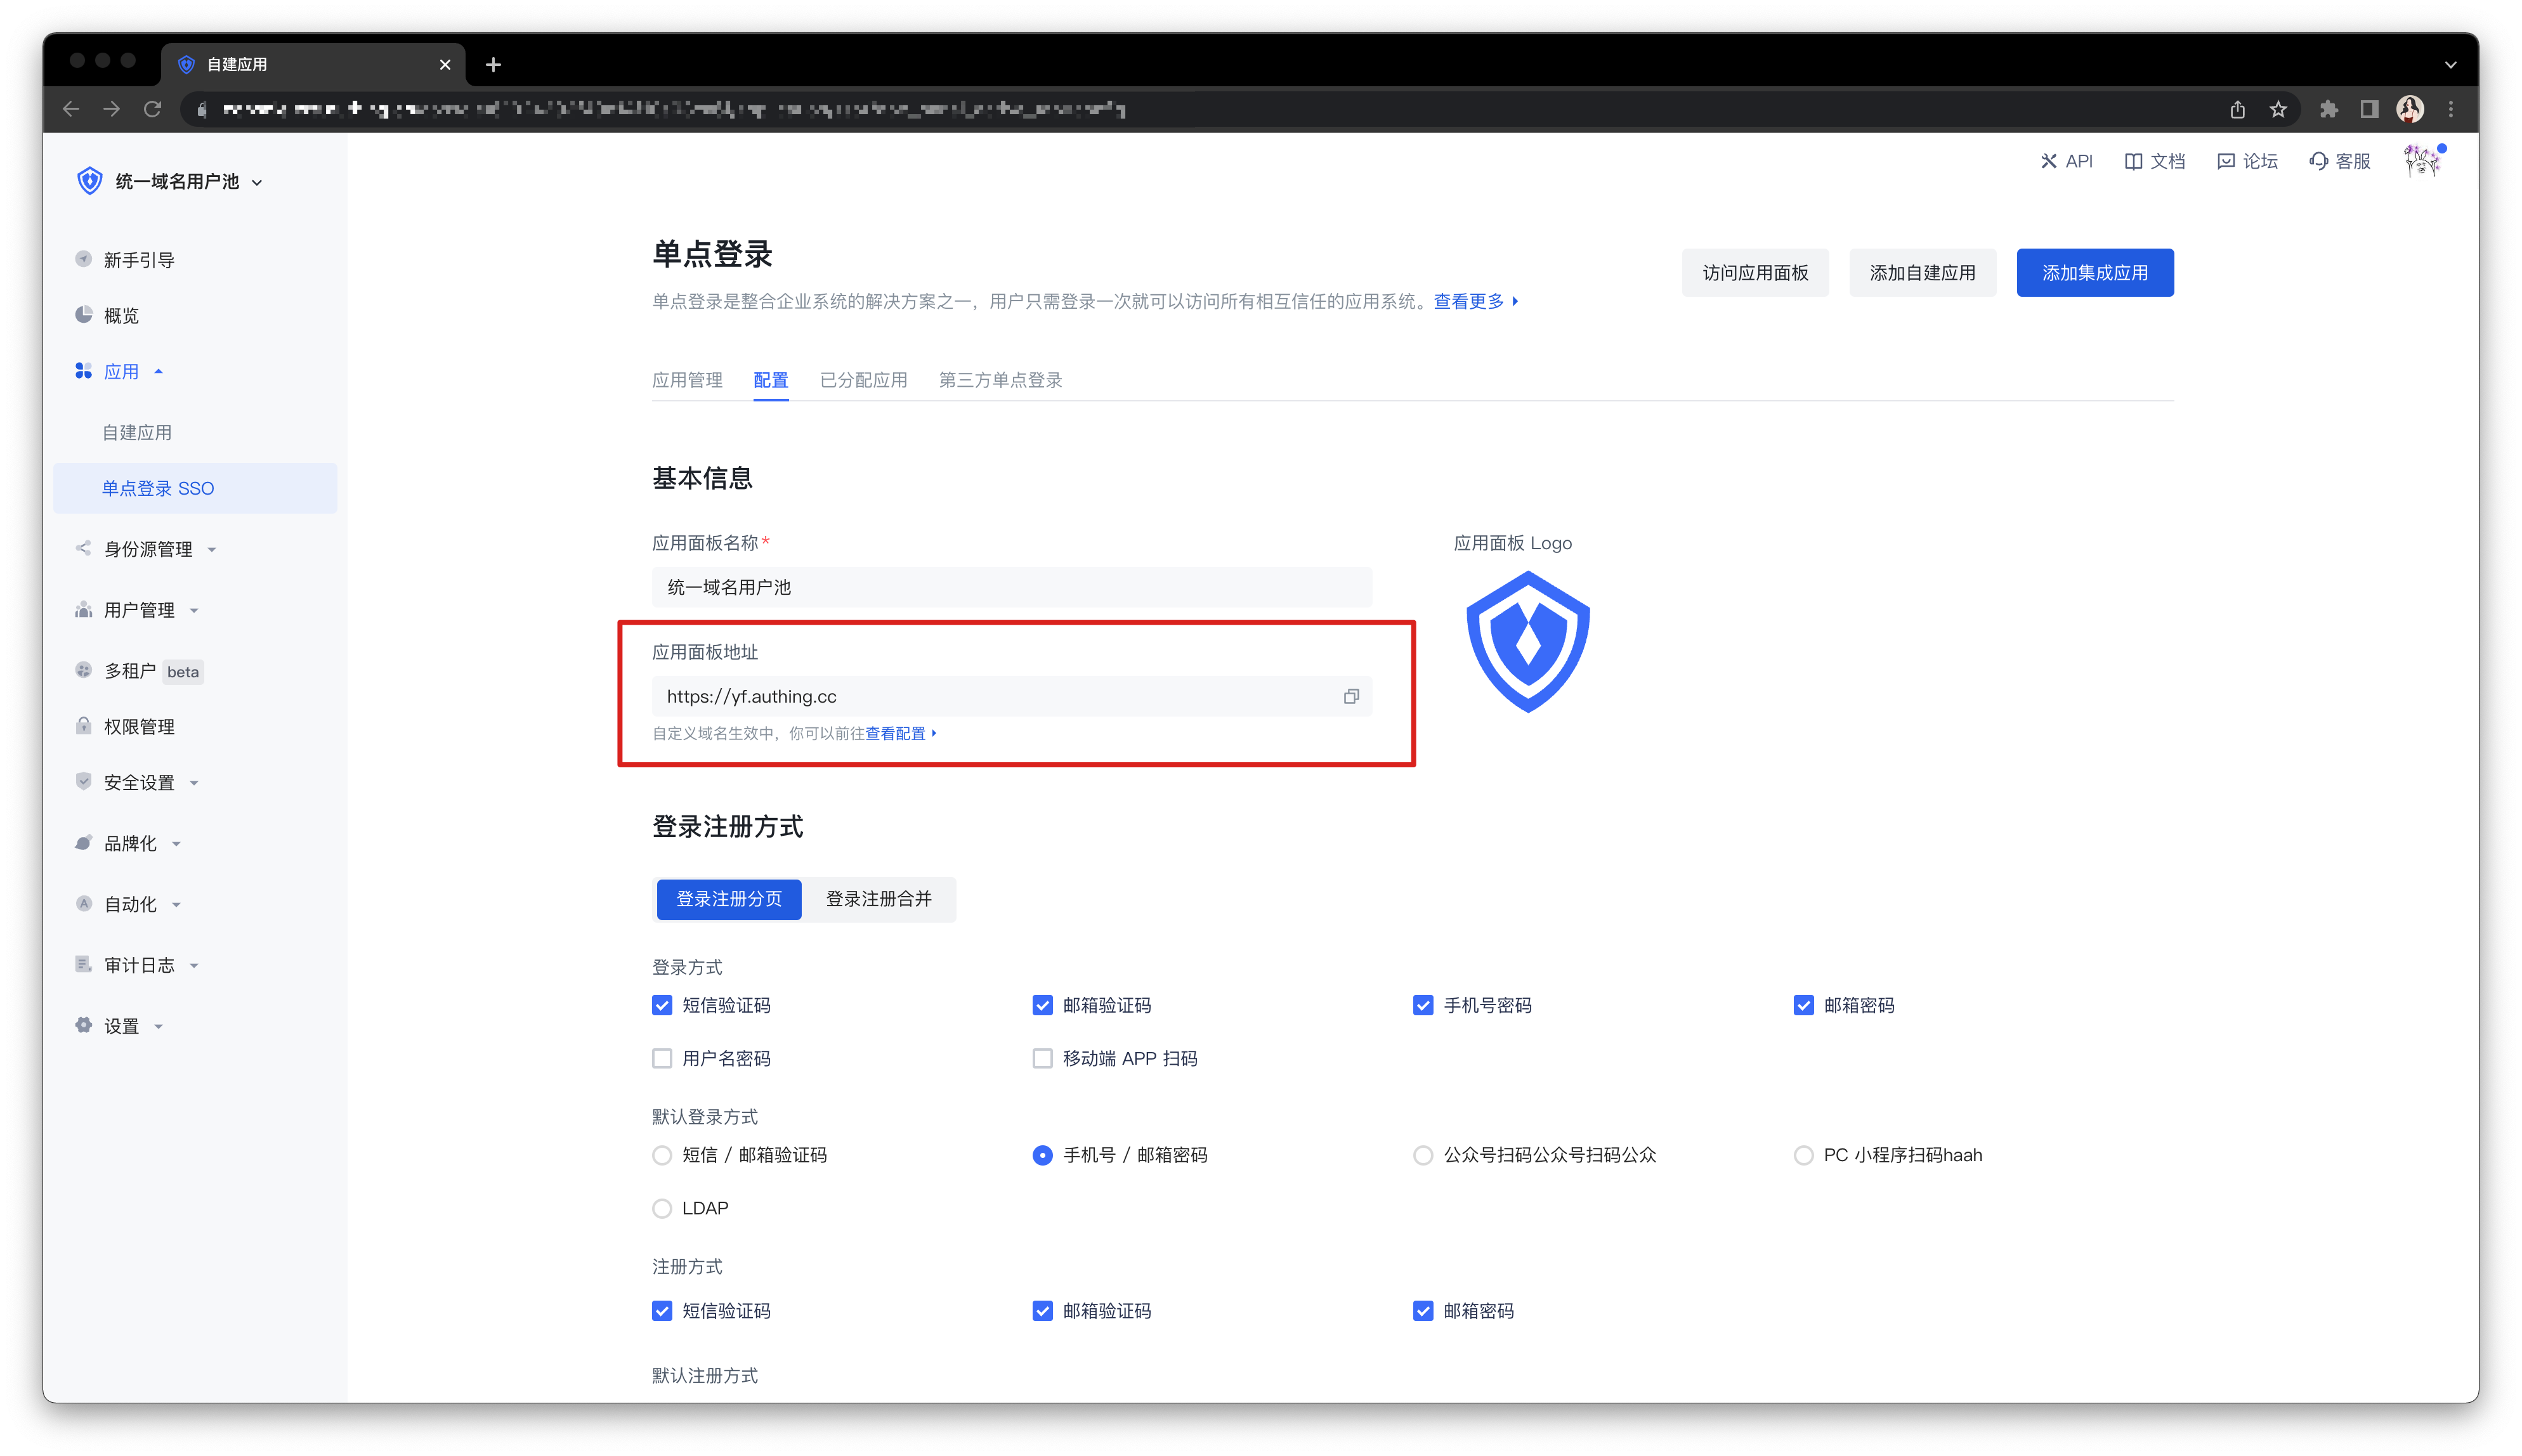
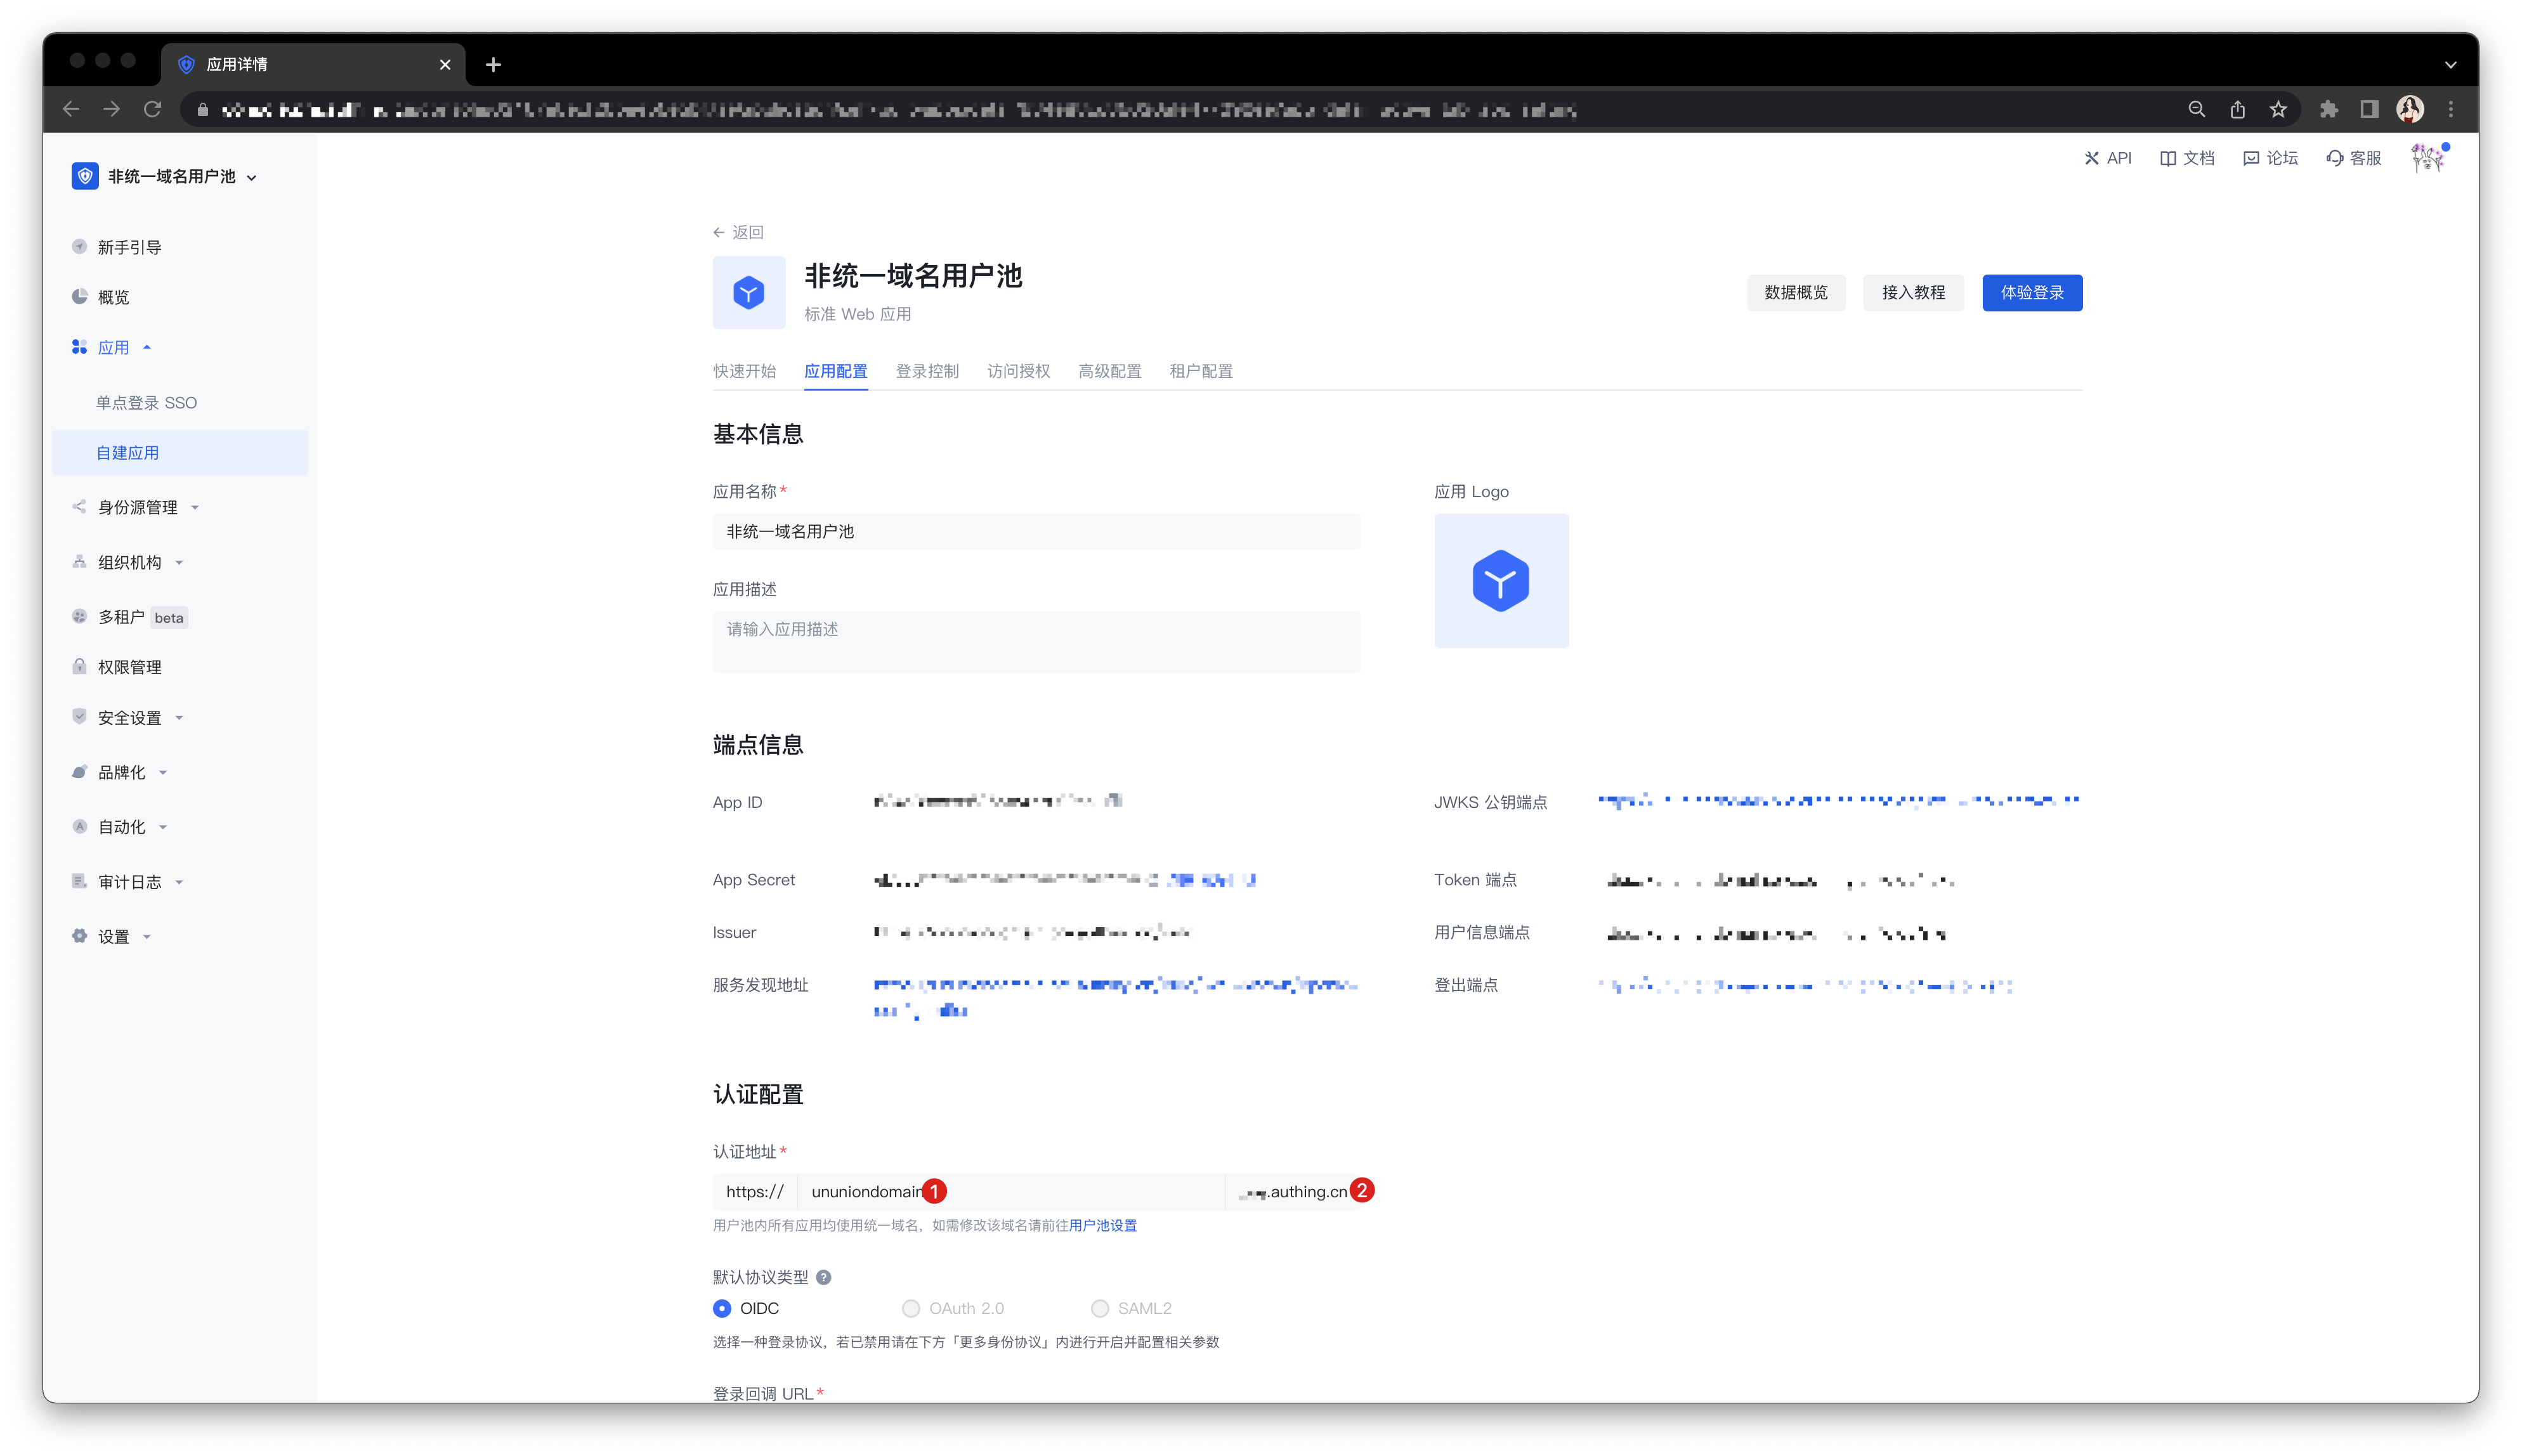
There are many types of applications in the user pool of GenAuth, including: self-built applications, integrated applications, and application panels that can accommodate these two types of applications for single sign-on (SSO). By default, the above types of applications in the GenAuth user pool use independent third-level domain names (xxx.authig.cn). You can independently modify the authentication address of any self-built application and application panel.
In contrast, a unified domain name means that all types of applications in the same user pool use the same third-level domain name. After creating such a user pool, you can modify the unified third-level domain name of this user pool in the User Pool Settings->Basic Settings->Basic Information tab. Your changes will take effect on all applications in the user pool at the same time, and different applications will be distinguished by splicing App ID after the authentication address (xxx.genauth.ai/APP_ID).
Step 2: Determine whether you need to use a unified domain name
When do you need to use a unified domain name?
- You want the third-level domain names of all applications in the user pool to be modified uniformly.
You want to use the custom domain name function in the entire user pool.
- Use a custom domain name in the application panel.
- Use a custom domain name for self-built applications.
When is it not recommended to use a unified domain name?
You want the third-level domain name of each application to be customized.
You accept the use of the default second-level domain name of GenAuth (i.e.
.genauth.ai).
Step 3: Create a user pool with a unified domain name
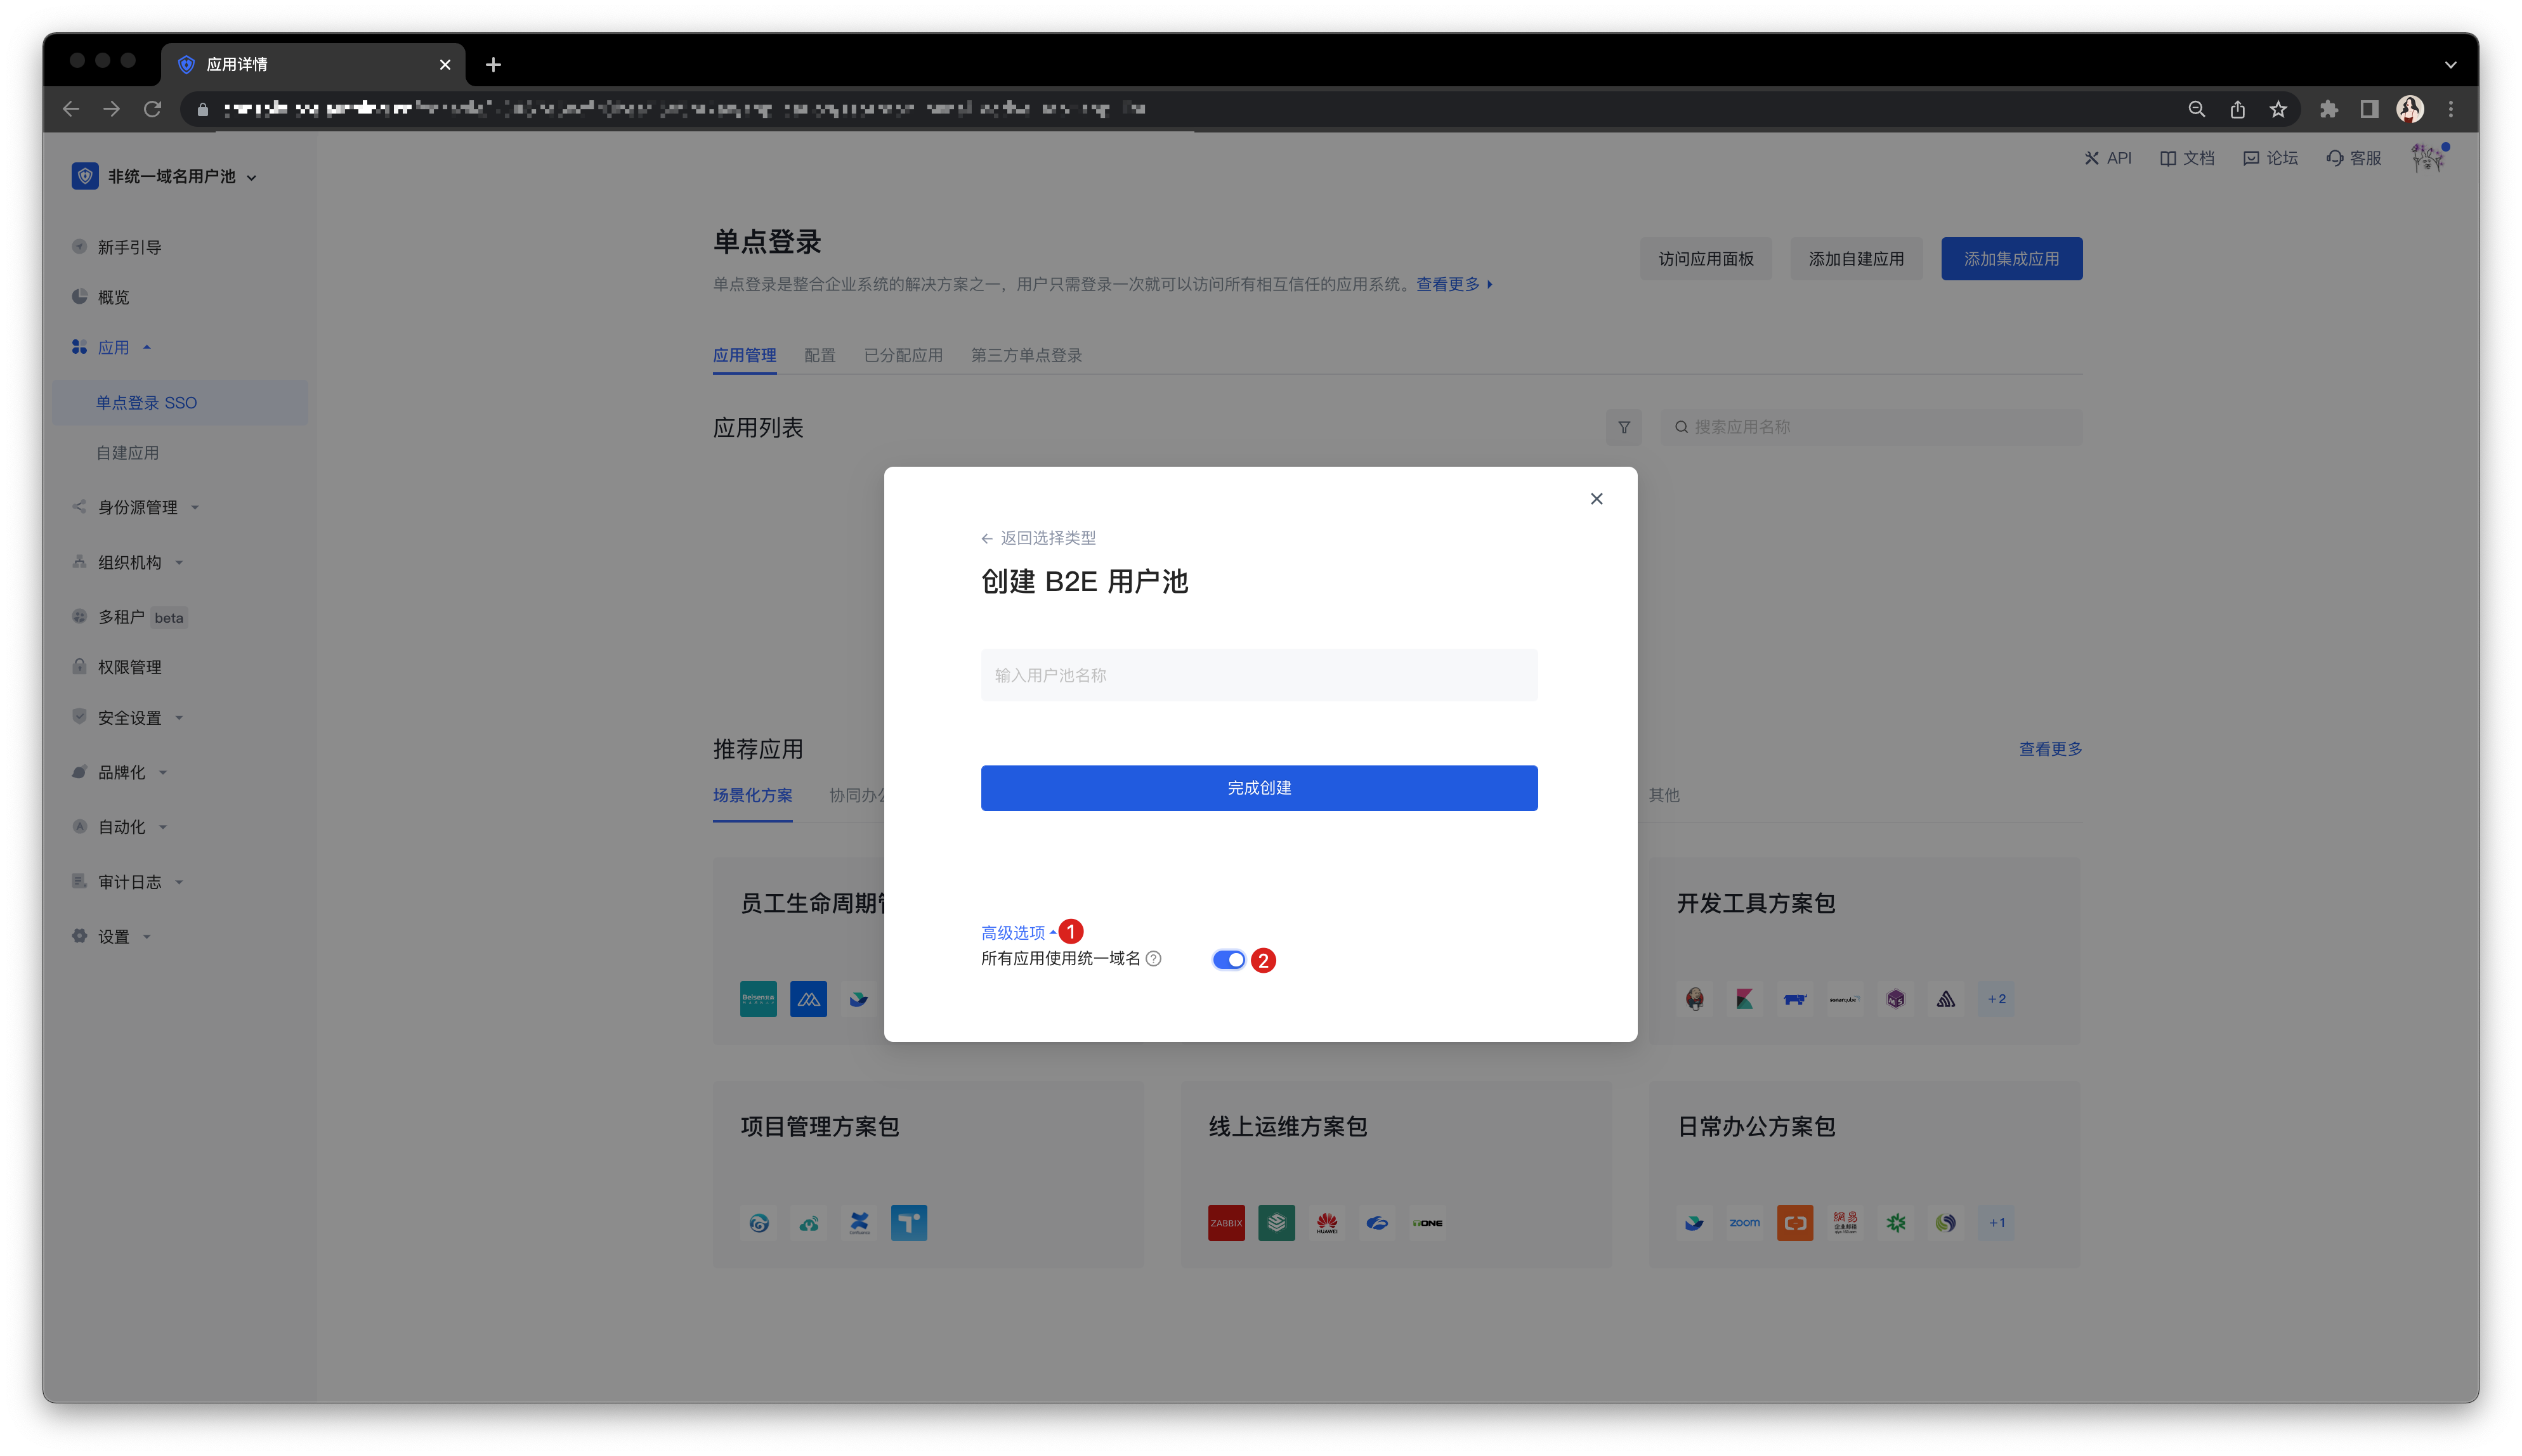
Open Advanced options when creating a user pool.
Turn on the Use unified domain name for all applications switch.
Step 4: Common operations for user pools with unified domain names
Configure a custom domain name in the newly created user pool with a unified domain name:
Configuration method: Follow the instructions in Customize domain name to complete the configuration.
Implementation effect: All self-built and integrated applications in the application panel and user pool use a unified custom domain name.
Switch the existing user pool to use a unified domain name:
Create a new user pool with a unified domain name and migrate existing data.
Contact GenAuth after-sales service staff for technical support, or submit a ticket.
How to identify the user's source
If you use hosted login page or embedded login component, GenAuth supports automatic identification of request parameters to write the user's source to the user's custom field. At the same time, the SDK provided by GenAuth can also write the registration source information to the user's custom field during login registration, thereby achieving the purpose of identifying the user's source.
Use hosted login page
The GenAuth hosted login page mode is considered the simplest and most secure way to integrate. This is because the login process is maintained by GenAuth and is kept secure by GenAuth. For most integrations, it is recommended to use the login process hosted by GenAuth. Your business system redirects the user to GenAuth, where the user authenticates and then redirects back to the application callback connection configured in the console.
Identifying the user source in the hosted login page can be divided into the following steps.
- Define a user custom field (such as
source) in the GenAuth console to store the user's source data. For details, see Add custom user fields. - When accessing the application domain name, bring the specified
queryparameter, such ashttps://your-app.genauth.ai?source=someWhere. - When the user logs in or registers, GenAuth will write this data to the user's custom field.
- You can then use the SDK provided by GenAuth to manage the user's custom fields. For details, see [SDK - Manage custom data](https://docs.genauth.ai/reference/sdk-for-node/management/UsersManagementClient#Get custom data).
Using the Embedded Login Component
The GenAuth Login Component (Guard) is an embeddable login form that can be configured according to your needs and is recommended for single-page applications. Guard can be integrated into your React, Vue.js, Angular, and native JavaScript projects, and you can use this component to quickly implement the login authentication process.
Identifying the user source in the embedded login component can be divided into the following steps:
- Define a user custom field (such as
source) in the GenAuth console to store the user's source data. For details, see Adding a custom user field. - Add the same query parameter to the URL of the page where the Guard component is located, such as
?source=someWhere. When the user registers using the Guard component, this parameter will be written to the user's custom field. - You can then use the SDK provided by GenAuth to manage the user's custom fields. For details, see [SDK - Manage Custom Data](https://docs.genauth.ai/reference/sdk-for-node/management/UsersManagementClient#Get Custom Data).
Use SDK
- Define a user-defined field (such as
source) in the GenAuth console to store the user's source data. For details, see Add Custom User Fields. - Pass custom data when calling the login function, such as:
- Register with email and password:
const { AuthenticationClient } = require("authing-js-sdk");

const authing = new AuthenticationClient({
  appId: "GEN_AUTH_APP_ID",
  appHost: "YOUR_APP_HOST",
});
const email = "test@example.com";
const password = "passw0rd";
const user = await authing.registerByEmail(email, password, null, {
  customData: {
    source: "google",
  },
});- Use social login:
const { AuthenticationClient } = require("authing-js-sdk");

const authing = new AuthenticationClient({
  appId: "GEN_AUTH_APP_ID",
  appHost: "YOUR_APP_HOST",
});
authing.wxqrcode.startScanning("domId", {
  onSuccess: (userinfo) => {
    console.log(userinfo);
  },
  customData: {
    source: "someWhere",
  },
});- After the user completes the login registration, GenAuth will write this data to the user's custom field.
- You can then use the SDK provided by GenAuth to manage the user's custom fields. For details, see [SDK - Manage Custom Data](https://docs.genauth.ai/reference/sdk-for-node/management/UsersManagementClient#Get Custom Data).
Join your business data with the GenAuth user
If you use GenAuth , your user data will be securely stored in the GenAuth cloud database, and you do not need to save an additional copy of the user data. You need to join your business data with the GenAuth user locally, and associate the user ID with the business data.
For example, your business system has an order table (orders), and its table structure is as follows:
CREATE TABLE `orders` (
  `id` int(10) unsigned NOT NULL AUTO_INCREMENT,
  `order_no` varchar(100) COLLATE utf8mb4_unicode_ci NOT NULL COMMENT 'Order number',
  `order_sn` varchar(100) COLLATE utf8mb4_unicode_ci NOT NULL COMMENT 'Transaction number',
  `supplier_id` int(11) NOT NULL COMMENT 'Merchant code',
  `supplier_name` varchar(255) COLLATE utf8mb4_unicode_ci NOT NULL COMMENT 'Merchant name',
  `order_status` tinyint(4) NOT NULL DEFAULT '0' COMMENT 'Order status 0 unpaid, 1 paid, 2 shipped, 3 signed, -1 return application, -2 returning, -3 returned, -4 transaction cancelled',
  `after_status` tinyint(4) NOT NULL DEFAULT '0' COMMENT 'User after-sales status 0 not initiated after-sales 1 applied for after-sales -1 after-sales cancelled 2 in progress 200 completed',
  `product_count` int(11) NOT NULL DEFAULT '0' COMMENT 'Quantity of goods',
  `product_amount_total` decimal(12,4) NOT NULL COMMENT 'Total price of goods',
  `order_amount_total` decimal(12,4) NOT NULL DEFAULT '0.0000' COMMENT 'Actual payment amount',
  `logistics_fee` decimal(12,4) NOT NULL COMMENT 'Freight amount',
  `address_id` int(11) NOT NULL COMMENT 'Delivery address code',
  `pay_channel` tinyint(4) NOT NULL DEFAULT '0' COMMENT 'Payment channel 0 Balance 1 WeChat 2 Alipay',
  `out_trade_no` varchar(255) COLLATE utf8mb4_unicode_ci DEFAULT NULL COMMENT 'Order payment number',
  `escrow_trade_no` varchar(255) COLLATE utf8mb4_unicode_ci DEFAULT NULL COMMENT 'Third-party payment serial number',
  `pay_time` int(11) NOT NULL DEFAULT '0' COMMENT 'Payment time',
  `delivery_time` int(11) NOT NULL DEFAULT '0' COMMENT 'Delivery time',
  `order_settlement_status` tinyint(4) NOT NULL DEFAULT '0' COMMENT 'Order settlement status 0 Unsettled 1 Settled',
  `order_settlement_time` int(11) NOT NULL DEFAULT '0' COMMENT 'Order settlement time',
  `is_package` enum('0','1') COLLATE utf8mb4_unicode_ci NOT NULL DEFAULT '0' COMMENT 'Is it a package?',
  `is_integral` enum('0','1') COLLATE utf8mb4_unicode_ci NOT NULL DEFAULT '0' COMMENT 'Is it an integral product?',
  `created_at` timestamp NULL DEFAULT NULL,
  `updated_at` timestamp NULL DEFAULT NULL,
  `deleted_at` timestamp NULL DEFAULT NULL,
  PRIMARY KEY (`id`),
  UNIQUE KEY `order_order_sn_unique` (`order_sn`),
  KEY `order_order_sn_order_status_out_trade_no_index` (`order_sn`,`order_status`,`out_trade_no`(191))
) ENGINE=InnoDB AUTO_INCREMENT=44 DEFAULT CHARSET=utf8mb4 COLLATE=utf8mb4_unicode_ci;
You can create a field owner_id to represent the ID of the order owner:
- Data type is varchar(32);
- The value it stores should be the ID of the user GenAuth;
ALTER TABLE orders ADD COLUMN `owner_id` varchar(32) NOT NULL COMMENT 'Order owner user ID',If you need to query all orders of a certain user, you can use the following SQL statement:
SELECT * FROM orders WHERE owner_id = '6035120c3xxxxxe890e080db'Impact of disabling third-party cookies on GenAuth
This article describes the impact of browsers blocking third-party cookies, explains why, and provides solutions.
Impact
Starting with version 13.1, Safari will block third-party cookies by default, which will affect some single sign-on features of GenAuth. Other similar updates, starting with Chrome version 83, will disable third-party cookies by default in incognito mode. Other browsers are also slowly making such updates to protect user privacy. Many browsers have disabled third-party cookies as a security configuration feature.
If you use a login page hosted by GenAuth, you will not be affected by this problem. Users who host their own login page and use the trackSession feature will be affected. This is because when requesting the GenAuth API, you need to carry GenAuth-related cookies across domains.
When the browser sends a cross-domain request that requires cookies, the browser will block the cookies because the domain name visited by the user and the domain name of GenAuth are not same origin.
When did these impacts occur?
Safari first introduced this feature in version 13.1 and released an update in March 2020. Chrome version 83 enables this feature by default in incognito mode. Firefox will introduce this feature in the near future. Safari calls this feature Intelligent Tracking Prevention, and Firefox calls this feature Enhanced Tracking Protection.
Which GenAuth functions are mainly affected?
trackSession
trackSession is a single sign-on function developed by GenAuth. You can get the current user's session information and user information on any website by requesting GenAuth's Session endpoint.
When using Ajax to request the GenAuth API interface across domains, such as /cas/session, the GenAuth Cookie will be automatically carried. The browser will block this Cookie because the request address is not same origin with the current URL. Then the Cookie cannot be passed to GenAuth, and GenAuth cannot retrieve the current user's session information and complete the response. The final result is that GenAuth will return a response that it has not logged in.
How to solve it?
In addition to using trackSession, you have many other options, such as maintaining the login state of the application by yourself instead of relying solely on the central authentication server, and using OIDC to complete single sign-on, or using Web SDK to complete single sign-on.
If you want to use trackSession, you can change the application domain name to your custom domain name from the browser's perspective. Please refer to the documentation for configuring a custom domain name. In this way, the original three-party cookie becomes a one-party cookie. The Ajax request domain name for requesting GenAuth will be same origin with the application domain name, and will not trigger the browser's mechanism to block three-party cookies.
For example, your GenAuth application domain name is app1.genauth.ai, and your application server domain name is myapp.mysite.com. You need to use login.mysite.com to proxy app1.genauth.ai. In this way, the GenAuth service and your application service can be placed under the same domain.
As long as the main domain name is the same, the different subdomains in the above example will not affect the same-origin policy of the cookie.
After configuring a custom domain name, you need to modify the configuration information of the GenAuth-related SDK and fill in the request endpoint domain name with your custom domain name. If you call the GenAuth API directly, you also need to modify these request addresses to your custom domain name.
How to deploy a transit proxy server
HTTP proxy
The following takes goproxy as an example to briefly introduce the deployment process of https proxy. For detailed official documents, please see: https://github.com/snail007/goproxy/blob/master/README_ZH.md.
Run as root:
curl -L https://mirrors.host900.com/snail007/goproxy/install_auto.sh | bashWait for it to finish. When the following prompt is output, it means that the installation is successful:
>>> installing ...
>>> install done, thanks for using snail007/goproxy free_10.0
>>> install path /usr/bin/proxy
>>> configuration path /etc/proxy
>>> uninstall just exec : rm /usr/bin/proxy && rm -rf /etc/proxy
>>> How to using? Please visit : https://snail007.github.io/goproxy/manual/zh/
Run (replace $PORT with the port you want to use):
proxy http -t tcp -p "0.0.0.0:$PORT"When the following prompt appears, it means the operation is successful:
2020/09/23 19:25:34 tcp http(s) proxy on [::]:xxxxxxPlease make sure that the server's firewall rules allow GenAuth server to access. The external IP of GenAuth server is:
52.80.250.250
140.179.19.50
How to get the GenAuth server cluster IP address
If you are using GenAuth's custom database function or using GenAuth services on the company's intranet, you may need to add the GenAuth server cluster IP to the whitelist.
The external elastic IP address of the GenAuth server cluster can be obtained through the following interface: https://core.genauth.ai/api/system/public-ips.
Pipeline FAQ
Q: Does the Pipeline function support async await syntax?
A: Yes.
Q: Can I use GenAuth SDK in the Pipeline function?
A: Yes, without importing and initializing. For details, see Available Node Modules.
Q: Can I write Pipeline functions in other languages?
A: No, currently only Node language is supported.
Q: What are the precautions for writing Pipeline functions?
A:
Please do not rename the pipe function.
It is recommended not to hard code, use environment variables to store constant values.
Q: What is the impact of refreshing the user pool secret on the Pipeline function?
A: Since the GenAuth Pipeline function runs completely in the cloud, refreshing the user pool secret will update all Pipeline functions in the user pool at the same time. This means that authing-js-sdk will not be able to be used normally in the Pipeline function for a short period of time.
Q: What are the performance optimization methods?
A: If it is a function that is not directly related to the pipeline process, such as new user registration notification, etc., it can be [set to asynchronous execution] (pipeline-function-api-doc.md#Set asynchronous execution).