Adaptive MFA
GenAuth CAMFA Overview
What is Continuous Adaptive Multi-Factor Authentication?
Continuous Adaptive MFA (CAMFA) is a secure authentication method that combines multiple authentication factors (such as passwords, biometrics, hardware tokens, etc.) and uses behavioral risk assessment technology to continuously and dynamically evaluate users' key behaviors in real time during the user's access lifecycle. When a risk is triggered, the user's current status will be confirmed by calling MFA authentication, thereby improving the security of the account and better protecting the data and resource security in the business system.
Typical application scenarios of continuous adaptive MFA
- You want users to complete authentication normally without triggering MFA in the geographical location (country/city) where they often log in. However, when their account logs in in an uncommon location, they need to complete MFA again before they can log in.
- You want enterprise members to access your application in the intranet environment without triggering MFA and complete authentication normally. However, when they access the application in the extranet environment, they need to complete MFA again before they can log in.
- You want users in your enterprise to be able to trigger different MFAs based on different attributes such as organization and role when logging into internal applications. For example, members of the finance department need to verify their mobile phone number via SMS when logging in, and members of the human resources department need to verify their OTP when logging in.
- You want users to access your application. If a certain IP logs in to multiple applications continuously in a short period of time or fails to log in continuously, then this IP needs to perform an MFA verification before continuing to log in.
In short, continuous adaptive MFA is suitable for scenarios where your application hopes to continuously monitor user behavior and conduct targeted MFA verification based on user behavior risks.
Core features of GenAuth continuous adaptive MFA
GenAuth continuous adaptive MFA, relying on the orchestration capabilities of GenAuth identity automation, is based on an event-driven approach. It can flexibly orchestrate security policies based on user attributes and user behavior characteristics, continuously monitor risks during user access, and set up triggering of multiple MFAs. While ensuring user experience, it effectively improves the security of authentication and resource access scenarios.
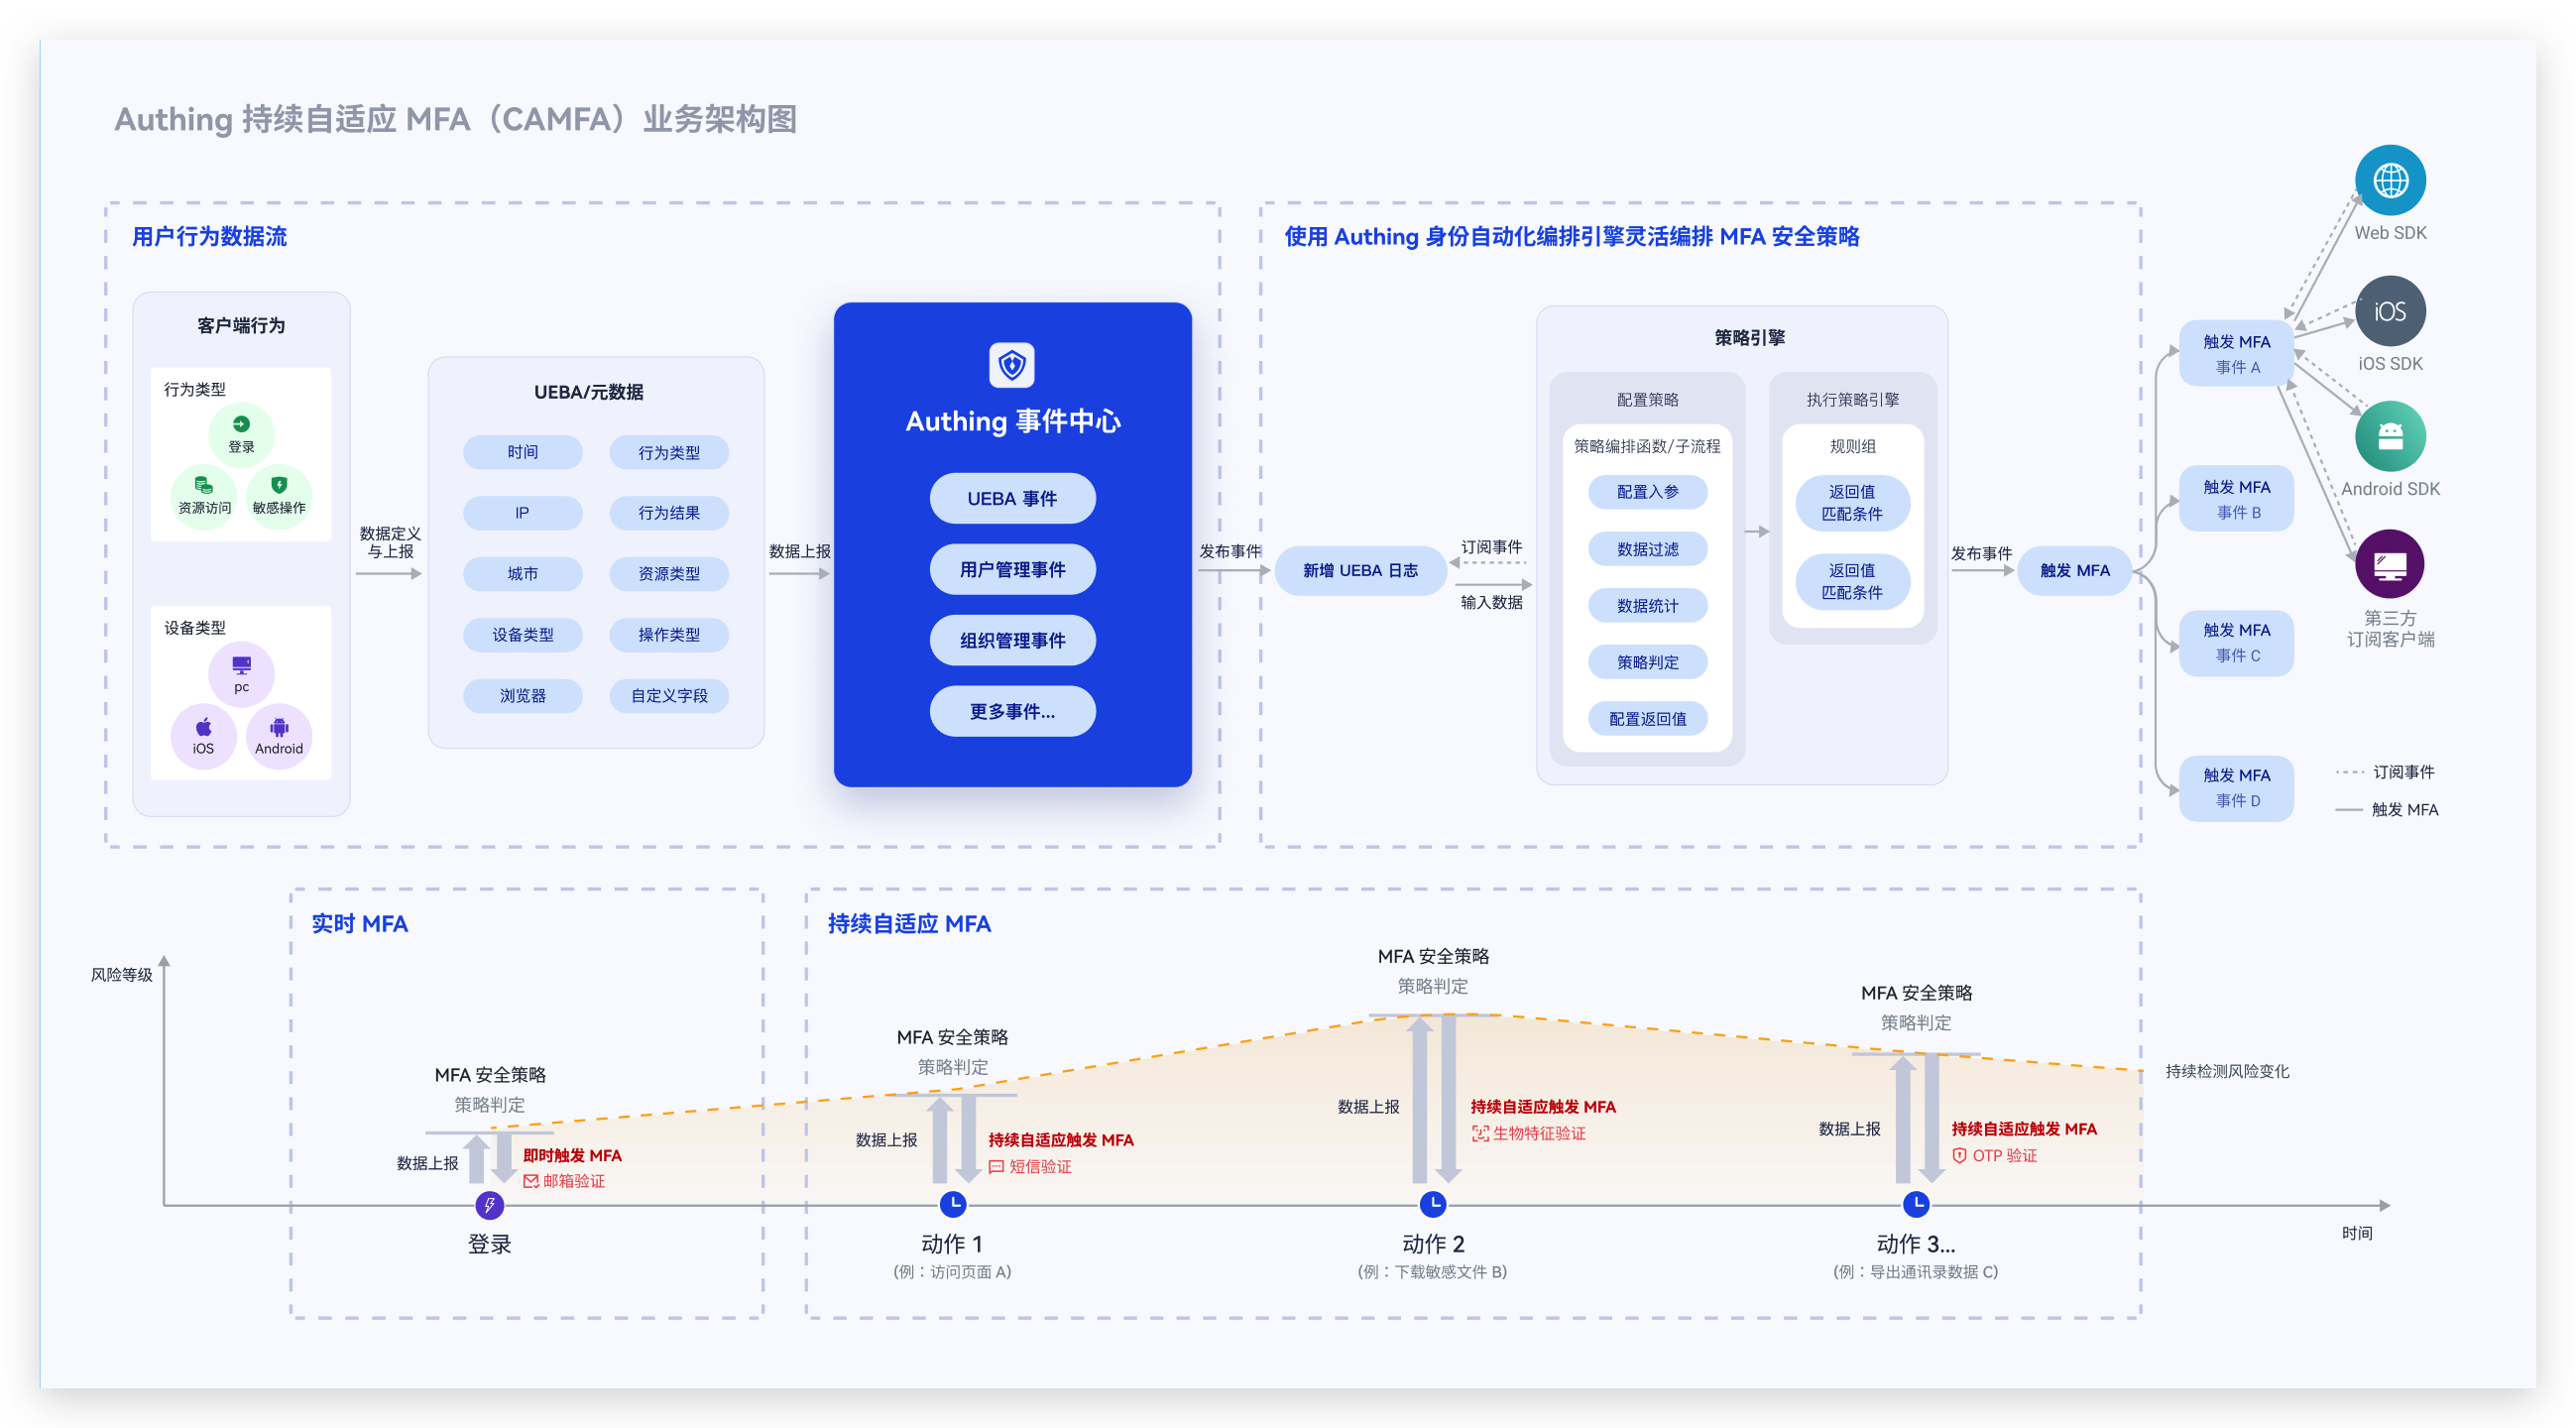
GenAuth continuous adaptive MFA has the following features:
- Multiple access methods: You can access GenAuth continuous adaptive authentication capabilities for your application in a variety of ways. Currently, it supports providing continuous adaptive MFA capabilities for your applications through GenAuth Guard/GenAuth application gateway/GenAuth MFA components
- Multi-source behavior data reporting: Continuous adaptive MFA can access user behavior data from multiple scenarios and multiple application systems, including device characteristics, network environment, behavior type, etc. If you access based on GenAuth MFA components, you can also fully customize user behavior data
- Visual orchestration of security policies: You can visually and flexibly orchestrate MFA security policies for different applications through workflows. Policies can be orchestrated based on multiple user attributes, behavior characteristics, and risk control indicators, supporting multiple policy branches, and different policies trigger different MFAs
- Multiple MFA verification methods: GenAuth continuous adaptive authentication supports multiple authentication methods, including mobile phone SMS verification/email verification/OTP verification/face recognition verification
- Developer-friendly: Provide SDK and open interfaces to help developers quickly call related capabilities.
How to access GenAuth CAMFA?
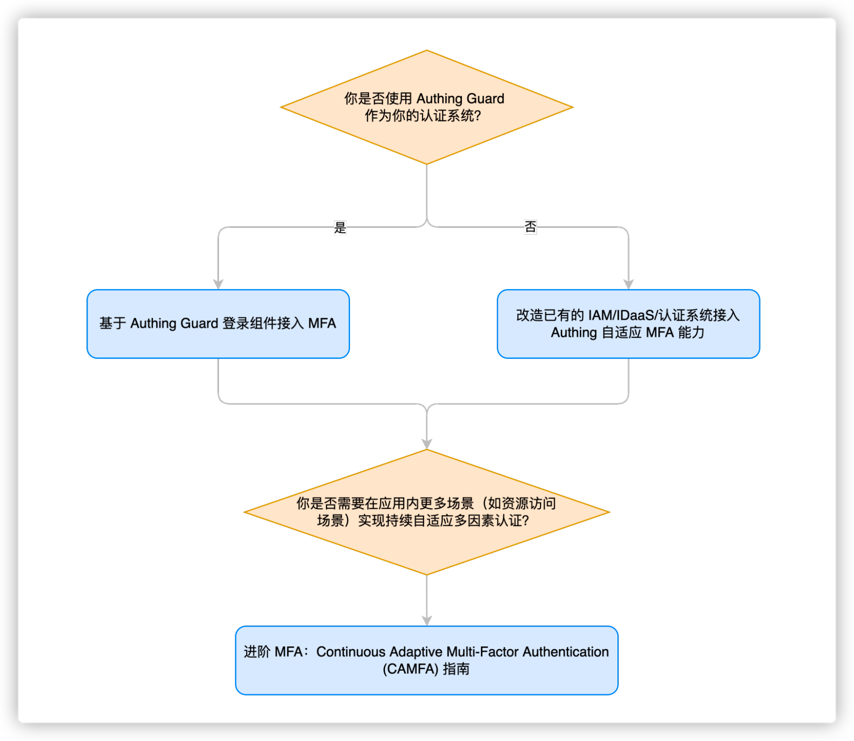
Currently, the GenAuth CAMFA function is only available to internal test customers. If you need to obtain internal test qualifications, you can contact your business consultant or contact us online
For more information about functions, please refer to
- Access MFA based on GenAuth Guard login component
- Transform existing IAM/IDaaS/authentication systems to access GenAuth adaptive MFA capabilities
- Advanced MFA: Continuous Adaptive Multi-Factor Authentication (CAMFA) Guide
Based on GenAuth Guard access GenAuth continuous adaptive MFA
We will assume that the following situation is your current goal and status, and we will provide you with the best solution
Goal: In self-developed applications or applications with code modification permissions, quickly launch MFA and security policy protection capabilities, improve business access security, improve user experience, support diversified business scenarios, and reduce enterprise management costs
Status: The current system MFA capability is weak
Solution: Access the GenAuth Guard authentication component to quickly access login and security policy capabilities
What is GenAuth Guard?
GenAuth Guard is a secure and reliable authentication and authorization service provided by GenAuth that can help enterprises and developers quickly build secure and reliable applications and services, improve user experience and protect user identity and information security. GenAuth Guard uses industry best practice security design and can be integrated into your development project with only a few lines of JavaScript code. It can be loaded directly from CDN or NPM, or built from source code. GenAuth Guard also provides multiple integration modes for Javascript native, React, Vue, and Angular, which can be seamlessly integrated in any of your projects and enjoy high customization flexibility. For more detailed information, please see Connecting to GenAuth Guard.
The overall process of connecting to MFA through the GenAuth Guard login component
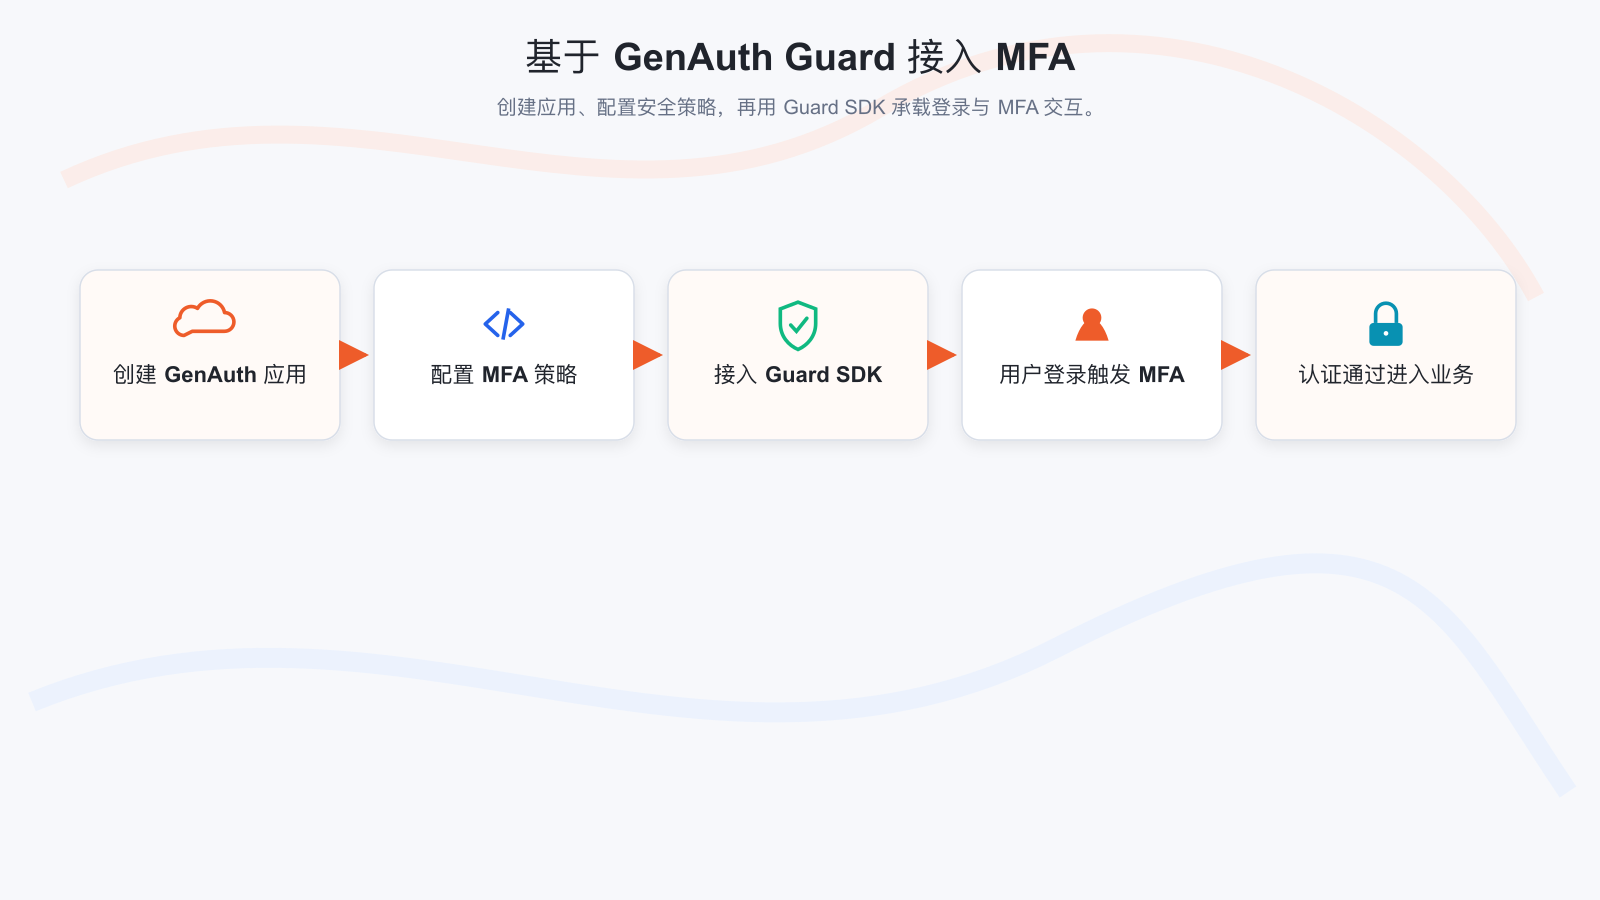
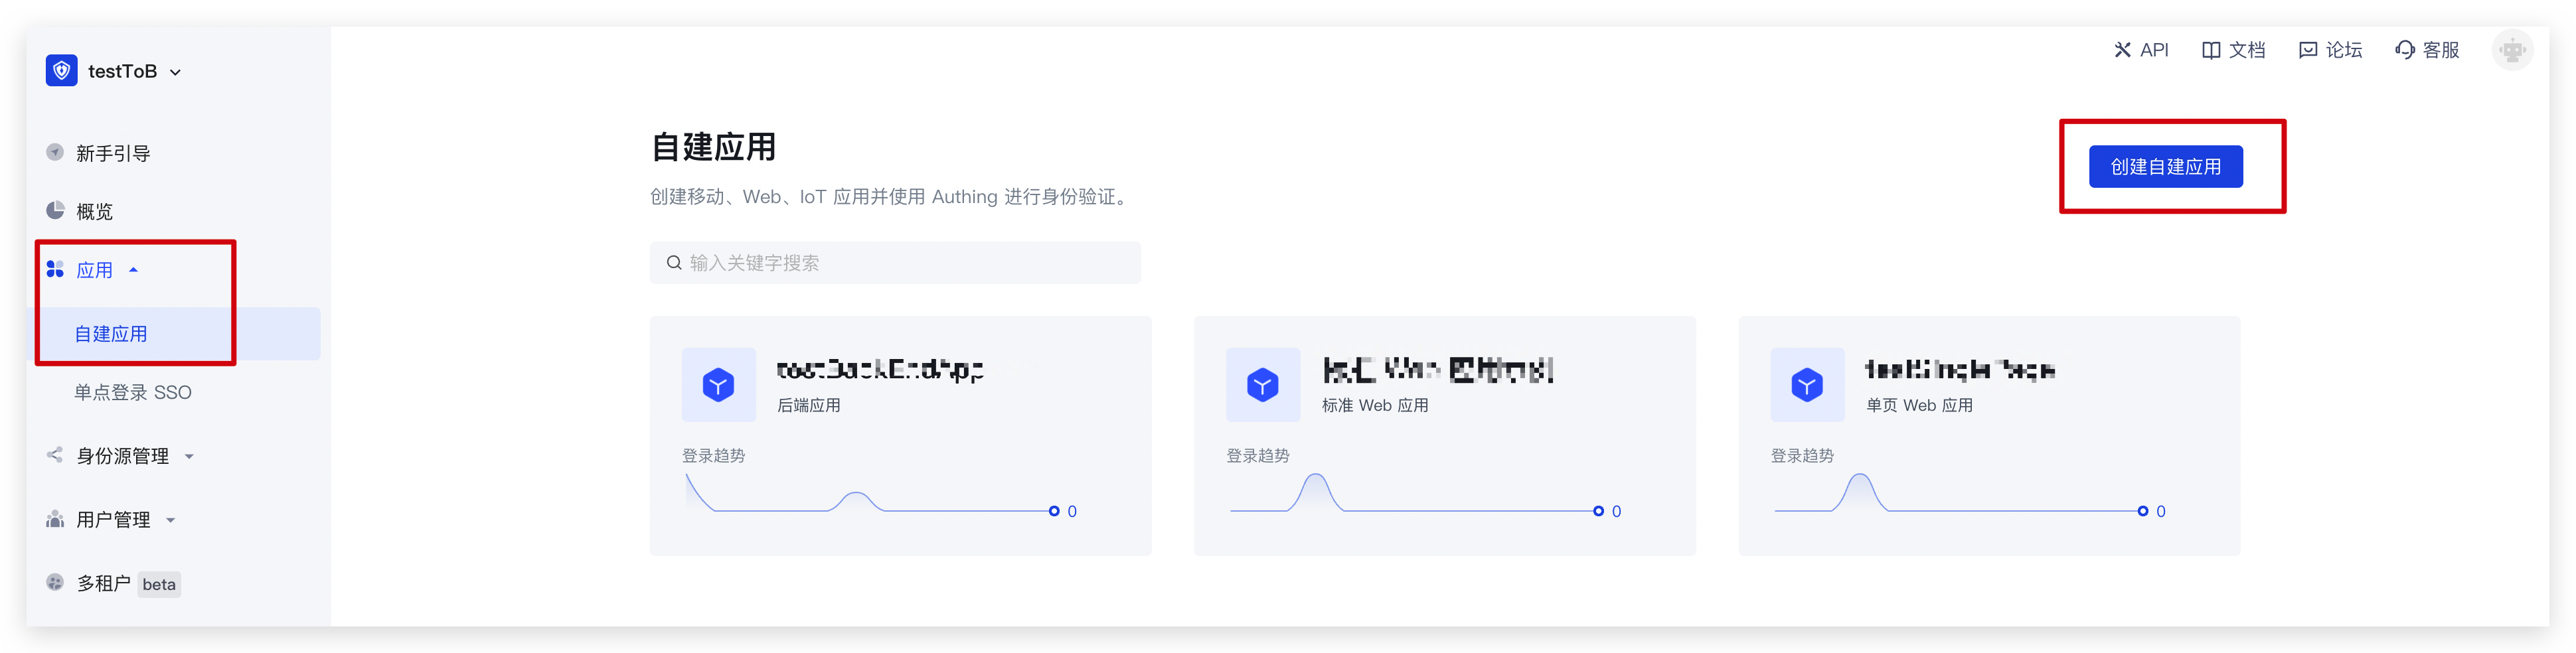
Step 1. Create a GenAuth application
You need to create an application in GenAuth first. Go to Console > Applications and click "Create a self-built application" in the upper right corner. 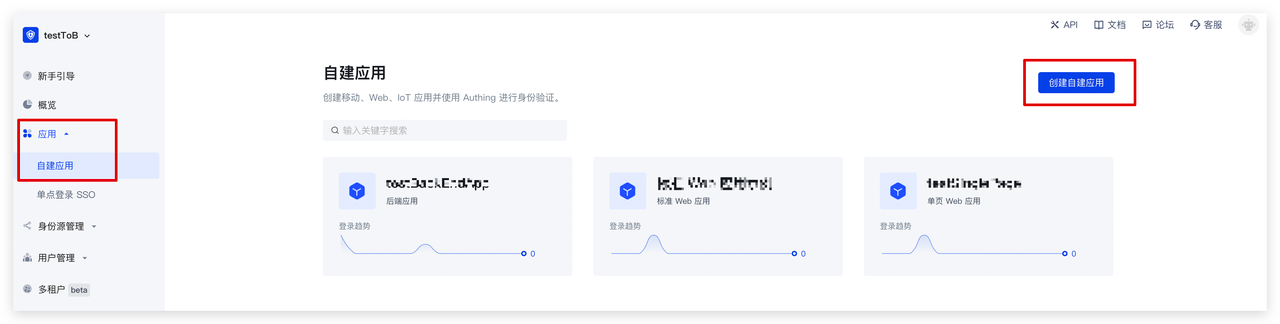 Fill in a domain name for the authentication address. It must be in a legal domain name format, such as my-awesome-app, as the unique identifier of this application in GenAuth.
 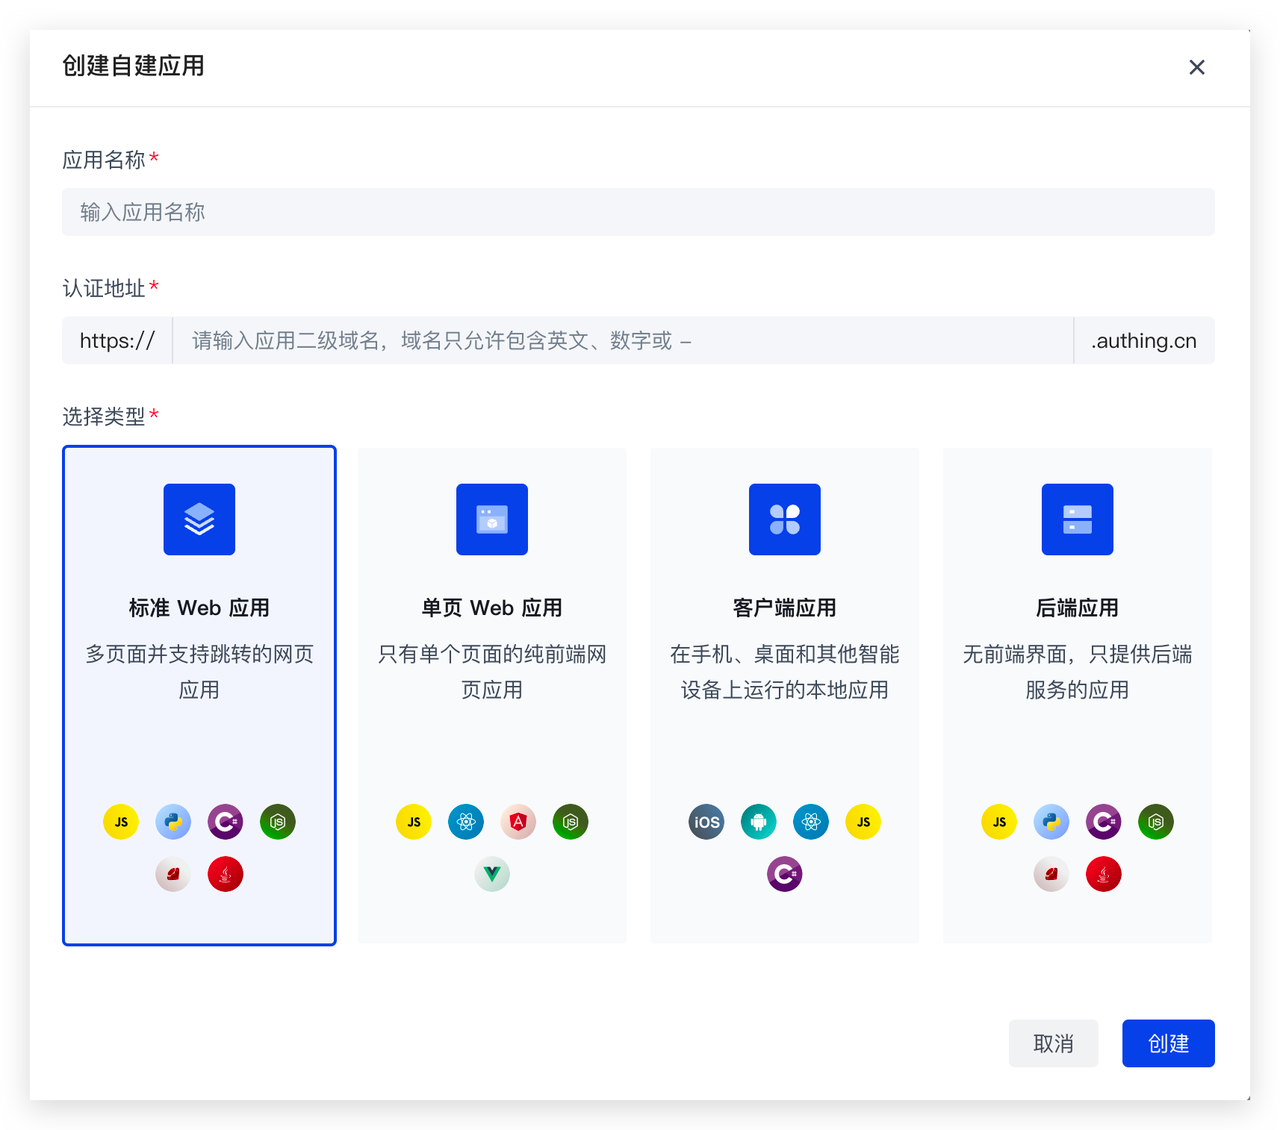 For detailed configuration, please refer to: https://docs.genauth.ai/guides/app-new/
Step 2. Configure adaptive MFA based on GenAuth application
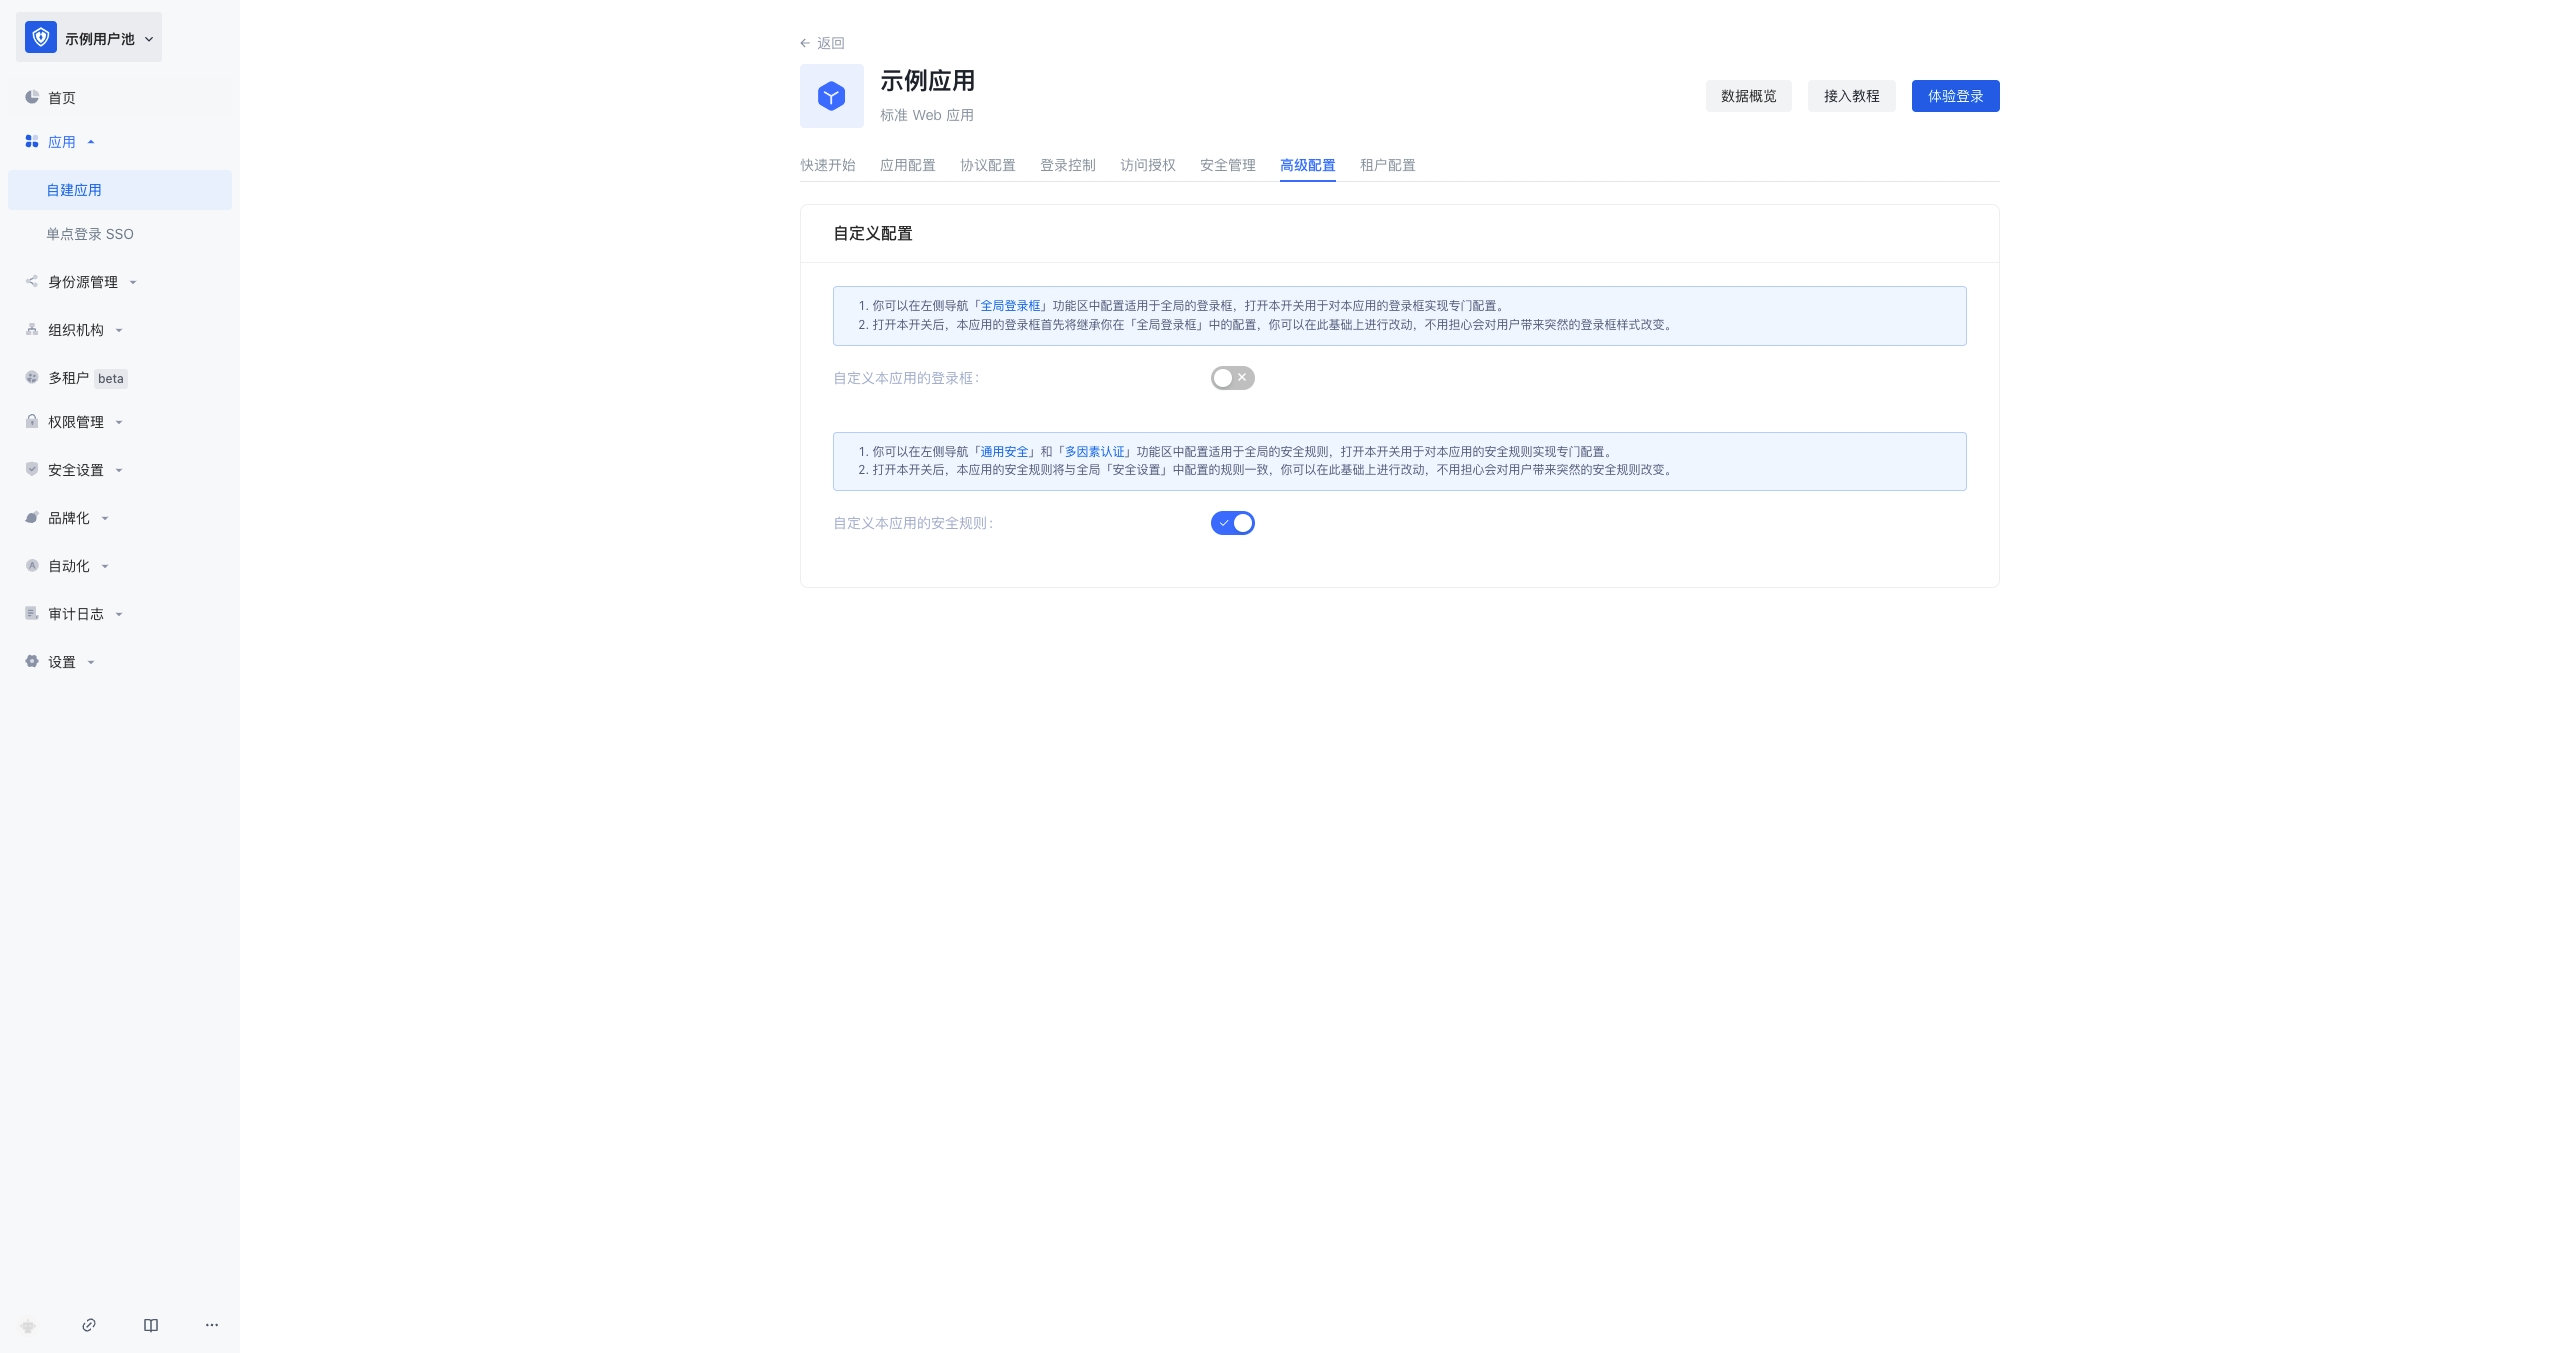
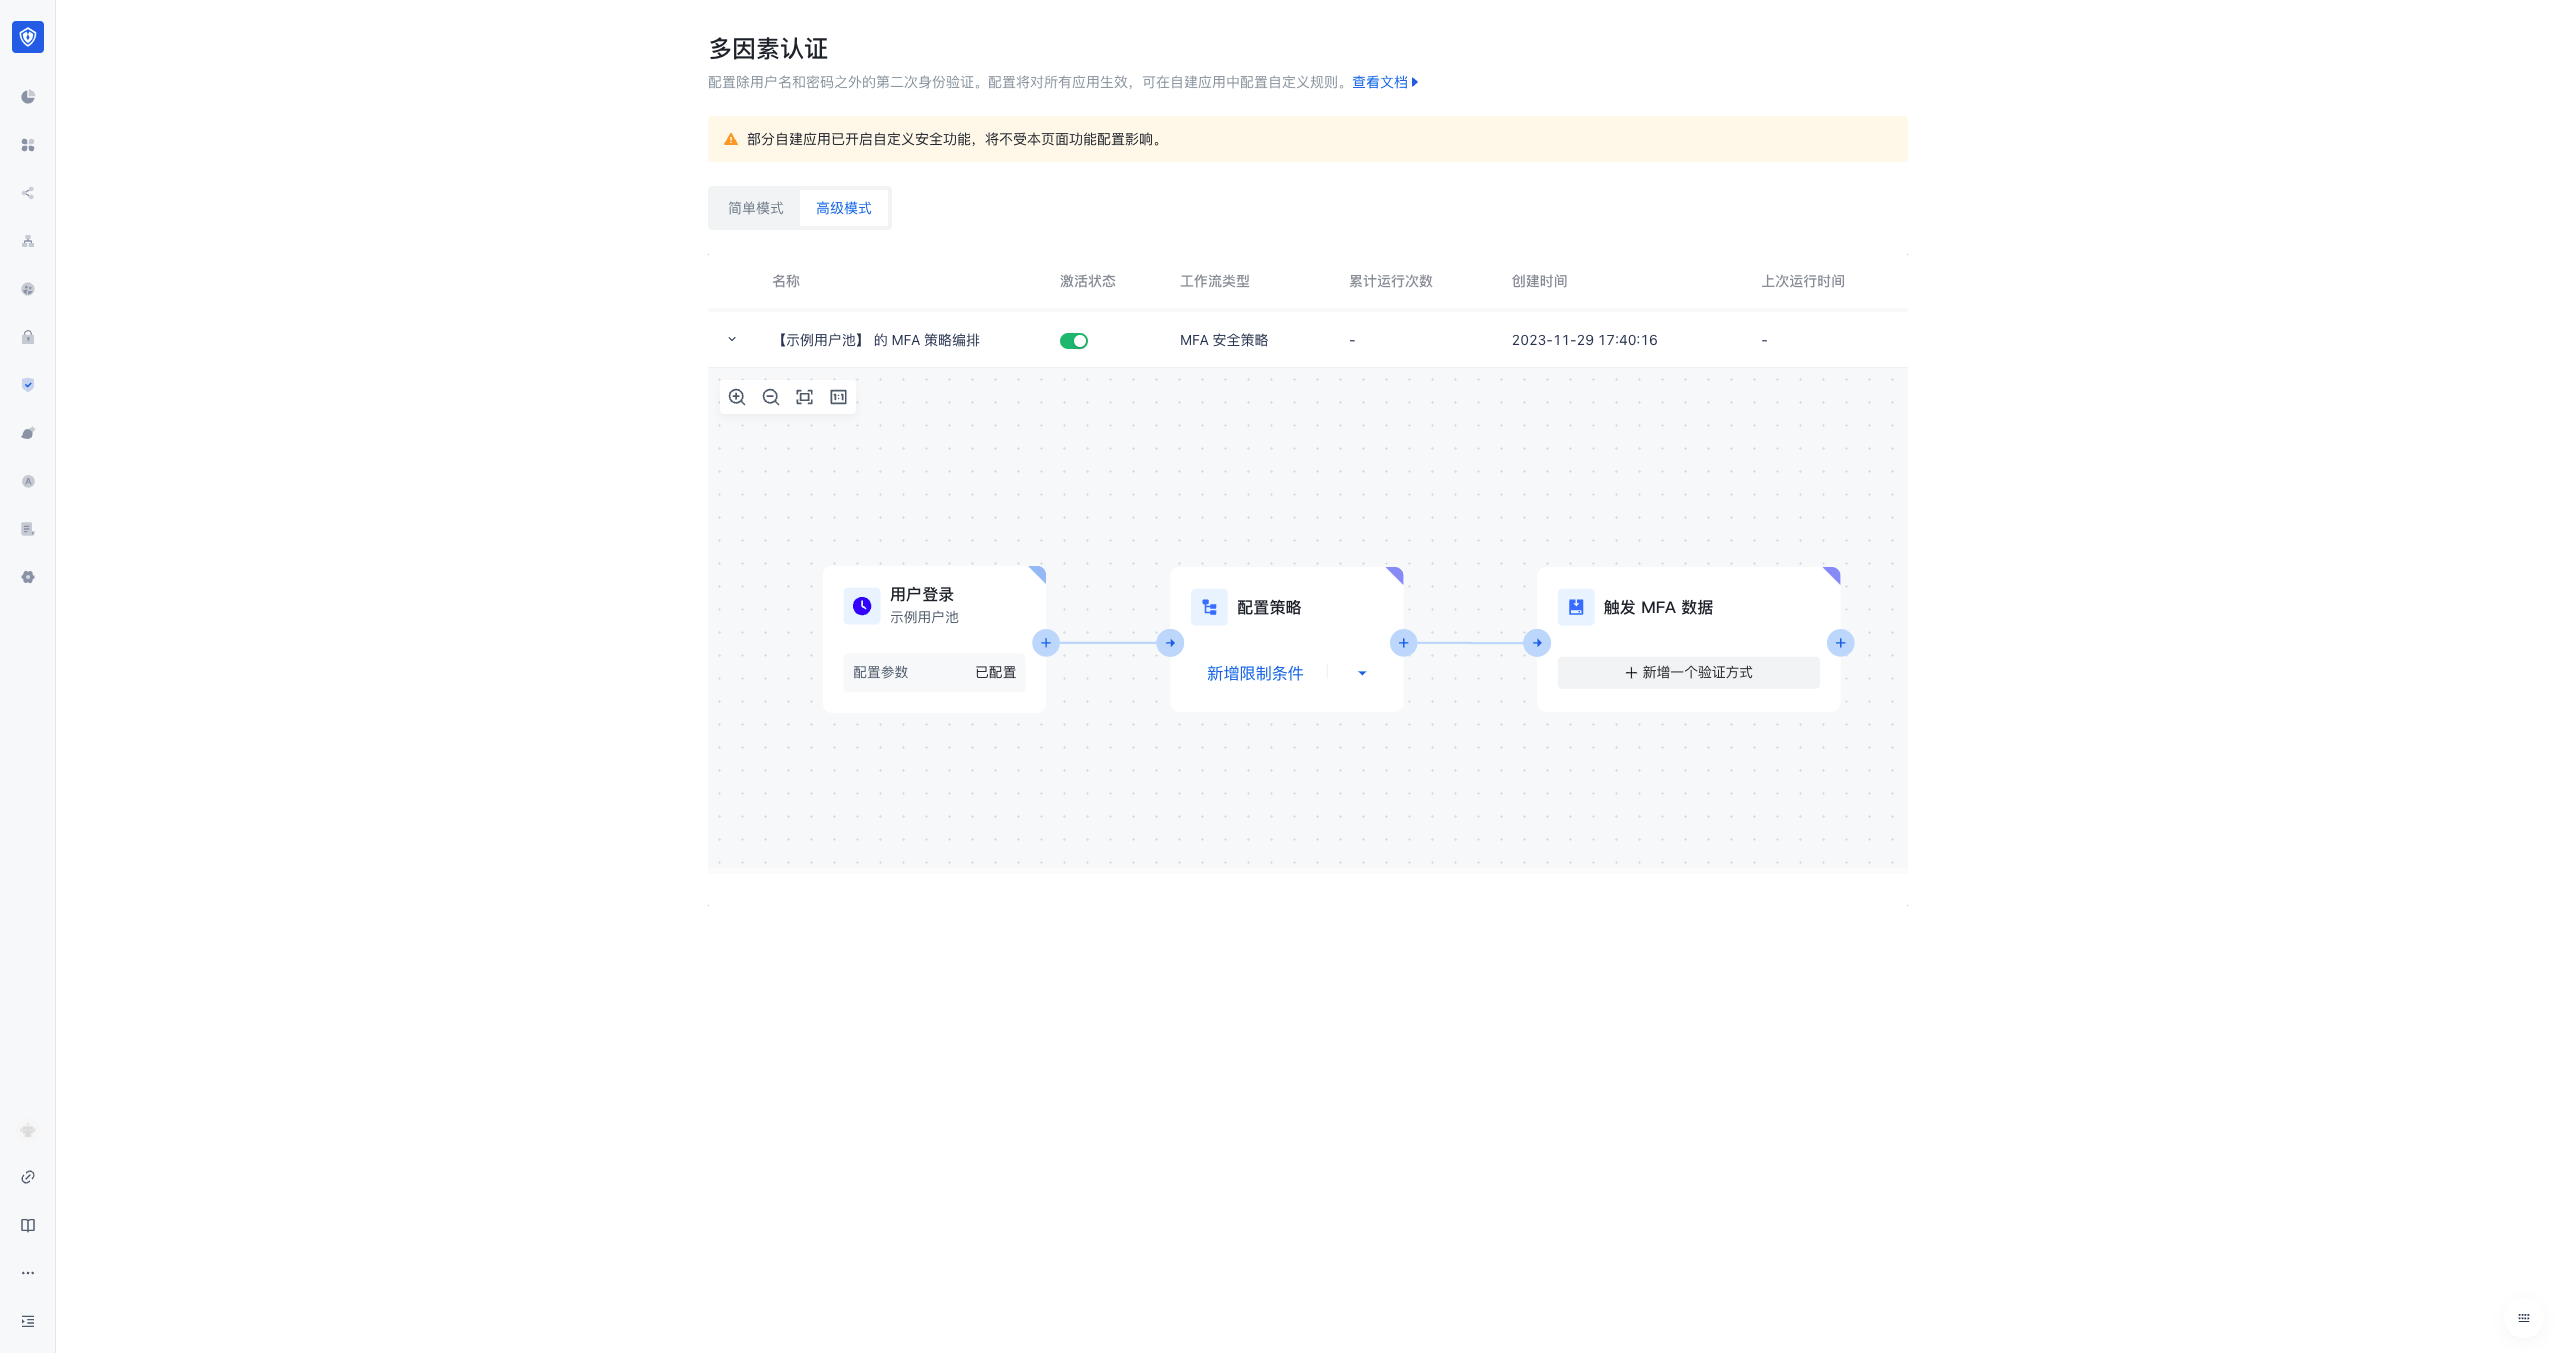
- Enter Console (opens new window) > Click Application Details > Click Advanced Configuration, and turn on **Customize the security rules for this application. **
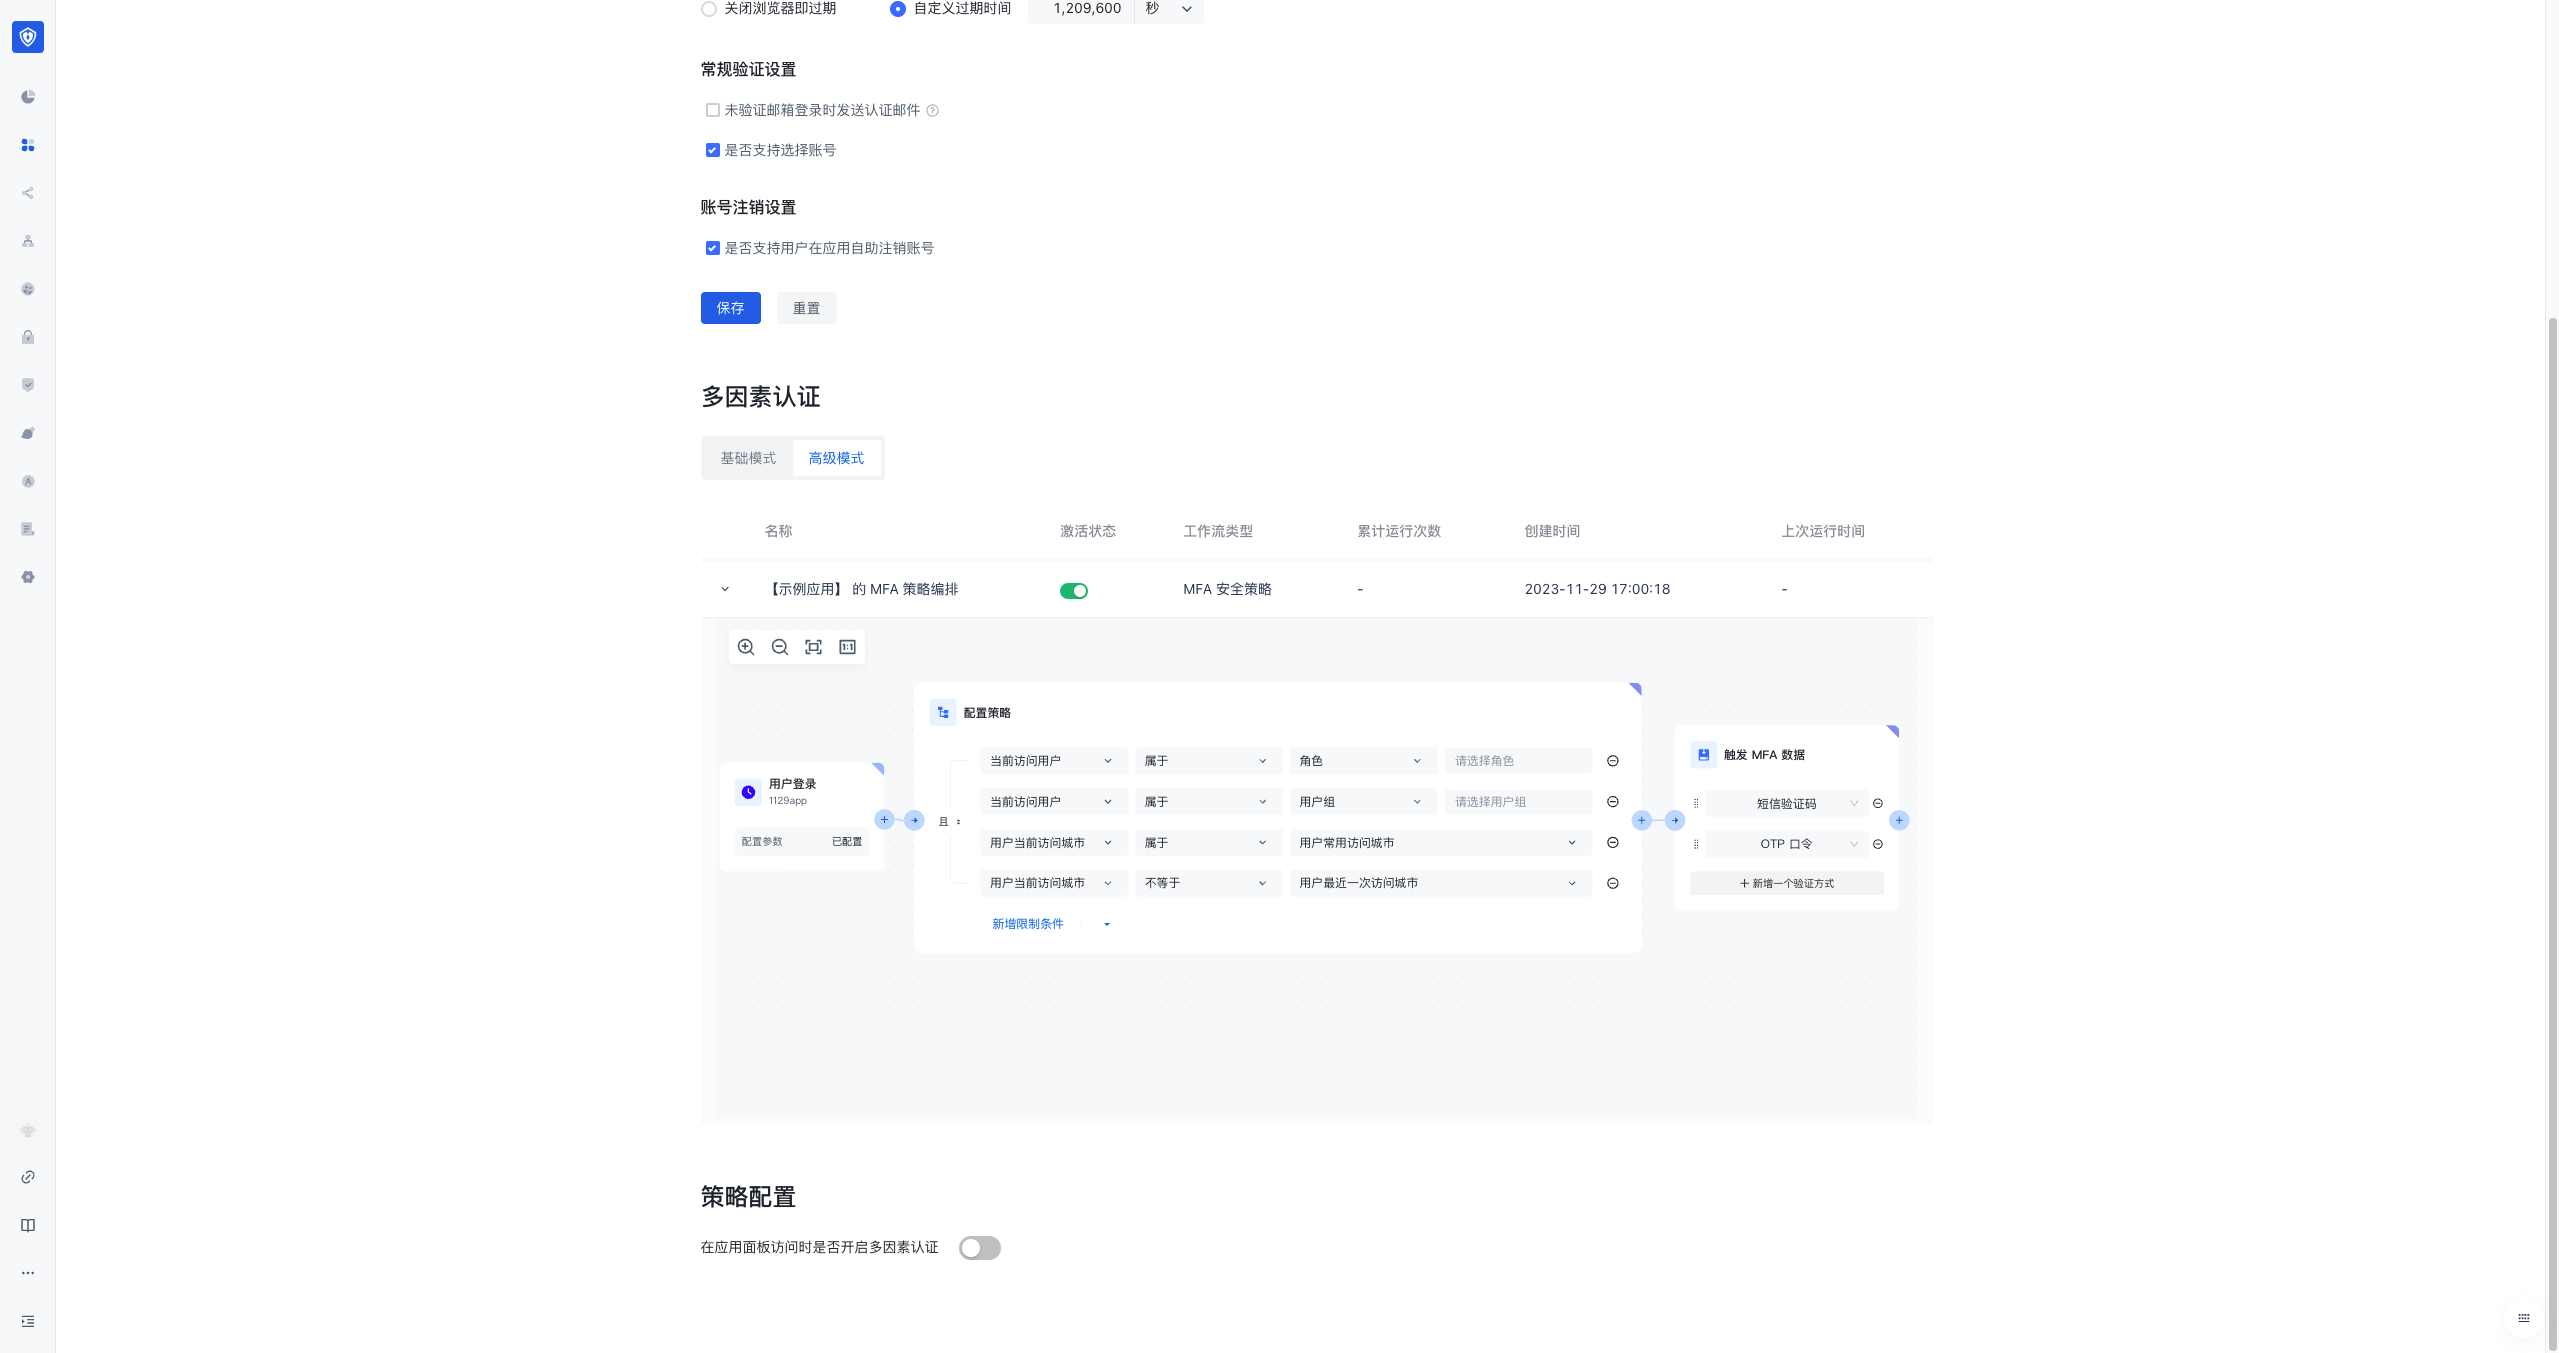
- In the application details, click Security Management, find the Multi-Factor Authentication module, click Advanced Mode, and you can see the workflow orchestrated by the MFA security policy.
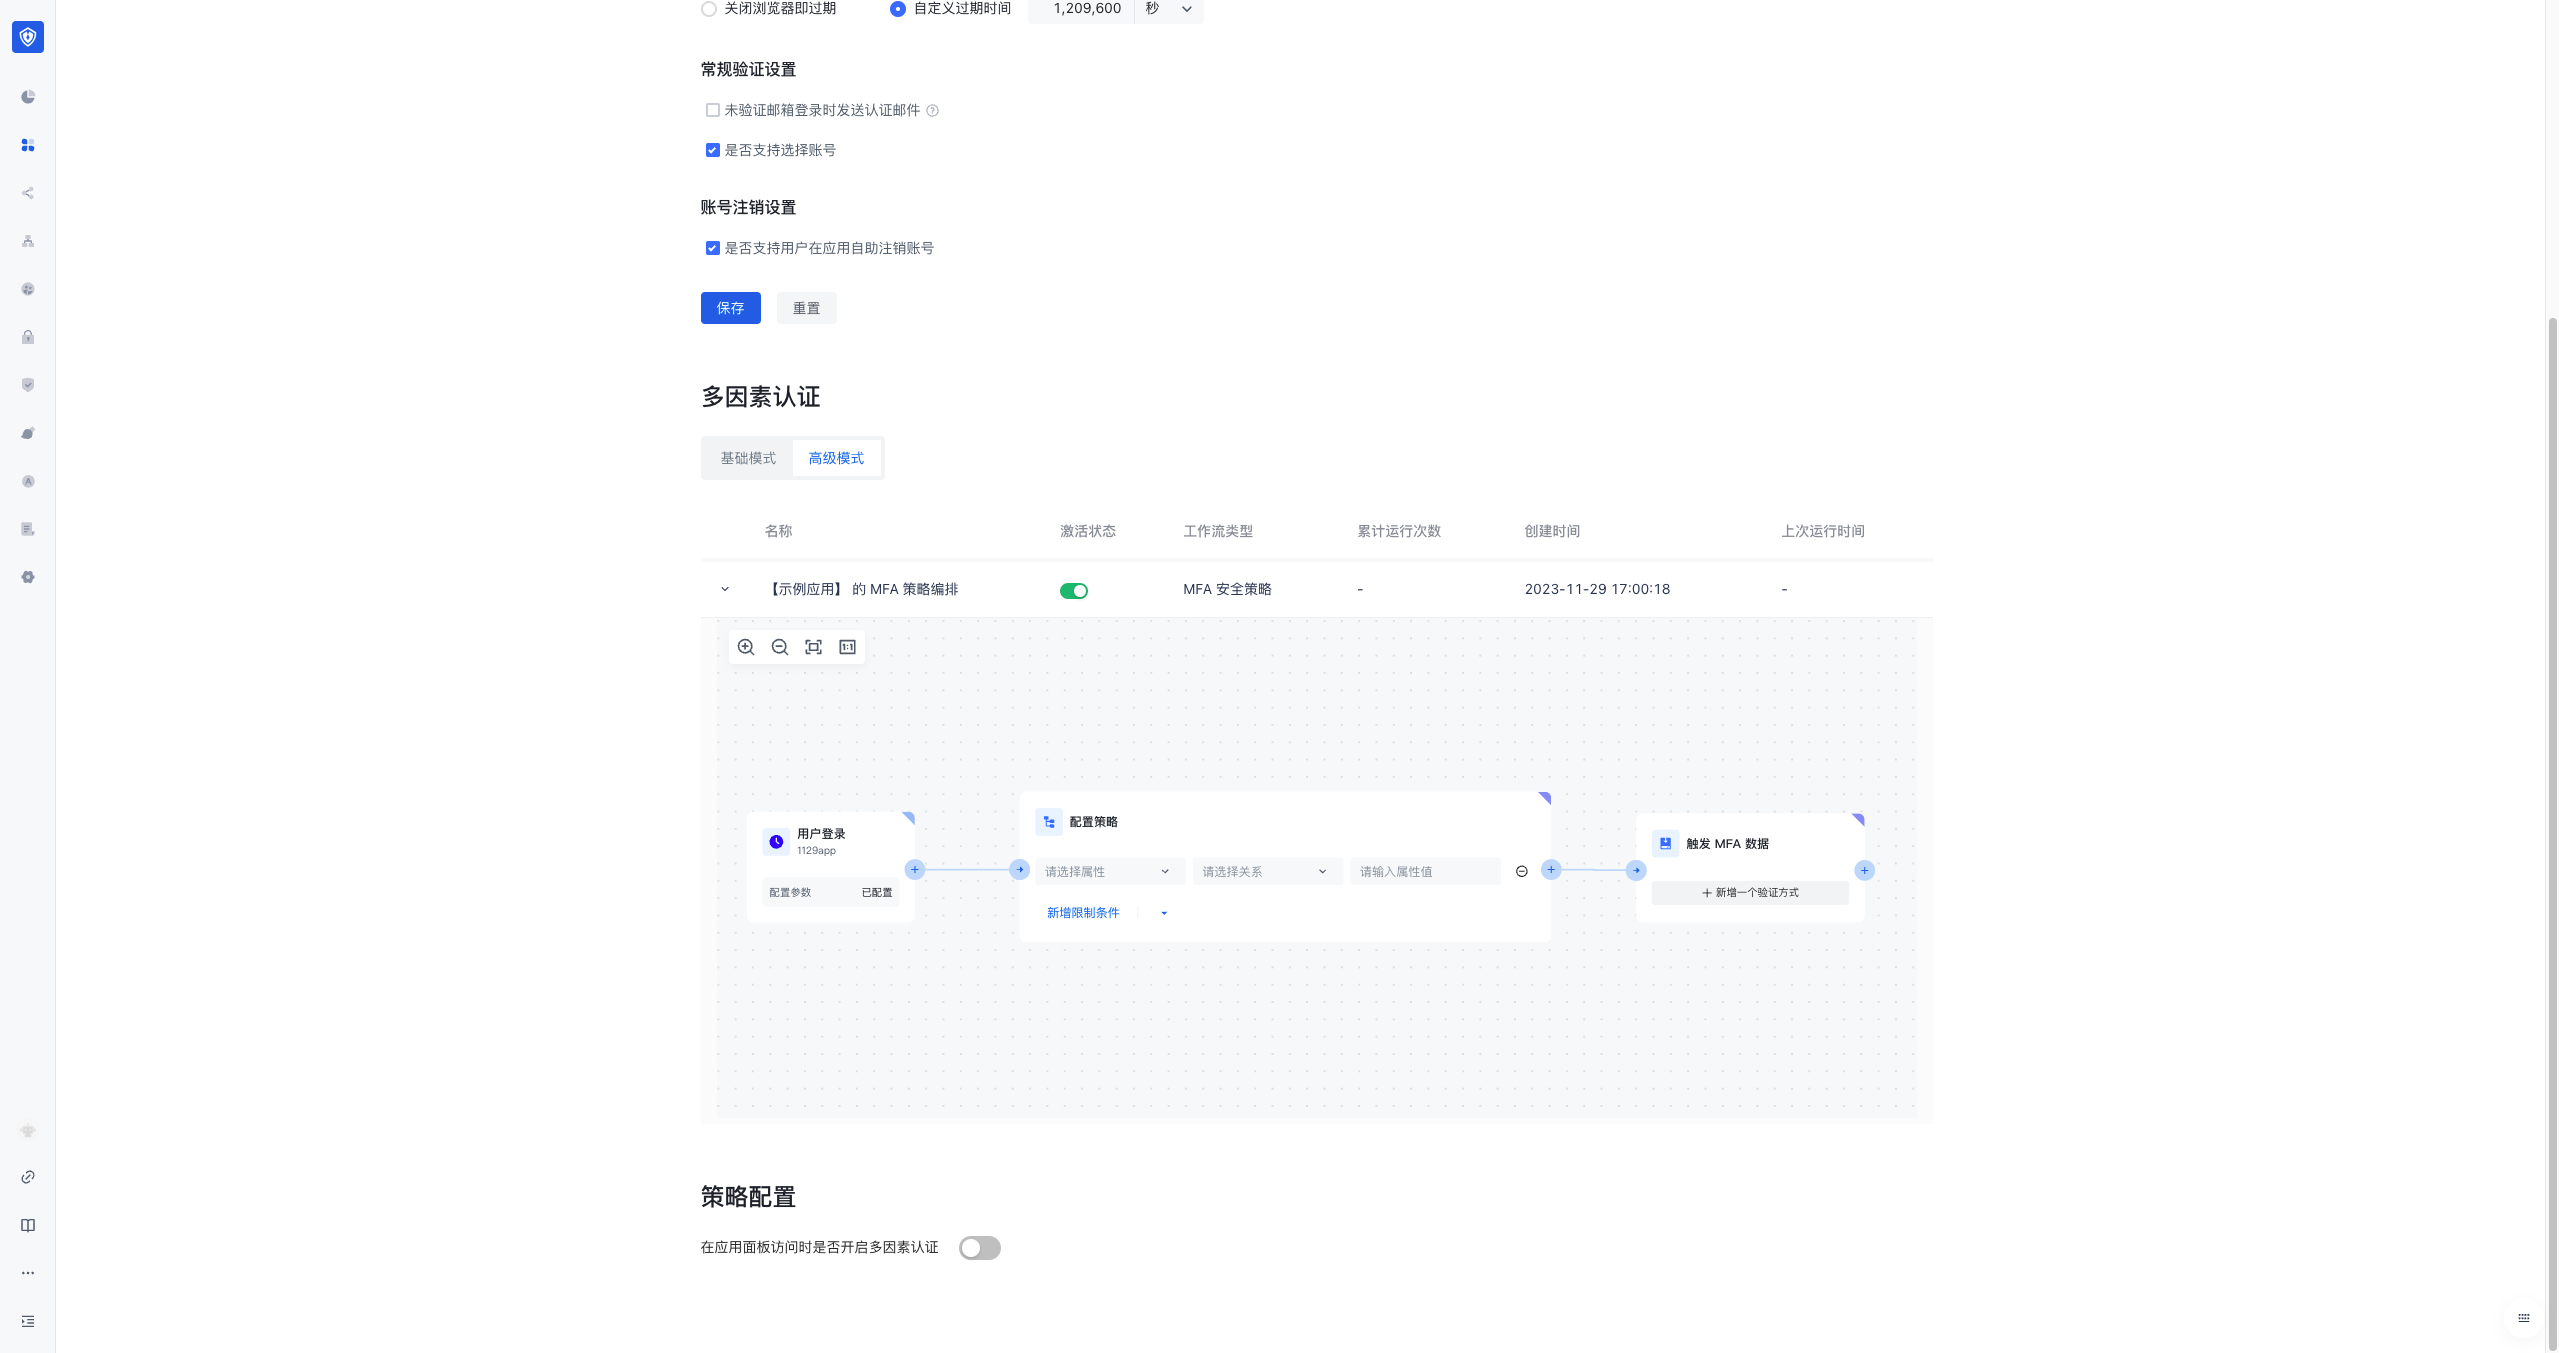
- You can configure the relevant policies and MFA methods for triggering MFA in the workflow node. Currently, policy configuration is supported based on the user's role, user group attributes, the user's last visited city, and the attributes of the frequently visited cities.
- In addition to configuring for each application, you can also configure a global continuous adaptive MFA security policy for all applications in the user pool. You can click Security Settings > Multi-factor Authentication in the console, and then click Advanced Mode to see and configure the workflow of the global MFA security policy orchestration for the user pool. All applications that do not have security settings enabled will inherit the global policy configuration.
Step 3. Connect to GenAuth Guard SDK to implement MFA
GenAuth Guard is a lightweight authentication component that you can embed in any application that interacts with users through a browser to handle complex user authentication processes in one stop. MFA is a module in the Guard component. You can use MFA capabilities by connecting GenAuth Guard to your project.
Step 1: Install and initialize Guard (browser loading)
First, use script and link tags to import files directly in your HTML file, and use the global variable GuardFactory
<!DOCTYPE html>
<html lang="en">
<head>
<meta charset="UTF-8" />
<meta http-equiv="X-UA-Compatible" content="IE=edge" />
<meta name="viewport" content="width=device-width, initial-scale=1.0" />
<title>GenAuth Guard Demo</title>
<script src="https://cdn.authing.co/packages/guard/5.1.5/guard.min.js"></script>
<link
rel="stylesheet"
href="https://cdn.authing.co/packages/guard/5.1.5/guard.min.css"
/>
</head>
<body>
<div id="authing-guard-container"></div>
<!-- Import Guard -->
</body>
</html>Step 2: Get Guard instance (CDN)
// Code example: https://github.com/Authing/Guard/blob/master/examples/guard/normal/embed.html
const guard = new GuardFactory.Guard({
  // You can view your App ID on the app details page in the GenAuth console
  appId: "GEN_AUTH_APP_ID",

  // If you are using a privately deployed GenAuth service, you need to pass in a custom host, such as:
  // host: 'https://my-authing-app.example.com',

  // By default, the first callback address you configured in the GenAuth console will be used as the callback address for this authentication.
  // If you have configured multiple callback addresses, you can also specify them manually (this address also needs to be added to the "Login callback URL" of the application):
  // redirectUri: "YOUR_REDIRECT_URI"
});

console.log("guard instance: ", guard);
For more installation methods, please refer to Web Guard
For more features, please refer to
- GenAuth Adaptive MFA Overview
- Transforming Existing IAM/IDaaS/Authentication Systems to Access GenAuth Adaptive MFA Capabilities
- Advanced MFA: Continuous Adaptive Multi-Factor Authentication (CAMFA) Guide
Transform the existing IAM/IDaaS/authentication system to access GenAuth adaptive MFA capabilities
We will assume that the following is your current goal and status, and we will provide you with the best solution
Goal: Enhance the login authentication security of the existing system, protect the company's sensitive data and applications, and improve the user experience Status: The existing IAM/IDaaS/authentication system is mainly self-developed or developed by a third party, with weak security capabilities or MFA does not have dynamic adaptive perception capabilities (for example, office equipment switching and office network changes can automatically evoke MFA). They usually support multiple authentication methods, such as username/password, social account login, mobile phone verification code, etc. However, these systems still have some problems, such as password leakage, social account theft, etc. Solution: Connect to the GenAuth security policy engine and MFA components to quickly improve security awareness
The overall process of transforming the existing IAM/IDaaS/authentication system to connect to GenAuth's adaptive MFA capabilities
Step 1. Create a GenAuth MFA application
You need to create an MFA application in GenAuth first. Go to Console (opens new window) > Applications and click "Add Application" in the upper right corner.
Step 2. Configure adaptive MFA based on GenAuth application
Enter Console > Application > Click Application Details > Click Security Management, and find the multi-factor authentication factor configuration interface as follows (click the corresponding switch to enable the authentication factor): 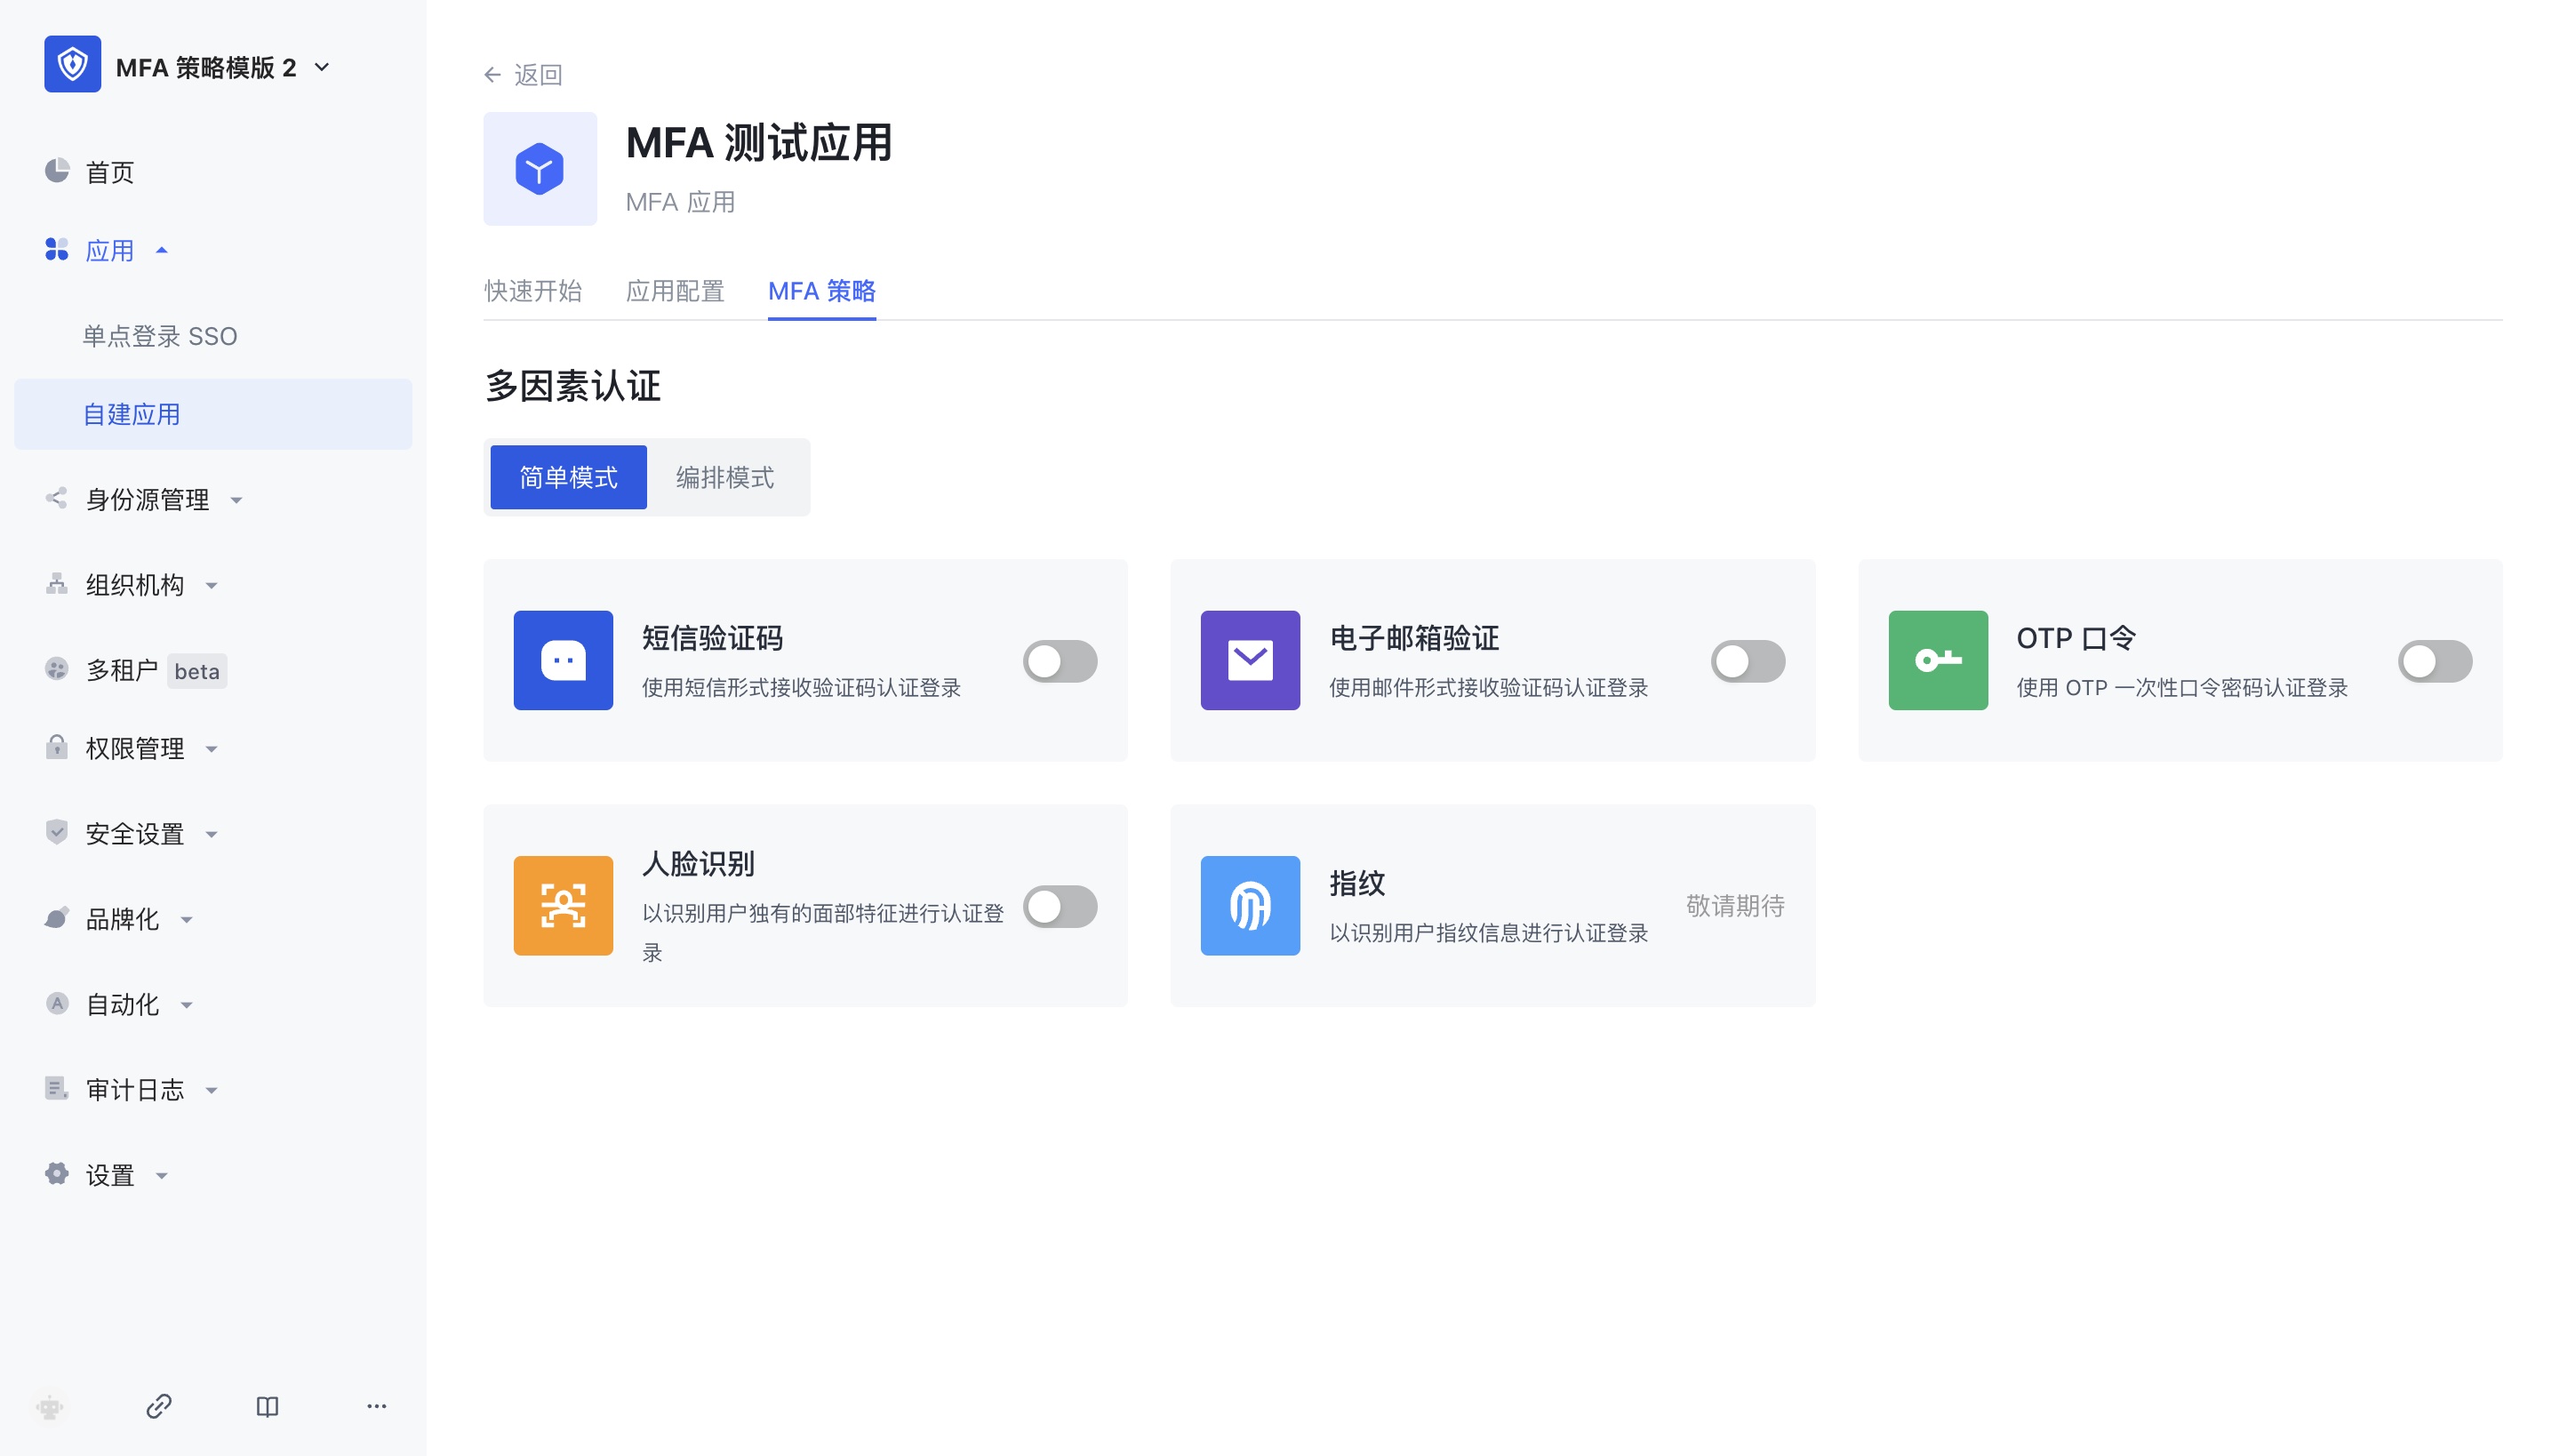
The adaptive MFA authentication strategy is based on GenAuth UEBA, which can perform in-depth analysis of user behavior and user profiles, and automatically select the MFA strategy that matches the current behavior. In the adaptive MFA authentication strategy, the GenAuth UEBA engine analyzes and judges based on the user's behavior and profile, such as the user's login history, device information, IP address, geographic location, activity mode, etc., to determine the current user's identity and risk level, and select the MFA strategy that matches it.
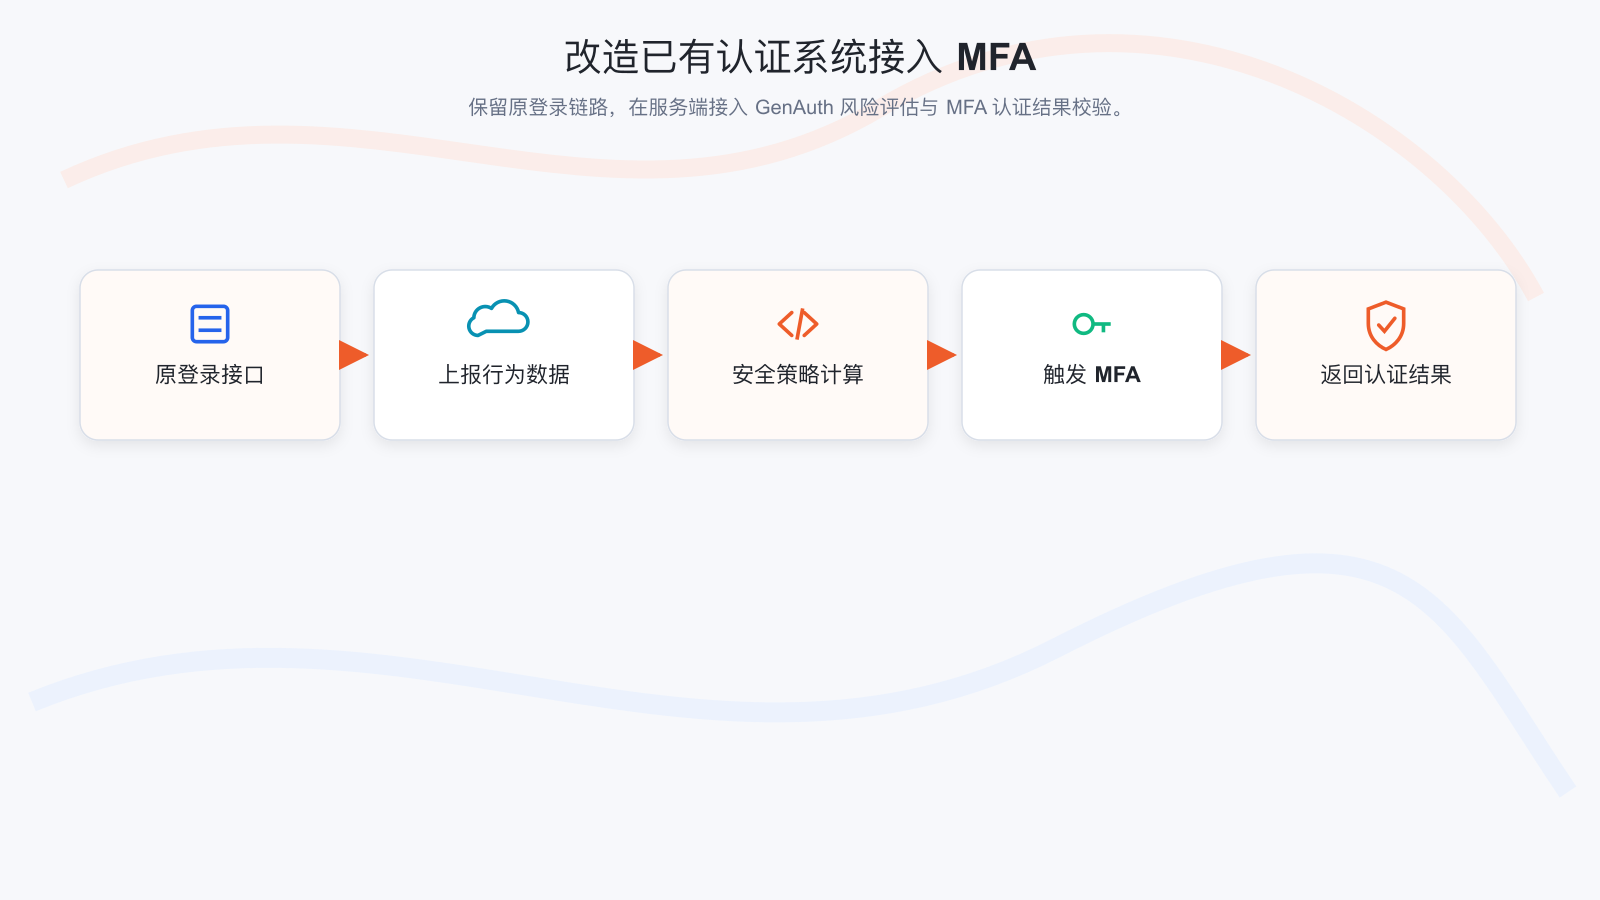
Step 3. Modify the existing IAM/IDaaS/authentication system to access GenAuth adaptive MFA capabilities
Assuming that your system has a relatively simple login authentication process, we will show you how to add GenAuth adaptive MFA security policy authentication capabilities to the simple login authentication process step by step
We recommend you to modify the existing system to access GenAuth adaptive MFA solutions
The following is the interaction sequence diagram 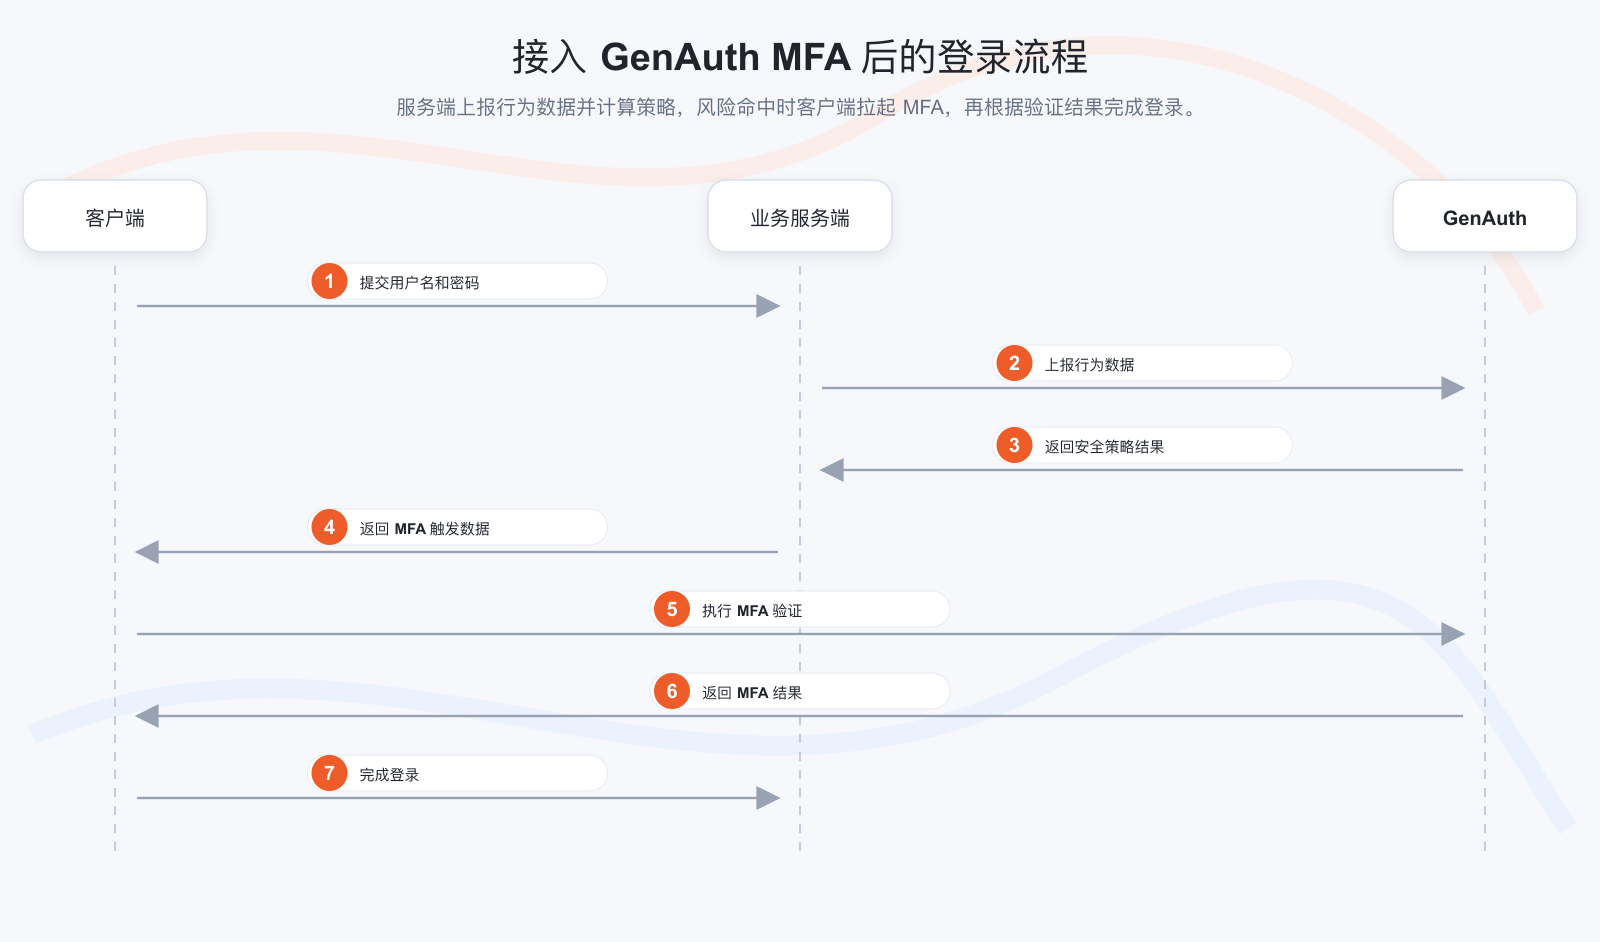
Client modification solution
- Install GenAuth MFA SDK, GenAuth SDK and introduce AuthinMFA, MetadataClient in the code
- Use MetadataClient to obtain user behavior data in the current system, such as IP, browser and other information
- Modify the original login authentication interface and transmit user behavior data to the system background
- Determine whether MFA authentication is currently required
- If MFA is required, use the MFA trigger data and AuthinMFA returned by the backend interface to start the MFA authentication process and perform MFA authentication
- Determine whether the authentication is successful based on the MFA authentication result. If the authentication is successful, record the user login status and jump to the business system; if the authentication fails, display an error message and return to the login page Server-side transformation plan
- Install GenAuth SDK in the code, introduce AuthenticationClient and MetadataManagementClient, and initialize them
- Transform the login interface to receive and carry the authentication status to report the user behavior data to the GenAuth system
- After the user behavior data is reported, if the user passes the authentication once, call the GenAuth security policy engine to calculate whether this authentication triggers MFA
- If MFA is triggered, return the trigger data of this MFA to the client; if MFA is not performed, the verification is successful
Server-side transformation plan
- Install GenAuth SDK in the code, introduce AuthenticationClient and MetadataManagementClient, and initialize them
- Transform the login interface to receive and carry the authentication status to report the user behavior data to the GenAuth system
- After the user behavior data is reported, if the user passes the authentication once, call the GenAuth security policy engine to calculate whether this authentication triggers MFA
- If MFA is triggered, return the trigger data of this MFA to the client Return to the client; if MFA is not performed, the verification is successful
Take a simple application system login code example to help you understand how to gradually transform the system
We assume that the client and server codes for your login system are as follows, which are simple enough to understand
Client code:
// Client code example

// Get the username and password of the current user
const username = form.username;
const password = form.password;

// Carry the username and password to initiate an authentication request to the server
const loginResult = clientLogin(username, password);

// Determine whether to perform subsequent operations based on the login result
if (loginResult.status) {
  // 1. Record login status
  // 2. Jump to the business system
} else {
  // 1. The interface prompts that the authentication failed
  // 2. Return to the login interface
}
Server code:
// Server code example

// Server login authentication method
function login(username, password) {
  // Query the current authenticated user
  const user = db.findByUsername(username);

  // Determine whether the user password is correct
  if (user.password === md5(password)) {
    return {
      status: true,
      token: jwt(user),
    };
  } else {
    return {
      status: false,
      message: "Account or password error",
    };
  }
}
Step 3.1 Client code transformation example
Step 3.1.1 Install and introduce GenAuth MFA SDK (used to pull up the MFA front-end interface) and GenAuth SDK (used to report user behavior data) in the code
$ npm install authing-js-sdk
$ npm install @authing/mfaimport { MetadataClient } from "authing-js-sdk";
import { AuthingMFA } from "@authing/mfa";
const appId = "AUHTING_APP_ID";
const appSecret = "AUHTING_APP_SECRET";
const authingMetadataClient = new MetadataClient();Step 3.1.2 Use Metadata Client to obtain user behavior data in the current system, such as IP, browser, etc.
Metadata Client is an out-of-the-box metadata rapid generation toolkit provided by GenAuth to help customers quickly access the GenAuth metadata platform. It has dozens of built-in metadata types of the GenAuth platform. For the usage of Metadata Client, please refer to: Metadata SDK usage document. In this example, it is mainly used to report user behavior data
// The load method collects the client environment information and stores it in json, such as IP, DeviceType (current request device type), SystemType (current operating system type), BrowserType (current request browser type), etc.
const metadata = authingMetadataClient.authingUEBA.load();Step 3.1.3 Modify the original login authentication interface and transmit user behavior data to the system background
// Transmit user behavior data to the server through the login interface
const loginResult = clientLogin(username, password, metadata);Step 3.1.4 Determine whether MFA authentication is currently required. If MFA is required, use the MFA trigger data returned by the backend interface and the GenAuth MFA SDK to start the MFA authentication process and perform MFA authentication
// Determine the login result returned by the server,
if (loginResult.status) {
// 1. Login successfully records the login status
// 2. Jump to the business system
} else if (loginResult.mfaTriggerData) {
// Use AuthingMFA SDK to start the MFA authentication process
AuthingMFA(loginResult.mfaTriggerData)
.start()
.then((mfaToken) => {
// mfaToken is the jwt token generated after the user's MFA
// You can use mfaToken as the user's successful login credential, or you can re-issue it based on the current token
});
} else {
// 5. The interface prompts that the authentication failed
}Step 3.1.5 Determine whether the authentication is successful based on the MFA authentication result. If the authentication is successful, record the user login status and jump to the business system; if the authentication fails, display an error message and return to the login page
// Use AuthingMFA SDK to start the MFA authentication process
AuthingMFA(loginResult.mfaTriggerData)
.start()
.then((mfaToken) => {
// You can use mfaToken as the user login credential, or re-issue it based on the current token
// The following example is the process of re-issuing mfaToken
const myToken = clientReIssueToken(mfaToken);
if (myToken) {
// 1. Record login status
// 2. Jump to the business system
} else {
// The interface prompts that the authentication failed
}
});If you choose to use GenAuth mfaToken as the user authentication token, you can refer to the following code
// Use AuthingMFA SDK to start MFA Authentication process
AuthingMFA(loginResult.mfaTriggerData).start().then(mfaToken => {
// TODO verify token legitimacy
// You can use mfaToken as a user login credential, or re-issue it based on the current token
if(myToken) {
// 1. Use mfaToken to record login status
// 2. Jump to business system
} else {
// Interface prompts authentication failure
}
}The overall code after client transformation is as follows
import { MetadataClient } from "authing-js-sdk";
import { AuthingMFA } from "@authing/mfa";

const appId = "AUHTING_APP_ID";
const appSecret = "AUHTING_APP_SECRET";

const authingMetadataClient = new MetadataClient();
// The load method collects information about the client environment and stores it in json, such as IP, DeviceType (current request device type), SystemType (current operating system type), BrowserType (current request browser type), etc.
const metadata = authingMetadataClient.authingUEBA.load();
// Pass user behavior data to the server through the login interface
const loginResult = clientLogin(username, password, metadata);
// Determine the login result returned by the server,
if (loginResult.status) {
// 1. Login successfully records the login status
// 2. Jump to business system
} else if (loginResult.mfaTriggerData) {
// Use AuthingMFA SDK to start MFA authentication process
AuthingMFA(loginResult.mfaTriggerData)
.start()
.then((mfaToken) => {
// You can use mfaToken as the user login credential, or you can re-issue it based on the current token
// The following example is the process of re-issuing mfaToken
// TODO SDK verify
const myToken = clientReIssueToken(mfaToken);
if (myToken) {
// 1. Record login status
// 2. Jump to business system
} else {
// The interface prompts that the authentication failed
}
});
} else {
// 5. The interface prompts that the authentication failed
}Step 3.2 Server code modification example
Step 3.2.1 Install GenAuth SDK in the code and introduce AuthenticationClient, MetadataManagementClient, and initialize
$ npm install authing-js-sdkimport { MetadataManagementClient, AuthenticationClient } from "authing-js-sdk";
const appId = "AUHTING_APP_ID";
const appSecret = "AUHTING_APP_SECRET";
const authingMetadataManagementClient = new MetadataManagementClient({
appId,
appSecret,
});
const authingAuthenticationClient = new AuthenticationClient({ appId });Step 3.2.2 Modify the login interface, receive and carry the authentication status, and report the user behavior data to the GenAuth system
const authingUEBA = authingMetadataManagementClient.authingUEBA

// User login interface
function login(username, password, metadata) {
    // Query the current authenticated user
    const user = db.findByUsername(username)
    const loginStatus = user.password === md5(password)

    // Report user behavior data with authentication status to the GenAuth system
    const clientUEBAMetadata = metadata
    const UEBAMetadata = await authingUEBA.capture({
        ...clientUEBAMetadata,
        loginStatus
    })

    // If authentication fails, just return an error
    if(!loginStatus) {
        return {
            status: false,
            message: 'Account or password error'
        }
    }
}
Why should user behavior data be forwarded through the business system server?
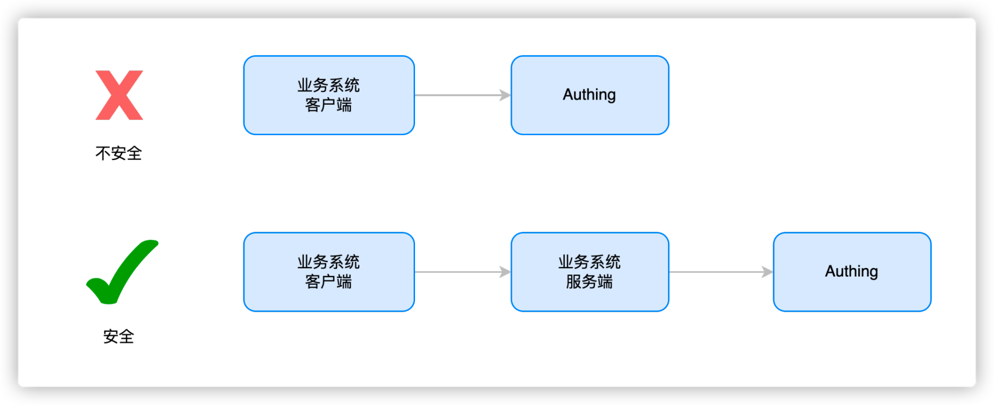
Data is transmitted to the server to make it more secure, avoid data leakage, abuse and arbitrary modification, and facilitate data persistence and ensure that data will not be lost. It is also convenient for data processing, better mining of data value, and support data sharing for use by other applications or devices.Step 3.2.3 Call the GenAuth security policy engine to calculate whether this authentication triggers MFA
// After the metadata is successfully uploaded, call the authentication side MFA workflow (specify the MFA work policy ID and the collected metadata information for each application, and obtain the metadata analysis results
const mfaTriggerData = authingAuthenticationClient.triggerWorkflow({
  workflowId: "xxx",
  metadata: clientUEBAMetadata, // Data in the UEBA metadata format bound by the user
});
Step 3.2.4 If MFA is triggered, return the trigger data of this MFA to the client; if MFA is not performed, the verification is passed
const mfaTriggerData = authingAuthenticationClient.MFA.triggerWorkflow({
  workflowId: "xxx",
  metadata: clientUEBAMetadata, // Data in the UEBA metadata format bound by the user
});

if (mfaTriggerData) {
  return {
    status: false,
    mfaTriggerData: mfaTriggerData,
  };
} else {
  return {
    status: true,
    token: jwt(user),
  };
}
Step 3.2.5 Add a new interface to verify the validity of MFA token and reissue the user token based on the verification result
// MFA verify interface
function clientReissueToken(mfaToken) {
  const mfaRes = authingAuthenticationClient.verify(mfaToken);
  // If mfaToken verification succeeds
  if (mfaRes.status) {
    // Take out the Id information contained in mfaToken
    const { originalIdentity } = mfaRes.data;
    // Query the user contained in the Id, and return the Token package if the user exists
    const user = db.findByUsername(originalIdentity);
    return {
      status: true,
      token: jwt(user),
    };
  } else {
    // If mfaToken verification fails, return failure information
    return {
      status: false,
      message: mfaRes.message,
    };
  }
}
The overall code after the server modification is as follows
import { MetadataManagementClient, AuthenticationClient } from 'authing-js-sdk'

const appId = 'AUHTING_APP_ID'
const appSecret = 'AUHTING_APP_SECRET'

const authingMetadataManagementClient = new MetadataManagementClient({appId, appSecret})
const authingAuthenticationClient = new AuthenticationClient({appId})

const authingUEBA = authingMetadataManagementClient.authingUEBA

// User login interface
function login(username, password, metadata) {
    // Query the current authenticated user
    const user = db.findByUsername(username)
    const loginStatus = user.password === md5(password)

    // Carry the authentication status to report the user behavior data to the GenAuth system
    const clientUEBAMetadata = metadata
    const UEBAMetadata = await authingUEBA.capture({
        ...clientUEBAMetadata,
        loginStatus
    })

    // If authentication fails, just return an error
    if(!loginStatus) {
        return {
            status: false,
            message: 'Account or password error'
        }
    }

    // After metadata is uploaded successfully, call the authentication side MFA workflow (specify the MFA work policy Id and collected metadata information for each application, and obtain the metadata analysis results
    const mfaTriggerData = authingAuthenticationClient.triggerWorkflow({
        'workflowId': 'xxx',
        'metadata': clientUEBAMetadata,// Data in the UEBA metadata format bound by the user
    })

    if(mfaTriggerData) {
        return {
            status: false,
            mfaTriggerData: mfaTriggerData
        }
    } else {
        return {
            status: true,
            token: jwt(user)
        }
    }
}

// MFA verify interface
function verifyMFA(mfaToken) {
    const mfaRes = authingAuthenticationClient.verify(mfaToken)
    // If mfaToken verification succeeds
    if(mfaRes.status) {
        // Get the ID information contained in mfaToken
        const { originalIdentity } = mfaRes.data
        // Query the user contained by ID, and return the Token package if the user exists
        const user = db.findByUsername(originalIdentity)
        return {
            status: true,
            token: jwt(user)
        }
    } else {
        // If mfaToken verification fails, return the failure information
        return {
            status: false,
            message: mfaRes.message
        }
    }
}
For more information about functions, please refer to
- GenAuth Adaptive MFA Overview
- Access based on GenAuth Guard login component MFA
- Advanced MFA: Continuous Adaptive Multi-Factor Authentication (CAMFA) Guide
Advanced MFA: Continuous Adaptive Multi-Factor Authentication (CAMFA) Guide
Goal: Improve user experience and security, reduce enterprise costs through intelligence Current situation: Self-developed systems do not have MFA or MFA functions are weak and urgently need to call MFA in multiple scenarios (such as resource access, device addition, information change) Solution: Access GenAuth advanced MFA components to quickly implement multi-scenario calls
What is Continuous Adaptive Multi-Factor Authentication
Continuous Adaptive Multi-Factor Authentication (CAMFA) is a secure authentication method that combines multiple authentication factors (such as passwords, biometrics, hardware tokens, etc.) and uses real-time risk assessment technology to dynamically evaluate users to improve security.
How to configure continuous adaptive multi-factor authentication

Step 1. Create a GenAuth MFA application
You need to create an MFA application in GenAuth first. Go to the console (opens new window) > Applications, and click "Add Application" in the upper right corner.
Step 2. Configure adaptive MFA based on the GenAuth application
Go to the Console > Applications > Click Application Details > Click Security Management, and find the multi-factor authentication factor configuration interface as follows (click the corresponding switch to enable the authentication factor):
The adaptive MFA authentication strategy is based on GenAuth UEBA, which can conduct in-depth analysis of user behavior and user portraits, and automatically select the MFA strategy that matches the current behavior. In the adaptive MFA authentication strategy, the GenAuth UEBA engine will analyze and judge based on the user's behavior and profile, such as the user's login history, device information, IP address, geographic location, activity pattern, etc., to determine the current user's identity and risk level, and select the MFA strategy that matches it.
Step 3. Report UEBA data from the business system backend to the GenAuth system
You need to introduce the GenAuth SDK in your server system and use MetadataManagementClient to report user behavior data to the GenAuth system. The specific operation process is as follows:
Step 3.1 Install GenAuth SDK
npm install authing-js-sdkStep 3.2 Initialize MetadataManagementClient
import { MetadataManagementClient } from "authing-js-sdk";

const appId = "AUHTING_APP_ID";
const appSecret = "AUHTING_APP_SECRET";

const authingMetadataManagementClient = new MetadataManagementClient({
  appId,
  appSecret,
});
Step 3.3 Get user behavior data and report it to the GenAuth system
// Get user behavior data information
const userUEBAData = getUserUEBAFromRequest(req);

// Report user behavior data to the GenAuth system
const UEBAMetadata =
  authingMetadataManagementClient.authingUEBA.capture(userUEBAData);
GenAuth provides more friendly ways to obtain user behavior information, please refer to 「MetadataClient」GenAuth MFA Quick Start
Why forward user behavior data through the business system server
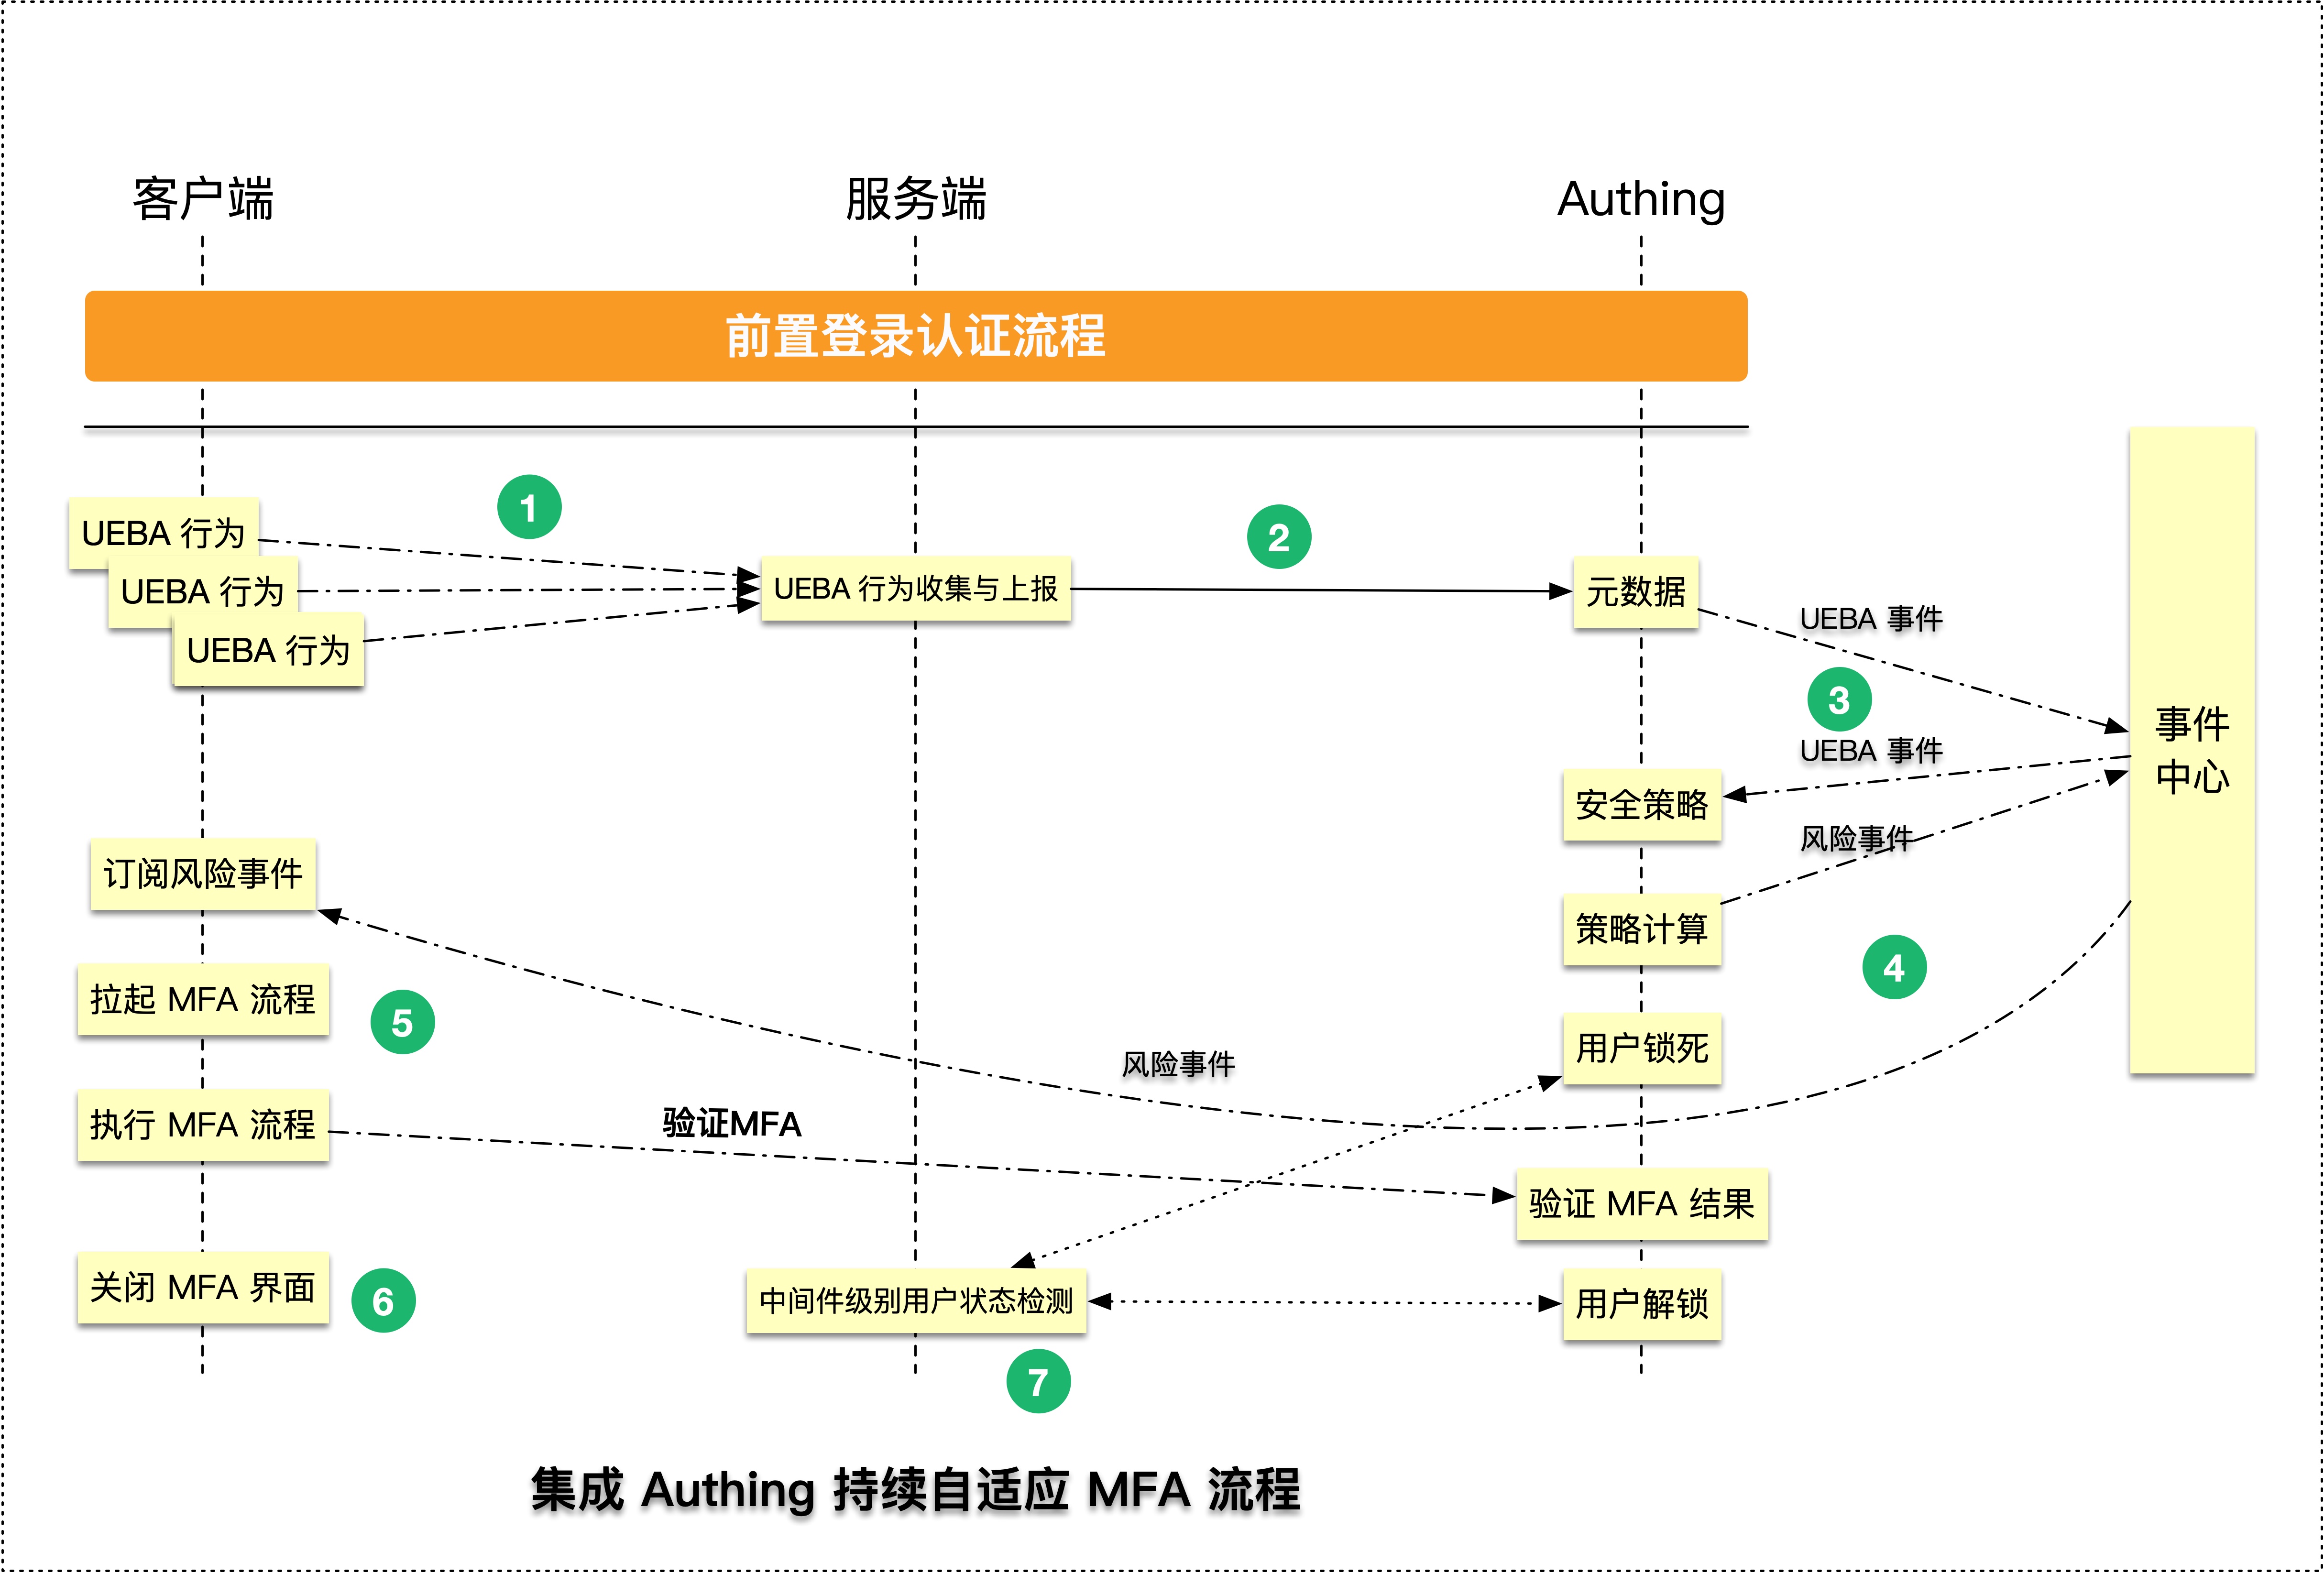
The purpose of transmitting data to the server is to make the data more secure, avoid data leakage, abuse and arbitrary modification, and also facilitate data persistence and ensure that data will not be lost. It is also convenient for data processing, better mining of data value, and support data sharing for use by other applications or devices.Step 4. Configure the continuous adaptive MFA security policy flow and publish security events
Step 5. Subscribe to the events published by the security policy flow
The continuous adaptive security policy requires your client to continuously monitor the MFA events and respond in real time after receiving the MFA events. The specific process is as follows
Step 5.1 Install GenAuth SDK on the server
$ npm install authing-js-sdk
$ npm install @authing/mfa
Step 5.2 Initialize AuthenticationClient
import { AuthenticationClient } from "authing-js-sdk";
import { AuthingMFA } from "@authing/mfa";
const appId = "YOUR_APP_ID";
const authingAuthenticationClient = new AuthenticationClient({ appId });
Step 5.3 Subscribe to MFA events, use MFA trigger data and AuthingMFA to start the MFA authentication process, and perform MFA authentication
// Subscribe to MFA events, and automatically add the current user's MFA status check logic through GenAuth
authingAuthenticationClient.MFA.subscribe(
  "authing.security.mfa?originalIdentity=originalIdentityexternalid",
  (mfaTriggerData) => {
    // Use AuthingMFA SDK to start the MFA authentication process
    AuthingMFA(mfaTriggerData)
      .start()
      .then((mfaToken) => {
        // mfaToken is the jwt token generated after the user's MFA
        // You can use mfaToken as the user's successful login credential, or you can re-issue it based on the current token
      });
  }
);
Step 5.4 Determine whether the authentication is successful based on the MFA authentication result. If the authentication is successful, record the user login status and jump to the business system; if the authentication fails, display an error message and return to the login page
// Use AuthingMFA SDK to start the MFA authentication process
AuthingMFA(mfaTriggerData).then((mfaToken) => {
  // You can use mfaToken as the user login credential, or re-issue it based on the current token
  // The following example is the process of re-issuing mfaToken
  const myToken = clientReIssueToken(mfaToken);
  if (myToken) {
    // 1. Record login status
    // 2. Jump to the business system
  } else {
    // The interface prompts that the authentication failed
  }
});
If you choose to use GenAuth mfaToken as the user authentication token, you can refer to the following code
// Use AuthingMFA SDK to start the MFA authentication process
AuthingMFA(mfaTriggerData)
  .start()
  .then((mfaToken) => {
    // You can use mfaToken as the user login credential, or re-issue it based on the current token
    if (myToken) {
      // 1. Use mfaToken to record the login status
      // 2. Jump to the business system
    } else {
      // The interface prompts that the authentication failed
    }
  });
Step 6. Lock all subsequent business operations of the current user and pull up MFA verification
After an MFA risk event occurs, you need to transform your backend system to restrict operations for users with MFA risks and prohibit subsequent requests
First, use a simple express backend system code as an example to help you understand how to modify the code of your business system
Step 6.1 Initialize the metadata management client
import { MetadataManagementClient } from "authing-js-sdk";

const appId = "YOUR_APP_ID";
const authingMetadataManagementClient = new MetadataManagementClient({ appId });
Step 6.2 Add express middleware to verify user MFA status to the server system
import express from 'express'
import { MetadataManagementClient } from 'authing-js-sdk'

const appId = 'YOUR_APP_ID'
const authingMetadataManagementClient = new MetadataManagementClient({appId})

const authingUEBA = authingMetadataManagementClient.authingUEBA
const mfaAuthMiddleware = (req, res, next) => {
    // Get the user ID in the token
    const { myUserId } = utils.getUser(req.header.token)
    // Check the user MFA status, you need to pass in the user ID
    const { mfaVerified } = await authingUEBA.checkUserStatus({ originalId: myUserId })
    // Reverse the process according to the MFA status
    if(mfaVerified) {
        // The customer performs the next business operation
        next()
    } else {
        throw new UnauthorizedClientError()
    }
}

const app = new express()
app.use(mfaAuthMiddleware)
Step 7 Design a disaster recovery verification mechanism
Step 7.1 Keep the MFA verification status persistent in the scenario of refreshing the page
After the user refreshes the page, GenAuth will automatically query the current user MFA verification success status in the security policy subscription method. If the status is verification failure, the current subscription function will be automatically executed. It is recommended that developers implement the trigger MFA method in the subscription function. The following is a specific code example:
Step 7.1.1 Install GenAuth SDK on the server
$ npm install authing-js-sdk
$ npm install @authing/mfa
Step 7.1.2 Initialize AuthenticationClient
import { AuthenticationClient } from "authing-js-sdk";
import { AuthingMFA } from "@authing/mfa";
const appId = "YOUR_APP_ID";
const authingAuthenticationClient = new AuthenticationClient({ appId });
Step 7.1.3 Subscribe to MFA events, use MFA trigger data and AuthingMFA to start the MFA authentication process, and perform MFA authentication
// Subscribe to MFA events, and the current user's MFA status will be automatically added through GenAuth check logic
authingAuthenticationClient.MFA.subscribe(
  "authing.security.mfa?user=xxx",
  (mfaTriggerrData) => {
    // Use AuthingMFA SDK to start MFA Authentication process
    AuthingMFA(mfaTriggerData)
      .start()
      .then((mfaToken) => {
        // mfaToken is the jwt token generated after the user MFA
        // mfaToken can be used as the user's login credential, or it can be re-issued based on the current token
      });
  }
);
Step 7.1.4 Determine whether the authentication is successful based on the MFA authentication result. If the authentication is successful, record the user login status and jump to the business system; if the authentication fails, display an error message and return to the system login page
// Use AuthingMFA SDK to start the MFA authentication process
AuthingMFA(mfaTriggerData)
  .start()
  .then((mfaToken) => {
    // You can use mfaToken as a user login credential, or you can re-issue it based on the current token
    // The following example is the process of re-issuing using mfaToken
    const myToken = clientReIssueToken(mfaToken);
    if (myToken) {
      // 1. Record login status
      // 2. Jump to the business system
    } else {
      // The interface prompts that the authentication failed
    }
  });
If you choose to use GenAuth mfaToken as the user authentication token, you can refer to the following code
// Use AuthingMFA SDK to start the MFA authentication process
AuthingMFA(mfaTriggerData)
  .start()
  .then((mfaToken) => {
    // You can use mfaToken as the user login credential, or re-issue it based on the current token
    if (myToken) {
      // 1. Use mfaToken to record the login status
      // 2. Jump to the business system
    } else {
      // The interface prompts that the authentication failed
    }
  });
Step 7.2 GenAuth automatically implements a disaster recovery mechanism for releasing users when the MFA service is down
In the authingUEBA.checkUserStatus method, GenAuth will have a built-in MFA service monitoring process. When the result returned by the MFA service is abnormal, the current user MFA will always be released
For more information about the features, please refer to
- GenAuth Adaptive MFA Overview
- Integrate MFA based on GenAuth Guard login component
- Transform existing IAM/IDaaS/authentication systems to integrate GenAuth adaptive MFA capabilities
Adaptive MFA orchestration/policy configuration instructions
Create adaptive MFA security orchestration through templates
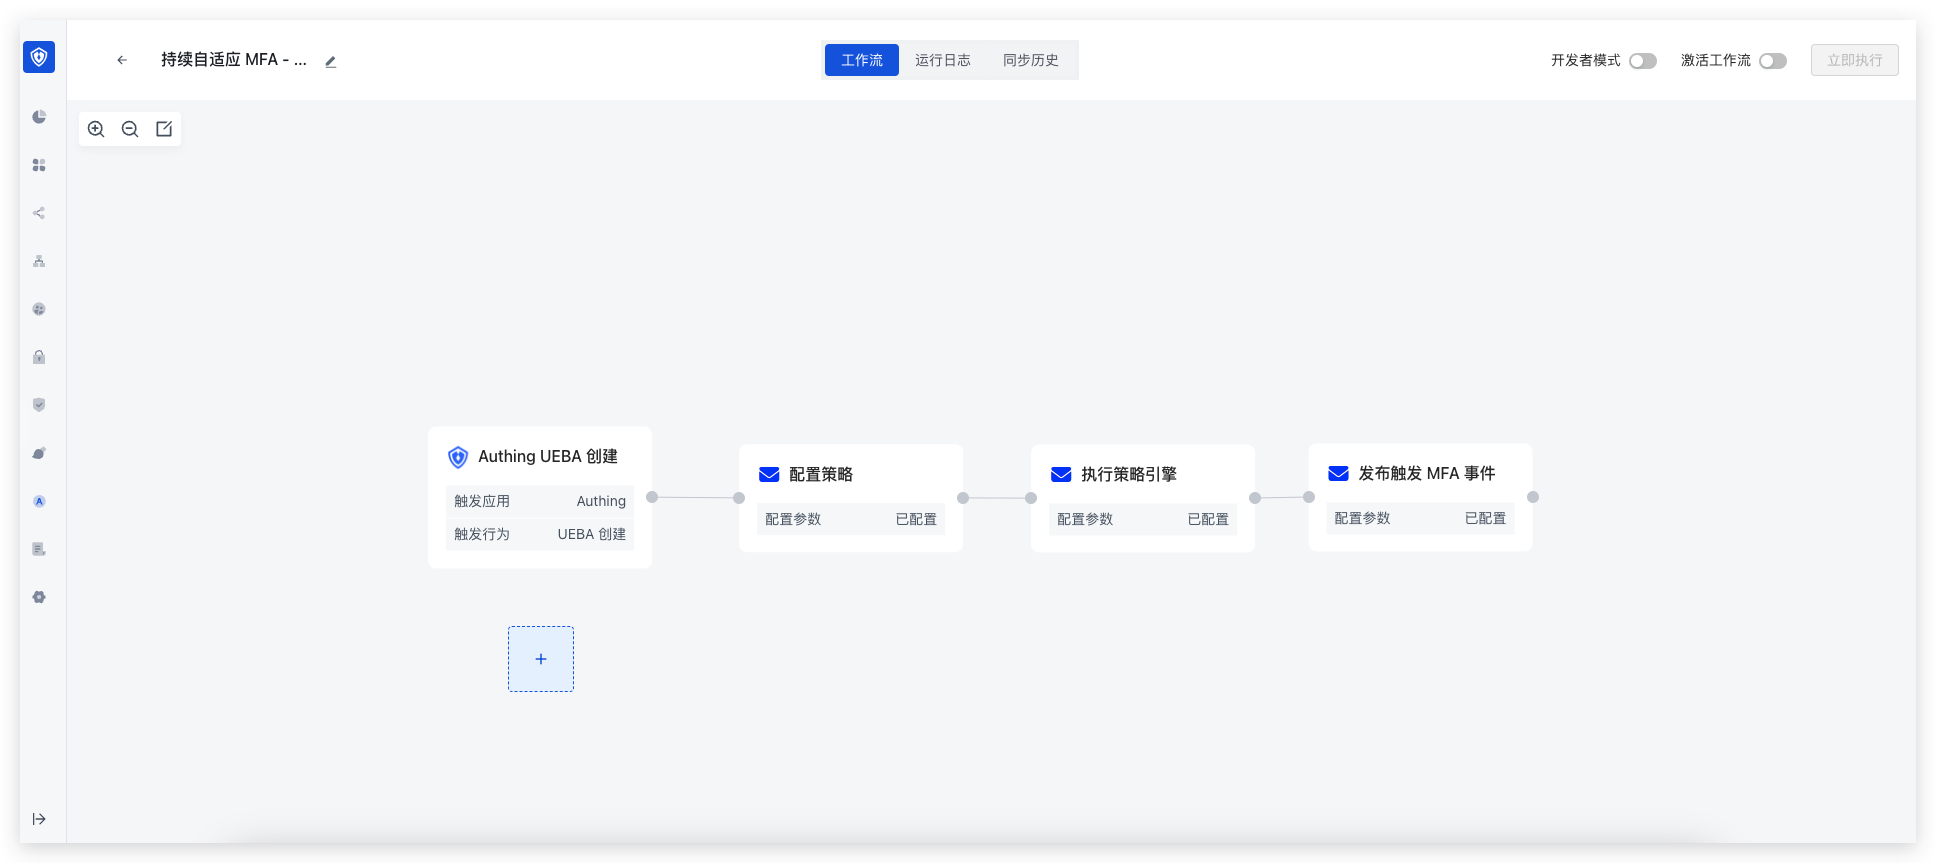
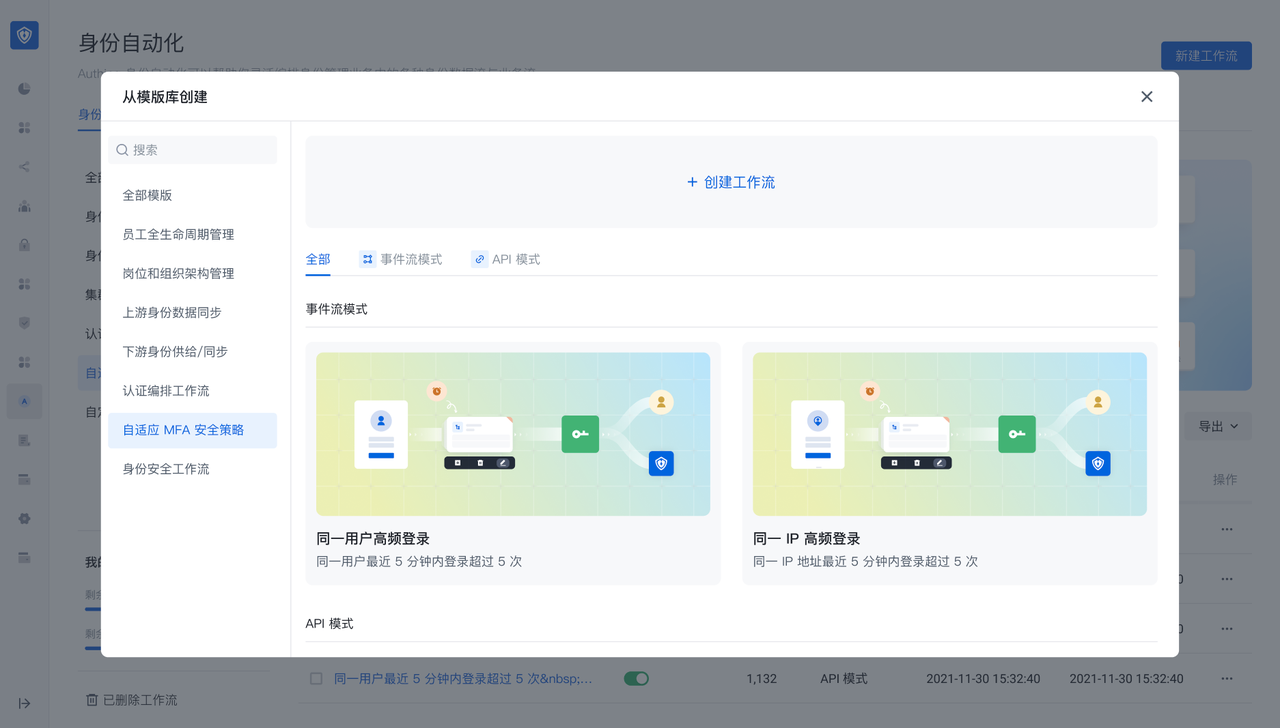 In the Identity Automation module, click New Workflow and find the "Adaptive MFA Security Policy" module to create an adaptive MFA security orchestration workflow through a template. The template has two modes:
- API mode: suitable for adaptive MFA scenarios
- Event stream mode: used for continuous adaptive MFA scenarios
Enter MFA security orchestration-API mode after creating through template
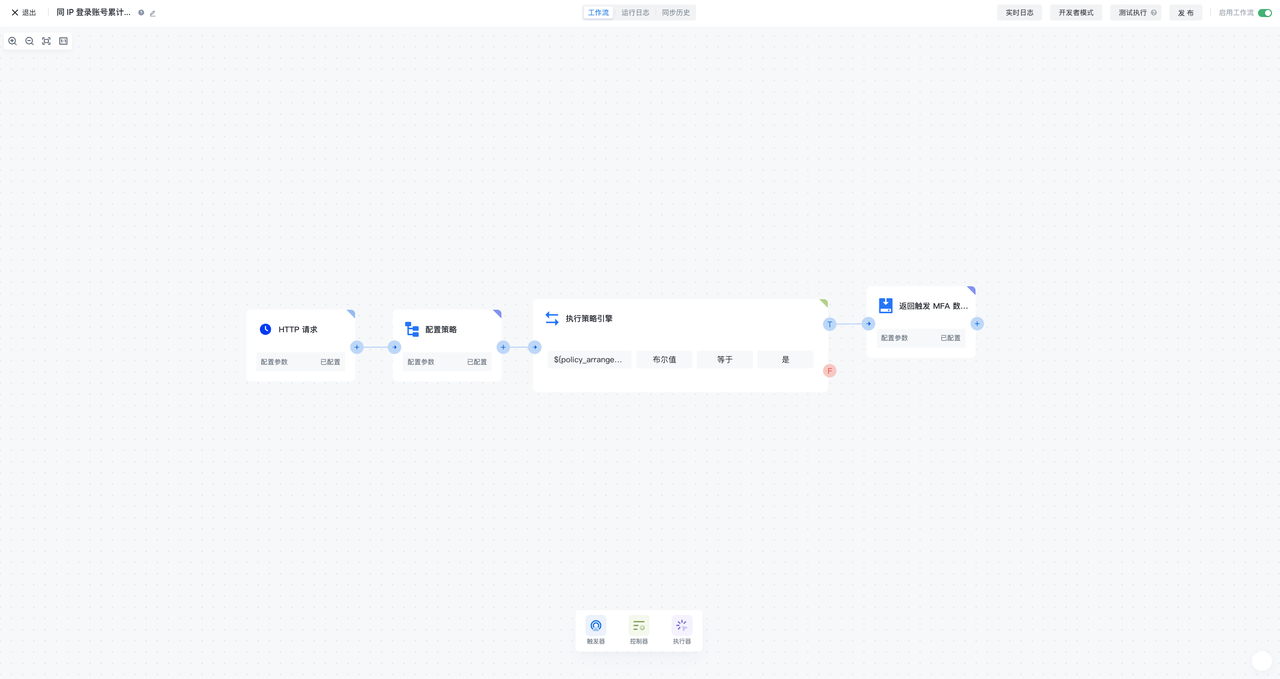
MFA security policy-API mode is a security orchestration flow consisting of HTTP request, configuration policy, execution policy engine, and return trigger MFA data. It is used for adaptive MFA scenarios and can trigger security orchestration workflows through HTTP requests, calculate user risks according to configuration policies, and return trigger MFA data according to calculation results
HTTP request
HTTP request is used as the trigger of MFA security policy flow. Whenever a new HTTP request is generated, the workflow will be triggered
Configure policy
In the configuration policy node, you can reference the policy orchestration function preset by GenAuth, or create a new custom policy orchestration function and then reference it. The policy orchestration function can receive the input data of the UEBA change event of the previous node, flexibly define the algorithm strategy, and output the corresponding return value of the configuration, which is given to the subsequent node execution policy engine for use
Execution policy engine
In the execution policy engine node, you can assemble the return value of the adaptive MFA security policy referenced in the configuration policy, such as the policy judgment result, and then configure the conditional expression (or combination of conditional expressions) to perform the calculation of the policy judgment
Return trigger MFA data
When the conditions (groups) of the execution policy engine node are met, it will enter the return trigger MFA data node. In the return trigger MFA data node, you can configure which MFA authentication method needs to be triggered, and you can flexibly configure the custom return value
Enter MFA security orchestration-event flow mode after template creation
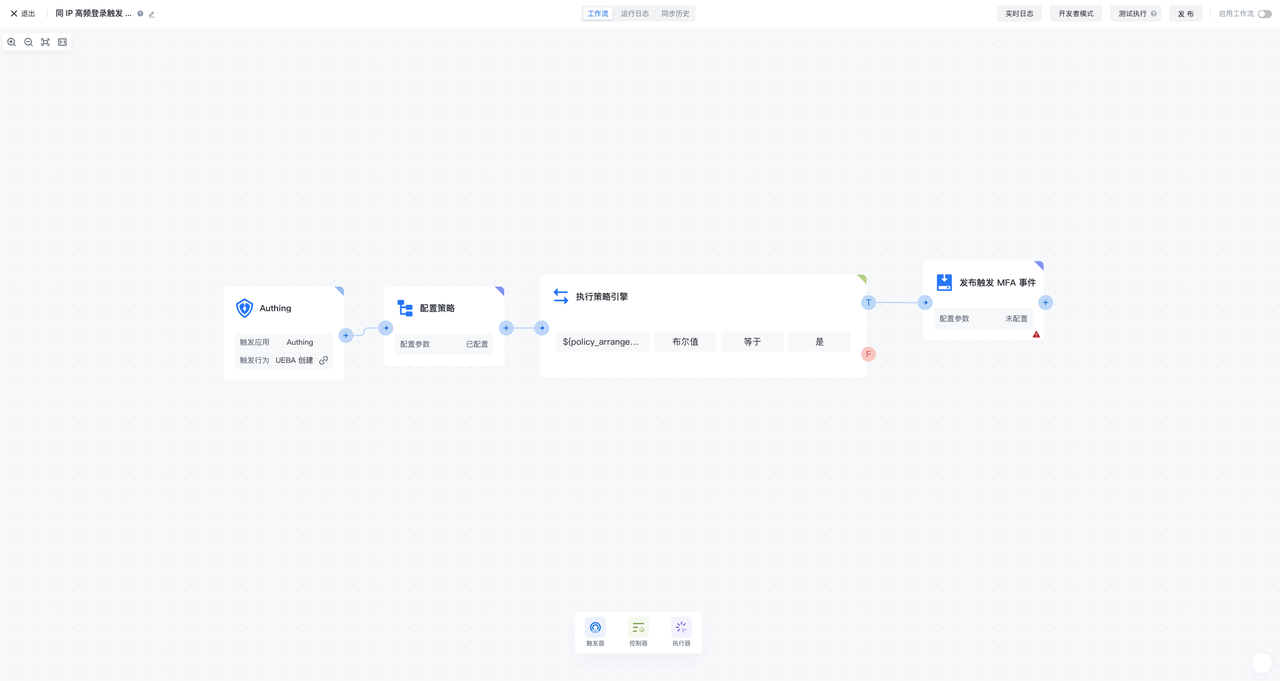
MFA security policy-event flow mode is a UEBA change event, configuration policy, execution policy engine, and release MFA The security orchestration flow composed of events is used for continuous adaptive MFA scenarios. It can continuously subscribe to UEBA events, calculate user risks according to the configuration policy, and publish specific MFA events based on the calculation results
UEBA change event
The UEBA change event is used as a trigger for the MFA security policy flow. Whenever a new UEBA event is generated, the workflow will be triggered
Configure policy
In the configuration policy node, you can reference the policy orchestration function preset by GenAuth, or create a new custom policy orchestration function and then reference it. The policy orchestration function can receive the input data of the UEBA change event of the previous node, flexibly define the algorithm strategy, and output the corresponding return value of the configuration, which is given to the subsequent node execution policy engine for use
Execution policy engine
In the execution policy engine node, you can assemble the return value of the adaptive MFA security policy referenced in the configuration policy, such as the policy judgment result, and then configure the conditional expression (or combination of conditional expressions) to perform the calculation of the policy judgment
Publish MFA event
When the conditions (groups) of the execution policy engine node are met, it will enter the publish MFA event node. In the publish MFA event node, you can configure which MFA authentication method needs to be triggered, and you can flexibly configure the custom return value
UEBA data object module configuration
When using MFA security orchestration-event flow mode, you also need to create a UEBA data object module in Settings-Data Object Management 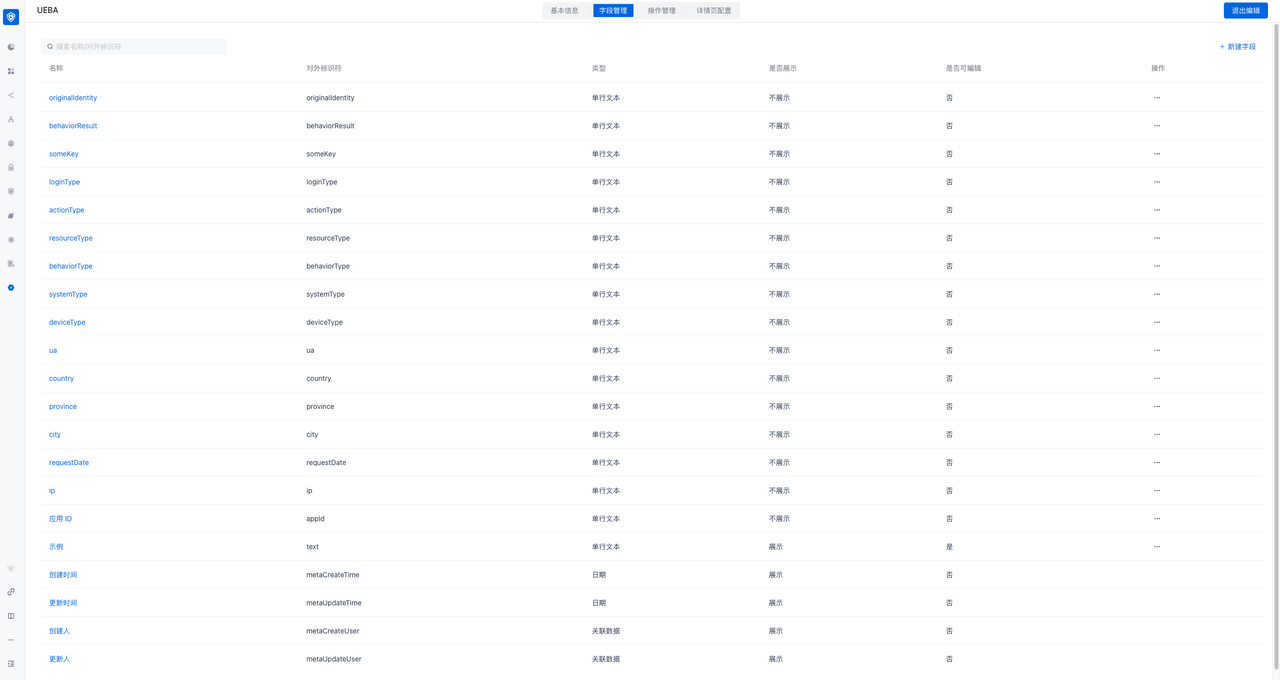
Specific field list reference:
| Name | External identifier | Explanation | Generation method |
|---|---|---|---|
| ---------------- | Application ID | ||
| appId | Request date | ||
| requestDate | ip | ||
| ip | Request city | Generate based on IP resolution | |
| city | Request province | Generate based on IP resolution | |
| province | Request country | Generate based on IP resolution | |
| country | User agent | ||
| ua | Device type | Generate based on UA resolution | |
| deviceType | Device system | Generate based on UA resolution | |
| systemType | Browser | Generate based on UA resolution | |
| browserType | User unique identifier | The unique ID of the user in the business system | Business system must be transmitted |
| originalIdentity | Behavior type | Business system optional (recommended) | |
| behaviorType | Behavior result | Business system optional (recommended) | |
| behaviorResult | Resource type | User operation resource type | Business system optional (recommended) |
| resourcesType | Operation type | User operation type on resources | Business system optional (recommended) |
| actionType | Authentication method | Business system optional (recommended) | |
| loginType | Custom field | Custom field | Business system optional (recommended) |
Configure adaptive MFA security policy
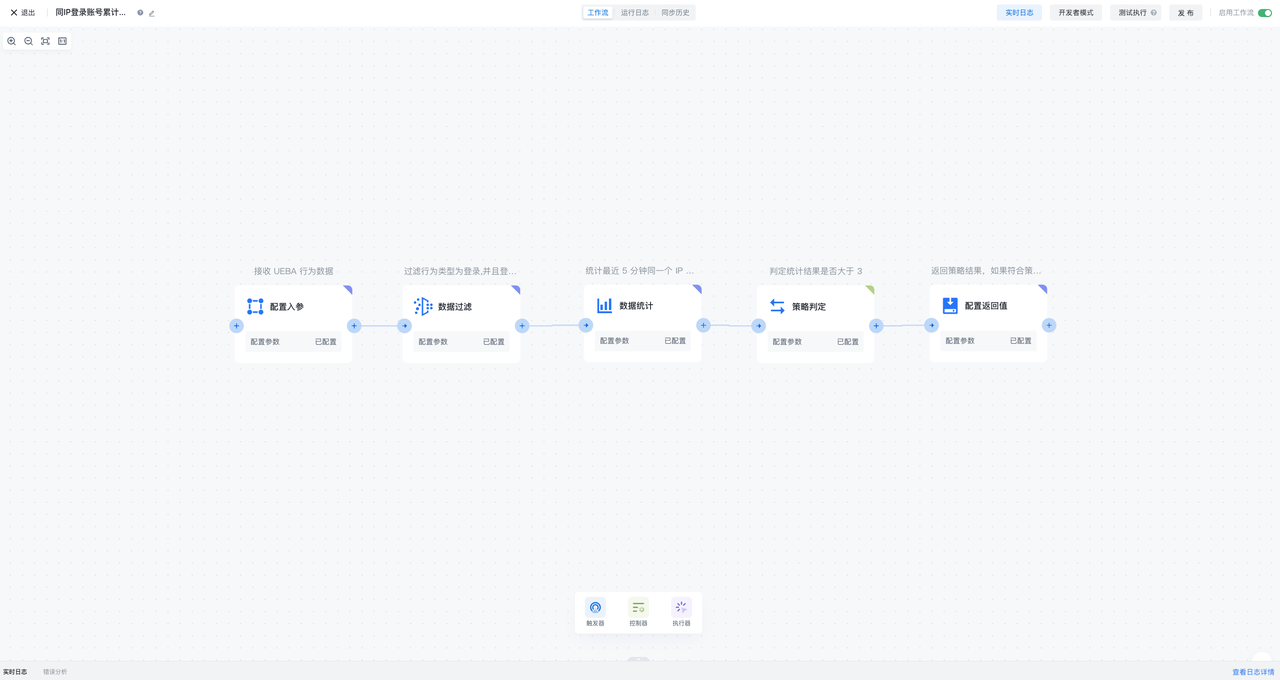
Adaptive MFA security policy is a security policy flow consisting of configuration input parameters, data filtering, data statistics, policy judgment, and configuration return value. It is used in adaptive/continuous self-use MFA scenarios. It can define the parameters for calculation input, filter data, statistics, make policy judgments, and finally output the policy calculation results. Adaptive MFA security policies can be referenced by adaptive MFA security orchestration workflows to obtain policy calculation results of behavioral data, thereby achieving flexible orchestration of MFA
Configuring input parameters
Configuring input parameter nodes can flexibly define the parameters and data types received by adaptive MFA security policies
Data filtering
Data filtering nodes can configure filtering conditions based on the data input by the previous order, and pass the data that meets the conditions to the back
Data statistics
Data statistics nodes can configure data statistics conditions after receiving data from the previous order node, and can set the statistical cycle, statistical field and statistical type, and output statistical results based on the configuration of statistical conditions
Policy judgment
Policy judgment nodes can configure policy judgment conditions based on the data input by the previous order node and the results of data statistics, and output policy hit results based on the conditions of policy judgment
Configuring return values
Configuring return value nodes can assemble the output results of the previous order node, including configuring the data fields of the input parameters, the statistical results of data statistics, the policy results of policy judgment, and the ability to customize any return value