Security Settings
Configure Web security domain
Path: Security Settings->General Security->Basic Security
INFO
This feature is not currently supported in the free version.
For Web applications, there is a risk of userPoolId/secret being stolen, so we need to take some special defensive measures. The key point is that we must be able to ensure that others cannot directly use your server resources even if they obtain your userPoolId. The Web side can limit the request source through the Web security domain name, which can simply prevent the theft of Web server resources.
After setting Security Domain (CORS), server resources can only be called through the JavaScript SDK under this domain name. Note: The domain name configuration strategy is consistent with the browser domain security strategy, requiring the domain name protocol, domain and port number to be strictly consistent. Subdomains and wildcards are not supported, otherwise access will be prohibited. Let's take an example to illustrate the difference between domain names:
// Cross-domain
www.a.com:8080
www.a.com

// Cross-domain
www.a.com:8080
www.a.com:80

// Cross-domain
a.com
www.a.com

// Cross-domain
xxx.a.com
www.a.com

// Different protocols, cross-domain
http:
https:
This can prevent others from stealing your server resources through other addresses on the external network. However, it should be noted that the purpose of the Web security domain name is to defend against malicious deployment, not to defend against forged dirty data (malicious users may still access the application data by binding the host), so if you want to have more fine-grained control over the data, you need to use it with ACL.
When used in WebView, it is recommended to load a deployed Web with a domain name through WebView, and then cache it locally, so that you can restrict it through the Web security domain name.
If you use JavaScript SDK on the front end, please be sure to configure the web security domain name when you plan to officially release it.

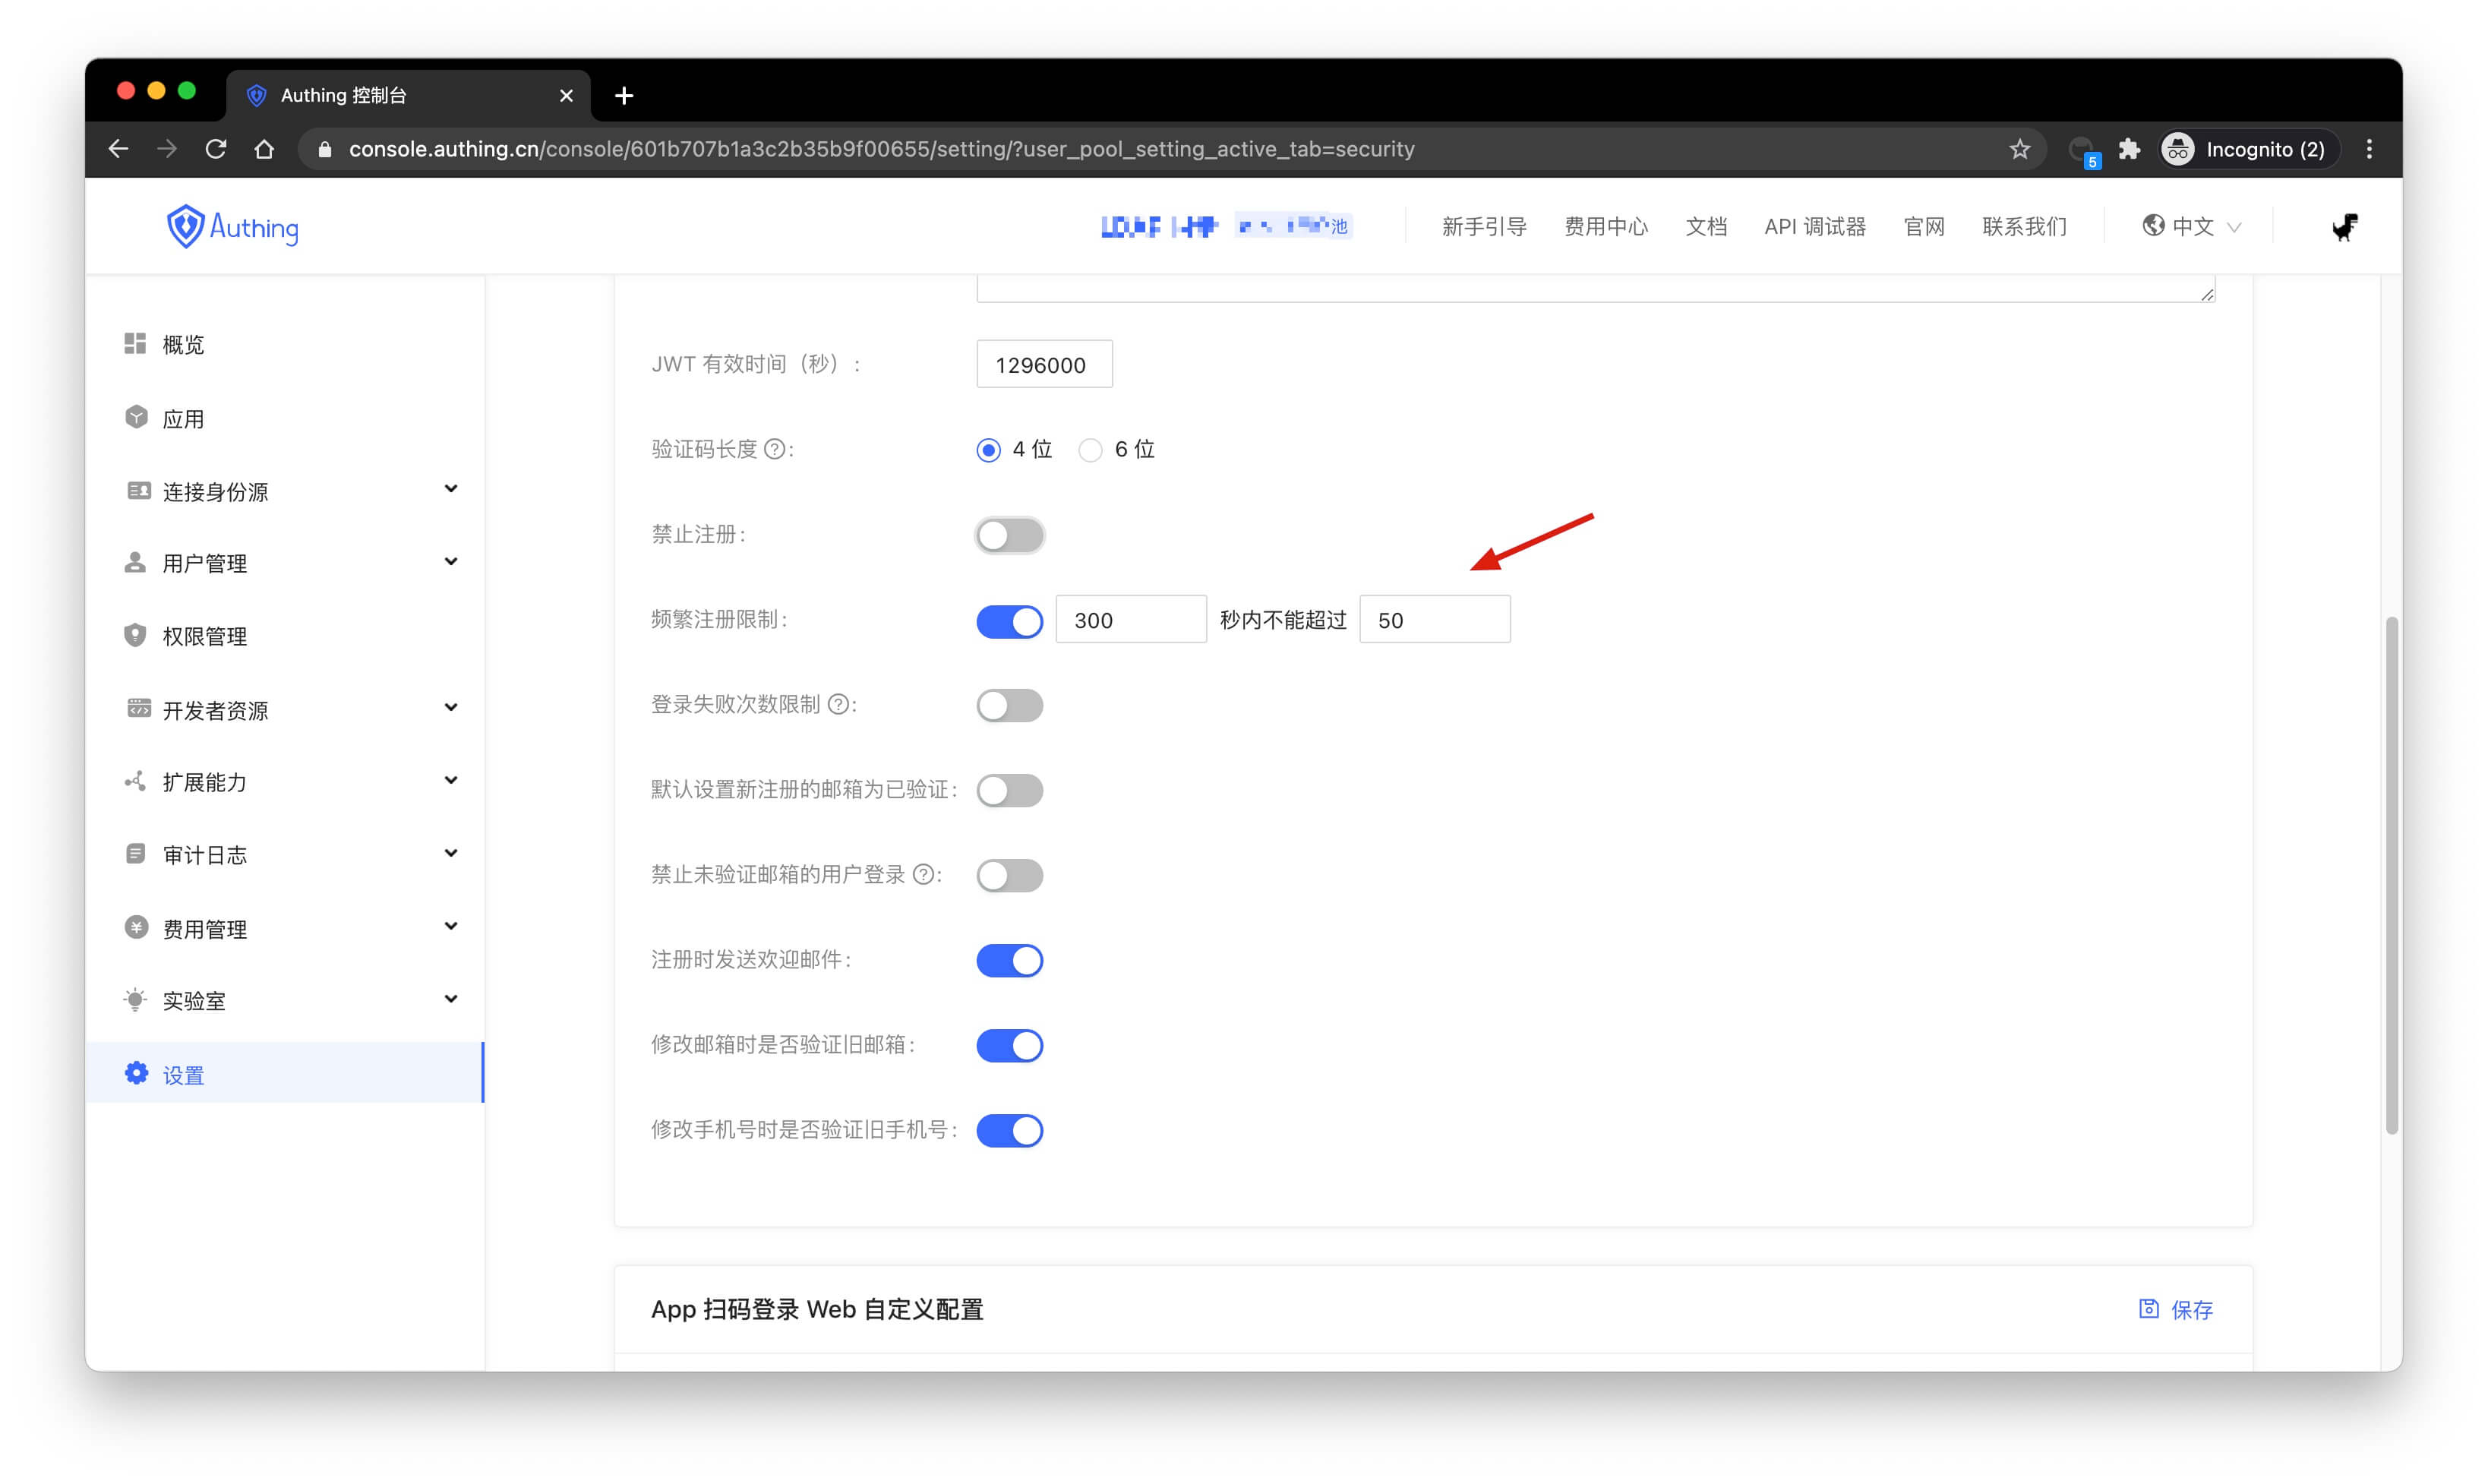
Configure registration frequency limit
Path: Security Settings->General Security->Registration Security
INFO
The free version does not support this feature yet.
You can turn on the Frequent Registration Limit switch in the console to limit the number of registrations per IP within a certain number of seconds:
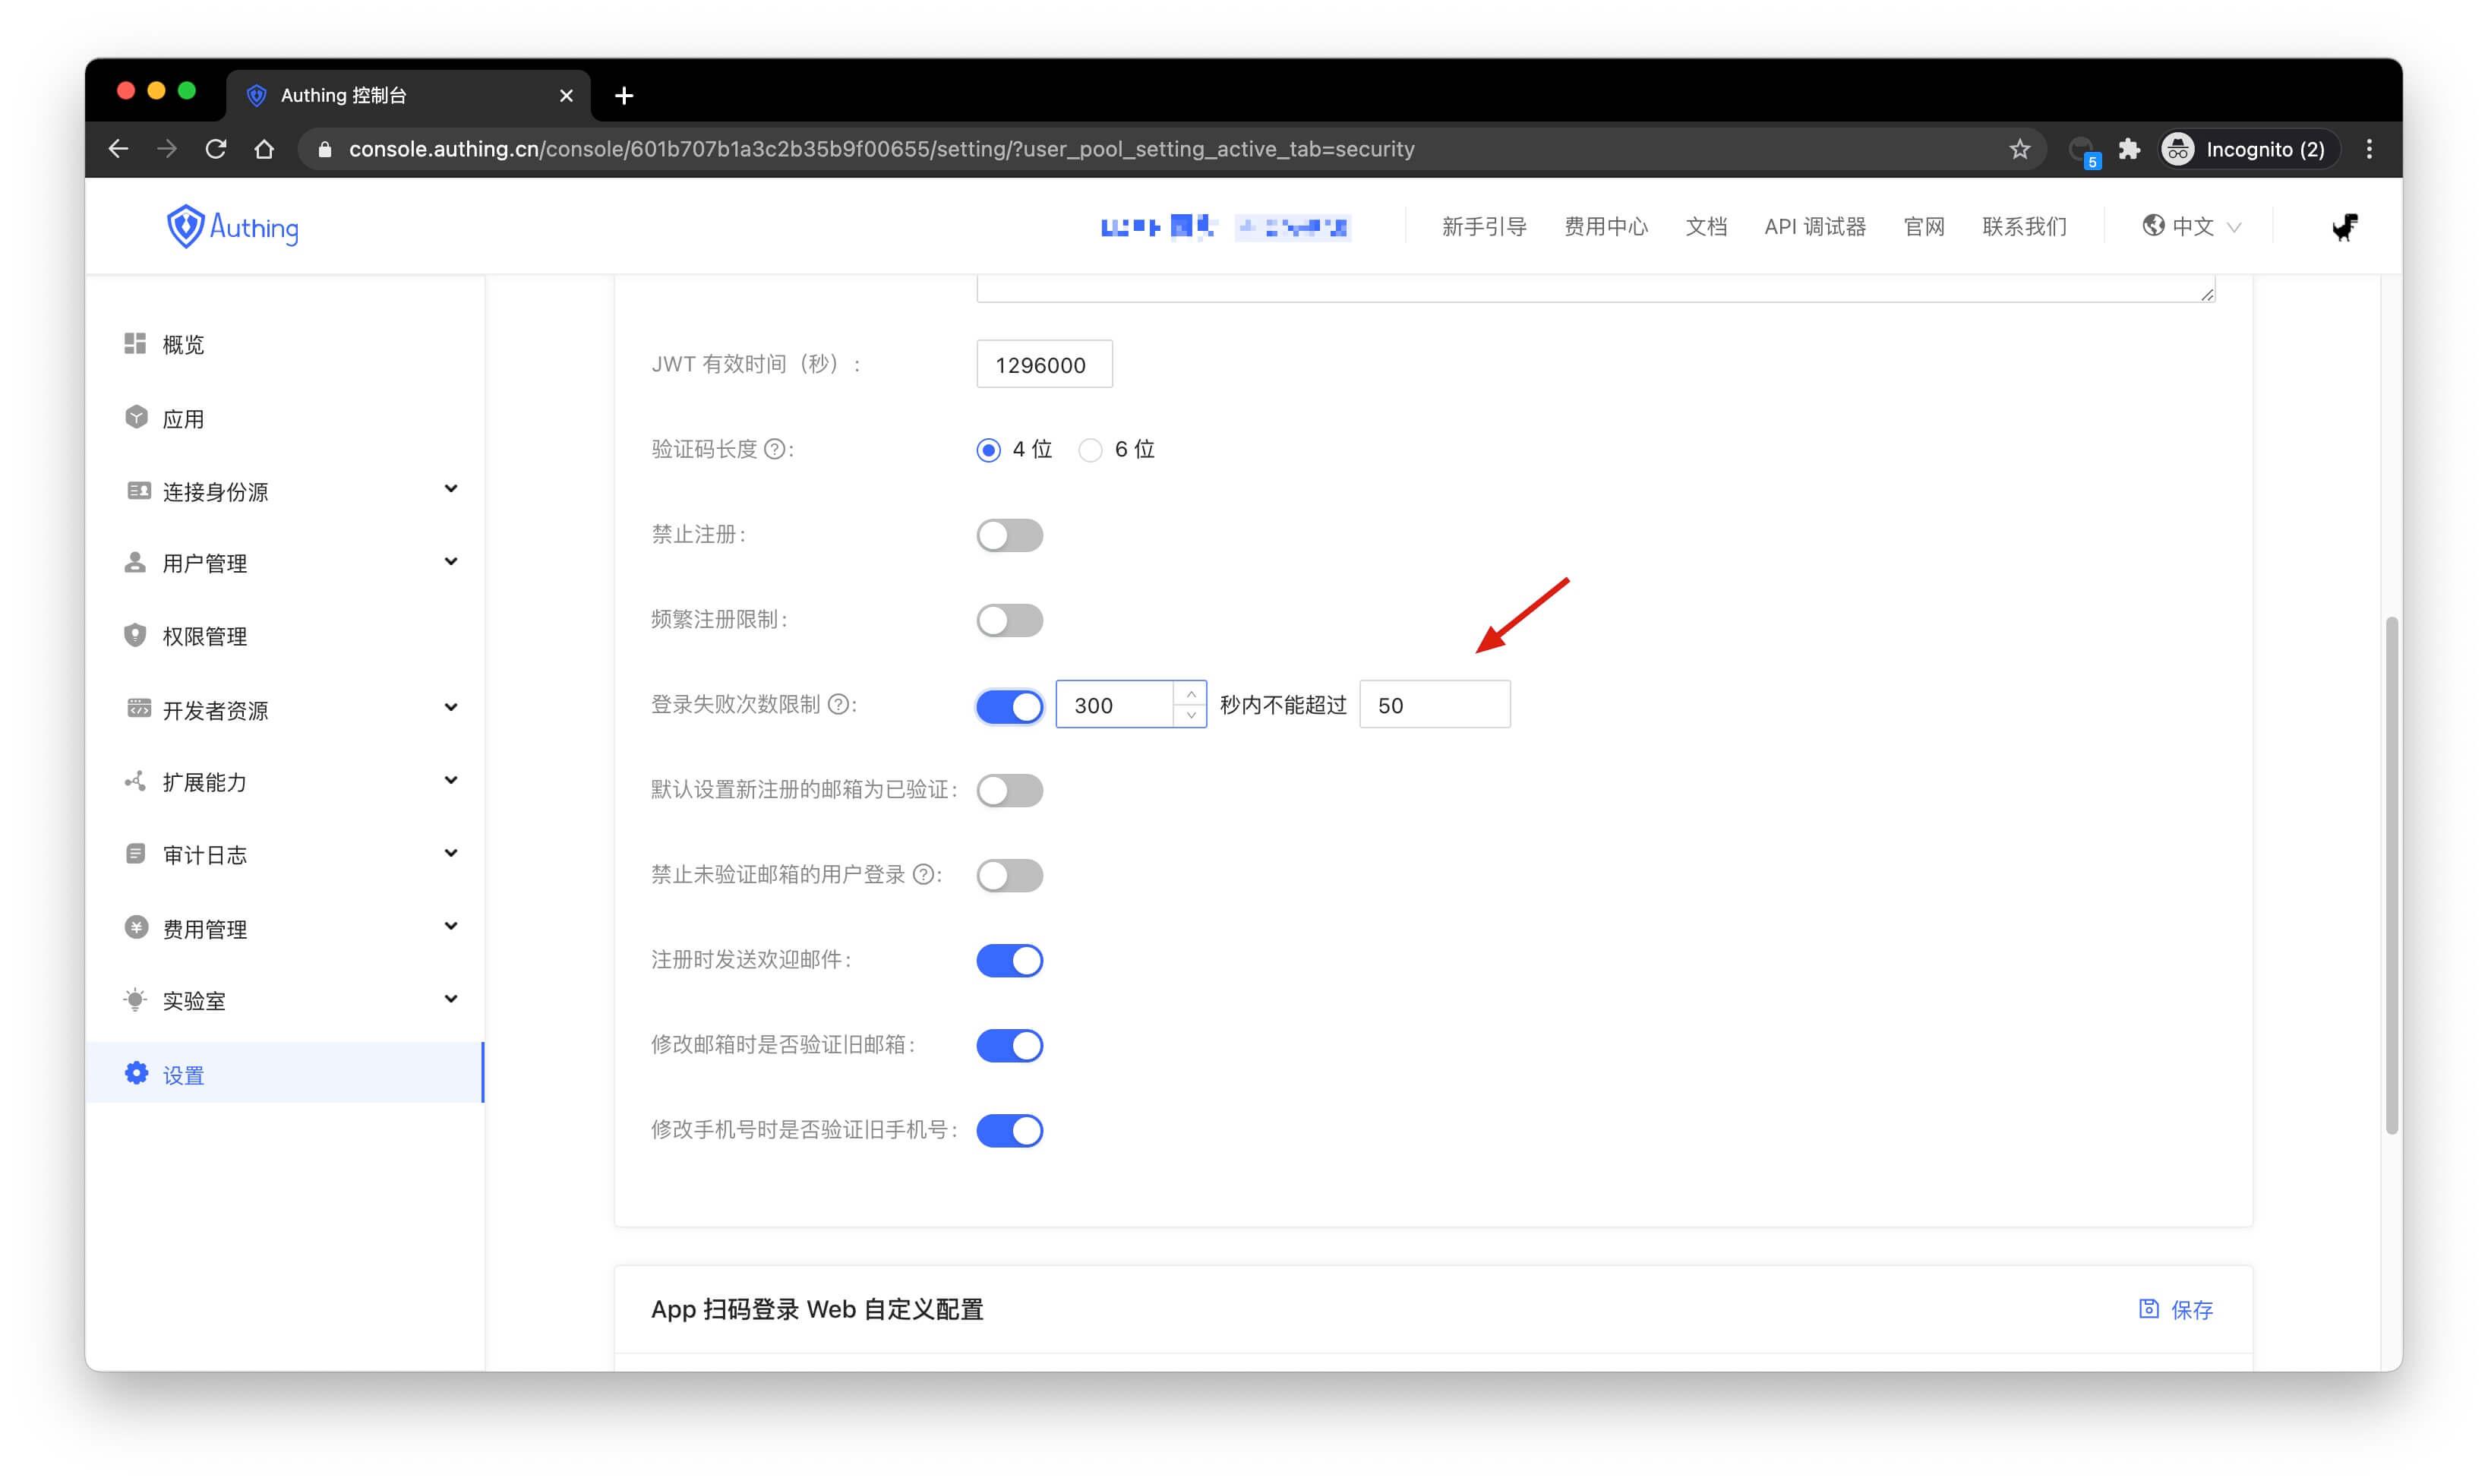
Configure login failure limit
Path: Security Settings->General Security->Login Security
INFO
The free version does not support this feature yet.
You can turn on the Login Failure Limit switch in the console to limit the number of failed logins for the same account within a certain number of seconds:
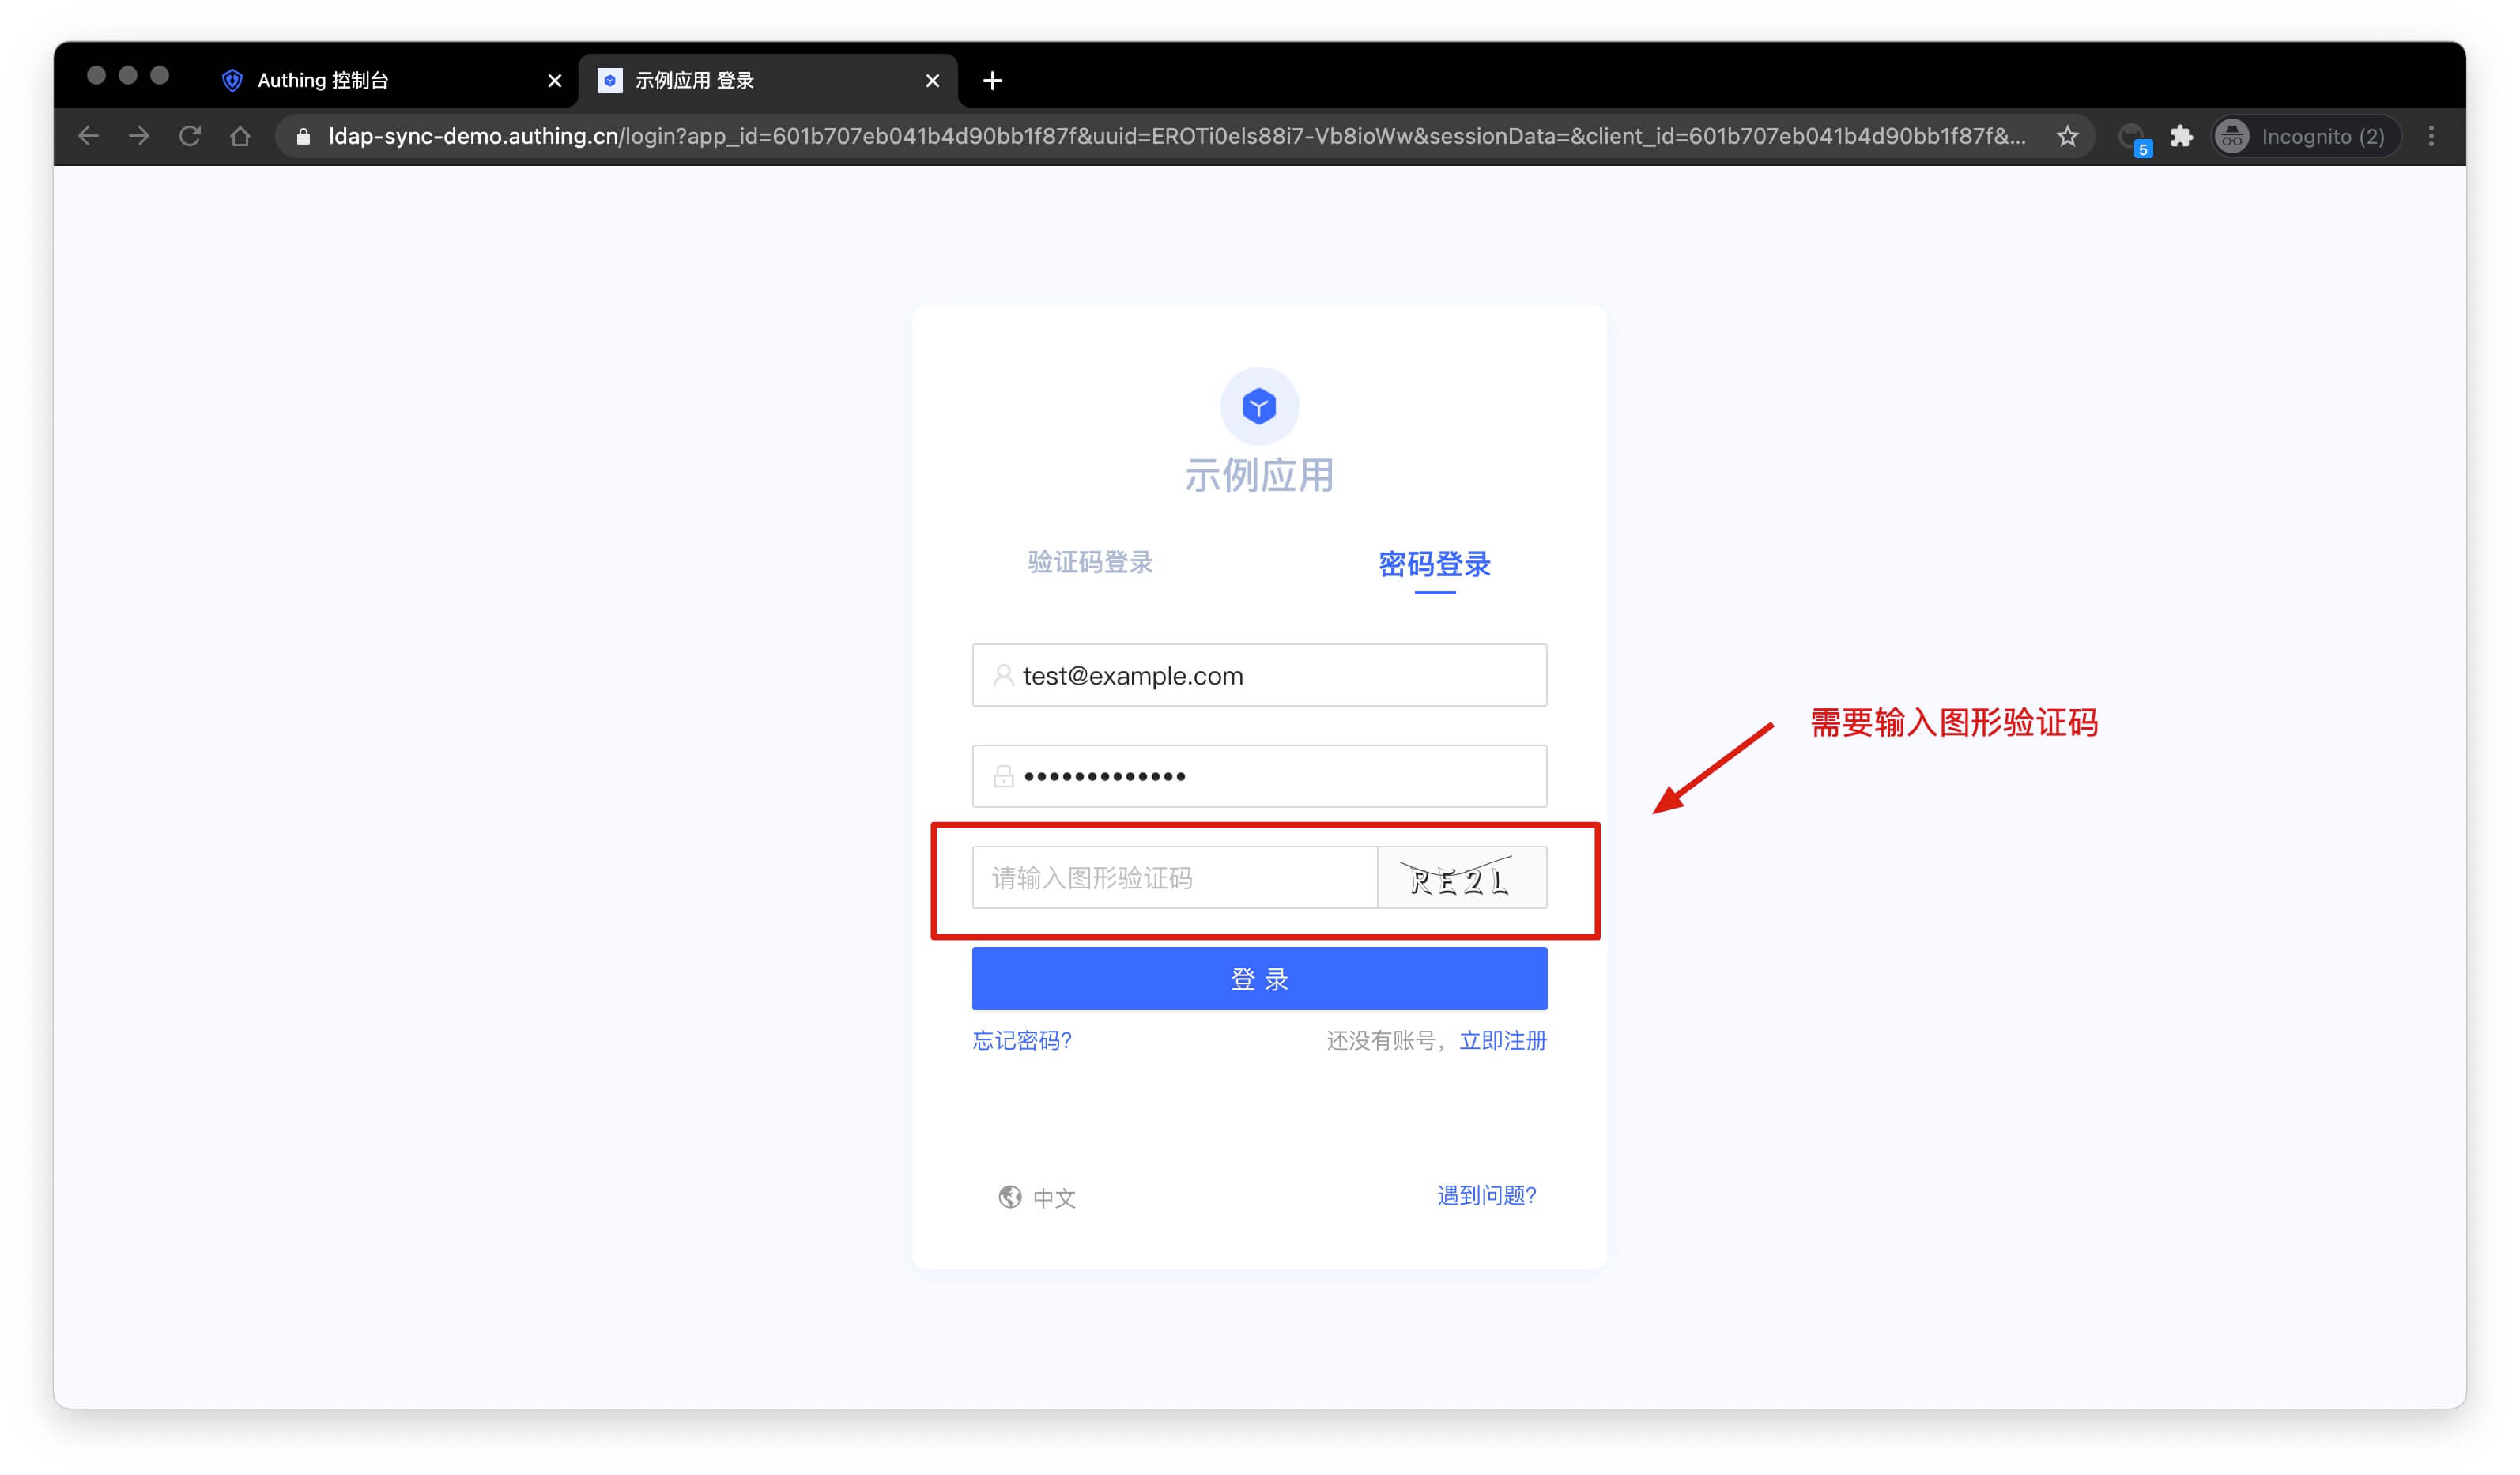
If the number of failed logins exceeds the specified time, the user needs to enter a graphic verification code to log in again:
Password Security
Path: Security Settings->Password Security
INFO
For information about the GenAuth user pool version that supports the various benefits of the "Password Security" function, please check the Official Website "Pricing" Page. If your version does not support this benefit and you want to try it, you can activate the trial period. For an introduction to the trial period and how to activate it, please check Trial Period.
Passwords are related to the information security of enterprises and users. The system will require users to meet a certain level of complexity when registering or changing passwords.
In addition, enterprises may include different user groups: internal employees, outsourced employees, partners, etc., and different groups require different password rules. GenAuth supports configuring differentiated password policies for different entities, and adjusting the execution priority by moving the policy order up and down. At the same time, it also supports custom password encryption method to be compatible with the user password summary encryption logic of the historical system, so as to achieve perfect compatibility with the original system password policy.
INFO
The configuration will take effect on all applications.
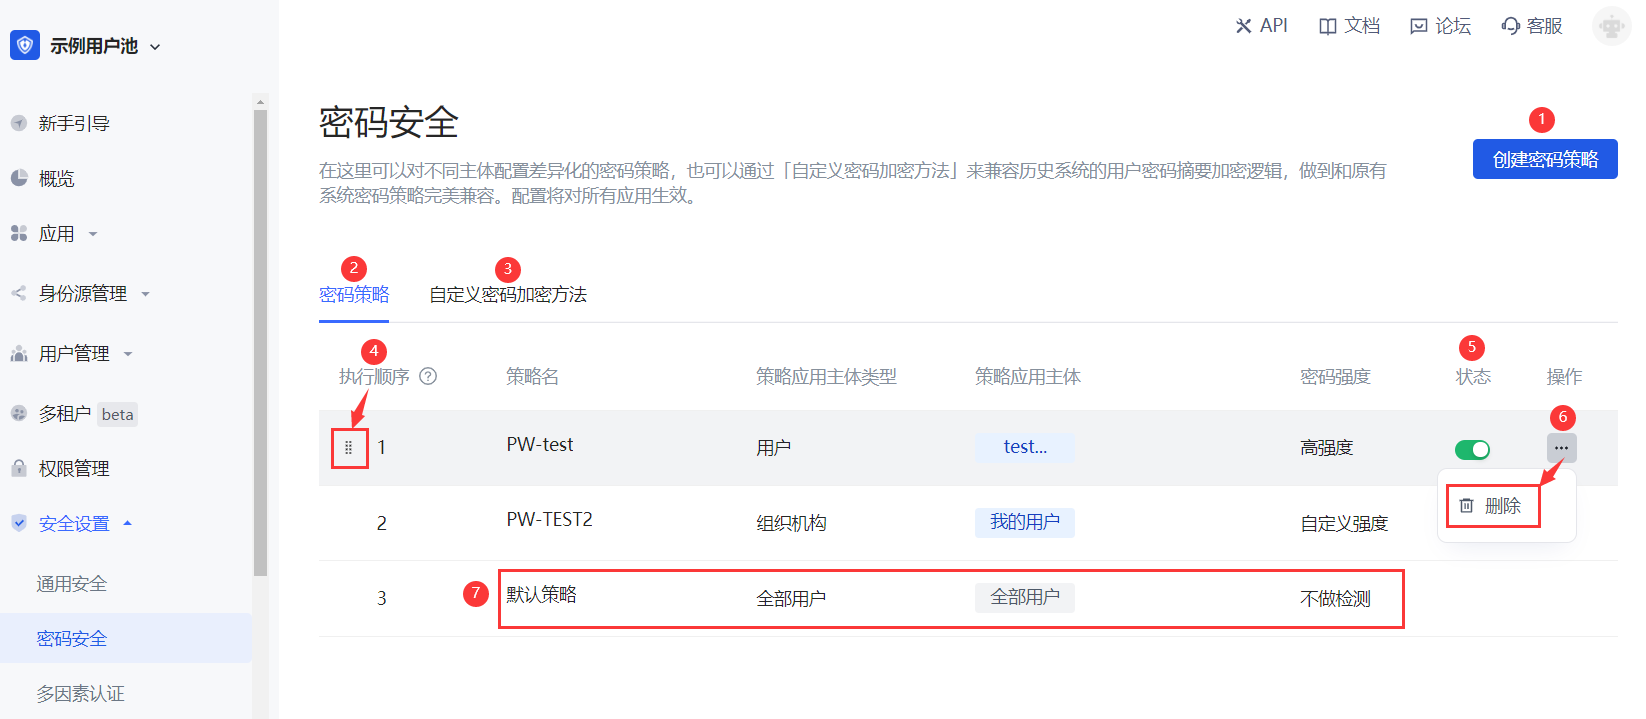
Serial number Element Description 1 Create password policy
- Click this button to create a new password policy.
- You can create up to 30 password policies (including the default policy); when the upper limit is reached, the button will be grayed out. 2 Password Policy Show the password policy list, including the system default policy and the policy created by the administrator. 3 Custom password encryption method Compatible with the user password summary encryption logic of the historical system. 4 Execution order Execute password policies from top to bottom. You can adjust the execution order of policies by pressing and holding the icon on the left (visible when the mouse is hovering) and dragging. 5 Status After creating a new password policy, the policy is enabled by default. It can be closed as needed. After closing, the current policy will not be executed. 6 Delete Click the More button in the Operation column to delete the currently selected password policy. Note:
- After deletion, it cannot be restored. Please operate with caution!
- If all application subjects of the current policy are deleted, the system will automatically delete the policy. 7 Default Policy
- The default policy is effective for all user subjects and applies globally.
- The password strength is not detected by default.
- You can click to enter the policy details to modify password strength and password rotation policy.
- The default policy is placed at the bottom of the policy list and cannot be adjusted, closed, or deleted.
Password Policy
To configure a password policy for a subject, perform the following steps:
On the Password Security page, click the Create Password Policy button in the upper right corner of the page. Open the Create Password Policy page.
Fill in the Policy Name and Description in the Basic Information module.
INFO
The password policy name must be unique. Description is a maximum of 200 characters.
- In the Policy Application Subject module, select Policy Application Subject Type.
INFO
You can filter subjects by User, Organization (optional for toE), and Group.
- Select Policy Application Subject.
INFO
- The data sources of User, Organization (optional for toE) and Group come from User List, Organization (optional for toE) and User Group Management in User Management respectively.
- Multiple subjects of the same type can be selected.
- If the selected subject is deleted in the data source, the password policy to which the subject belongs will be linked to delete the subject.
- Select the applicable password strength (No detection, Low strength, Medium strength, High strength, Custom strength).
INFO
- The password strength set here applies to user registration password, user password reset and user password modification.
- Password strength is not detected by default.
- For custom password strength rules, you need to define a regular expression below and enter a password error prompt.
Enter a password in the Password Detection field to detect whether the password meets the password strength rules set above. If it meets the requirements, a green check mark will be displayed after the input box; if it does not meet the requirements, an error message will be displayed after the input box, and the user needs to modify the information according to the message.
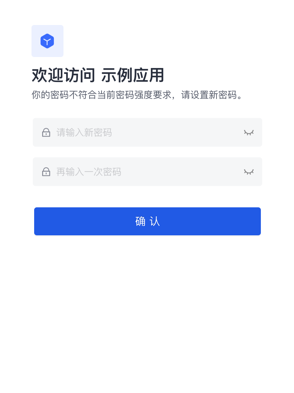
Turn on the User login password strength check switch (off by default).
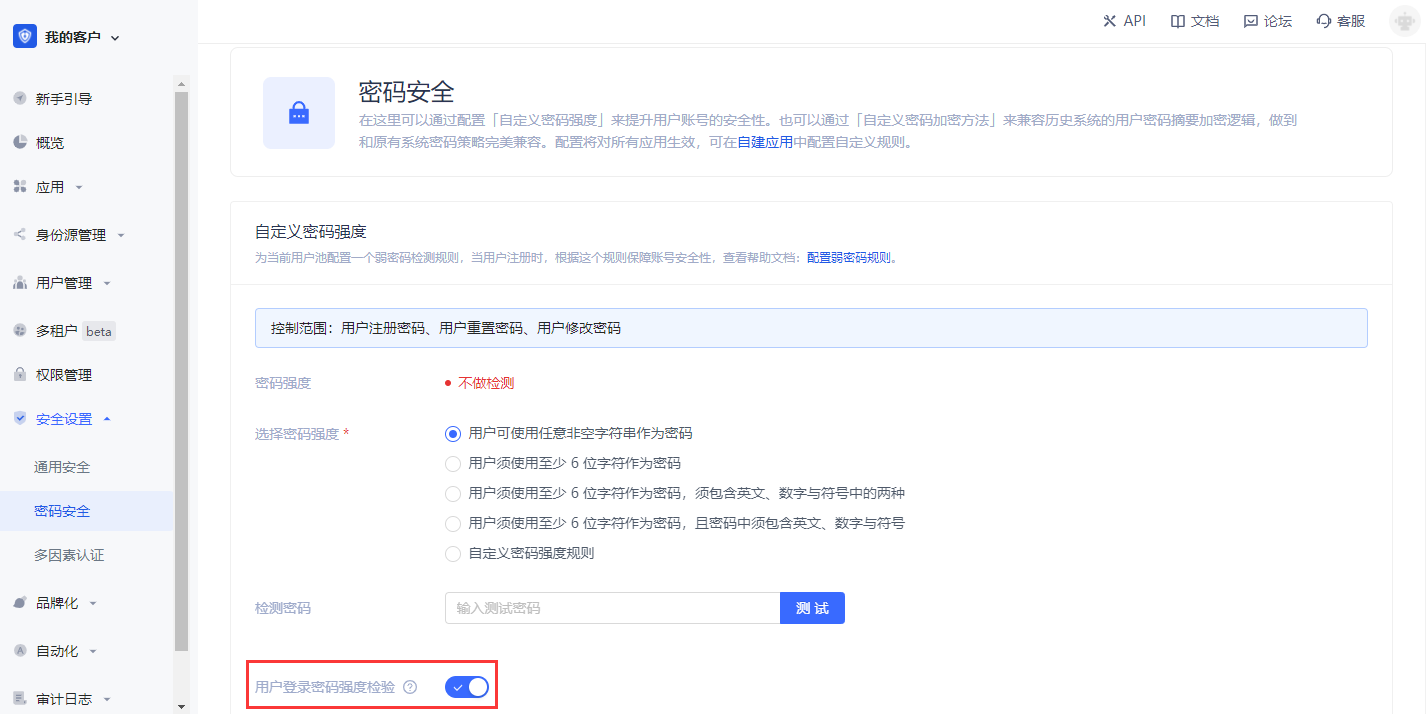
INFO
After turning it on, when a higher password strength rule is set, log in to an account with a lower password strength and jump to the password modification page.
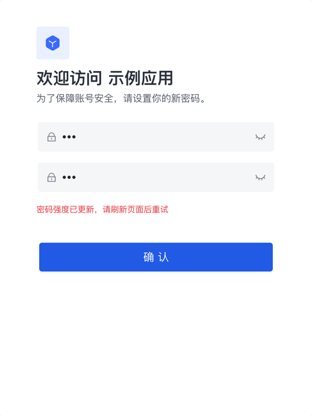
INFO
If the administrator increases the password strength when the user is modifying the password, the page will prompt the user to refresh the page and try again.
- Set password rotation policy (default closed).
Forced password change period: After the selected period, the user will be forced to change the password when logging in.
Password expiration reminder: Send an email reminder to the user once a day during the expiration period until the user successfully changes the password.
INFO
- The user must change the password when logging in.
- Administrators can modify the email template in Branding->Message Settings.
- Password non-repeatable period: During the selected period, when the user changes or resets the password, the password used in the past cannot be used again.
- Click Create. The newly created password policy will be displayed at the top of the Password Security->Password Policy list.
INFO
- When modifying an existing password policy, the Save and Reset buttons are below.
- Click Reset, and all modified but unsaved configurations will be restored to the state after the last save.
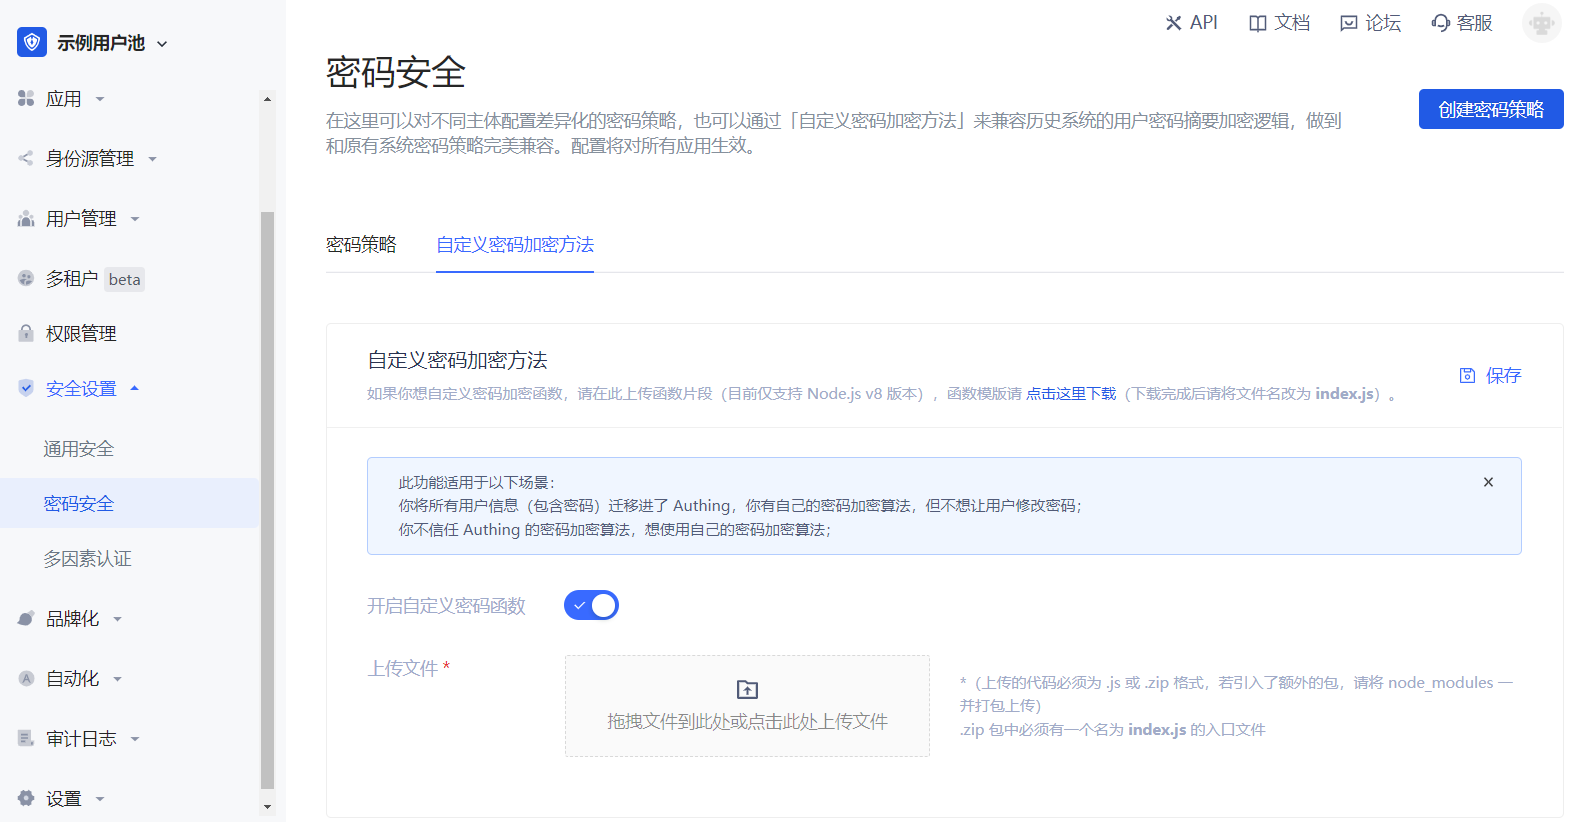
Custom Password Encryption Method
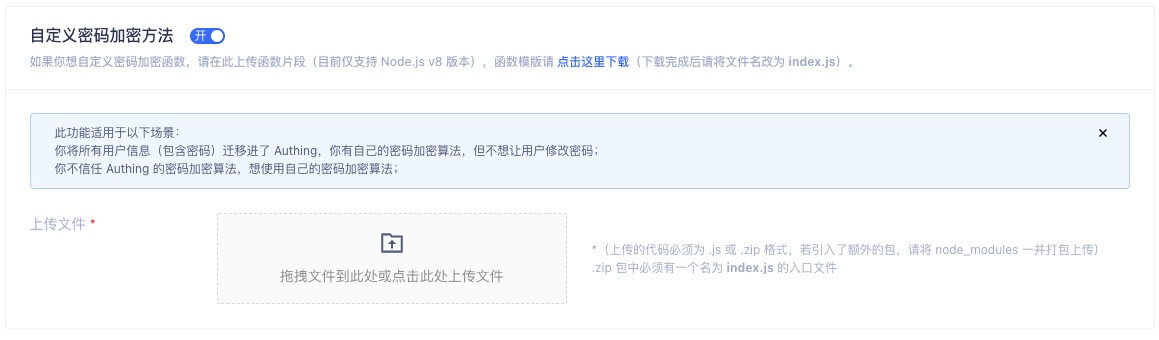
If you want to customize the password encryption function, please upload the function snippet here (currently only supports Node.js). You can click here to download the function template (GenAuth does not store users' password plaintext).
This feature is suitable for the following scenarios:
- You have migrated all users to GenAuth but don't want them to change their passwords;
- You don't trust GenAuth's password encryption algorithm and want to use your own;
This document explains how to configure the password encryption function.
Configuration Steps
Path: Security Settings->Password Security->Custom Password Encryption Method
As shown below:
INFO
Custom Password Encryption Method
Download Template
Click Download Template on the page to download the Node.js code template. The template code is shown below:
var getRawBody = require("raw-body");

const encryptPassword = (password) => {
  // Write the password encryption function here

  return password;
};

/**
 *
 * @param {String} password plaintext password
 * @param {String} encryptedPassword encrypted password
 */
const comparePassword = (password, encryptedPassword) => {
  // Write the password validation function here

  return password === encryptedPassword;
};

module.exports.encrypt = function (request, response, context) {
  // get request body
  getRawBody(request, function (err, body) {
    const queries = request.queries;
    const password = queries.password;

    if (!password) {
      response.setStatusCode(500);
      response.setHeader("content-type", "application/json");
      response.send(
        JSON.stringify(
          {
            message: "Please provide password via url query",
          },
          null,
          4
        )
      );
    }

    const respBody = {
      password: encryptPassword(password), // Encrypt password here
    };

    response.setStatusCode(200);
    response.setHeader("content-type", "application/json");
    response.send(JSON.stringify(respBody, null, 4));
  });
};

module.exports.validate = function (request, response, context) {
  // get request body
  getRawBody(request, function (err, body) {
    const queries = request.queries;
    const password = queries.password;
    const encryptedPassword = queries.encryptedPassword;

    if (!password) {
      response.setStatusCode(500);
      response.setHeader("content-type", "application/json");
      response.send(
        JSON.stringify(
          {
            message: "Please provide password via url query",
          },
          null,
          4
        )
      );
    }

    const respBody = {
      isValid: comparePassword(password, encryptedPassword), // Validate password here
    };

    response.setStatusCode(200);
    response.setHeader("content-type", "application/json");
    response.send(JSON.stringify(respBody, null, 4));
  });
};
编写代码
You need to write the corresponding password encryption method in the encryptPassword function, and write the corresponding password validation method in the vlidatePassword function.
If developers need to import third-party NPM packages, please install them directly using NPM.
INFO
NPM is the package management tool for the Node.js ecosystem.
Here is a code example of importing the bcryptjs package:
$ npm install bcryptjsAfter installation is complete, a node_modules folder will appear in the directory, then write the code:
var getRawBody = require("raw-body");

const encryptPassword = (password) => {
  // Implement your login here.
  // Your can use bcrypt for example
  // more info here: https://github.com/kelektiv/node.bcrypt.js
  var bcryptjs = require("bcryptjs");
  var genSaltSync = bcryptjs.genSaltSync();
  return bcryptjs.hashSync(password, genSaltSync);
};

const vlidatePassword = (plainText, encrypted) => {
  // plainText is the plainText password use provide to be validate.
  // encrypted is user's password encryped in database.

  // Implement your login here.
  // Your can use bcrypt for example
  // more info here: https://github.com/kelektiv/node.bcrypt.js
  var bcryptjs = require("bcryptjs");
  return bcryptjs.compareSync(password, encryptedPassword);
};
Upload Function to Server
INFO
GenAuth only supports code packages in .js format or .zip format.
If you haven't imported any packages, you can directly upload the .js format template file; if you have imported packages, please package them together with node_modules into .zip format and upload in the GenAuth console.
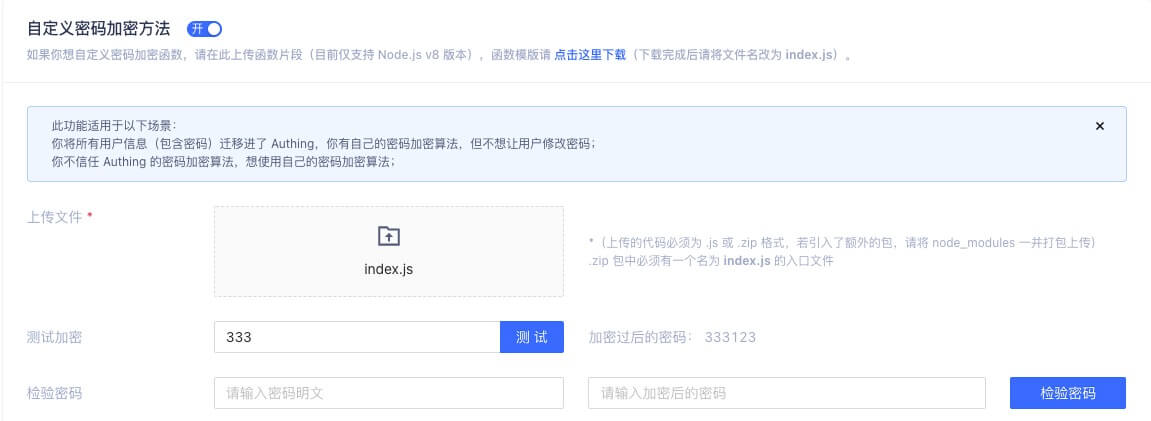
Test Password Encryption Function
After successful upload, developers can test the password encryption effect. As shown below, enter the original password in the input box and click "Encryption Test" to see the encrypted password (if no encryption function is uploaded, GenAuth's default password encryption result will be displayed).
Notes
INFO
The password encryption function takes effect immediately after uploading and will affect existing users. It is recommended to use this feature in a completely new user pool.
If you need to modify the password encryption function in an old user pool, please contact GenAuth After-sales Service.
Multi-factor Authentication Overview
INFO
For information about the GenAuth user pool version that supports the various benefits of the "Multi-factor Authentication" feature, please check the Official Website "Pricing" page. If your version does not support this benefit and you want to try it out, you can activate the trial period. For an introduction to the trial period and how to activate it, please check the Trial Period.
Multi-factor Authentication (MFA) is a very simple security practice that can add an extra layer of protection beyond the username and password. After enabling MFA, when a user logs in, in addition to providing a username and password (the first authentication), a second authentication is required. Multi-factor authentication combined will provide higher security protection for your account and resources. You can learn about What is Multi-factor Authentication here.
You can learn the following MFA authentication information in this section:
- MFA based on SMS verification code
- MFA based on email verification code
- MFA based on one-time password with timestamp algorithm
- MFA based on face recognition
- Access MFA through SDK
- MFA policy configuration

MFA based on SMS verification code
Overview
Multi-factor authentication (MFA) is a security system that performs secondary identity authentication to verify the legitimacy of an operation. For example, a bank's USB shield requires SMS verification for remote login. This article introduces a multi-factor authentication method based on SMS verification code.
Preparation
Role: Administrator
Before enabling SMS verification code MFA, perform the following preparations:
Enable SMS verification code MFA
Role: Administrator
Enable application-level SMS verification code MFA
INFO
To configure application-level MFA, you must enable the Customize security rules for this application switch in Application->Self-built application->Application details->Advanced configuration before the Security management tab will appear.
To enable application-level SMS verification code MFA, perform the following steps:
Select Application->Self-built application in the navigation menu on the left side of the console.
Select the application for which SMS verification code MFA needs to be enabled in the self-built application list.
Go to the application details page, select Security management, and enable the SMS verification code switch in the Multi-factor authentication module.
Enable global SMS MFA
To enable global SMS verification code MFA, perform the following steps:
Select Security settings->Multi-factor authentication in the navigation menu on the left side of the console.
Enable the SMS verification code switch in the Multi-factor authentication module.
Select the applicable identity source in the Policy Configuration module and turn off the MFA switch of other irrelevant identity sources.
Login using SMS verification code MFA
Experience login
Role: Administrator
To experience SMS verification code MFA, the administrator needs to perform the following steps:
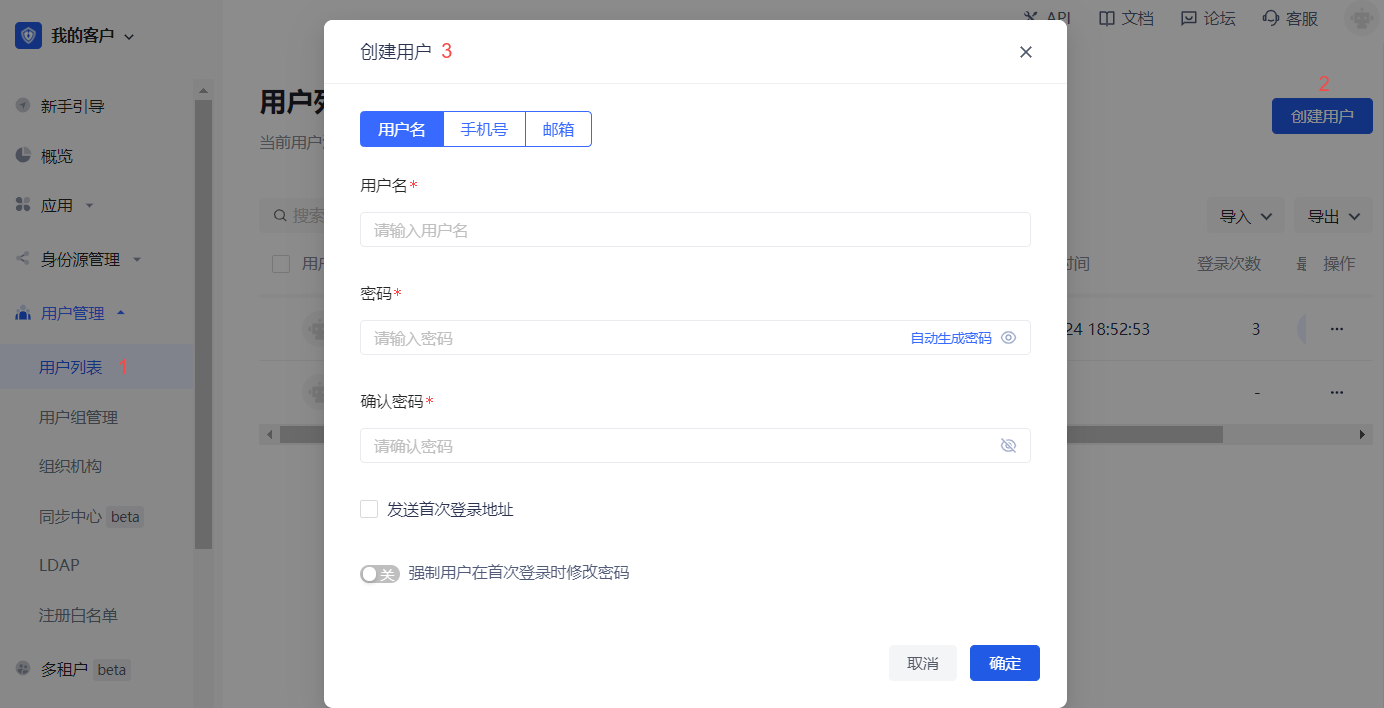
- Select User Management->User List in the navigation menu on the left side of the console, click the Create User button to create a user for SMS verification code MFA login by Username/Mobile Number/Email.
INFO
To enable SMS verification code MFA, you must bind a mobile phone number for the new user.
To bind a mobile phone number, click the drop-down hidden button in the Personal Information module on the user details page to fill in the mobile phone number.

Select Application->Self-built Application, click the Experience Login button in the upper right corner of the target application details page, and log in with the account created above.
Enter your mobile phone number and the verification code sent to your mobile phone on the Verification Code Login page to complete the SMS verification code-based MFA verification process.
User Login
Role: Ordinary User
To perform SMS verification code MFA when logging in, follow these steps:
Log in by username/mobile phone number/email account or scan code.
After one identity authentication, if the user has not yet bound a mobile phone number, the system pops up the Bind Mobile Phone Number window, and enter the mobile phone number at this time.

INFO
If the mobile phone number has been bound, after one identity authentication, this step will be skipped and you will be asked to enter the SMS verification code directly.
- Enter the SMS verification code obtained by the mobile phone.
The prompt completes the authentication and the login is successful.
Disable SMS MFA
Role: Administrator
To disable SMS verification code MFA, you can disable the function at the application level and globally:
Disable application-level SMS verification code MFA: Go to the application details, select Security Management, and turn off the SMS Verification Code switch in the Multi-Factor Authentication module.
Disable global SMS verification code MFA: Select Security Settings->Multi-Factor Authentication, and turn off the SMS Verification Code switch in the Multi-Factor Authentication module.
MFA based on email verification code
Overview
Multi-factor authentication (MFA) is a security system that performs secondary identity authentication to verify the legitimacy of an operation. For example, a bank's USB shield requires mobile phone and email verification for remote login. This article introduces multi-factor authentication based on email verification code.
Preparation
Role: Administrator
Before enabling email verification code MFA, perform the following preparations:
Enable Email Verification Code MFA
Role: Administrator
Enable Application-level Email Verification Code MFA
INFO
To configure application-level MFA, you must enable the Customize security rules for this application switch in Application->Self-built Application->Application Details->Advanced Configuration before the Security Management tab will appear.
To enable application-level Email Verification Code MFA, perform the following steps:
Select Application->Self-built Application in the navigation menu on the left side of the console.
Select the application for which you need to enable Email Verification Code MFA in the list of self-built applications.
Go to the application details page, select Security Management, and enable the Email Verification switch in the Multi-factor Authentication module.
Enable Global Email Verification Code MFA
To enable Global Email Verification Code MFA, perform the following steps:
Select Security Settings->Multi-factor Authentication in the navigation menu on the left side of the console.
Enable the Email Verification switch in the Multi-factor Authentication module.
Select the applicable identity source in the Policy Configuration module and turn off the MFA switch of other irrelevant identity sources.
Login using email verification code MFA
Experience login
Role: Administrator
To experience email verification code MFA, the administrator needs to perform the following steps:
Select User Management->User List in the navigation menu on the left side of the console, click the Create User button to create a user for email verification code MFA login by Username/Mobile Number/Email.
Select Application->Self-built Application, click the Experience Login button in the upper right corner of the target application details page, and log in with the account created above.
After one identity authentication, if the email address has not been bound, the system opens the Bind Email page, and enter the email address at this time.
INFO
If the email address has been bound in the Personal Information module on the user details page in advance, after one identity authentication, the step of entering the email address will be skipped, and you will be required to enter the email verification code directly.
- Enter the verification code obtained from the email address.
The prompt is that the authentication is completed and the login is successful.
User login
Role: Ordinary user
To perform email verification code MFA when logging in, perform the following steps:
Log in by username/mobile number/email account or scan code.
After one identity authentication, if the user has not yet bound an email, the system opens the Bind email page, and enter the email address at this time.
INFO
If the email has been bound, after one identity authentication, the step of entering the email address will be skipped, and you will be required to directly enter the email verification code.
- Enter the verification code obtained from the email.
The prompt is that the authentication is completed and the login is successful.
Turn off email verification code MFA
Role: Administrator
To turn off email verification code MFA, you can turn off the function at the application level and globally:
Turn off application-level email verification code MFA: Enter the application details, select Security Management, and turn off the Email Verification switch in the Multi-factor Authentication module.
Turn off the global email verification code MFA: Select Security Settings->Multi-factor Authentication, and turn off the Email Verification switch in the Multi-factor Authentication module.
MFA with one-time password based on timestamp algorithm
Overview
Multi-factor authentication (MFA) is a security system that performs secondary identity authentication to verify the legitimacy of an operation. For example, the bank's USB shield requires SMS verification for remote login. This article introduces a one-time password (OTP) multi-factor authentication method consisting of a six-digit password that changes dynamically over time.
Preparation
Role: Administrator
Before enabling OTP MFA, perform the following preparations:
Enable OTP MFA
Role: Administrator
Enable application-level OTP MFA
INFO
To configure application-level MFA, you must enable the Customize security rules for this application switch in Applications->Self-built applications->Application details->Advanced configuration before the Security management tab will appear.
To enable application-level OTP MFA, perform the following steps:
Select Applications->Self-built applications in the navigation menu on the left side of the console.
Select the application for which you want to enable OTP MFA in the list of self-built applications.
Go to the application details page, select Security management, and enable the OTP password switch in the Multi-factor authentication module.
Enable global OTP MFA
To enable global OTP MFA, perform the following steps:
Select Security settings->Multi-factor authentication in the navigation menu on the left side of the console.
Enable the OTP password switch in the Multi-factor authentication module.
Select the applicable identity source in the Policy Configuration module and turn off the MFA switch of other irrelevant identity sources.
Login using OTP MFA
Experience login
Role: Administrator
To experience OTP MFA, administrators should perform the following steps:
Select User Management->User List in the navigation menu on the left side of the console, click the Create User button to create a user for OTP MFA login by Username/Mobile Number/Email.
Select Application->Self-built Application, click the Experience Login button in the upper right corner of the target application details page, and log in with the account created above.
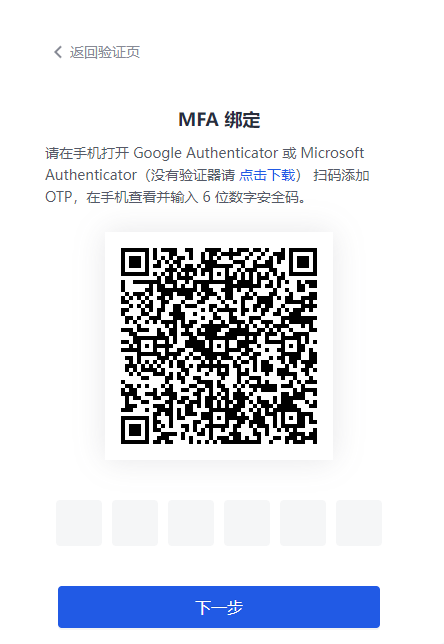
Bind OTP.
- Method 1:
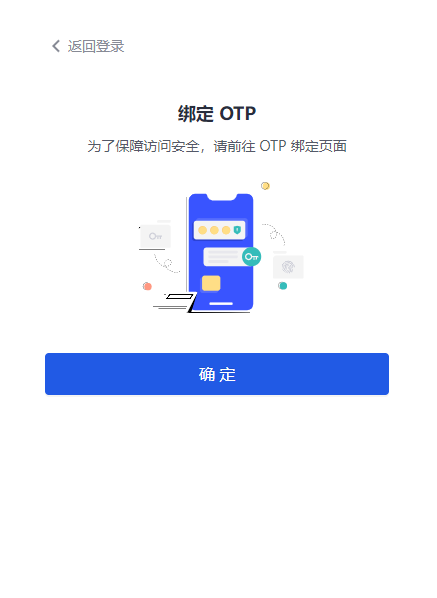
a. Click OK to open the MFA binding scan code window.
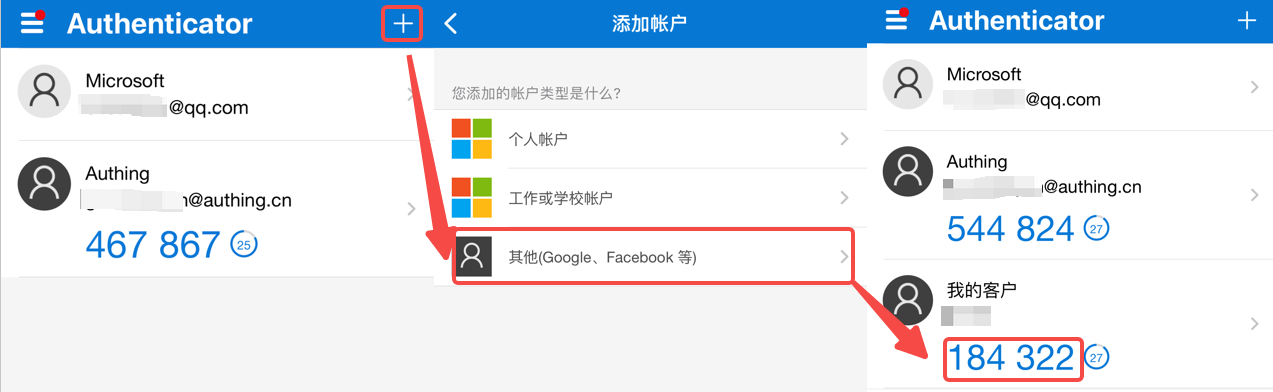
b. Download and open Google Authenticator / Microsoft Authenticator APP on your mobile phone (Microsoft Authenticator is used as an example to add MFA below.), click the + button in the upper right corner, select Other (Google, Facebook, etc.), and scan the code to add MFA.
After scanning the code, you can view the newly added MFA in the account list of the APP.
c. Enter the dynamic password displayed on the MFA on the computer, click Next, back up the key, check the Save key prompt below, and click Next to complete the confirmation binding.
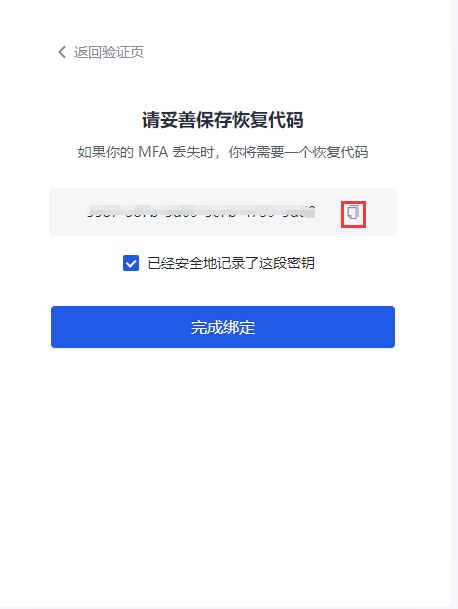
INFO
Be sure to keep the recovery code shown here properly. If you lose your MFA and cannot log in with your MFA password in the future, you can use this key to restore account access.
The system prompts that the authentication is successful.
- Method 2:
To bind OTP, follow these steps:
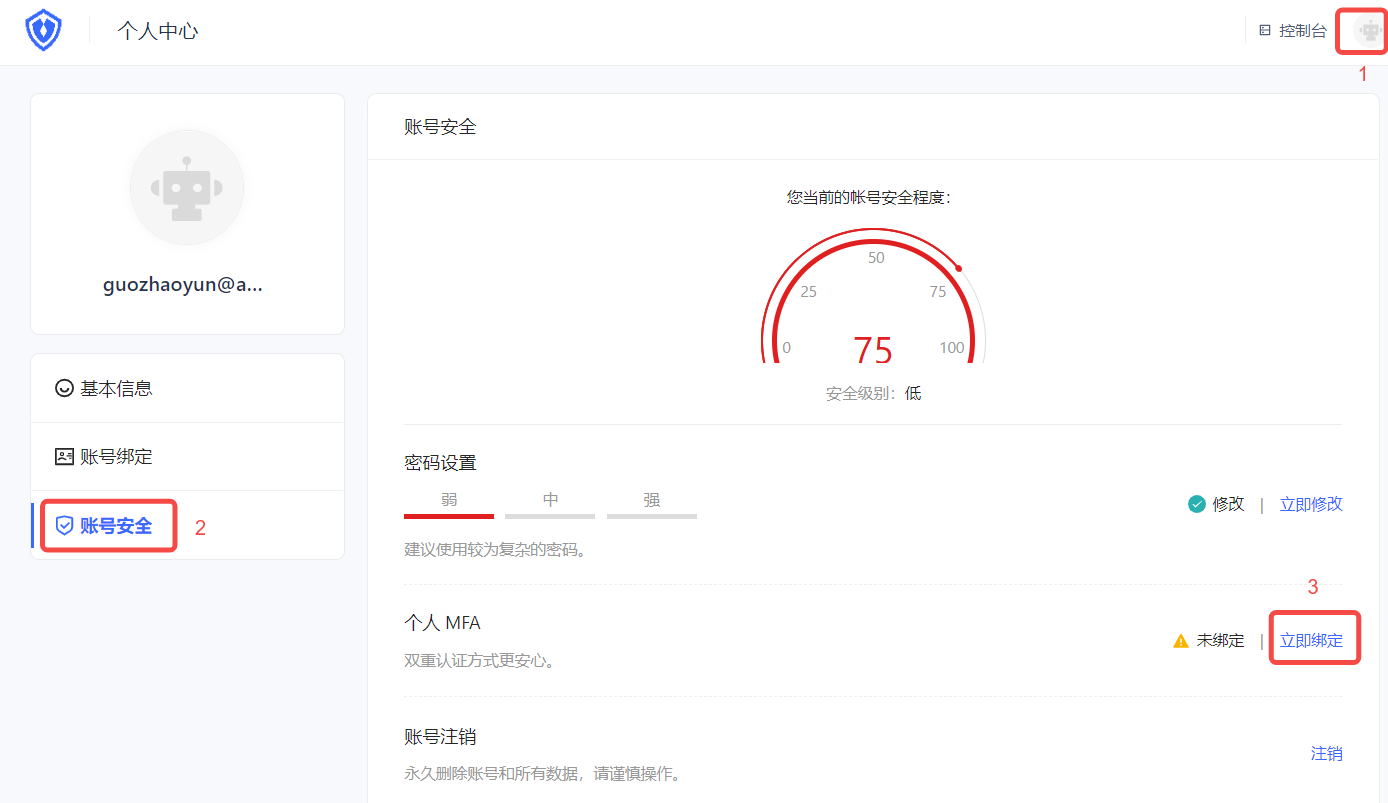
a. Visit https://<your application domain name>.genauth.ai to log in. Then visit https://<your application domain name>.genauth.ai/u and click the avatar in the upper right corner of the page to enter the Personal Center.
b. Select Personal Center->Account Security->Personal MFA, and click the Bind Now button to bind MFA.
c. Download and open Google Authenticator / Microsoft Authenticator APP on your mobile phone (Microsoft Authenticator is used as an example to add MFA below.), click the + button in the upper right corner, select Other (Google, Facebook, etc.), and scan the web console QR code.

After scanning the code, you can view the newly added MFA and the generated dynamic password in the account list of the APP.
d. Click Next on the web page and enter the dynamic password.
e. Back up the key, check the Save Key prompt below, click Next to complete the confirmation binding, and click Next.
The prompt is successful.
User login
Role: Ordinary user
The user's OTP MFA login method is similar to the administrator's login experience. Please refer to the above methods 1 and 2.
If the user has completed the OTP MFA binding, the next time you log in, you can perform the following steps:
- Visit
https://<your application domain name>.genauth.ai. Use the account bound to MFA to log in. After the first identity authentication, you will be prompted to enter the security code for the second authentication.
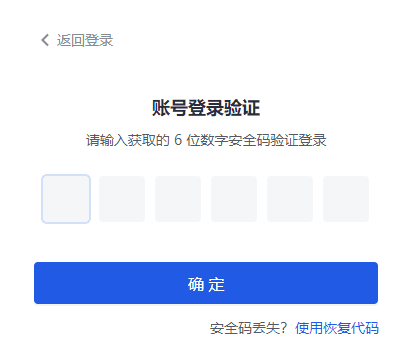
- Check the mobile Authenticator APP and enter the dynamic password to complete the second authentication and log in.
Unbind OTP MFA
Role: Ordinary user
To unbind the MFA binding between Authenticator and the console, perform the following steps:
Select Personal Center->Account Security->Personal MFA.
Click the Modify Now button.
Click the Unbind button in the upper right corner of the MFA Binding page that opens, and confirm the unbinding.
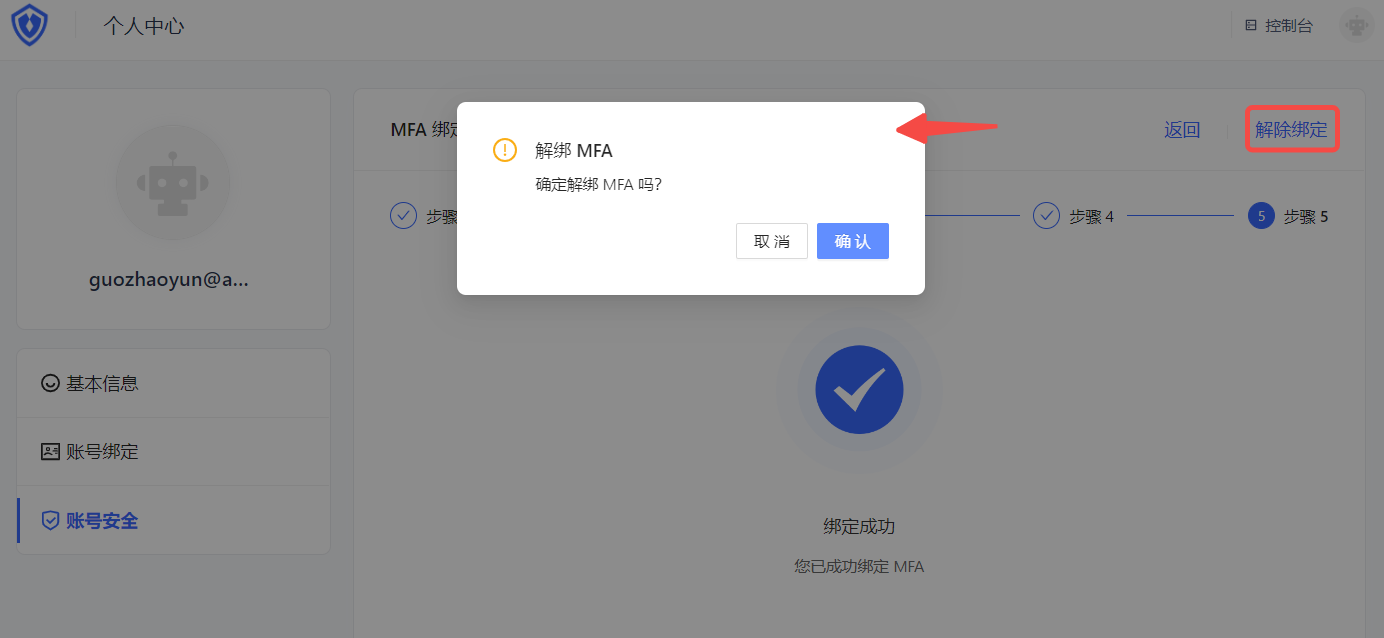
The message says that the unbinding is successful.
Disable OTP MFA
Role: Administrator
To disable OTP MFA, you can disable the function at the application level and globally:
Disable application-level OTP MFA: Go to the application details, select Security Management, and disable the OTP Password switch in the Multi-Factor Authentication module.
Disable global OTP MFA: Select Security Settings->Multi-Factor Authentication, and disable the OTP Password switch in the Multi-Factor Authentication module.
MFA based on face recognition
Overview
Multi-factor authentication (MFA) is a security system that performs secondary identity authentication to verify the legitimacy of an operation. For example, a bank's USB shield requires SMS verification for remote login. This article introduces a multi-factor authentication method that recognizes the user's unique facial features.
Preparation
Role: Administrator
Before enabling face recognition MFA, perform the following preparations:
Enable Face Recognition MFA
Role: Administrator
Enable App-level Face Recognition MFA
INFO
To configure App-level MFA, you must enable the Customize security rules for this app switch in App->Self-built App->App Details->Advanced Configuration before the Security Management tab will appear.
To enable App-level Face Recognition MFA, perform the following steps:
Select App->Self-built App in the navigation menu on the left side of the console.
Select the app for which you want to enable Face Recognition MFA in the list of self-built apps.
Go to the App Details page, select the Security Management tab, and enable the Face Recognition switch in the Multi-factor Authentication module at the bottom of the page.
Enable Global Face Recognition MFA
To enable Global Face Recognition MFA, perform the following steps:
Select Security Settings->Multi-factor Authentication in the navigation menu on the left side of the console.
Enable the Face Recognition switch in the Multi-Factor Authentication module.
Select the applicable identity source in the Policy Configuration module and turn off the MFA switch for other irrelevant identity sources.
Login using Face Recognition MFA
Experience login
Role: Administrator
INFO
Face recognition MFA is supported on both the web and mobile terminals, and the phone and computer must be equipped with a camera.
To experience Face Recognition MFA, administrators should perform the following steps:
Select User Management->User List in the navigation menu on the left side of the console, click the Create User button to create a user for Face Recognition MFA login by using the Username/Phone Number/Email.
Select Application->Self-built Application, click the Experience Login button in the upper right corner of the target application details page, and log in using the account created above.
After one identity authentication, the system prompts you to call your camera, click Allow to open the camera for authentication.
User login
Role: Normal user
To perform face recognition MFA when logging in, follow these steps:
Log in by username/mobile number/email account or scan code.
After one identity authentication, the system prompts to call your camera, click Allow to open the camera for authentication.
INFO
Face recognition MFA authentication may take several seconds, please wait patiently. After the authentication is completed, it will prompt success.
Turn off face recognition MFA
Role: Administrator
To turn off face recognition MFA, you can turn off the function at the application level and globally:
- Turn off application-level face recognition MFA: Go to application details, select Security Management, and turn off the Face Recognition switch in the Multi-factor Authentication module.
- Turn off full face recognition MFA: Select Security Settings->Multi-factor Authentication, and turn off the Face Recognition switch in the Multi-factor Authentication module.
Access MFA through SDK
Overview
GenAuth can not only configure the MFA authentication process through the console, but also customize the MFA authentication process of GenAuth through the SDK.
This article will take GenAuth - Node/JavaScript SDK as an example to guide users to complete the SDK-based MFA custom development.
It includes: binding MFA authenticator, unbinding MFA authenticator, user secondary authentication, etc.
Preparation
Multi-factor authentication (MFA) API
Reference authentication API documentation
Reference management API documentation
Multi-factor authentication (MFA) SDK
Reference SDK v2 Documentation
MFA policy configuration
Path: Security Settings->Multi-factor Authentication->Policy Configuration
Role: Administrator
GenAuth supports configuring whether to enable MFA for different third-party identity sources at the user pool level.
INFO
- The Policy Configuration module will display all identity sources configured under the Identity Source Management menu. Before configuring the MFA policy, make sure that the user pool has configured the target identity source.
- This configuration is effective globally and is not affected by the custom security function configuration of self-built applications.
- When no MFA authentication method is enabled globally, all third-party identity sources displayed in the policy configuration are disabled by default.
- When one or more MFA authentication methods are enabled globally, the default state of each identity source is switched to enabled.
- When the switch of a certain identity source connection is turned off globally, all MFA processes will be skipped when users log in to all applications of the user pool using the identity source connection method.
- When a certain identity source connection switch is turned on globally, users will need to perform secondary identity authentication when logging into all applications of the user pool using this identity source connection method.