Federation authentication
What is federation authentication
In the early days of the Internet, your various account information was scattered across different sites and applications, which resulted in the following problems:
- Every time you visited a new site, you had to register a new username and password account.
- This account was only stored on this site.
- You could not stay logged in at different sites, and user information could not be communicated between different sites.
Federation authentication uses standard protocols to unite different identity providers to authenticate users. Federation is a trust relationship between identity providers. Identity providers that have established a federation relationship can pull user information from each other through standard protocols.

Why do we need federation authentication
Federation authentication is a distributed identity authentication. When a user logs in to an identity provider, the user can choose to log in to a federated identity provider that the current identity provider trusts. Users can log in to a new system through federation authentication without having to register an account in the new system every time. For example, many websites now have their own account registration login method, and also have a WeChat scan code direct login method. Among them, WeChat is the identity federation of this website. Users **do not need to fill in **information to register an account, directly use WeChat to log in.
Using federated authentication has the following benefits:
- Users do not have to create a new account every time.
- After accessing federated authentication, users can browse in different organizations and sites.
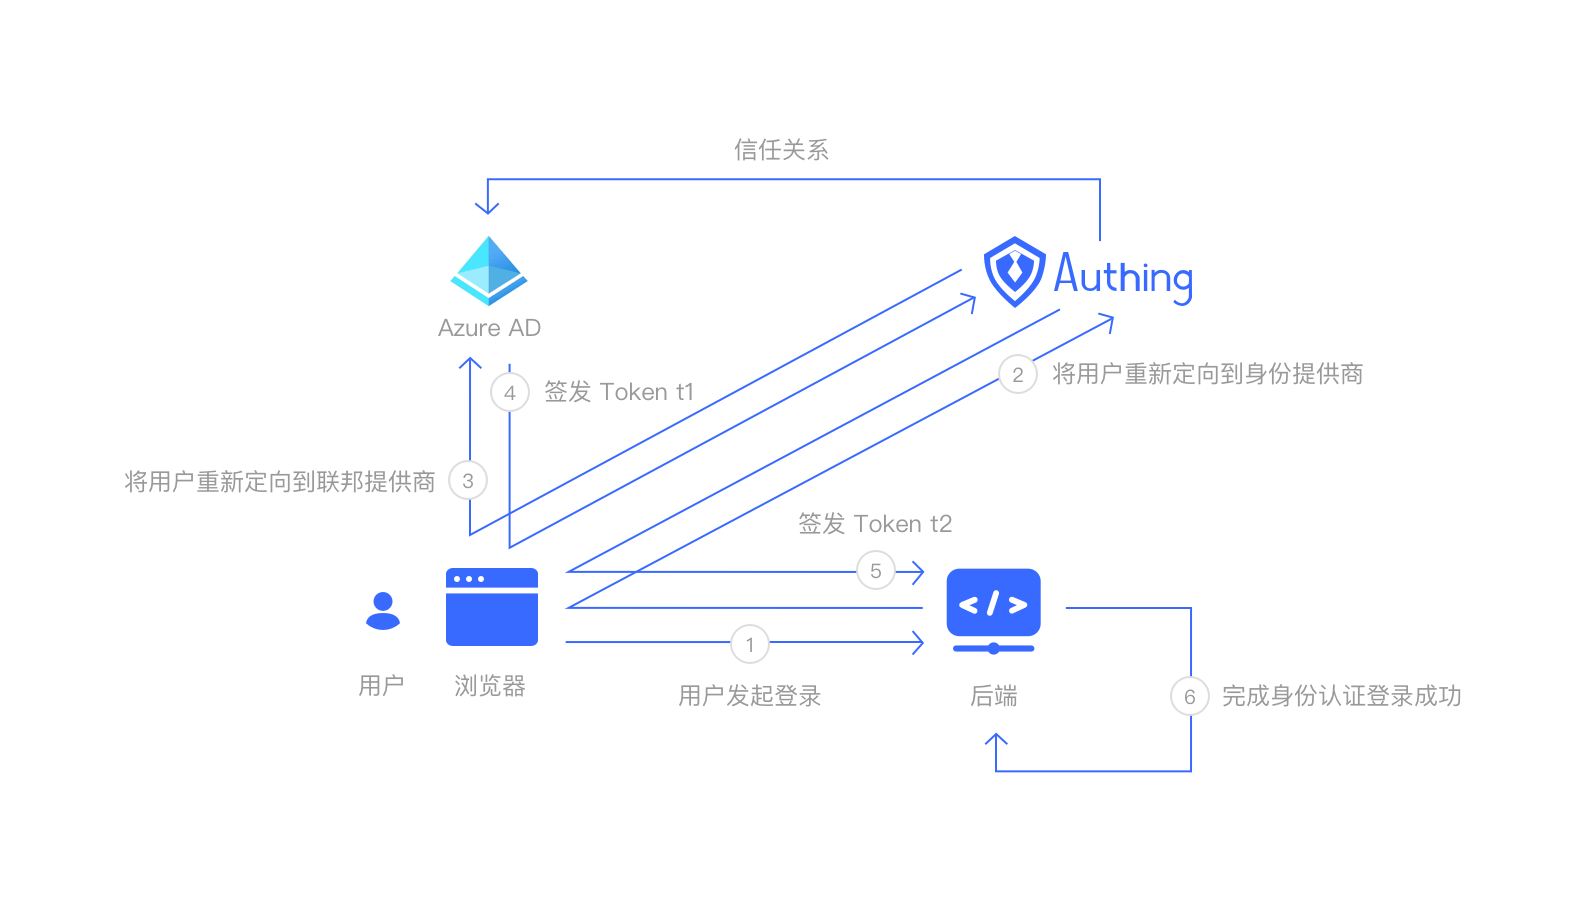
Principle of federated authentication
The following is the process of federated authentication. The user is redirected to the identity federation for authentication. The user first authenticates in the identity federation. The identity federation authentication sends an identity assertion to GenAuth, which is equivalent to the user completing the authentication in GenAuth. GenAuth then sends the identity assertion to the business system, and the business system completes the login.
Federation authentication capabilities of GenAuth
GenAuth supports multiple standard protocols for federated authentication. You can use this application to quickly experience it.

OAuth2
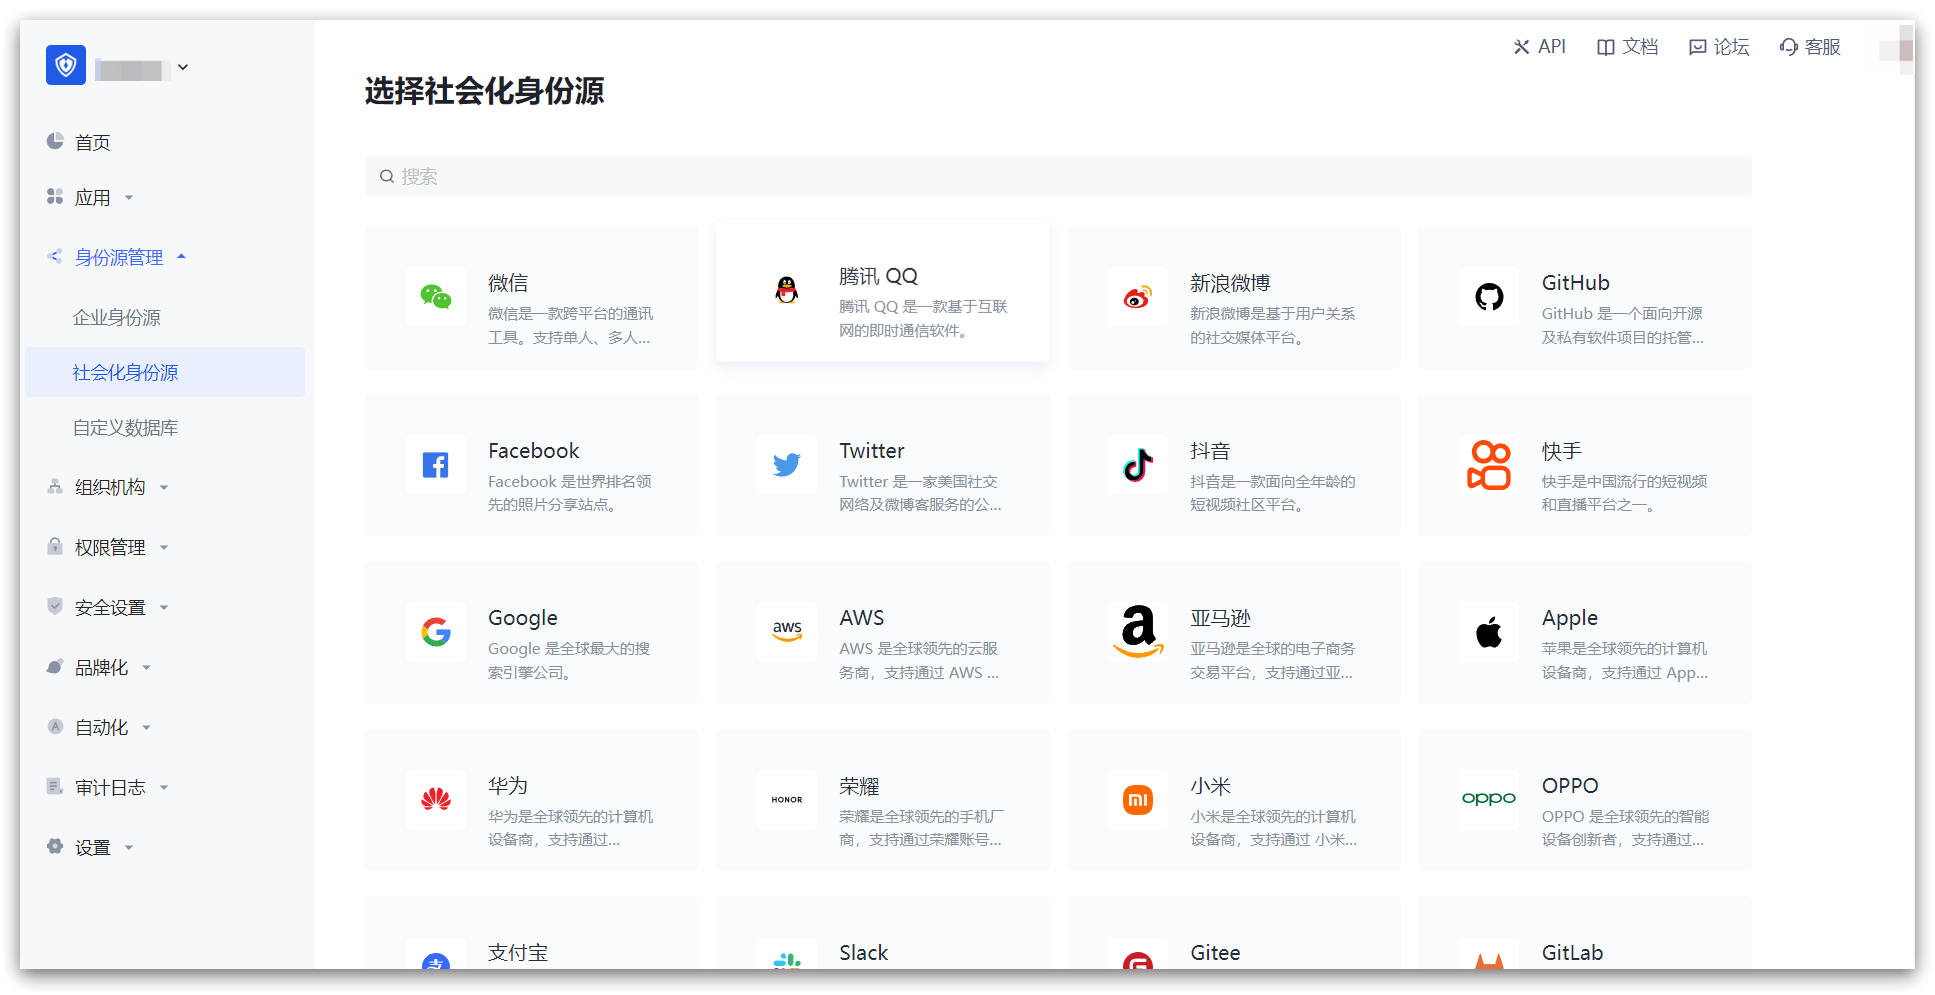
GenAuth supports rich social login and custom OAuth2 identity federation.
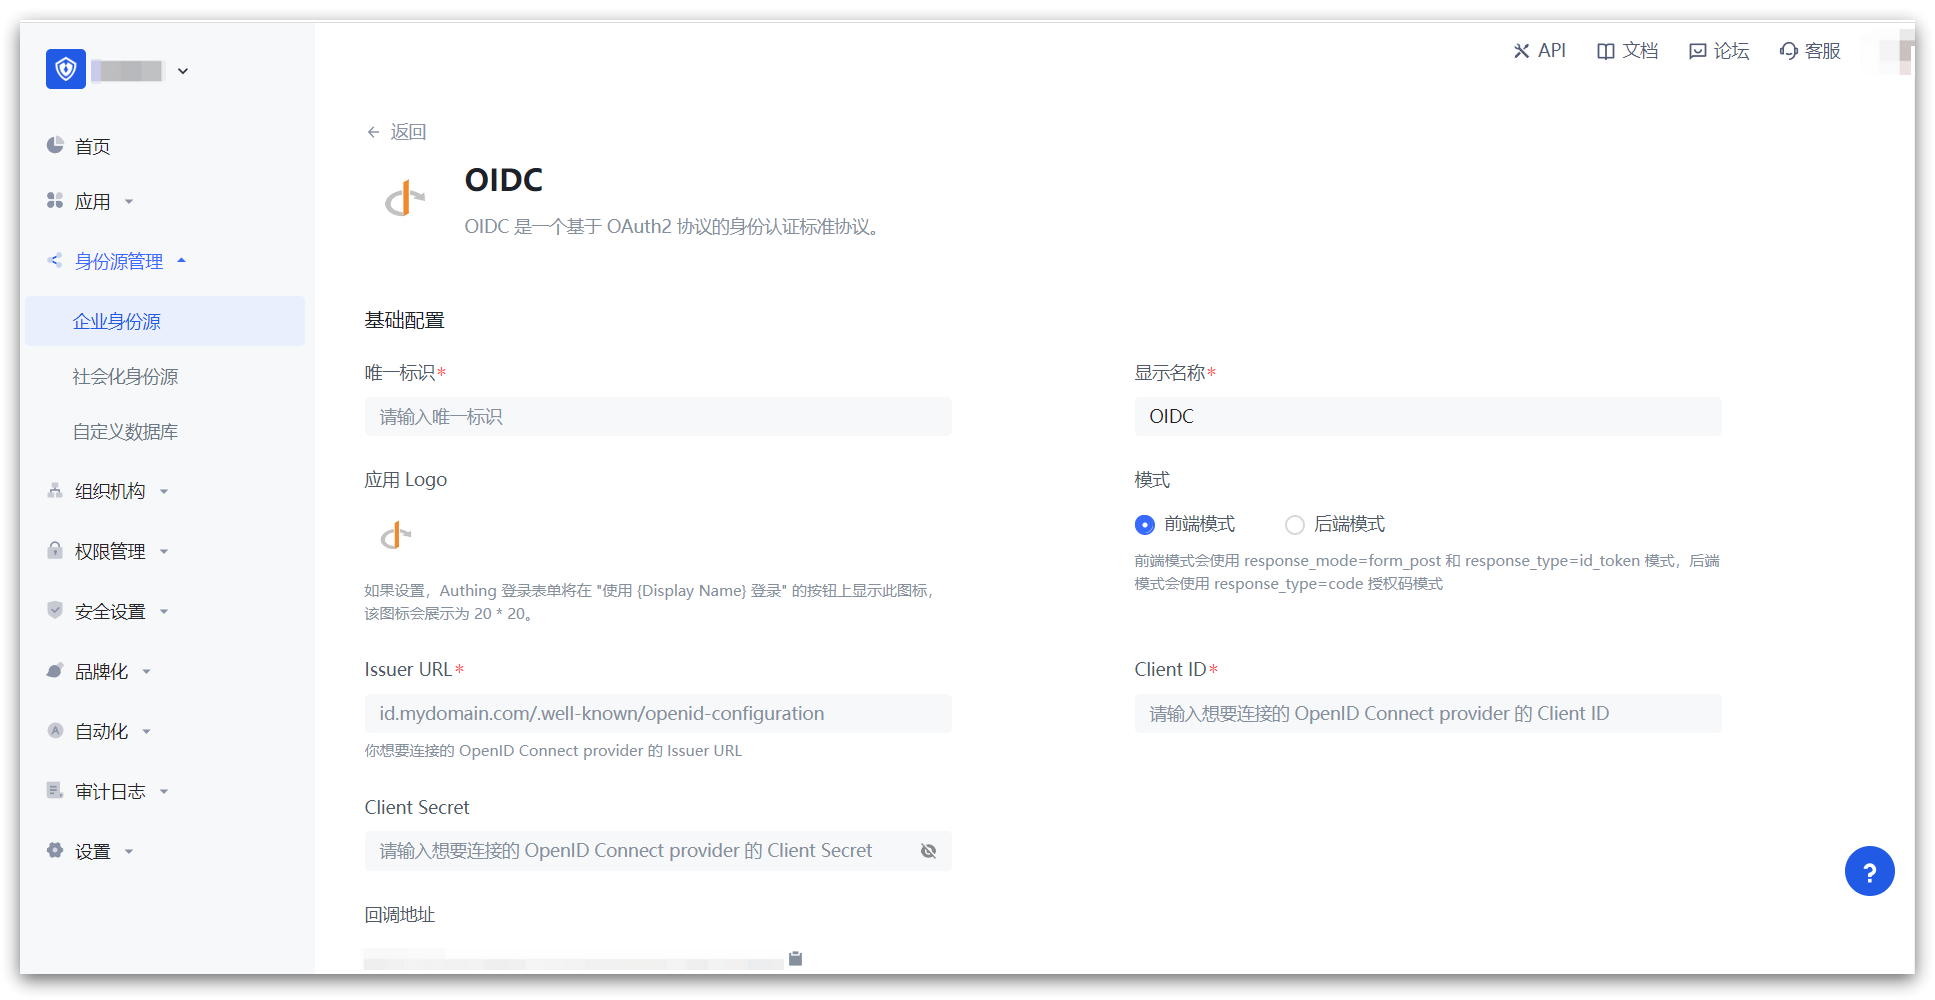
OpenID Connect
GenAuth supports federation authentication using the OIDC protocol.
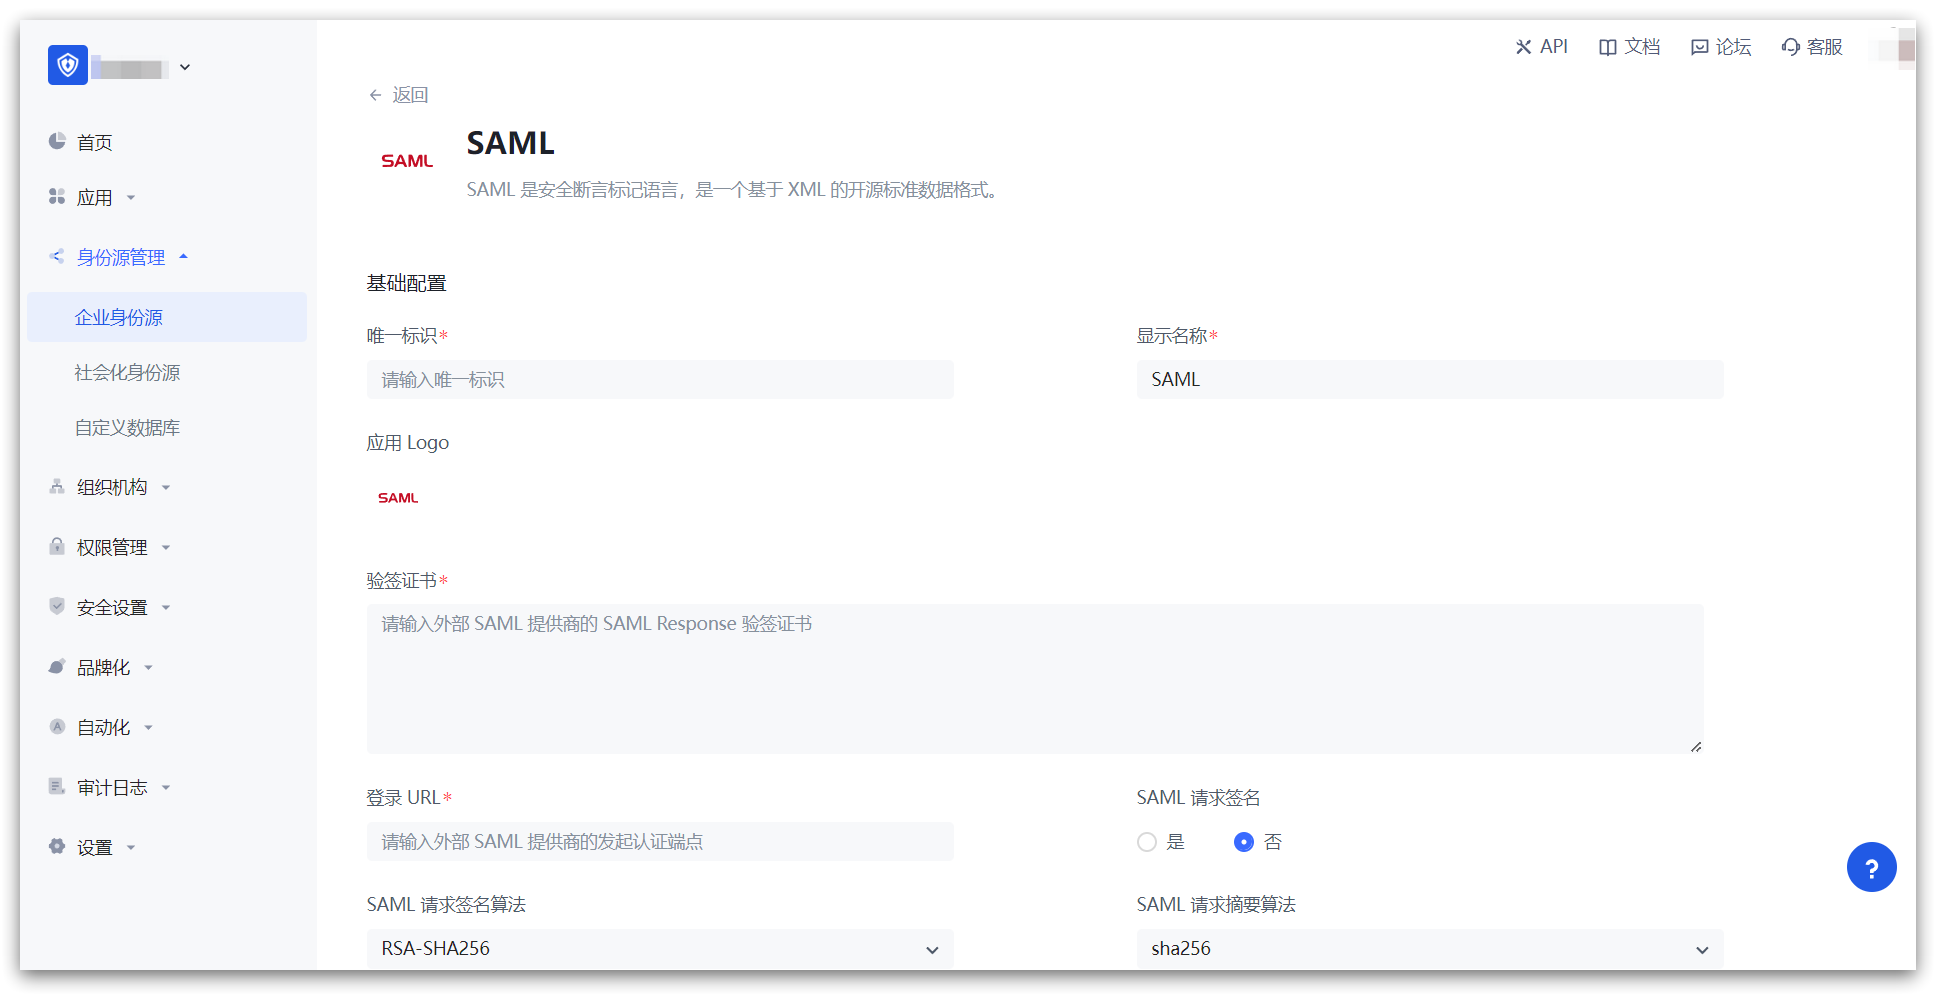
SAML2
GenAuth supports federation authentication using the SAML2 protocol.
CAS
GenAuth supports federation authentication using the CAS protocol.
Become an OpenID Connect identity source
This article describes how to make GenAuth an OIDC identity source. Other systems can access GenAuth as an identity provider through the OIDC protocol.
The OpenID Connect protocol, referred to as OIDC, is a lightweight, secure identity authentication and authorization protocol. OIDC is a superset of the OAuth 2.0 protocol.
The OpenID Connect protocol has the following authorization modes, namely
- [Authorization code mode](#Authorization code mode)
- [Implicit mode](#Implicit mode)
- [Hybrid mode](#Hybrid mode)
- Client Credentials mode
- [Password mode](#Password mode)
After becoming an OpenID Connect identity source, other applications can use the corresponding mode process to complete user authentication and authorization.
You can understand the OIDC protocol in depth here.
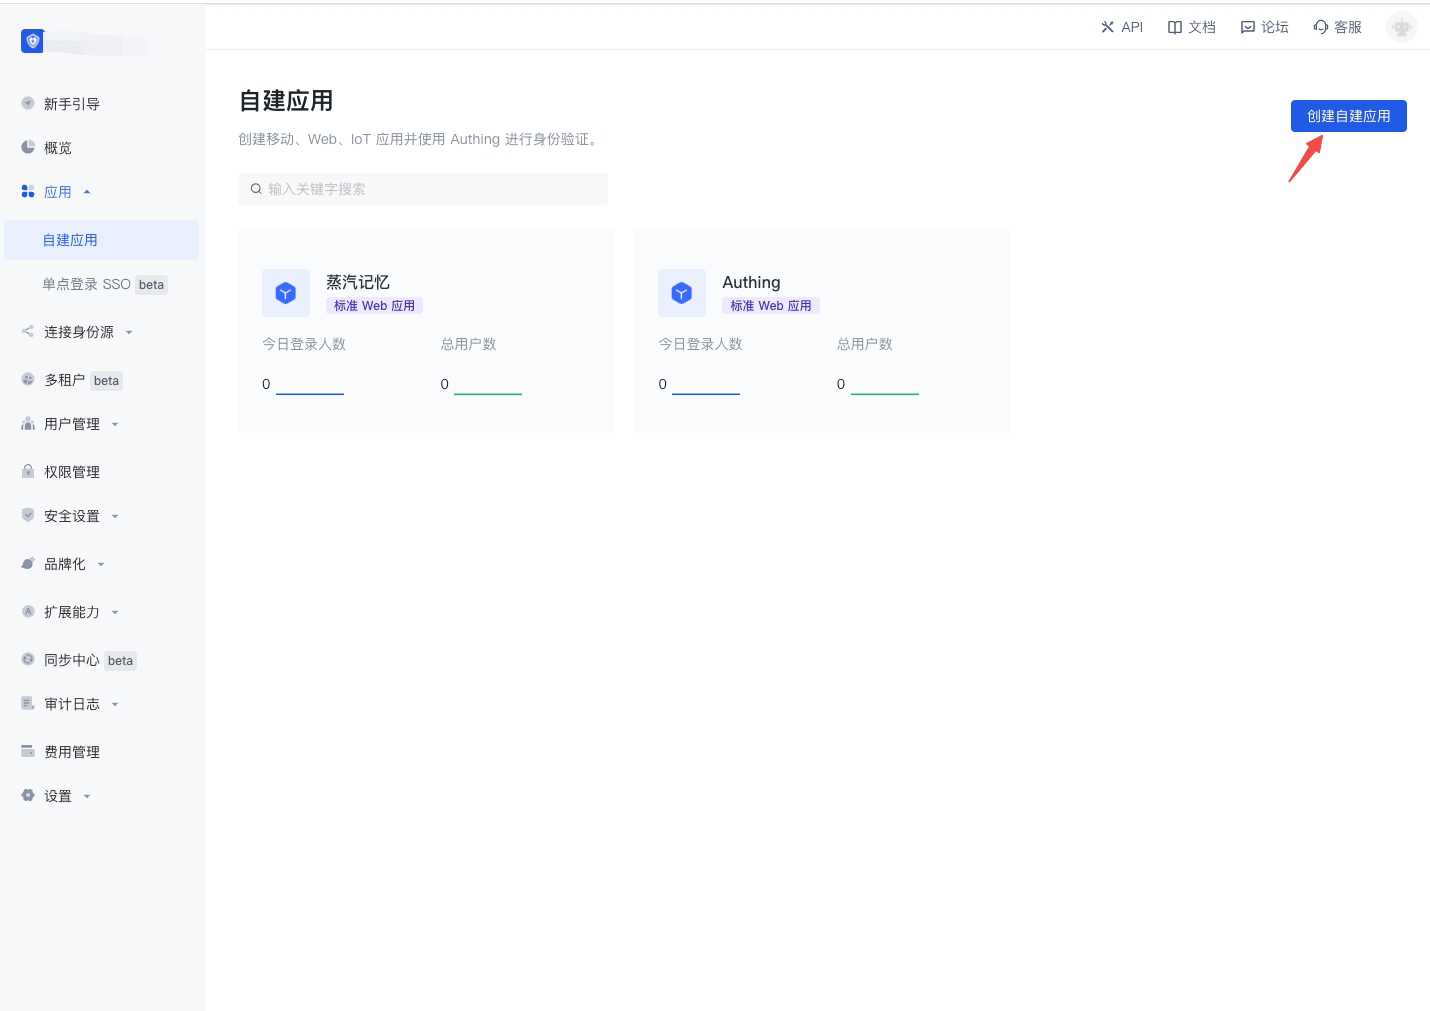
Create an application
In order to enable your application to have identity authentication capabilities, you need to create an application in GenAuth. It is recommended to fill in the name of your actual application project. Go to Console > Application > Application List and click Create Application:
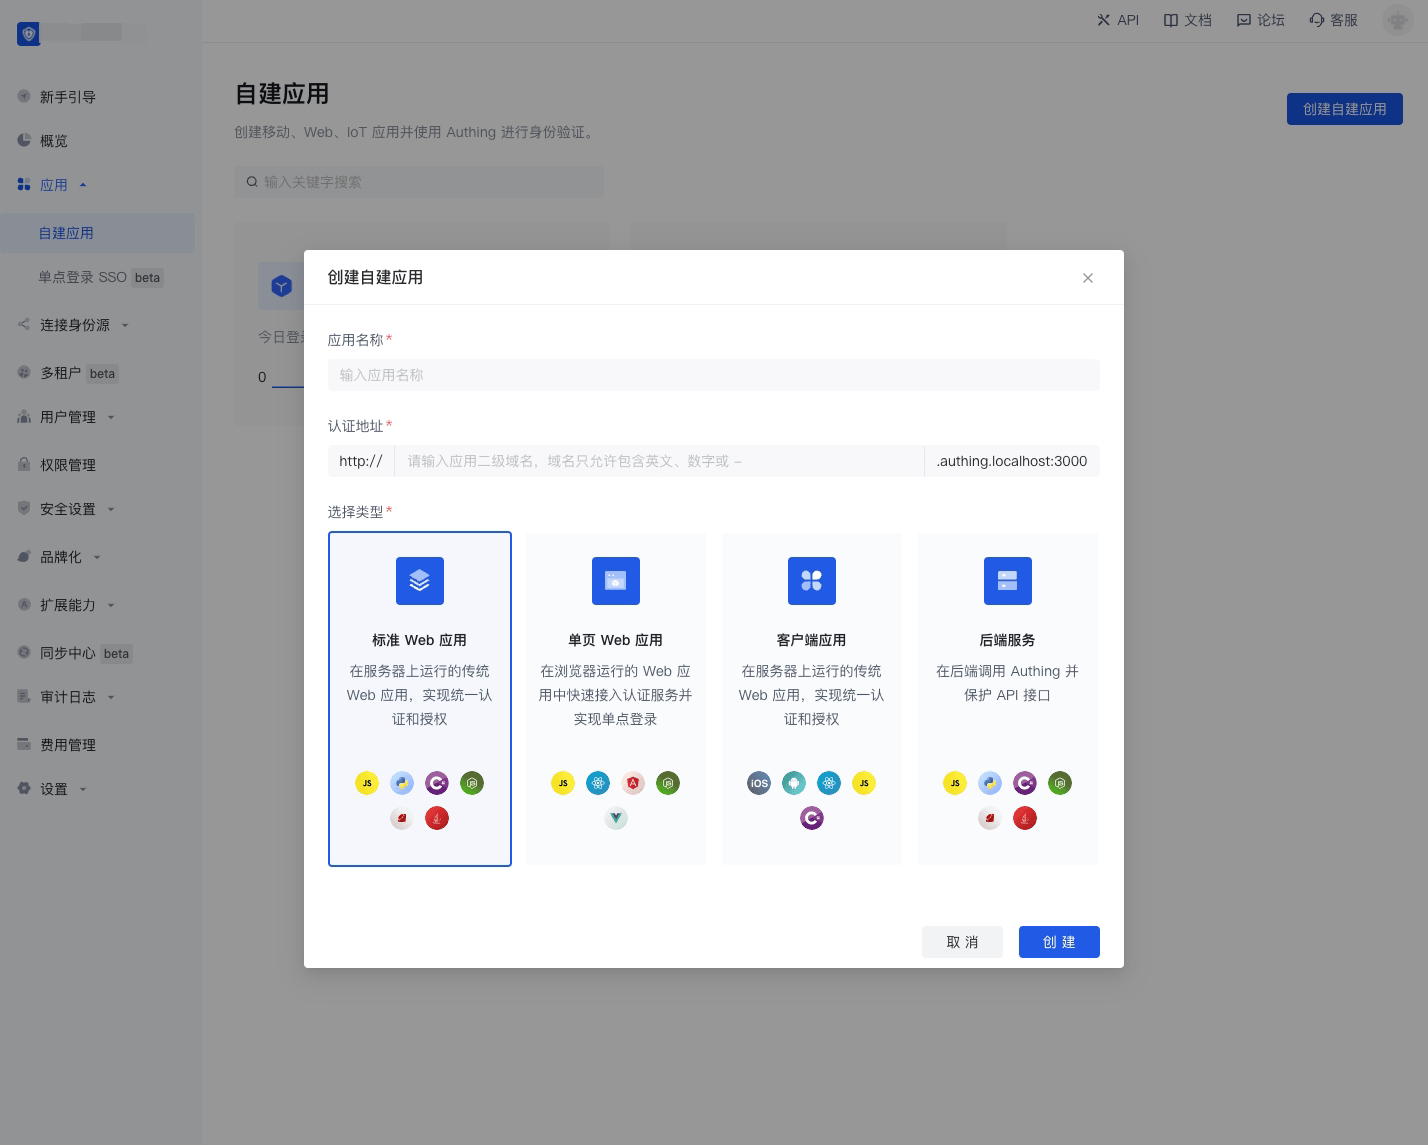
Fill in your Application Name, for example: Network Notes Project, and specify an Authentication Address for your project, where your users will complete authentication in the future.
Callback Link Fill in your project Backend Route, where GenAuth will send user information (to be exact, an authorization code) to this address. Finally, click Create.
Authorization Code Mode
If your application project has a backend service that can store keys securely, it is recommended to use the Authorization Code Mode.
First, go to Console > Application, find your application, enter the application details, and in the "Authorization" card below, check authorization_code in the authorization mode, check code in the return type, and then click Save.

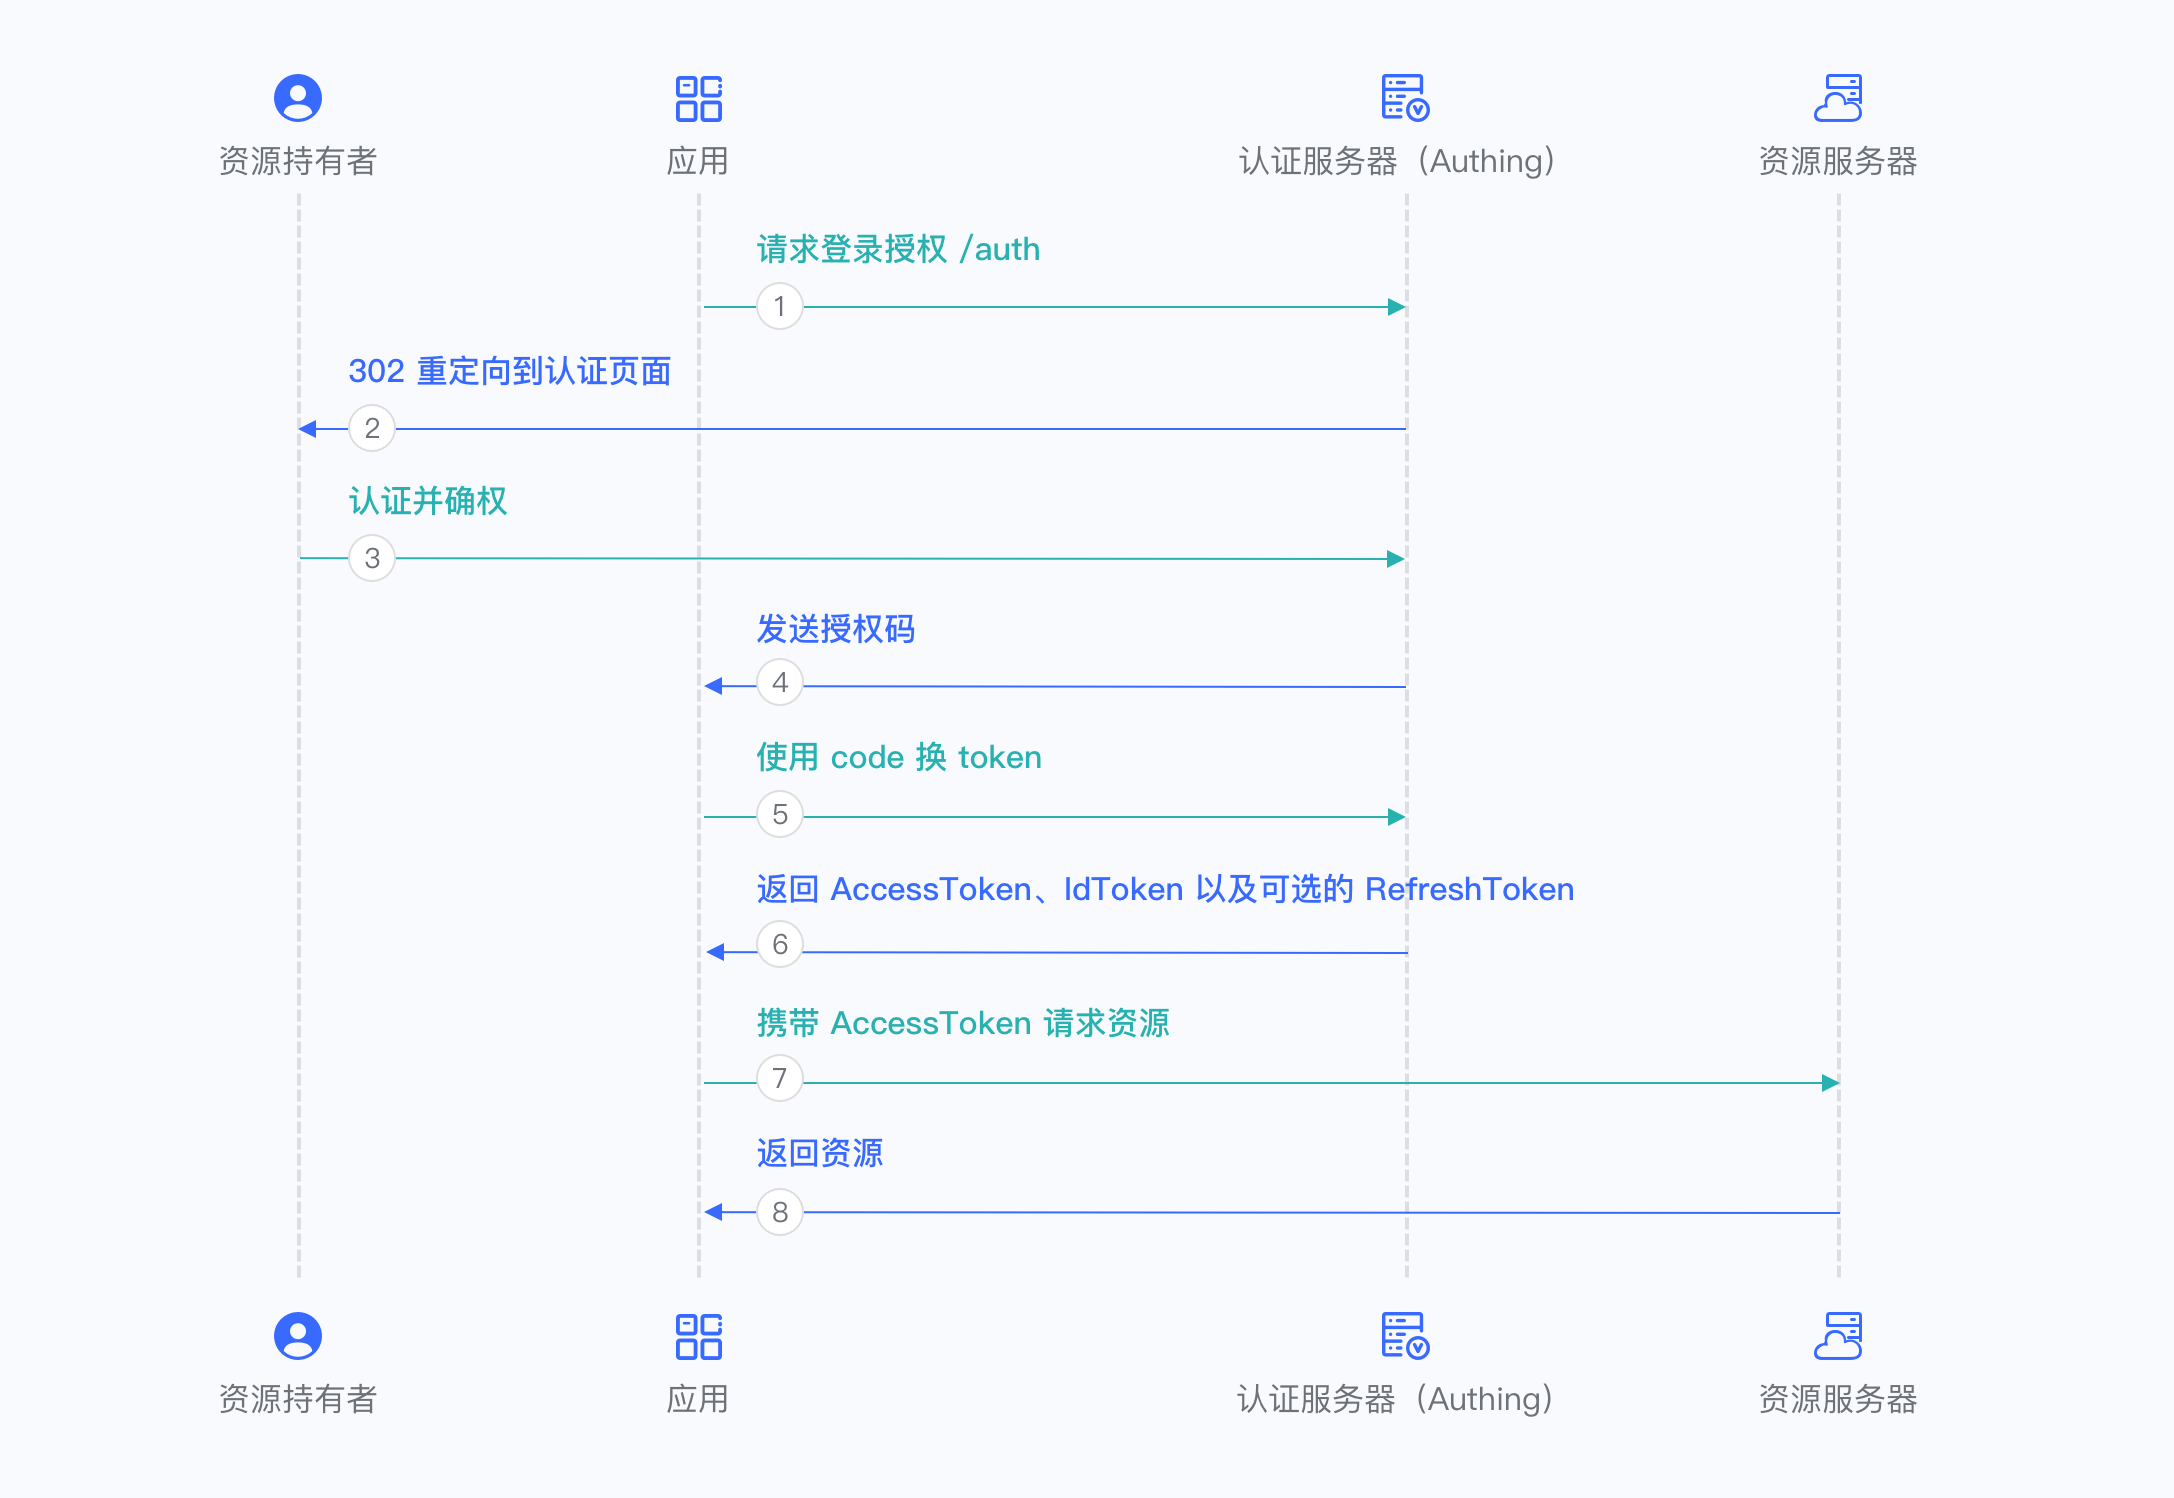
Overall, there are the following processes:
- In your application, let the user visit the login link, the browser jumps to GenAuth, and the user completes authentication in GenAuth.
- The browser receives an authorization code sent from the GenAuth server.
- The browser sends the authorization code to your application backend through redirection.
- Your application service sends the authorization code to GenAuth to obtain AccessToken and IdToken, and returns a refresh token if necessary.
- Your application backend now knows the user's identity, and can subsequently save user information, redirect to other front-end pages, use AccessToken to call other APIs of the resource party, and so on.
The flow chart is as follows:
Authorization code + PKCE mode
If your application is a SPA front-end application or mobile app, it is recommended to use Authorization code + PKCE mode to complete user authentication and authorization. Authorization code + PKCE mode is suitable for scenarios where keys cannot be stored securely (such as front-end browsers).
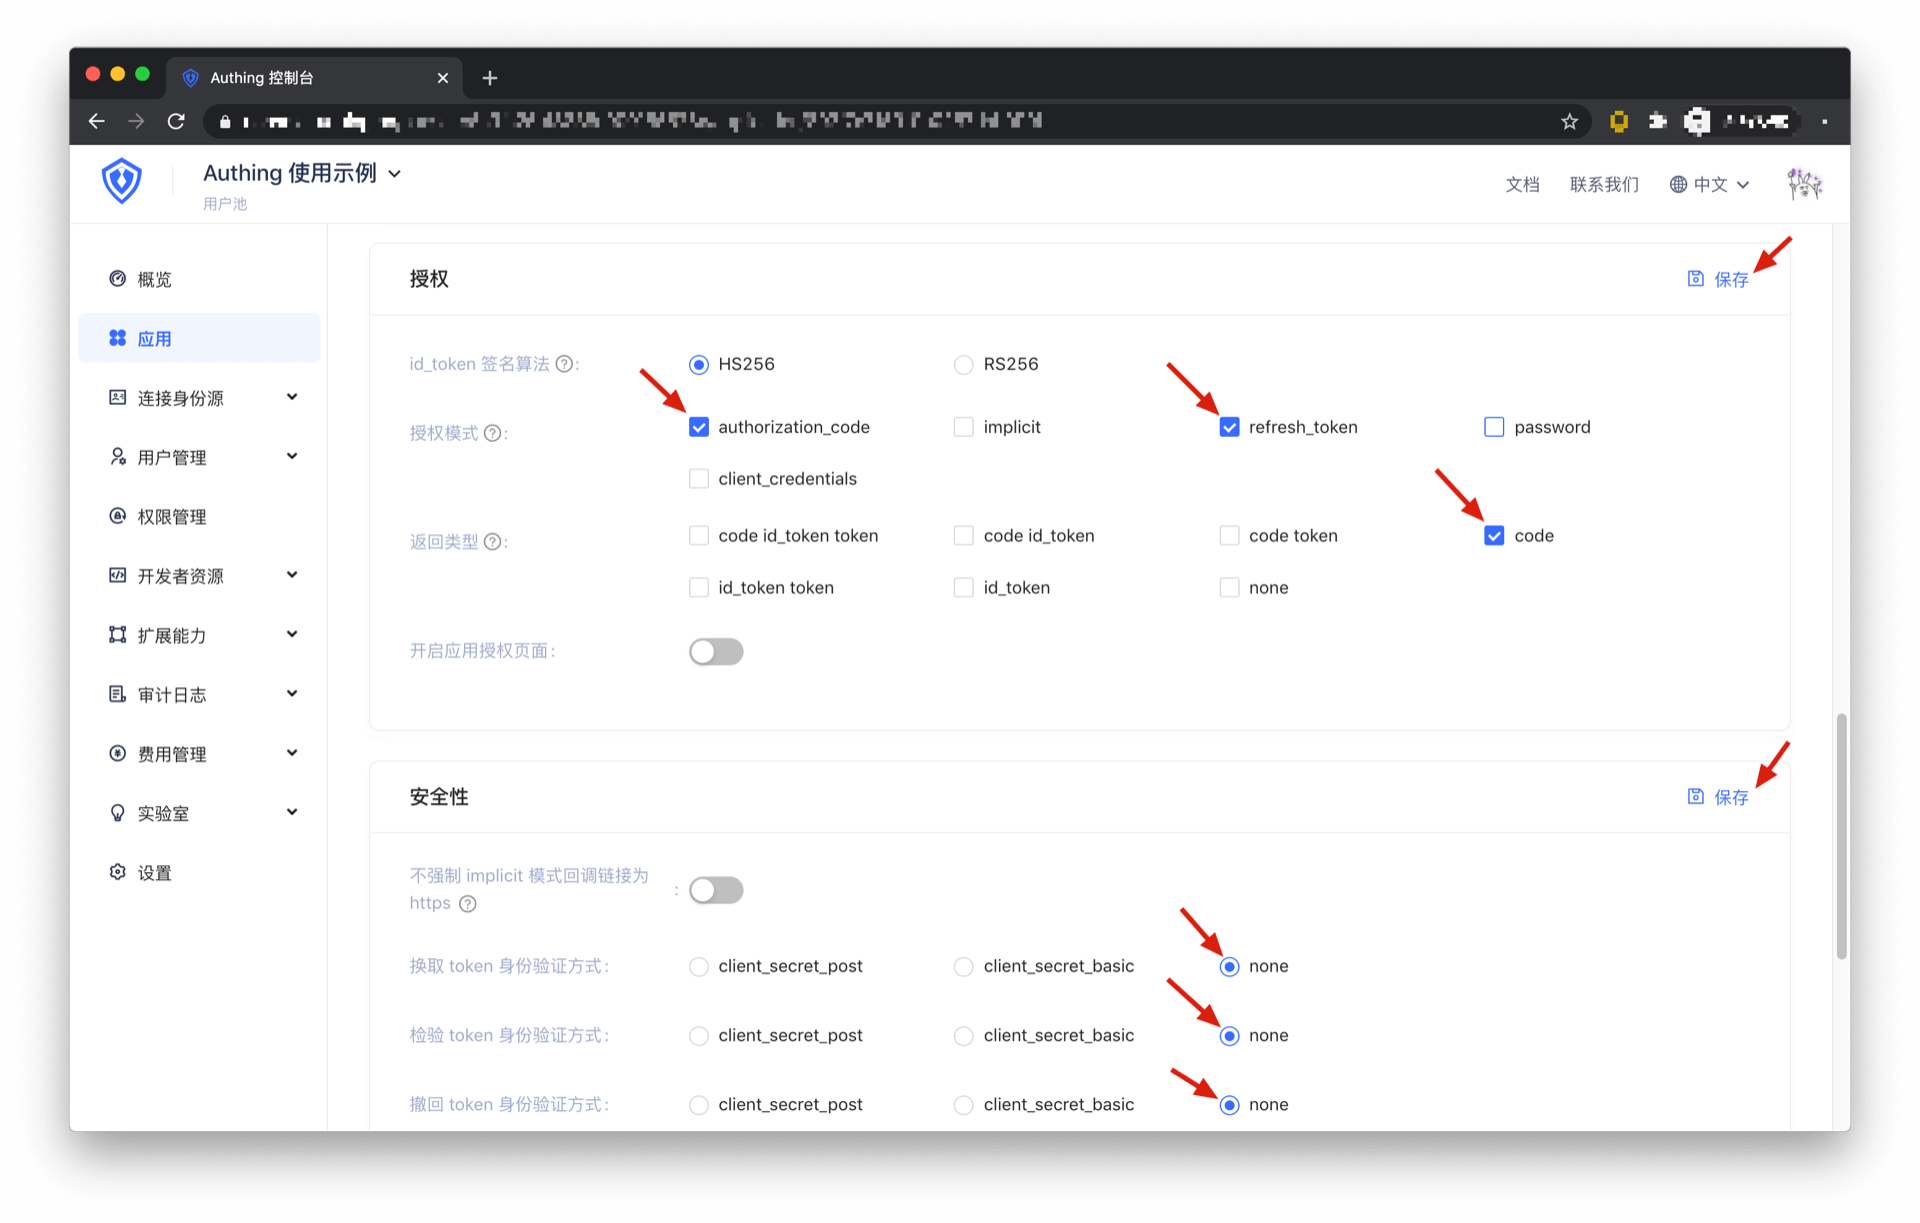
First, in Console > Application, find your application, enter the application details, in the "Authorization" card below, check authorization_code in the authorization mode, check code in the return type, and click Save. In the "Security" card, select none for the exchange token authentication method, the verification token authentication method, and the withdrawal token authentication method, and then click Save.
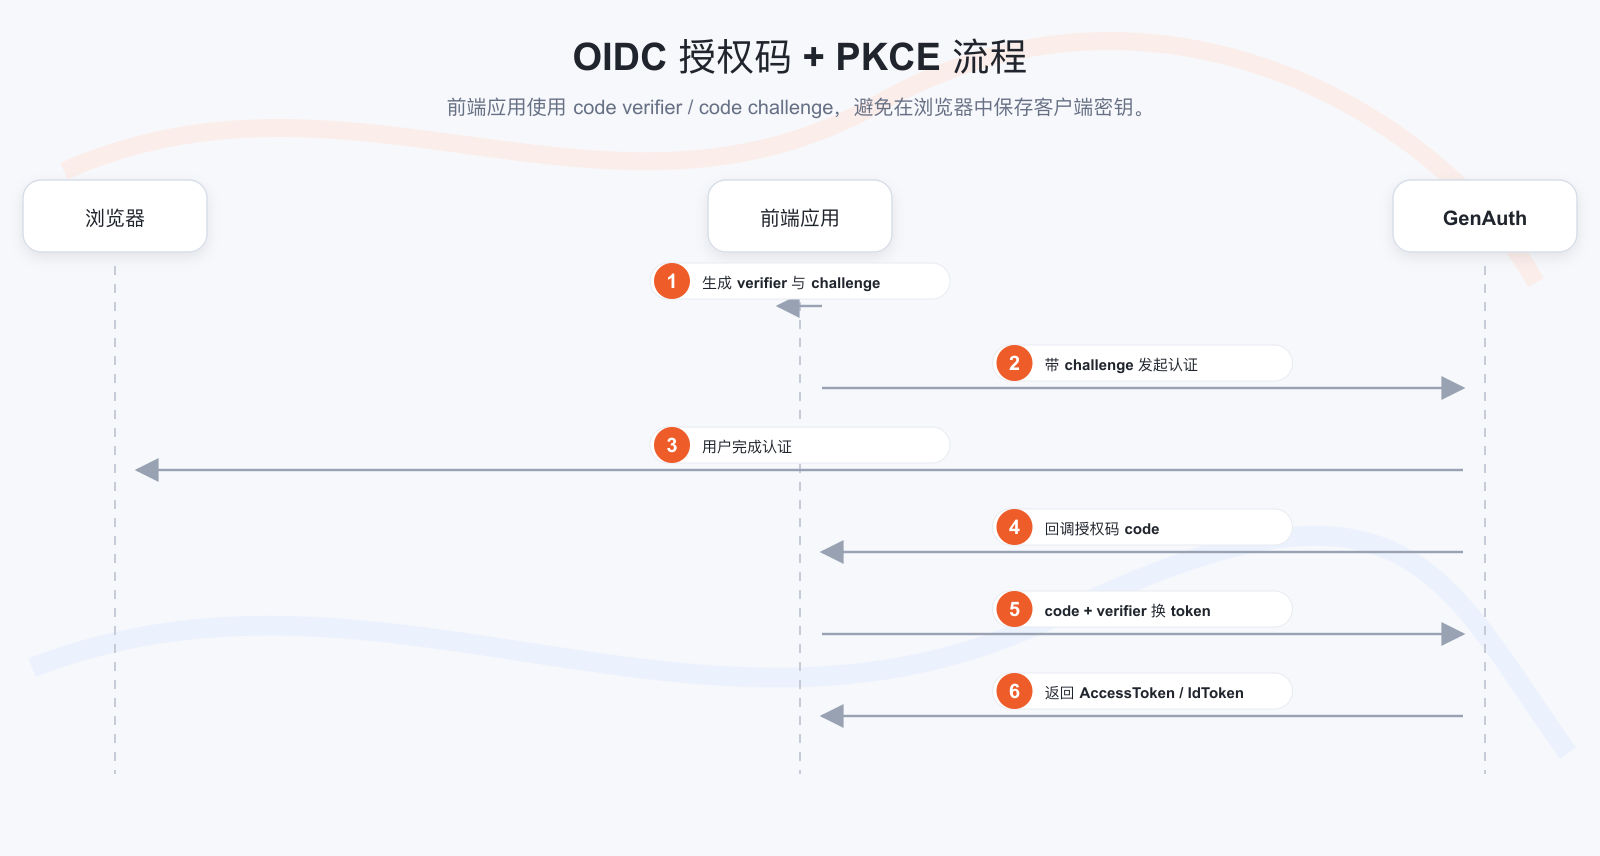
Overall, there is the following process.
- In your application, let the user visit the login link, the browser jumps to GenAuth, and the user completes authentication in GenAuth.
- The browser receives an authorization code sent from the GenAuth server.
- The browser sends the authorization code to your application frontend through redirection.
- Your application sends the authorization code and verification code to GenAuth to obtain AccessToken and IdToken, and returns Refresh token if necessary.
- Your application frontend now knows the user's identity, and subsequently uses Access token to exchange for user information, redirect to other frontend pages, use AccessToken to call other APIs of the resource party, and so on.
The flow chart is as follows:
Implicit mode
If your application is a SPA front-end application and does not have back-end services, it is recommended to use implicit mode to complete user authentication and authorization. Implicit mode is suitable for scenarios where keys cannot be stored securely (such as front-end browsers). In implicit mode, the application does not need to use code to exchange tokens, and does not need to request the /token endpoint. AccessToken and IdToken will be returned directly from the authentication endpoint.
INFO
Because implicit mode is used in scenarios where keys cannot be stored securely, implicit mode does not support obtaining Refresh Token.
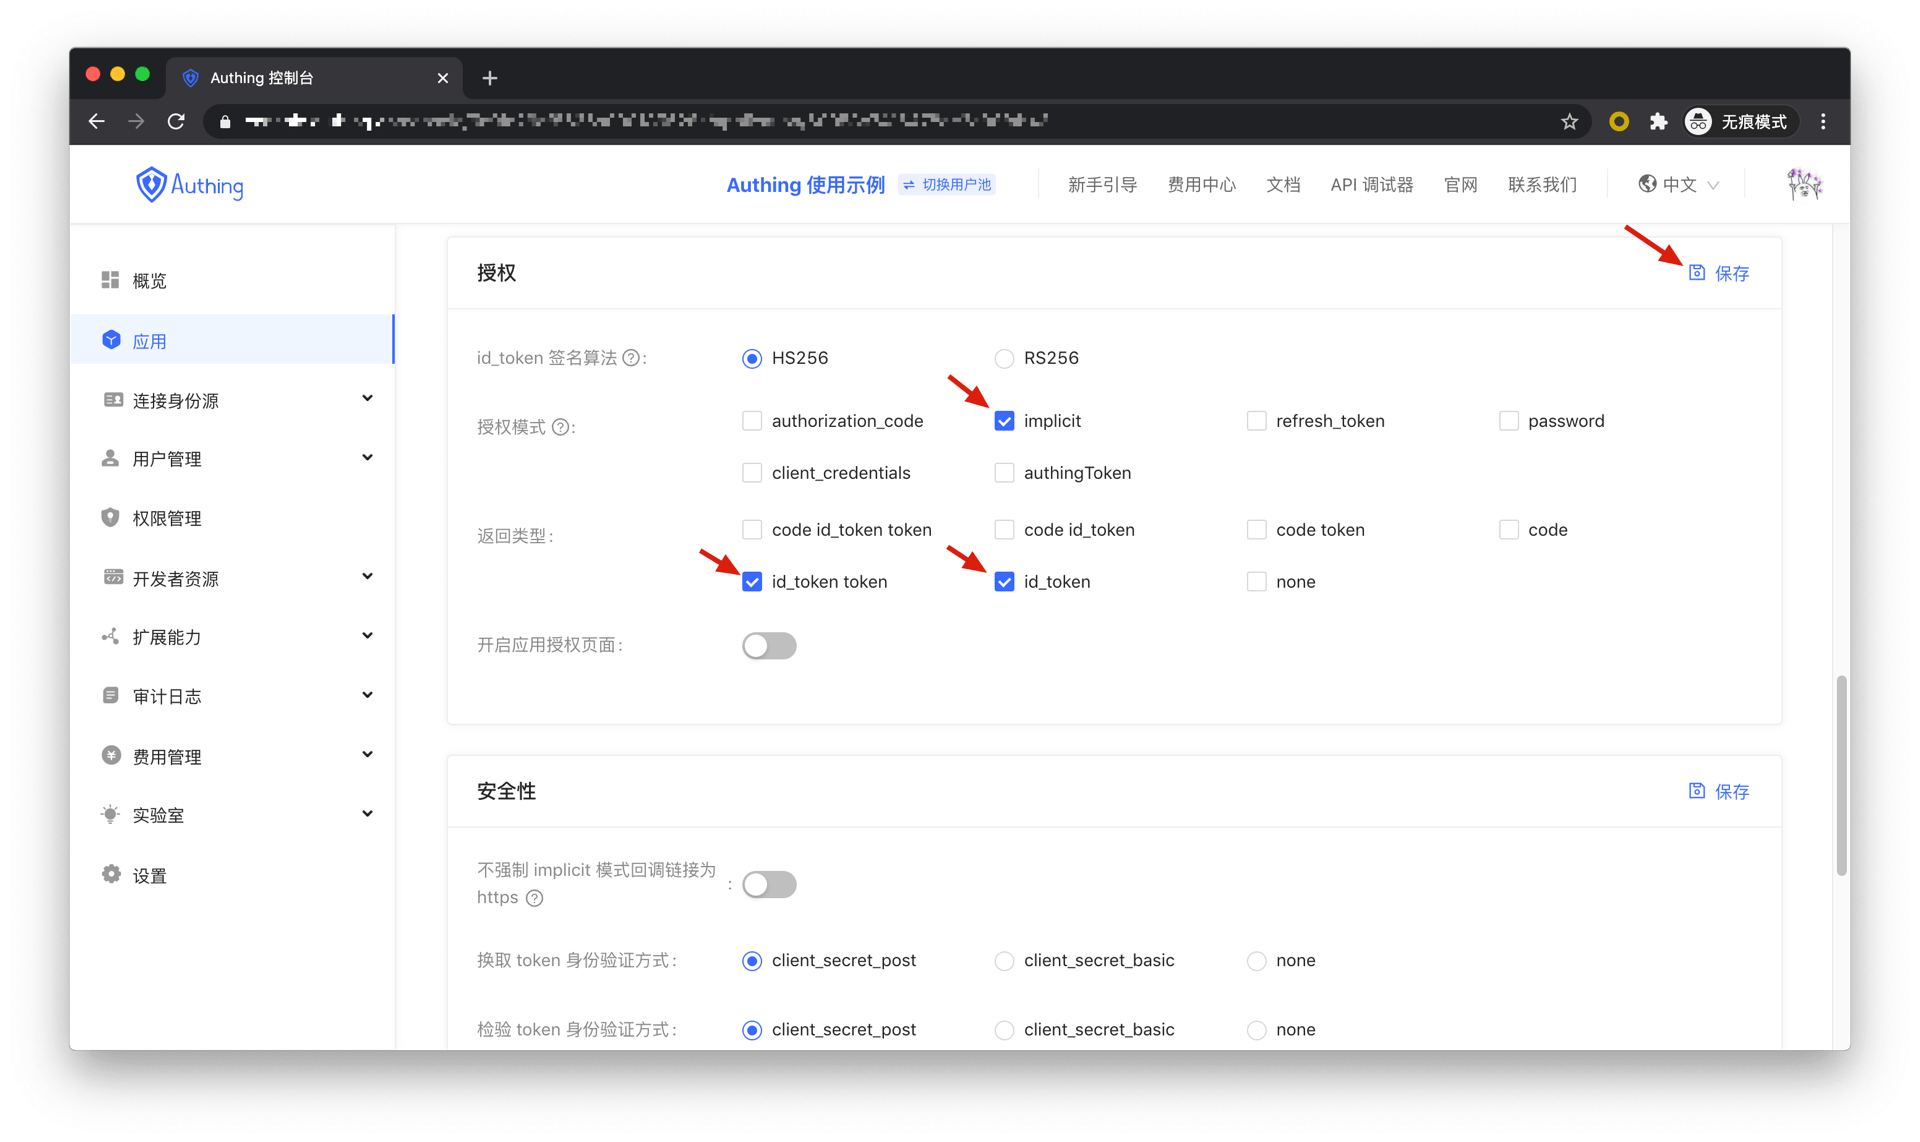
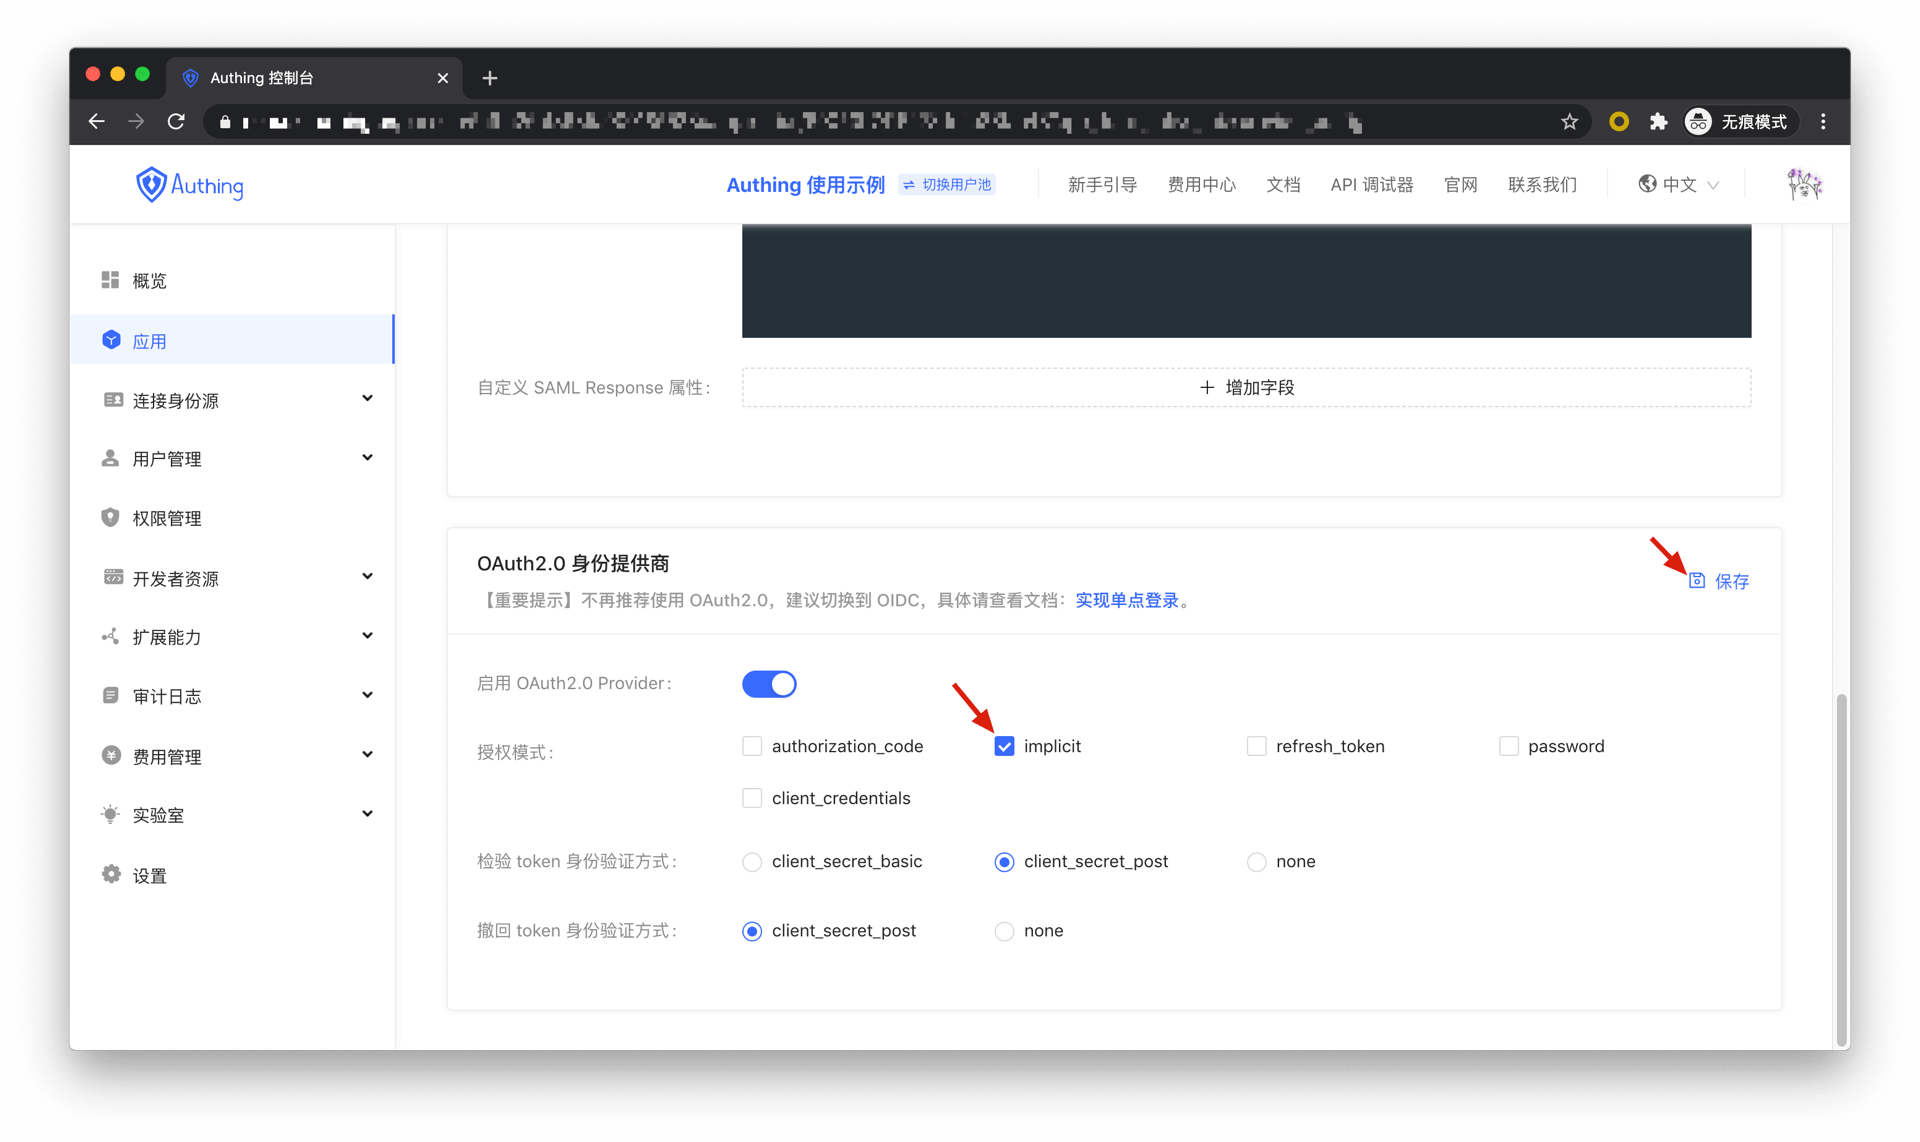
First, go to Console > Application, find your application, enter the application details, and in the "Authorization" card below, check implicit in the authorization mode, check id_token token and id_token in the return type, and then click Save.
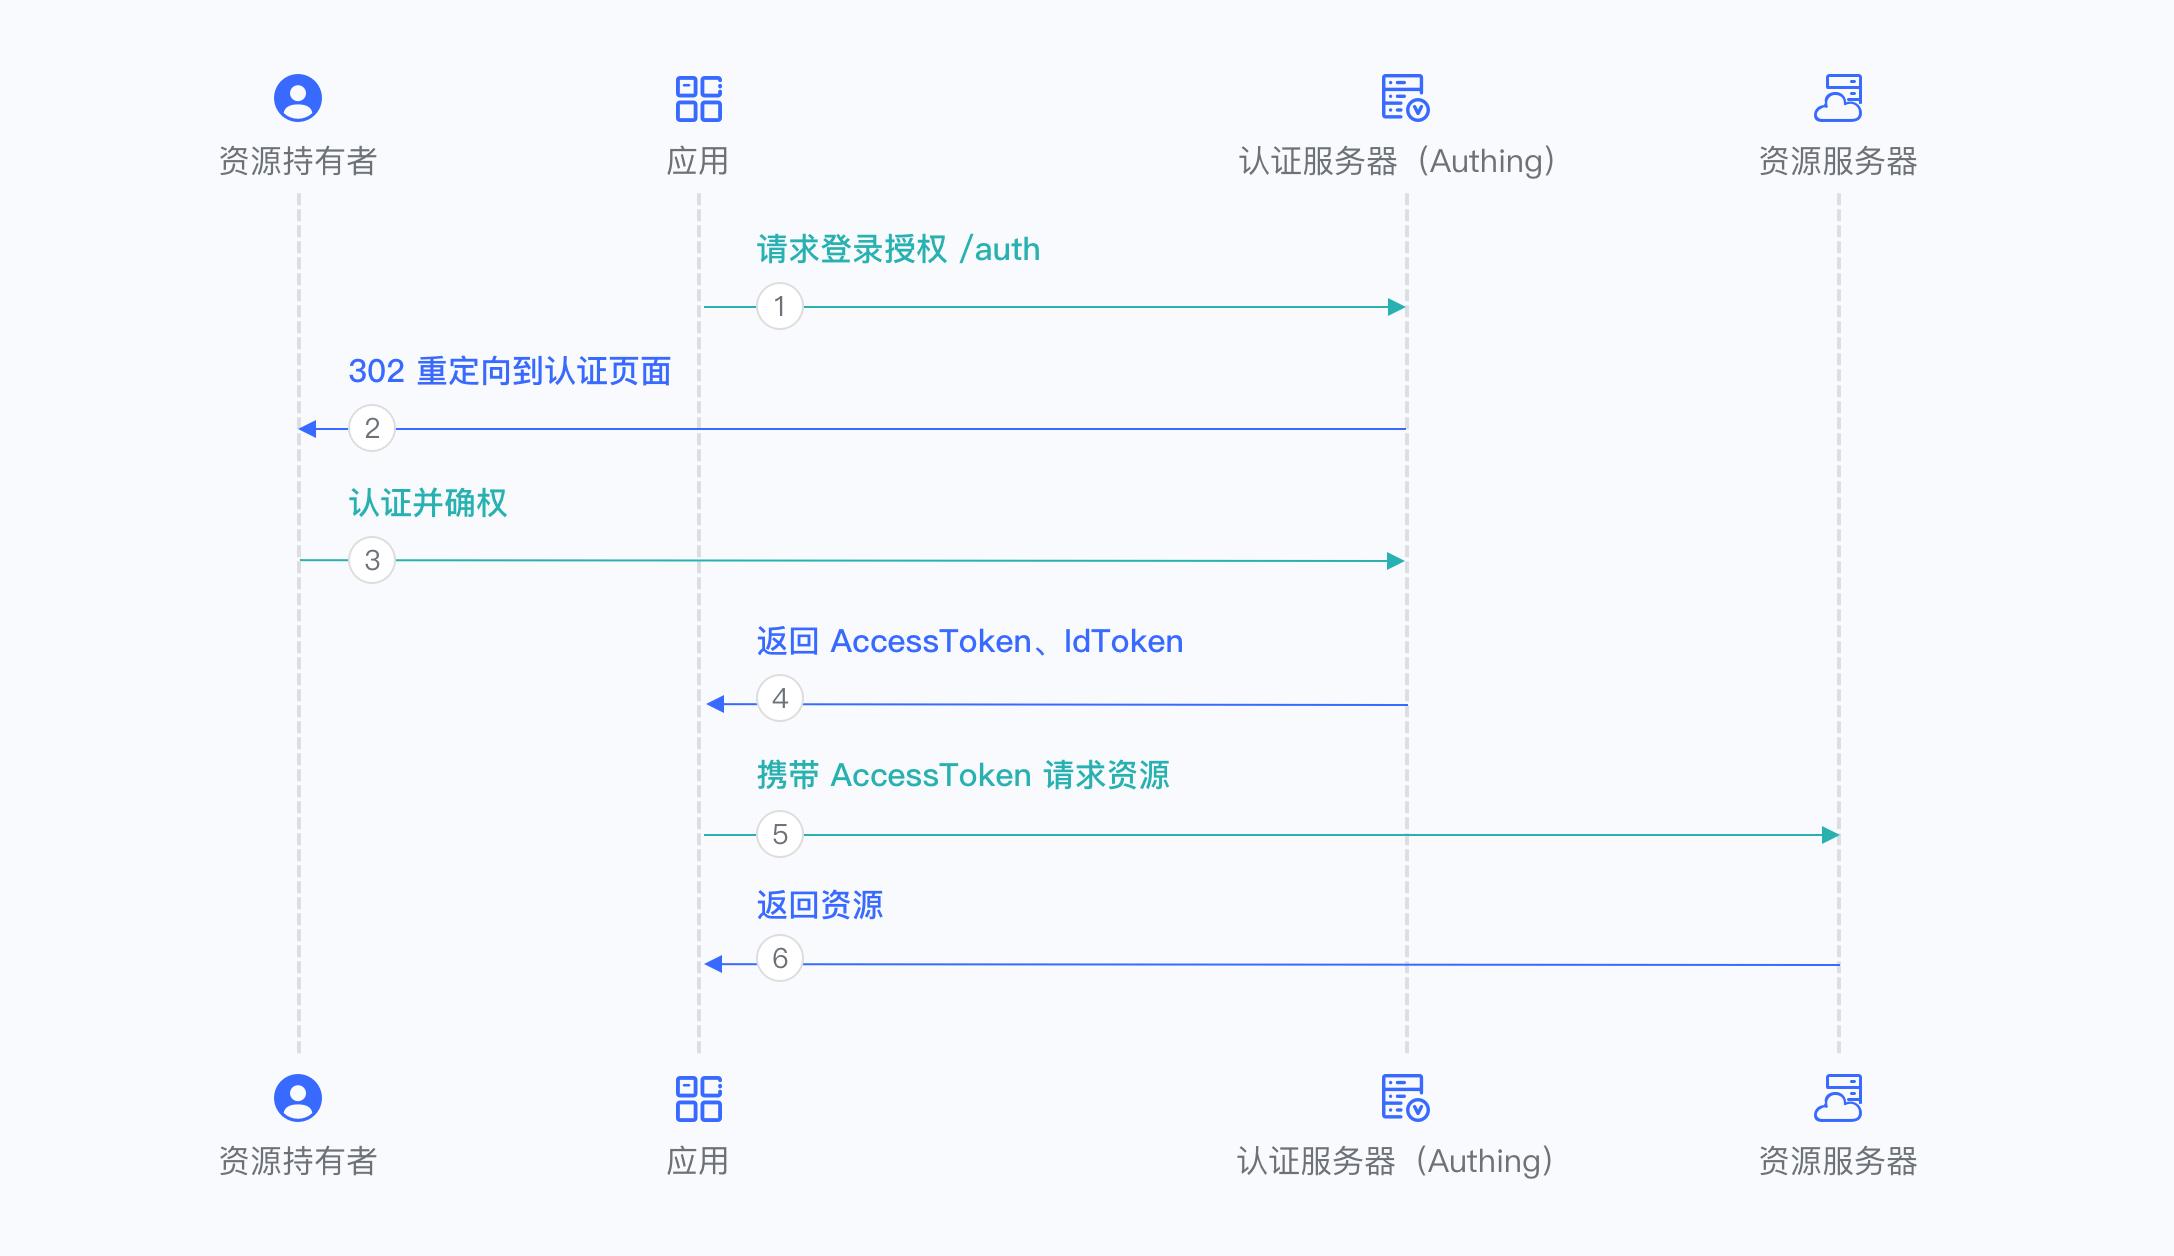
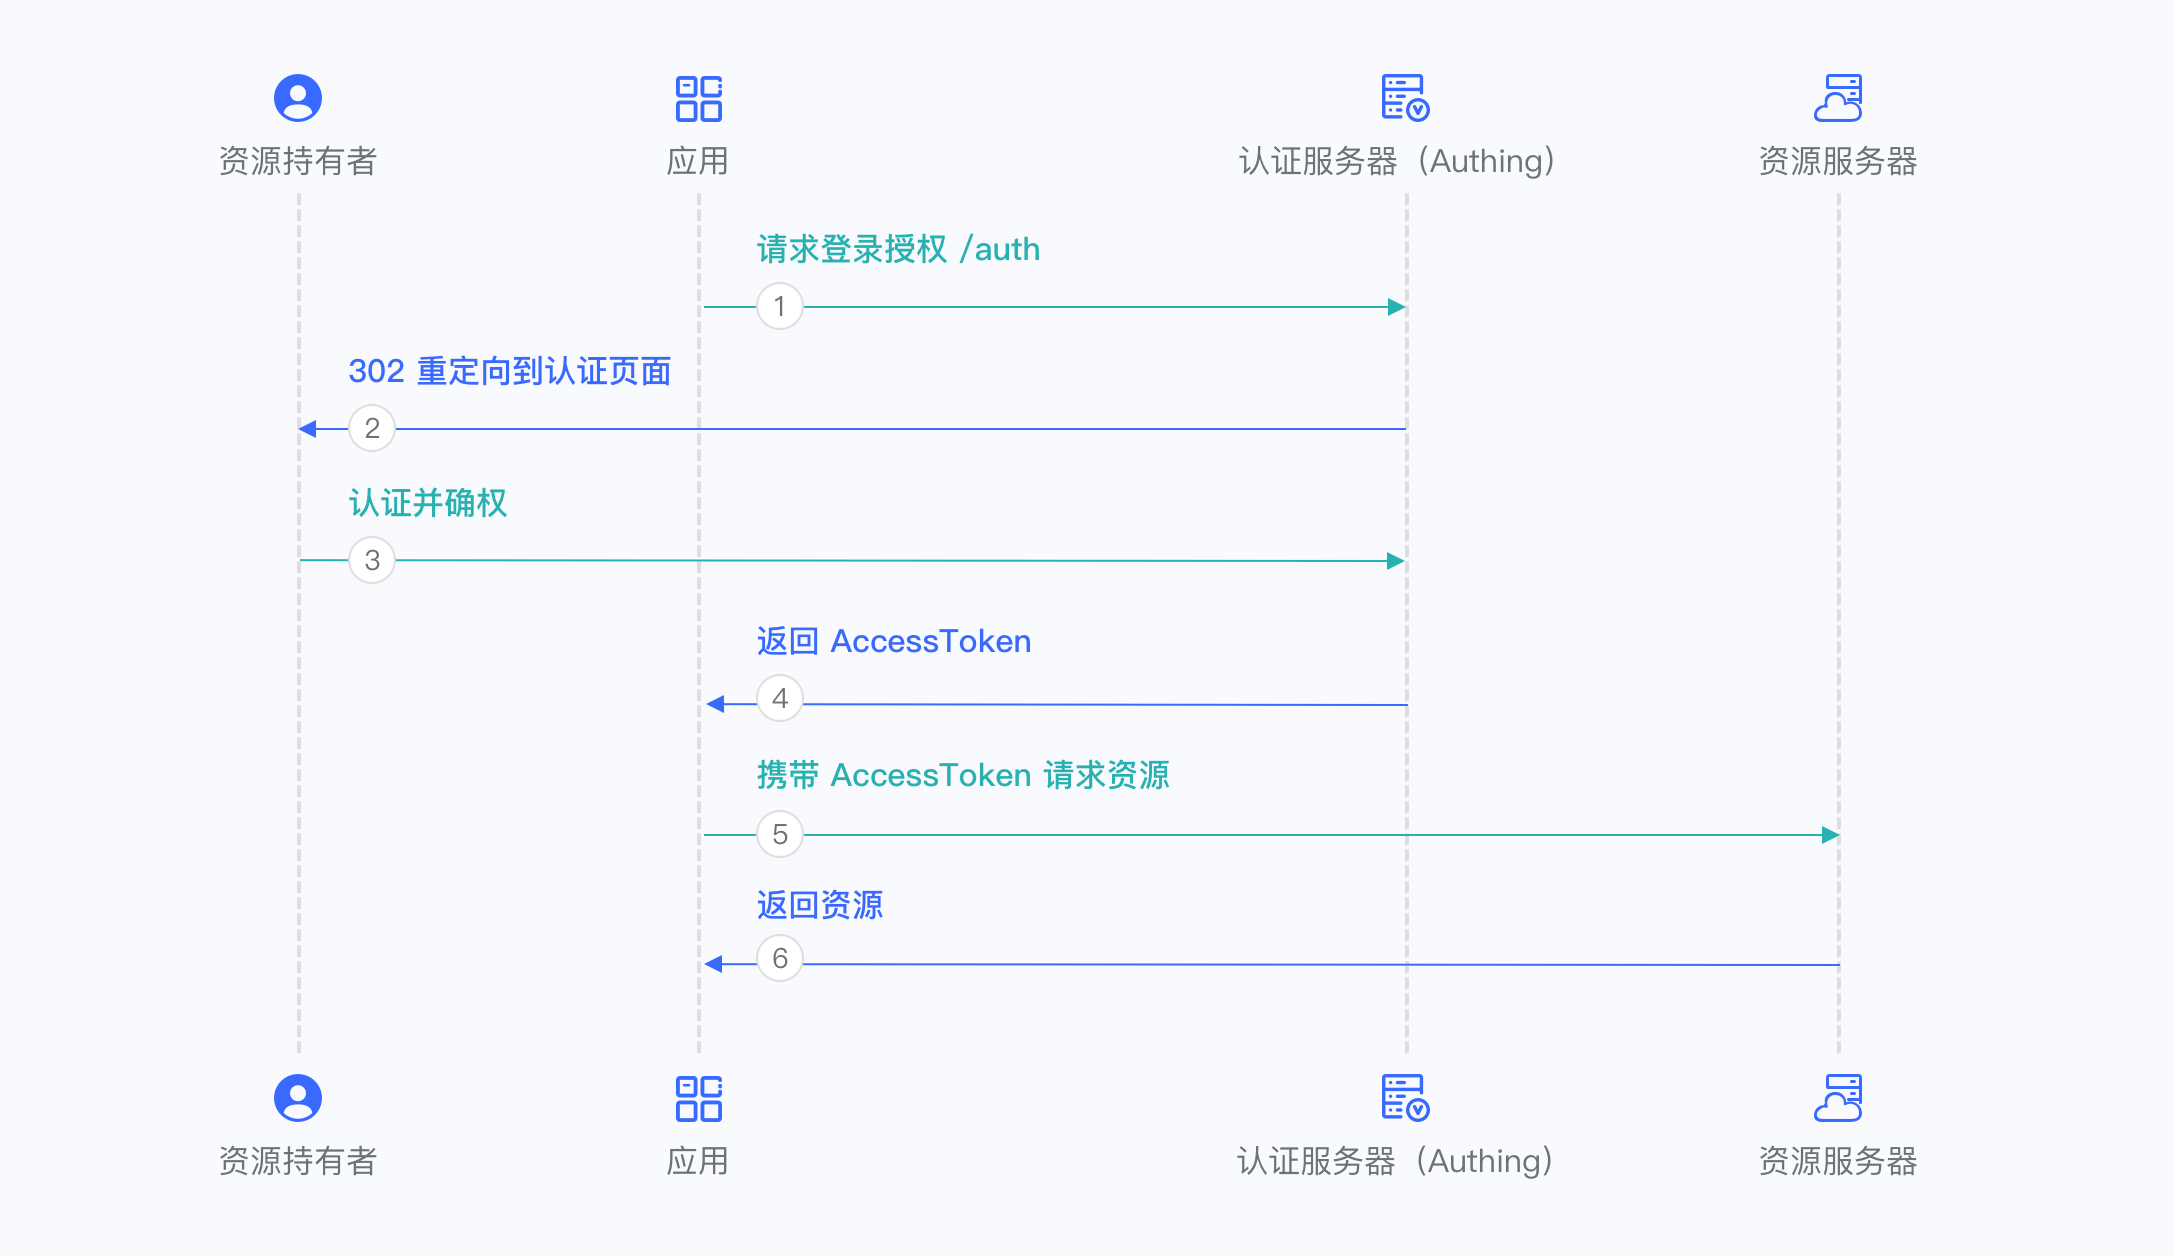
Overall, there is the following process.
- In your application, let the user visit the login link, the browser jumps to GenAuth, and the user completes authentication in GenAuth.
- GenAuth redirects the browser to your application callback address, and passes AccessToken and IdToken as URL hash.
- Your application extracts the token from the URL.
- Your application can save AccessToken and IdToken for subsequent use, such as carrying AccessToken to access the resource server, and carrying IdToken to request the server so that the server can identify the user.
The flow chart is as follows:
Hybrid mode
In some scenarios, you may want to obtain both the token directly from the authentication endpoint and the authorization code for subsequent refresh token acquisition. It is recommended to use hybrid mode. In hybrid mode, the application will receive both the token and the code. The application can choose to send the code to the backend service to obtain the user's AccessToken, IdToken, and refresh token from the /token endpoint.
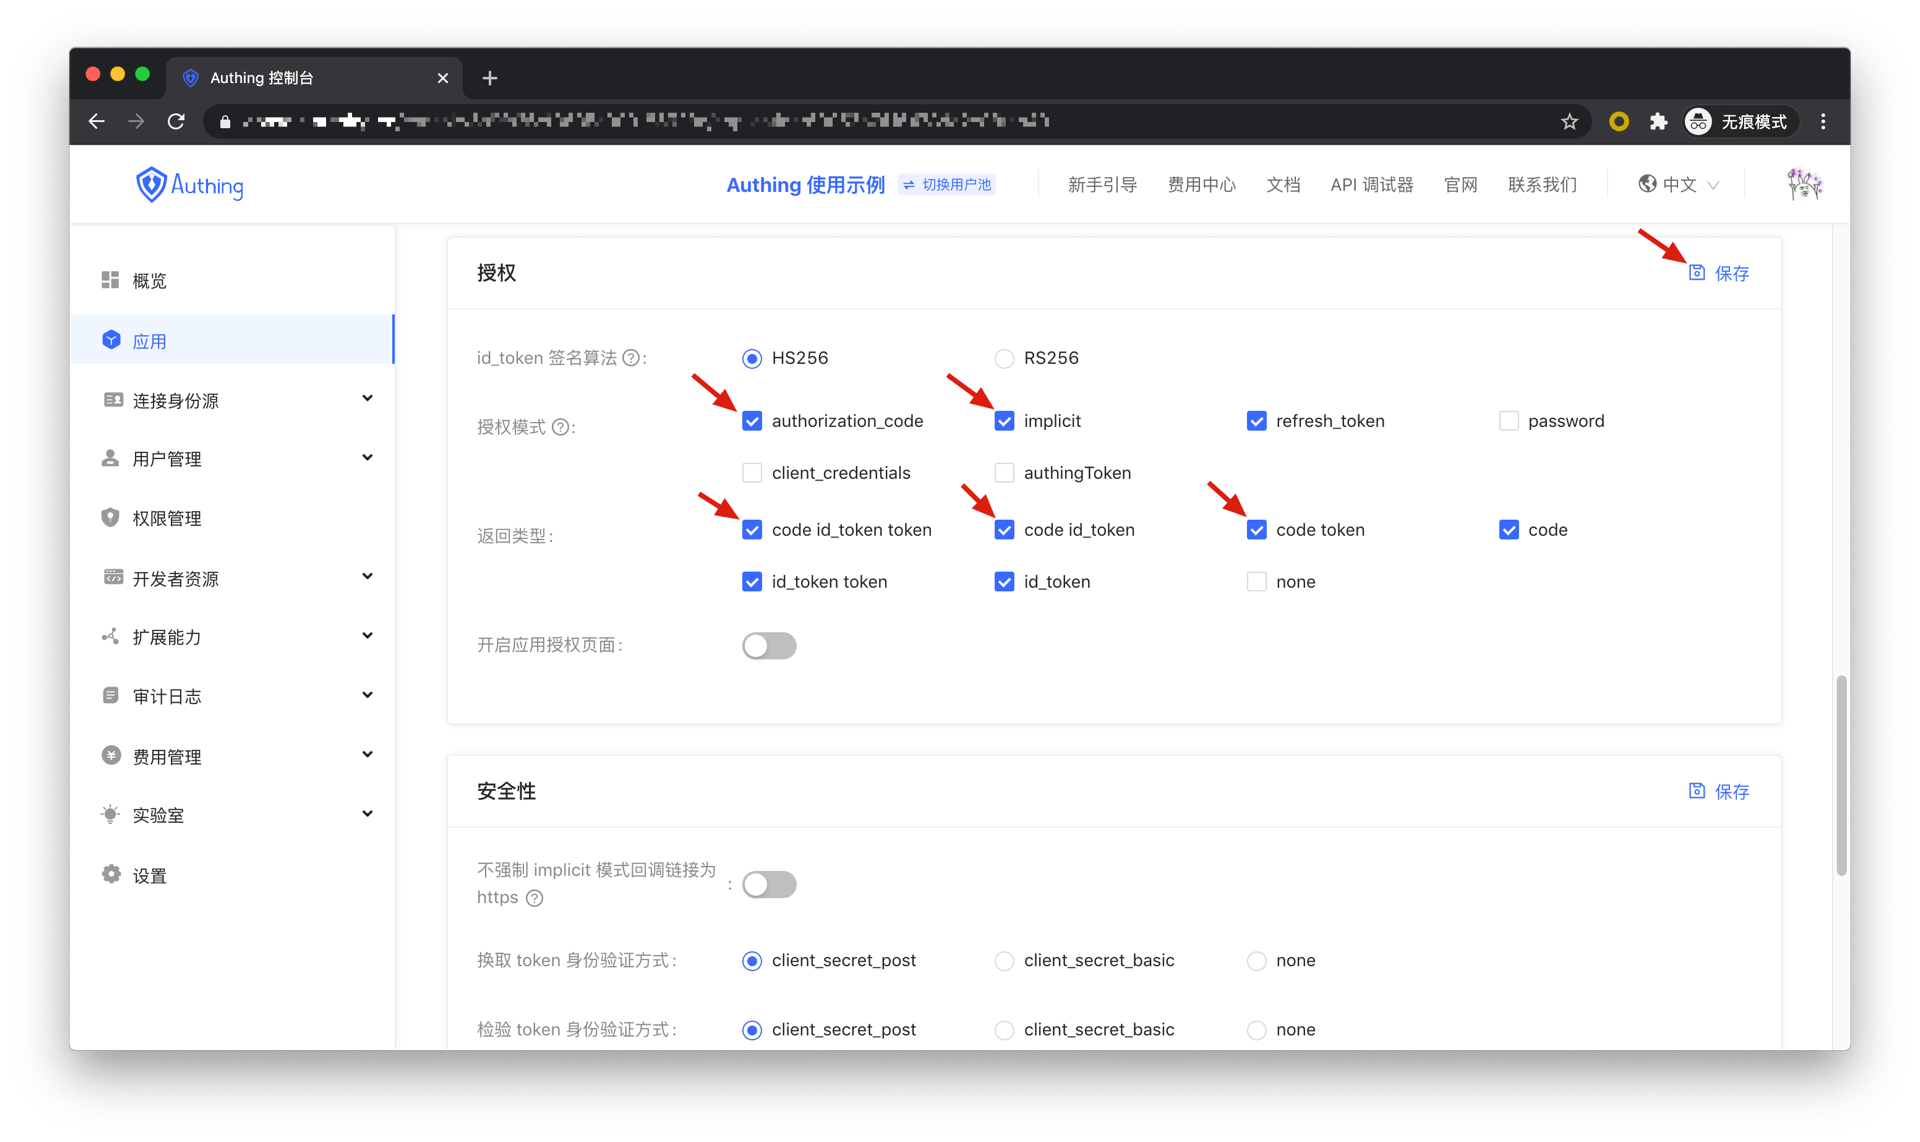
First, in Console > Application, find your application, enter the application details, and in the "Authorization" card below, check authorization_code and implicit in the authorization mode, check code id_token token, code id_token, and code token in the return type, and then click Save.
Overall, there is the following process.
- In your application, let the user access the login link, the browser jumps to GenAuth, and the user completes authentication in GenAuth.
- GenAuth redirects the browser to your application callback address, and passes the code, AccessToken, and IdToken as URL hash.
- Your application extracts the code and token from the URL.
- Your application can save the AccessToken and IdToken for subsequent use, such as accessing the resource server with the AccessToken and requesting the server with the IdToken so that the server can identify the user.
- Your application can send the code to the backend.
- The application backend can use the code to obtain the user's AccessToken, IdToken, and refresh token. After that, you can save the user information, use the AccessToken to call other APIs of the resource party, and so on.
The flow chart is as follows:

Client Credentials mode
Client Credentials mode is used for server-to-server authorization (M2M authorization) without user participation. You need to create a programmatic access account and give the AK and SK key pairs to your resource caller.
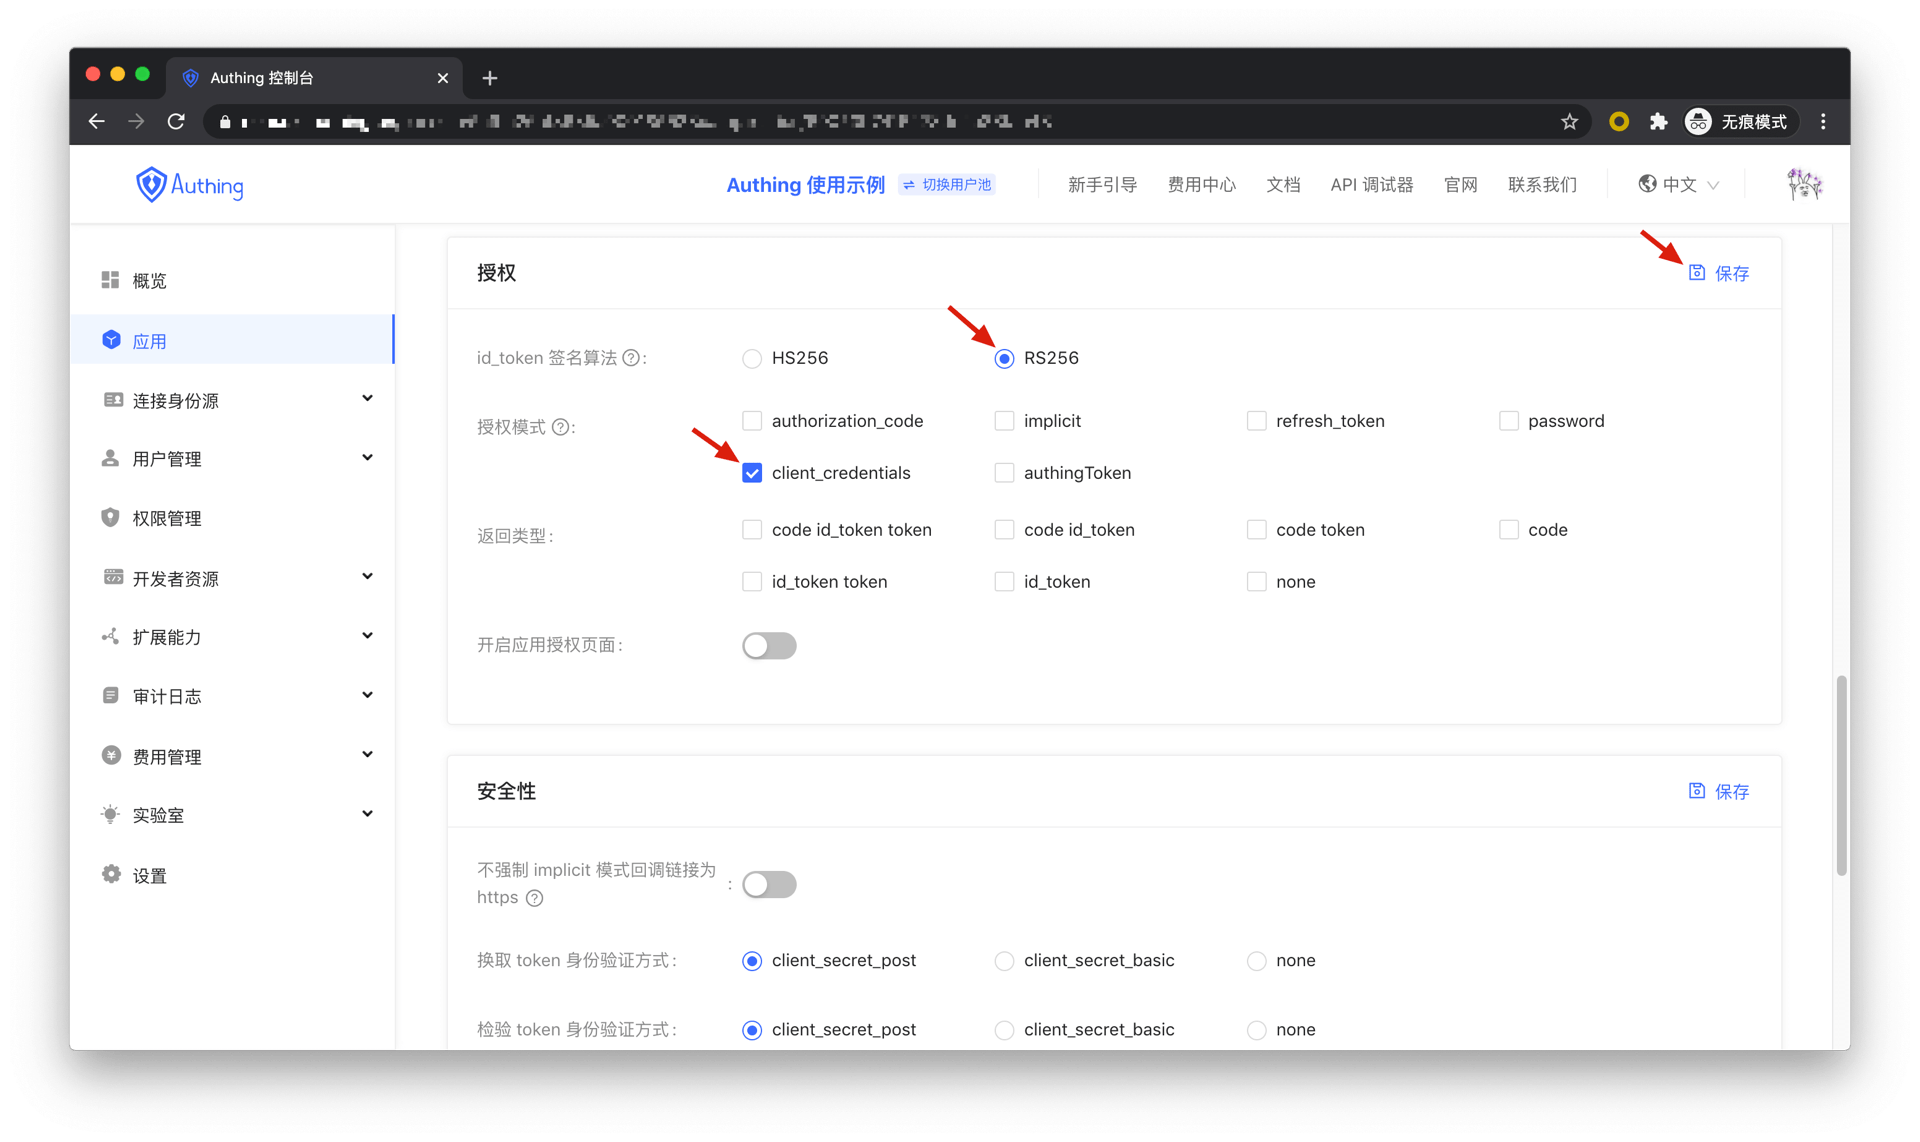
First, go to Console > Application, find your application, enter the application details, and in the "Authorization" card below, id_token signature algorithm Select RS256, check client_credentials in the authorization mode and click Save.
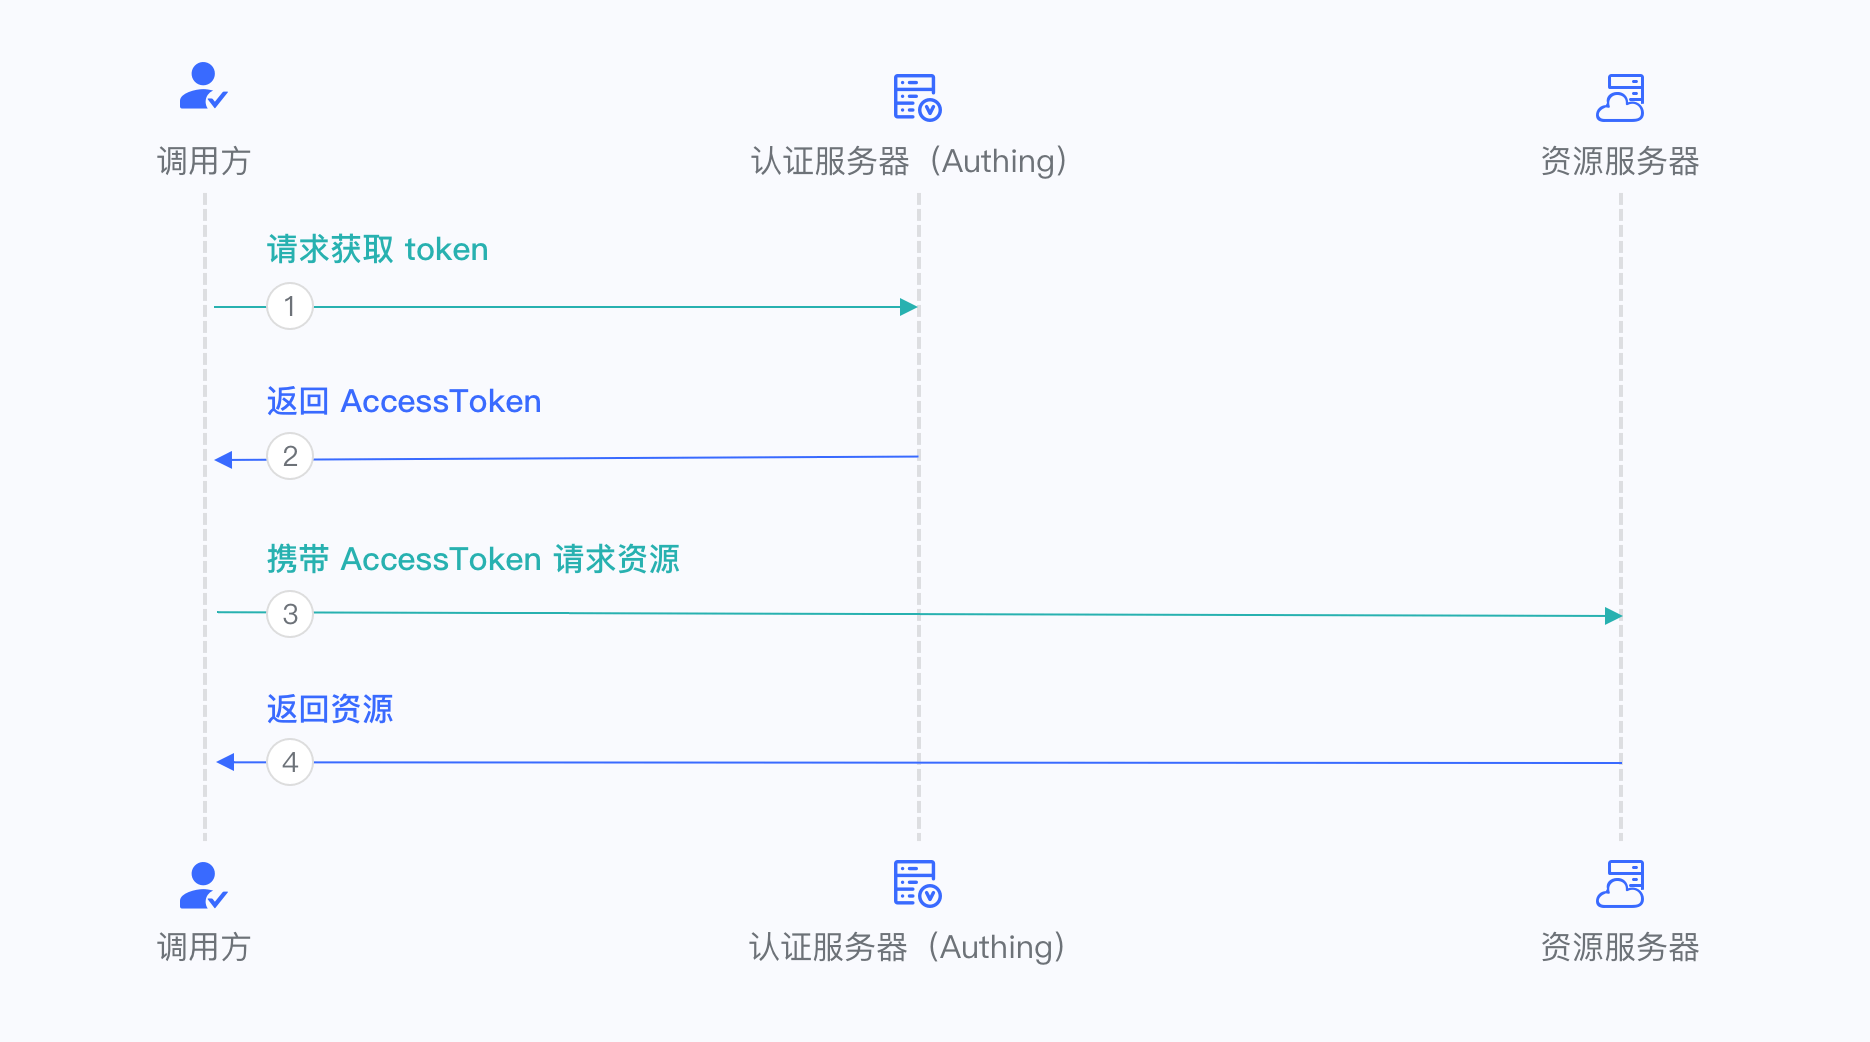
Overall, there is the following process.
- The resource caller sends his credentials AK, SK and the requested scope to the GenAuth authorization endpoint.
- If the credentials are correct and the caller has resource permissions, GenAuth issues an AccessToken for it.
The flow chart is as follows:
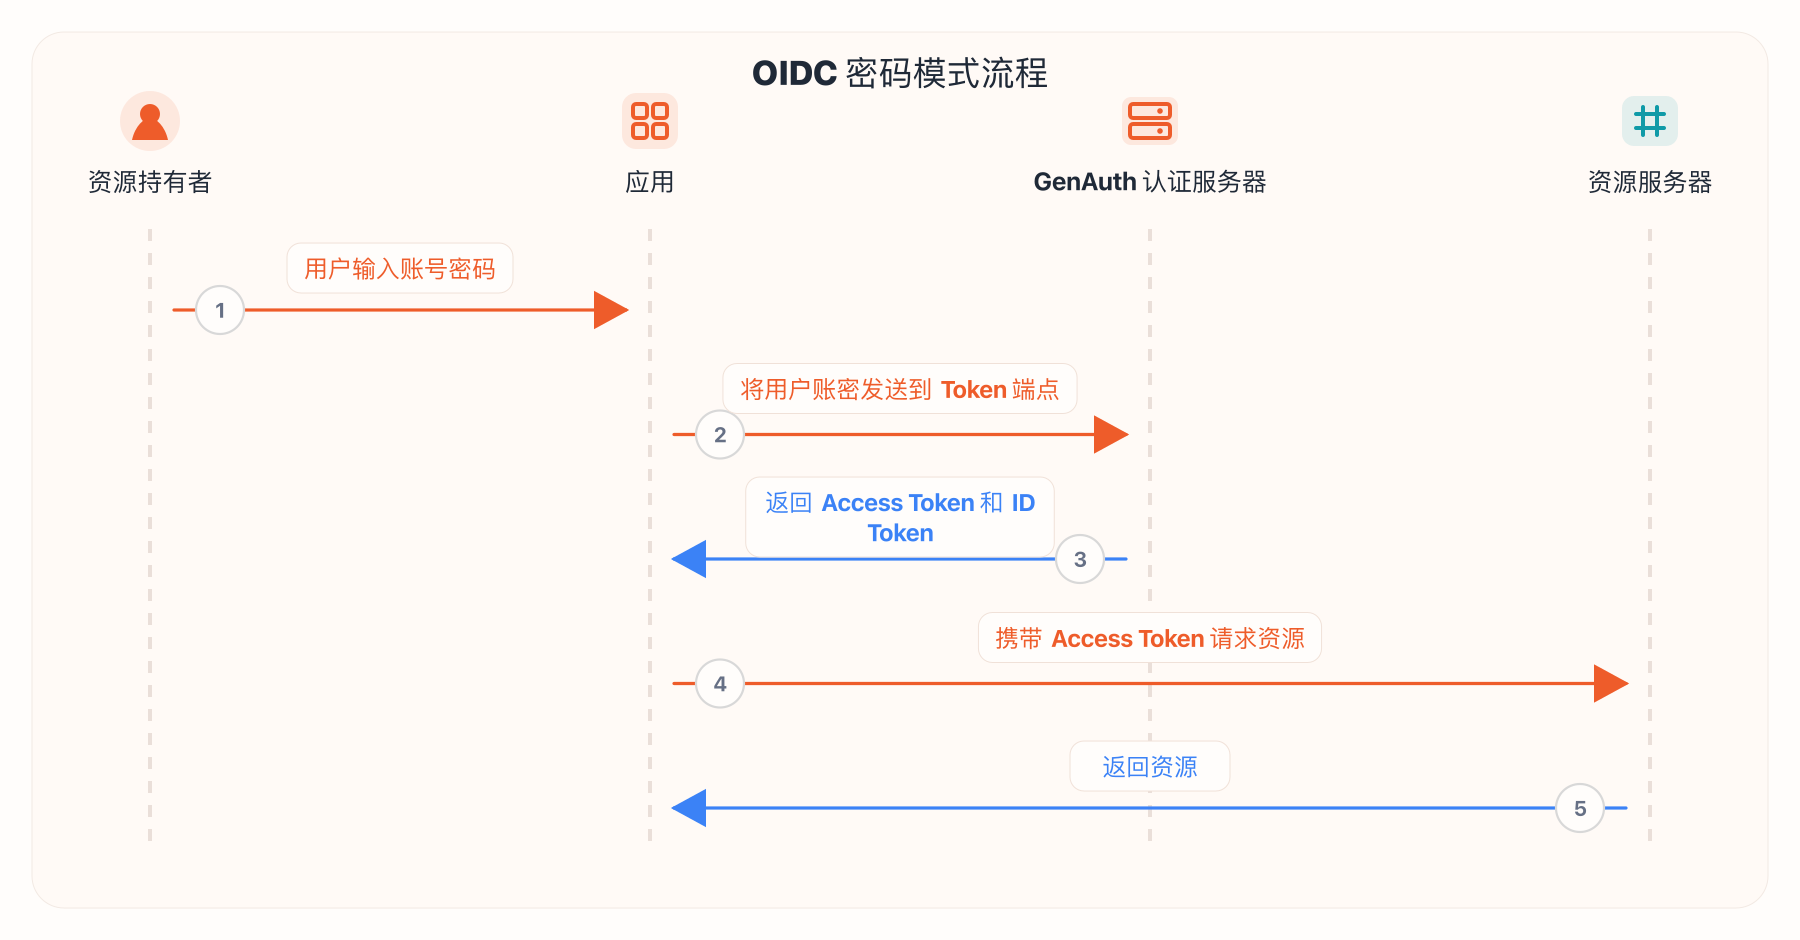
Password mode
This mode is not recommended. Try to use other modes. Only consider using password mode when other modes cannot solve the problem. If you use password mode, make sure your application code logic is very secure and will not be attacked by hackers, otherwise it will directly leak the user's account and password. It is generally used to transform and integrate very old applications, otherwise never make it your first choice.
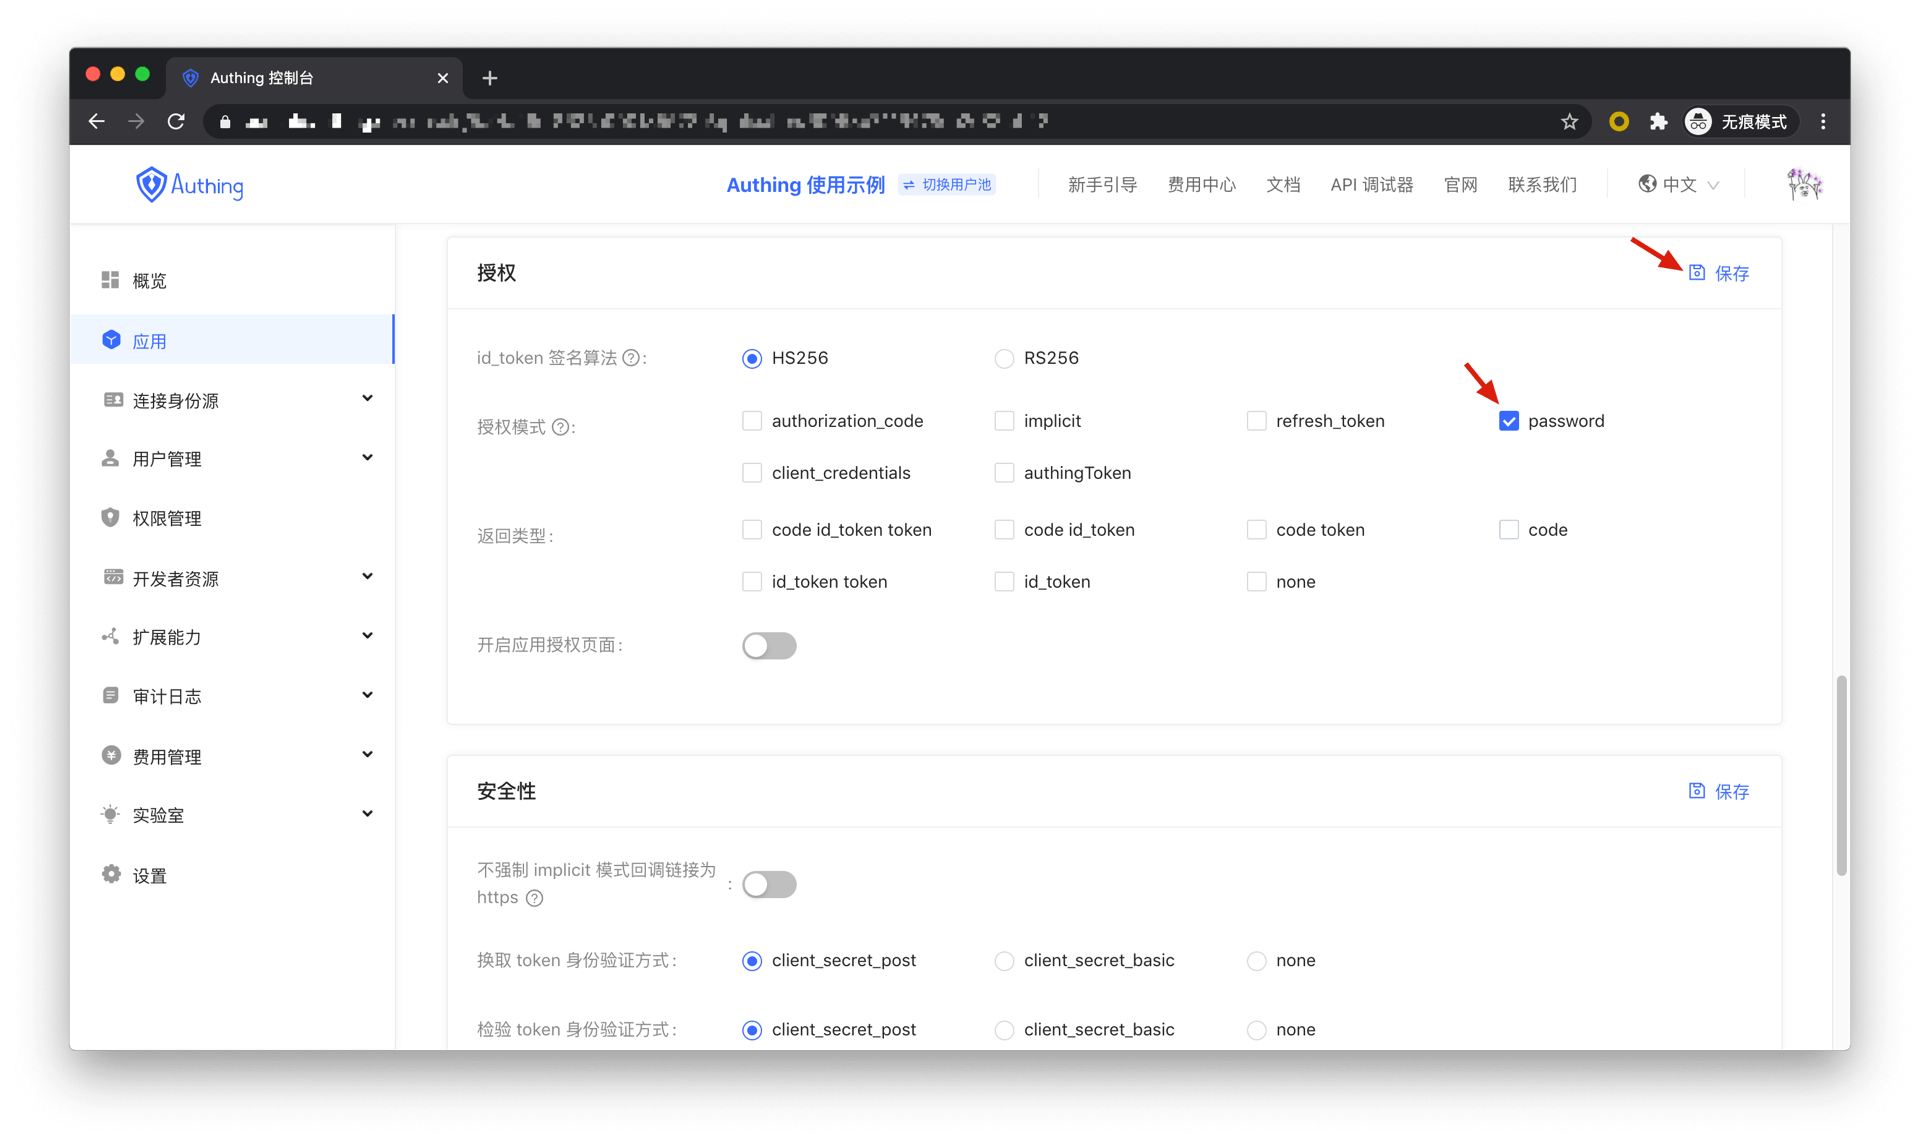
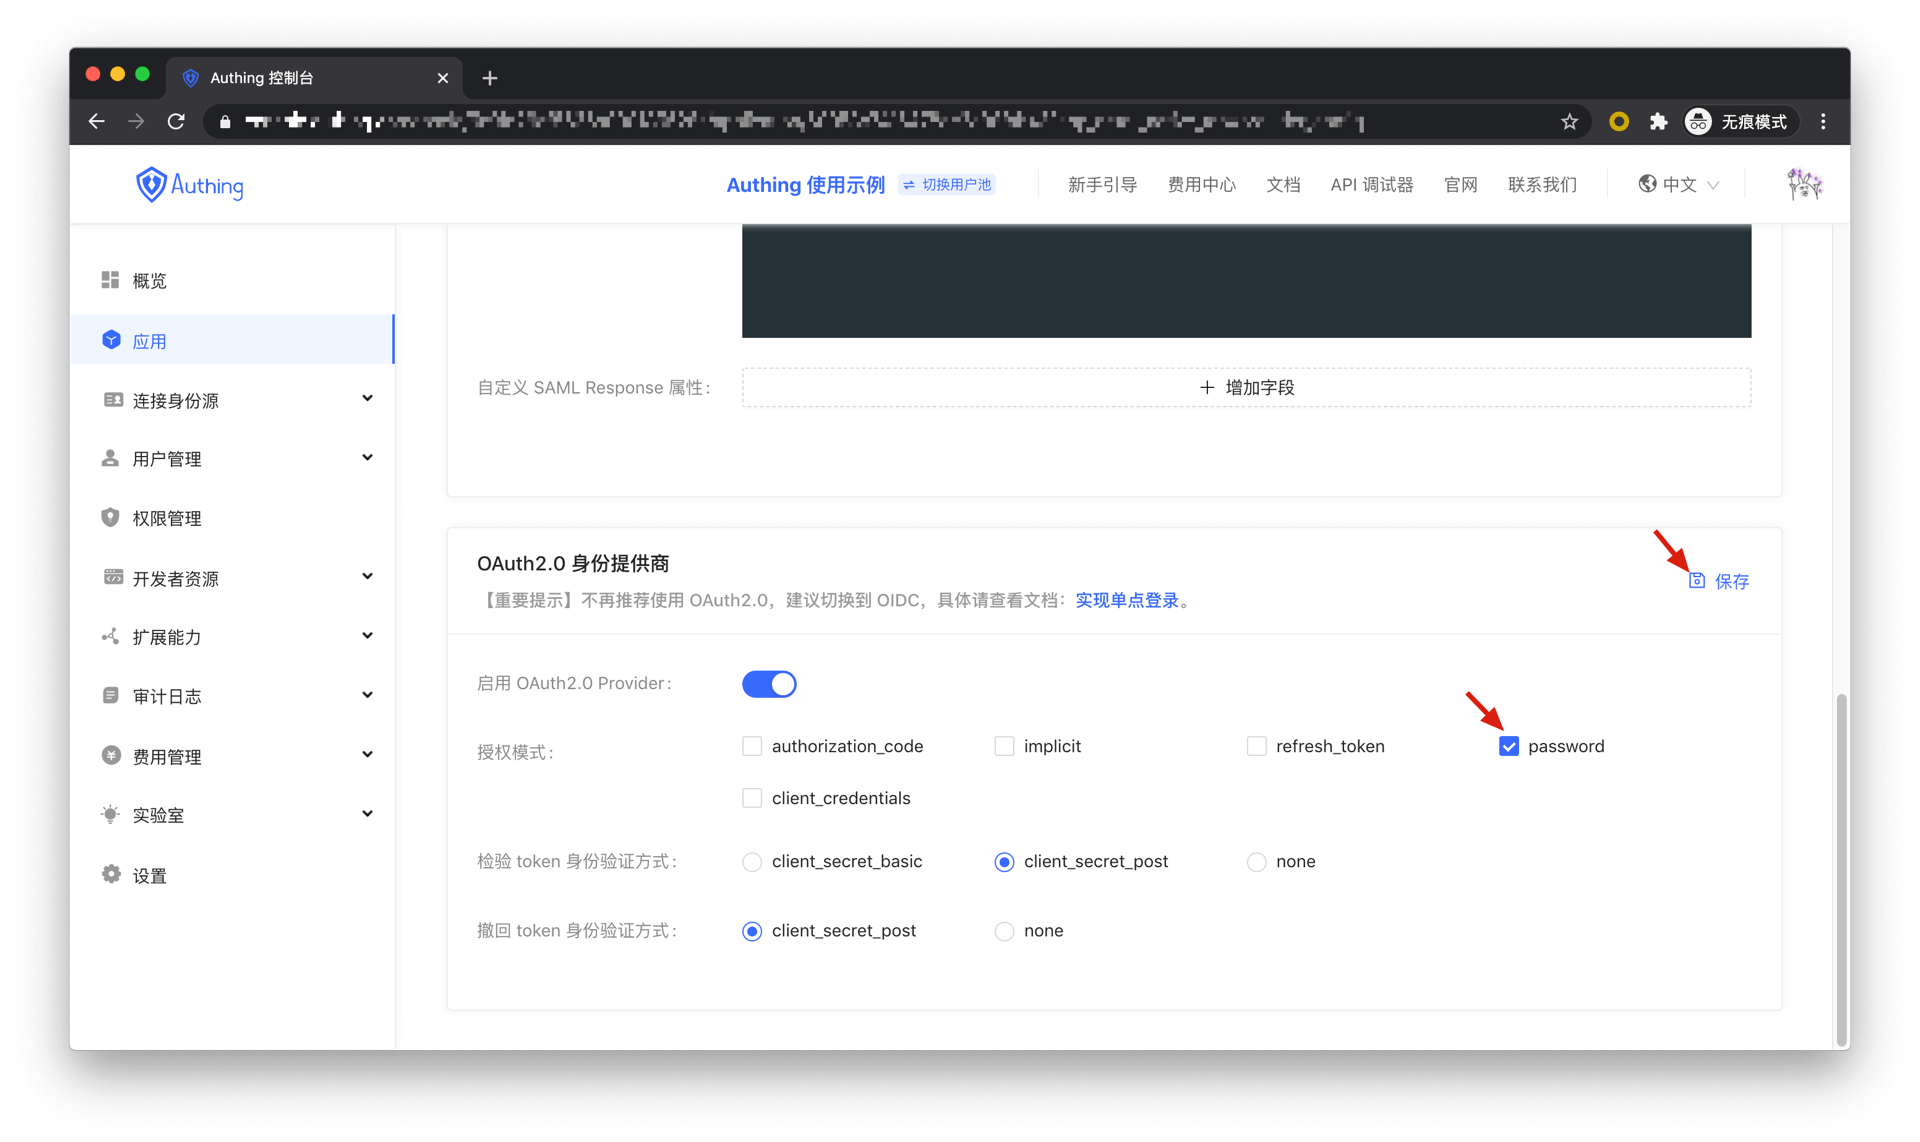
First, in Console > Application, find your application, enter the application details, and in the "Authorization" card below, check password in the authorization mode and click Save.
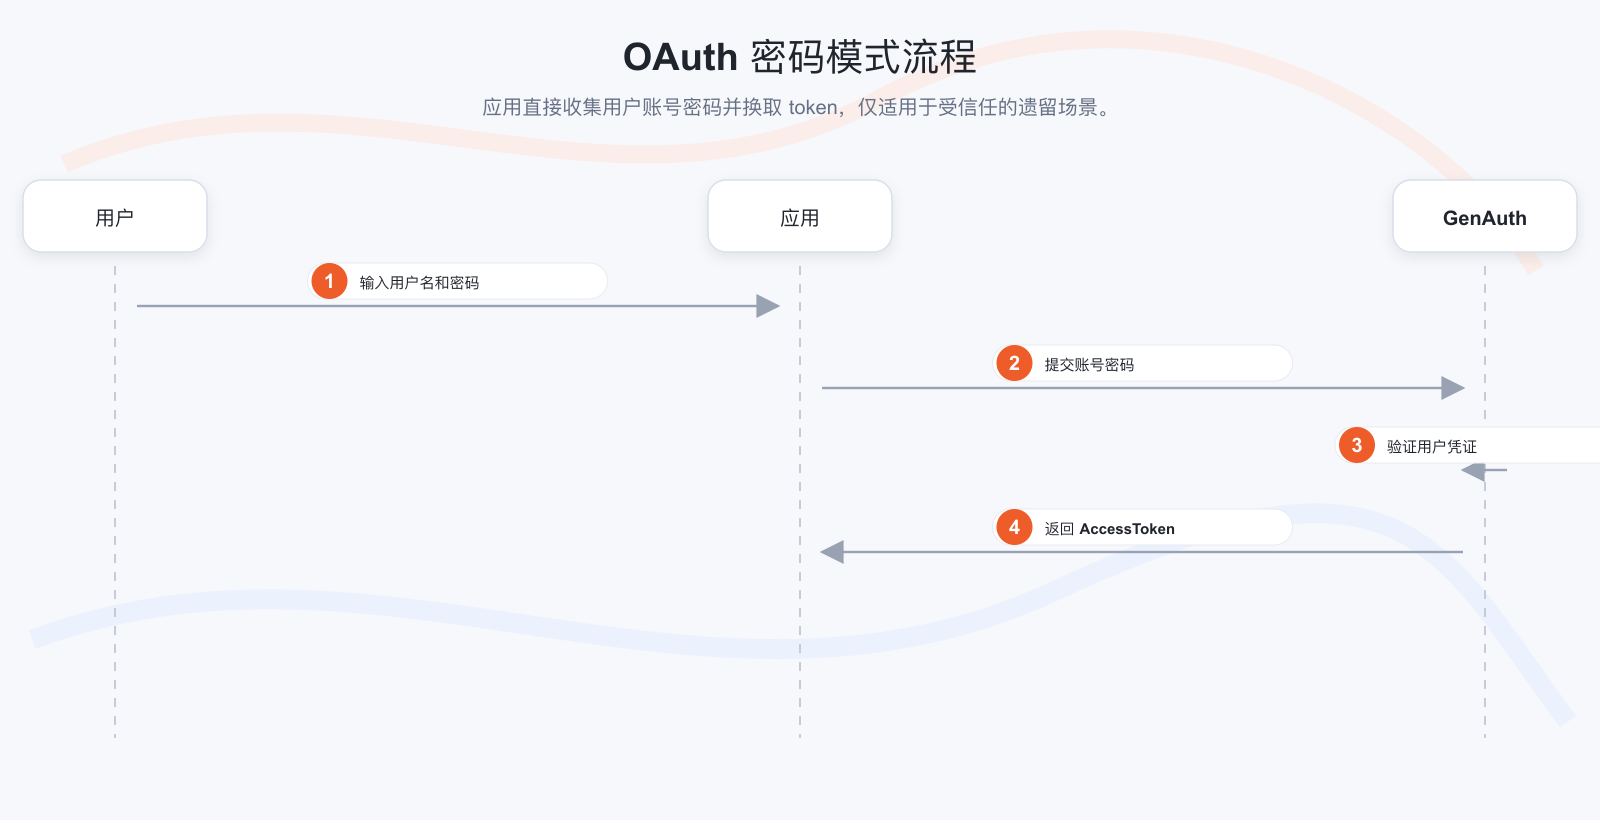
Overall, there is the following process.
- Your application asks the user to enter the account and password information.
- Your application sends the user's account and password to GenAuth.
- If the account and password are correct, GenAuth returns a token.
The flow chart is as follows:
Refresh Access Token
Refresh Token is needed to refresh Access Token. You can learn about Refresh Token here. Refresh Token is used to obtain new Access Token and keep the user logged in.
Get Refresh Token
If you want to get Refresh Token, you need to send a request to GenAuth to get Refresh Token.
Only Authorization Code Mode and Password Mode support Refresh Token.
When the authorization mode and Scope parameter combination shown in the table below are sent to the Token endpoint, GenAuth will return Refresh Token.
| Authorization Mode | Scope |
|---|---|
| refresh_token | offline_access |
| password | offline_access |
WARNING
Note ⚠️⚠️⚠️: When using the Authorization Code Mode, you must carry the scope parameter when requesting the Authorization Endpoint (/oidc/auth), and the value must include offline_access, and must carry the prompt parameter, and the value must be consent. Otherwise, GenAuth will not return any Refresh Token.
Get Refresh Token in Authorization Code Mode
When using the Authorization Code Mode, you first need to access the Authorization Endpoint (/oidc/auth), carry the scope parameter, the value must include offline_access, and must carry the prompt parameter, and the value must be consent, to obtain an Authorization Code. Then send the authorization code to the Token endpoint, and GenAuth will return the Access Token, Id Token, and Refresh Token. See Using the OIDC Authorization Code Mode for more information.
Example of getting the authorization code and refresh token
The following request example can get the authorization code and refresh token. Note the offline_access content in the scope parameter.
https://{your application domain}/oidc/auth?client_id={application ID}
&response_type=code
&scope=openid%20profile%20email%20phone%20address%20offline_access
&redirect_uri={callback address}
&state=4756806
Examples of getting Access Token, Id Token and Refresh Token
The following request example can get Access Token, Id Token and Refresh Token from the Token endpoint. The value of the code parameter is the authorization code returned from the authentication endpoint in the previous step.
POST https://${your application domain}/oidc/token?grant_type=authorization_code
&redirect_uri={callback address}
&code={authorization code}
&client_id={application ID}
&client_secret={application key}
Response example
{
  "access_token": "eyJhbGciOiJSUzI1NiIsInR5cCI6IkpXVCIsImtpZCI6IlRmTE90M0xibjhfYThwUk11ZXNzYW1xai1vM0RCQ3MxLW93SExRLVZNcVEifQ.eyJqdGkiOiJZUHB4NUVEWGlQWVJvNUFQWXAzci0iLCJzdWIiOiI1ZmY3MDFkODQ2YjkyMDNlMmY2YWM2ZjMiLCJpYXQiOjE2MTQwOTE0OTksImV4cCI6MTYxNDA5NTA5OSwic2NvcGUiOiJvZmZsaW5lX2FjY2VzcyBwcm9maWxlIG9wZW5pZCIsImlzcyI6Imh0dHBzOi8vb2lkYzEuYXV0aGluZy5jbi9vaWRjIiwiYXVkIjoiNWYxN2E1MjlmNjRmYjAwOWI3OTRhMmZmIn0.ZN_SlfVg1oNMz7uAK-5K84dqqqmlZehmAPOLytOR9HnLHImKJ9VO5u1hRsAjGCob0kMUV5wVxQhX3EFks7FtMamiX2Jvn-NYh4V_5T6l3LFf4uoKF6AykAg483nG3EEENuGgQo15bBszsoCGqFnNmUd0T4Cgxx0zbxXPxMdp_dcE14KzmNz1w-Qg3yVeYmSTZFdcLtZA2BYnVEa7LYA2yA3DgawwAcRmrlyEfnvCO3uY2TcsTKEAfQ-QgVIGRWOfyUE5f-_X3TolliO1fXnwZBdxEKMXLGW5E2bPVcePyiV0upYbUnQ079UxBlEiWlgeW_rpkTPXDxHAgiE488gtlg",
  "expires_in": 3600,
  "id_token": "eyJhbGciOiJIUzI1NiIsInR5cCI6IkpXVCJ9.eyJzdWIiOiI1ZmY3MDFkODQ2YjkyMDNlMmY2YWM2ZjMiLCJiaXJ0aGRhdGUiOm51bGwsImZhbWlseV9uYW1lIjpudWxsLCJnZW5kZXIiOiJVIiwiZ2l2ZW5fbmFtZSI6bnVsbCwibG9jYWxlIjpudWxsLCJtaWRkbGVfbmFtZSI6bnVsbCwibmFtZSI6bnVsbCwibmlja25hbWUiOm51bGwsInBpY3R1cmUiOiJodHRwczovL2ZpbGVzLmF1dGhpbmcuY28vYXV0aGluZy1jb25zb2xlL2RlZmF1bHQtdXNlci1hdmF0YXIucG5nIiwicHJlZmVycmVkX3VzZXJuYW1lIjpudWxsLCJwcm9maWxlIjpudWxsLCJ1cGRhdGVkX2F0IjoiMjAyMS0wMi0yM1QxNDo0NDoxOC4wODVaIiwid2Vic2l0ZSI6bnVsbCwiem9uZWluZm8iOm51bGwsImF0X2hhc2giOiIxaWRJSUxaWExpZkRscXJMY3ZNeV9BIiwiS0VZIjoiVkFMVUUiLCJhdWQiOiI1ZjE3YTUyOWY2NGZiMDA5Yjc5NGEyZmYiLCJleHAiOjE2MTQwOTUwOTgsImlhdCI6MTYxNDA5MTQ5OSwiaXNzIjoiaHR0cHM6Ly9vaWRjMS5hdXRoaW5nLmNuL29pZGMifQ._H59237sqpsY0OgyY_RM7CvuG6cFo1x03y-DBhd5hik",
  "refresh_token": "3T49f4Y48szoMmwBXragjqLwQZC4QhgnsM5Oy2WfmU-",
  "scope": "openid offline_access profile",
  "token_type": "Bearer"
}
Get a Refresh Token in Password Mode
In password mode, you will only use the Token endpoint. See Using Password Mode for more information.
Include offline_access in the request scope parameter for password mode.
POST https://${your application domain}/oidc/token?grant_type=password
&client_id={application ID}
&client_secret={application key}
&username={user name}
&password={password}
&scope=openid%20offline_access
Response example
{
  "access_token": "eyJhbGciOiJSUzI1NiIsInR5cCI6IkpXVCIsImtpZCI6IlRmTE90M0xibjhfYThwUk11ZXNzYW1xai1vM0RCQ3MxLW93SExRLVZNcVEifQ.eyJqdGkiOiJZUHB4NUVEWGlQWVJvNUFQWXAzci0iLCJzdWIiOiI1ZmY3MDFkODQ2YjkyMDNlMmY2YWM2ZjMiLCJpYXQiOjE2MTQwOTE0OTksImV4cCI6MTYxNDA5NTA5OSwic2NvcGUiOiJvZmZsaW5lX2FjY2VzcyBwcm9maWxlIG9wZW5pZCIsImlzcyI6Imh0dHBzOi8vb2lkYzEuYXV0aGluZy5jbi9vaWRjIiwiYXVkIjoiNWYxN2E1MjlmNjRmYjAwOWI3OTRhMmZmIn0.ZN_SlfVg1oNMz7uAK-5K84dqqqmlZehmAPOLytOR9HnLHImKJ9VO5u1hRsAjGCob0kMUV5wVxQhX3EFks7FtMamiX2Jvn-NYh4V_5T6l3LFf4uoKF6AykAg483nG3EEENuGgQo15bBszsoCGqFnNmUd0T4Cgxx0zbxXPxMdp_dcE14KzmNz1w-Qg3yVeYmSTZFdcLtZA2BYnVEa7LYA2yA3DgawwAcRmrlyEfnvCO3uY2TcsTKEAfQ-QgVIGRWOfyUE5f-_X3TolliO1fXnwZBdxEKMXLGW5E2bPVcePyiV0upYbUnQ079UxBlEiWlgeW_rpkTPXDxHAgiE488gtlg",
  "expires_in": 3600,
  "id_token": "eyJhbGciOiJIUzI1NiIsInR5cCI6IkpXVCJ9.eyJzdWIiOiI1ZmY3MDFkODQ2YjkyMDNlMmY2YWM2ZjMiLCJiaXJ0aGRhdGUiOm51bGwsImZhbWlseV9uYW1lIjpudWxsLCJnZW5kZXIiOiJVIiwiZ2l2ZW5fbmFtZSI6bnVsbCwibG9jYWxlIjpudWxsLCJtaWRkbGVfbmFtZSI6bnVsbCwibmFtZSI6bnVsbCwibmlja25hbWUiOm51bGwsInBpY3R1cmUiOiJodHRwczovL2ZpbGVzLmF1dGhpbmcuY28vYXV0aGluZy1jb25zb2xlL2RlZmF1bHQtdXNlci1hdmF0YXIucG5nIiwicHJlZmVycmVkX3VzZXJuYW1lIjpudWxsLCJwcm9maWxlIjpudWxsLCJ1cGRhdGVkX2F0IjoiMjAyMS0wMi0yM1QxNDo0NDoxOC4wODVaIiwid2Vic2l0ZSI6bnVsbCwiem9uZWluZm8iOm51bGwsImF0X2hhc2giOiIxaWRJSUxaWExpZkRscXJMY3ZNeV9BIiwiS0VZIjoiVkFMVUUiLCJhdWQiOiI1ZjE3YTUyOWY2NGZiMDA5Yjc5NGEyZmYiLCJleHAiOjE2MTQwOTUwOTgsImlhdCI6MTYxNDA5MTQ5OSwiaXNzIjoiaHR0cHM6Ly9vaWRjMS5hdXRoaW5nLmNuL29pZGMifQ._H59237sqpsY0OgyY_RM7CvuG6cFo1x03y-DBhd5hik",
  "refresh_token": "3T49f4Y48szoMmwBXragjqLwQZC4QhgnsM5Oy2WfmU-",
  "scope": "openid offline_access profile",
  "token_type": "Bearer"
}
Become an OAuth 2.0 identity source
This article describes how to make GenAuth an OAuth2.0 identity source. Other systems can access GenAuth as an identity provider through the OAuth2.0 protocol.
The OAuth2.0 protocol has the following authorization modes: Authorization code mode, Implicit mode, Password mode. After becoming an OAuth2.0 identity source, other applications can use the corresponding mode process to complete user authentication and authorization.
You can learn more about the OAuth 2.0 protocol here.
Create an application
In order to enable your application to have identity authentication capabilities, you need to create an application in GenAuth. It is recommended to fill in the name of your actual application project. Go to Console > Application > Application List and click Create Application:
Fill in your Application Name, for example: Network Notes Project, and specify an Authentication Address for your project, where your users will complete authentication in the future. Callback Link Fill in your project Backend Route, where GenAuth will send user information (to be exact, an authorization code) to this address. Finally, click Create.
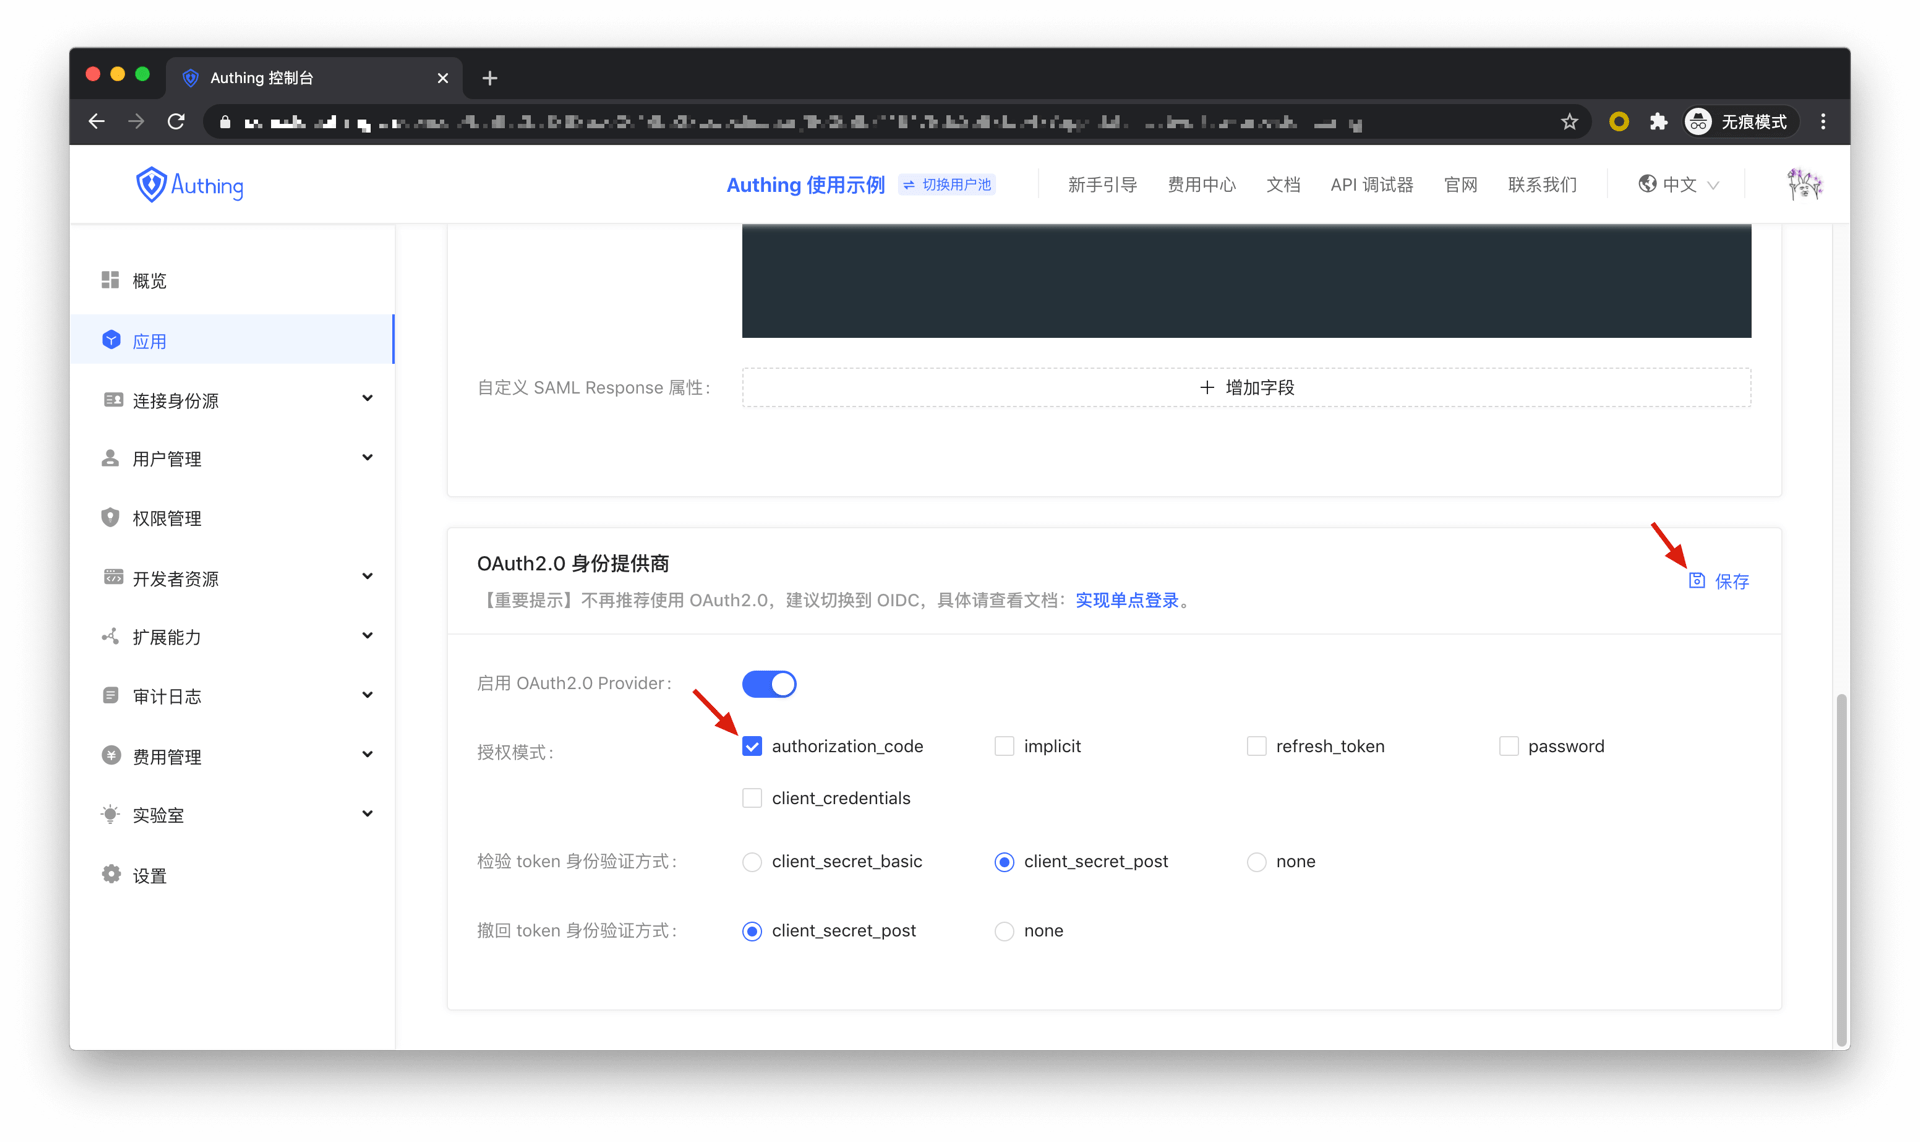
Find your application and go to the "Enable Identity Provider" tab.
In the "OAuth2.0 Identity Provider" card below, turn on the Enable OAuth2.0 Provider switch and click Save.

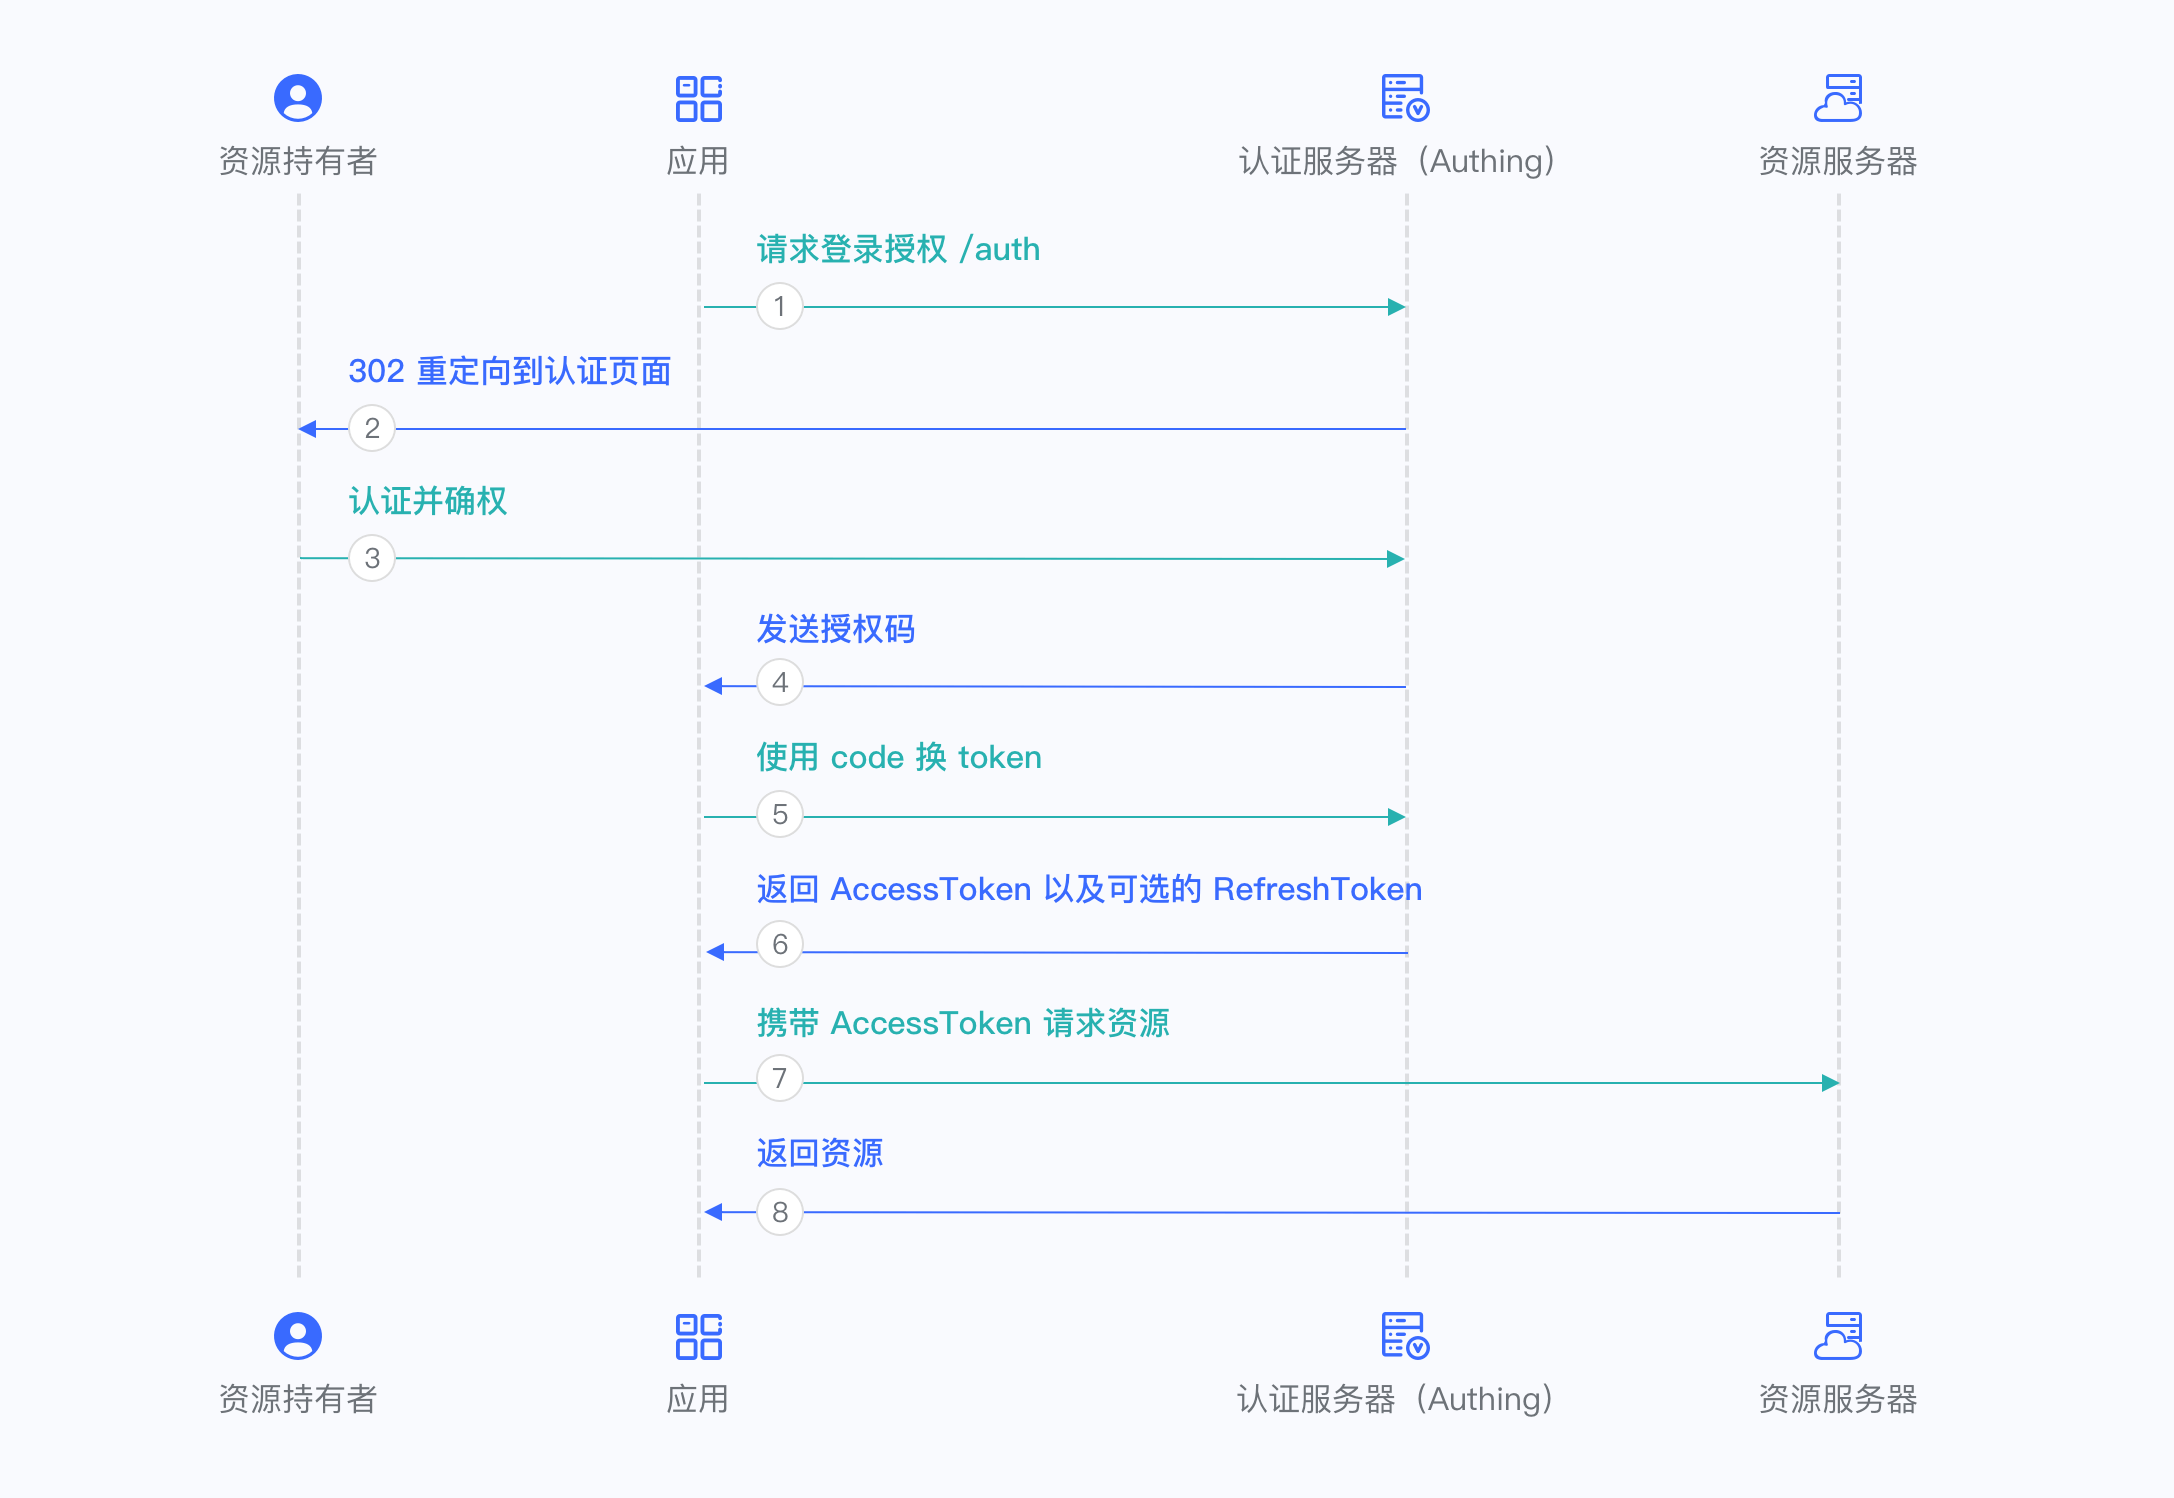
Authorization Code Mode
If your application project has a backend service that can store keys securely, it is recommended to use the Authorization Code Mode.
First, in Console > Application, find your application, enter the application details, enter the "Enable Identity Provider" tab, in the "OAuth2.0 Identity Provider" card below, check the authorization mode authorization_code, and then click Save.
Overall, there is the following process.
- In your application, let the user visit the login link, the browser jumps to GenAuth, and the user completes authentication in GenAuth.
- The browser receives an authorization code sent from the GenAuth server.
- The browser sends the authorization code to your application backend through redirection.
- Your application service sends the authorization code to GenAuth to obtain AccessToken, and returns a refresh token if necessary.
- Your application backend now knows the user's identity, and can subsequently save user information, redirect to other front-end pages, use AccessToken to call other APIs of the resource party, and so on.
The flow chart is as follows:
Implicit mode
If your application is a SPA front-end application and does not have a back-end service, it is recommended to use implicit mode to complete user authentication and authorization. Implicit mode is suitable for scenarios where keys cannot be stored securely (such as front-end browsers). In implicit mode, applications do not need to exchange codes for tokens, and do not need to request the /token endpoint. AccessToken will be returned directly from the authentication endpoint.
First, in the console > Applications, find your application, enter the application details, enter the "Enable Identity Provider" tab, and in the "OAuth2.0 Identity Provider" card below, check the authorization mode "implicit", and then click Save.
Overall, there is the following process.
- In your application, let the user visit the login link, the browser jumps to GenAuth, and the user completes the authentication in GenAuth.
- GenAuth redirects the browser to your application callback address, and the AccessToken is passed as the URL hash.
- Your application extracts the token from the URL.
- Your application can save AccessToken for subsequent use, such as using AccessToken to obtain user information and accessing resource servers with AccessToken.
The flow chart is as follows:
Password mode
This mode is not recommended. Try to use other modes. Only when other modes cannot solve the problem will you consider using password mode. If you use password mode, please make sure that your application code logic is very secure and will not be attacked by hackers, otherwise it will directly leak the user's account and password. It is generally used to transform and integrate very old applications, otherwise never make it your first choice.
First, in Console > Application, find your application, enter the application details, enter the "Enable Identity Provider" tab, and in the "OAuth2.0 Identity Provider" card below, check password for the authorization mode, and then click Save.
Overall, there is the following process.
- Your application asks the user to enter the account and password information.
- Your application sends the user's account and password to GenAuth.
- If the account and password are correct, GenAuth returns a token.
The flow chart is as follows:
Become a SAML2 Identity Source
This article describes how to enable a SAML2 identity provider in GenAuth to provide identity assertions to other service providers. GenAuth can be integrated with third-party applications through the SAML2 protocol. You can learn more about the SAML2 protocol here.
Create an application
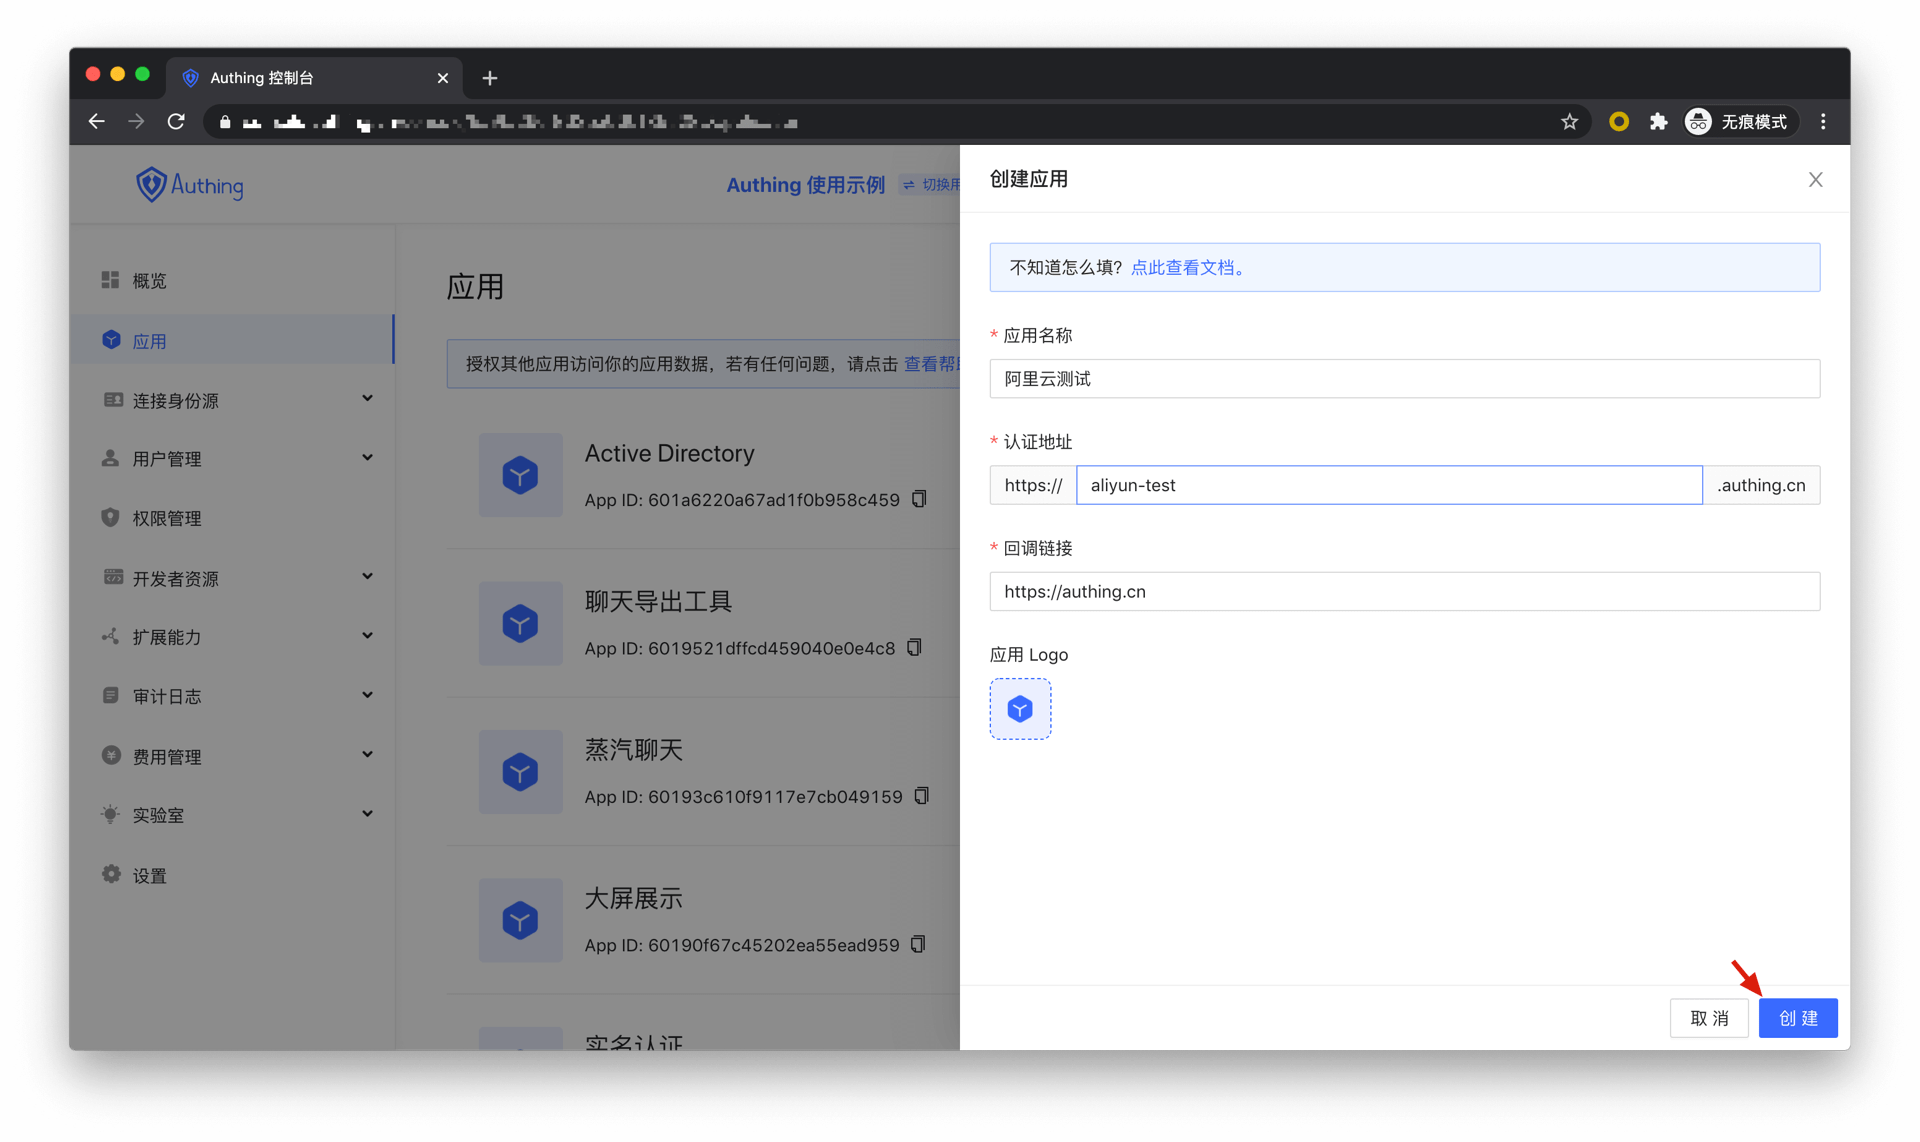
In order to enable your application to have identity authentication capabilities, you need to create an application in GenAuth. It is recommended to fill in the name of your actual application project. Go to Console > Application > Application List and click Create Application:
Fill in your Application Name, for example: Alibaba Cloud Test, and fill in an Authentication Address at will, and finally click the "Create" button:
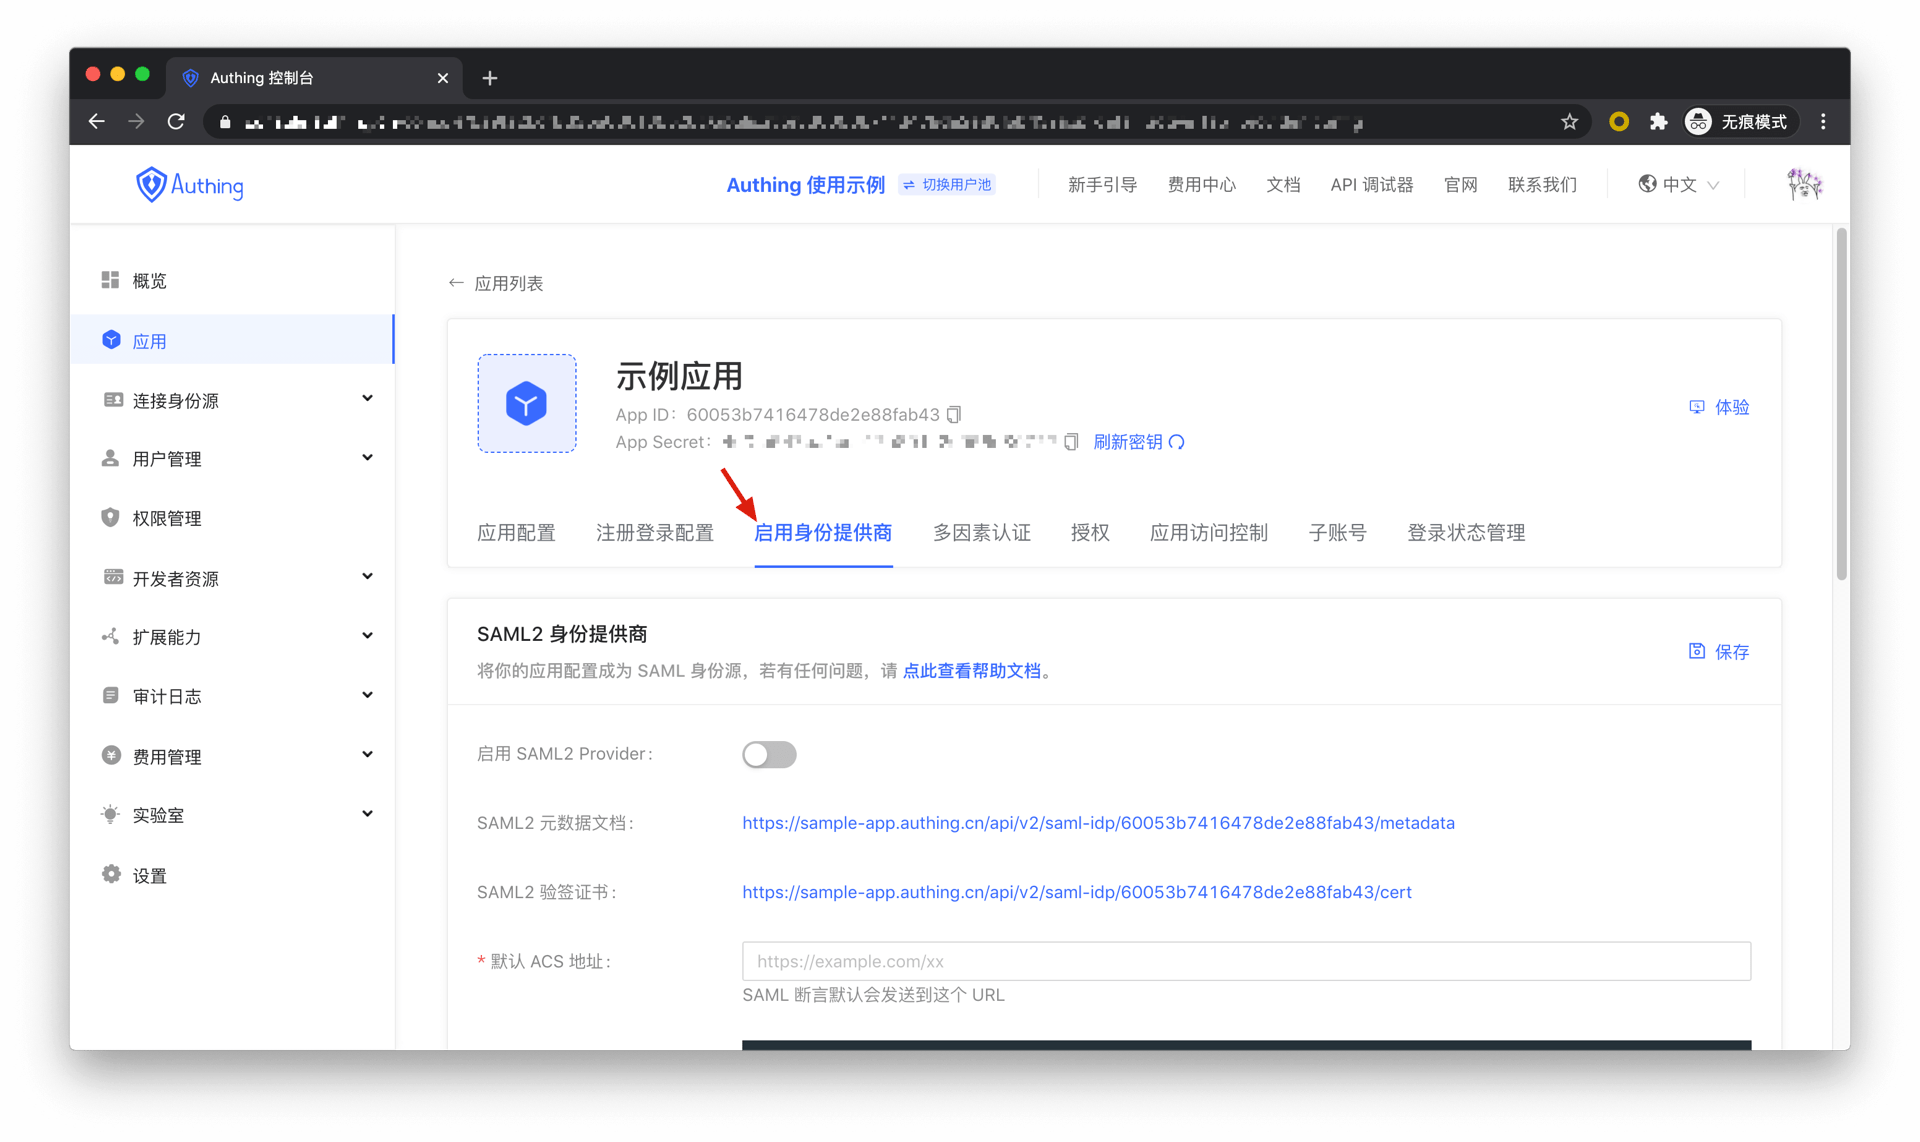
Configure SAML2 Identity Provider
In order to use your organization and users for SAML2 identity authentication, you need to enable the SAML2 identity provider of the application and configure it. Find your application and go to the "Enable Identity Provider" tab.
In the "SAML2 Identity Provider" card, turn on the Enable SAML2 Provider switch and fill in the Default ACS address and Settings information. Then click Save. The specific ACS address will be provided by the SAML SP, and the specific settings need to be configured according to the requirements of the SAML SP.
INFO
When you create a SAML2 IdP in GenAuth, some SPs may ask you to upload the IdP metadata document before providing you with the corresponding configuration information. At this time, it is recommended to fill in an arbitrary ACS address and default settings information. Then download the IdP metadata document of GenAuth and upload it to the SP. Then modify the ACS address and settings information to the correct content obtained from the SP.
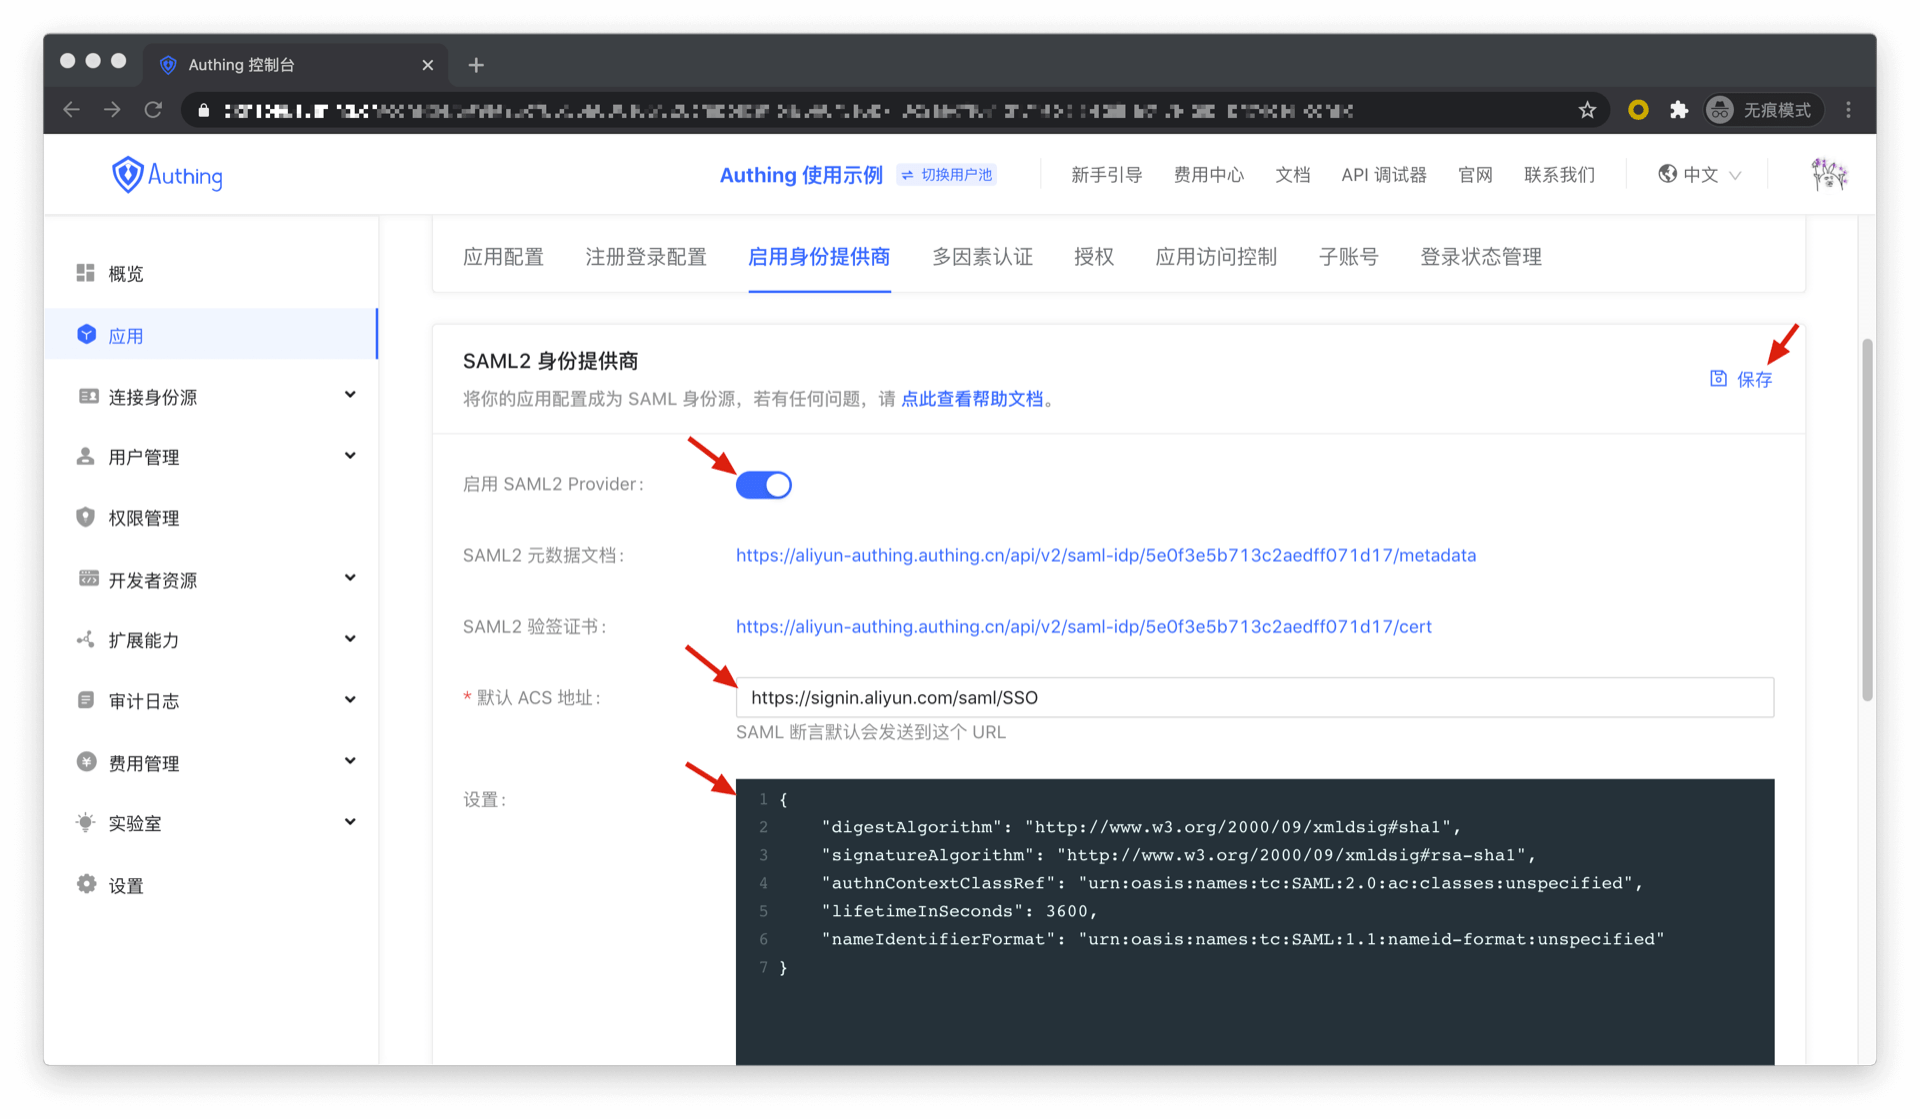
Default ACS Address: SAML2 Identity Provider will send SAML Response to the consumption address specified in SAML Request by default (return to where it came from, GenAuth will send SAML identity assertion to the address specified by AssertionConsumerServiceURL parameter in SAML Request by default). If the consumption address is not specified in SAML Request, GenAuth will send SAML Response to the address filled in here. You can get this address from SP and fill it in here. If you can't find it at SP, you might as well fill in one at random, but some SPs will not specify the consumption address in SAML Request, in this case you must fill in the correct address here.
Settings: Advanced configuration of SAML2 Identity Provider, you need to fill in a JSON format object, containing the following:
| key | type | description | default |
|---|---|---|---|
| samlRequestSigningCert | string | SAML Request signing certificate, you can get this certificate content from SP. After filling in this field, it will be considered that the SAML Request is signed and check whether the signature is legal. If SP does not sign the request, GenAuth will reject the SAML Request and cause authentication failure. | - |
| signResponse | boolean | Whether to sign the SAML Response | false |
| nameIdentifierFormat | string | The unique identifier format in the SAML Response. | urn:oasis:names:tc:SAML:1.1:nameid-format:unspecified |
| lifetimeInSeconds | number | The expiration time of the SAML identity assertion, in seconds. | 3600 |
| authnContextClassRef | string | SAML authentication context. | urn:oasis:names:tc:SAML:2.0:ac:classes:unspecified |
| signatureAlgorithm | string | SAML assertion signature algorithm. | http://www.w3.org/2001/04/xmldsig-more#rsa-sha256 |
| mappings | object | Attribute mapping dictionary, mapping fields in GenAuth user information to mapping dictionary in SAML identity assertion. The key on the left side represents the user information field in GenAuth, and the value on the right side represents the attribute name in SAML identity assertion. | No field mapping is done by default. |
| destination | string | Destination in SAML Response. | Defaults to AssertionConsumerServiceURL in SAML Request. If it does not exist, it is the configured default ACS address. If the IdP initiates the login, you may need to find this value from the third-party application document to fill in, otherwise the login may be incorrect. |
| recipient | string | recipient in SAML Response. | Defaults to AssertionConsumerServiceURL in SAML Request. If it does not exist, it is the configured default ACS address. If the IdP initiates the login, you may need to find this value from the third-party application document to fill in, otherwise the login may be incorrect. |
| audience | string | audience in SAML Response. | Defaults to AssertionConsumerServiceURL in SAML Request. If it does not exist, it is the configured default ACS address. If the IdP initiates the login, you may need to find this value from the third-party application document to fill in, otherwise the login may be incorrect. |
| emailDomainSubstitution | string | Email domain substitution. The email domain in the identity in the SAML assertion will be replaced with the content filled in here. Some SPs require that the email domain in the identity assertion must be specific. If this field is filled in, user pool registration must be prohibited**, otherwise there is a risk of account fraud. | - |
Example:
{
  "audience": null,
  "recipient": "https://signin.aliyun.com/saml/SSO",
  "destination": "https://signin.aliyun.com/saml/SSO",
  "mappings": {
    "email": "Email",
    "username": "UserName"
  },
  "digestAlgorithm": "http://www.w3.org/2000/09/xmldsig#sha1",
  "signatureAlgorithm": "http://www.w3.org/2000/09/xmldsig#rsa-sha1",
  "authnContextClassRef": "urn:oasis:names:tc:SAML:2.0:ac:classes:unspecified",
  "lifetimeInSeconds": 3600,
  "nameIdentifierFormat": "urn:oasis:names:tc:SAML:1.1:nameid-format:unspecified",
  "samlRequestSigningCert": "-----BEGIN CERTIFICATE-----\nMIICyDCCAjGgAwIBAgIBADANBgkqhkiG9w0BAQUFADCBgDELMAkGA1UEBhMCdXMx\nDTALBgNVBAgMBGFzZGYxDTALBgNVBAoMBGFzZGYxGDAWBgNVBAMMD2lkcDMuYXV0\naGluZy5jbjENMAsGA1UEBwwEYXNkZjENMAsGA1UECwwEYXNkZjEbMBkGCSqGSIb3\nDQEJARYMYXNkZkAxMjMuY29tMB4XDTE5MDUyNTA1NTgwMFoXDTIwMDUyNDA1NTgw\nMFowgYAxCzAJBgNVBAYTAnVzMQ0wCwYDVQQIDARhc2RmMQ0wCwYDVQQKDARhc2Rm\nMRgwFgYDVQQDDA9pZHAzLmF1dGhpbmcuY24xDTALBgNVBAcMBGFzZGYxDTALBgNV\nBAsMBGFzZGYxGzAZBgkqhkiG9w0BCQEWDGFzZGZAMTIzLmNvbTCBnzANBgkqhkiG\n9w0BAQEFAAOBjQAwgYkCgYEA2gggFHKUYkoEp83BfGgVjBiev+MIBm+AOuKVqIAX\naJDa1NHL+ApBWsfbKNoPPMy8sZdCBrDm6w5cx9cBjw4uBUap3elxr+MiFoCCc2Eg\nJundFhBVXkU6TafLzfoW4w6/yonmQ798nBKQrTmdc76tpT9xCwU2AmS5ooScQ9Xu\nNn0CAwEAAaNQME4wHQYDVR0OBBYEFMDHVJxYcOlCxnnRi1Lx4tj7gWKNMB8GA1Ud\nIwQYMBaAFMDHVJxYcOlCxnnRi1Lx4tj7gWKNMAwGA1UdEwQFMAMBAf8wDQYJKoZI\nhvcNAQEFBQADgYEAvDodW/ewvCEadY4PCFaBT0ZqoEvrb96hOrbP2hZV4lkCMbLq\noPWASgGTNr9TPnxGCvP9xOv77wzgLs7EAOI+ea1D+NIjUuKnjCLLBv034vMp8bRI\n/Ea9AsGqVCr8tK/3dPoJMxHIjs2cpqNdDcalCZkwBZ1Z0c0YtKIVDFnym5U=\n-----END CERTIFICATE-----",
  "emailDomainSubstitution": "authing.onaliyun.com"
}
Custom SAML Response Attributes: You can add some custom attributes to the SAML identity assertion, and the newly added attributes will appear in the Attributes of the SAML identity assertion.
Example:

INFO
Configure custom SAML Response attributes
The above configuration will add the following attributes to the SAML identity assertion:
<saml:Attribute Name="https://cloud.tencent.com/SAML/Attributes/Role" NameFormat="urn:oasis:names:tc:SAML:2.0:attrname-format:basic">
  <saml:AttributeValue
    xmlns:xs="http://www.w3.org/2001/XMLSchema"
    xmlns:xsi="http://www.w3.org/2001/XMLSchema-instance" xsi:type="xs:string">qcs::cam::uin/2165337796:roleName/authing,qcs::cam::uin/2165337796:saml-provider/authing
  </saml:AttributeValue>
</saml:Attribute>
<saml:Attribute Name="https://cloud.tencent.com/SAML/Attributes/RoleSessionName" NameFormat="urn:oasis:names:tc:SAML:2.0:attrname-format:basic">
  <saml:AttributeValue
    xmlns:xs="http://www.w3.org/2001/XMLSchema"
    xmlns:xsi="http://www.w3.org/2001/XMLSchema-instance" xsi:type="xs:string">Test
  </saml:AttributeValue>
</saml:Attribute>
你还可以从 GenAuth 的用户信息上动态读取字段,在一行中最右侧的文本框中输入:My email is ${user.email} and my gender is ${user.gender}。 
INFO
Dynamically read user information fields
This content will add the following attributes to the SAML identity assertion:
<saml:Attribute Name="CustomName" NameFormat="urn:oasis:names:tc:SAML:2.0:attrname-format:basic">
  <saml:AttributeValue
    xmlns:xs="http://www.w3.org/2001/XMLSchema"
    xmlns:xsi="http://www.w3.org/2001/XMLSchema-instance" xsi:type="xs:string">My email is yezuwei@genauth.ai and my gender is M
  </saml:AttributeValue>
</saml:Attribute>
Integration with Applications
GenAuth has been integrated with Alibaba Cloud, Tencent Cloud, Huawei Cloud, AWS, and Kibana (AWS) for SAML2. Please refer to the corresponding configuration documents for detailed steps.
Log in to the Alibaba Cloud Console (China Region)
Please refer to the Access Document.
Log in to the Alibaba Cloud Console (International Region)
Please refer to the Access Document.
Log in to the Tencent Cloud Console
Please refer to the Access Document.
Log in to the AWS Console (China Region)
Please refer to the Access Document.
Log in to the Huawei Cloud Console (China Region)
Please refer to the Access Document.
Log in to the Kibana Console (AWS China Region)
Please refer to the Access Document.
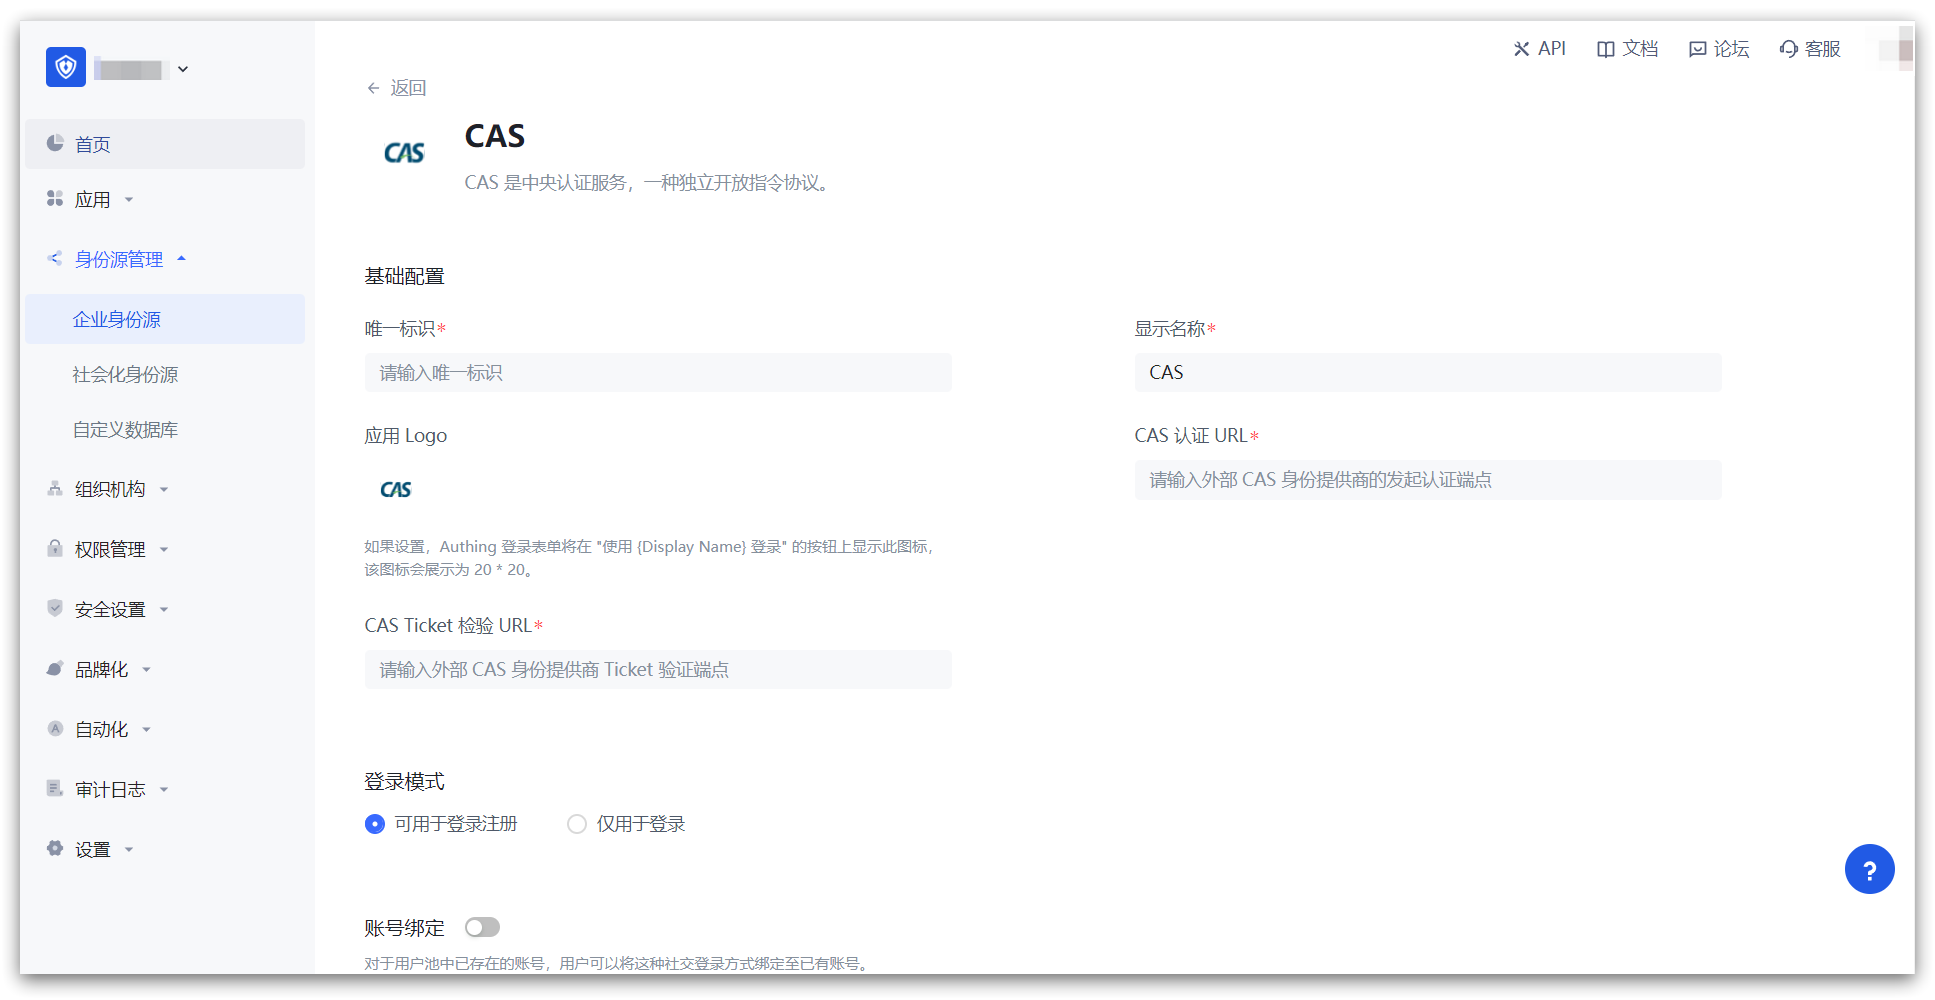
Become a CAS identity source
This article describes how to make GenAuth a CAS identity source. Other systems can access GenAuth as an identity provider through the CAS protocol.
Currently, GenAuth implements the /login, /validate, and /logout endpoints of CAS 1.0.
You can learn more about the CAS protocol here.
Create an application
In order to enable your application to have identity authentication capabilities, you need to create an application in GenAuth. It is recommended to fill in the name of your actual application project. Go to Console > Application > Application List and click Create Application:
Fill in your Application Name, for example: Network Notes Project, and specify an Authentication Address for your project. Your users will complete authentication at this address in the future. Callback link Fill in your project backend route, GenAuth will send the ticket to this address. Finally, click Create.
Find your application and go to the "Enable Identity Provider" tab.
In the "CAS Identity Provider" card below, turn on the Enable CAS IdP switch and click Save.

Web flow
In the Web flow, the overall process is as follows:
- The user visits App1 for the first time.
- The user does not establish a session with App1 and is redirected to the authentication page.
- The user is not authenticated, and the user completes the identity authentication on the CAS Server.
- The user is redirected to the callback address of App1 with the Ticket.
- App1 checks the validity of the Ticket at the CAS Server.
- App1 establishes a session with the user and returns the protected resource.
- The user accesses the application App2.
- The user does not establish a session with App2 and is redirected to the authentication page.
- The CAS Server finds that the user has been authenticated, and the user is redirected to the callback address of App2 with the Ticket.
- App2 checks the validity of the Ticket at the CAS Server.
- App2 establishes a session with the user and returns the protected resource.
The flow chart is as follows:
