Migrate users to GenAuth
If you want to import users from your system to GenAuth, please be sure to read the instructions in this section.
If you want to migrate users to GenAuth smoothly without downtime, you need to use the custom database function and write the corresponding database script. The first time a user authenticates, the user will be authenticated using the custom data script you configured. After successful authentication, the user will be migrated to the GenAuth database; the second time a user authenticates, the GenAuth database will be used for verification. When all users have authenticated at least once, the migration process is complete. For details, see Lazy Migration of Users to GenAuth.
If you want to use your own database to store user data and do not want to expose user data to GenAuth, you can use a custom database to store user data.
You can also choose to import all users into GenAuth at once. We provide API & SDK to help you quickly write import scripts. For details, please see Use SDK to import users. In this process, you also need to confirm a question first: Can you get the user's plain text password? If you can get it, just use the plain text password to create a new user; if not, you need to write a custom password function first, so that when the user logs in in GenAuth, the custom password encryption and verification function you wrote will be used, and the user's previous password will still be valid, without requiring the user to reset his or her password.
If you are using it for internal employees (EIAM), you can also import organizations and user directories from third-party enterprise identity sources such as WeChat for Business, DingTalk, LDAP Server, and Windows local Active Directory. For details, see this./import-from-third-party-identity-provider/README.md.
Import users using SDK
GenAuth supports SDKs for multiple languages including Java, JavaScript/Node.js, Python, PHP, C#, Go, and Ruby:
This article uses Node.js as an example to introduce how to write a script to import users. You can choose the language you are familiar with.
Step 1: Use a custom password function (optional)
If the password field in your user data table is in plain text, you can skip this step; if it is in cipher text, you need to go to Basic Configuration -> Password Management -> Custom Password Encryption Method to enable the option and write a function for encrypting and verifying passwords. For details, see Custom Password Encryption Method.
Step 2: Export your user data
Please export your user data to JSON format, the content is an array, each element is an object, one element corresponds to a user's information, save it as users.json, for example:
[
  {
    "uid": "GEN_AUTH_USER_1",
    "nickname": "zhang",
    "account_id": "zhang",
    "mail": "test1@123.com",
    "password": "$2b$12$nCa3WDbsc3tvM57ifzjwrOAGGuNK7EPV0R17WKcW6f13NZvX97yLe",
    "phone": "13100000001",
    "emailVerified": true,
    "loginsCount": 4
  },
  {
    "uid": "GEN_AUTH_USER_2",
    "nickname": "wang",
    "account_id": "wang",
    "mail": "test2@123.com",
    "password": "$2b$12$HGloOlfz1HzD0v/r5m1r7OCMcx6X85eC5.At3Ckxe.Jn/u/Za/yy2",
    "phone": "13100000002",
    "emailVerified": false,
    "loginsCount": 12
  },
  {
    "uid": "GEN_AUTH_USER_3",
    "nickname": "zhao",
    "account_id": "zhao",
    "mail": "test3@123.com",
    "password": "$2b$12$ia1oUZZFbEUpLvuqUsKideQq9lVkf2kq9vFaTvp7dlfeCx8UlTmDu",
    "phone": "13100000003",
    "emailVerified": true,
    "loginsCount": 0
  }
]
Step 3: Confirm the mapping relationship between user fields
Before you start importing, you need to confirm the mapping relationship between your user structure and the GenAuth user field. You can get all the fields and their definitions of the GenAuth user here.
Step 4: Import user data to GenAuth
If you don't have a NodeJS environment, you need to install NodeJS first.
Create an index.js file.
Paste the following js script into index.js:
const fs = require("fs");
const path = require("path");

const { ManagementClient } = require("authing-js-sdk");
const userPoolId = "xxxxxxxxxxxxxxxxxxx";
const secret = "xxxxxxxxxxxxxxxxxxx";

// If the file is large, it is recommended to read it in batches
// Please save the user information and this file in the same directory. The file content is an array JSON of user data. One element is an information object of one user. Here, read the users.json mentioned above
let users = fs.readFileSync(path.resolve("users.json"), { encoding: "utf8" });
users = JSON.parse(users);
async function main() {
  const managementClient = new ManagementClient({
    userPoolId,
    secret,
  });

  for (let i = 0; i < users.length; i++) {
    let yourUser = users[i];
    try {
      // Complete field alignment here
      await managementClient.users.create(
        {
          nickname: yourUser.nickname,
          password: yourUser.password,
          email: yourUser.mail,
          emailVerified: yourUser.emailVerified,
          phone: yourUser.phone,
          loginsCount: yourUser.loginsCount,
          // Store raw data for future use
          oauth: JSON.stringify(yourUser),
        },
        {
          /**
           * Turn on this switch, the password field will be written directly to the GenAuth database, and GenAuth will not encrypt this field again
           * If your password is not stored in plain text, you should keep it turned on and write a password function calculation
           */
          keepPassword: true,
        }
      );
    } catch (err) {
      console.log(err);
      // Write users who failed to import to a file
      fs.writeFileSync(
        path.resolve("users_failed.json"),
        JSON.stringify(yourUser) + "\n",
        {
          flag: "a",
        }
      );
    }
  }
}

main();
After copying, please align the fields and then execute
$ npm install authing-js-sdk
$ node index.js
The code can be viewed on GitHub: users-migration
Get help
Have a problem? Contact us, Feel free to talk.
Custom Password Encryption Method
If you want to customize the password encryption function, please upload the function snippet here (currently only supports Node.js). You can click here to download the function template (GenAuth does not store users' password plaintext).
This feature is suitable for the following scenarios:
- You have migrated all users to GenAuth but don't want them to change their passwords;
- You don't trust GenAuth's password encryption algorithm and want to use your own;
This document explains how to configure the password encryption function.
Configuration Steps
Path: Security Settings->Password Security->Custom Password Encryption Method
As shown below:
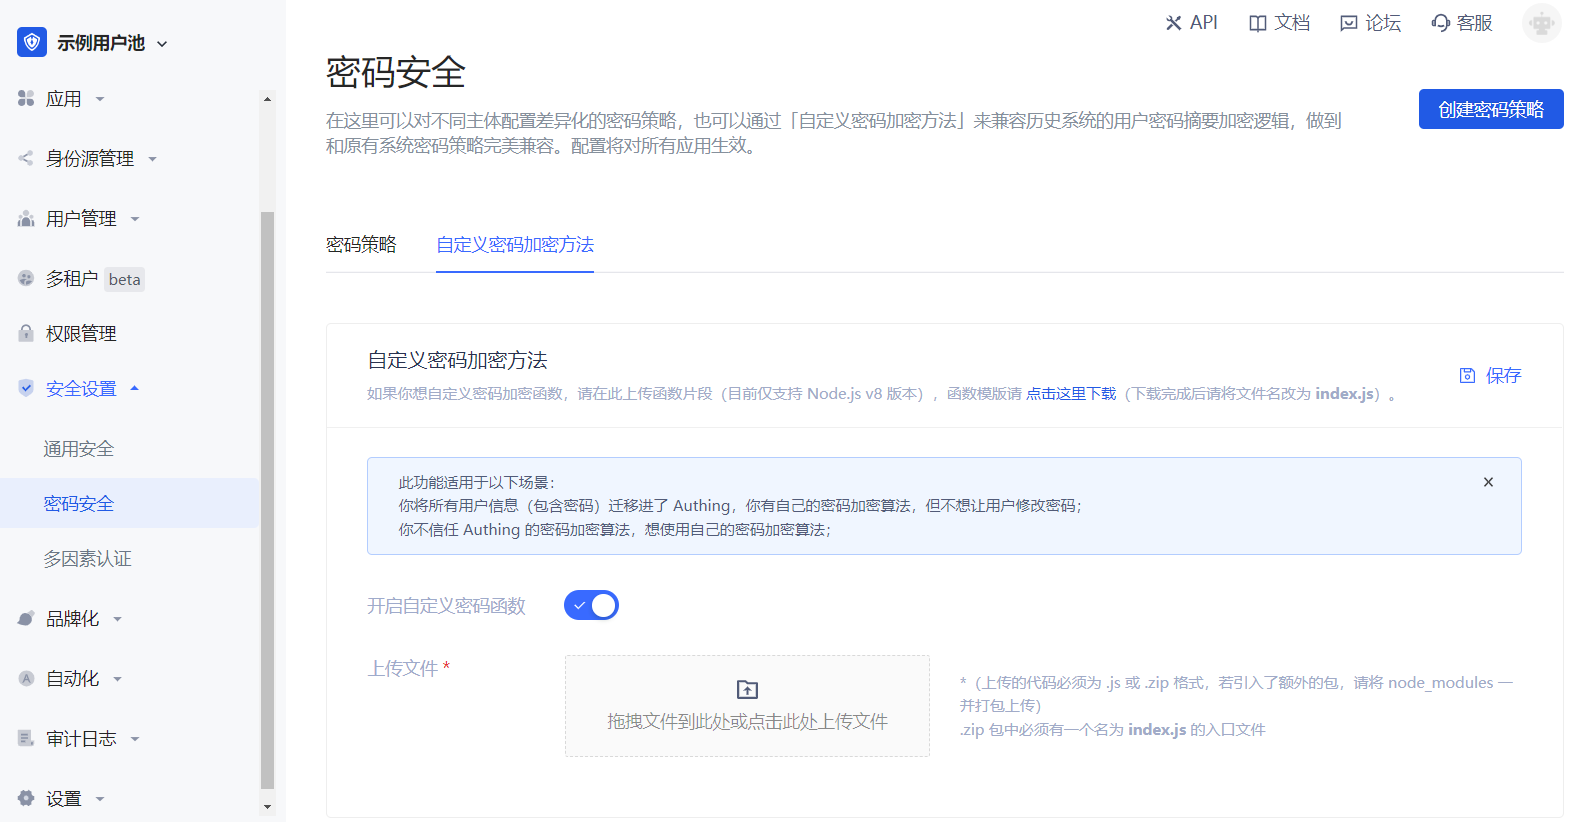
INFO
Custom Password Encryption Method
Download Template
Click Download Template on the page to download the Node.js code template. The template code is shown below:
var getRawBody = require("raw-body");

const encryptPassword = (password) => {
  // Write the password encryption function here

  return password;
};

/**
 *
 * @param {String} password plaintext password
 * @param {String} encryptedPassword encrypted password
 */
const comparePassword = (password, encryptedPassword) => {
  // Write the password validation function here

  return password === encryptedPassword;
};

module.exports.encrypt = function (request, response, context) {
  // get request body
  getRawBody(request, function (err, body) {
    const queries = request.queries;
    const password = queries.password;

    if (!password) {
      response.setStatusCode(500);
      response.setHeader("content-type", "application/json");
      response.send(
        JSON.stringify(
          {
            message: "Please provide password via url query",
          },
          null,
          4
        )
      );
    }

    const respBody = {
      password: encryptPassword(password), // Encrypt password here
    };

    response.setStatusCode(200);
    response.setHeader("content-type", "application/json");
    response.send(JSON.stringify(respBody, null, 4));
  });
};

module.exports.validate = function (request, response, context) {
  // get request body
  getRawBody(request, function (err, body) {
    const queries = request.queries;
    const password = queries.password;
    const encryptedPassword = queries.encryptedPassword;

    if (!password) {
      response.setStatusCode(500);
      response.setHeader("content-type", "application/json");
      response.send(
        JSON.stringify(
          {
            message: "Please provide password via url query",
          },
          null,
          4
        )
      );
    }

    const respBody = {
      isValid: comparePassword(password, encryptedPassword), // Validate password here
    };

    response.setStatusCode(200);
    response.setHeader("content-type", "application/json");
    response.send(JSON.stringify(respBody, null, 4));
  });
};
编写代码
You need to write the corresponding password encryption method in the encryptPassword function, and write the corresponding password validation method in the vlidatePassword function.
If developers need to import third-party NPM packages, please install them directly using NPM.
INFO
NPM is the package management tool for the Node.js ecosystem.
Here is a code example of importing the bcryptjs package:
$ npm install bcryptjsAfter installation is complete, a node_modules folder will appear in the directory, then write the code:
var getRawBody = require("raw-body");
const encryptPassword = (password) => {
// Implement your login here.
// Your can use bcrypt for example
// more info here: https://github.com/kelektiv/node.bcrypt.js
var bcryptjs = require("bcryptjs");
var genSaltSync = bcryptjs.genSaltSync();
return bcryptjs.hashSync(password, genSaltSync);
};
const vlidatePassword = (plainText, encrypted) => {
// plainText is the plainText password use provide to be validate.
// encrypted is user's password encryped in database.
// Implement your login here.
// Your can use bcrypt for example
// more info here: https://github.com/kelektiv/node.bcrypt.js
var bcryptjs = require("bcryptjs");
return bcryptjs.compareSync(password, encryptedPassword);
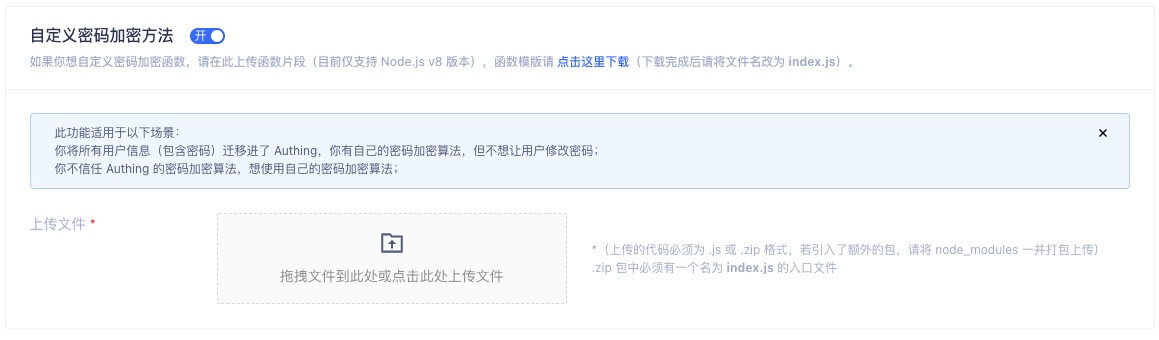
};Upload Function to Server
INFO
GenAuth only supports code packages in .js format or .zip format.
If you haven't imported any packages, you can directly upload the .js format template file; if you have imported packages, please package them together with node_modules into .zip format and upload in the GenAuth console.
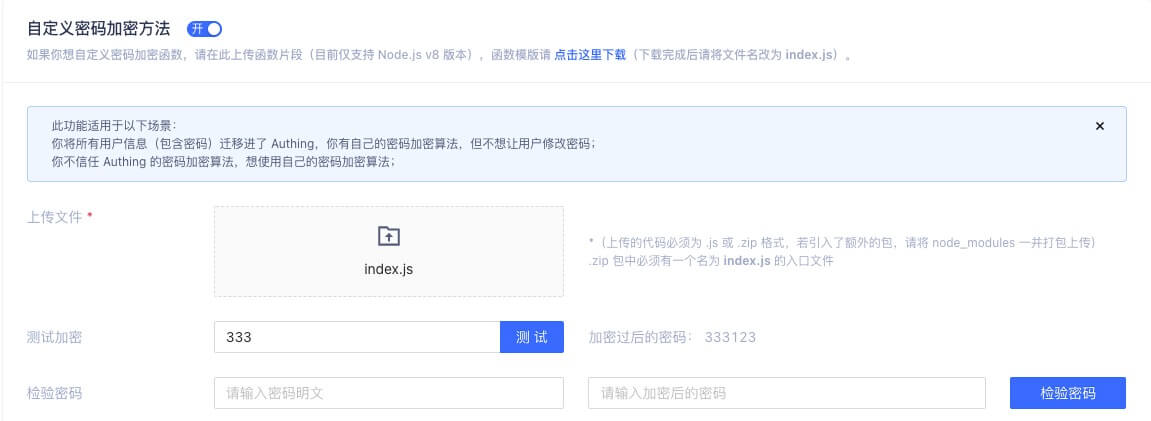
Test Password Encryption Function
After successful upload, developers can test the password encryption effect. As shown below, enter the original password in the input box and click "Encryption Test" to see the encrypted password (if no encryption function is uploaded, GenAuth's default password encryption result will be displayed).
Notes
INFO
The password encryption function takes effect immediately after uploading and will affect existing users. It is recommended to use this feature in a completely new user pool.
If you need to modify the password encryption function in an old user pool, please contact GenAuth After-sales Service.