Manage user permissions
INFO
For information about the GenAuth user pool version that supports the various benefits of the "Permission Management" function, please check the Official Website "Price" page. If your version does not support this benefit and you want to try it, you can activate the trial period. For an introduction to the trial period and how to activate it, please check the Trial Period.
In the previous section, we introduced authentication. Authentication refers to the process of identifying the identity of the requester (such as using passwords, WeChat, mobile phone verification codes, etc.). After successfully identifying the user's identity, what we need to do next is to **manage and assign permissions. **
Permission management generally refers to the fact that users can access and only access their authorized resources according to the security rules or security policies set by the system, no more and no less.
Currently, the two widely used permission models are [Role-based access control (RBAC)](/en/genauth/guides/access-control/#merged-guides-access-control-choose-the-right-access-control-model is role-based access control-rbac) and [Attribute-based access control (ABAC)](/en/genauth/guides/access-control/#merged-guides-access-control-choose-the-right-access-control-model is attribute-based access control-abac), each of which has its own advantages and disadvantages: the RBAC model is simpler to build, but its disadvantage is that it cannot authorize resources in a fine-grained manner (it only authorizes a certain type of resource rather than a specific resource); the ABAC model is relatively complex to build and has a high learning cost, but its advantages are fine-grained and dynamic execution based on context.
Next, you can learn how to choose a suitable permission model for your application system.
Choose the right permission model
The two widely used permission models are: [Role-based access control (RBAC)](#What is role-based access control-rbac) and [Attribute-based access control (ABAC)](#What is attribute-based access control-abac). Each has its own advantages and disadvantages: the RBAC model is simpler to build, but its disadvantage is that it cannot authorize resources in a fine-grained manner (it only authorizes a certain type of resource rather than a specific resource); the ABAC model is relatively complex to build, and the learning cost is relatively high. Its advantages are fine-grained and dynamic execution based on context.
What is role-based access control (RBAC)
Role-based access control (RBAC for short) refers to authorizing the relevant permissions of users through their roles (Role), which achieves more flexible access control. Compared with directly granting user permissions, it is simpler, more efficient, and more scalable.

When using RBAC, by analyzing the actual situation of system users, different roles are granted to them based on common responsibilities and needs. You can grant one or more roles to a user, and each role has one or more permissions. This relationship between user-role and role-permission allows us to no longer manage individual users separately. Users inherit the required permissions from the granted roles.
Take a simple scenario (Gitlab's permission system) as an example. There are three roles in the user system: Admin, Maintainer, and Operator. These three roles have different permissions. For example, only Admin has the permission to create and delete code repositories, while other roles do not have them.
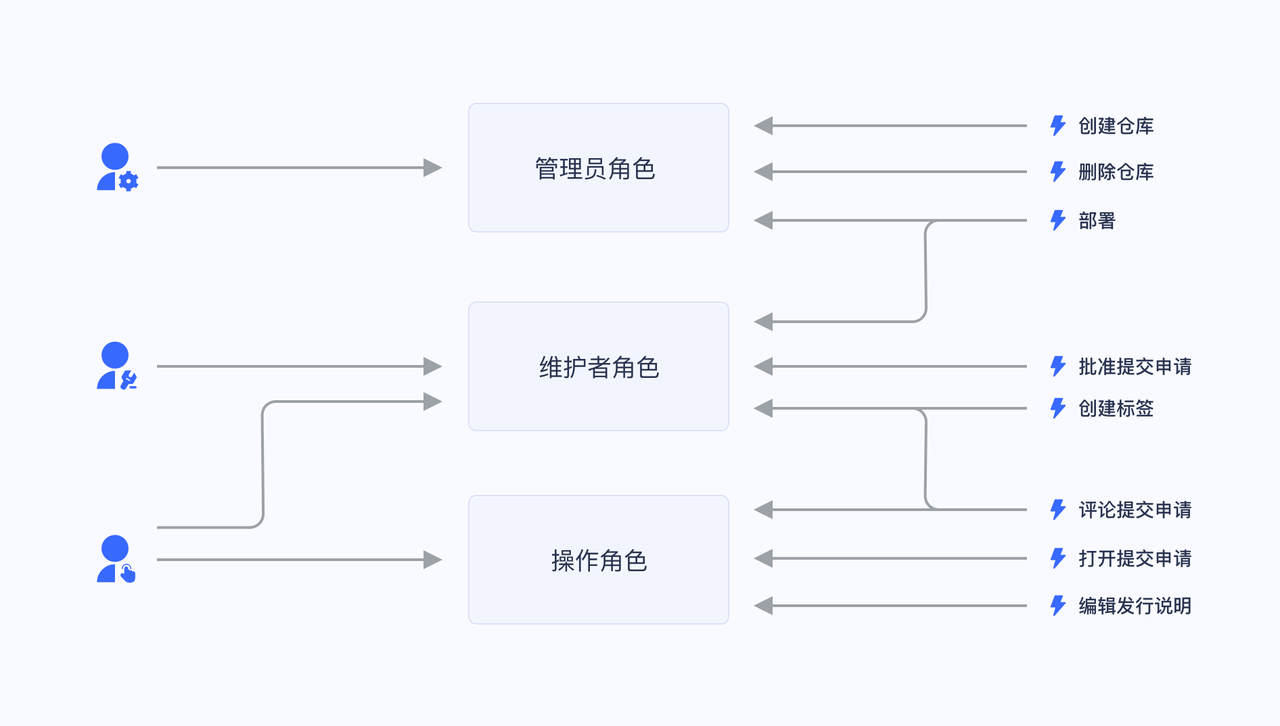
We grant a user the role of "Admin", and he has the two permissions of "Create code repository" and "Delete code repository".
Not directly granting user authorization policies is for future scalability considerations. For example, if there are multiple users with the same permissions, we need to assign the same permissions to these users when assigning them, and modify the permissions of these users one by one when modifying them. After we have roles, we only need to set permissions for the role, assign different roles to different users, and then modify the permissions of the role to automatically modify the permissions of all users in the role.
What is Attribute-Based Access Control (ABAC)
Attribute-Based Access Control (ABAC) is a very flexible authorization model. Unlike RBAC, ABAC dynamically determines whether an operation is allowed through various attributes.
The main components of ABAC
In ABAC, whether an operation is allowed is determined by the dynamic calculation of objects, resources, operations, and environmental information.
- Object: The object is the user who currently requests to access the resource. The attributes of the user include ID, personal resources, roles, departments, and organizational memberships;
- Resource: The resource is the asset or object (such as files, data, servers, or even APIs) that the current access user wants to access. Resource attributes include the file's creation date, file owner, file name and type, data sensitivity, etc.;
- Operation: An operation is an operation that a user attempts to perform on a resource. Common operations include "read", "write", "edit", "copy", and "delete";
- Environment: The environment is the context of each access request. Environment attributes include the time and location of the access attempt, the object's device, the communication protocol, and the encryption strength.
How ABAC uses attributes to dynamically calculate decision results
During the execution of ABAC's decision statements, the decision engine dynamically calculates the decision results based on the defined decision statements, combined with factors such as objects, resources, operations, and environments. ,
Whenever an access request occurs, the ABAC decision system analyzes whether the attribute value matches the established policy. If there is a matching policy, the access request is passed.
For example, the policy "When the department of a document is the same as the department of the user, the user can access this document" will be matched by the following attributes:
- Department of the object (user) = Department of the resource;
- Resource = "Document";
- Operation = "Access";
The policy "People in Department A are prohibited from accessing System B before 9 am" will be matched by the following attributes:
Department of the object = Department A;
Resource = "System B";
Operation = "Access";
Environment = "The time is 9 am".
ABAC Application Scenarios
Under the ABAC permission model, you can easily implement the following permission control logic:
- Authorize A to edit a specific department;
- When the department to which a document belongs is the same as the user's department, the user can access the document;
- When the user is the owner of a document and the document is in draft status, the user can edit the document;
- Forbid people in department A to access system B before 9 a.m.;
- Forbid access to system A as an administrator in places other than Shanghai;
The above logic has several common points:
- Specific to a resource rather than a class of resources;
- Specific to a certain operation;
- Can dynamically execute policies through the context of the request (such as time, geographic location, resource tag);
If it is condensed into one sentence, you can **fine-grainedly authorize under what circumstances to have a specific permission on a resource. **
GenAuth's permission model
There are several concepts in GenAuth:
- User: your end user;
- Role: a role is a logical collection. You can authorize a role to have certain operation permissions, and then grant the role to a user, and the user will inherit all permissions in the role;
- Resource: you can define the entity objects in your application system as resources, such as orders, products, documents, books, etc. Each resource can define multiple operations, such as documents have read, edit, and delete operations;
- Authorization: authorize certain operations of a certain type of resource to a role or user.
In the GenAuth permission system, we implement the role permission inheritance of the RBAC model through the two objects of user and role. On top of this, we can also dynamically and fine-grainedly authorize around attributes, thereby implementing the ABAC permission model. At the same time, in order to meet the design requirements of complex organizational structures in large systems, we combine resources, roles, and permission authorizations into a unified permission group to facilitate management by developers.
How do I choose which permission model to use
Here, the size of the organization is a crucial factor. Due to the initial design and implementation difficulties of ABAC, it may be too complicated to consider for small businesses.
For small and medium-sized enterprises, RBAC is a simple alternative to ABAC. Each user has a unique role with corresponding permissions and restrictions. When a user moves to a new role, their permissions are changed to those of the new position. This means that a small number of internal and external users can be easily managed in a hierarchy with clearly defined roles.
However, it is not efficient for large organizations when new roles must be established manually. Once the attributes and rules are defined, ABAC's policies are easier to apply when there are many users and stakeholders, while also reducing security risks.
In short, choose ABAC if:
- You are in a large organization with many users;
- You need deep, specific access control capabilities;
- You have time to invest in a long-range model;
- You need to ensure privacy and security compliance;
However, consider RBAC if:
- You are in a small or medium-sized enterprise;
- Your access control policy is broad;
- You have few external users and your organizational roles are well defined;
Next
Next, you can learn how to integrate the RBAC permission model into your application system or integrate the ABAC permission model into your application system.
Integrate RBAC permission model into your application system
[Previous](/en/genauth/guides/access-control/#What is role-based access control-rbac) We introduced what role-based access control (RBAC) is. The following article introduces how to quickly integrate the RBAC permission model into your system based on GenAuth.
First, let's understand a few core concepts in GenAuth:
- User: your end user;
- Role: A role is a logical collection. You can authorize a role to have certain operation permissions, and then grant the role to a user, who will inherit all permissions of the role;
- Resource: You can define entity objects in your application system as resources, such as orders, products, documents, books, etc. Each resource can define multiple operations, such as documents have read, edit, and delete operations;
- Authorization: Authorize certain operations of a certain type of resource to a role or user.
Through the combination of users, roles, resources, and authorization, a flexible and fine-grained permission model can be easily and intuitively implemented.
Create a role
You can use the GenAuth console to create a role: In Permission Management - Role Management, click the Add Role button:
- Role code: The unique identifier of the role, unique within the permission group, only English letters, numbers, underscores _, and dashes - are allowed. Here we fill in
admin. - Role description: The description of the role, here we fill in
administrator.
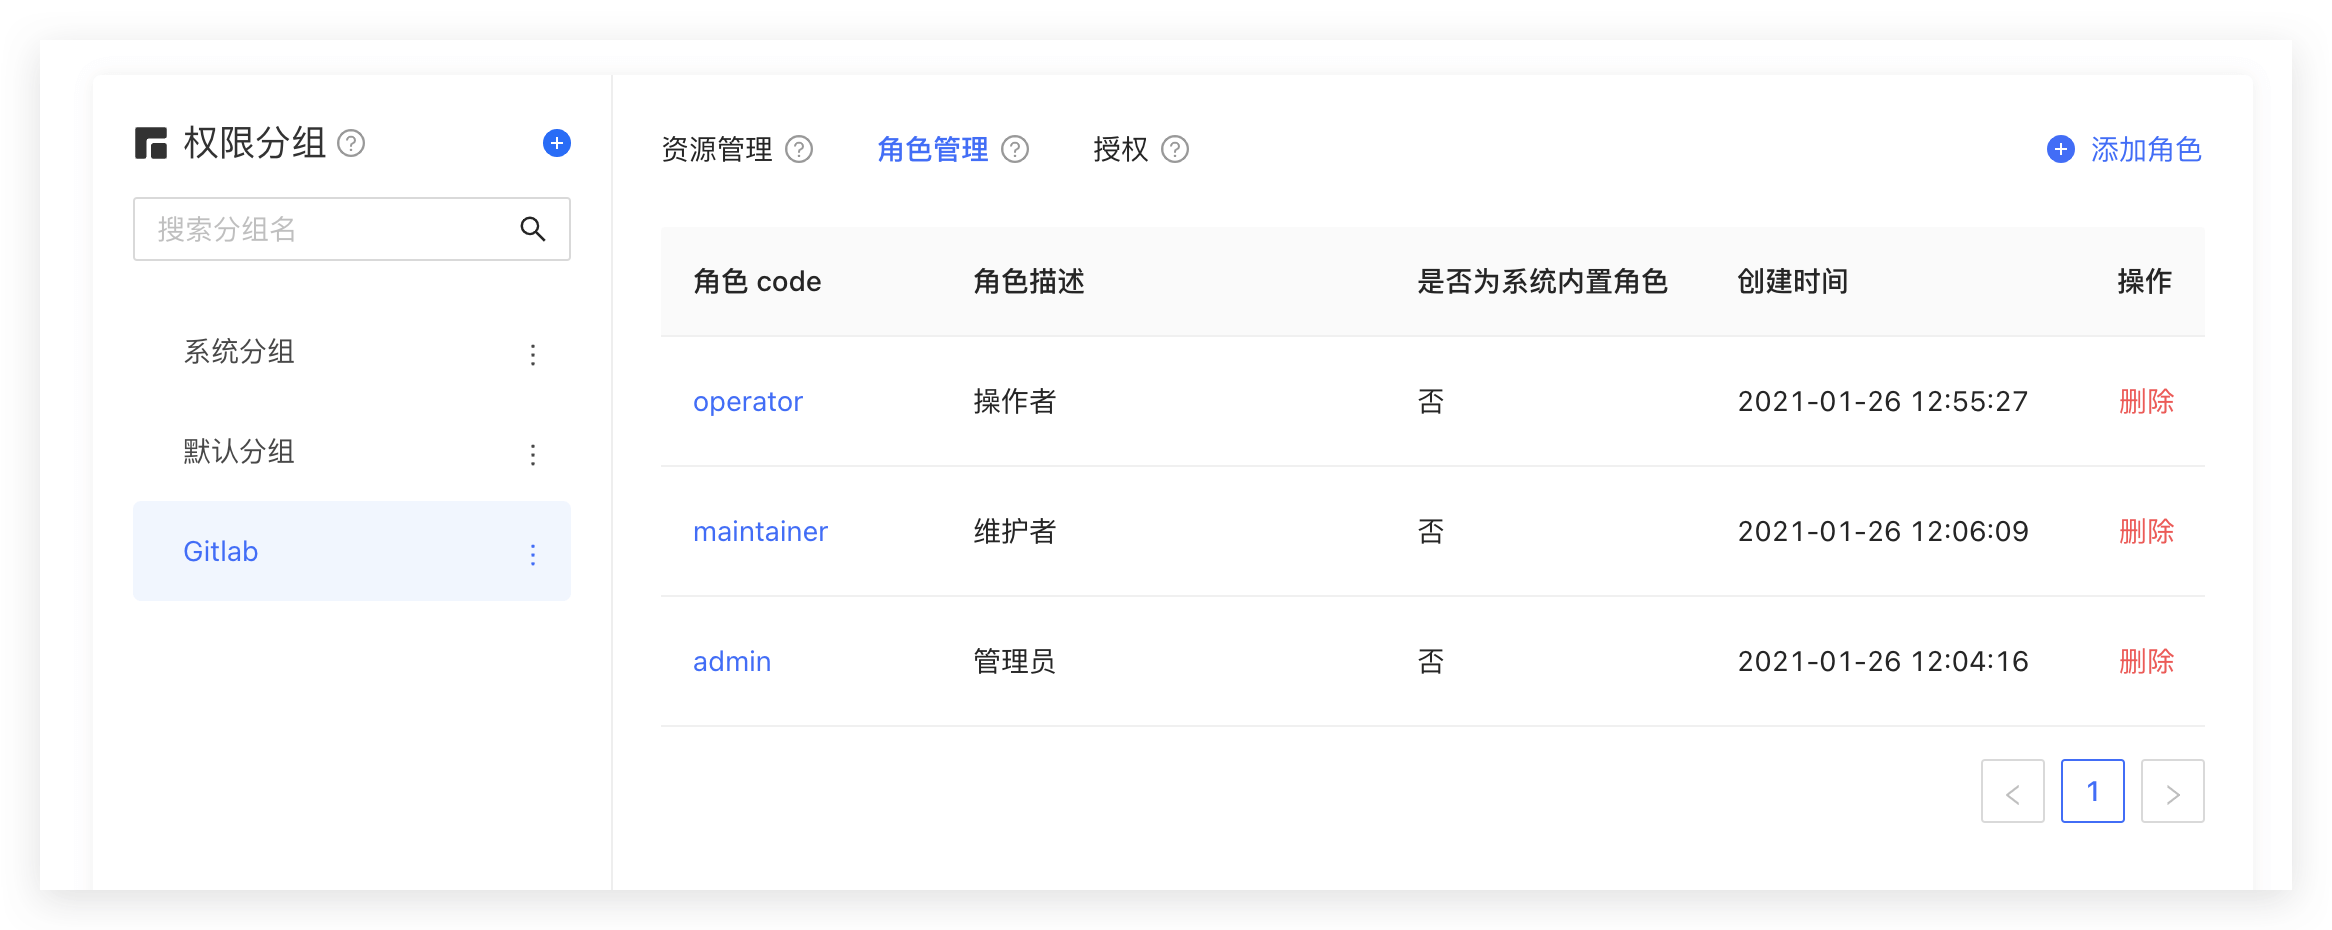
Create three roles:
You can also use the API & SDK to create roles. For details, see Role Management SDK.
Authorize user roles
On the role details page, you can authorize this role to the user. You can search for users by username, phone number, email address, or nickname:

After selecting a user, click Confirm, and you can view a list of users who are authorized to this role.
You can also use API & SDK to grant roles to users. For details, see Role Management SDK.
Control permissions by user roles in the backend
After the user successfully authenticates and obtains the Token, you can parse the current user's ID. Next, you can use the API & SDK we provide to obtain the role granted to the user in the backend. Here, Node.js is used as an example:
Here, Node SDK is used as an example. We also support SDKs in Python, Java, C#, PHP, etc. For details, click here.
First, get the list of all roles granted to the user:
import { ManagementClient } from "authing-js-sdk";

const managementClient = new ManagementClient({
  userPoolId: "YOUR_USERPOOL_ID",
  secret: "YOUR_USERPOOL_SECRET",
});
const { totalCount, list } = await managementClient.users.listRoles("USER_ID");
After getting all the roles of the user, we can determine whether the user has the devops role:
if (!list.map((role) => role.code).includes("devops")) {
  throw new Error("No permission to operate!");
}
Create resources
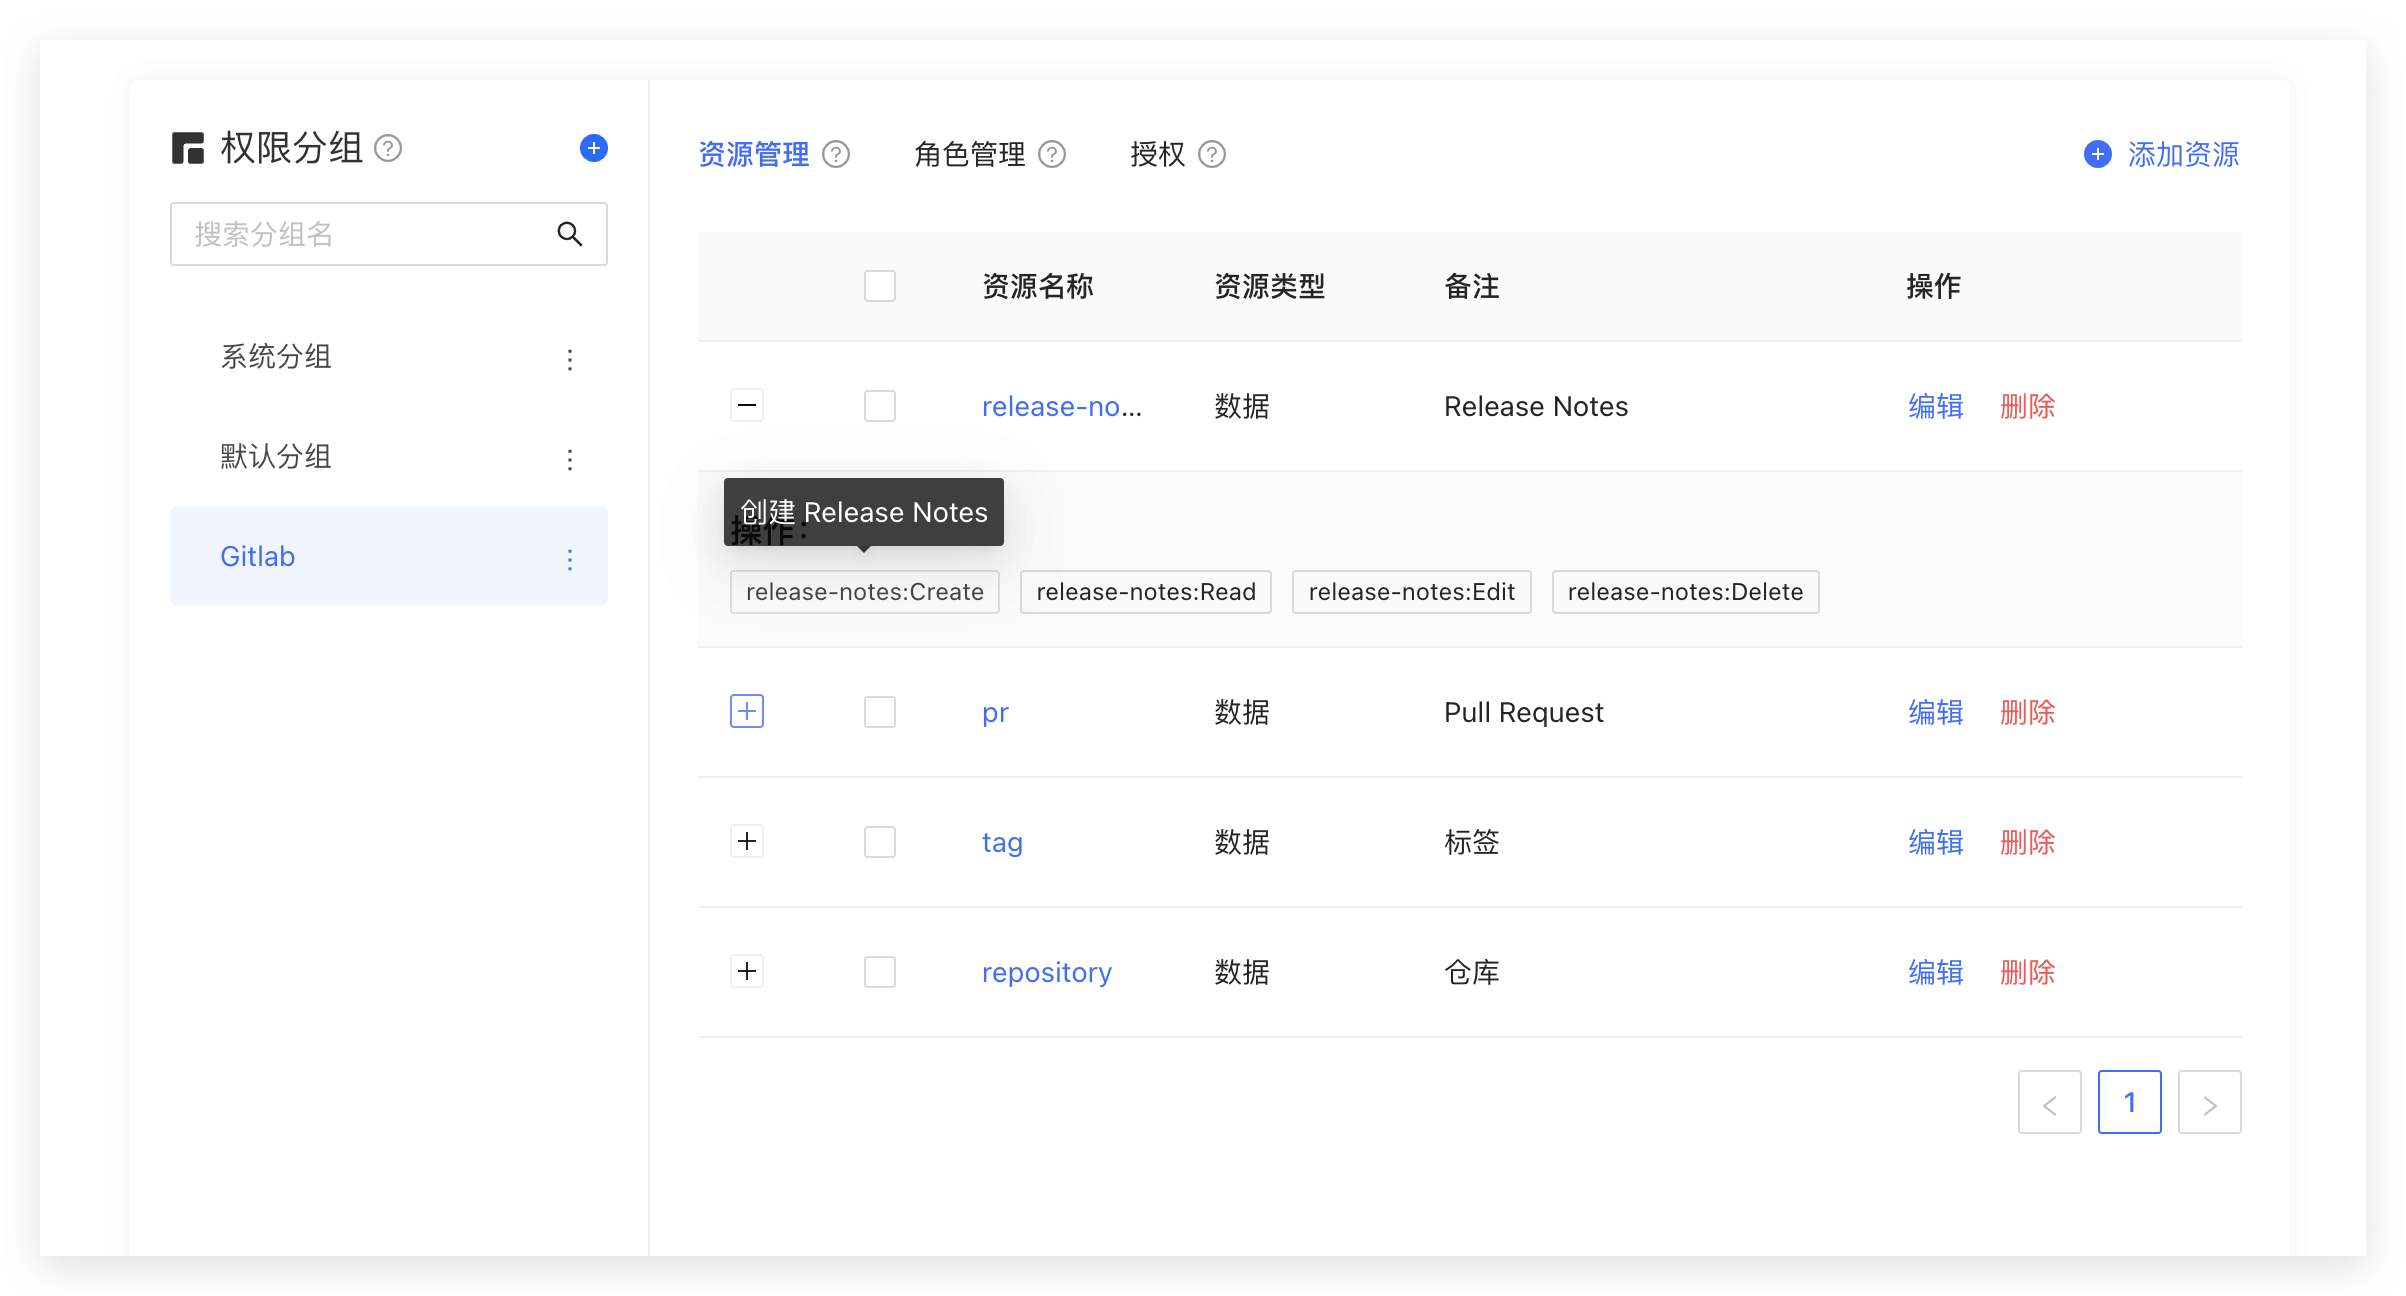
In the previous step, we controlled permissions by whether the user has a certain role. This permission control is still relatively coarse-grained because it only determines whether the user has a certain role, but not whether he has a specific permission. GenAuth can perform more fine-grained authorization around resources based on the role-based access control model (RBAC).
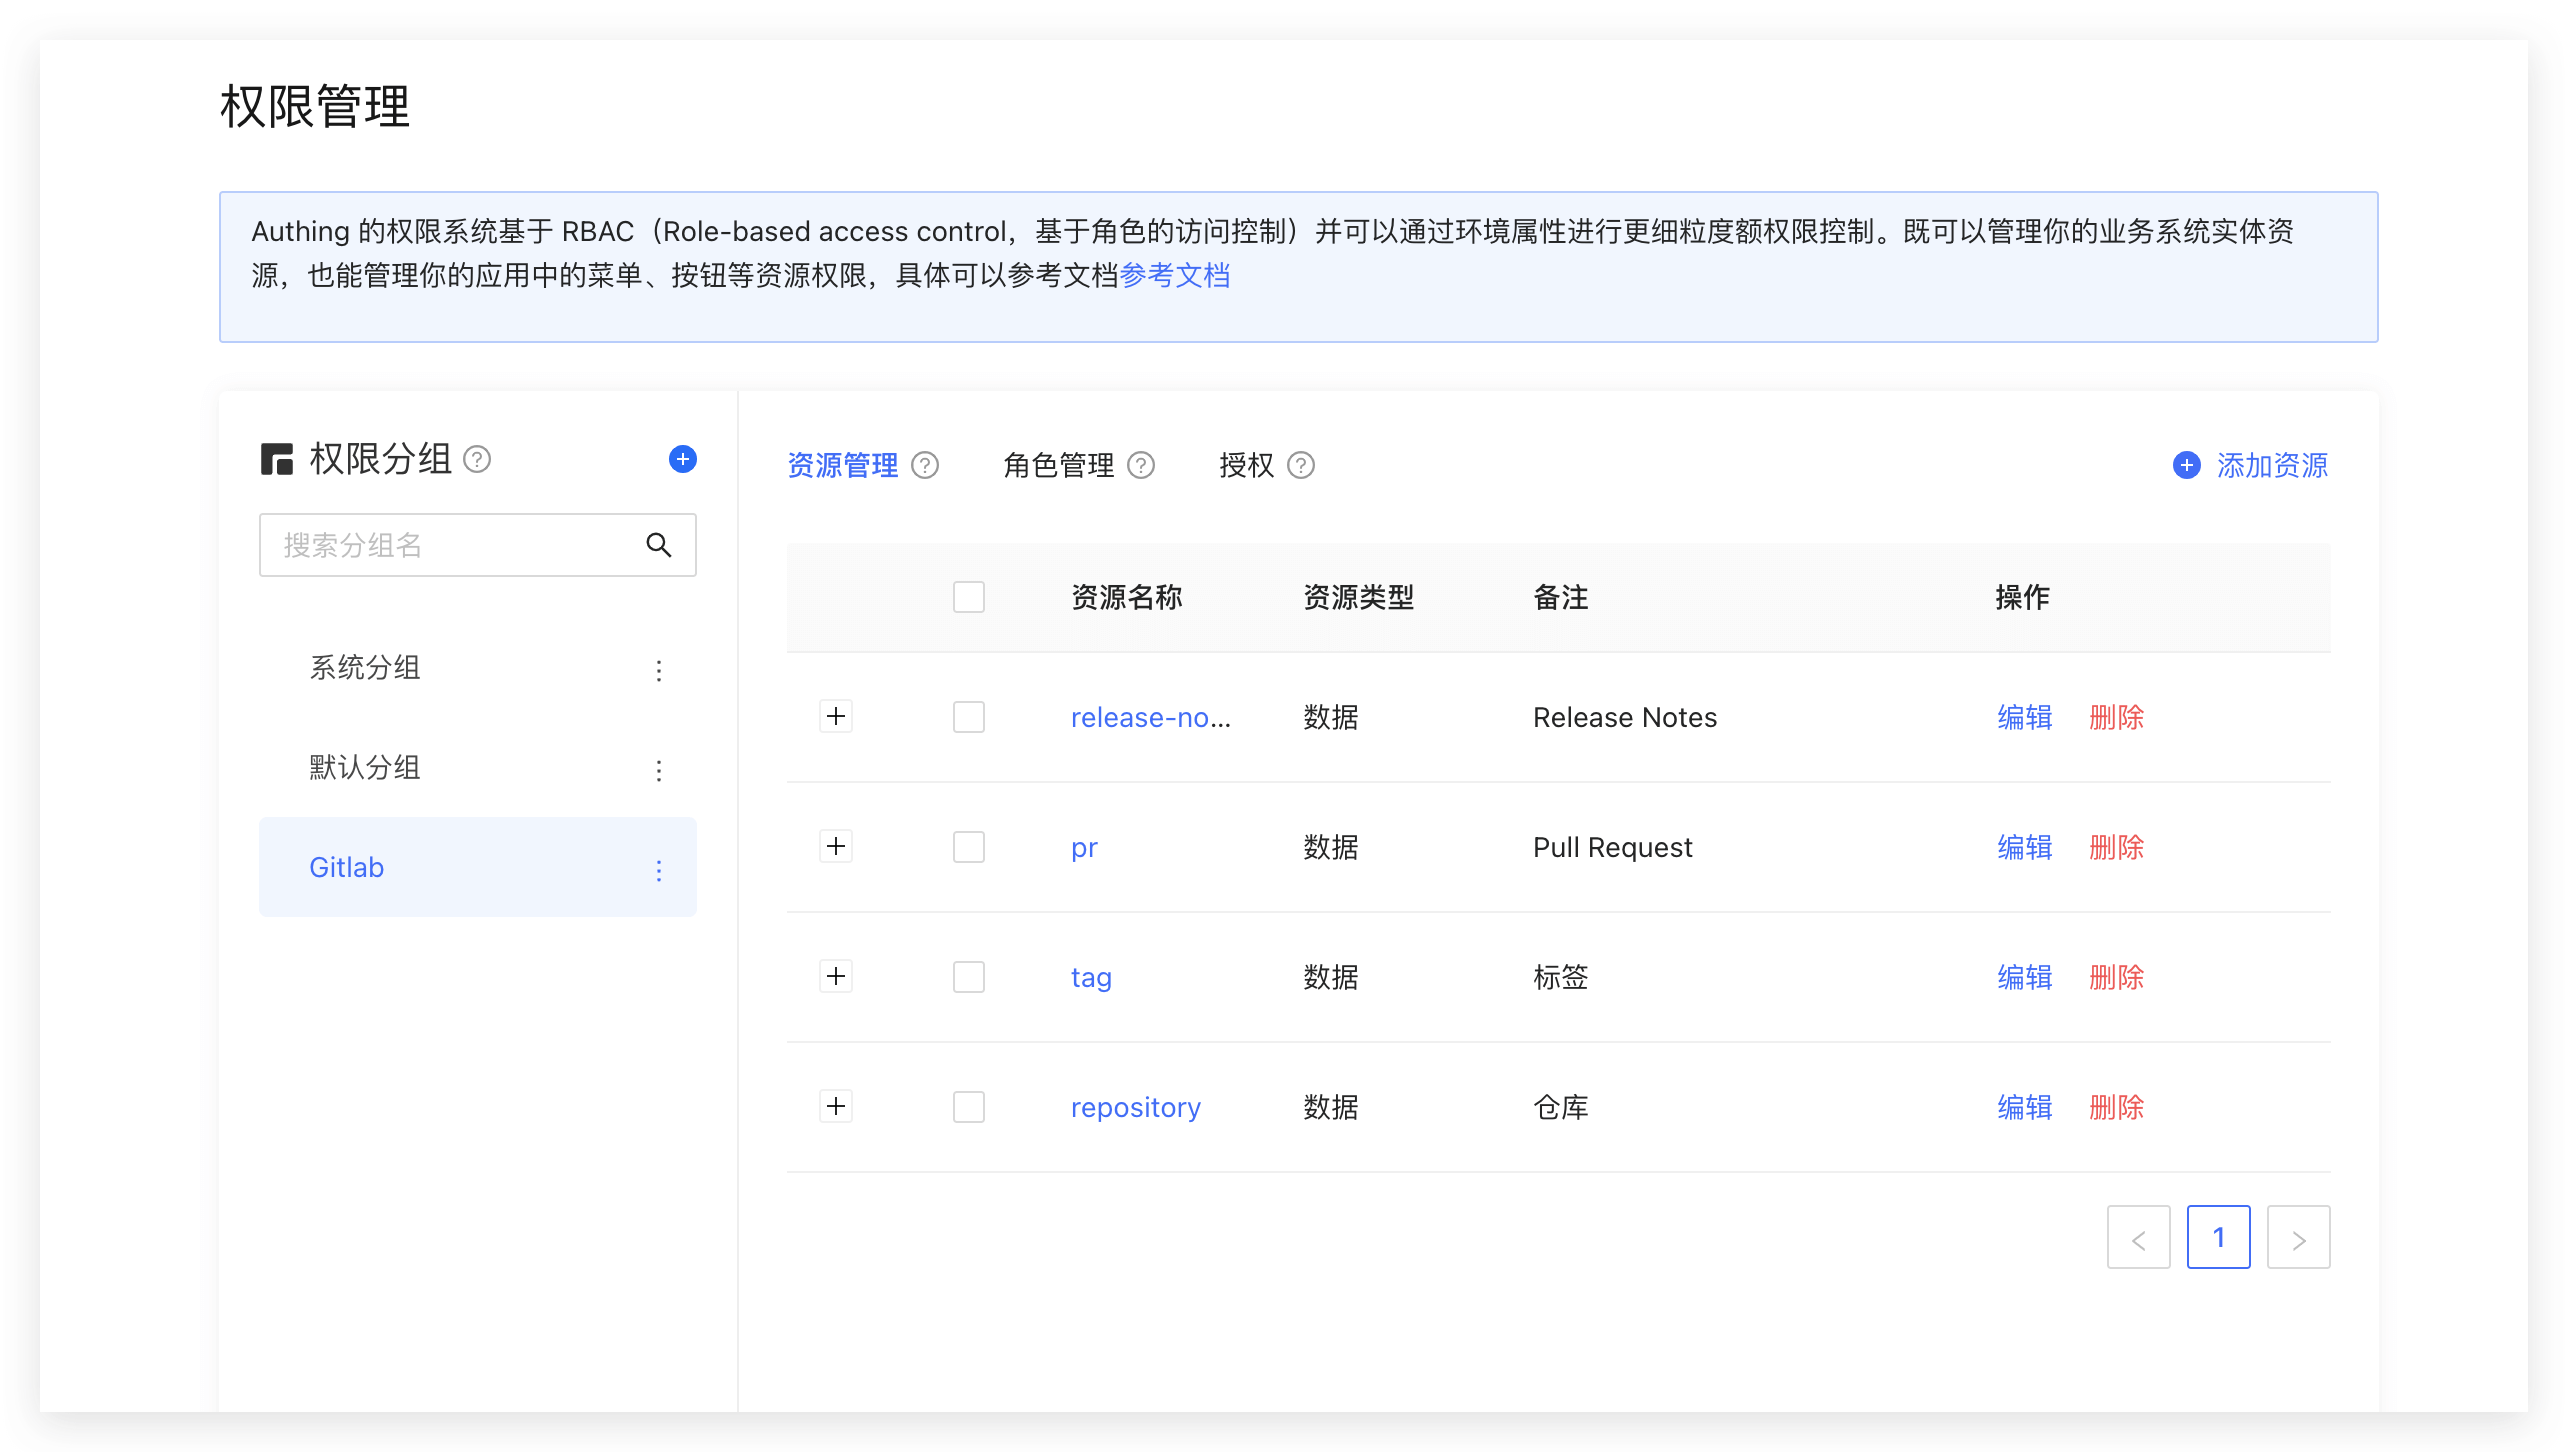
You can abstract some objects of the system into resources, and define some operations on these resources. For example, in the scenario of this article, Repository, Tag, PR, and Release Notes are all resources, and these resources have corresponding operations:
- Repository: create, delete, etc.
- PR: open, comment, merge, etc.
- Tag: create, delete, etc.
- Release Notes: create, read, edit, delete, etc.
We create these resources in GenAuth:
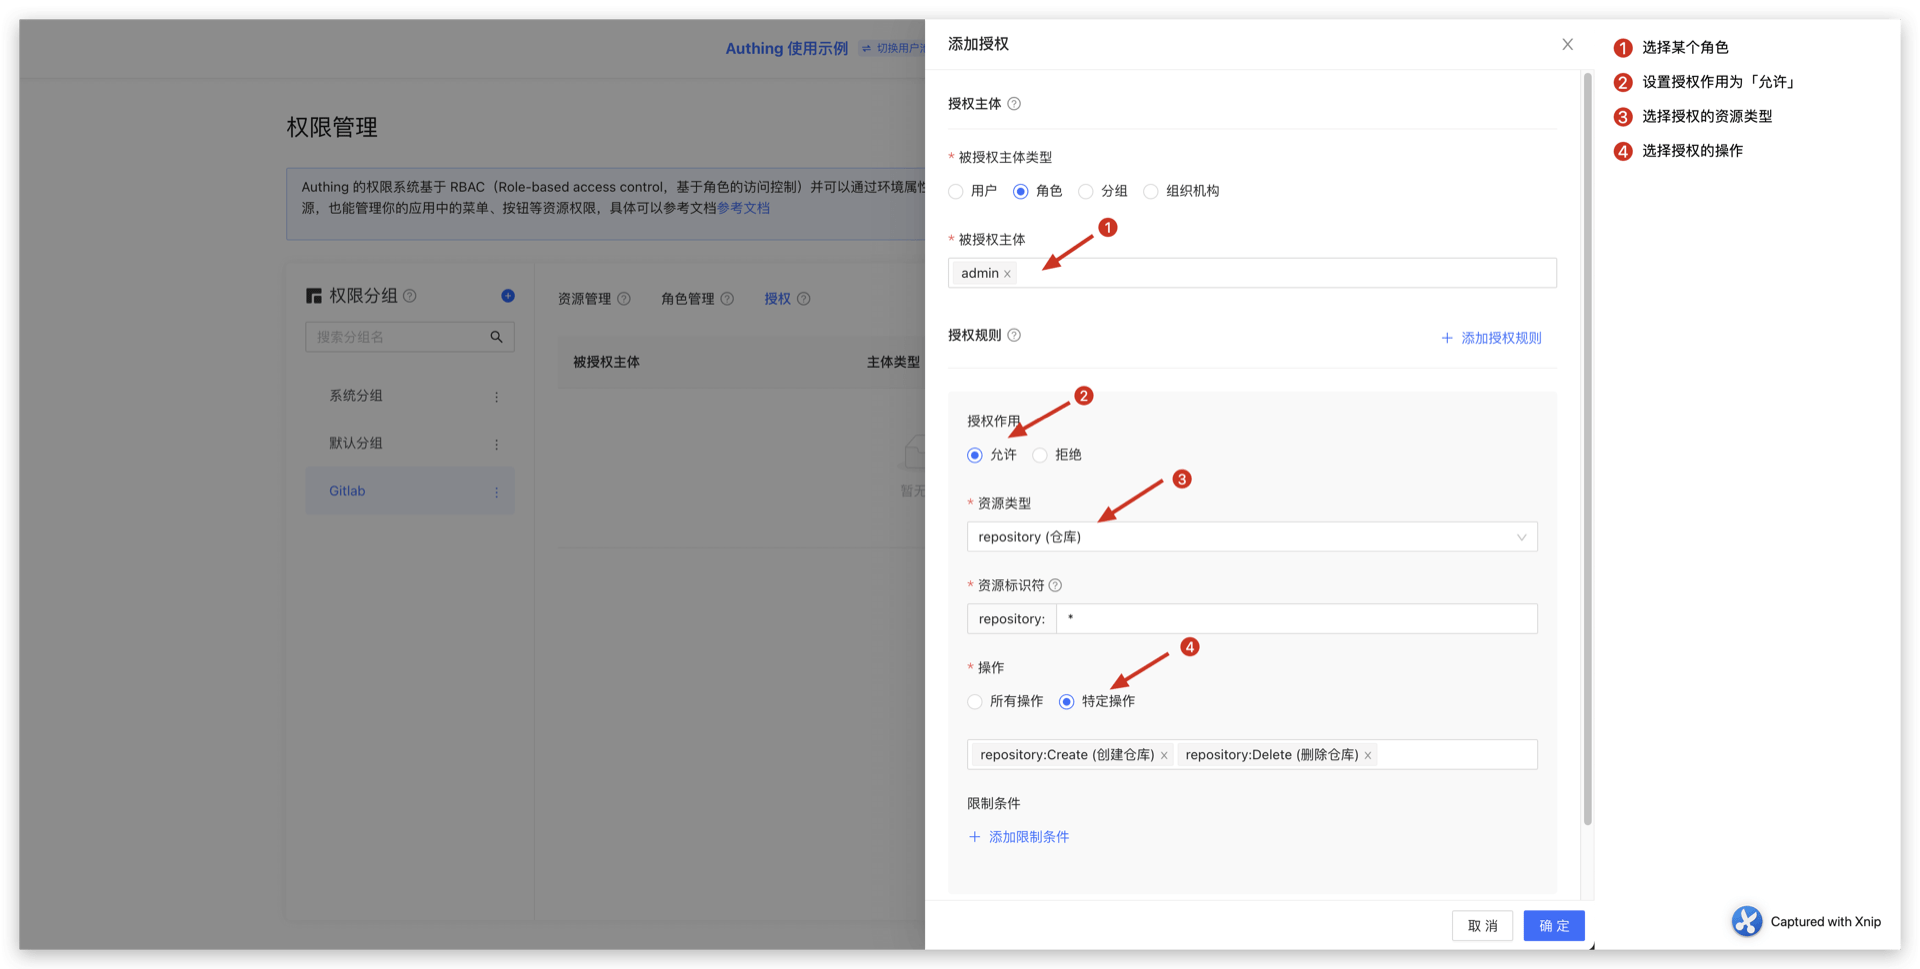
Authorize roles to operate resources
GenAuth also supports authorization to users and roles. If a user is in a role, he will also inherit the permissions authorized by this role. Therefore, GenAuth can not only implement the standard RBAC permission model, but also perform more fine-grained and dynamic permission control on this basis.
For example, in the following example, we grant the admin role the Create and Delete permissions for the repository resource:
Determine whether the user has permissions on the backend
In the previous step, we authorized a user (role) to have specific operation permissions for a specific resource through resource authorization. When we perform interface authentication on the backend, we can make more fine-grained judgments:
Here we take the Node SDK as an example. We also support SDKs in Python, Java, C#, PHP and other languages. For details, please click here](/reference/).
Call the managementClient.acl.isAllowed method with the following parameters:
- userId: user ID. Users can be directly authorized to operate specific resources or inherit the permissions authorized by the role.
- resource: resource identifier, such as
repository:123represents the code repository with ID 123, andrepository:*represents resources such as code repositories. - action: specific operations, such as
repository:Deleterepresents the operation of deleting the code repository. - options: other options, optional
- options.namespace, resource permission group code
import { ManagementClient } from "authing-js-sdk";

const managementClient = new ManagementClient({
  userPoolId: "YOUR_USERPOOL_ID",
  secret: "YOUR_USERPOOL_SECRET",
});
const { totalCount, list } = await managementClient.acl.isAllowed(
  "USER_ID",
  "repository:123",
  "repository:Delete"
);
The GenAuth policy engine will dynamically execute the policy based on the permission policy you configured, and finally return true or false. You only need to determine whether the user has the operation permission based on the return value.
Next Steps
You can learn how to authorize users based on the ABAC permission model.
Integrate the ABAC permission model into your application system
[Previously](/en/genauth/guides/access-control/#What is attribute-based access control-abac) We introduced what attribute-based access control (ABAC) is. The following article introduces how to quickly integrate the ABAC permission model into your system based on GenAuth. In the previous lecture, we introduced how to integrate the RBAC permission model. I believe you are aware that the RBAC permission model is static, that is, there is no dynamic attribute such as environment and object attributes involved, so it is difficult to implement access control similar to the following scenarios:
- When the department to which a document belongs is the same as the user's department, the user can access the document;
- When the user is the owner of a document and the document status is draft, the user can edit the document;
- People in department A are prohibited from accessing system B before 9 am;
- Accessing system A as an administrator is prohibited in places other than Shanghai;
Main components of ABAC
In ABAC, whether an operation is allowed is determined by dynamic calculation based on object, resource, operation and environment information.
- Object: The object is the user who currently requests to access the resource. The user's attributes include ID, personal resources, roles, department and organization membership, etc.;
- Resource: The resource is the asset or object (such as file, data, server, or even API) that the current accessing user wants to access. Resource attributes include the file's creation date, file owner, file name and type, data sensitivity, etc.;
- Operation: An operation is an operation that a user attempts to perform on a resource. Common operations include "read", "write", "edit", "copy", and "delete";
- Environment: The environment is the context of each access request. Environment attributes include the time and location of the access attempt, the object's device, the communication protocol, and the encryption strength.
How ABAC uses attributes to dynamically calculate decision results
During the execution of ABAC's decision statements, the decision engine dynamically calculates the decision results based on the defined decision statements, combined with factors such as objects, resources, operations, and environments. ,
Whenever an access request occurs, the ABAC decision system analyzes whether the attribute value matches the established policy. If there is a matching policy, the access request is passed.
For example, the policy "When the department of a document is the same as the department of the user, the user can access this document" will be matched by the following attributes:
- Department of the object (user) = Department of the resource;
- Resource = "Document";
- Action = "Access";
The policy "People in department A are prohibited from accessing system B before 9 am;" will be matched by the following attributes:
- Department of the object = Department A;
- Resource = "System B";
- Action = "Access";
- Environment = "Time is 9 am".
Specify restrictions when authorizing resources in GenAuth
When authorizing resources, we can specify restrictions. For example, in the following example, we add a restriction: requiring the current requesting user to be MFA authenticated.

In addition to the MFA authentication attribute, you can also obtain the following attributes in the policy engine context of GenAuth:
- User object attributes, such as gender, organization, group, role, whether the email address is verified, whether the mobile phone number is verified, custom data, whether MFA authentication has been passed, the user's last MFA authentication time, etc.;
- Environment attributes: client IP, client UA, client browser, request source country, request source province, request source city, etc.;
- Resource attributes: resource creation time, resource owner, resource tag, etc.;
You can form flexible policy authorization statements based on these attributes.
Use permission groups to manage permission resources
Permission groups can be understood as namespaces for permissions. Roles and resources in different permission groups are independent of each other, and there will be no conflict even if they have the same name.

Create permission groups
Click the Add button in the Permission Group menu of Permission Management: 
Fill in the group name and group identifier in the pop-up window. The identifier is used as a unique identifier to identify the permission group during later authentication.

In the created permission group, you can use the ABAC or RBAC permission model introduced earlier to independently manage permission resources.
How to use permission groups to determine permissions
import { ManagementClient } from 'authing-js-sdk'

const managementClient = new ManagementClient({
  userPoolId: 'YOUR_USERPOOL_ID',
  secret: 'YOUR_USERPOOL_SECRET',
})
const { totalCount, list } = await managementClient.acl.isAllowed(
  'USER_ID',
  'resource',
  'operation',
  'permission group identifier'
)
Relationship between permission groups and applications
When each application is created, GenAuth will create a permission group for you. The automatically created permission group name is the application name, the identifier is the application ID, and it cannot be modified. GenAuth will also create a default permission group for each user pool. When your permission resources are relatively simple and do not need to be isolated and managed at the application level, you can directly use the default permission group. When your application is complex and contains conflicting roles or resources, you can manually create permission groups to isolate and manage permission resources.
Manage resource permissions
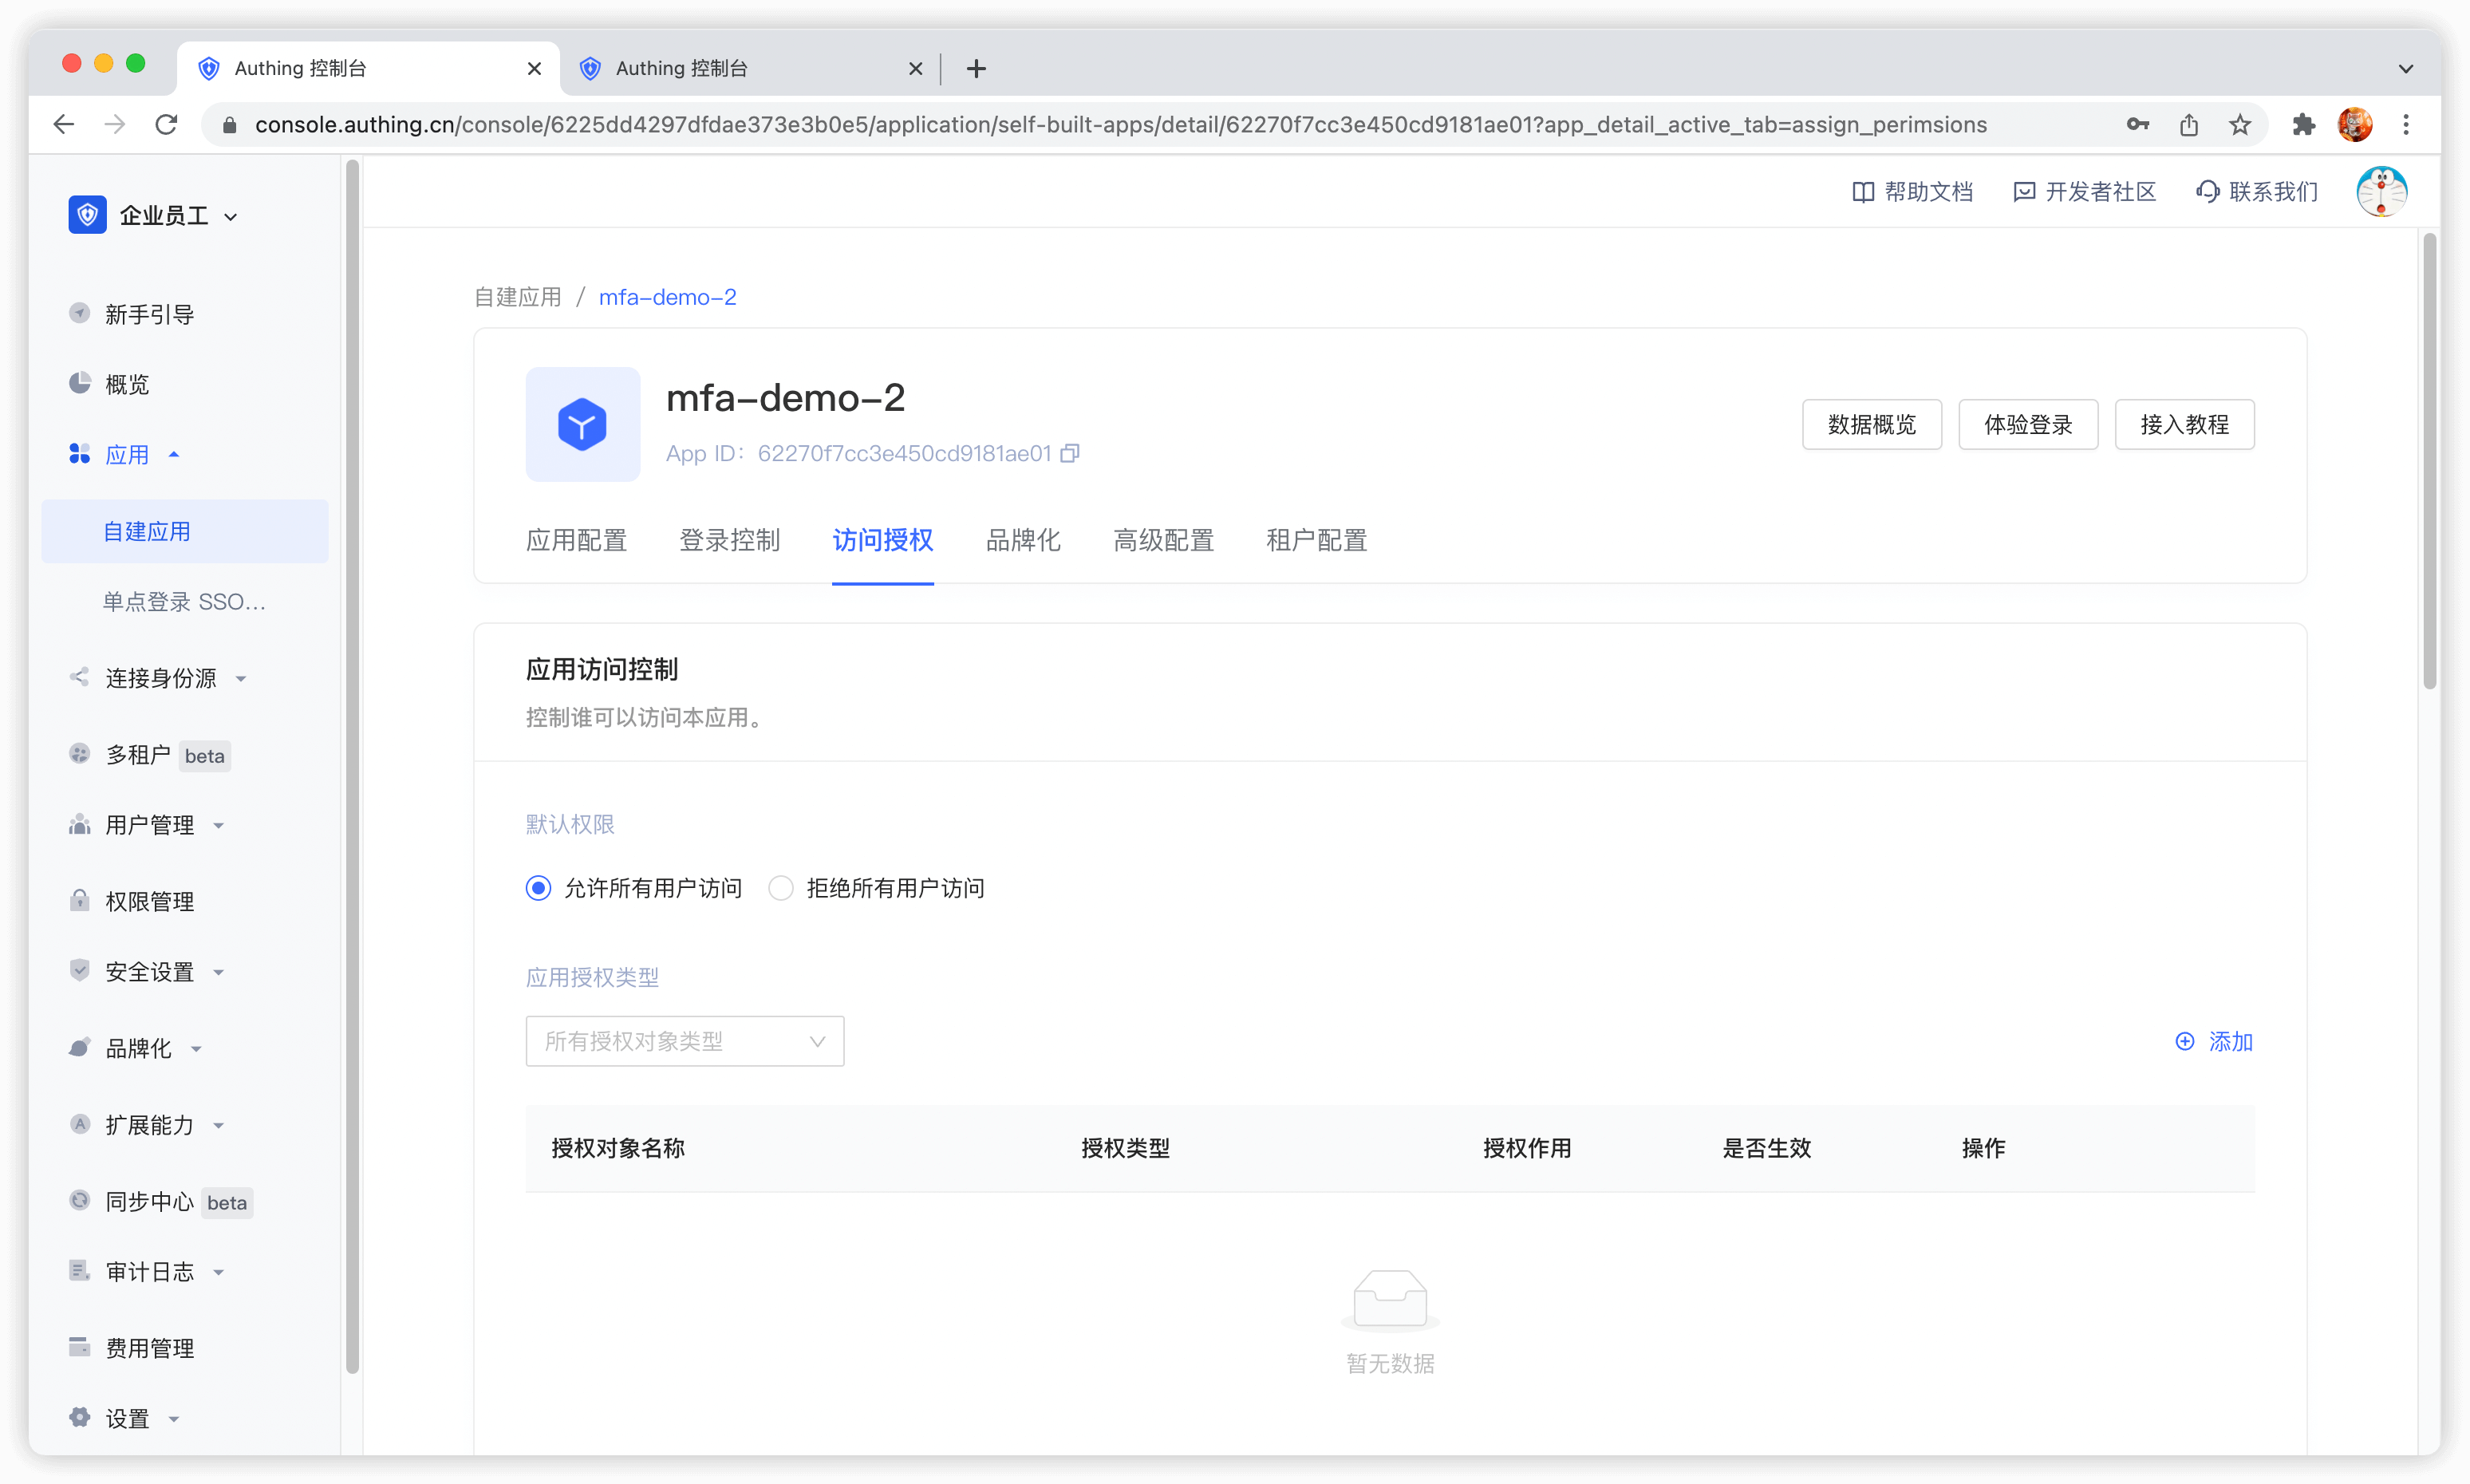
As an administrator, you can manage and assign permissions to resources in the console. Before practicing permission management and authorization, you need to understand several concepts first.
- Application: As an administrator, you can create application. An application is a definition of the application project you are developing in GenAuth. For example, if you are actually developing a "Network Notes" application, you should create an application called "Network Notes" in GenAuth.
- Resource: Later, you can define some resources in GenAuth. For example, the resources in the "Network Notes" application may include notebooks, note content, authors, etc.
- User: You can also assign permissions directly to users. You can also divide your users into different groups, roles, and organizational departments, so that it is easier to manage when assigning permissions in the future.
- Role: A role is a collection of users. Users in a role will automatically inherit the permissions authorized by the role.
Next, we create applications, resources, and users, and then define the authorization relationship between resources and users.
Create an application
Please refer to the Create an application document.
Create resources
Access the authorized resource card under the application and click the Add button on the right.
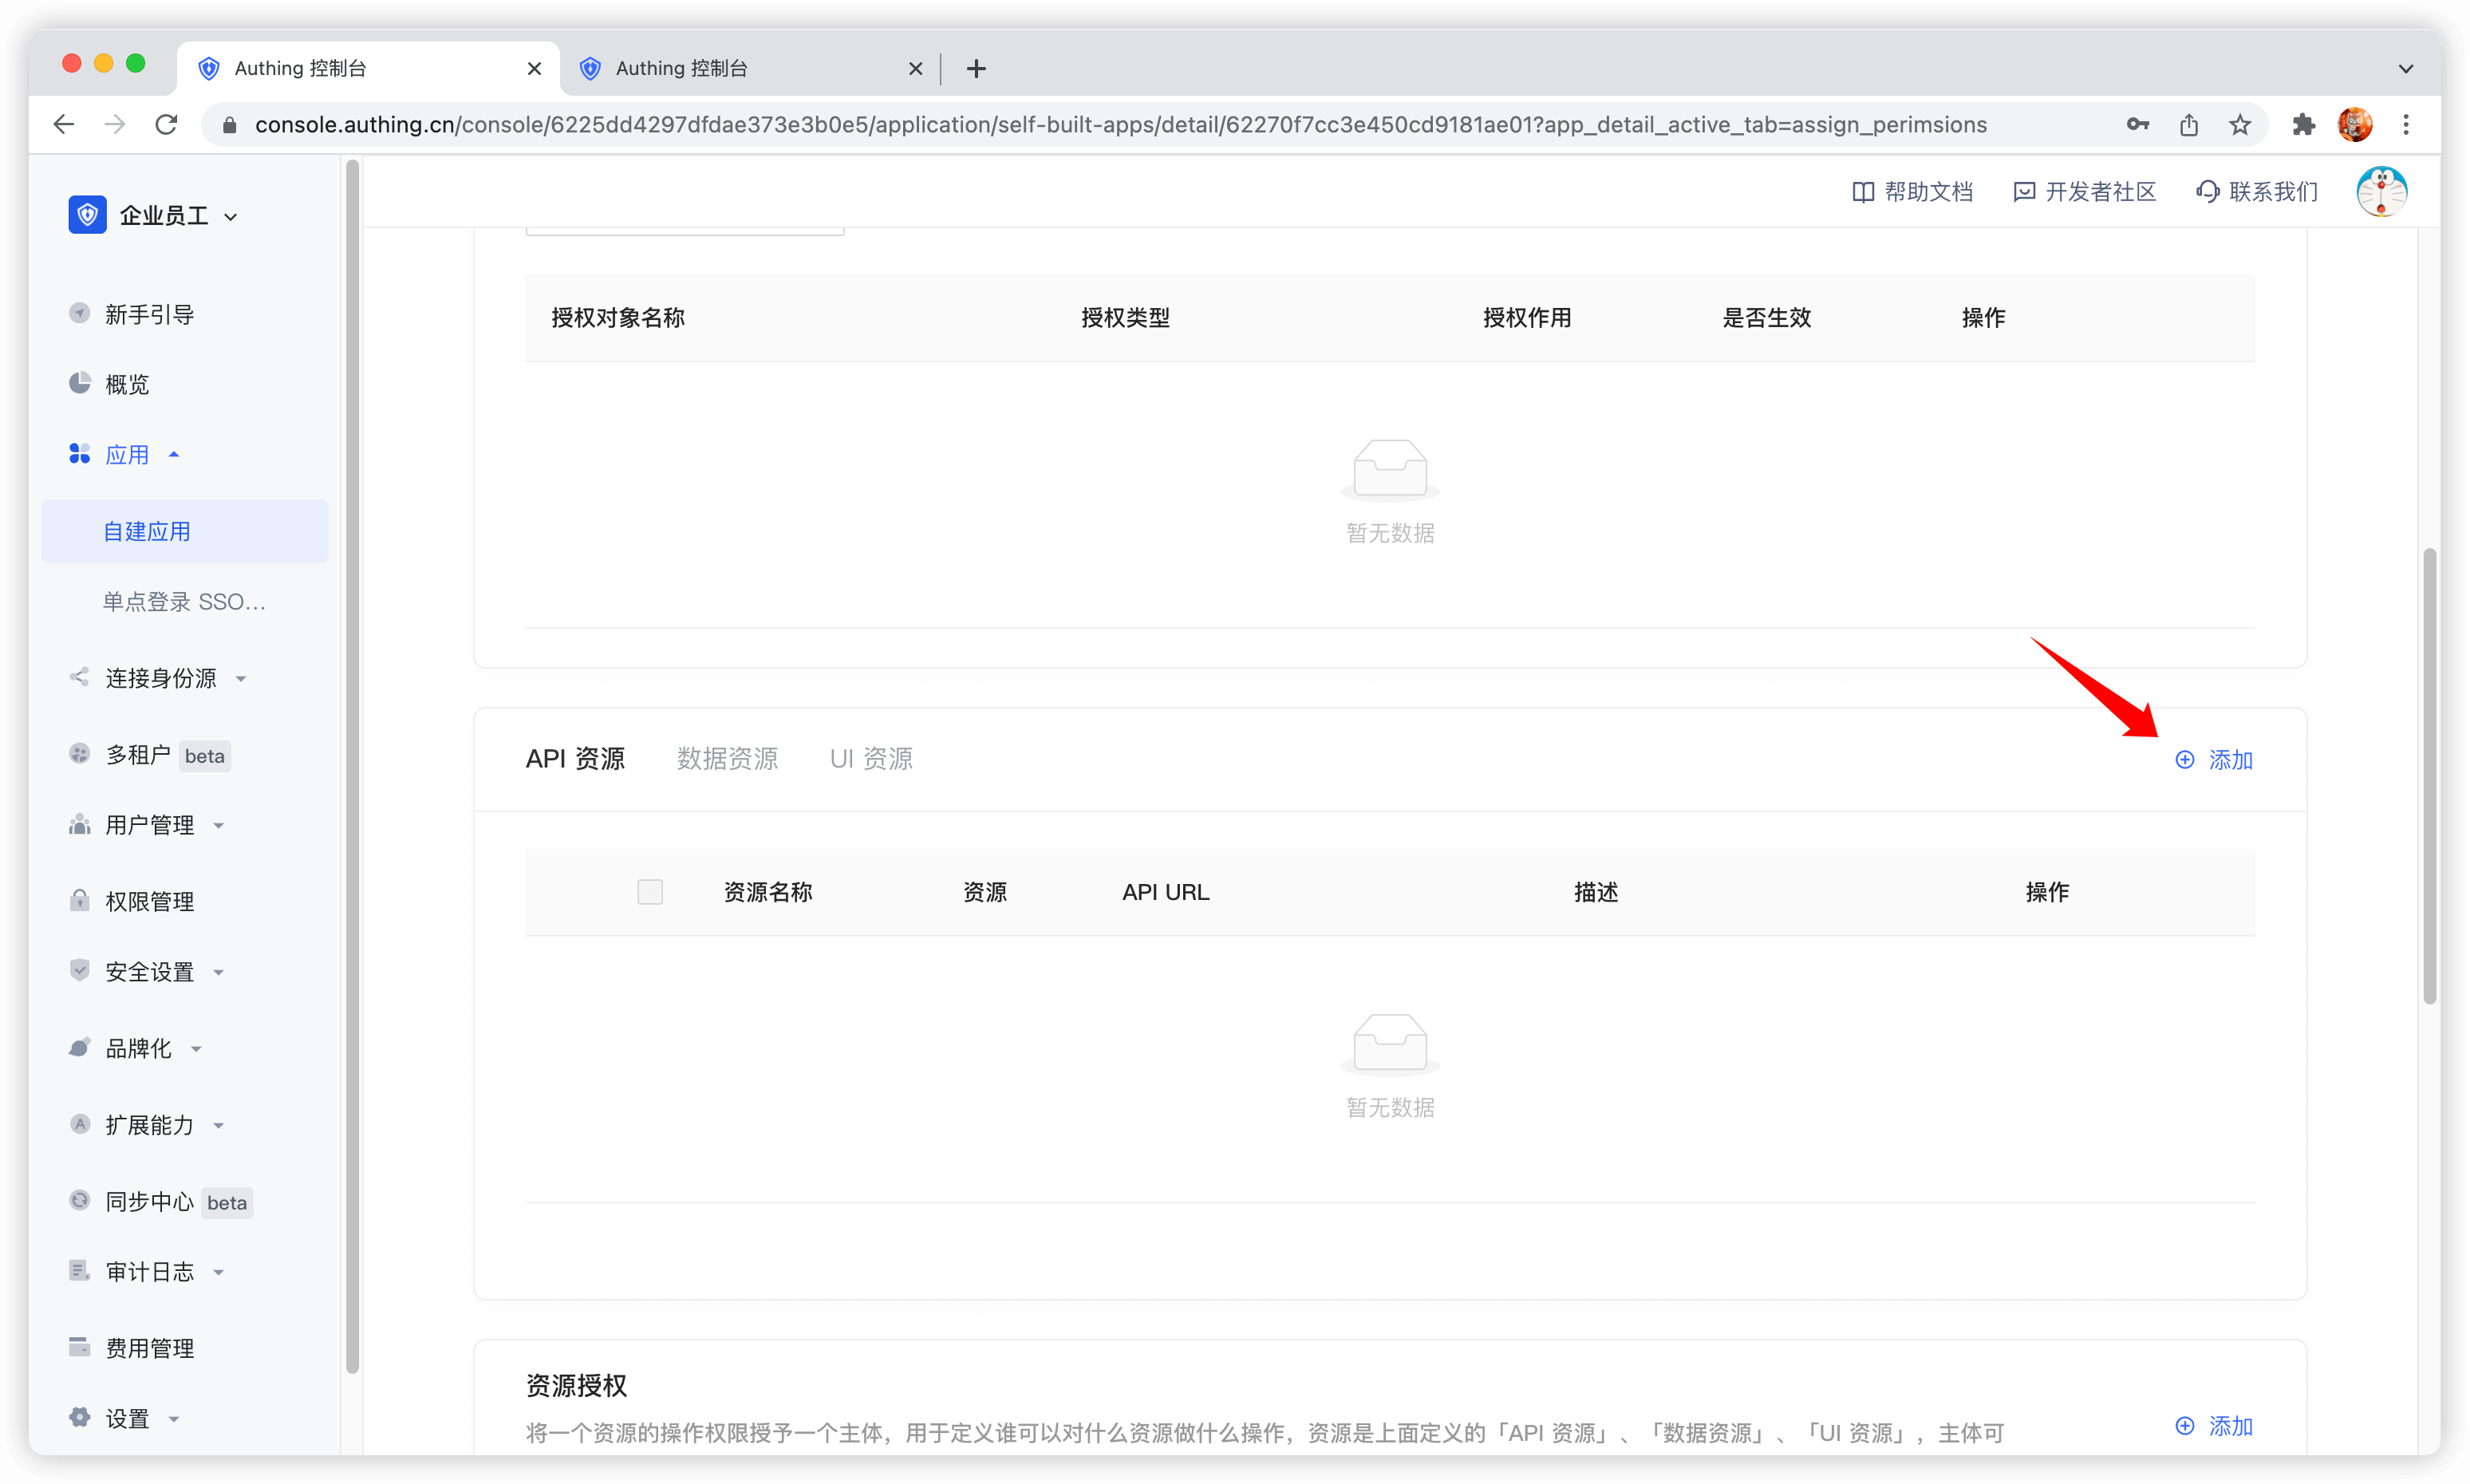
Then fill in a resource name. It is recommended to fill in a semantic resource name for easy subsequent management. In the operation type, you can define resource operations. Here, read and write operations are defined. Finally, click Save, and a resource is created.

Create a user
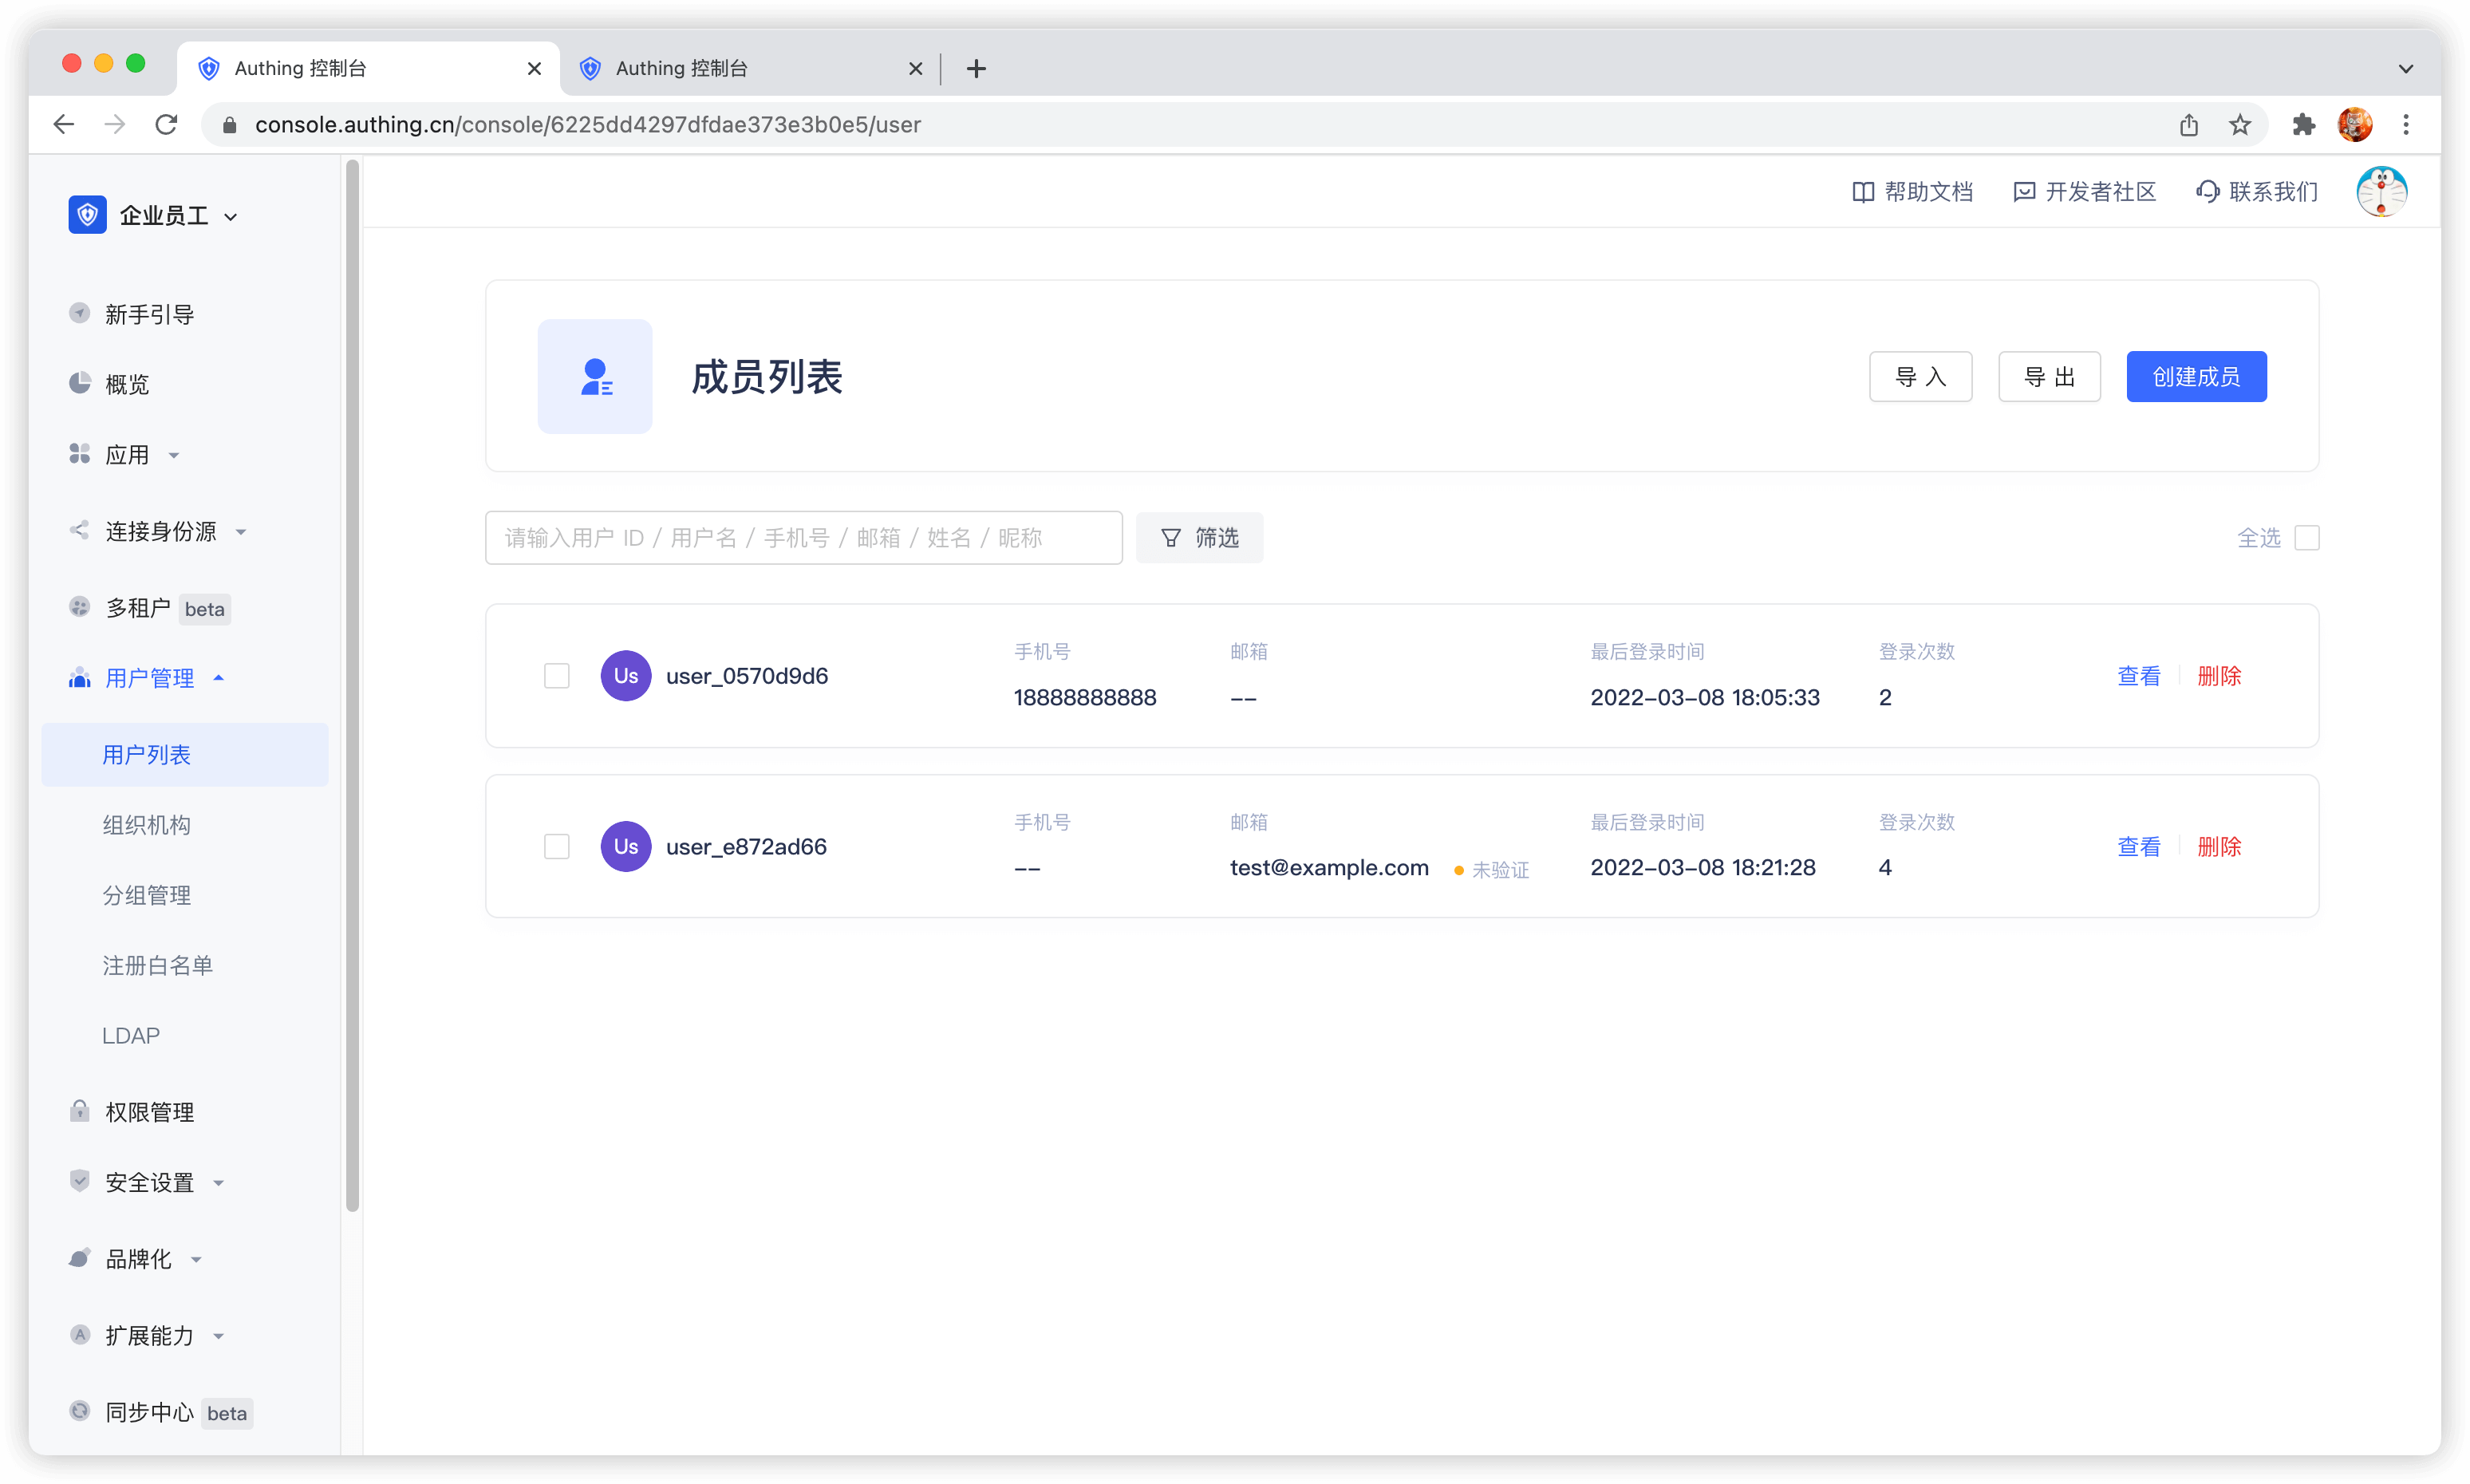
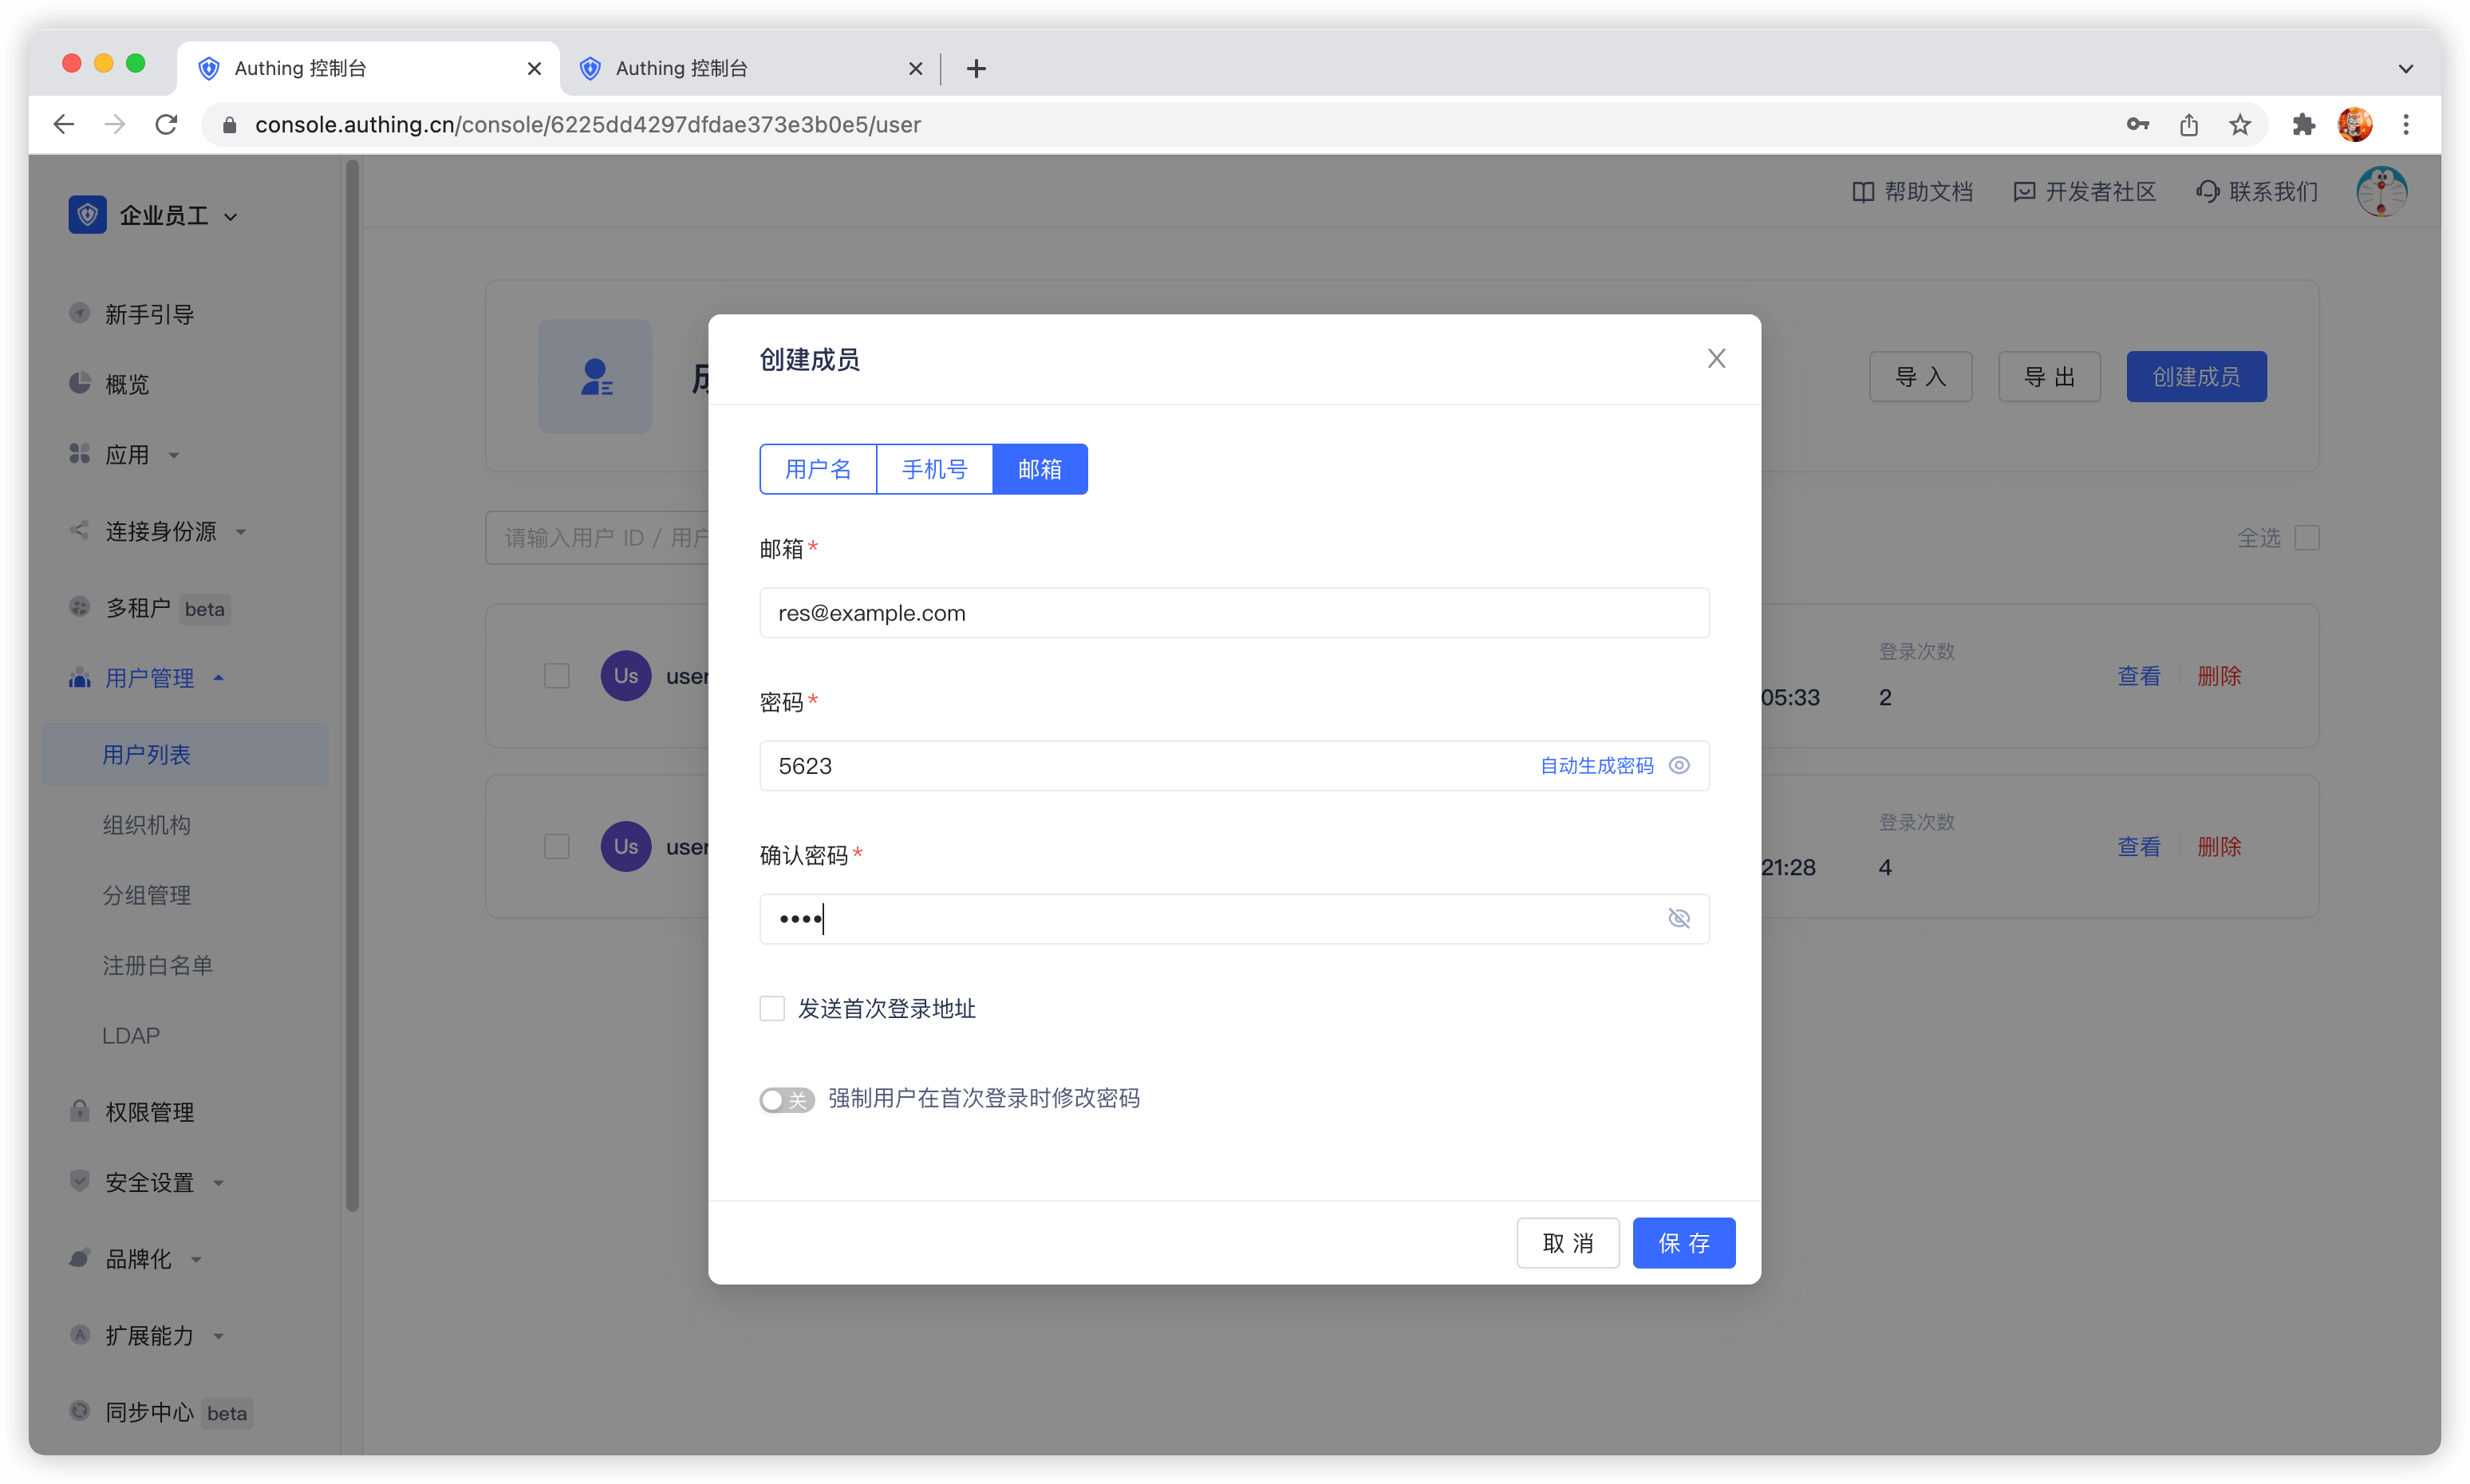
In the user list, click New to create a user.
Create a role
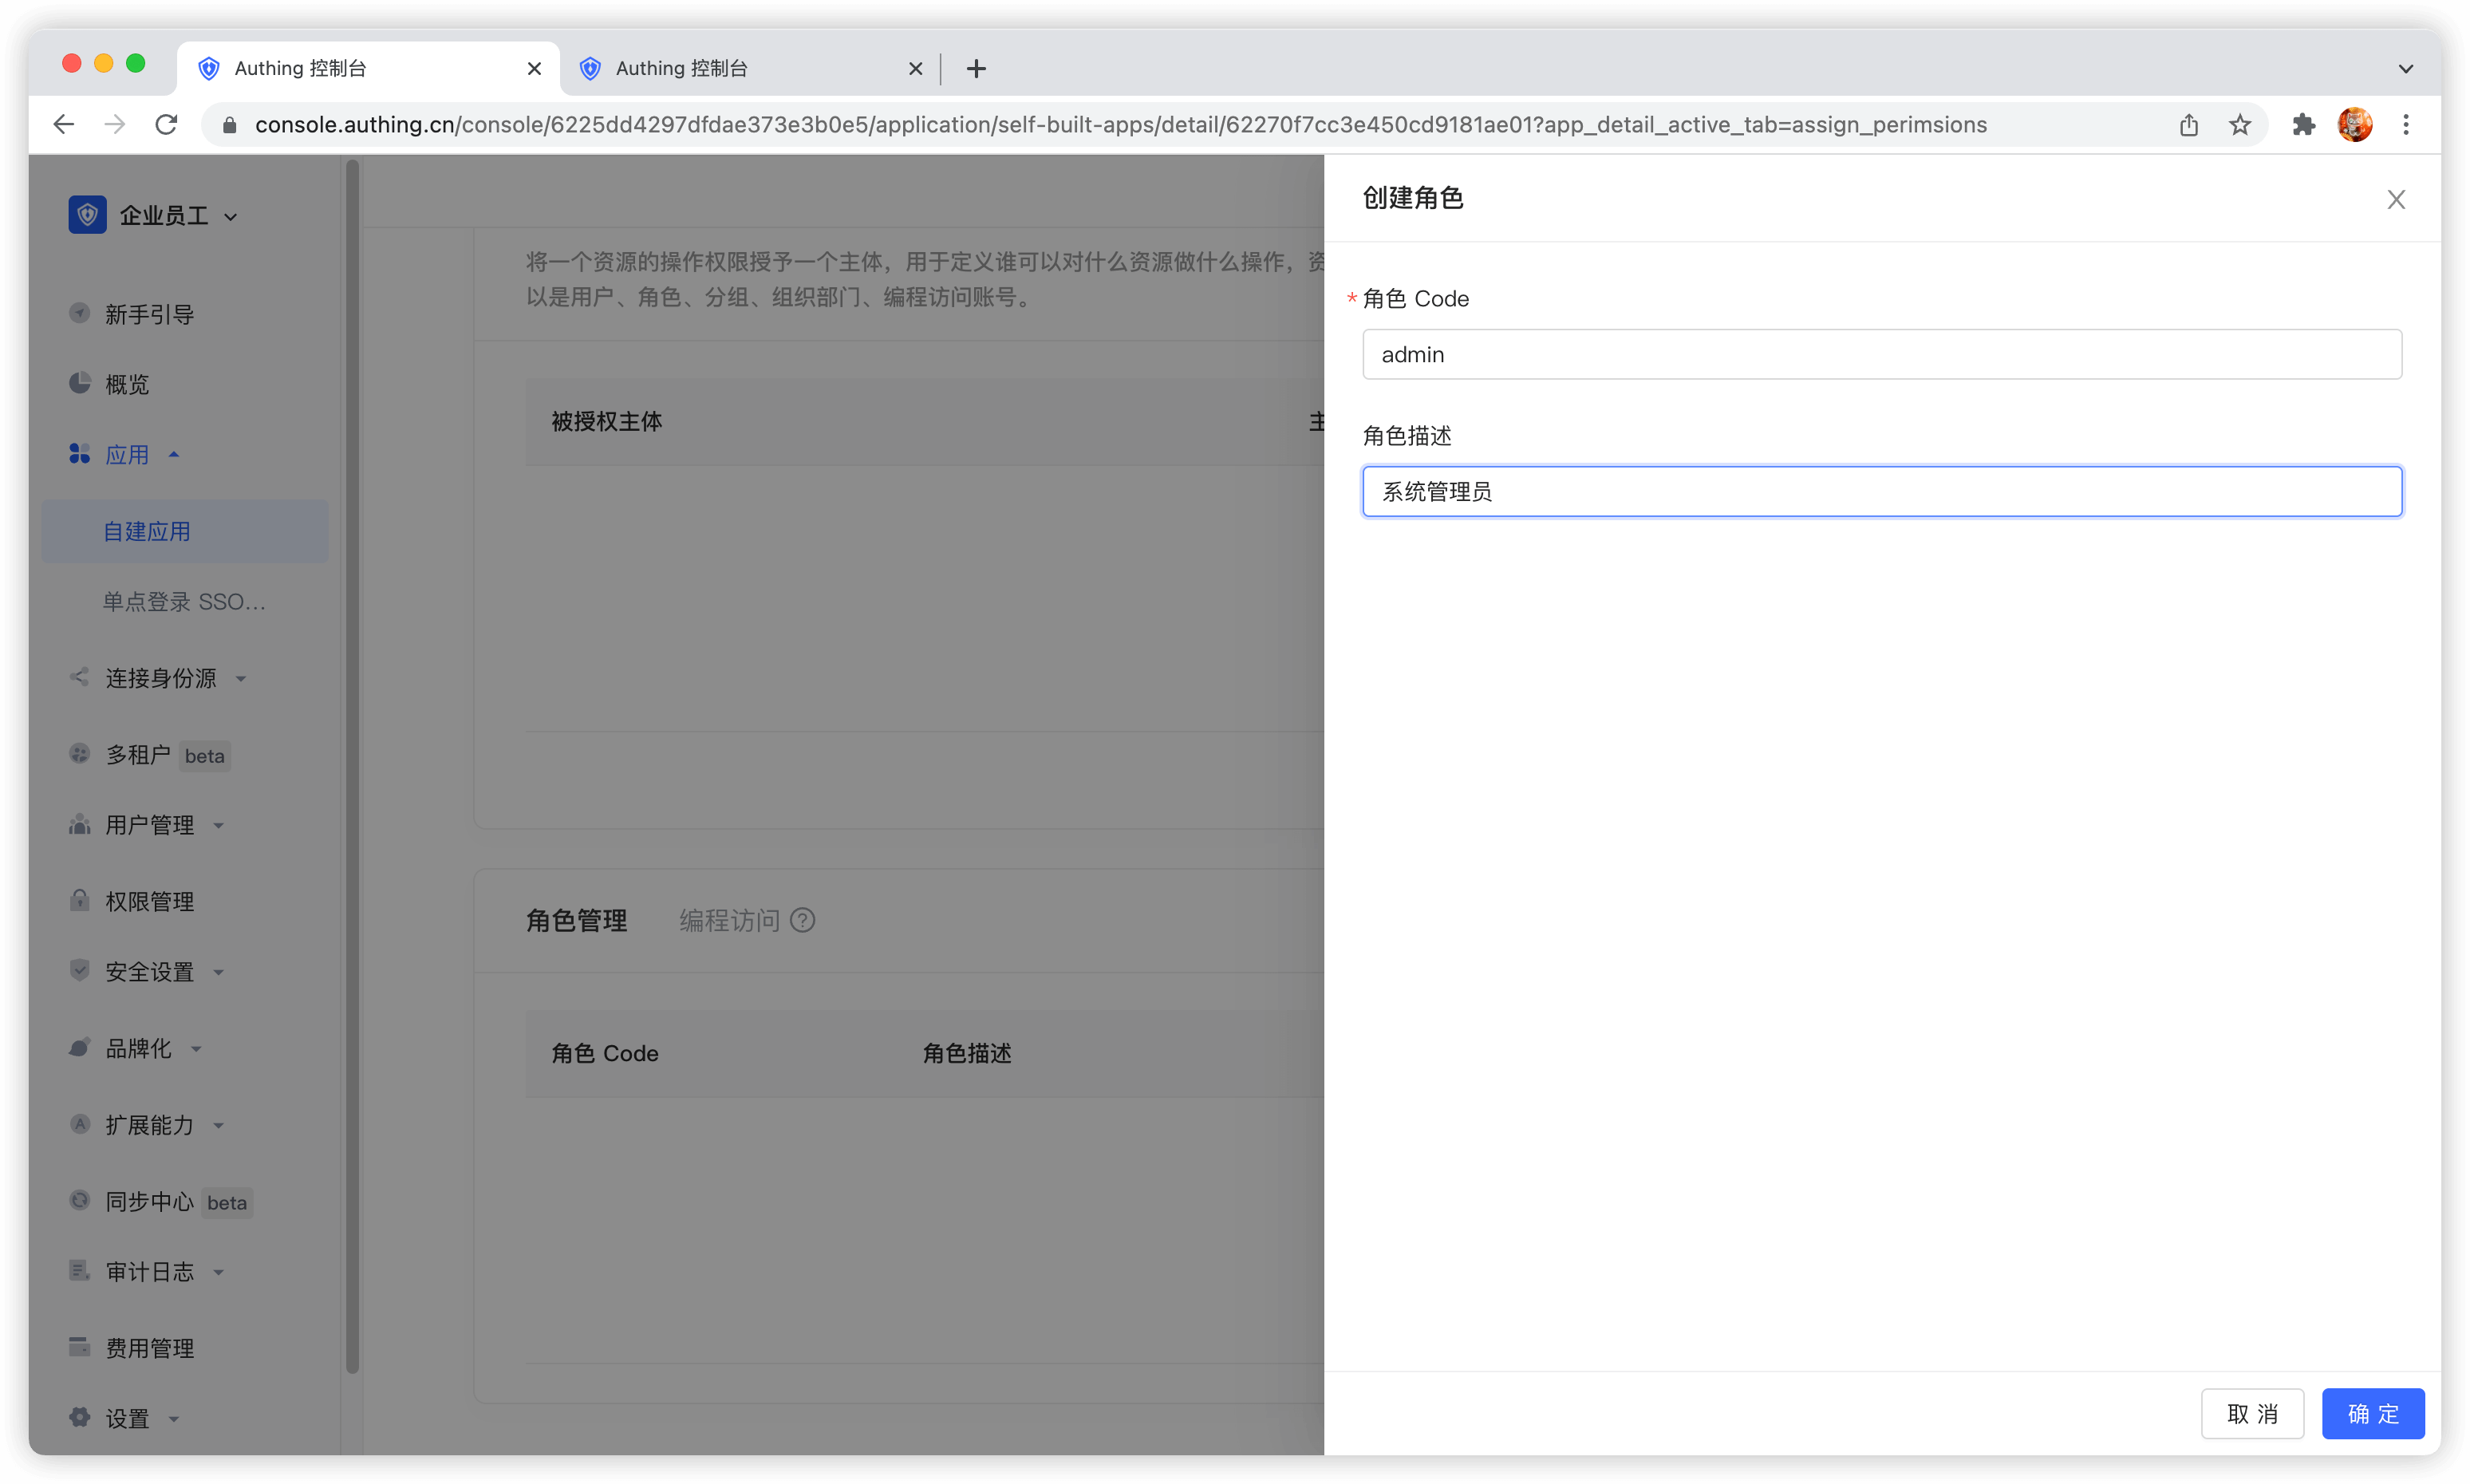
In the Role Management card of the Access Authorization menu of the App Details, click the Add button on the right:
After creating a role, you can add users to this role:
You can search for users by username, email, or nickname.

Manage permissions
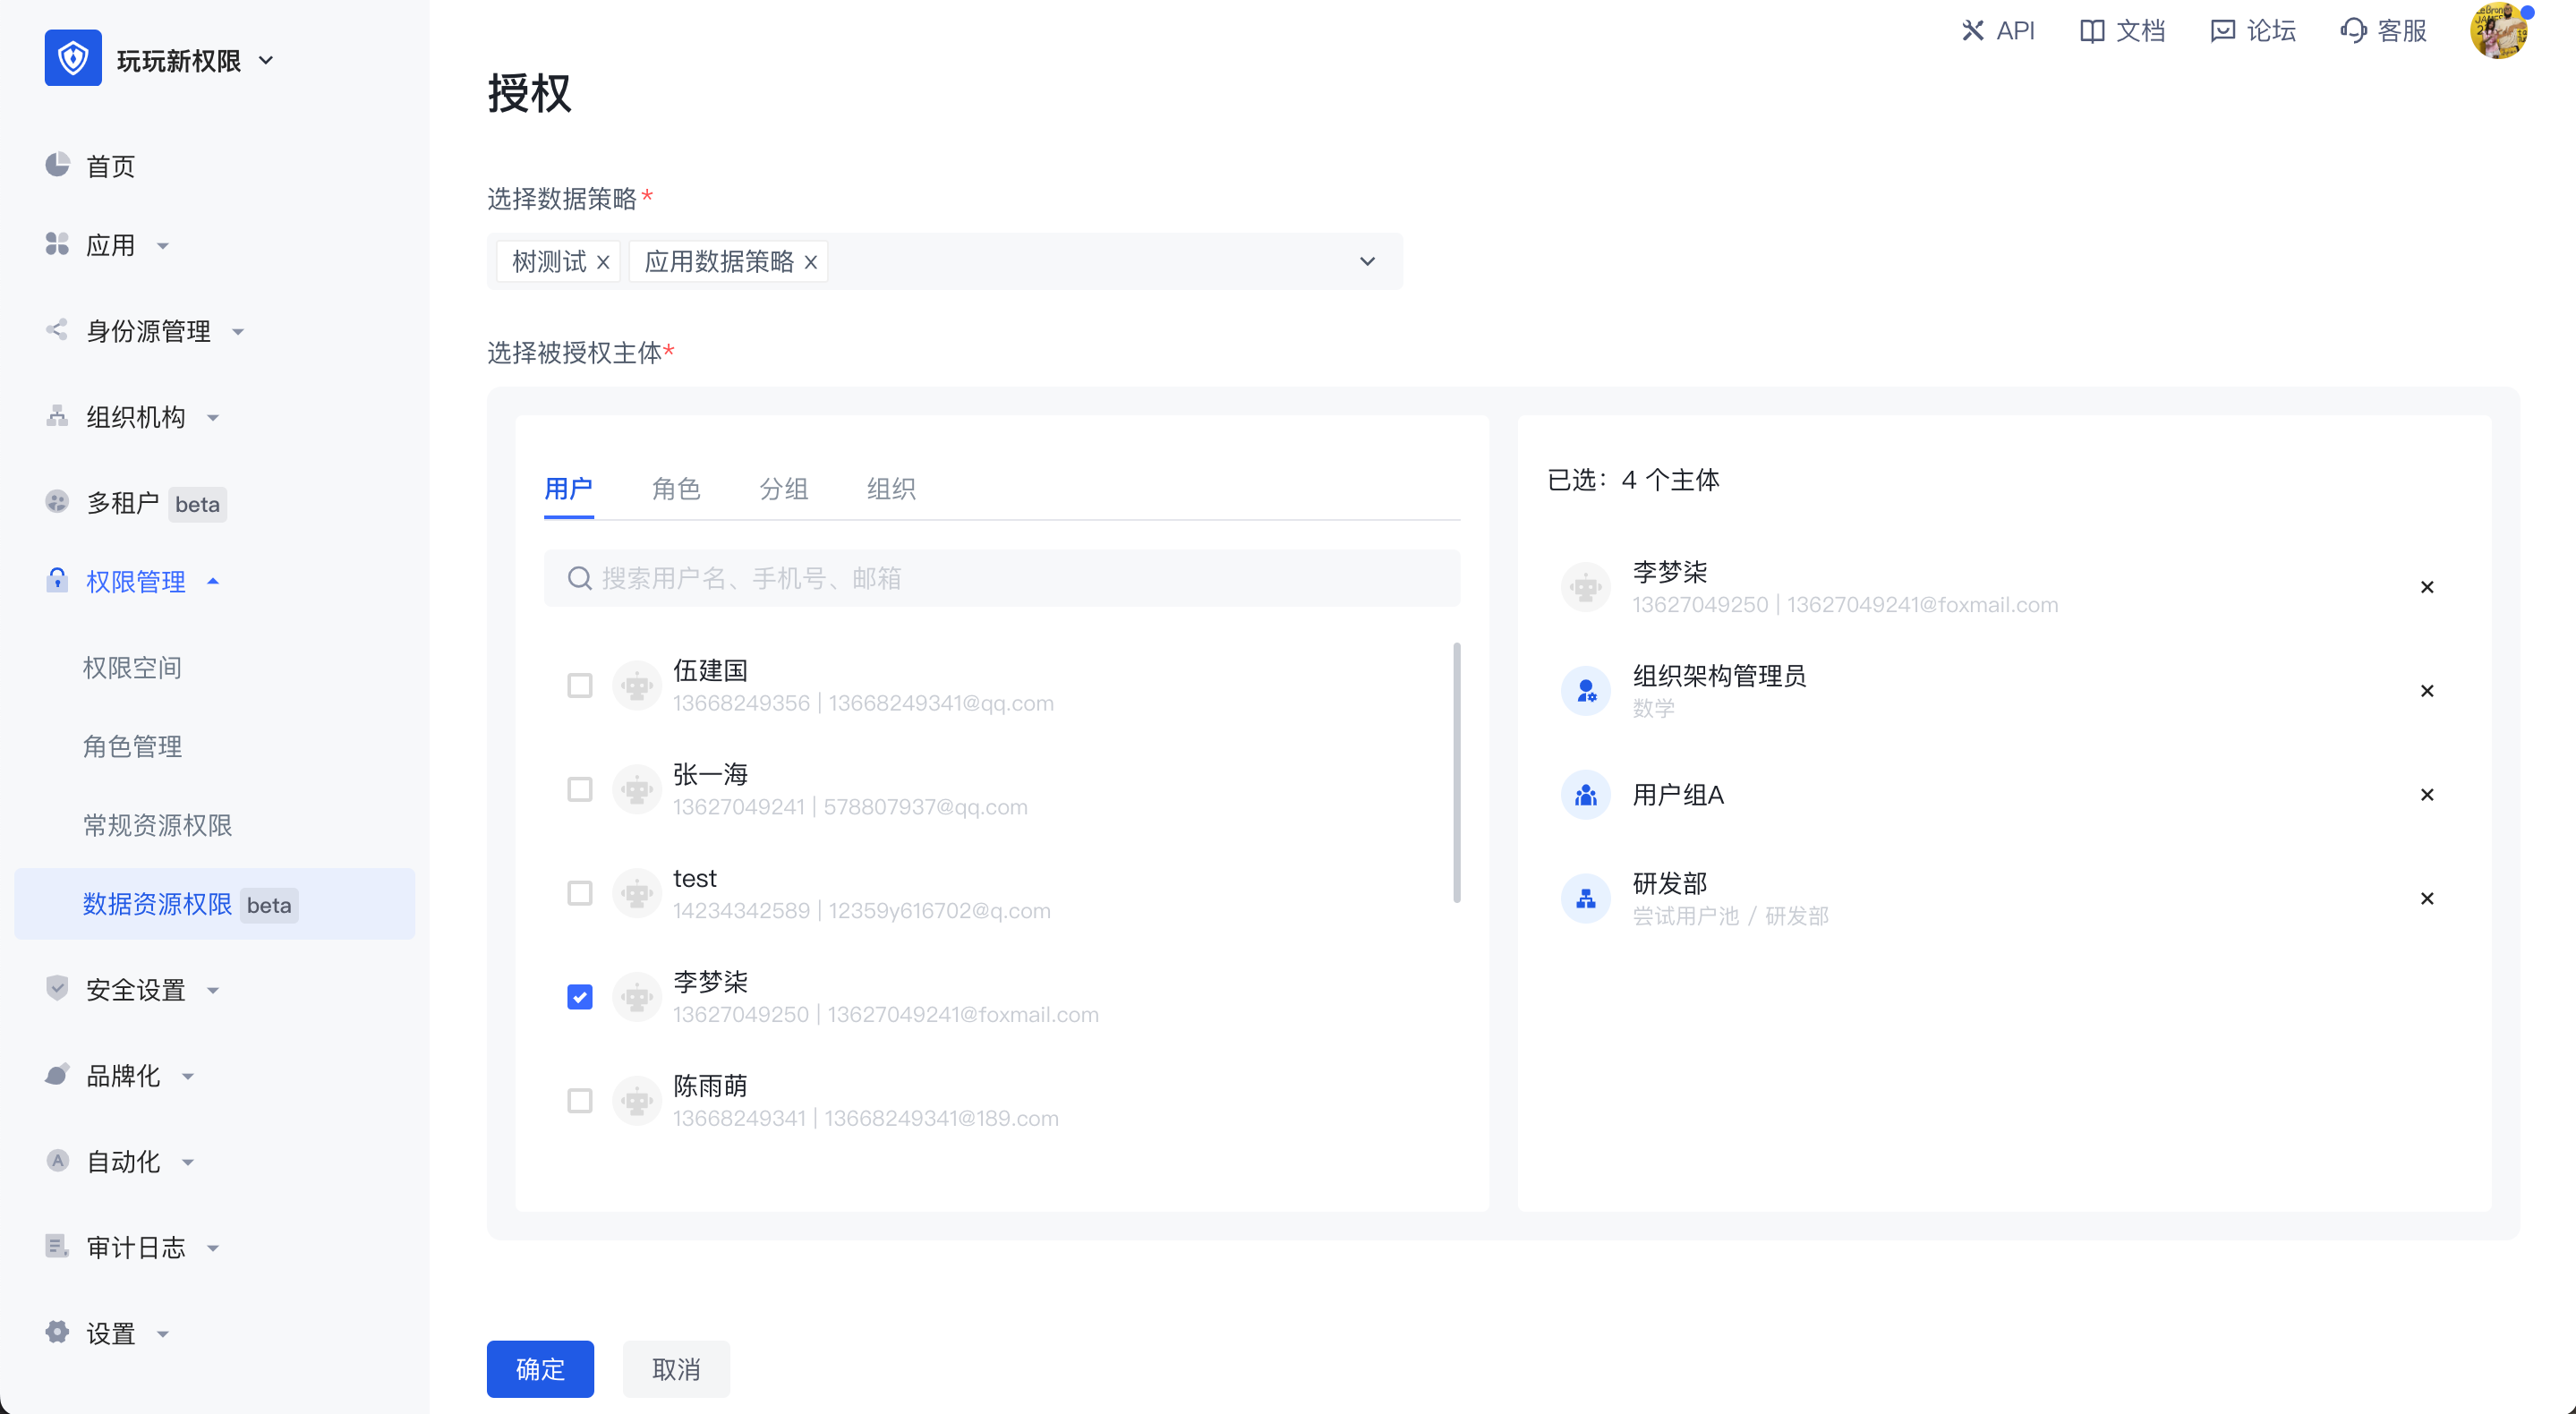
Now that you have resources and people, you need to define who can do what operations on what resources. In the resource authorization card of the app, click the Add button on the right.
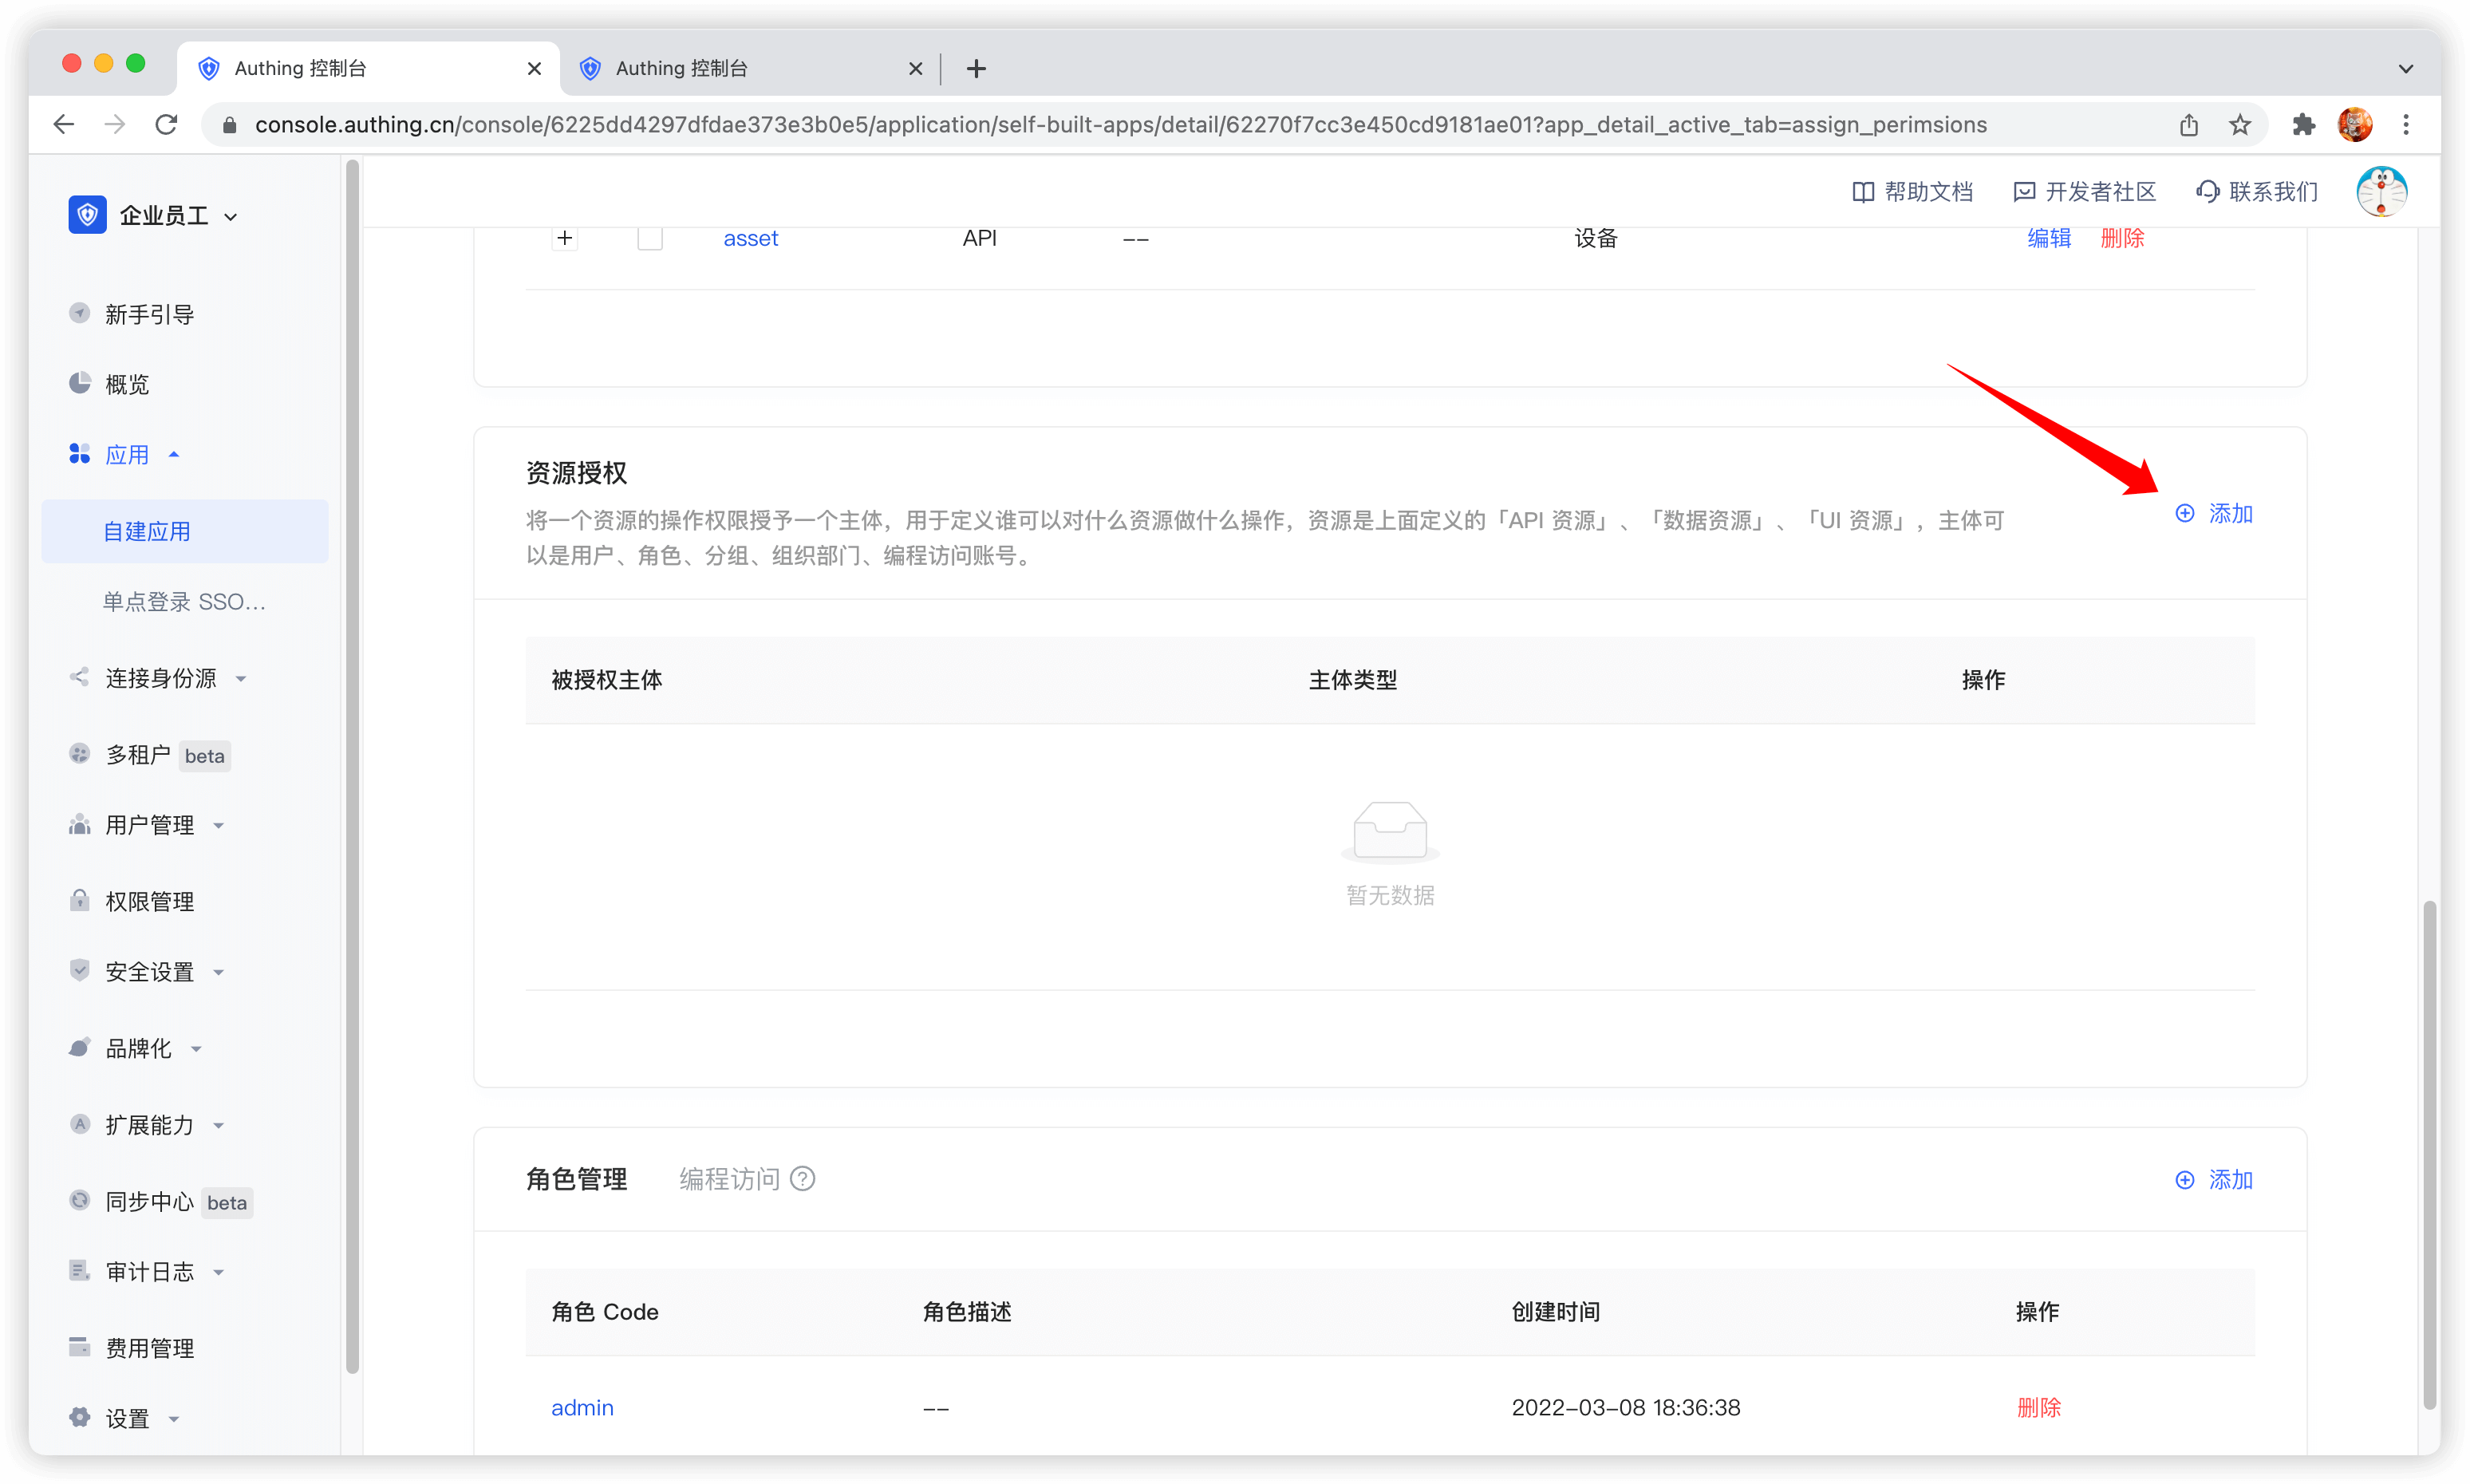
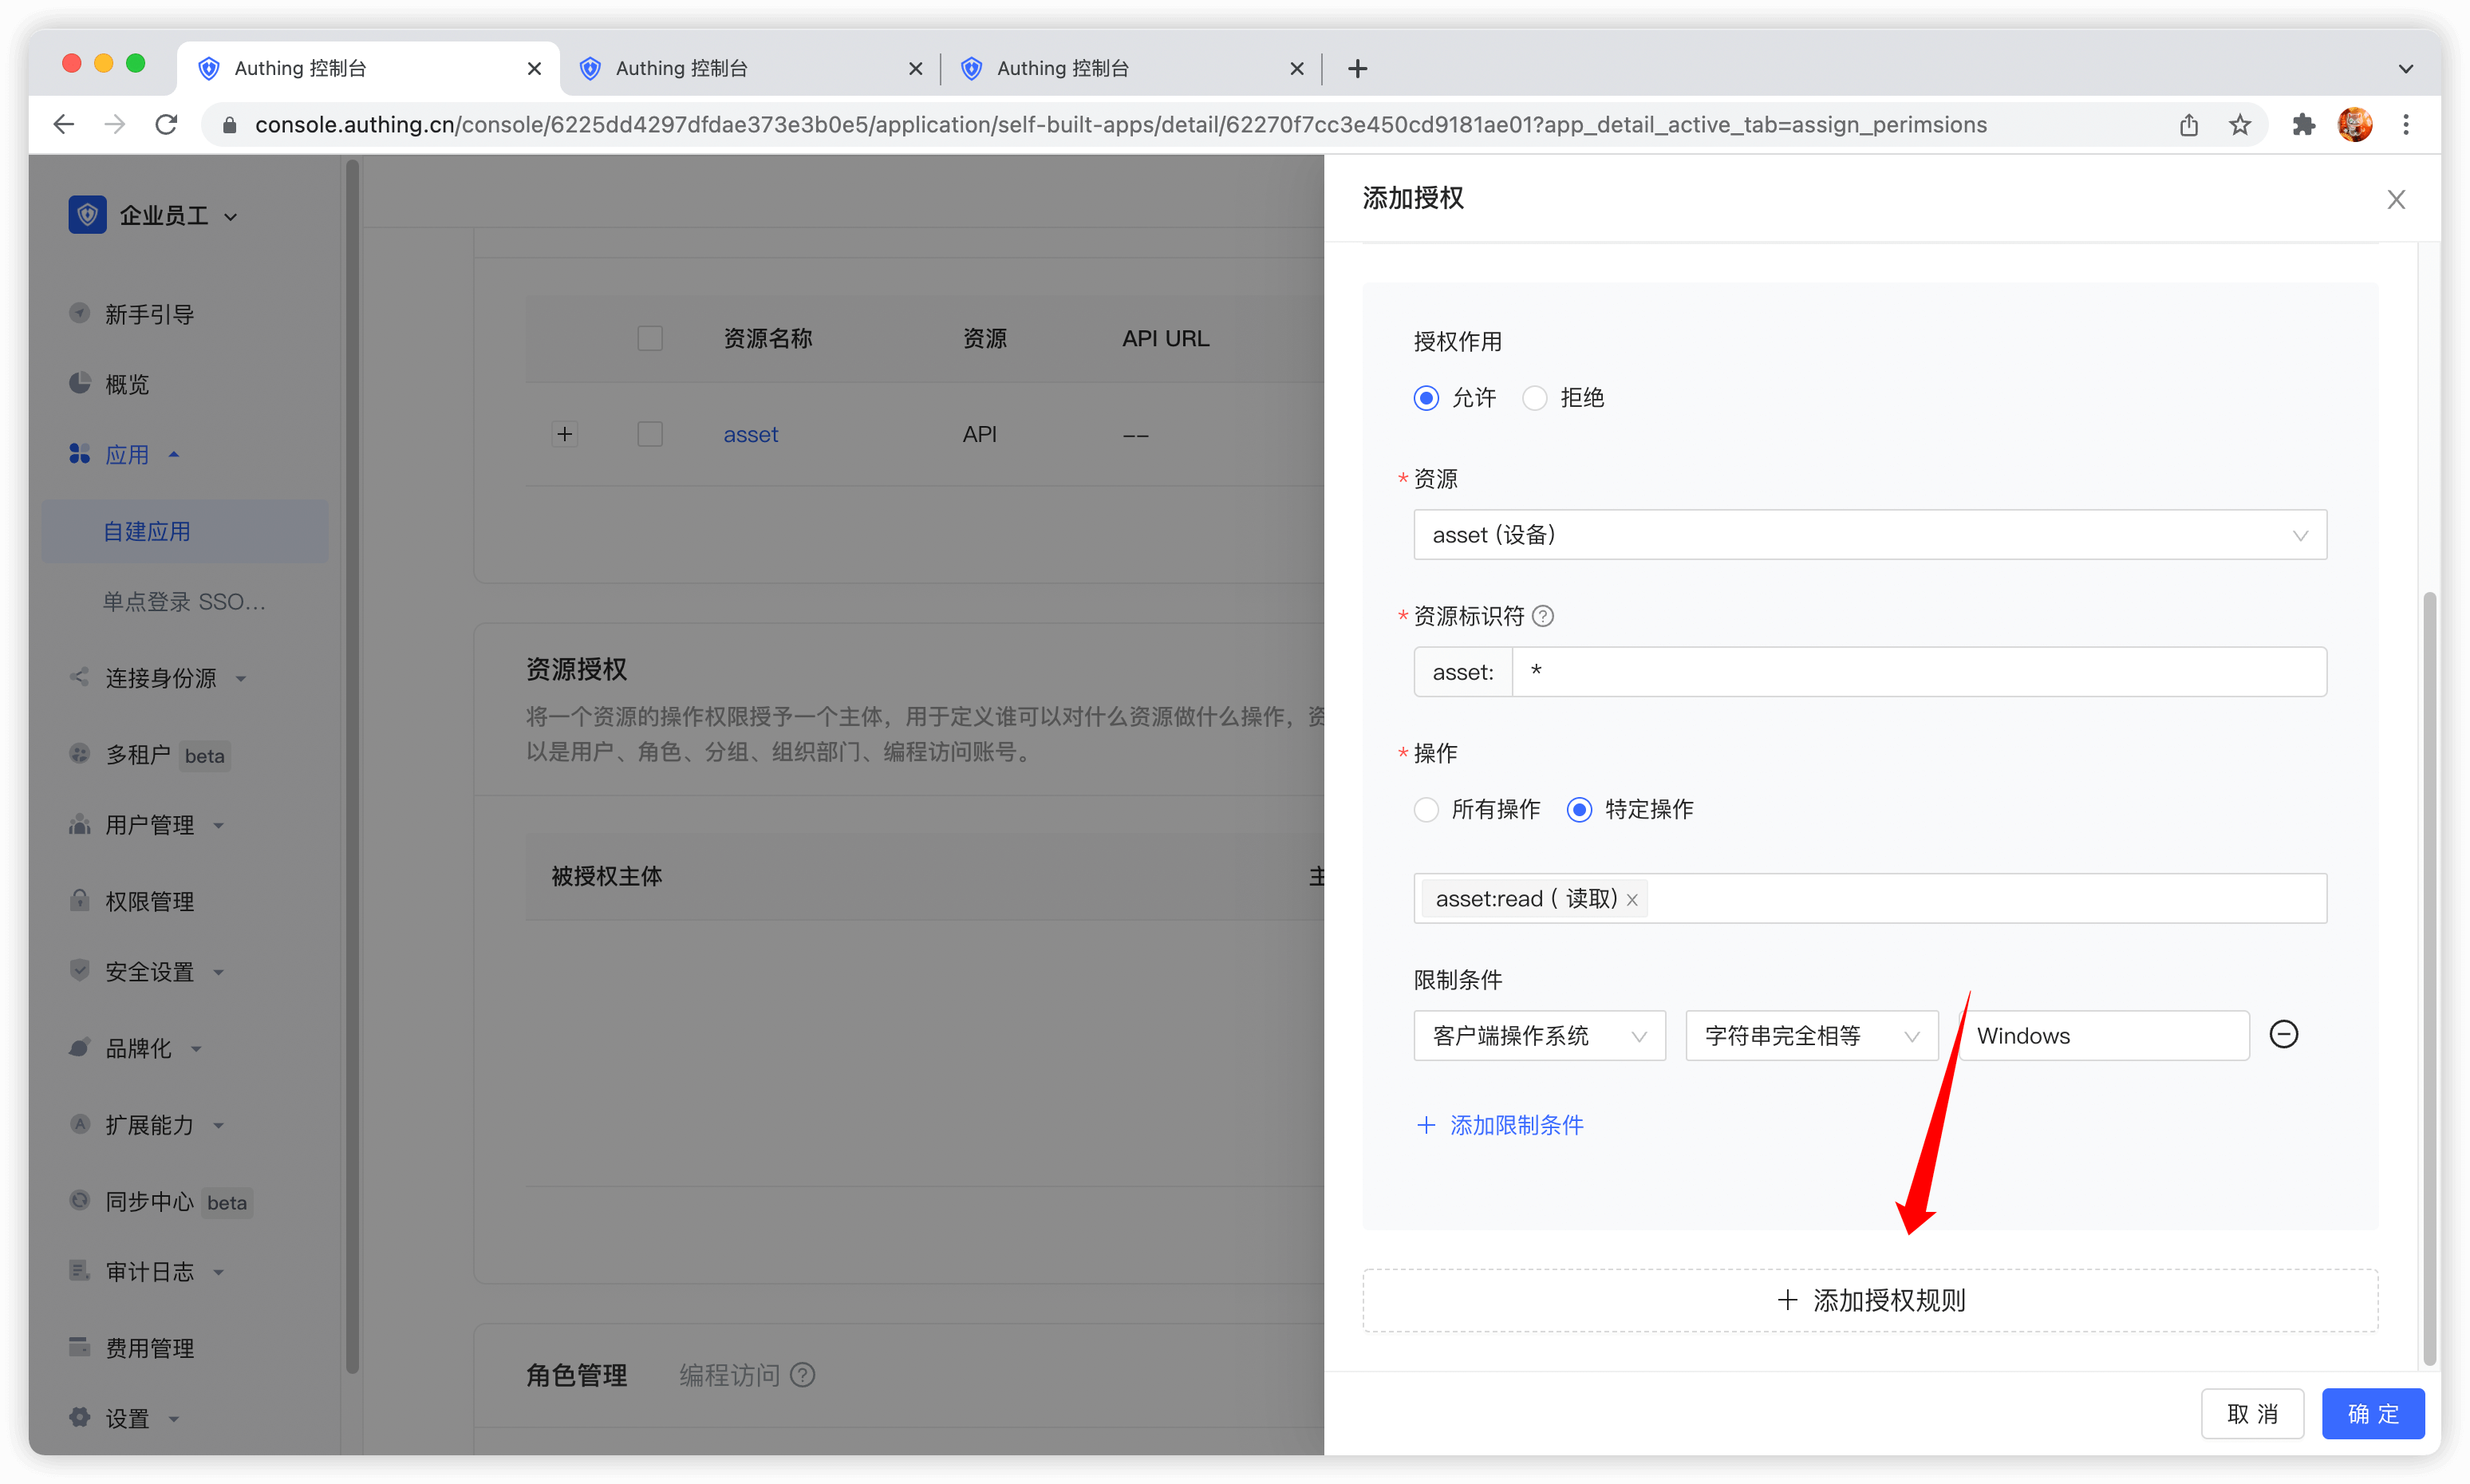
Authorized subject can select user, here we select the user we just created, and select the device resource we just created in the resource type below. 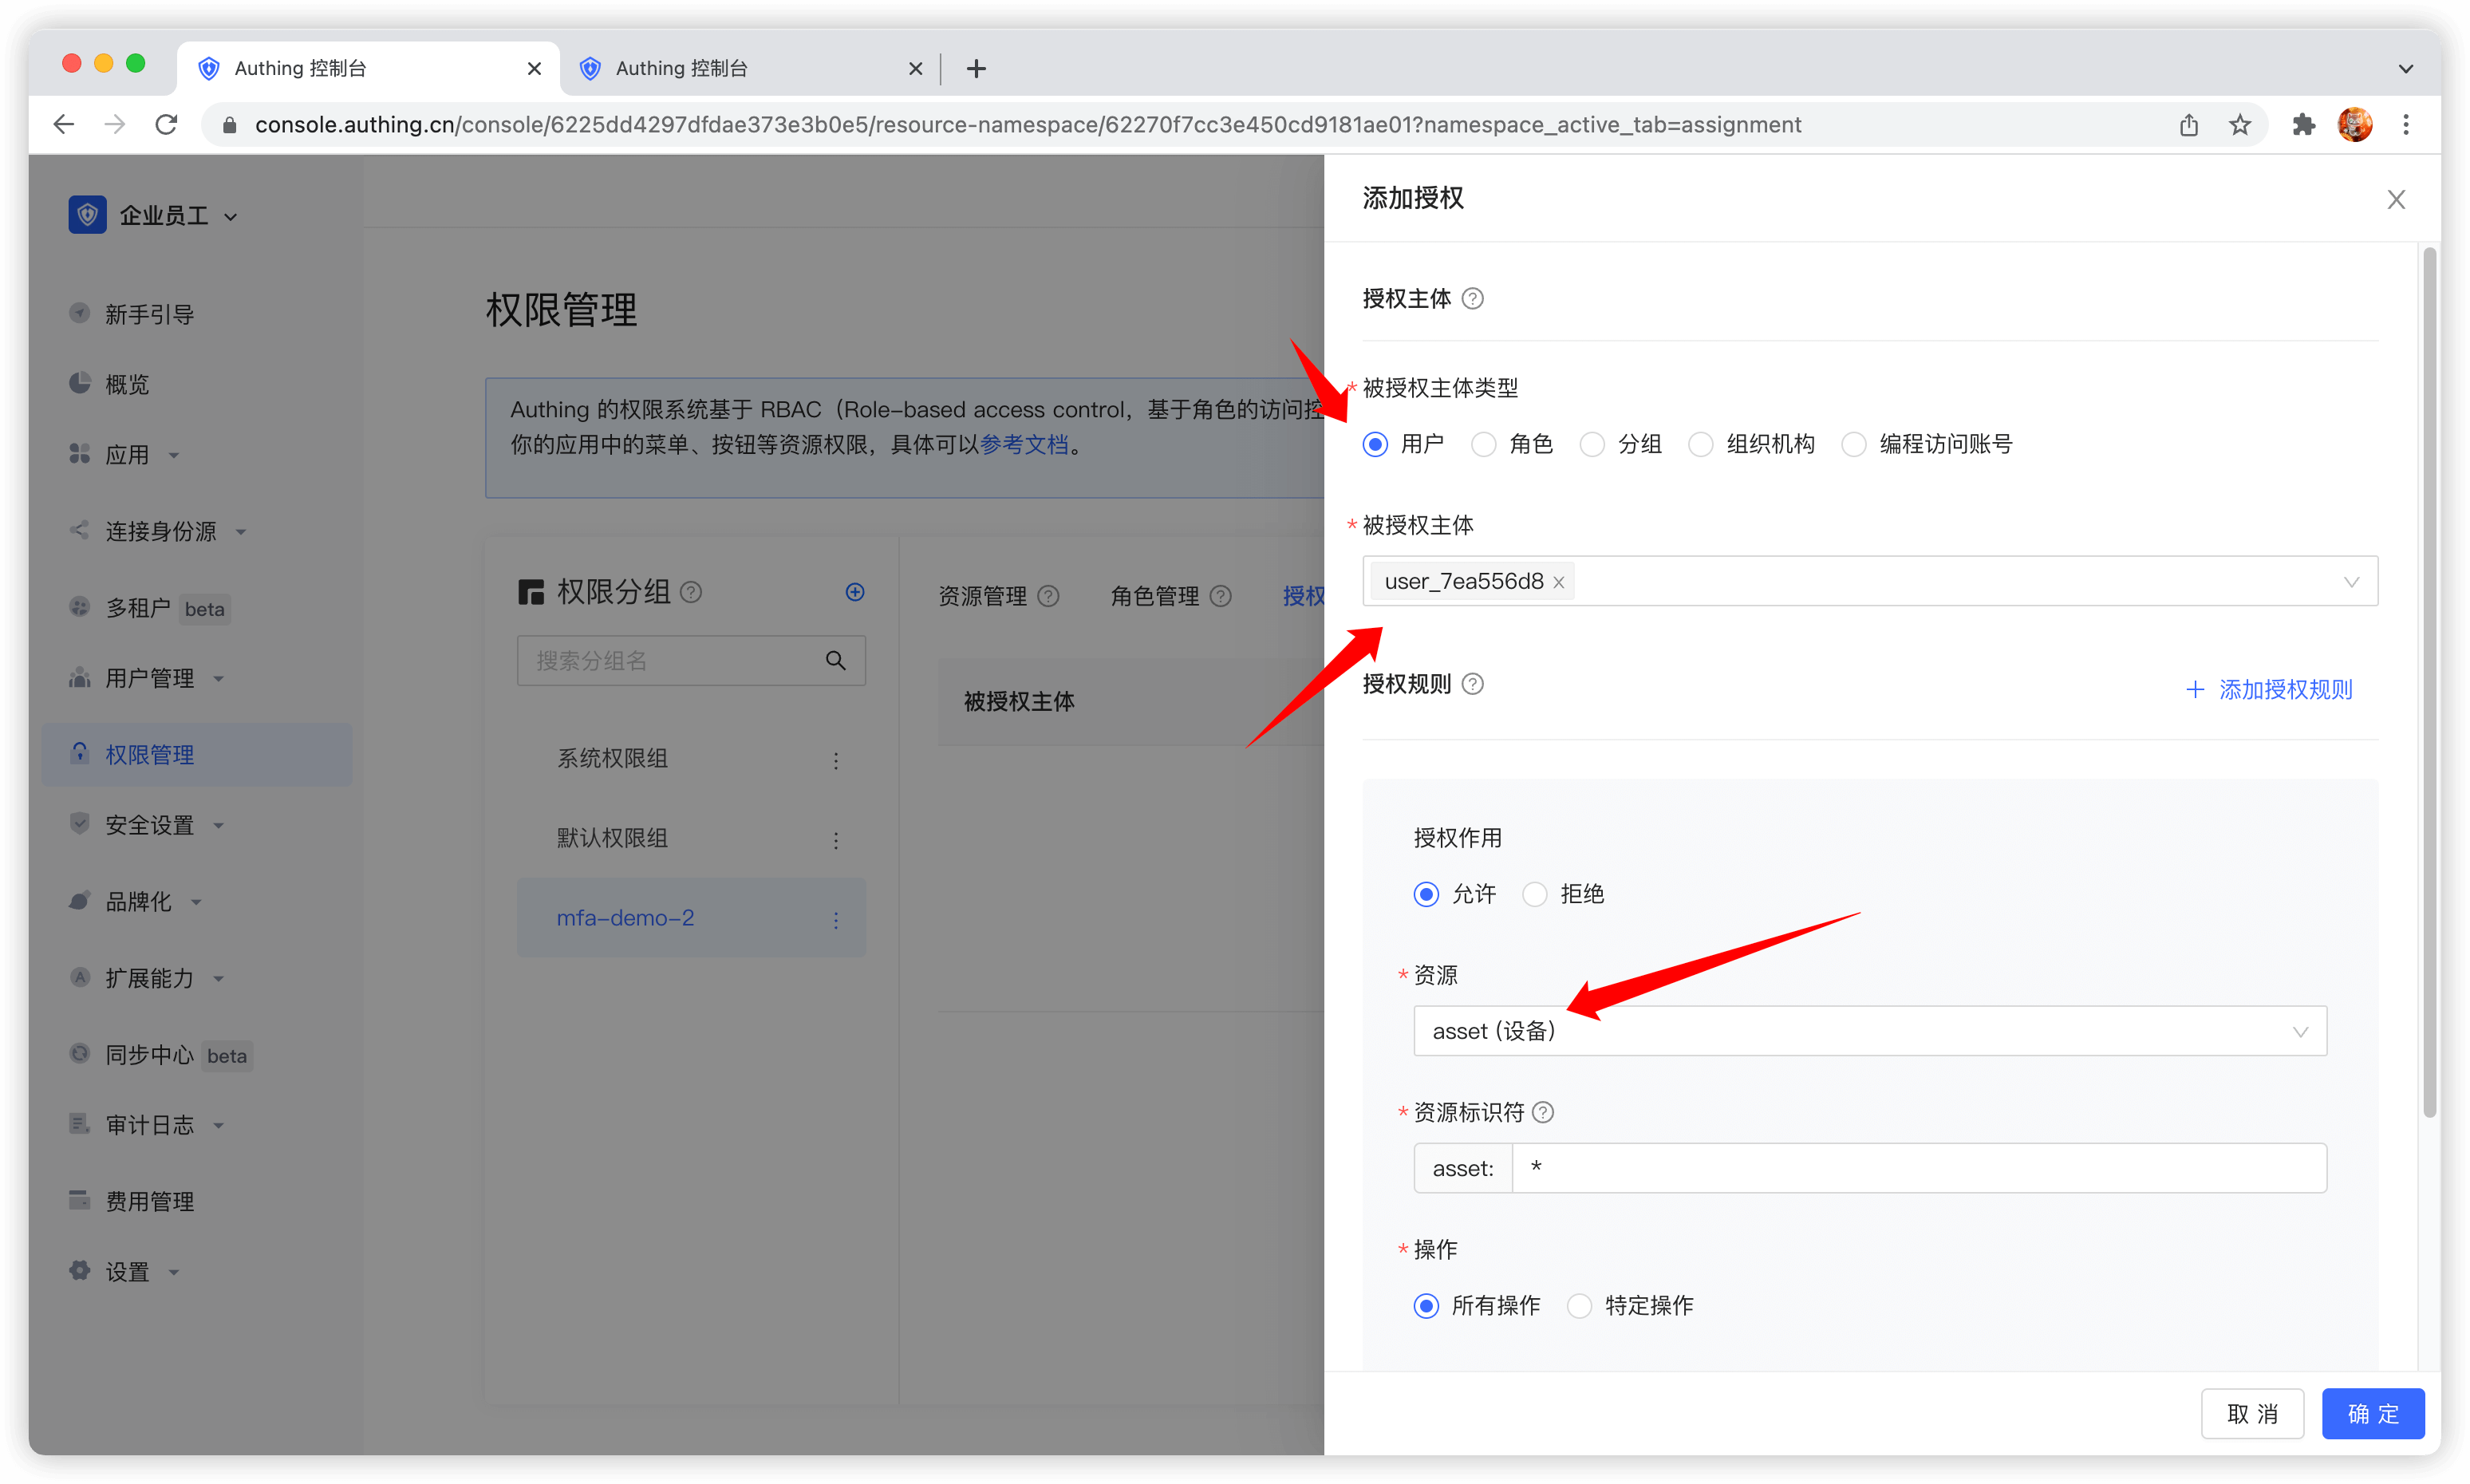
Authorized subject can also select role, so that all users in the role will automatically inherit the permissions authorized by the role.
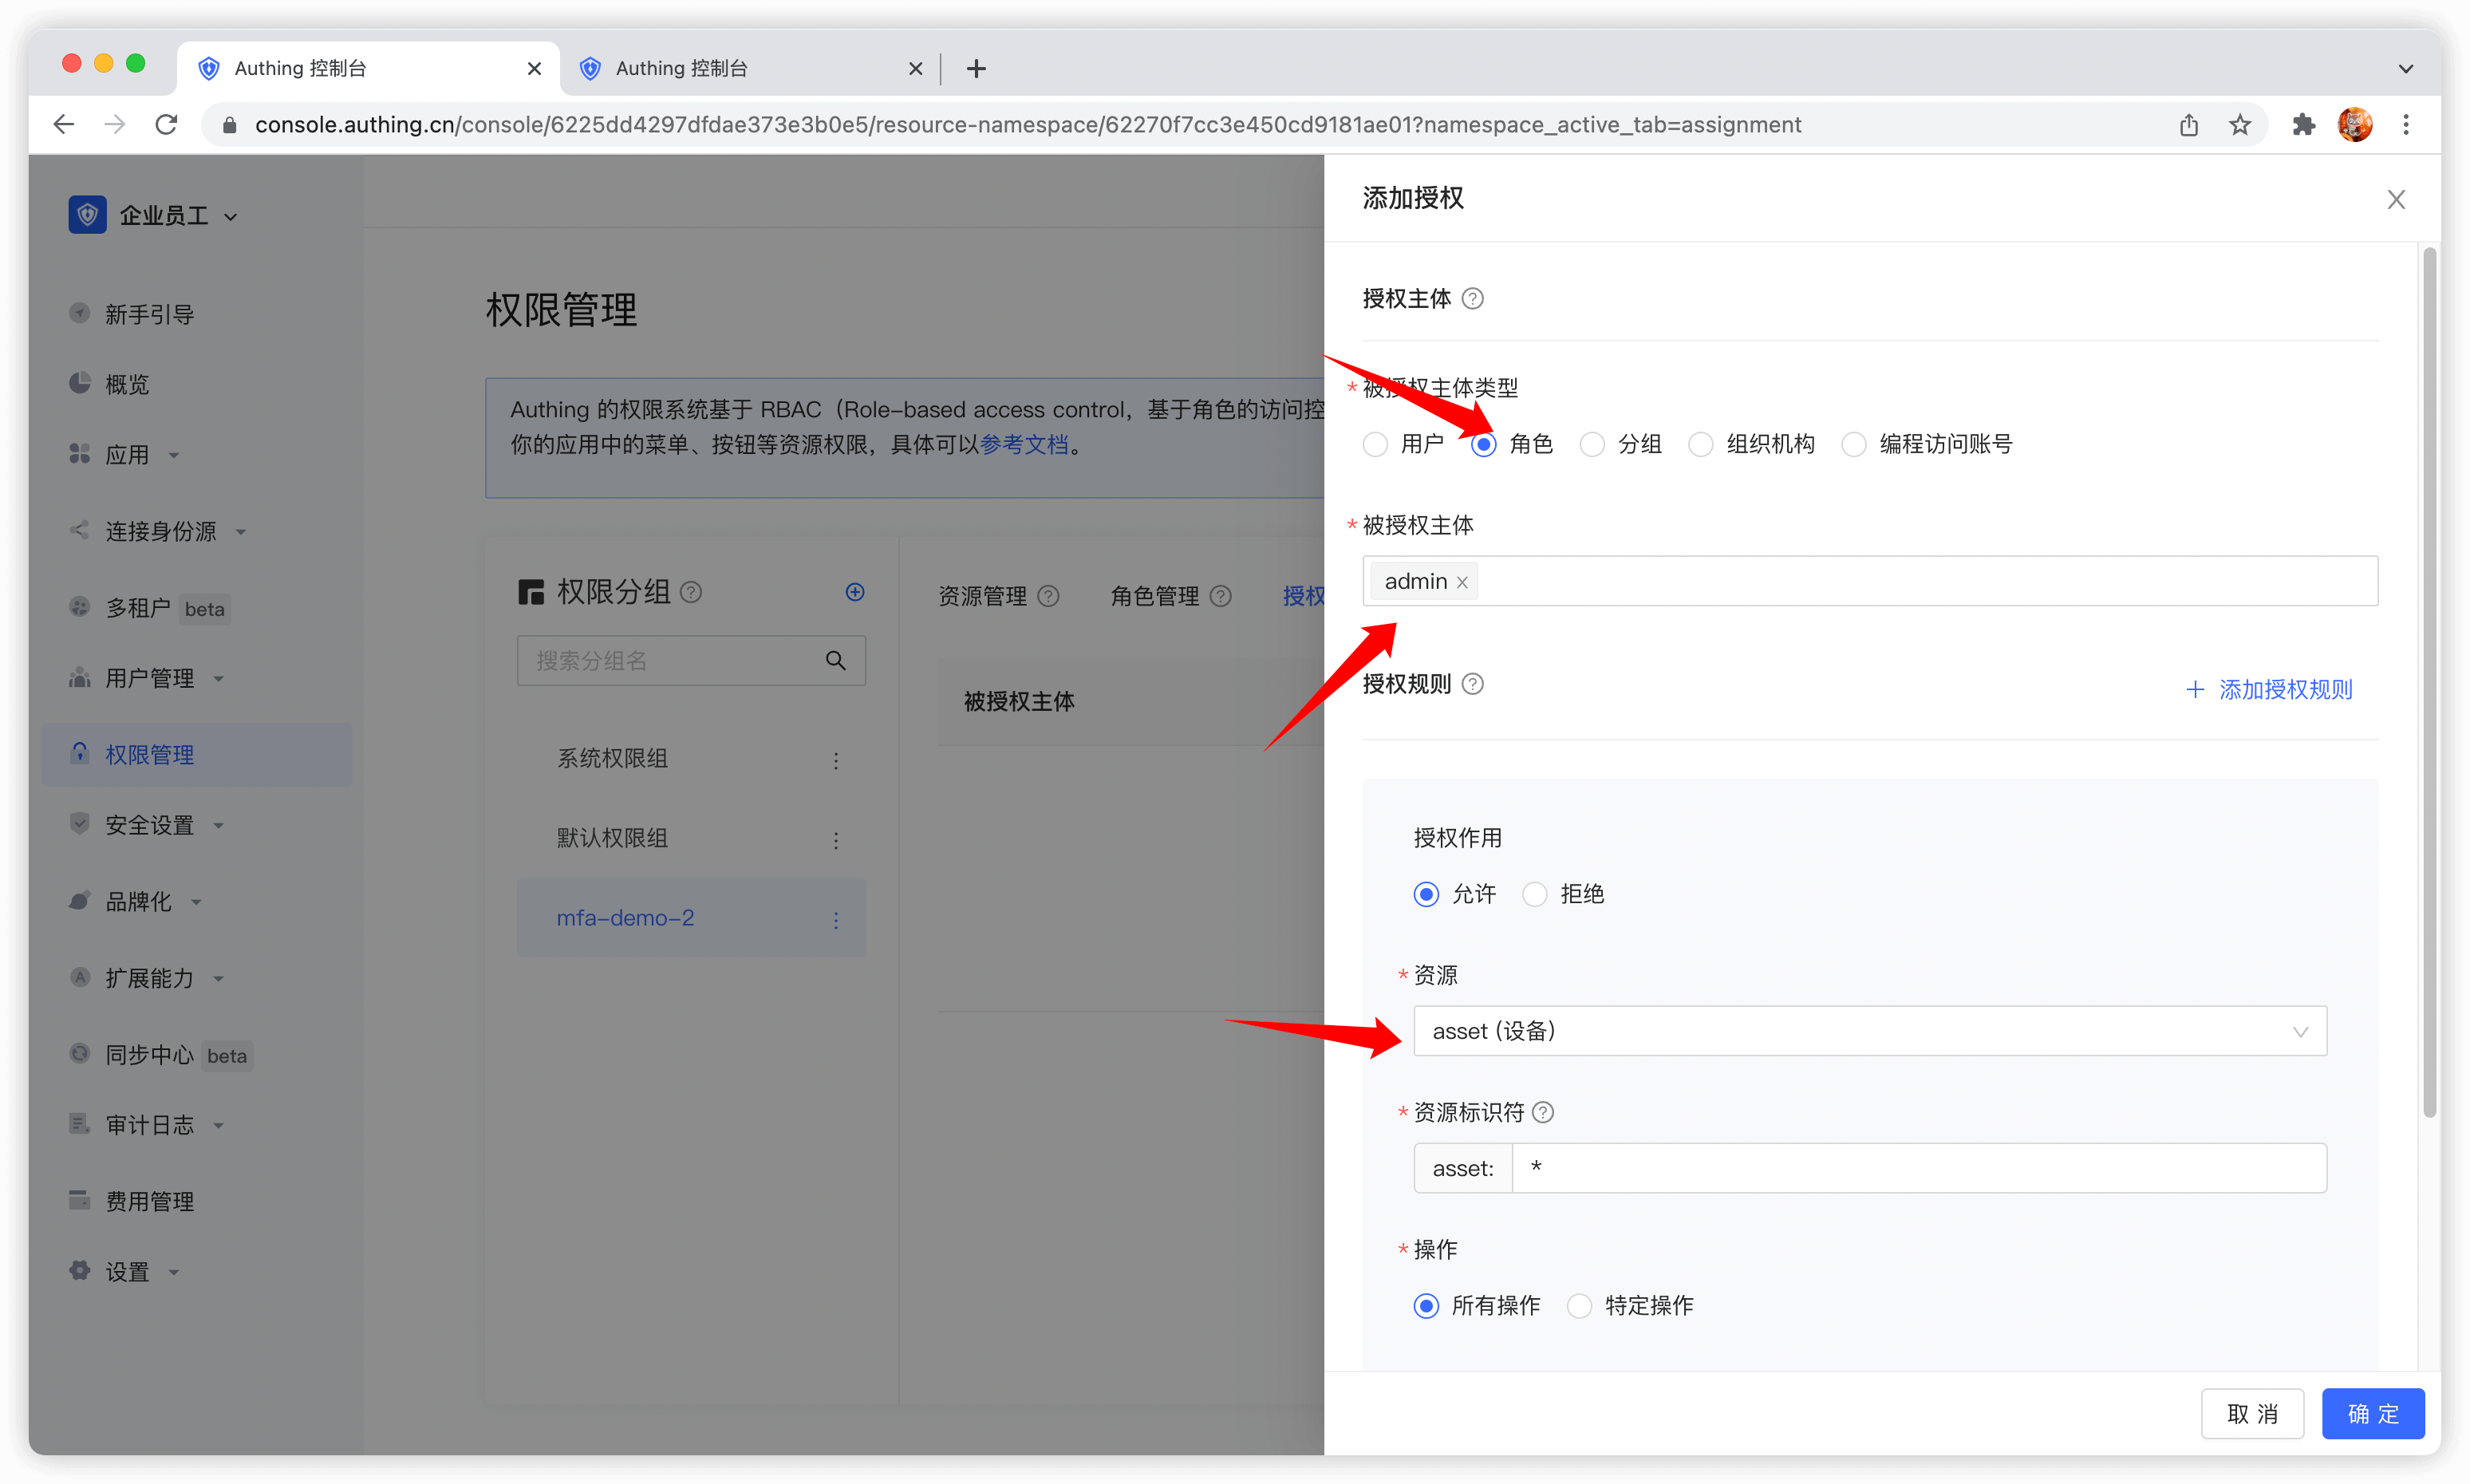
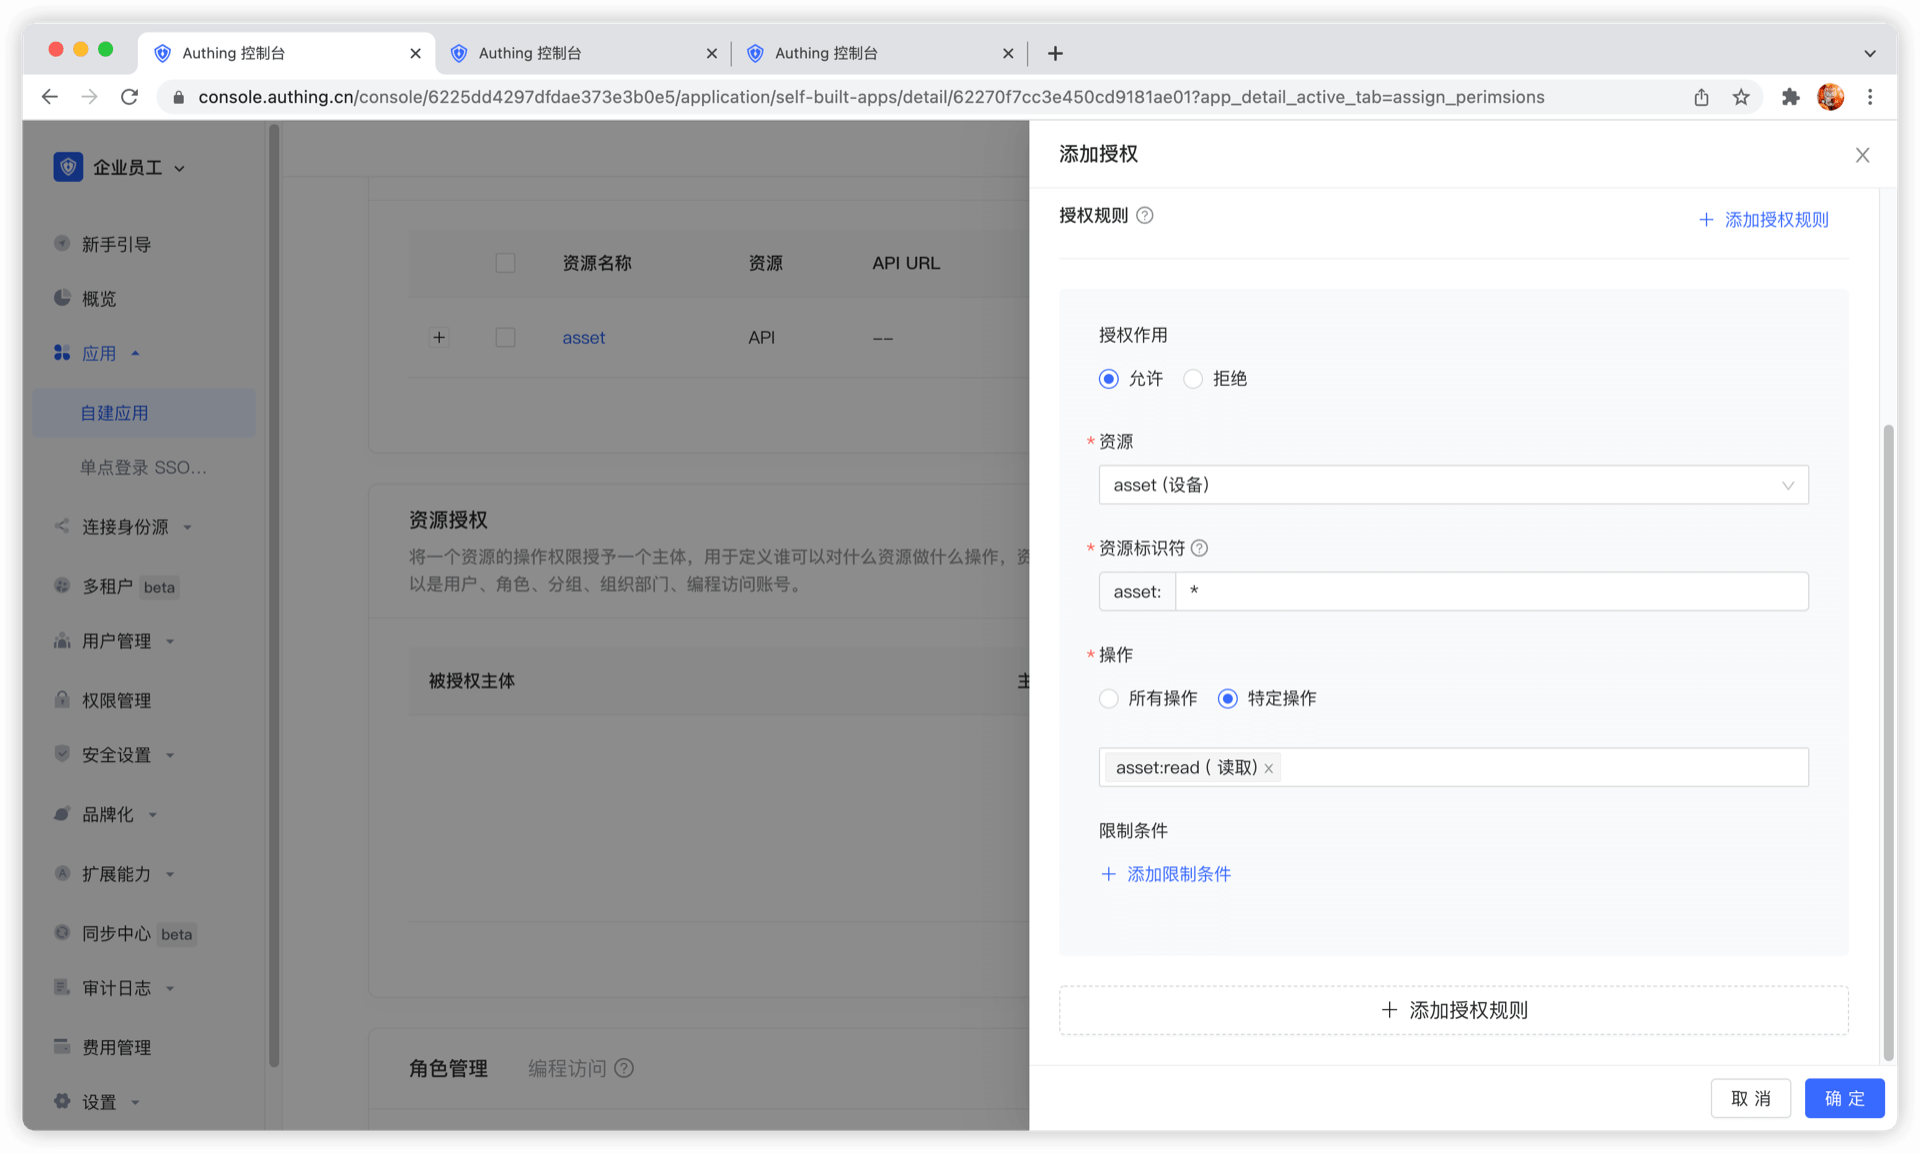
Then fill in * in resource identifier, which means authorizing all device resources, select specific operation, select the read device list operation in the resource operation we just defined, and finally click OK.
If you fill in a specific identifier, such as 42, it means that the device resource numbered 42 is authorized to the subject. The subject only has the permission for the resource asset:42, and can only authorize the relevant permissions of the asset:42 resource at most during authorization.
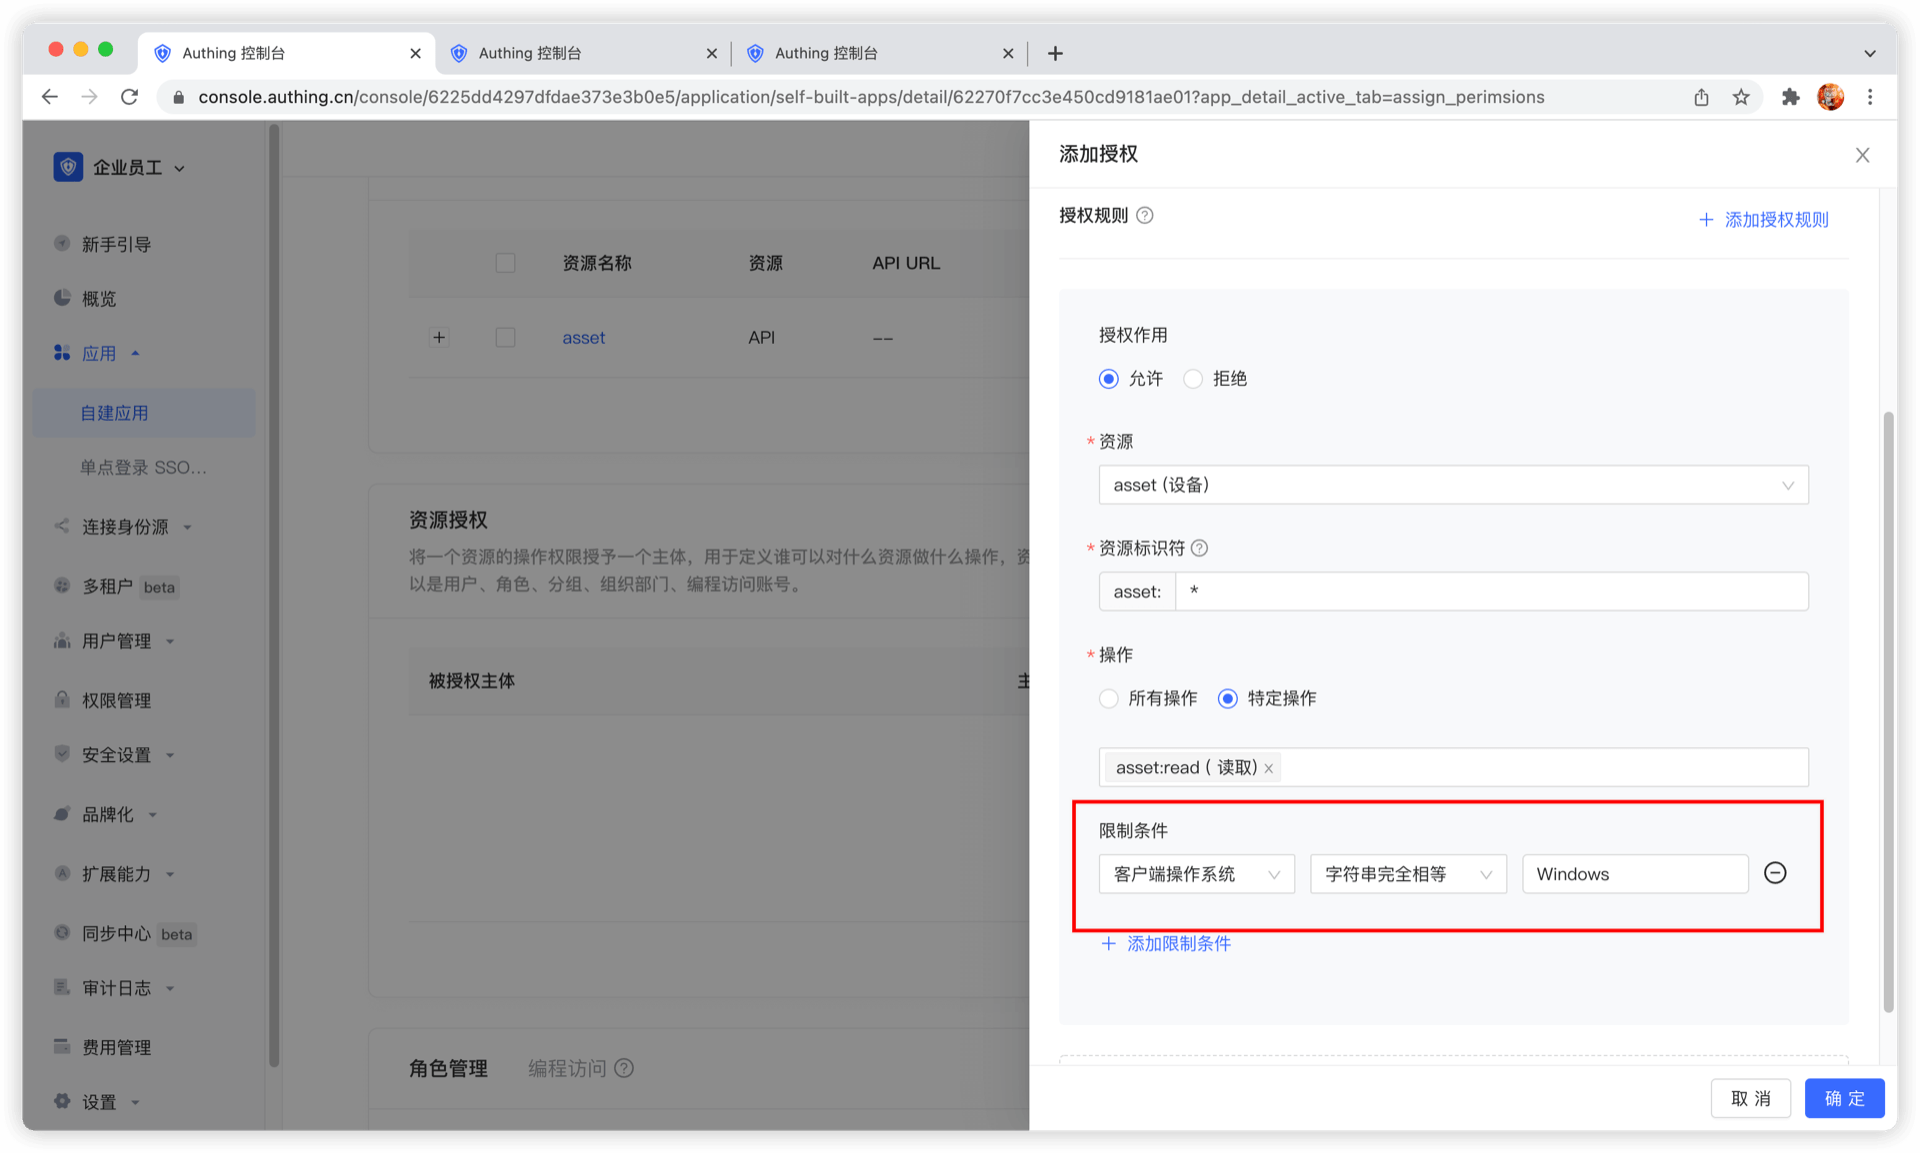
We can also add restrictions to the authorization rules, for example, this rule is only valid for Windows users. If authorization is initiated from a Linux machine, GenAuth will think that the user has no permission and cannot complete the authorization of device resources.
If you want to authorize multiple resources to the user, you can continue to add authorization rules.
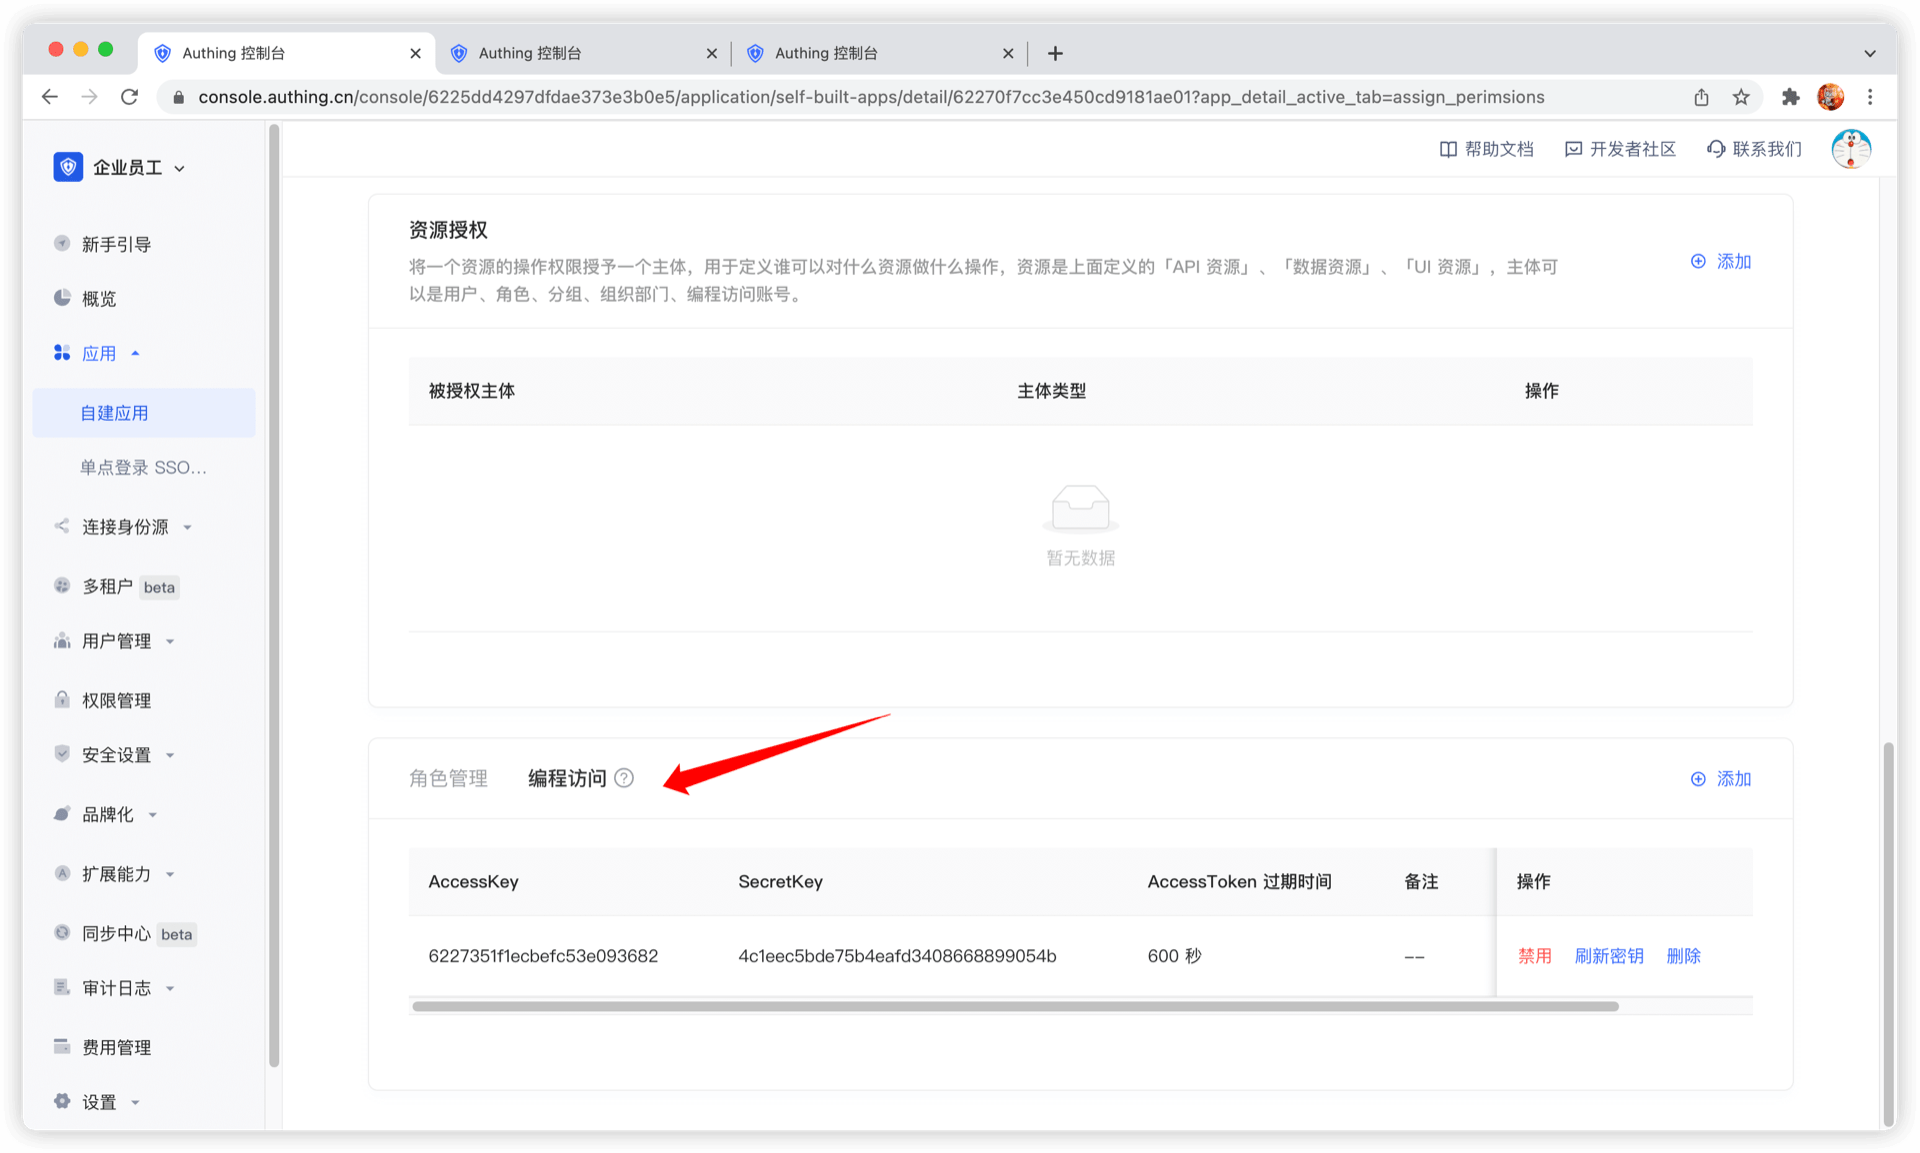
Programmatic access account
The programmatic access account is a pair of AccessKey and SecretKey under the application, which is used to hand over to third-party vendors such as outsourcers. You can use the programmatic access account in combination with the OIDC authorization code to obtain the user's AccessToken and IdToken, or use the programmatic access account to perform OIDC ClientCredentials mode to request authorization on behalf of the caller itself.
Data resource permissions
As enterprise business systems become more and more complex, it becomes increasingly difficult to manage and control access rights to various resources. In order to ensure data security and comply with relevant regulations, enterprises need a flexible and powerful permission management tool to manage and monitor resource access rights in the system. GenAuth's data resource permissions are designed to solve this problem and help enterprises easily manage scenario-based resources and authorizations in business systems. GenAuth recommends that you use data resource permissions with more powerful and flexible permission modeling and permission governance capabilities.
- Application scenarios
Data resource permissions are mainly used in the following scenarios:
- Manage application menus with hierarchical structures, such as the sidebar menu of an enterprise's internal management system.
- Manage document directory access operation permissions, such as read, edit, and delete permissions for an enterprise's internal knowledge base.
- Perform fine-grained permission management on other resources, such as API interfaces.
- Problem solving
Data resource permissions mainly solve the following problems:
- Simplify the permission management process and improve work efficiency.
- Ensure data security and prevent data leakage and abuse.
- Support compliance audits and reports to reduce compliance risks.
- Adapt to the ever-evolving and changing needs of enterprises, and support flexible resource management and authorization strategies.
- Functional advantages
- Highly flexible resource definition and management: GenAuth supports fine-grained definition and management of various types of resources, enabling enterprises to flexibly configure permission strategies according to actual needs.
- Policy-based authorization: A policy-based authorization method that assigns specific resource access rights to roles or users. Policies can contain multiple resources and operations, supporting flexible permission combinations and management.
- Complete permission view: By providing an intuitive permission view, it helps enterprises quickly understand and manage the authorization relationship between users, roles and resources, and improves the efficiency of permission management.
- Audit and monitoring: Record user access operations to resources, support real-time monitoring and regular auditing, and ensure data security and compliance.
- Easy to integrate and expand: GenAuth's data resource permission function can be easily integrated with existing enterprise systems, while supporting expansion according to customer needs to meet changing business needs.
By introducing GenAuth's data resource permission function, enterprises can achieve efficient, secure and flexible management and authorization of scenario-based resources in business systems. This will help reduce the company's operating costs and risks, while improving the company's control over data resource access and ensuring data security and compliance.
GenAuth data resource permissions are mainly composed of the following functions, click to view detailed descriptions.
Permission space
Permission space can be understood as a namespace for permissions. You can create roles, resources, and manage permissions in permission spaces. Roles and resources in different permission spaces are independent of each other, and there will be no conflict even if they have the same name.
Main functions of permission space
- You can create and define different types of resources in permission space
- You can create and define roles in permission space
- You can authorize resources to roles in permission space, and then authorize roles to different users and organizations to implement permission management based on RBAC model; you can also authorize resources to other types of subjects such as users in permission space, and set condition-based authorization policies to implement permission management based on ABAC model.
- You can view and manage resource permission details in permission space
Relationship between permission space and application
Whenever you create an application, GenAuth will create a corresponding permission space for you. The name is equal to the application name, and the corresponding space Code is equal to the application ID, which cannot be modified.
When some of your business systems do not need to connect to GenAuth authentication and only need permission capabilities, you can also create an independent permission space that has no corresponding relationship with the application, specifically used to manage permissions within the business system.
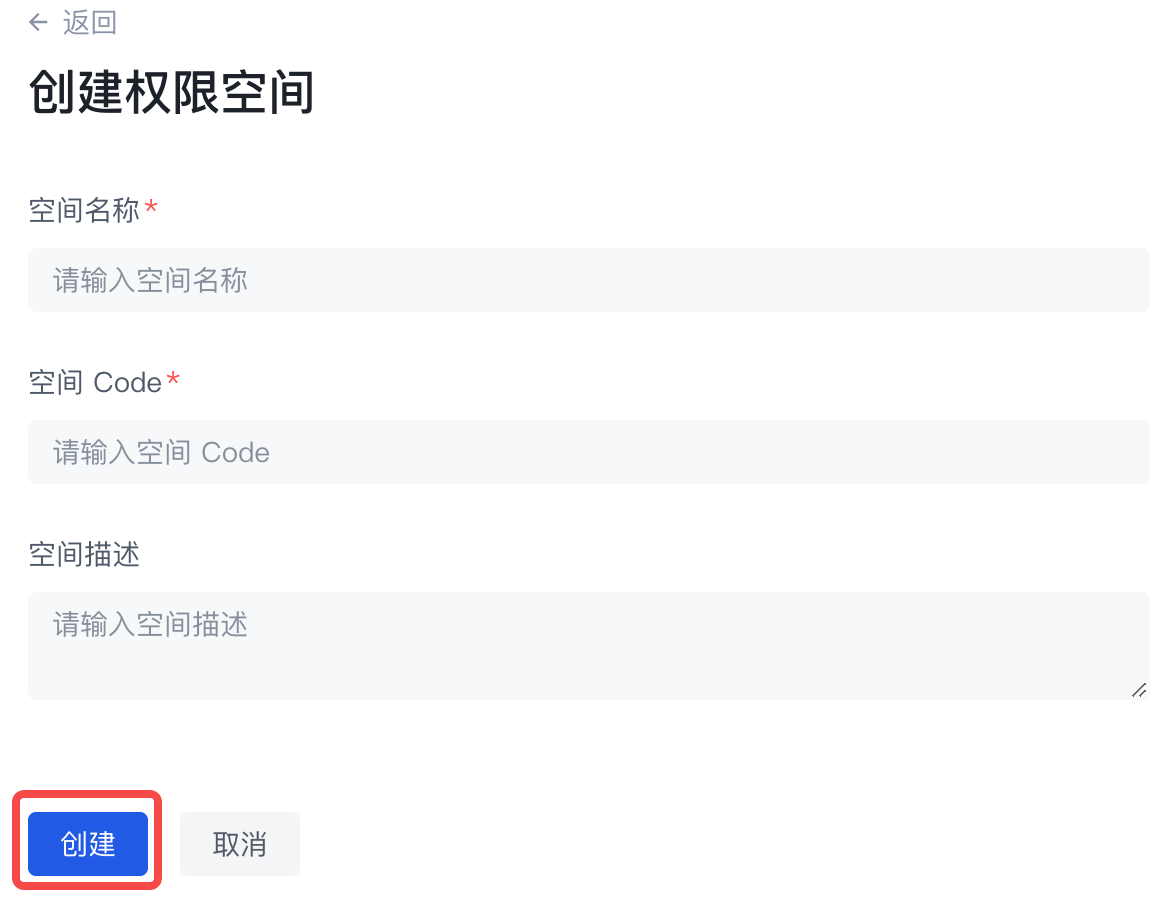
Create a permission space
You can click Create permission space on the permission list page to enter the creation page: 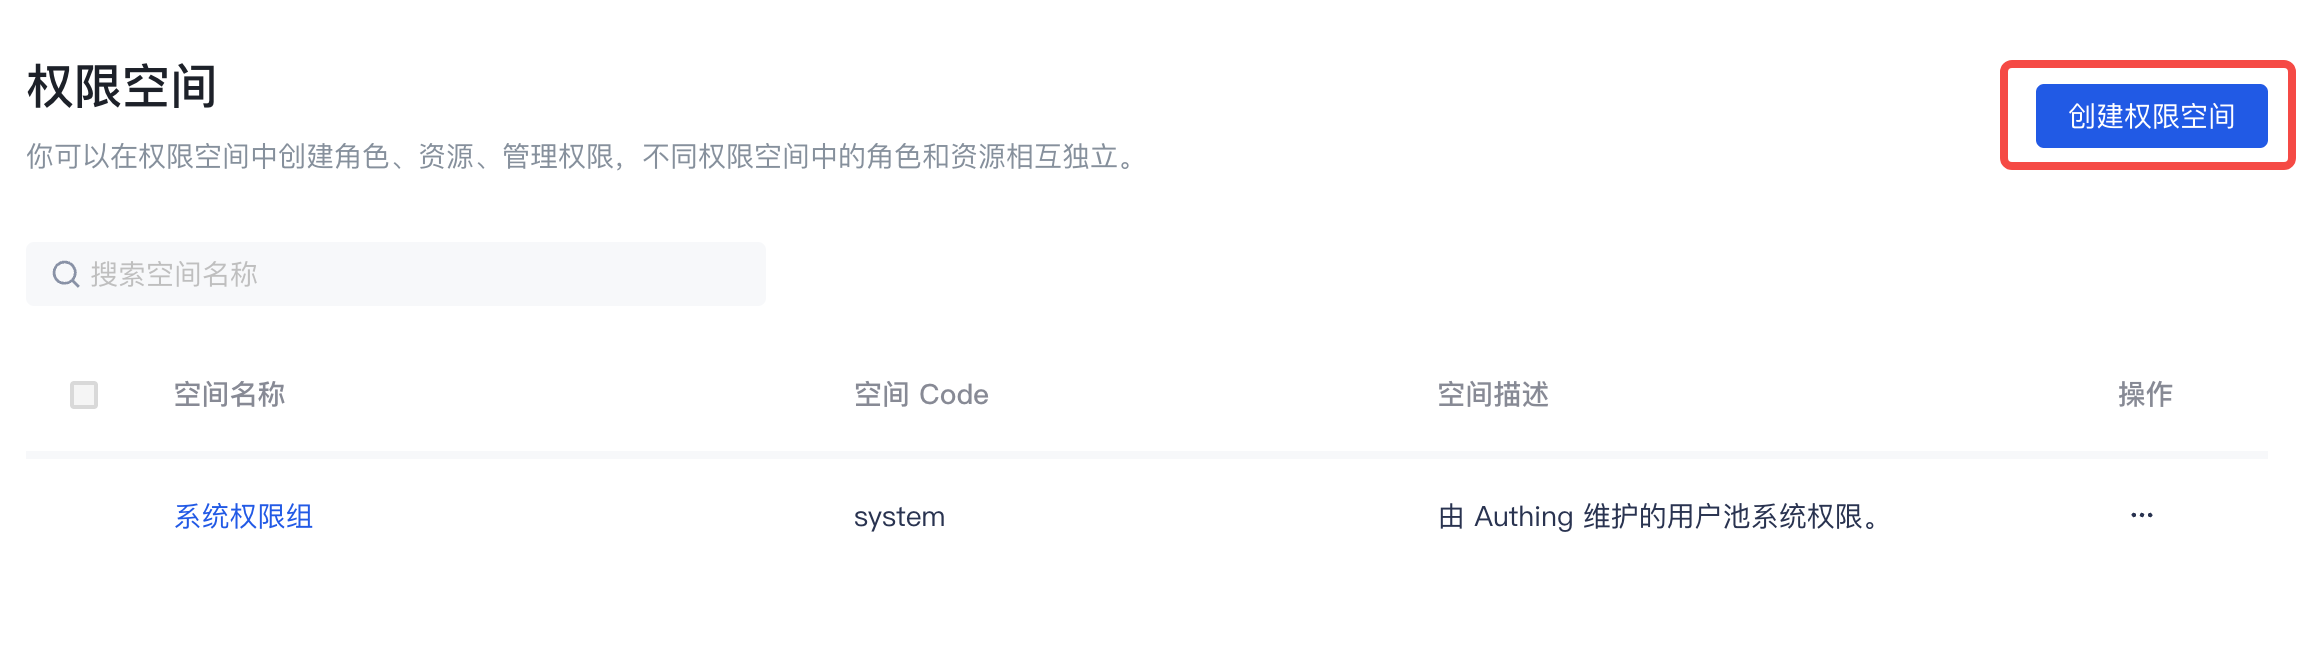
When creating a permission space, you must fill in the space name and space code, and optionally fill in the space description. Fill in the instructions as follows:
| Field name | Description |
|---|---|
| Space name | It is recommended to use the name of the business system, such as "Office Platform" |
| Space Code | The unique identifier of the permission space, it is recommended to use a semantic description, such as "OA" |
| Space description | Optional |
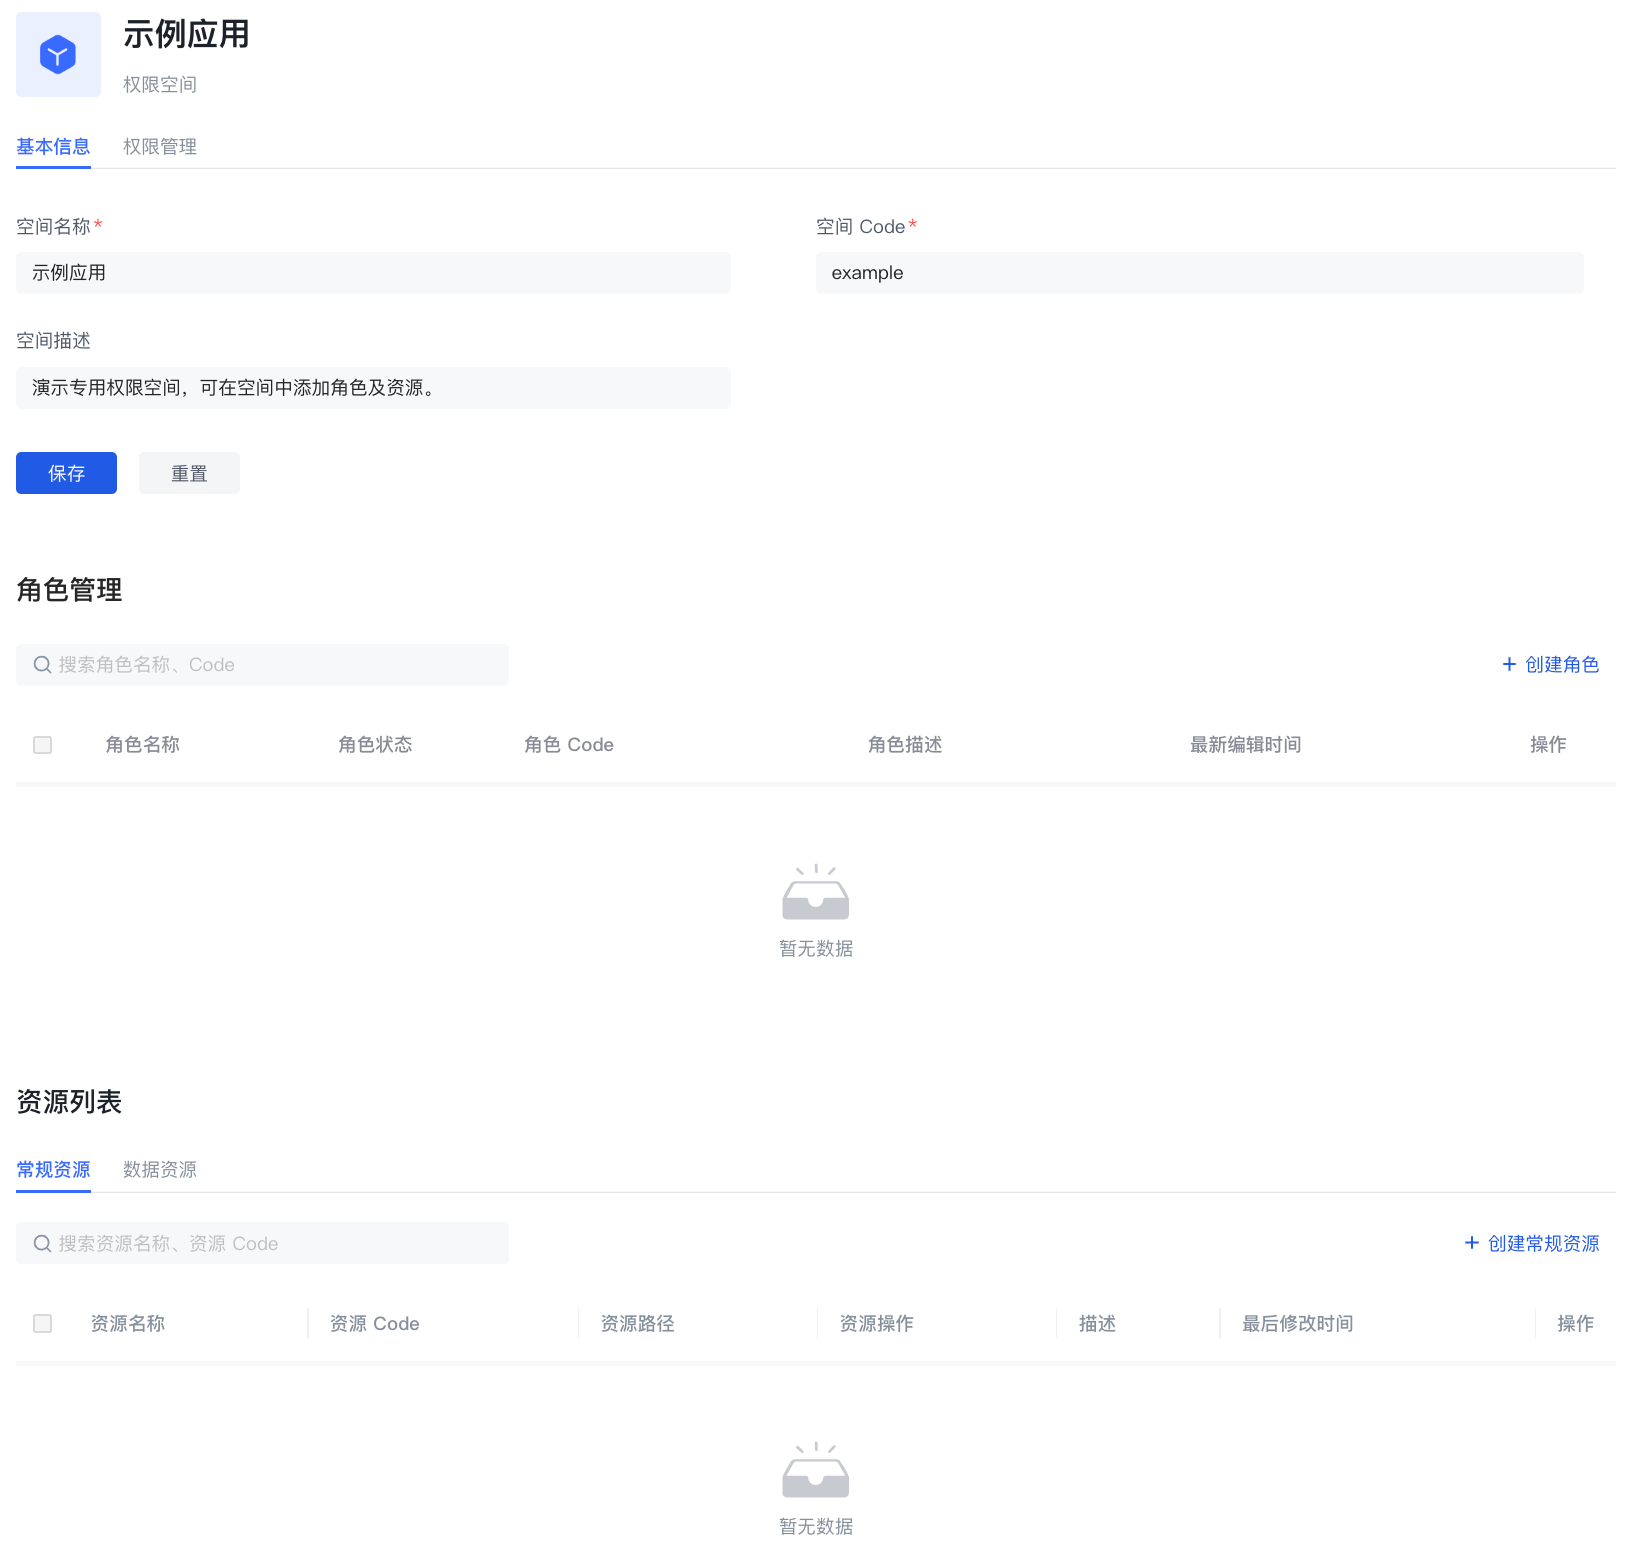
Manage permission space
On the basic information page of the permission space, you can mainly:
Manage roles under the permission space
- Create roles under the permission space
- View role details under the permission space
- Edit roles under the permission space
- Delete roles under the permission space
Manage resources under the permission space
- Create resources under permission space
- View resource details under permission space
- Edit resources under permission space
- Delete resources under permission space
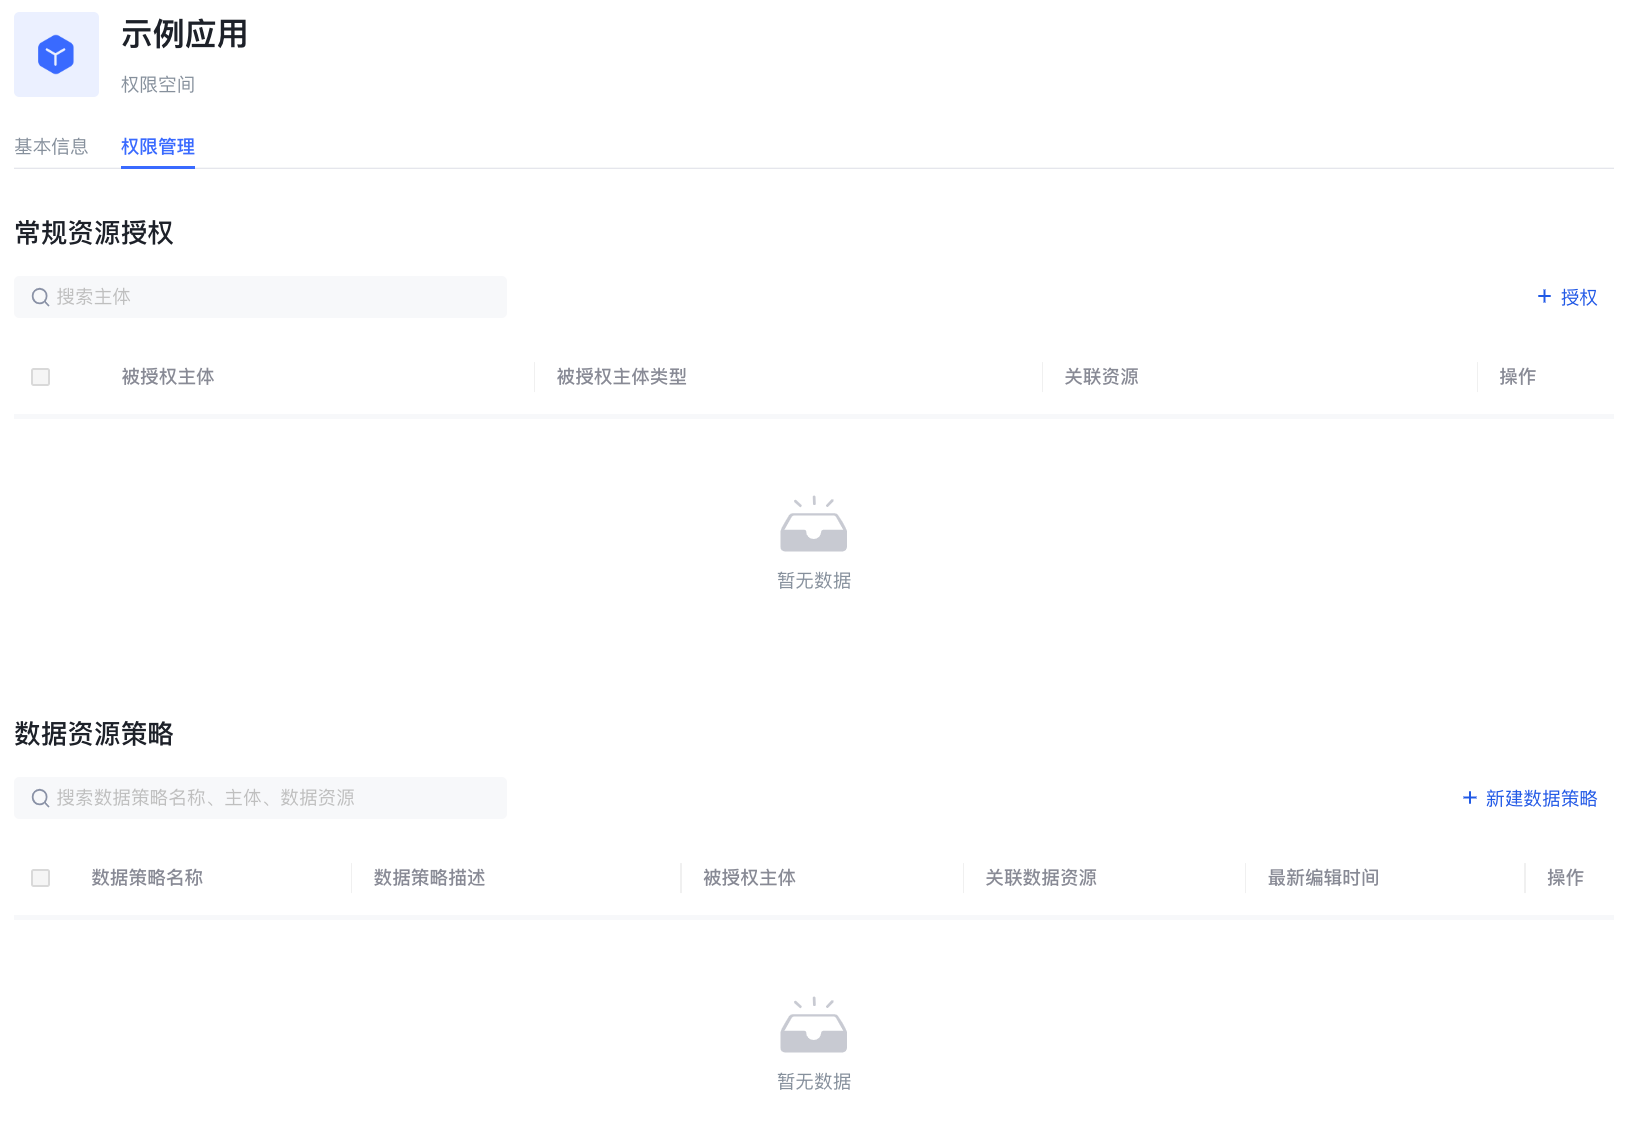
Permission space permission management
On the permission space permission management page, you can mainly
- Manage general resource authorization under permission space
- Create authorization
- View and modify authorization
- Delete authorization
- Manage data resource authorization under permission space
- Create data policy
- View and modify data policy
- Delete data policy
Role Management
A role is a logical collection. You can define roles in each permission space and grant a role certain resource and operation permissions. When you grant a role to a user, the user will inherit all permissions in the role.
The role management module is mainly used to centrally manage roles in all permission spaces in the user pool.
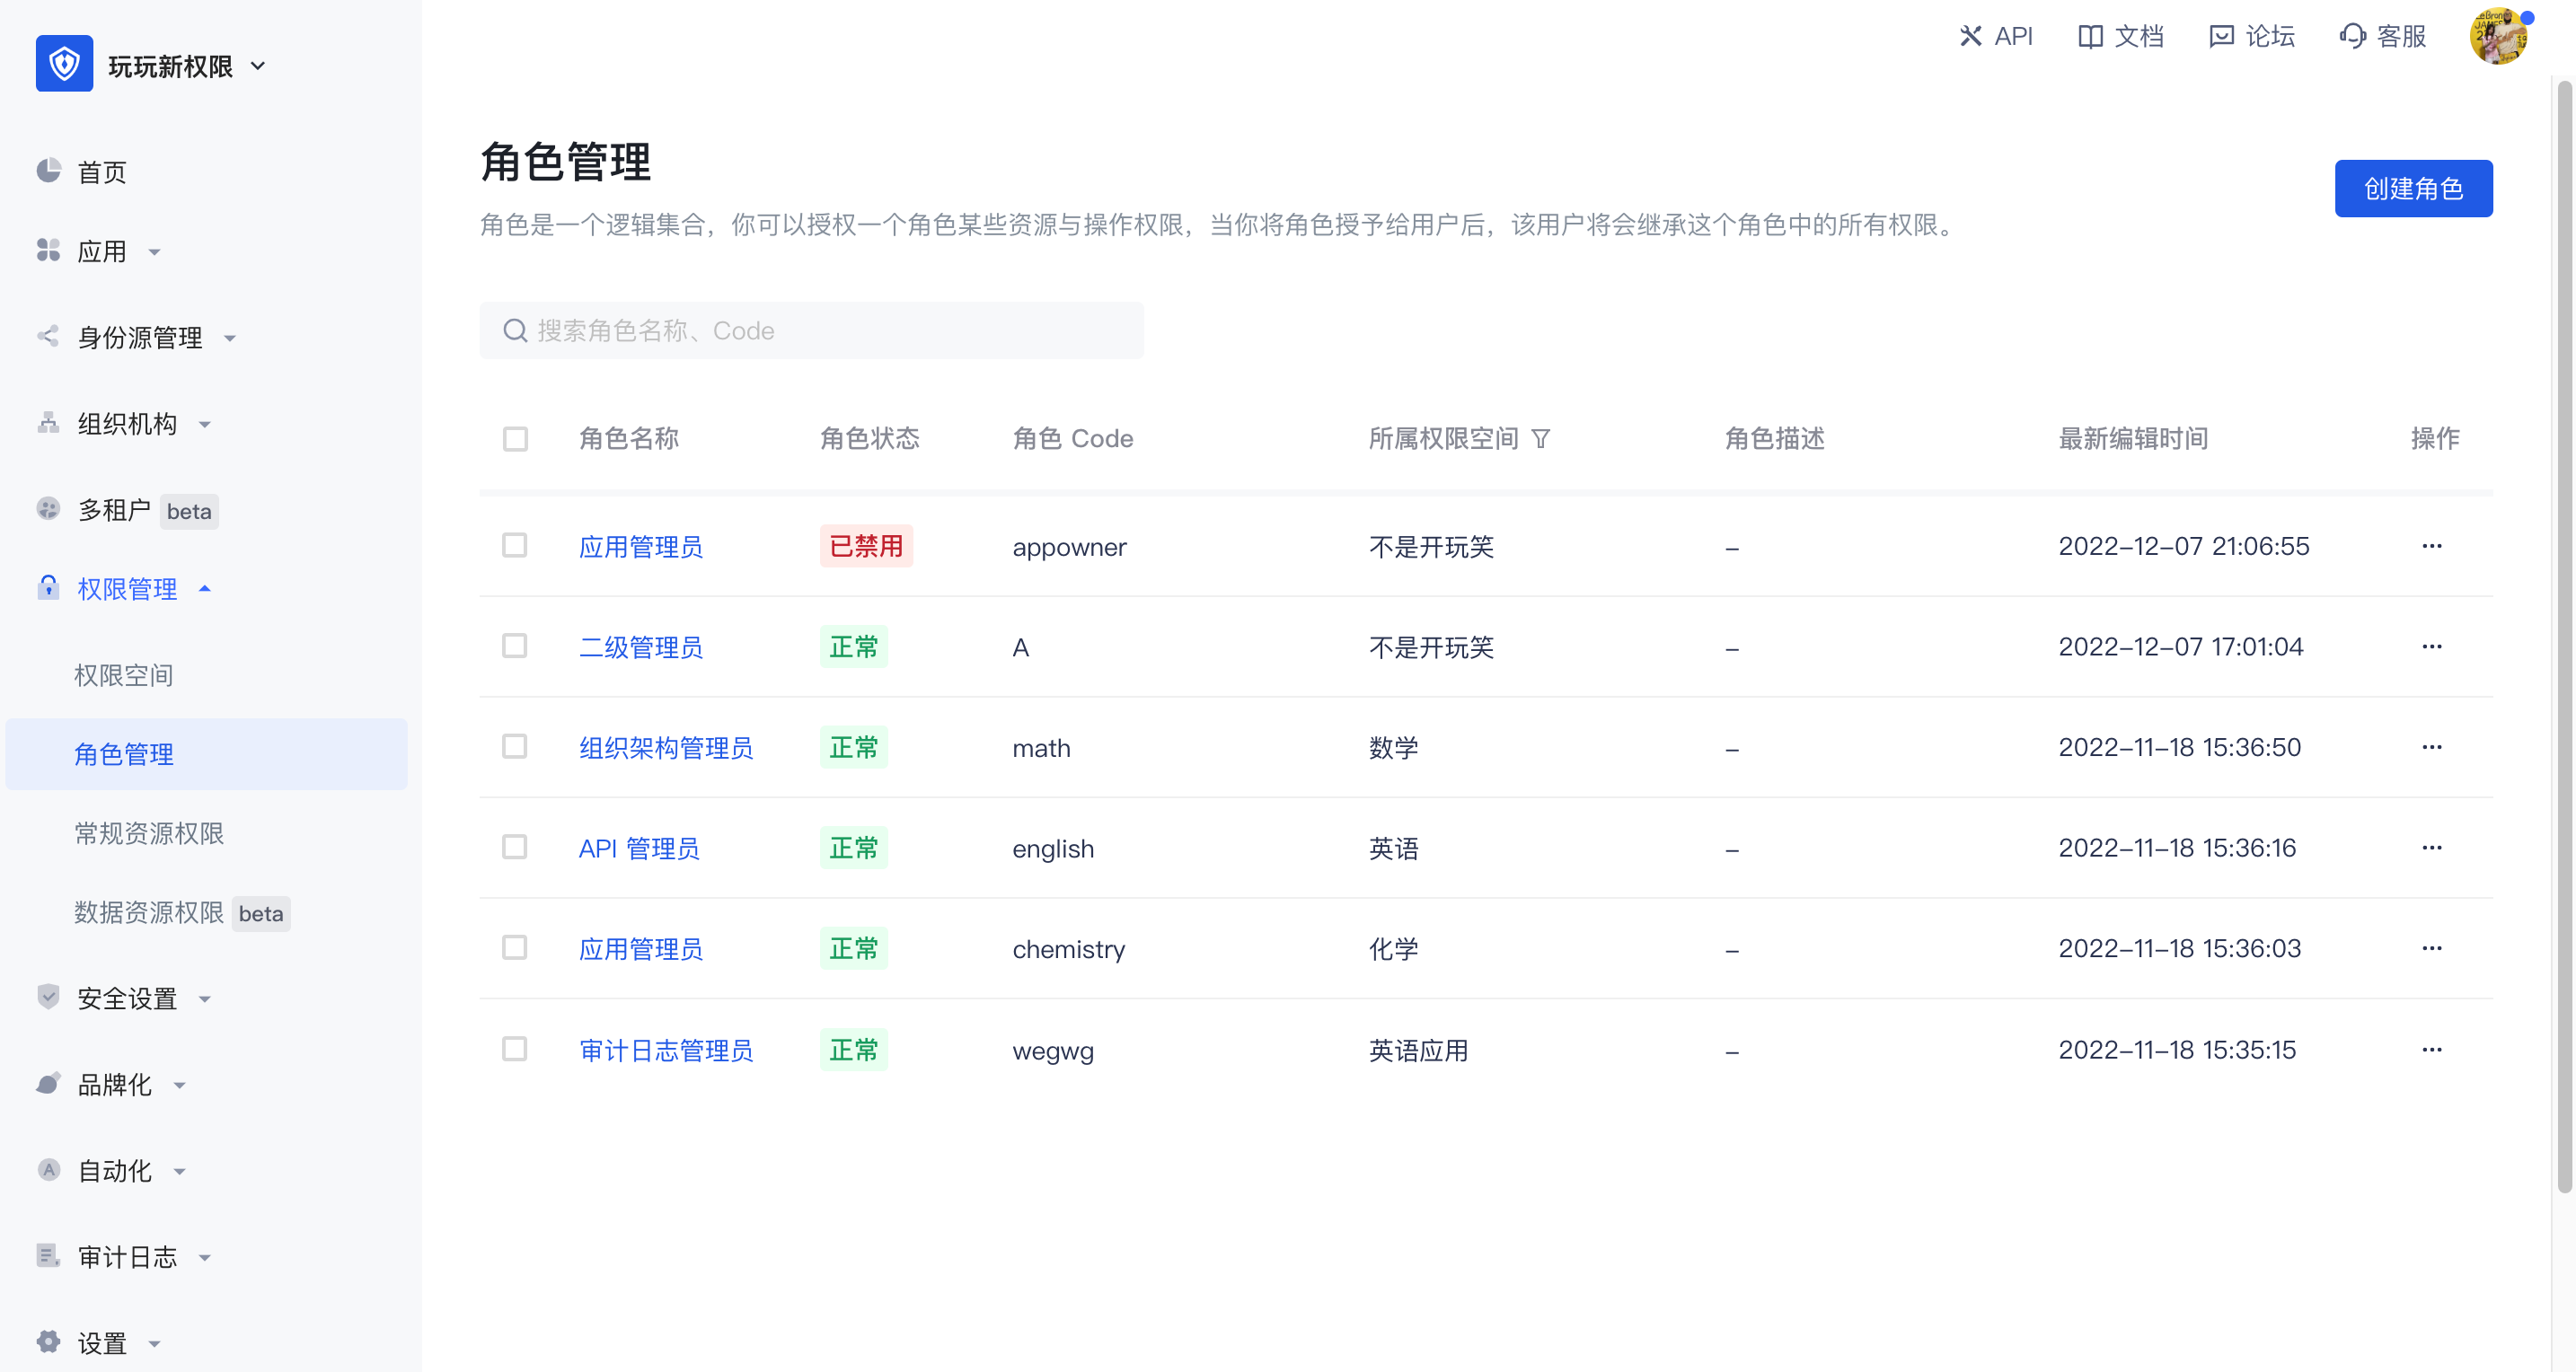
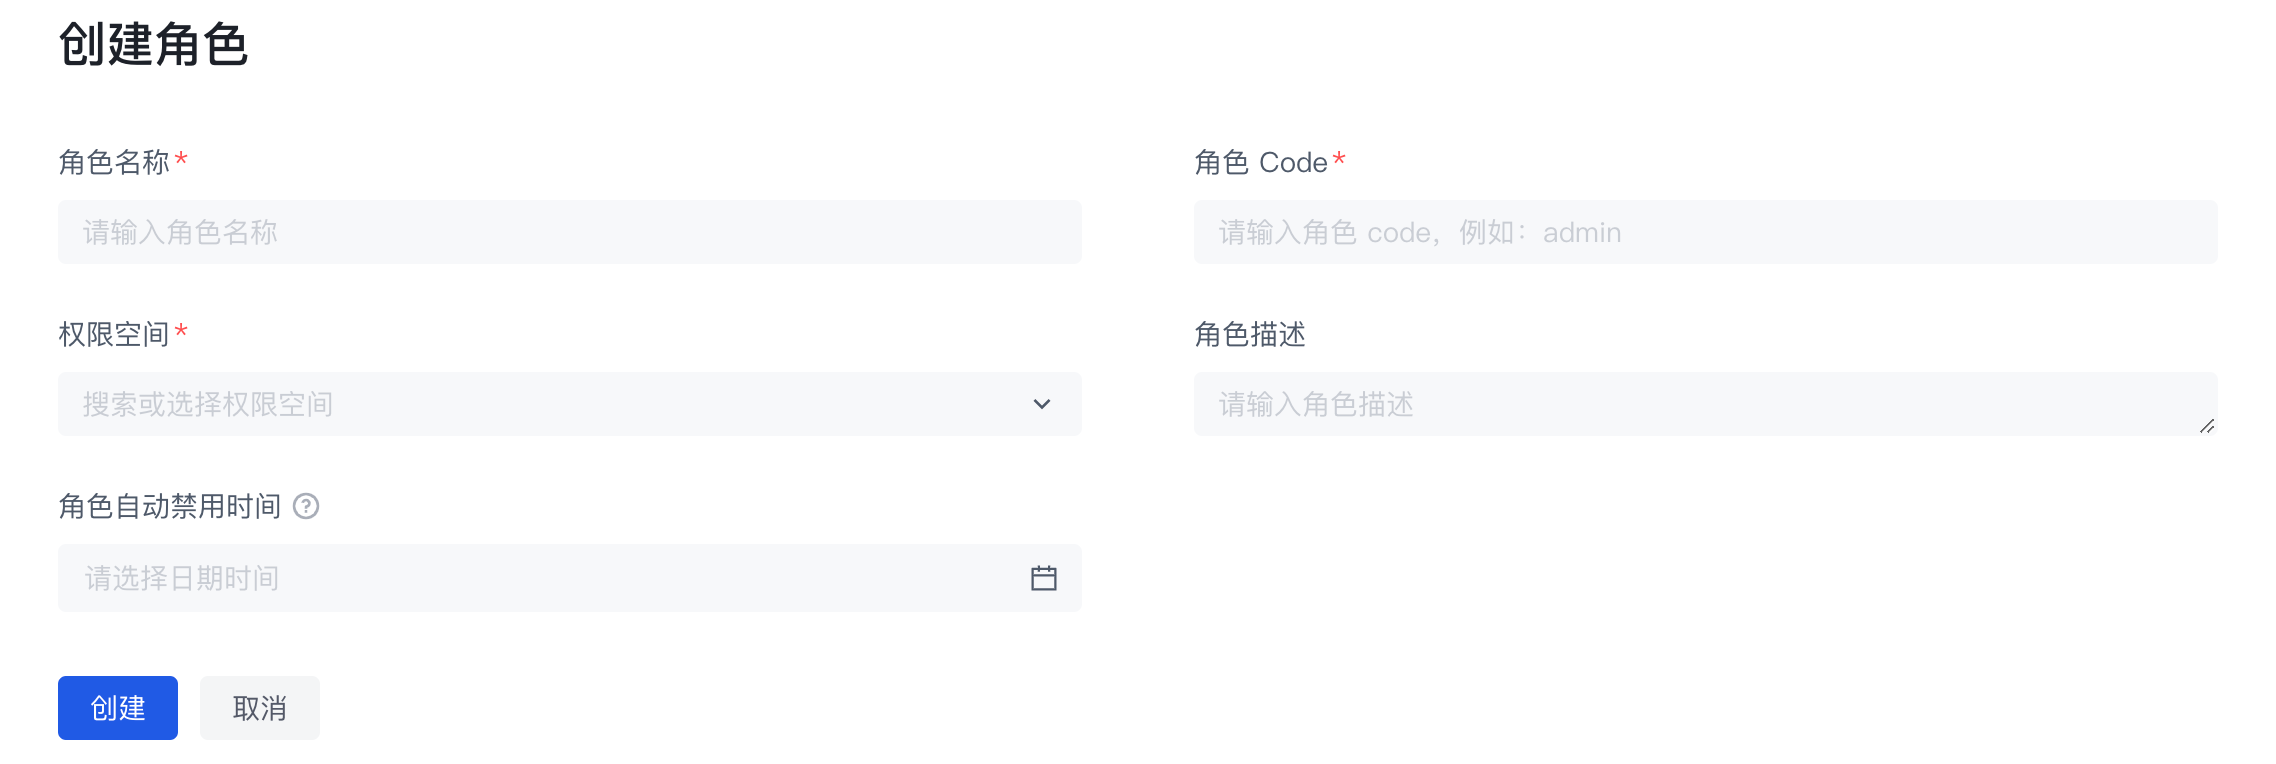
Create a role
You can click Create Permission Space on the list page to enter the creation page
| Field Name | Description |
|---|---|
| Role Name | Name the role according to the permission scenario to be granted to the role, such as "Administrator" or "Auditor" |
| Role Code | The unique identifier of the role. It is recommended to use a semantic description, such as "admin" |
| Permission Space | The permission space to which the role belongs |
| Role Description | Optional |
| Role Auto-disable Time | You can set an auto-disable time for temporary roles. After disabling, the permissions associated with the role will be revoked. You can restore the permissions by enabling the role |
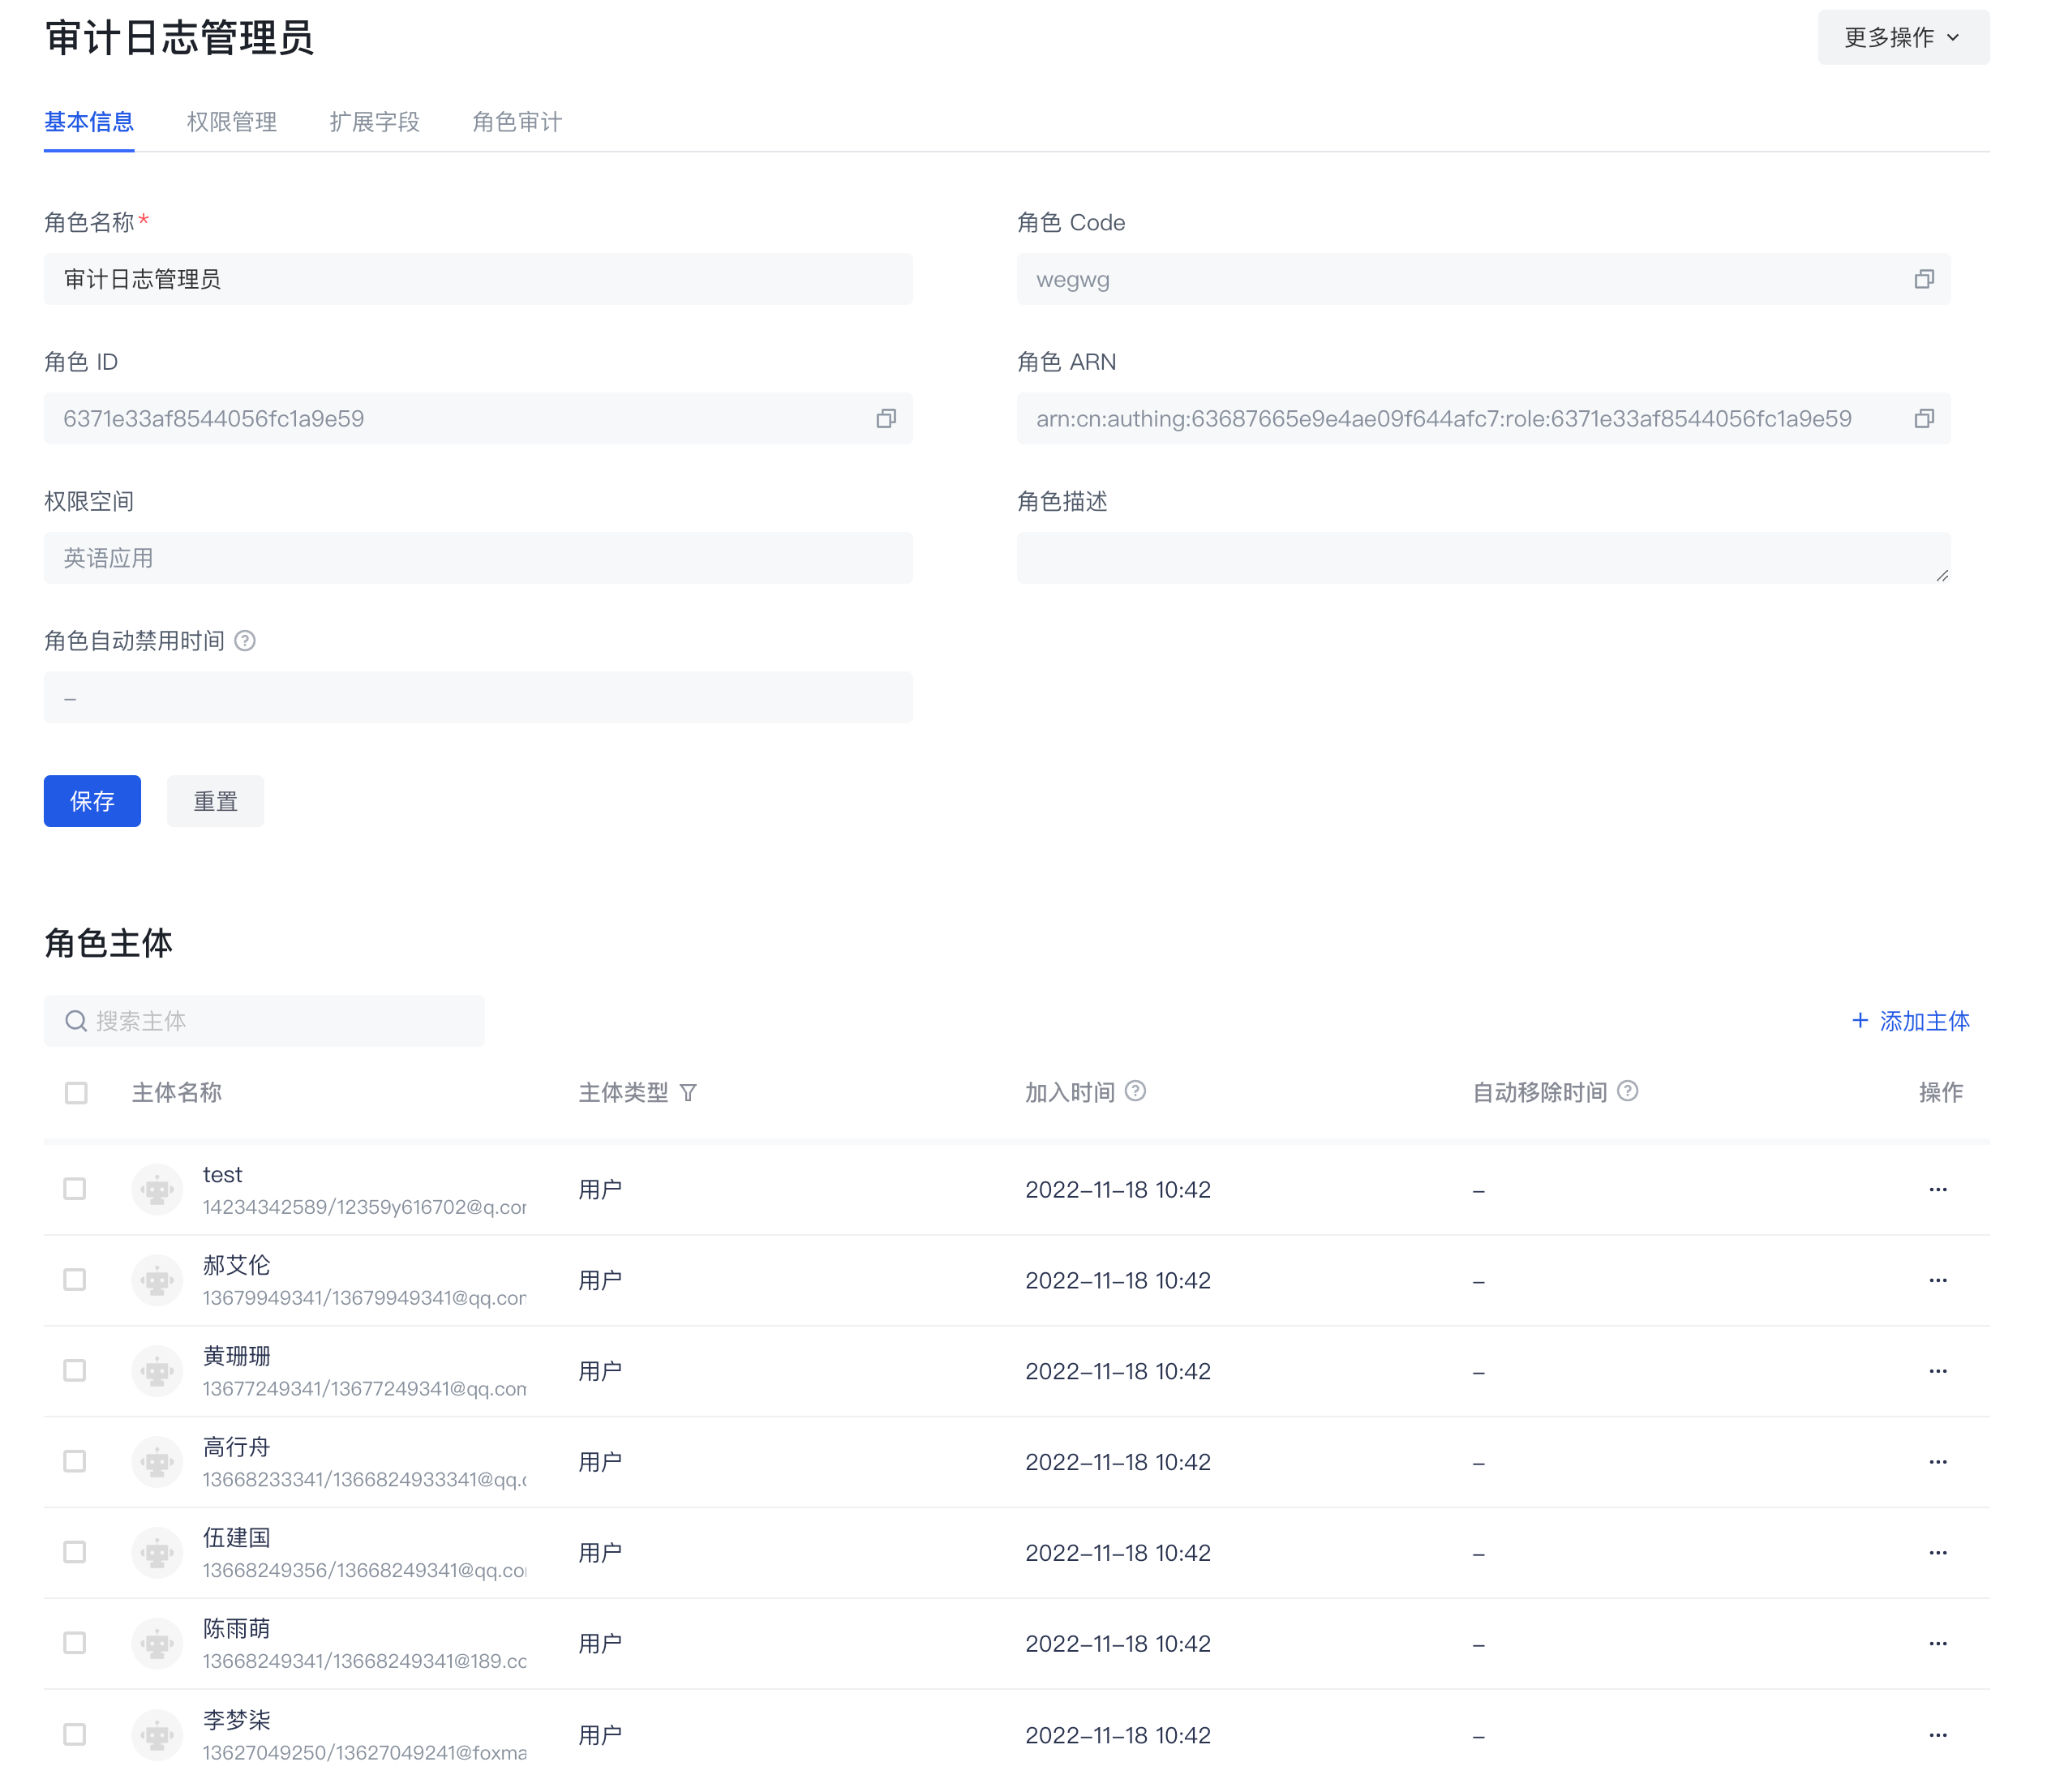
Basic Role Information
On the basic information page of the role details, you can mainly
- Manage role subjects
- Add role subjects
- Add specified users as role subjects
- Add specified organizations as role subjects
- When adding a subject, you can set the automatic removal time of the subject.
- View the role subject
- Remove the role subject
- Add role subjects
- Manage the basic information of the role
- View the basic information of the role
- Role name
- Role Code
- Role ID
- Role ARN
- Role permission space
- Role description
- Modify the role name and role description
- View the basic information of the role
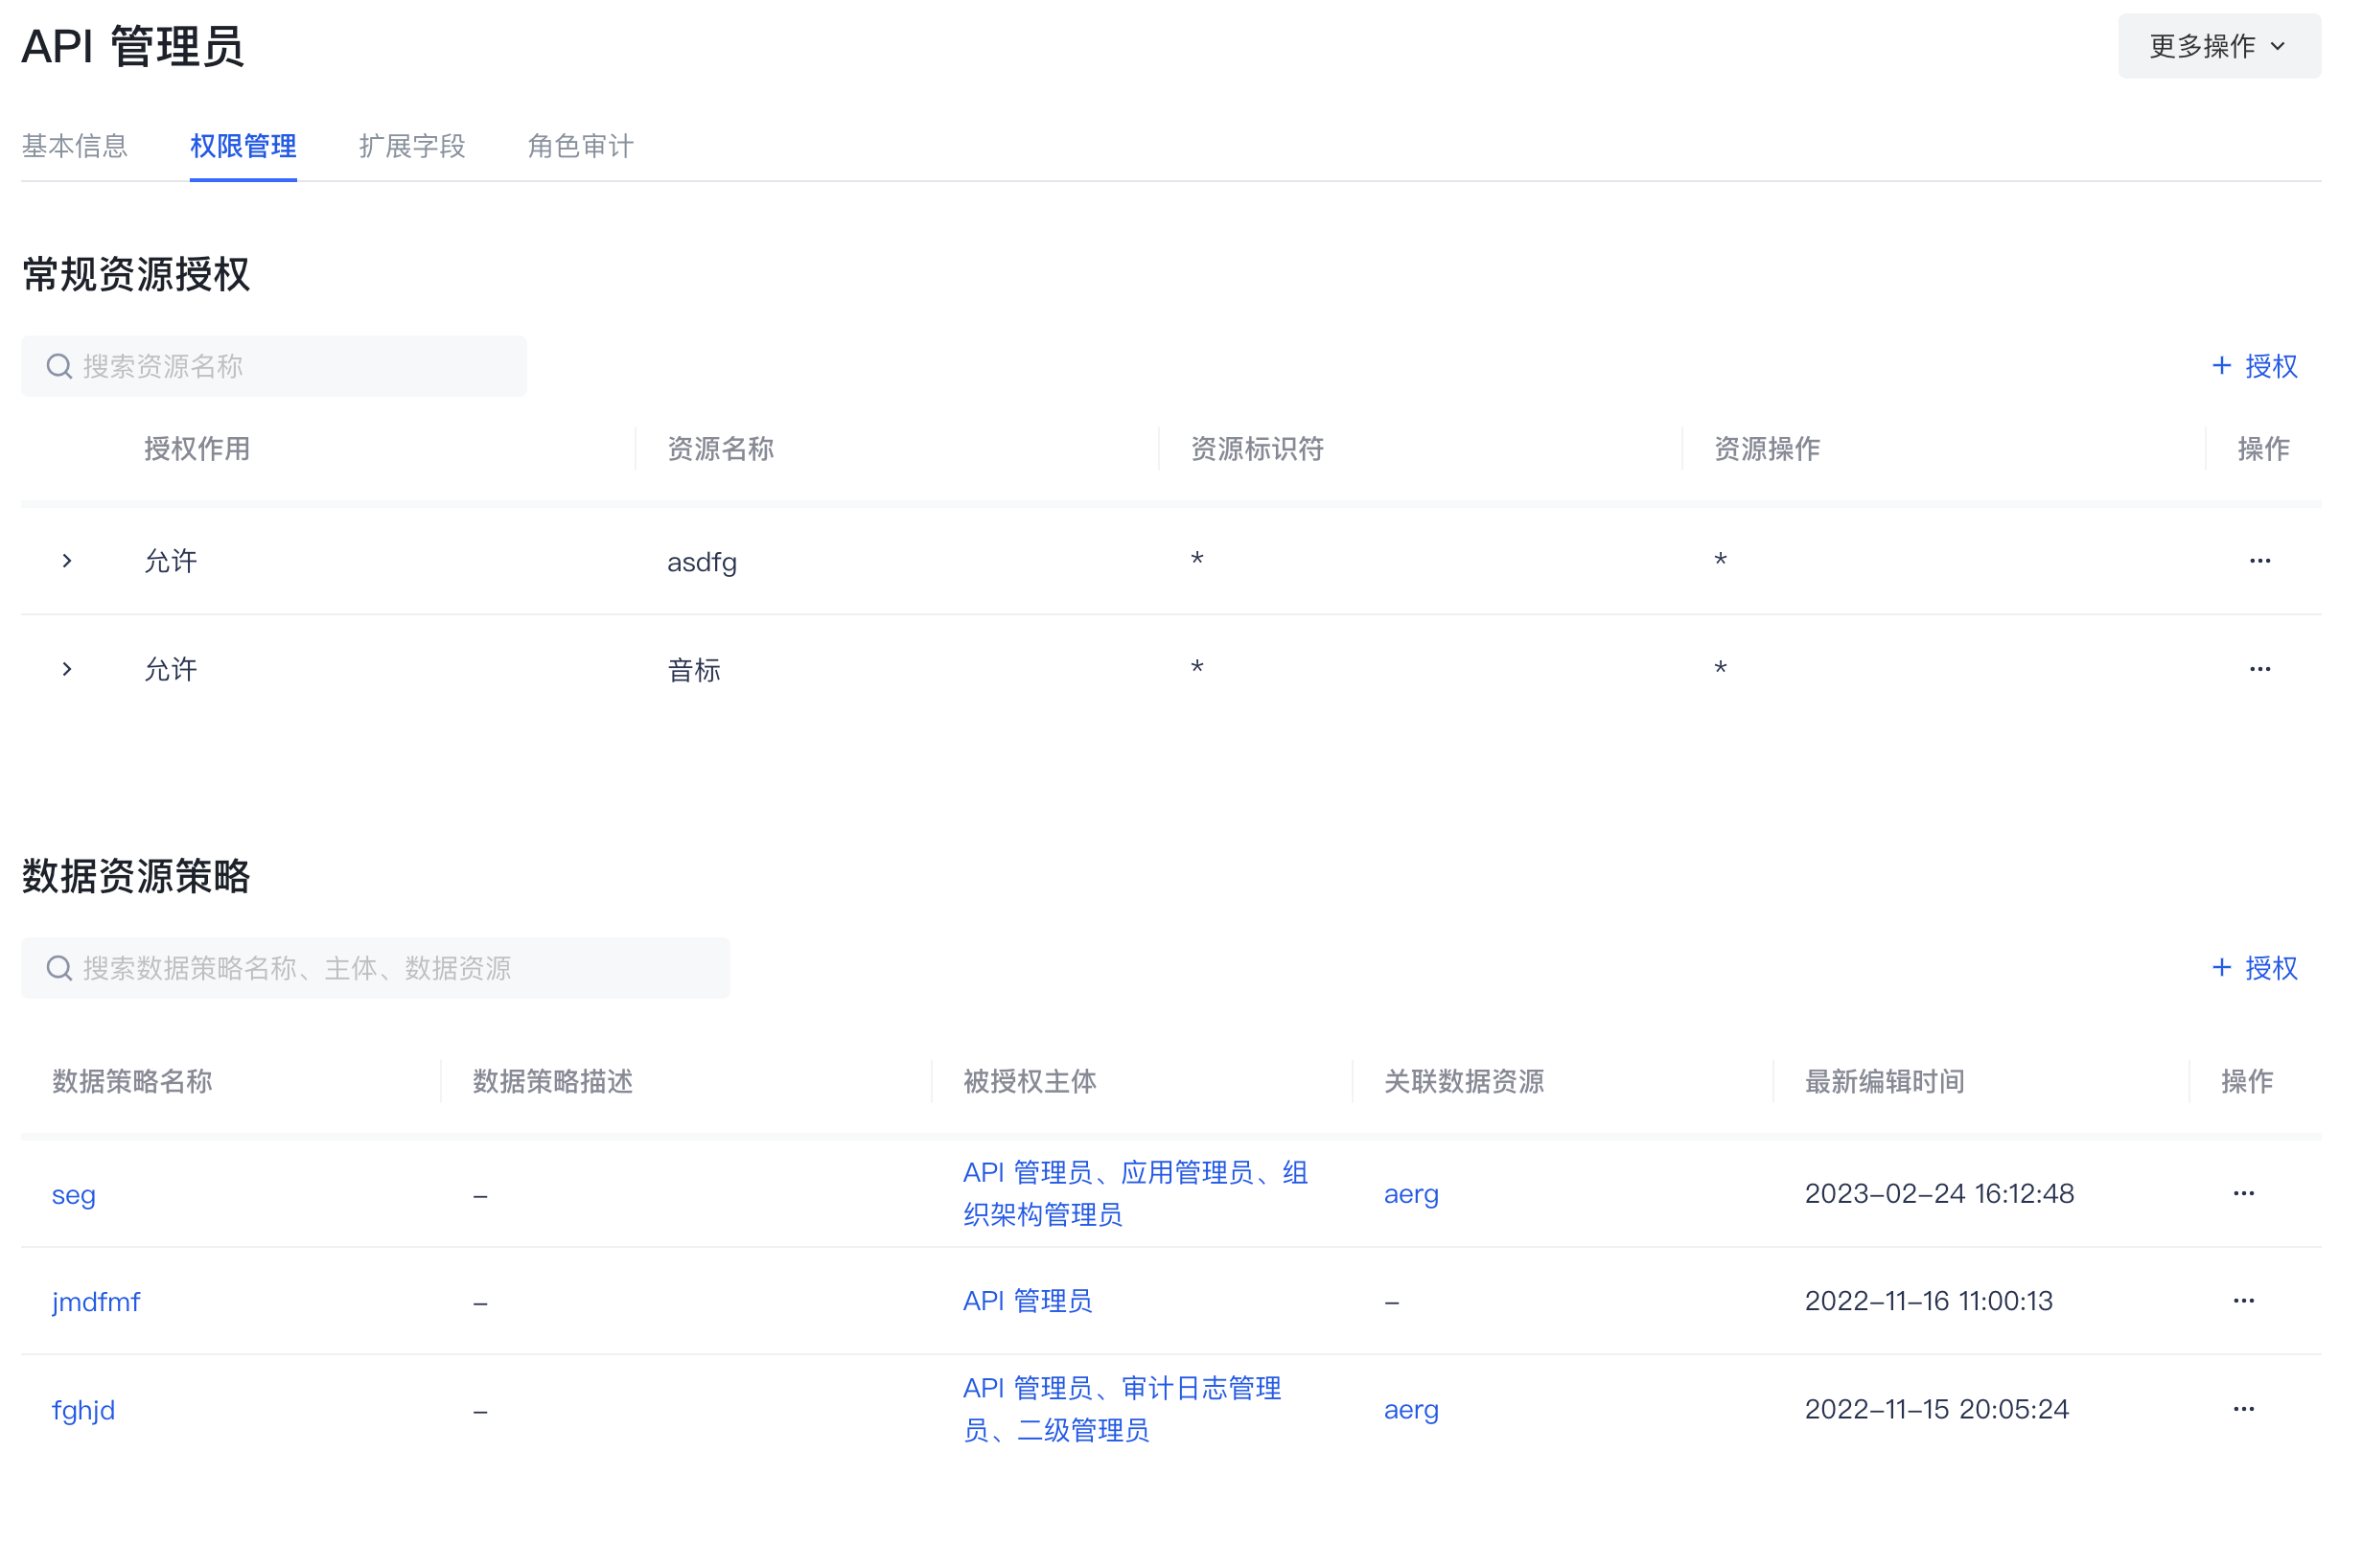
Role permission management
On the permission management page of the role details, you can mainly
- Manage the general resource authorization associated with the role
- Authorize general resources to the current role
- View and modify the general resource authorization associated with the current role
- Remove the general resource authorization associated with the current role
- Manage the data resource authorization associated with the role
- Authorize the data policy to the current role
- View the data policy and details authorized to the current role
- Remove the data policy authorized to the current role
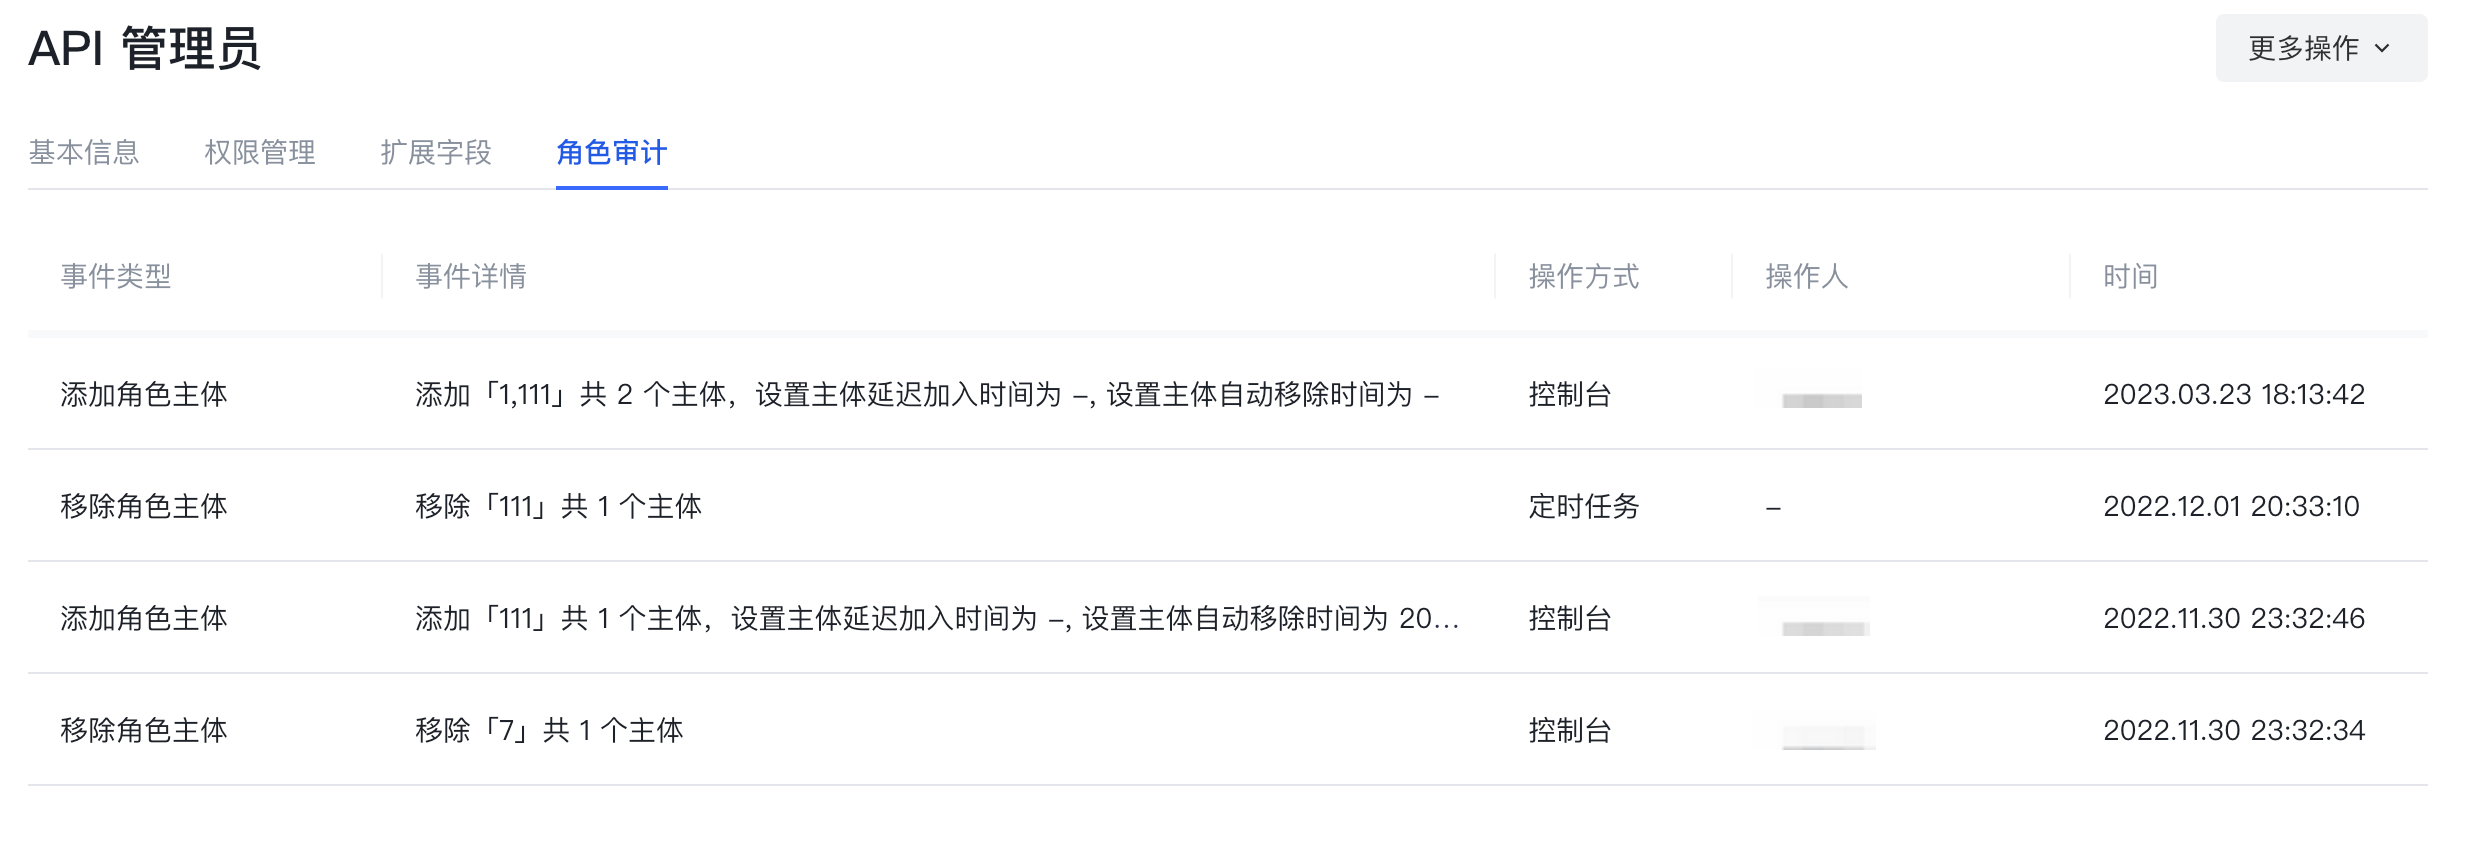
Role Audit
On the Role Audit page of the role details, you can view the historical change records of the current role, mainly including
- Create a role
- Add a subject to a role, remove a subject
- Add authorization to a role, remove authorization
Data resources
Data resources are resources that are closer to the actual business data permission management scenario. In data resource permission management, a complete closed loop of definition, authorization, and permission view query of various types of resources such as menus, document directories, APIs, and contracts can be realized.
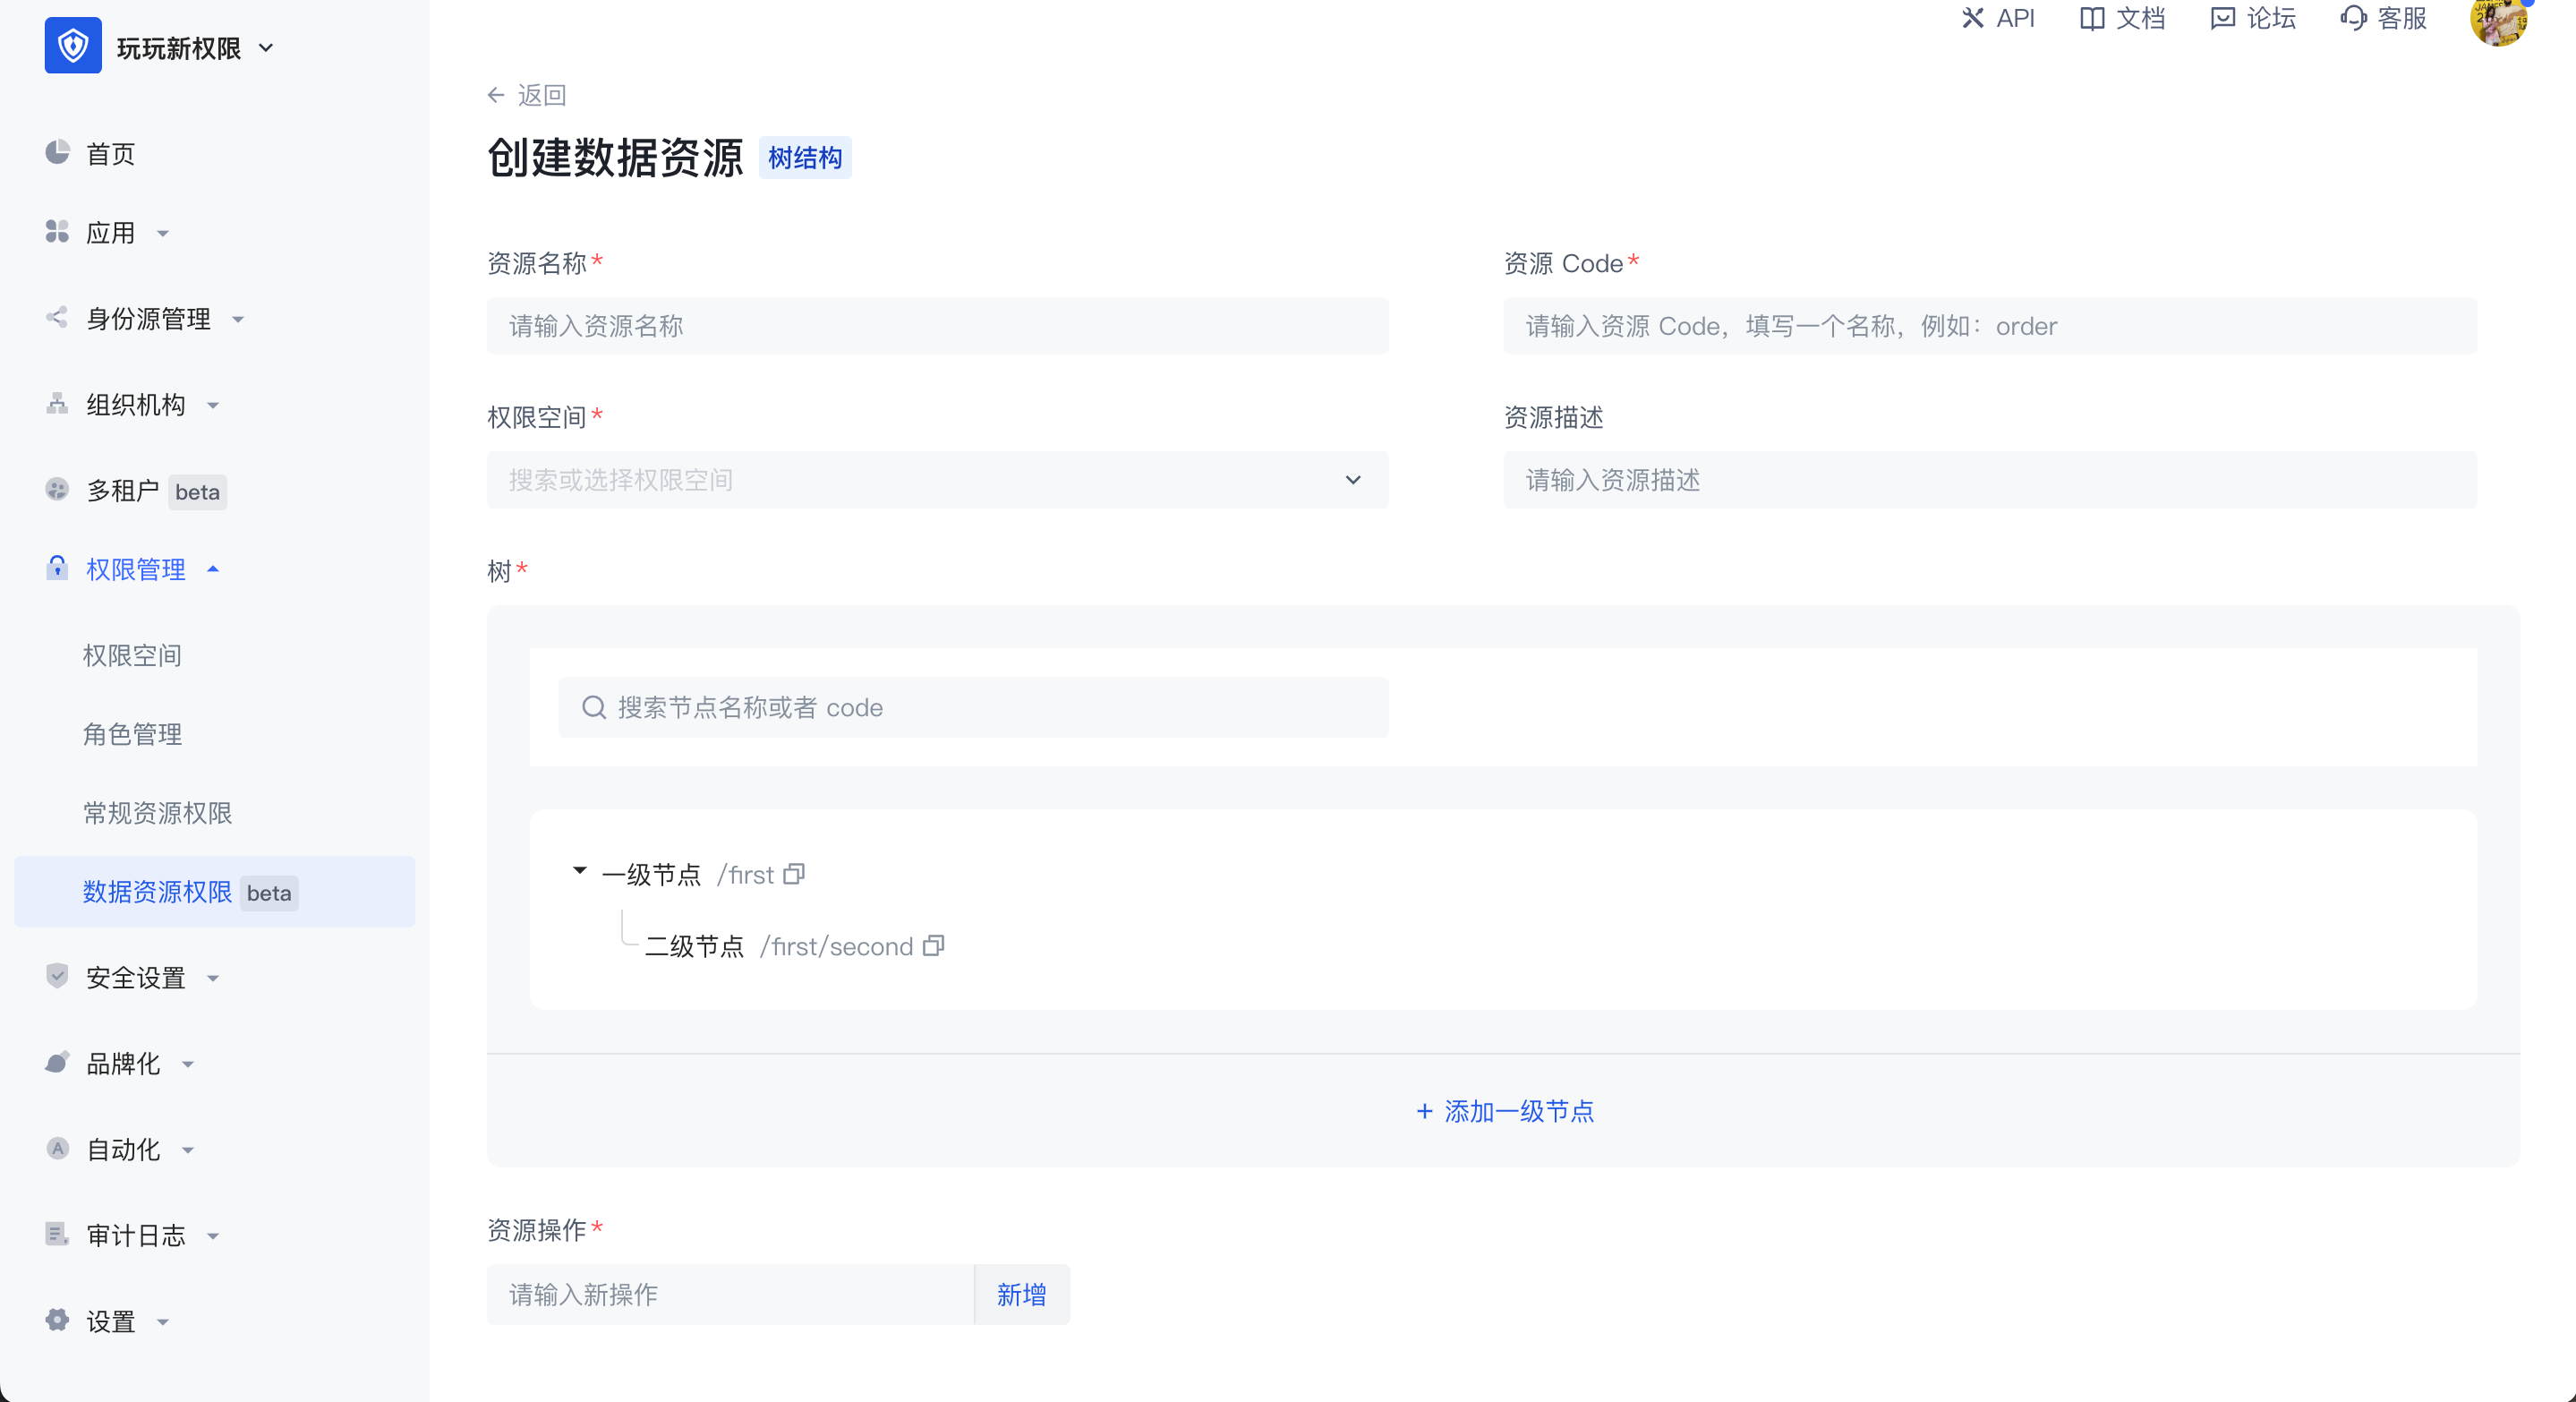
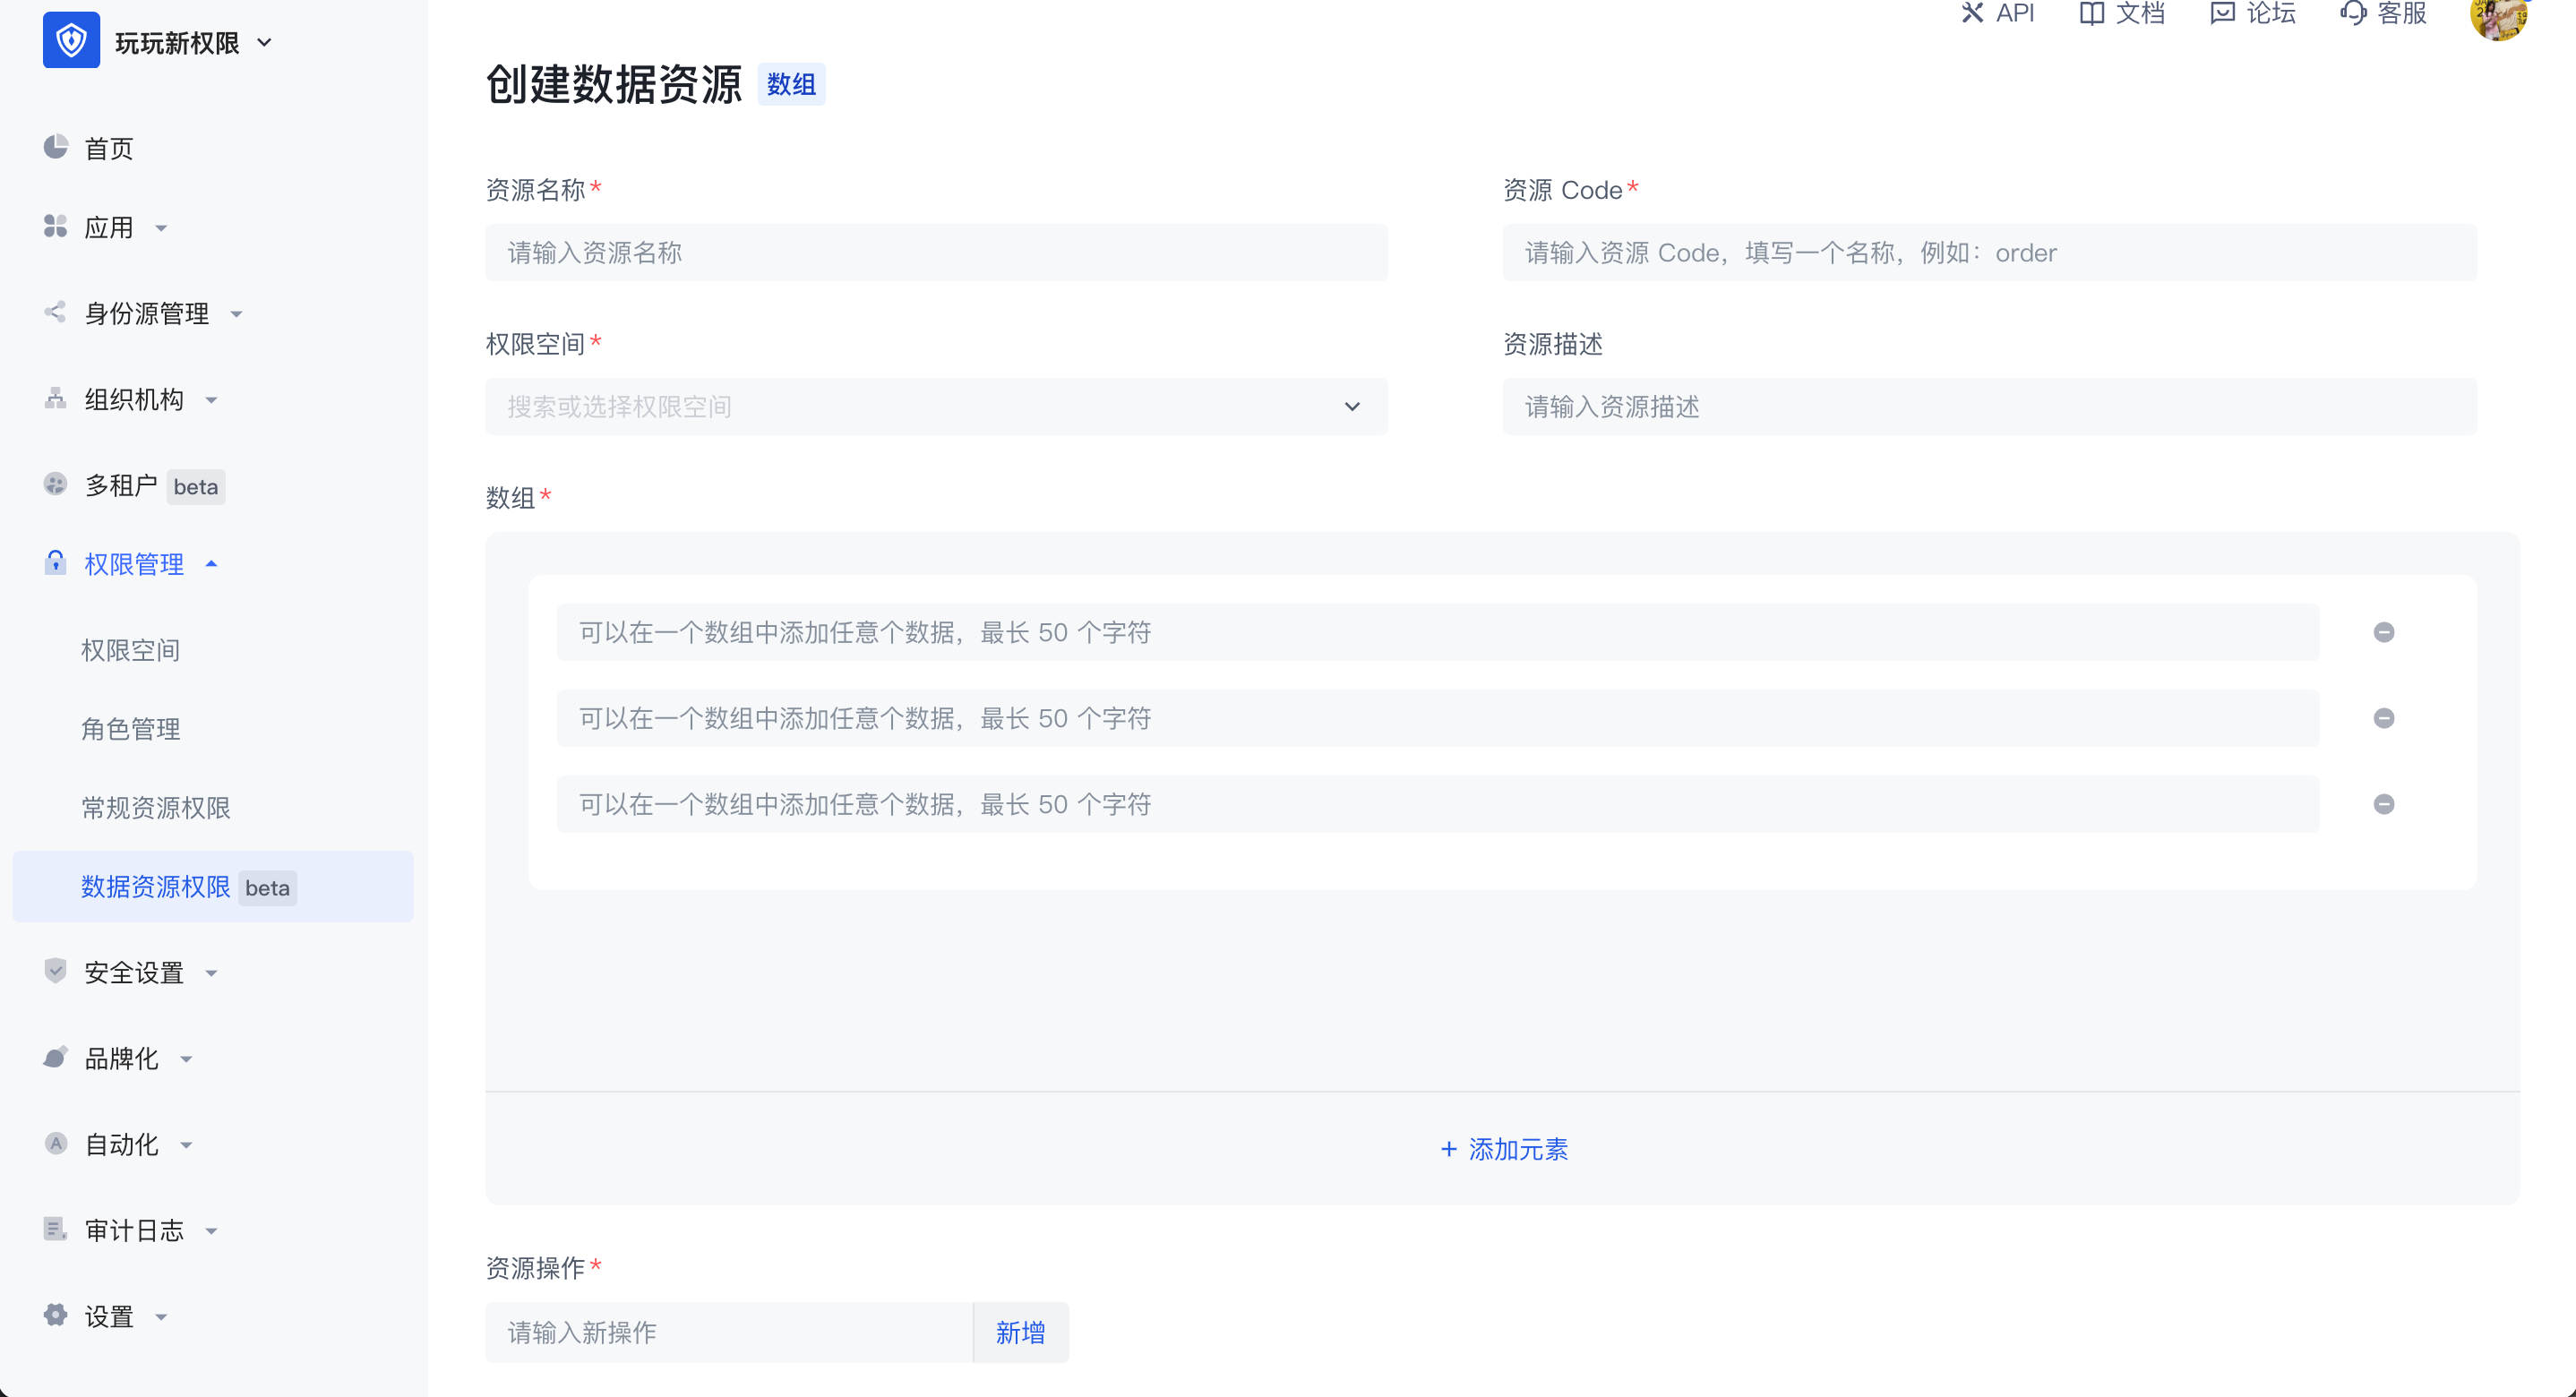
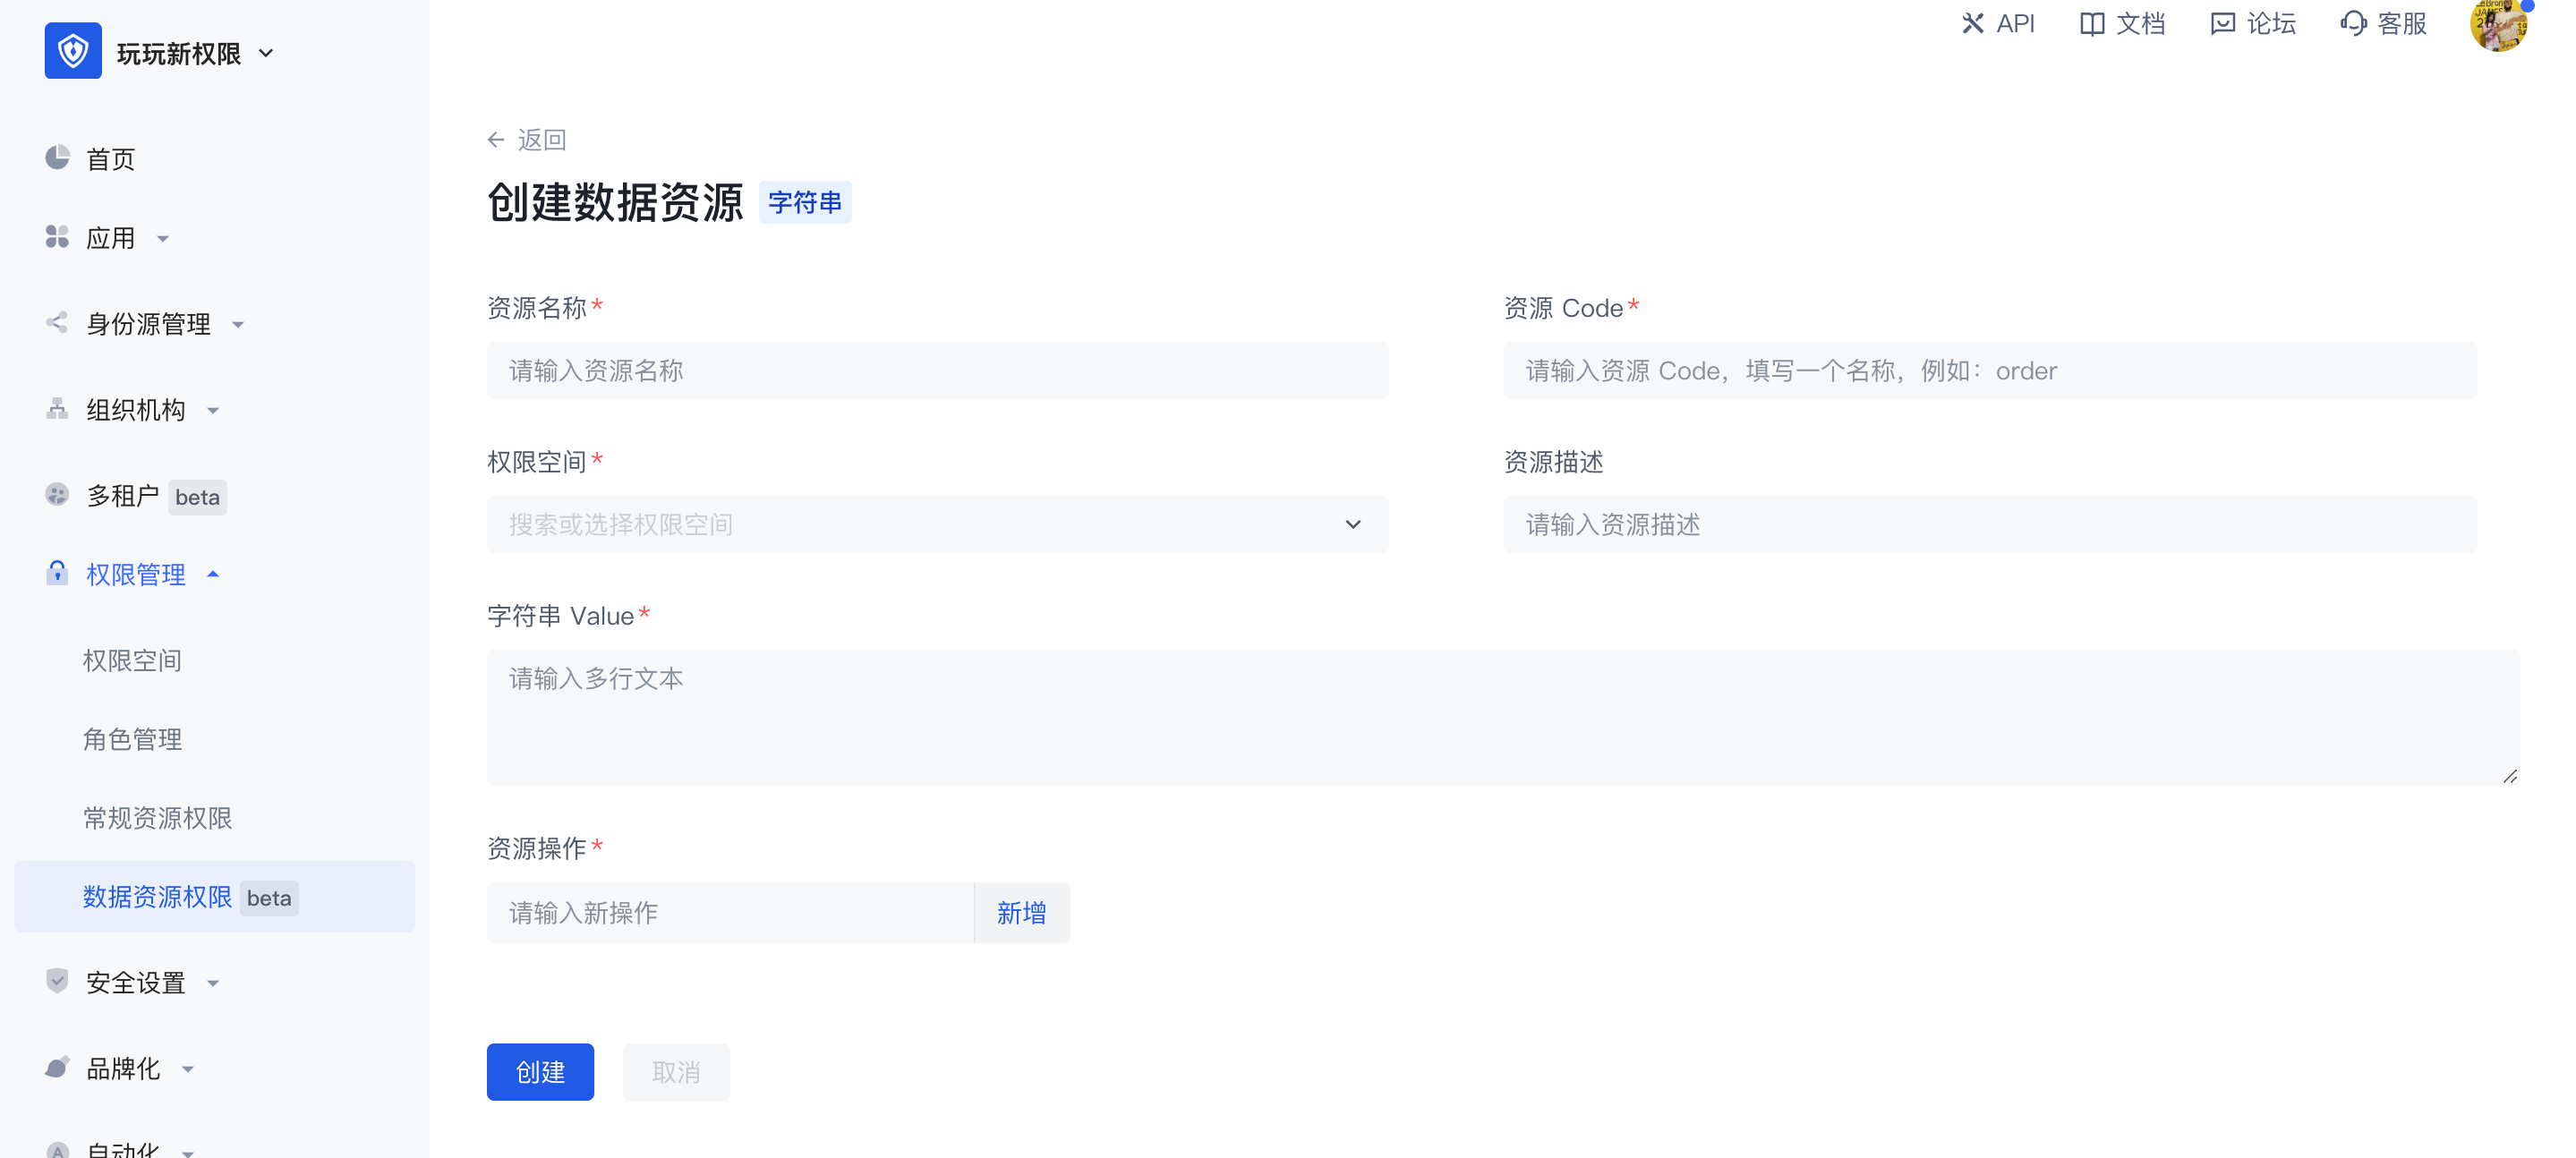
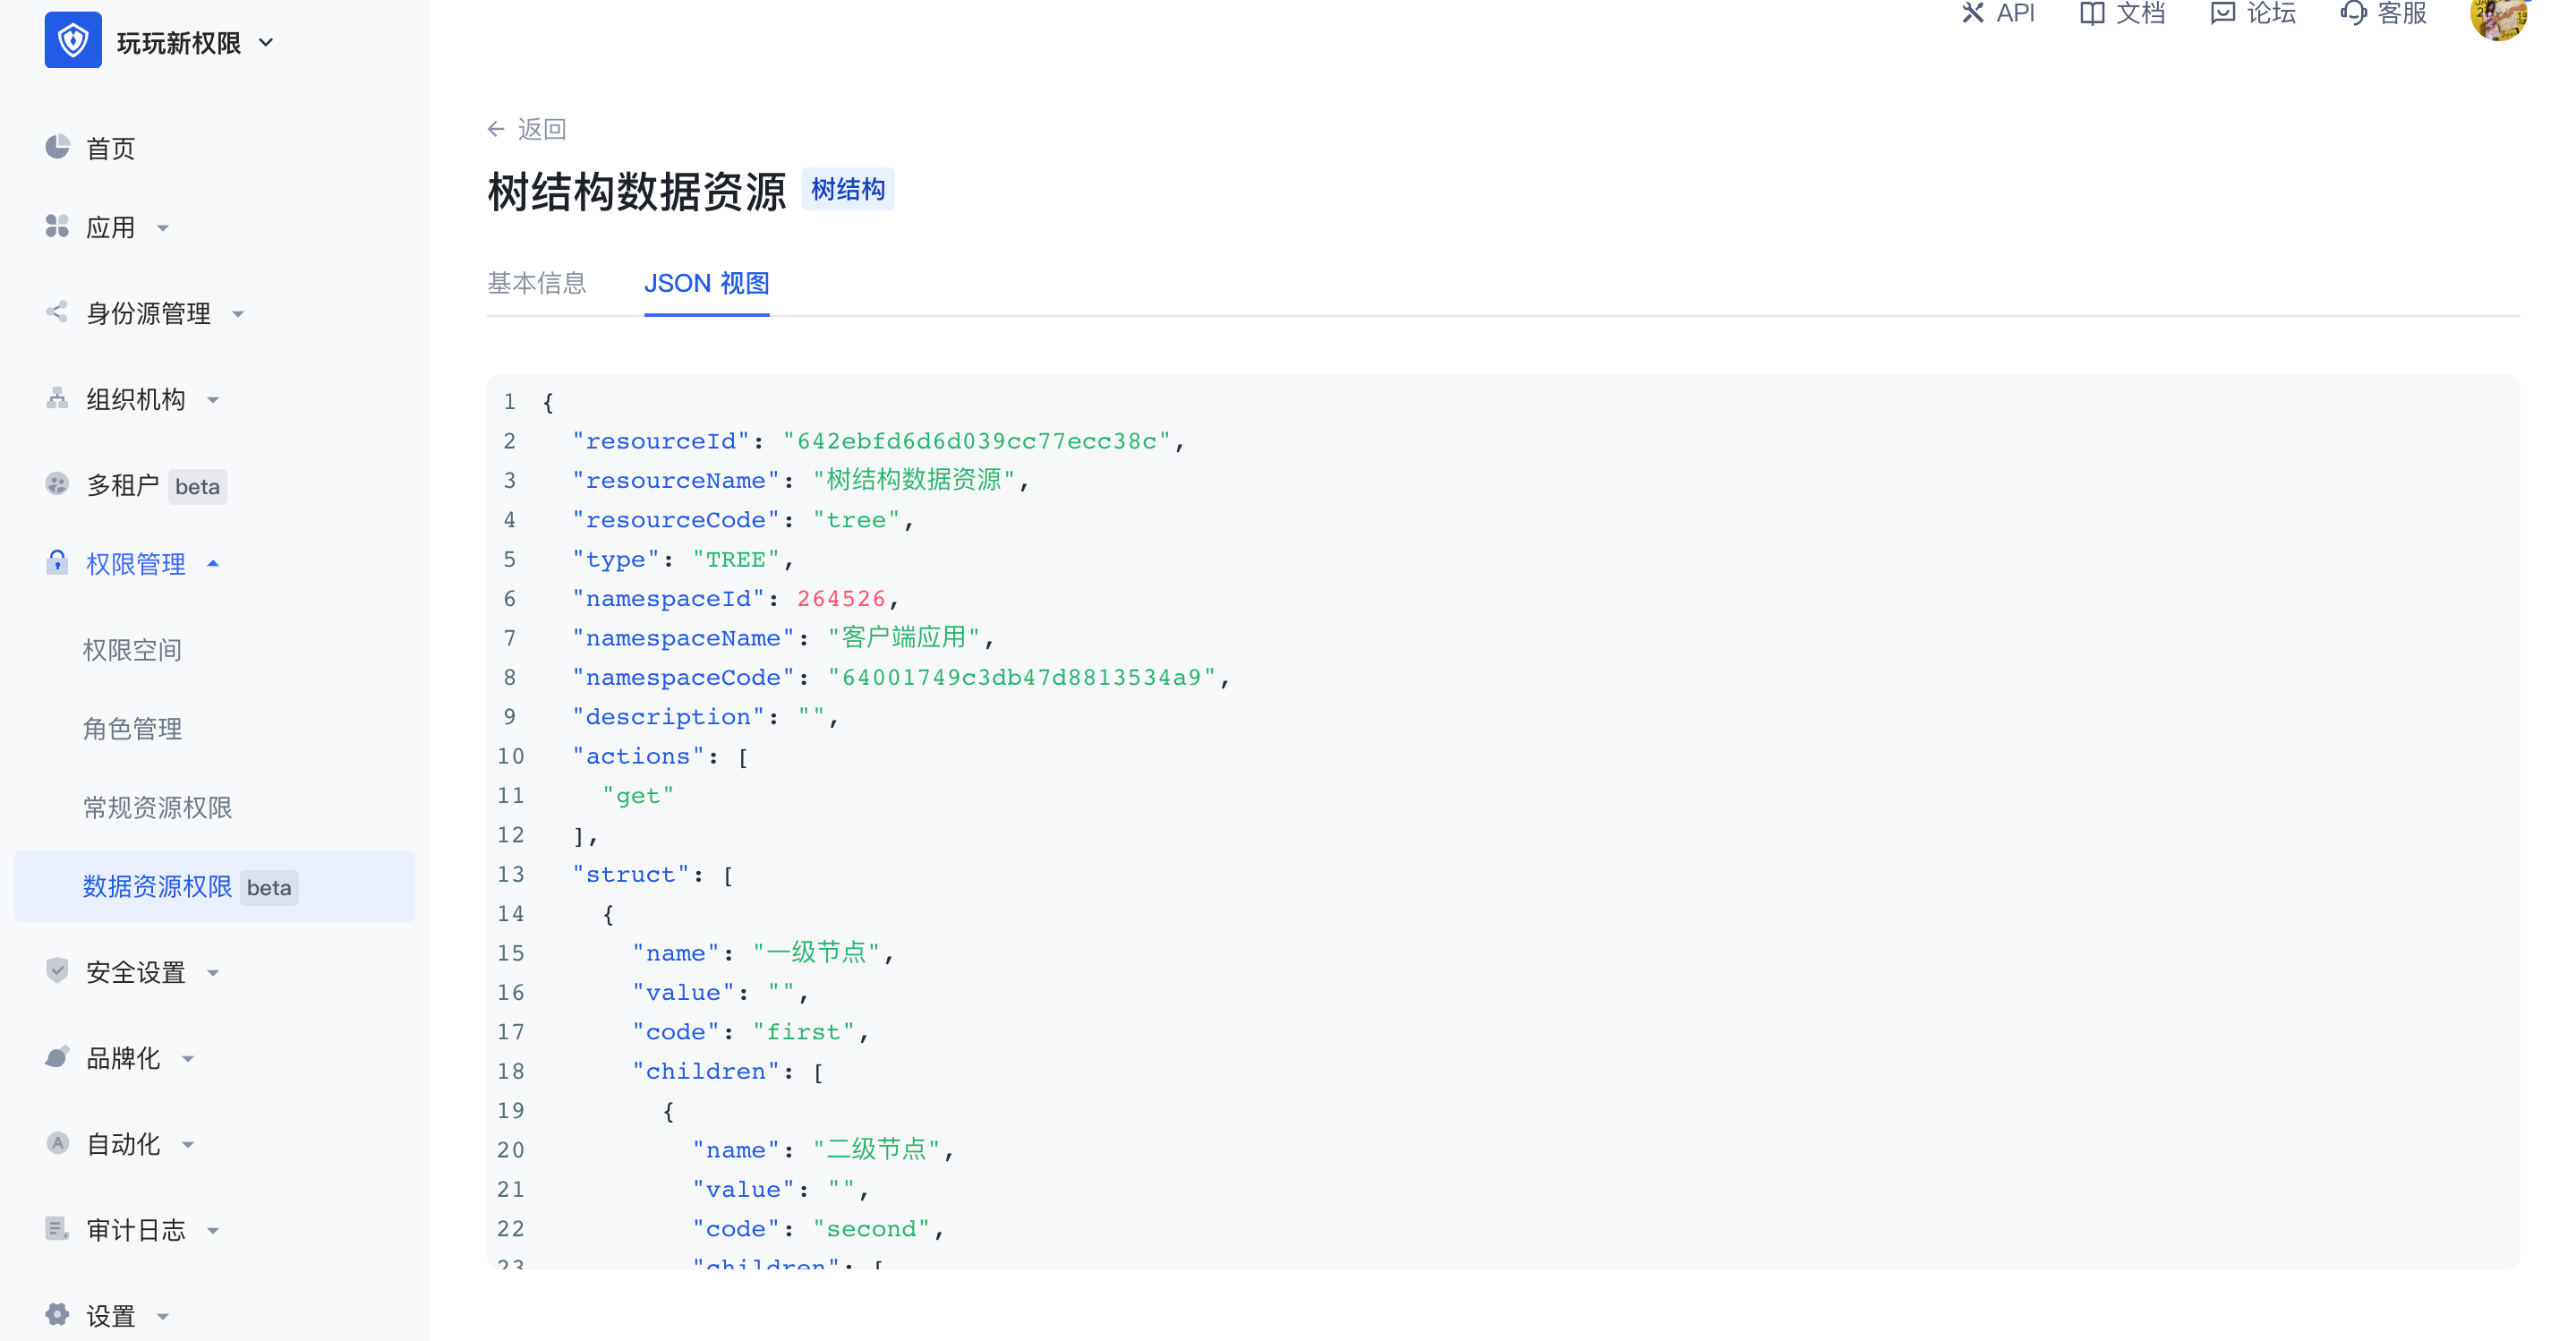
Data resources provide three types of resource structures, namely tree structure type, array structure type, and string structure type, so that users can easily create resources of corresponding structures. Each type has its own unique data structure, and each type of data resource has many application scenarios. When entering the data resource permission management page, you can edit and view the list of data resources in the entire user pool. Click Create Data Resource in the upper right corner to select the data type.

- Tree structure
There are two common application scenarios for tree structure data resources, namely tree structure menus and document systems with directory hierarchies. In the scenario of managing menu resources, when the super administrator wants to set the system menu as a resource in the permission management and wants to enable each menu administrator to have the permission to use different menu resources, the menu can be split into different resources and authorized to different subject objects. The tree structure is hierarchical, and the value in each node can be customized. In the tree structure, child nodes can be created, and nodes of the same level can also be created.
- Array structure
The common application scenario of data resources with array structure is data management such as contract terms. Multiple data resources with array structure can be added. Any data can be added in an array, with a maximum of 50 characters.
- String structure
The common application scenario of data resources with string structure is the management of resources such as APIs. It is generally used for path reference. In string data resources, multiple lines of text content can be entered without restriction, or the API path can be filled in to implement resource management of APIs.
The difference between data resources and regular resources is:
- Data resources provide three common data resource types, which can facilitate users to create various types of resources more flexibly;
- Authorization method. Data resources cannot be directly authorized to the subject object. They need to be packaged into policies for authorization. Regular resources can be directly authorized to roles.
Data resource details: After creating a data resource, you can view and edit the value in the resource in the resource details page. After creation, the permission space and resource code in the resource cannot be modified.
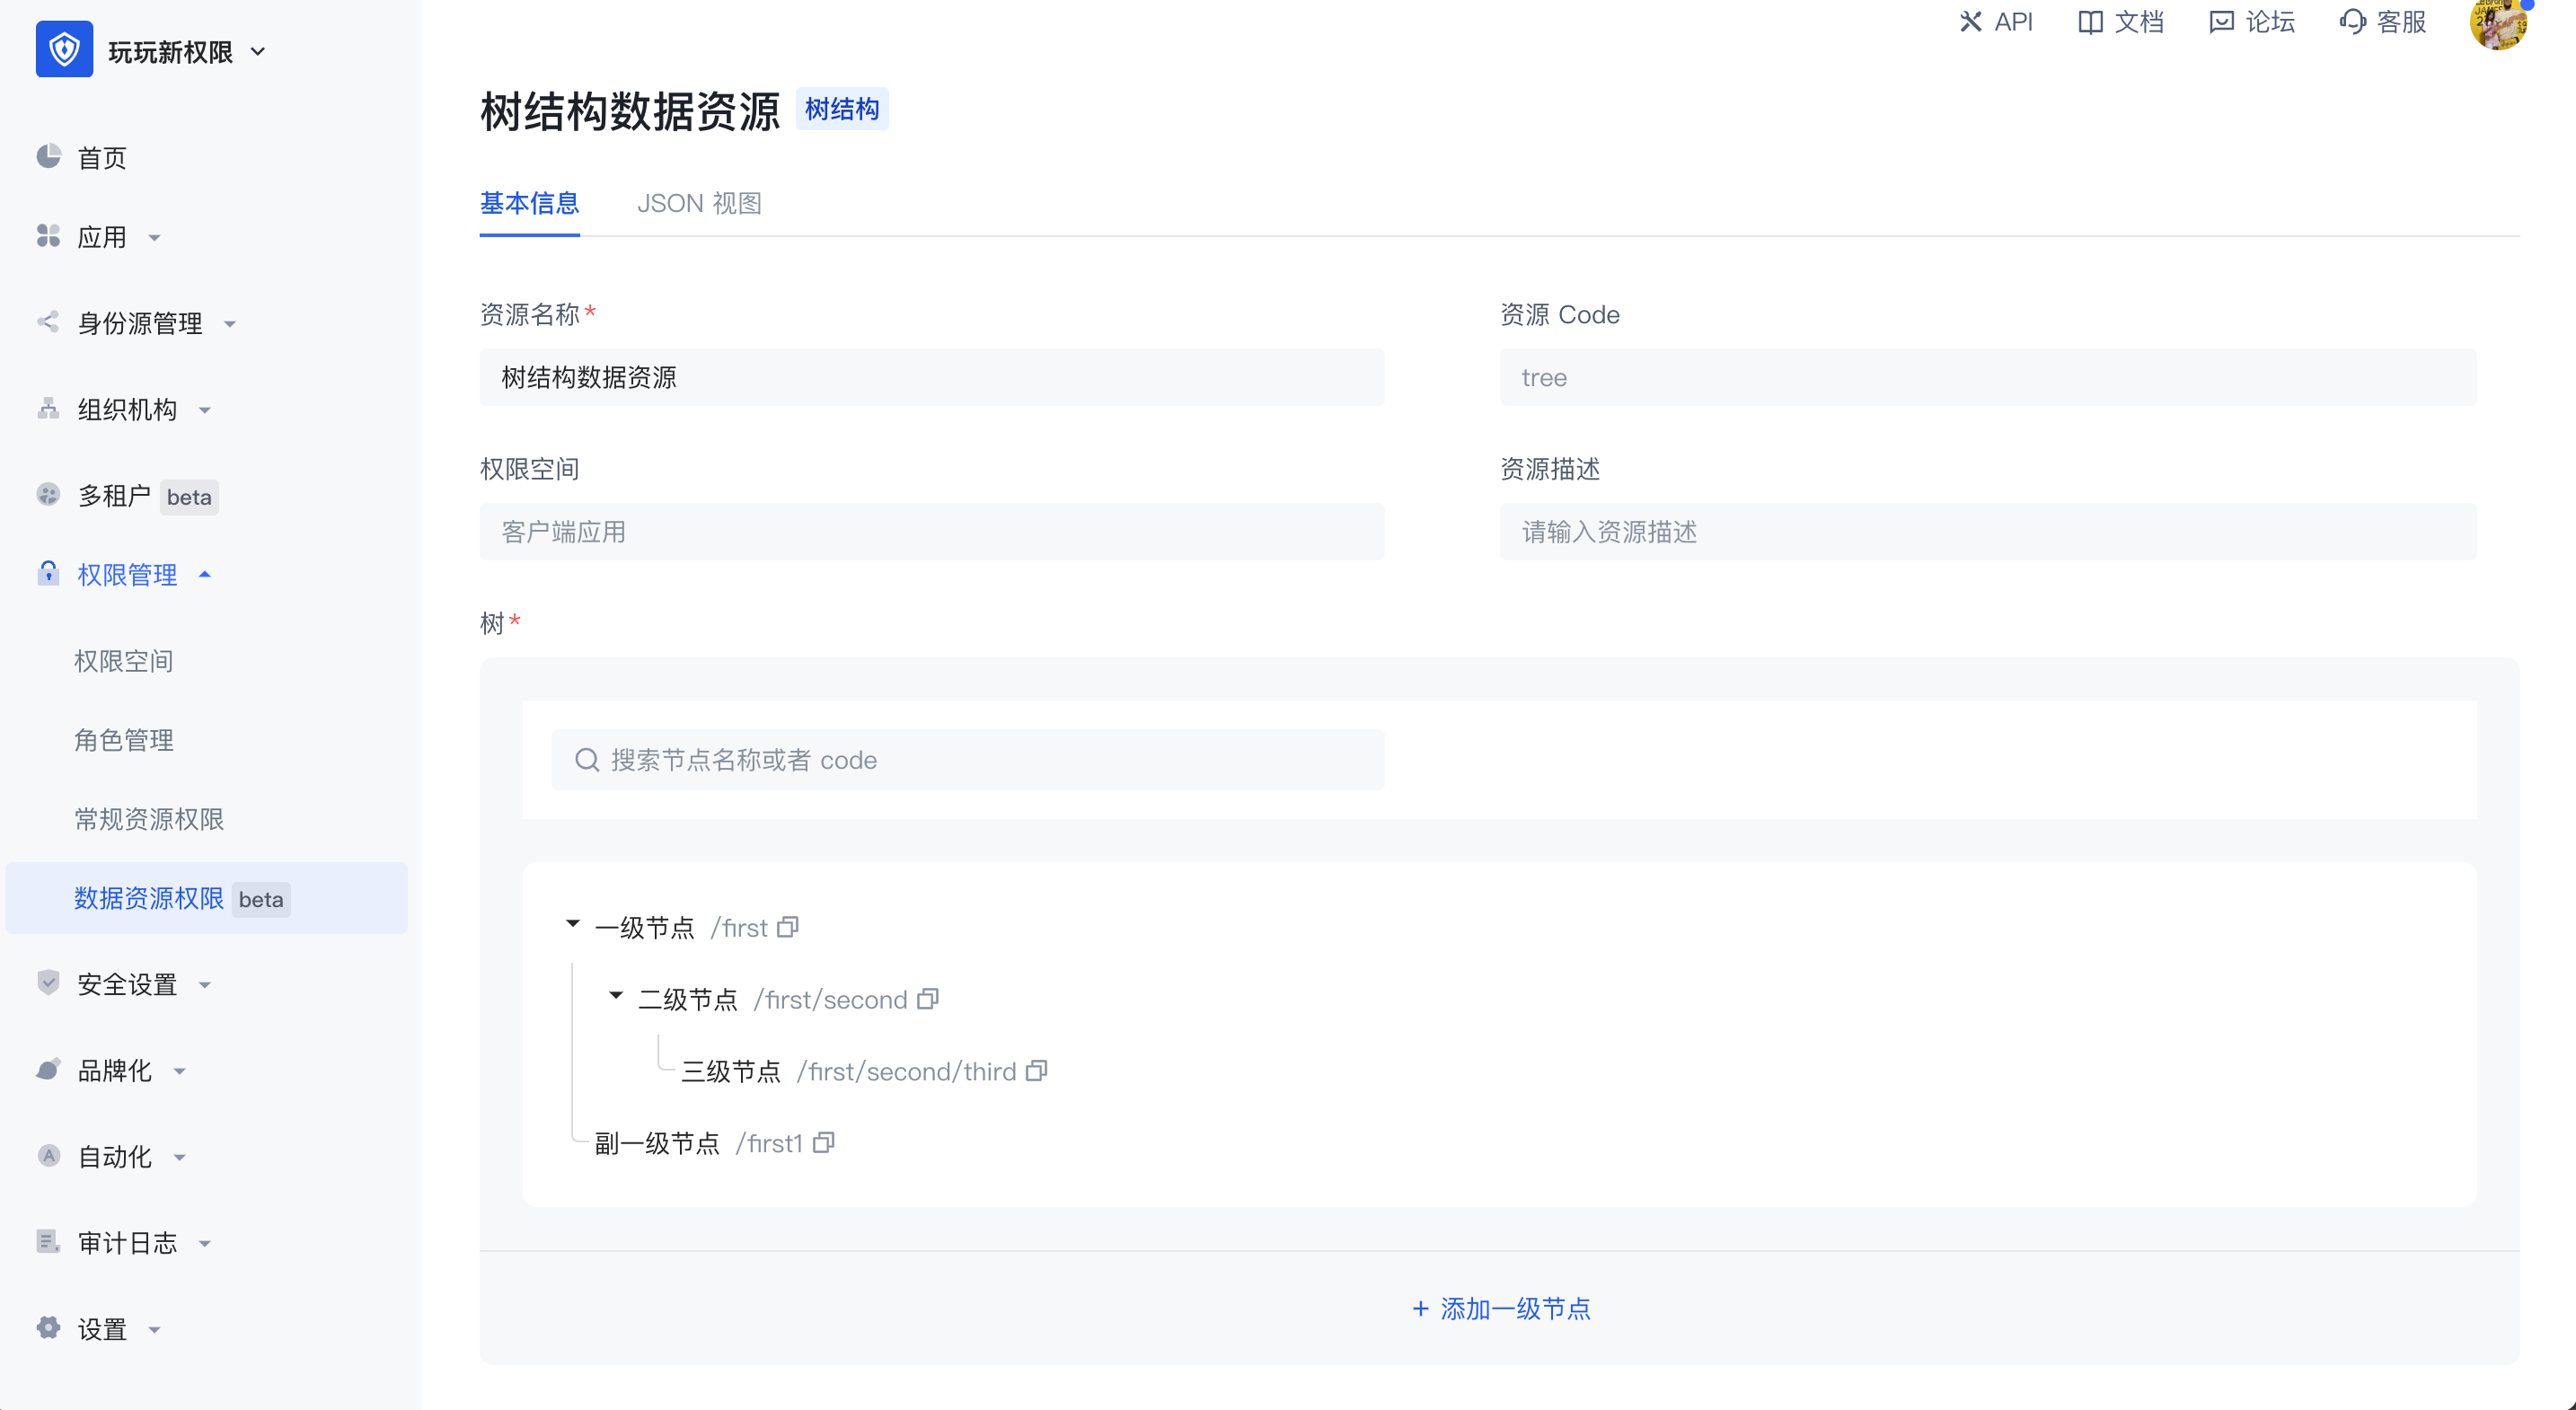
JSON view: Supports viewing the data representation of resources in JSON in the resource details.
Data policy and authorization
Data policy
Data policy: Packing together several resources, operations, authorization roles and restrictions is called a policy.
In the data policy list, you can view all data policy authorization subjects and related data resources, and support adding, editing, modifying and deleting data policies.
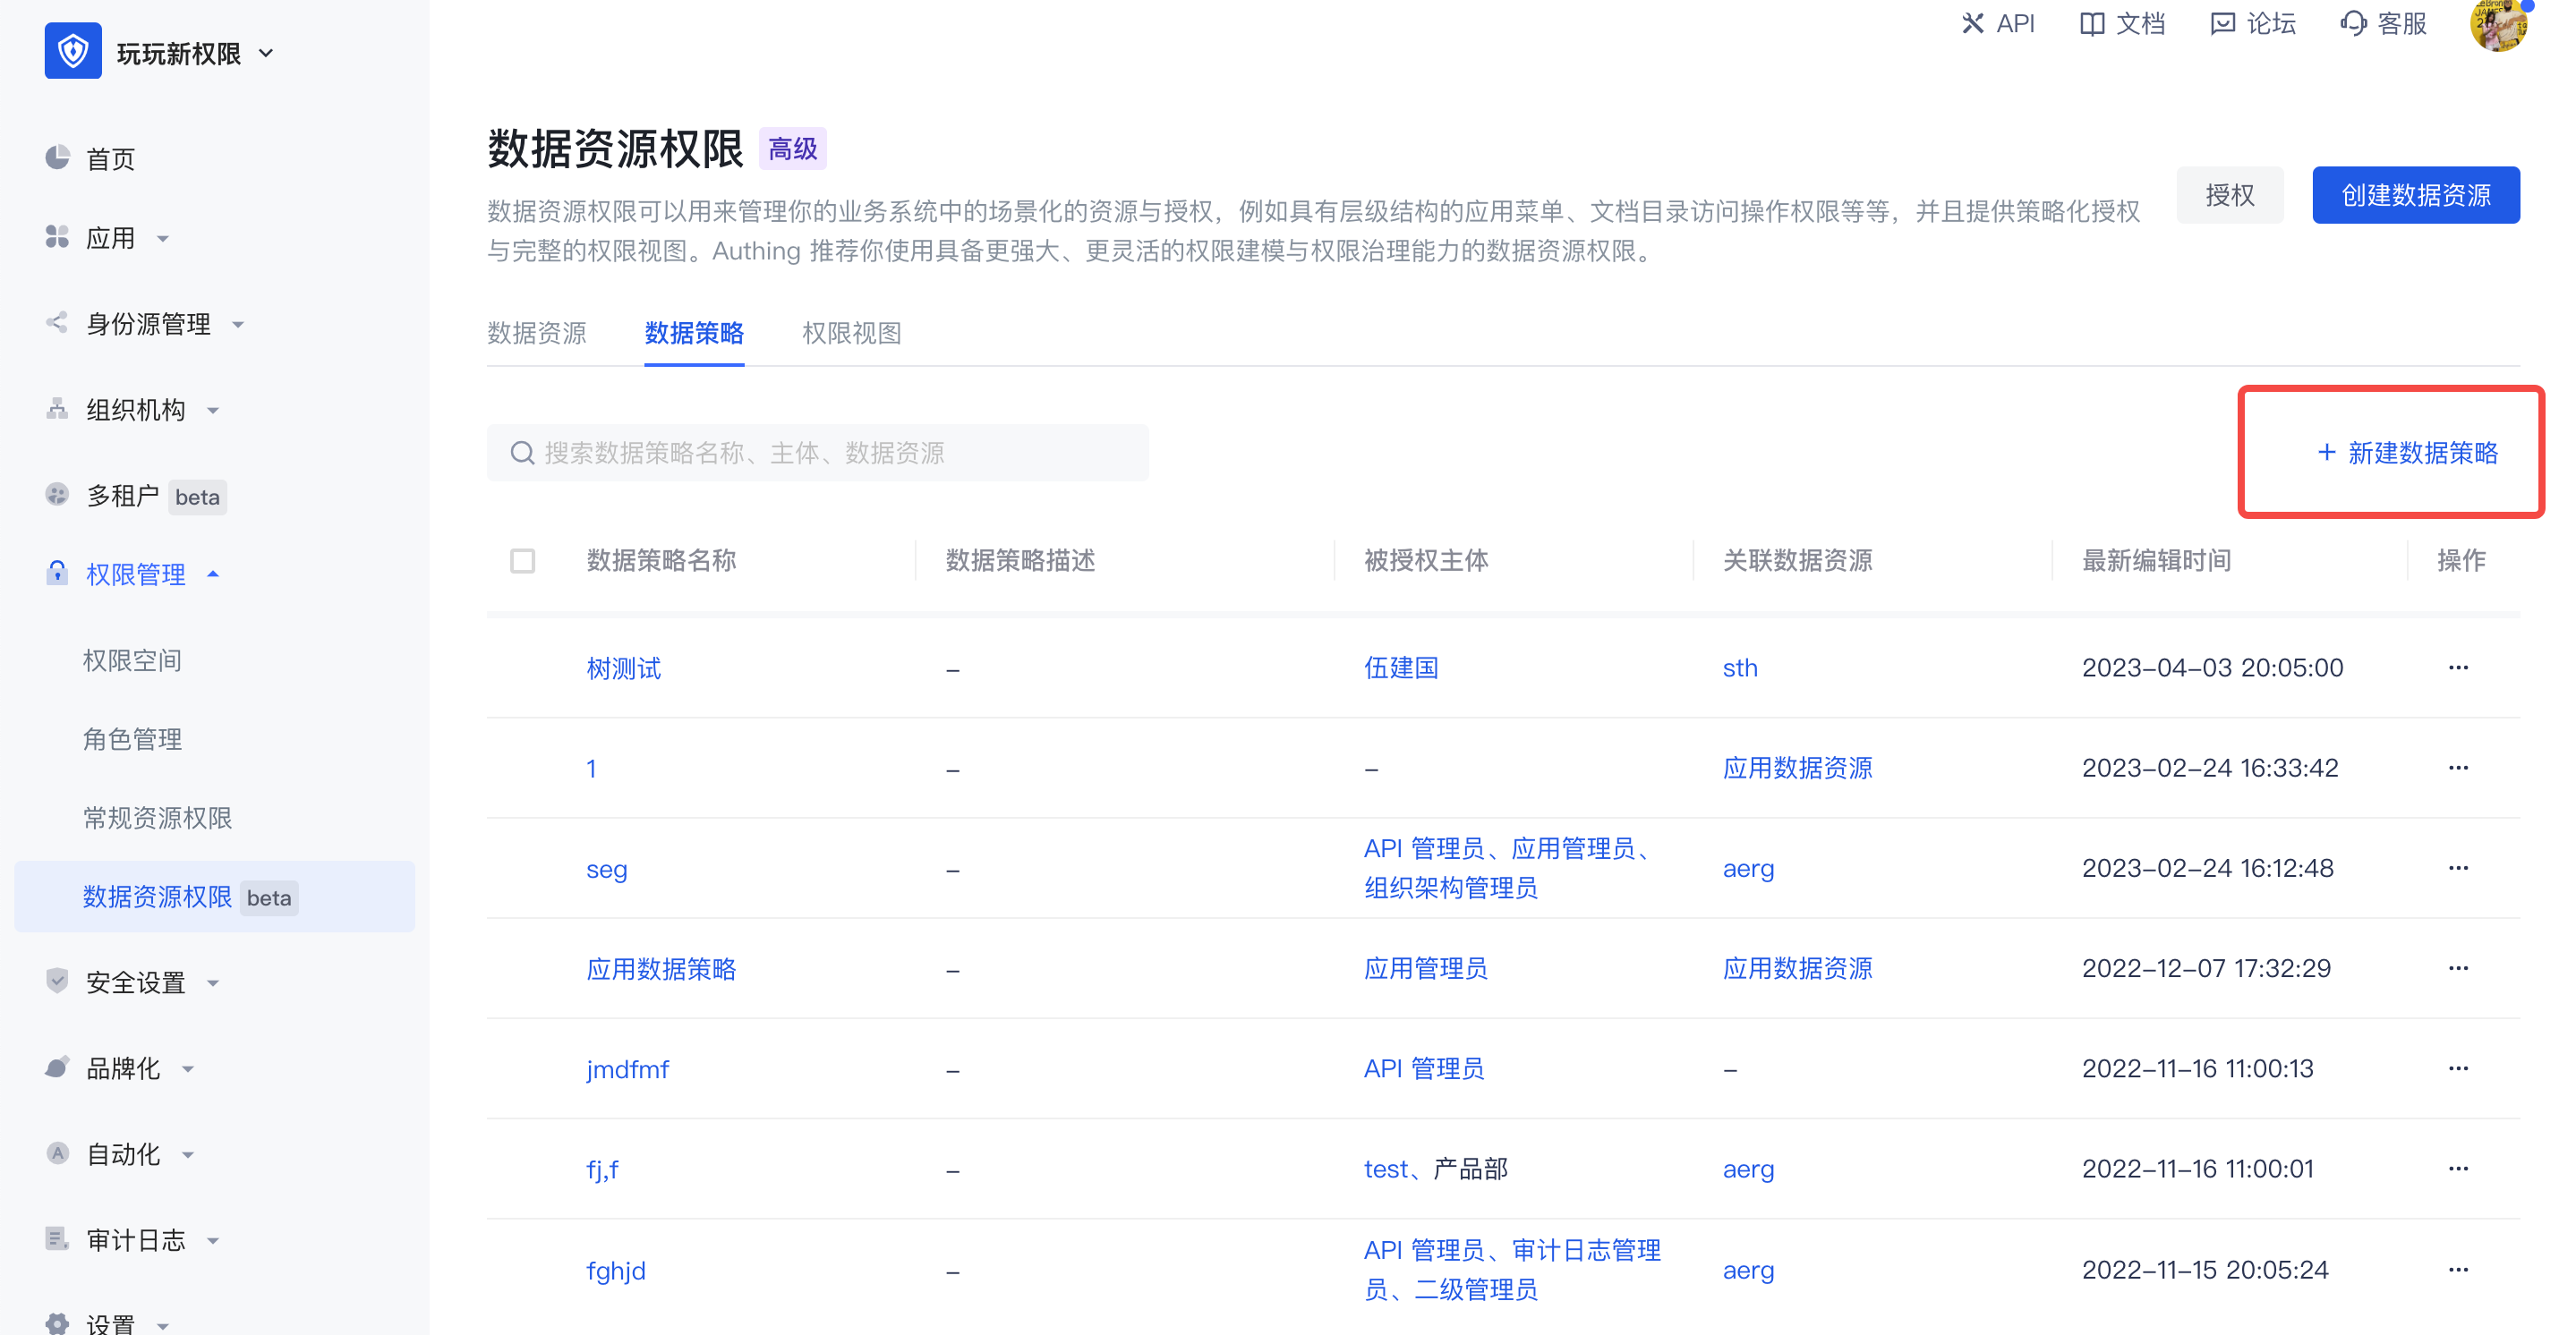
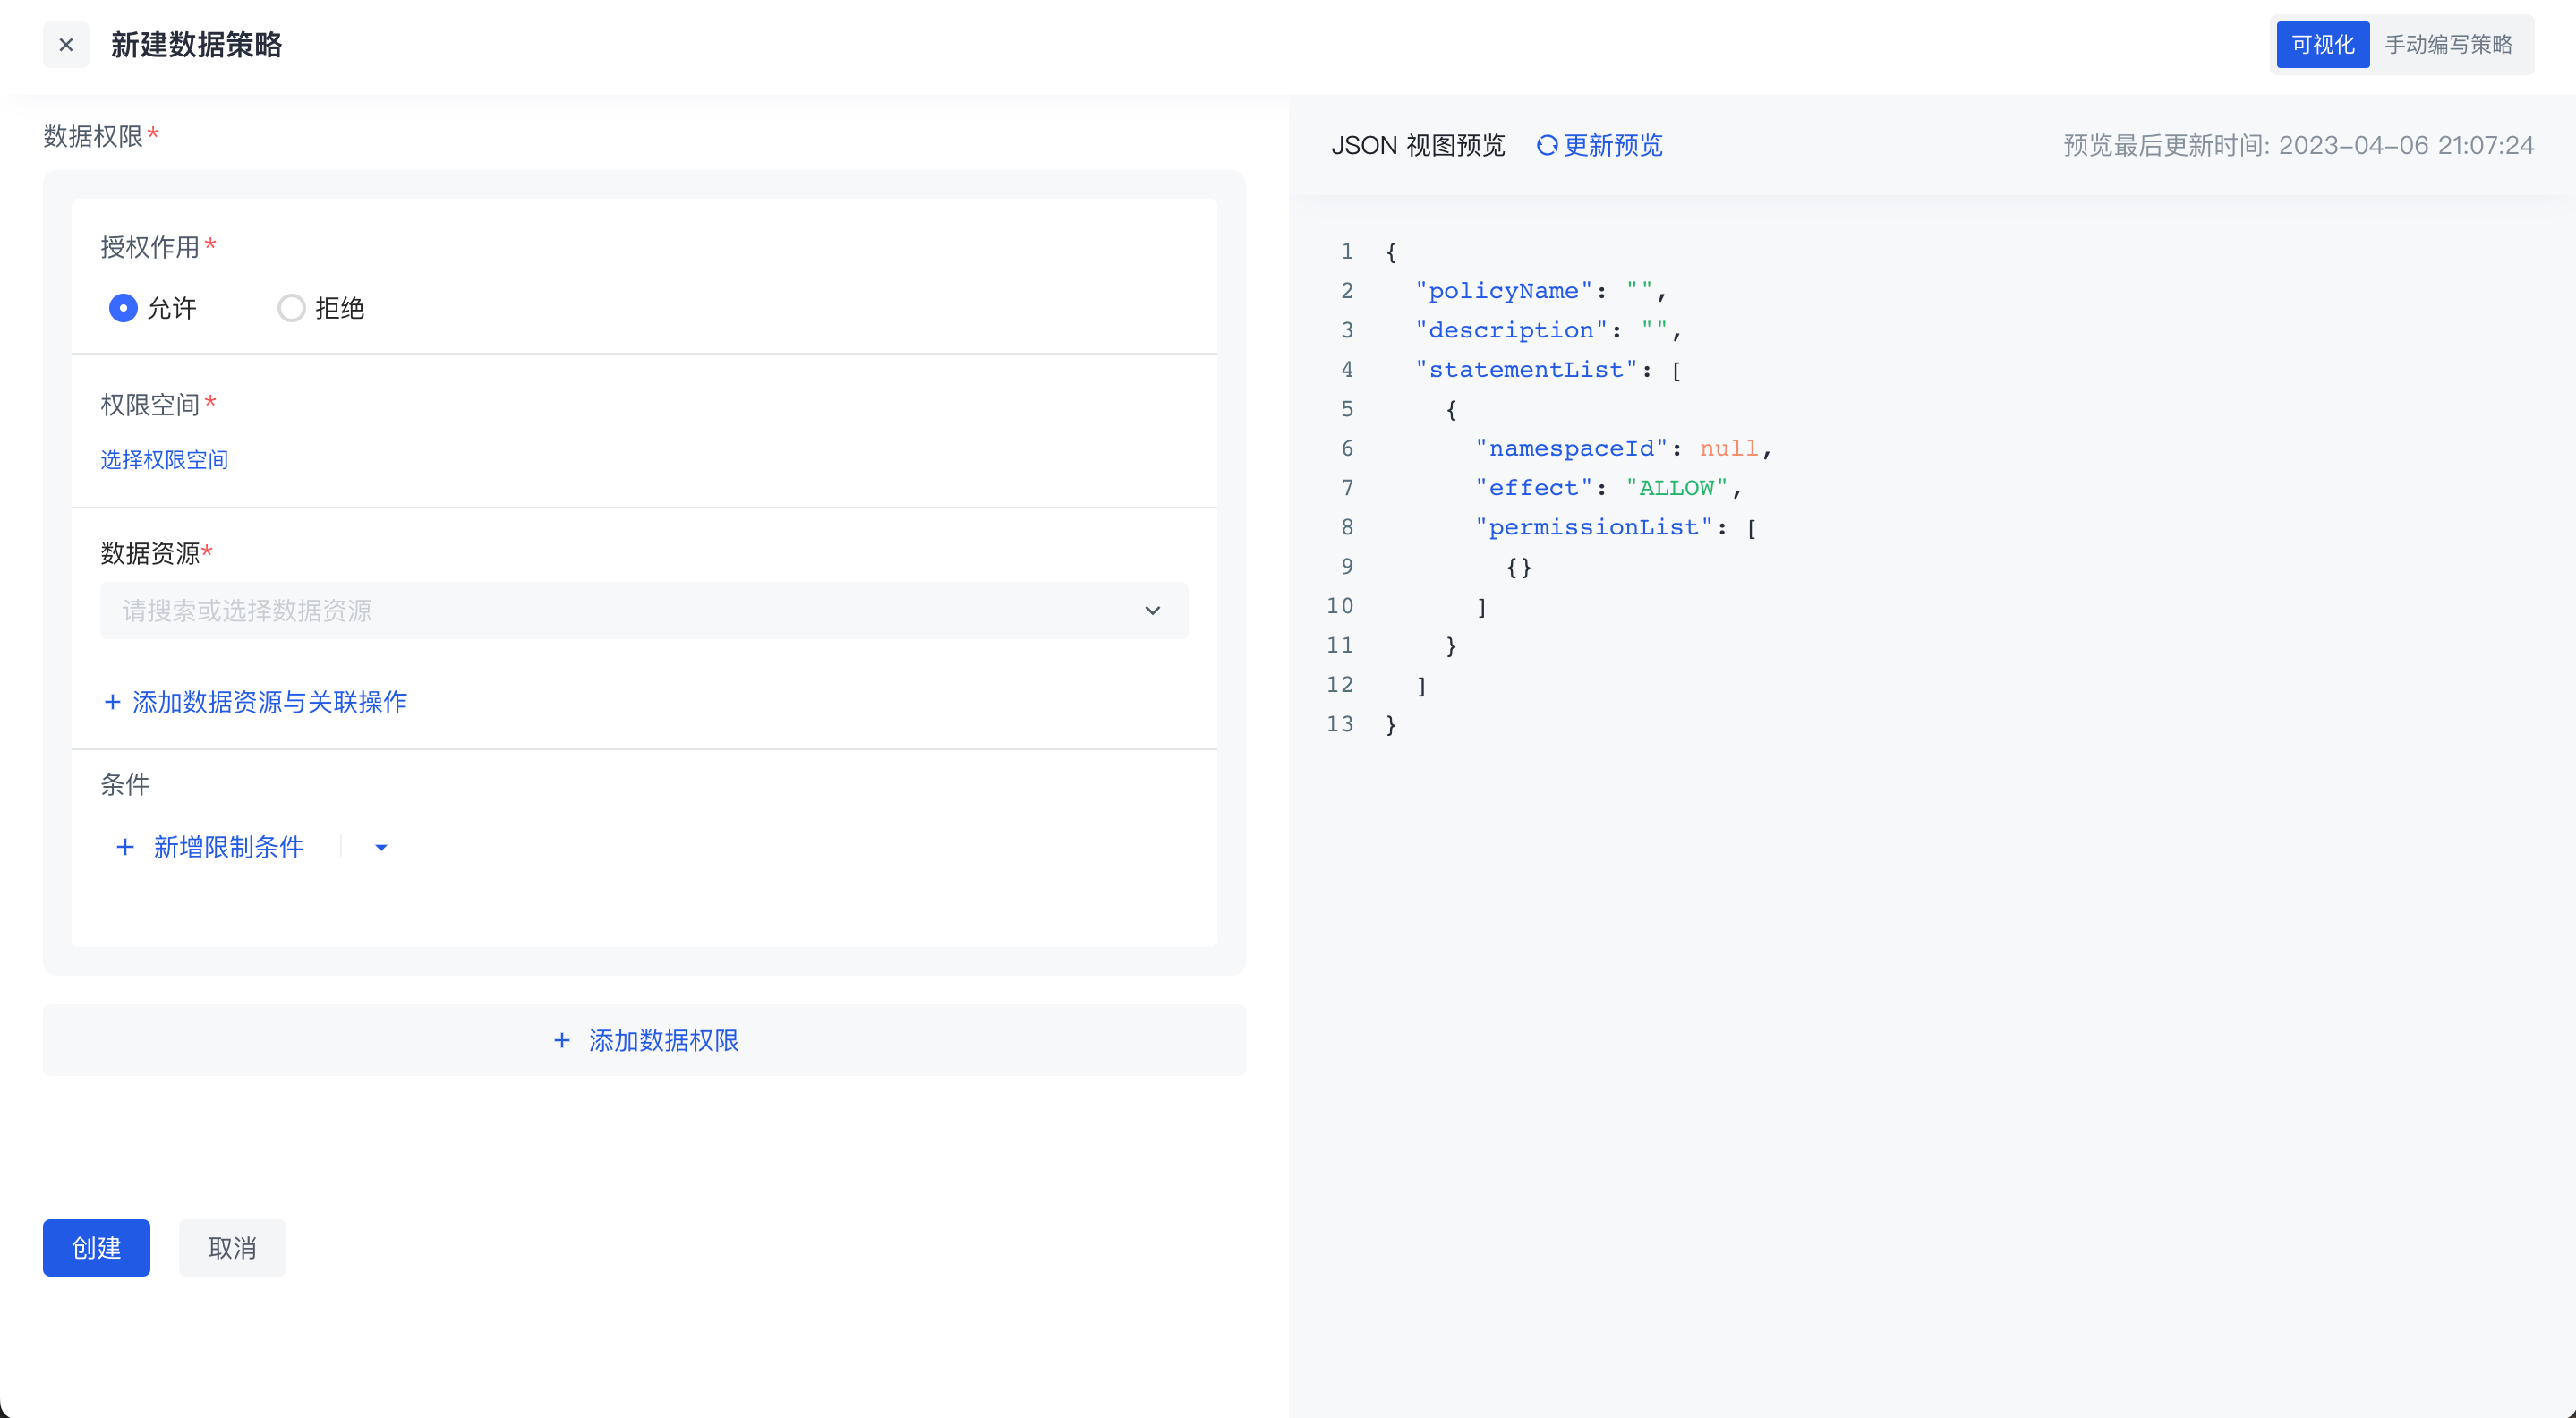
When creating a new data policy, there are two editing methods:
- Visual editing policy
There can be multiple data permissions in a policy. For each data permission, you need to select the authorization role first, and then select the resources and related operations in the permission space. On this basis, you can also add permission restrictions, and finally package the resources together to form a data policy.
In the data policy, you can select resources across permission spaces. If the resource is a tree-structured data resource, select granularity refinement, or select a node at a certain level.
- Manually Write Policies
Switch to the manual writing policy in the upper right corner to write data permission policies through DSL.
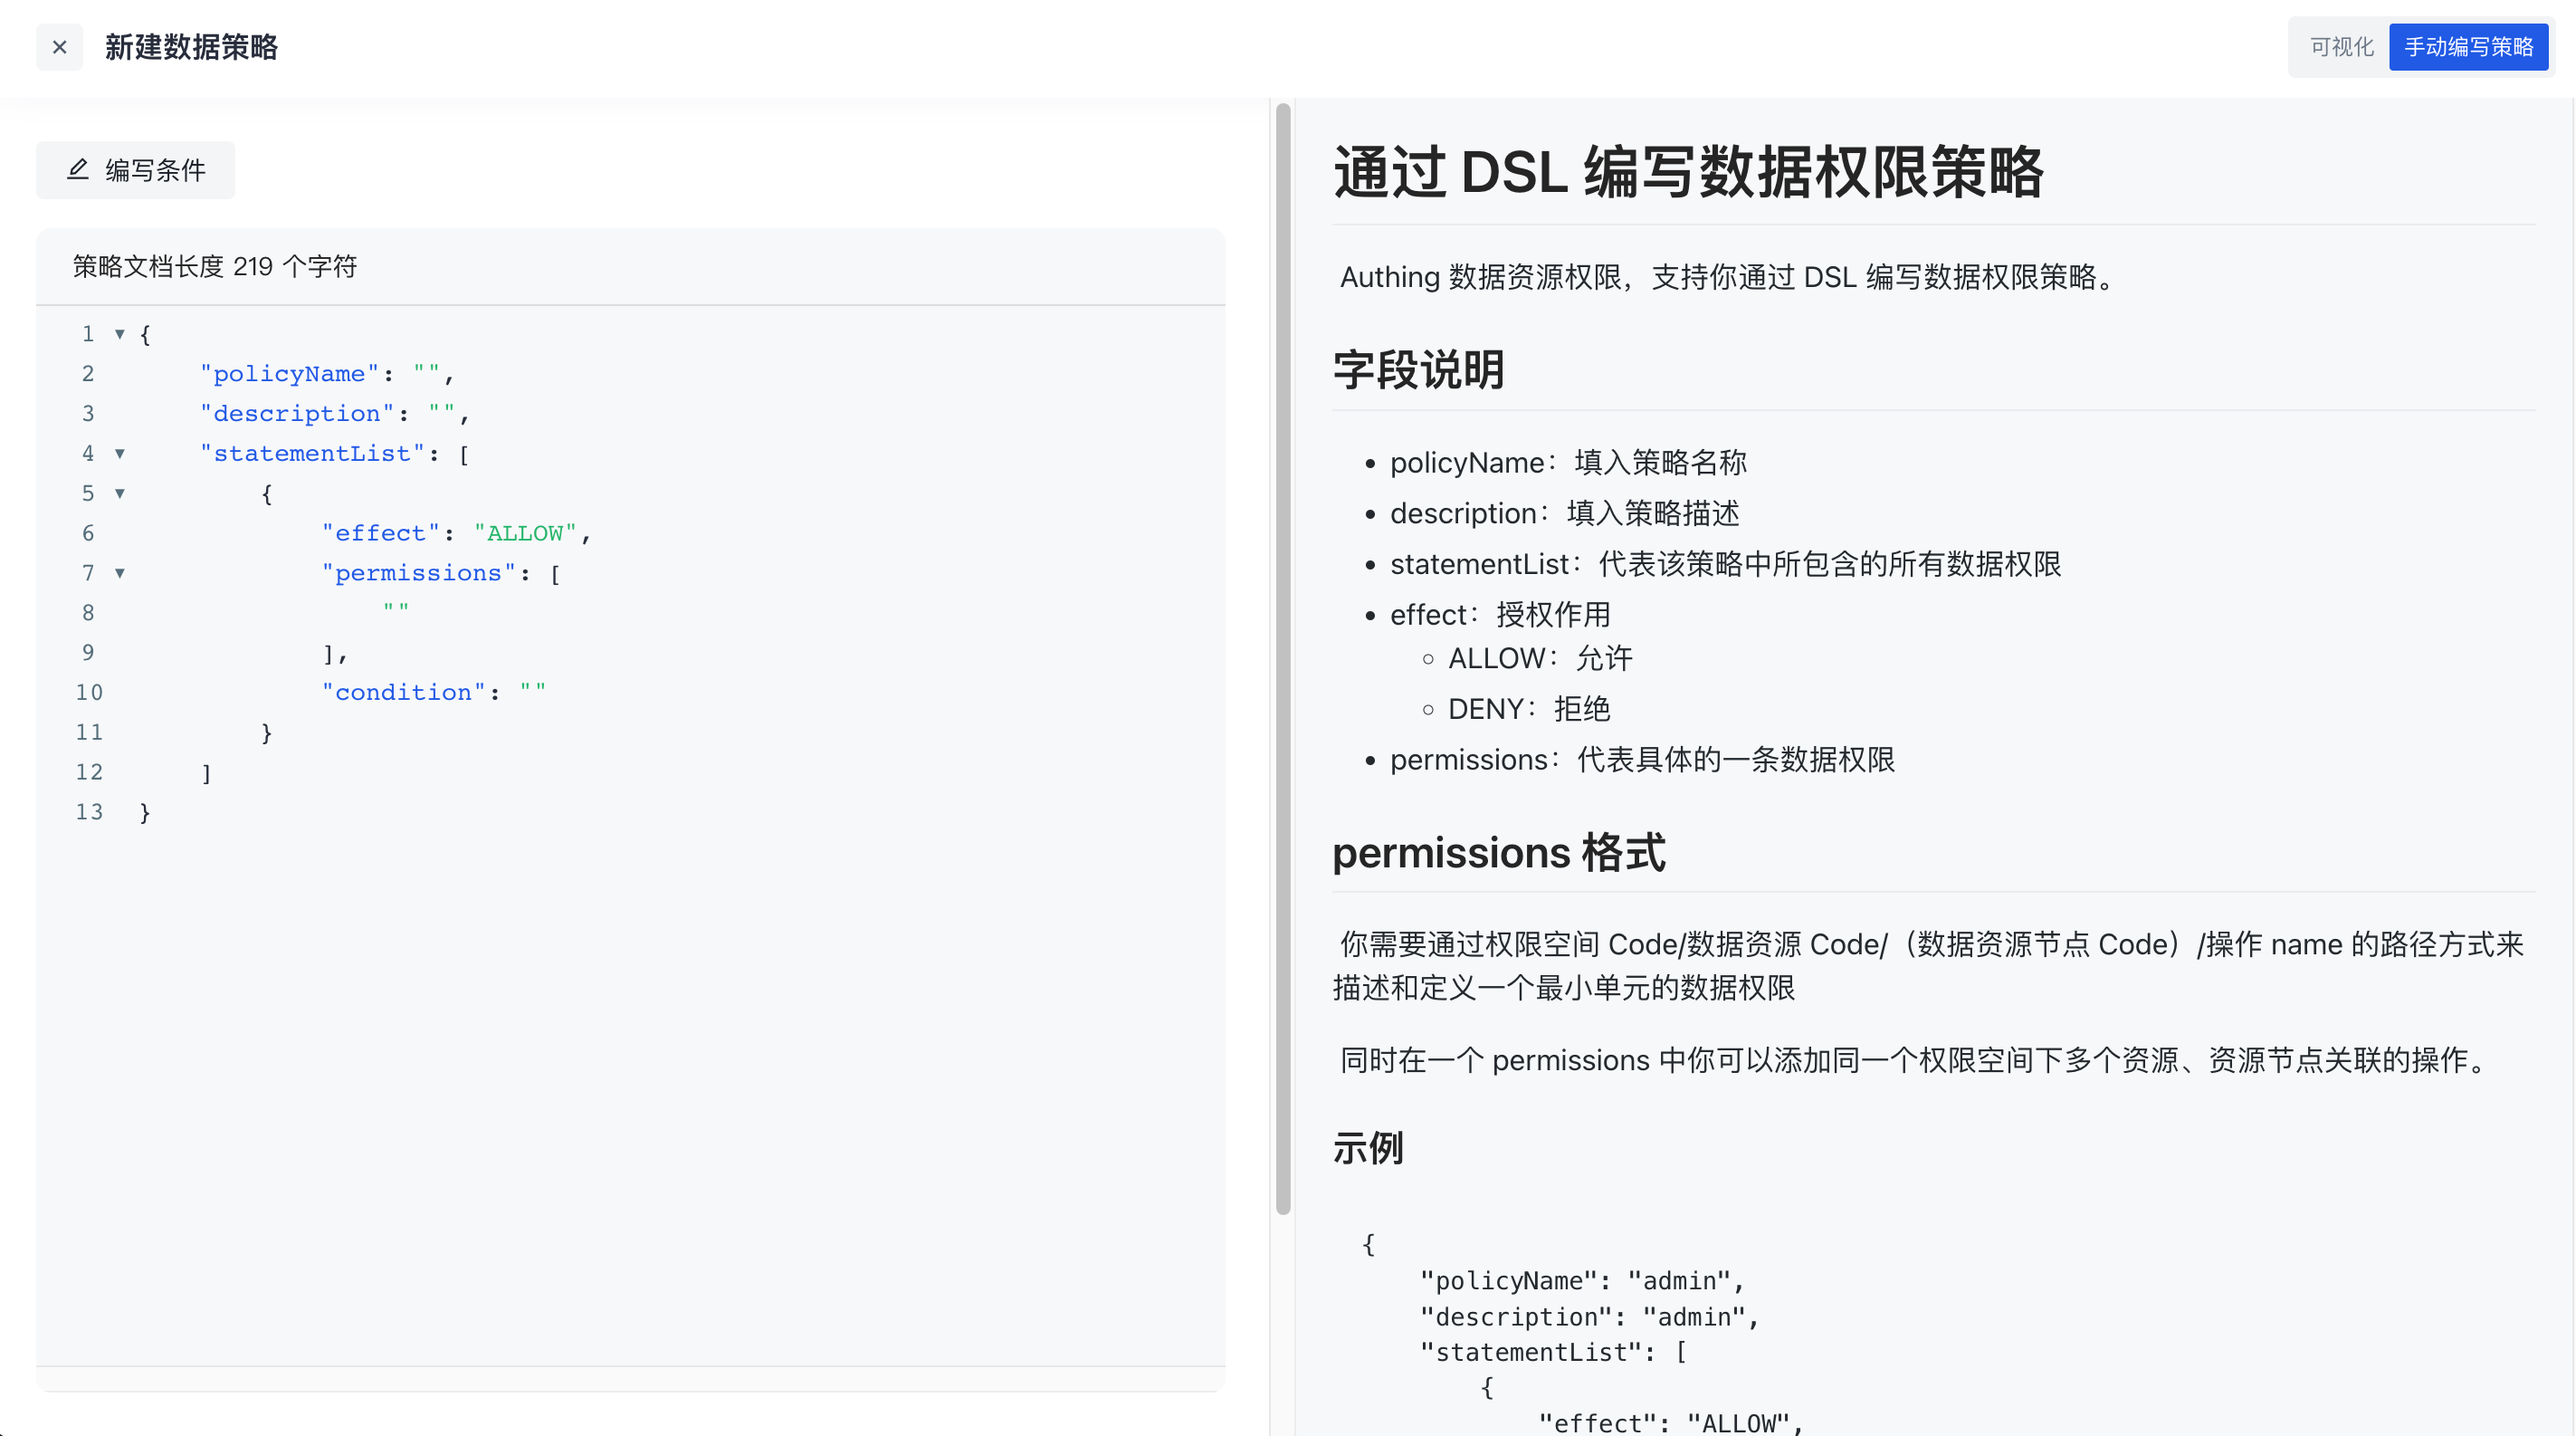
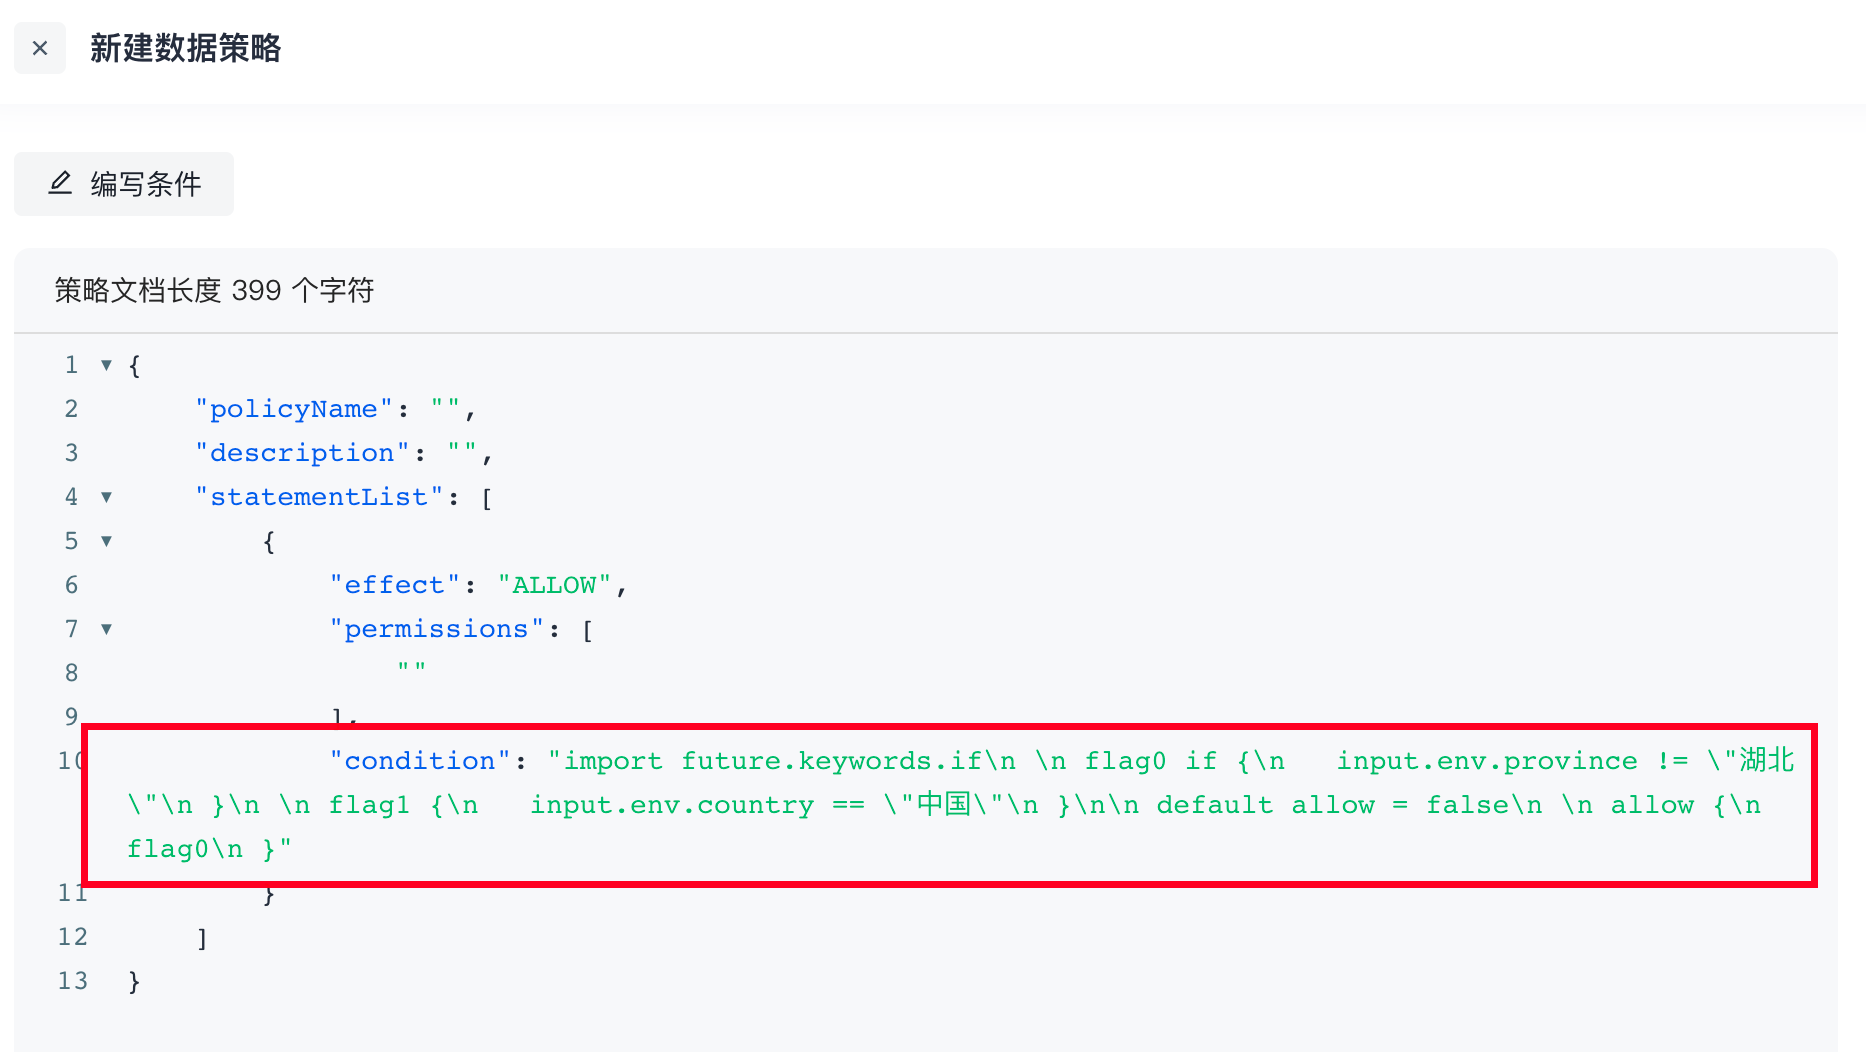
Click the write condition in the upper left corner to support writing conditions in data permission policies through rego language. For details, see [Data Policy and OPA](https://docs.genauth.ai/guides/access-control/data-permission/policy/link address)
Authorization
After the policy is packaged, click the Authorize button in the upper right corner of the permission management page to authorize it to a subject. One or more data policies can be authorized to multiple authorized subjects across different types at the same time.
Data Policy and OPA
Policy: Principles and methods determined according to the situation. For example, when we are sick, we have to go to the hospital to see a doctor. This is a policy, and the if and switch keywords in programming languages are a good reflection of this.
Open Policy Agent, abbreviated as OPA, is an open source general policy engine written in the Go language. There may be a large number of policies in the code we write, which are highly coupled with services. Once there is a change, it needs to be recompiled or redeployed. OPA can help us solve this pain point. It decouples policies and services (i.e., policy decoupling). These policies exist independently of the application.
Official website address: https://www.openpolicyagent.org/
Use of OPA
OPA provides a rich RESTful API. When we need to make policy decisions, we will query OPA and provide structured data (JSON) as input. Note: OPA accepts arbitrary structured data as input
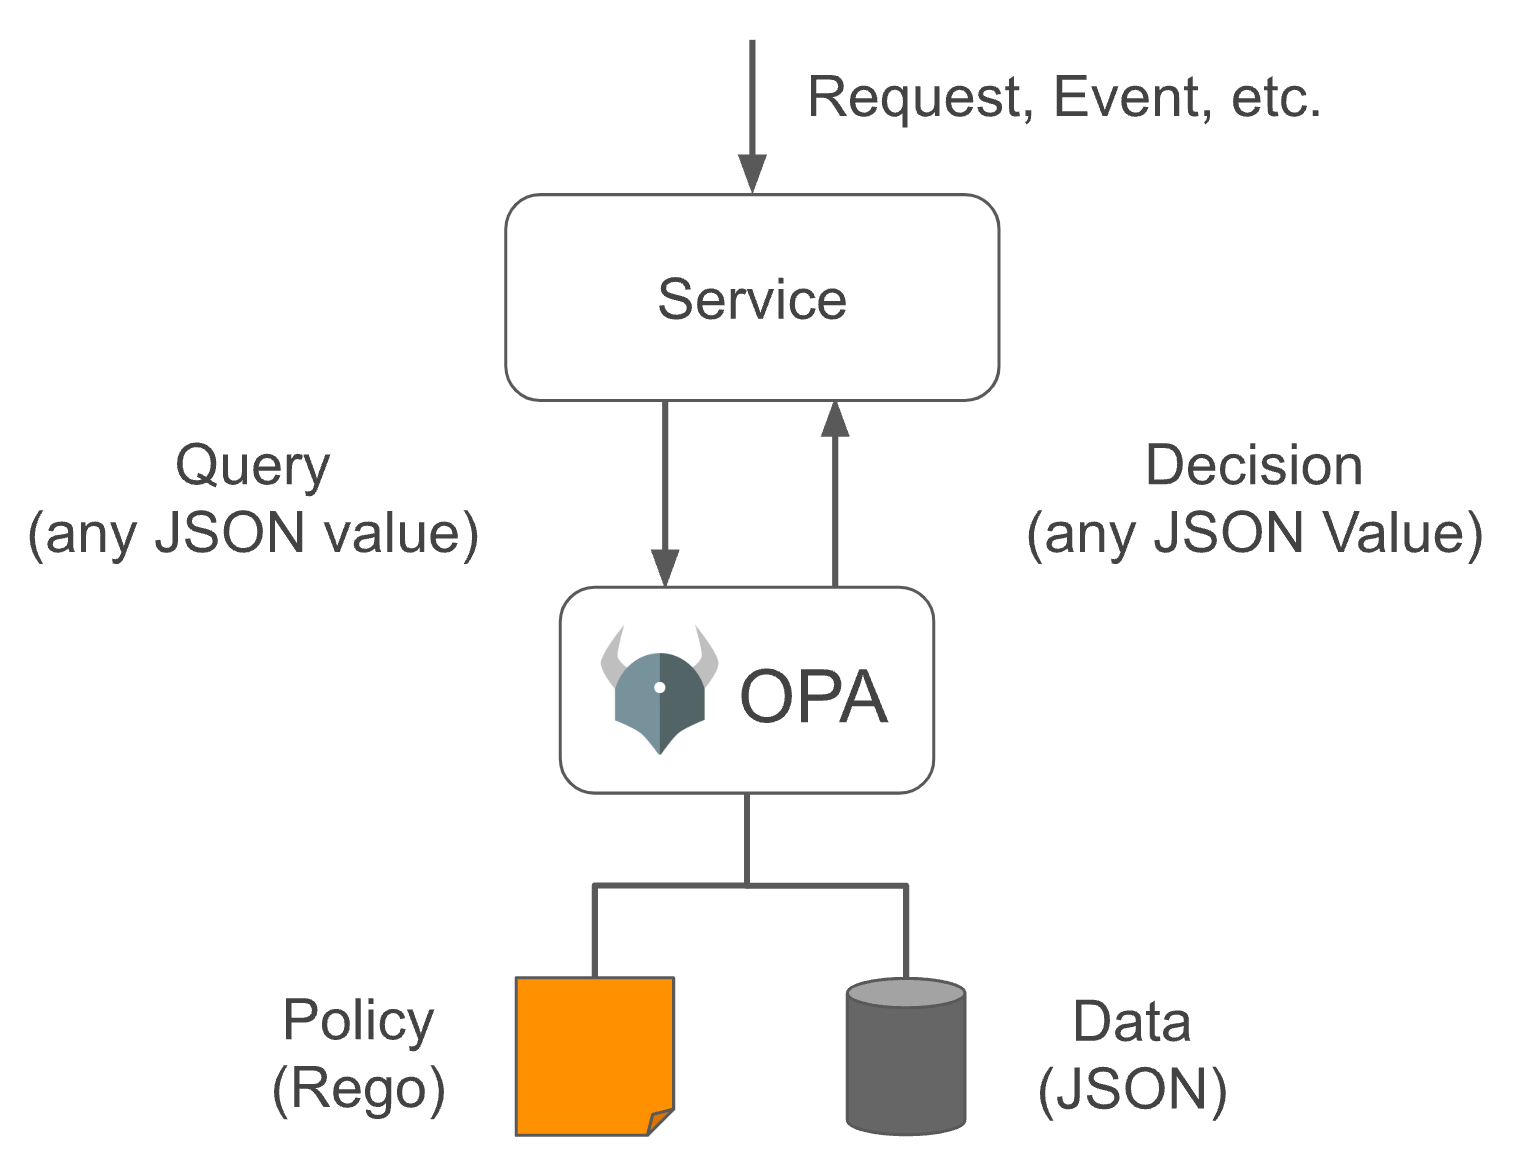
In OPA, input is generally called input, which can be of any type. The output can also be of any type, that is, it can output a Boolean value of true or false, or a JSON string object.
Our permission management implements attribute-based access control (Attribute-based access control - ABAC), which is implemented by converting a set of conditions defined in the data policy into OPA policies and letting it help us make policy decisions when needed (OPA has many more uses)
How to define OPA policies
OPA policies are written in the Rego language, which is inspired by Datalog, which is an easy-to-understand query language with a history of decades. Rego extends Datalog to support document models such as JSON/YAML. For a detailed introduction, please refer to the official document https://www.openpolicyagent.org/docs/latest/policy-language/#what-is-rego
OPA policies are defined in modules. Modules include: Package, Import, and Rule. Except for Package, which is unique and required, the other two can be 0 or more. Among them, Rule is composed of Head (defining variables) and Body (defining expressions). The abstract syntax tree (AST) of the entire Module is as follows:
Module
 |
 +--- Package (Reference)
 |
 +--- Imports
 |     |
 |     +--- Import (Term)
 |
 +--- Rules
       |
       +--- Rule
             |
             +--- Head
             |     |
             |     +--- Name (Variable)
             |     |
             |     +--- Key (Term)
             |     |
             |     +--- Value (Term)
             |
             +--- Body
                   |
                   +--- Expression (Term | Terms | Variable Declaration)
The policies written in Rego are usually defined in text files and parsed and compiled by OPA at runtime, so Rego is written in the data policy. Conditions are converted into strings:
Example
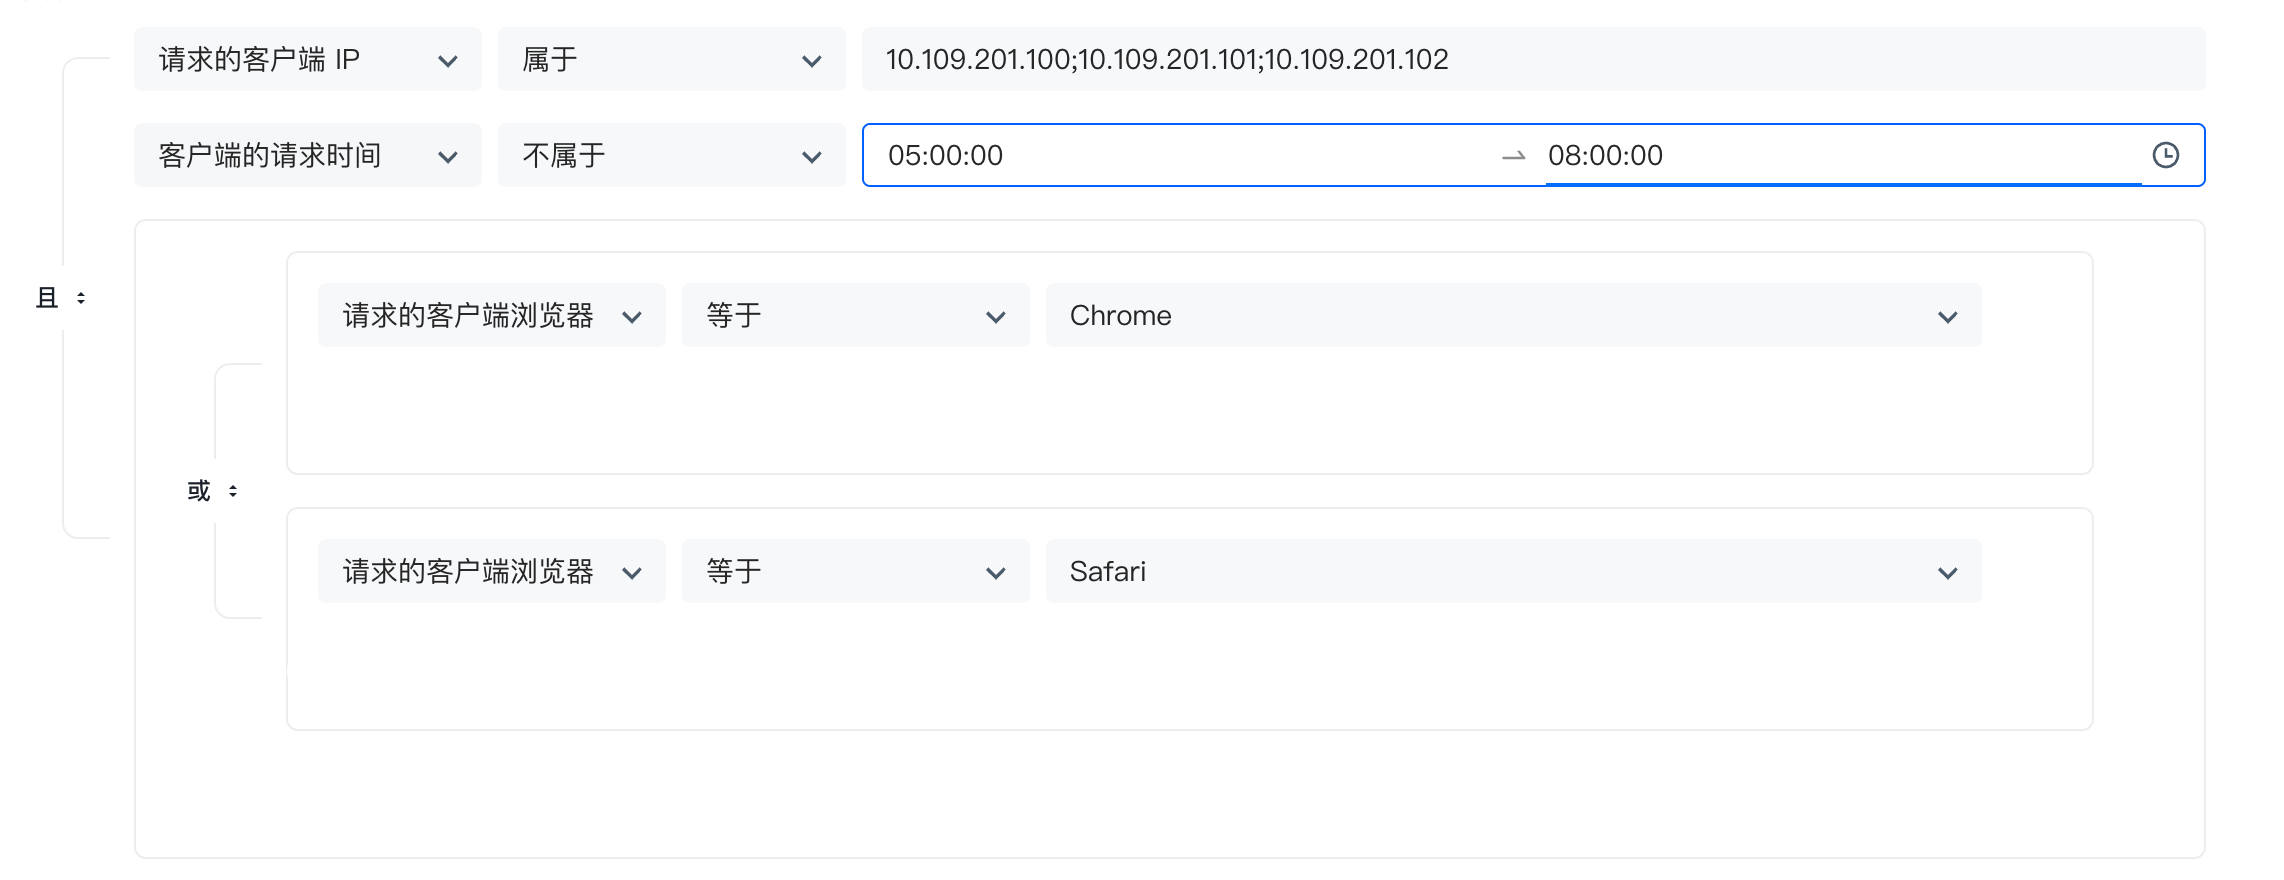
Judge whether the current request satisfies the following conditions: IP belongs to: 10.109.201.100, 10.109.201.101, 10.109.201.102; the request time is not between 5-8 am; and the browser is Chrome or Safari. The following figure is configured through a form:
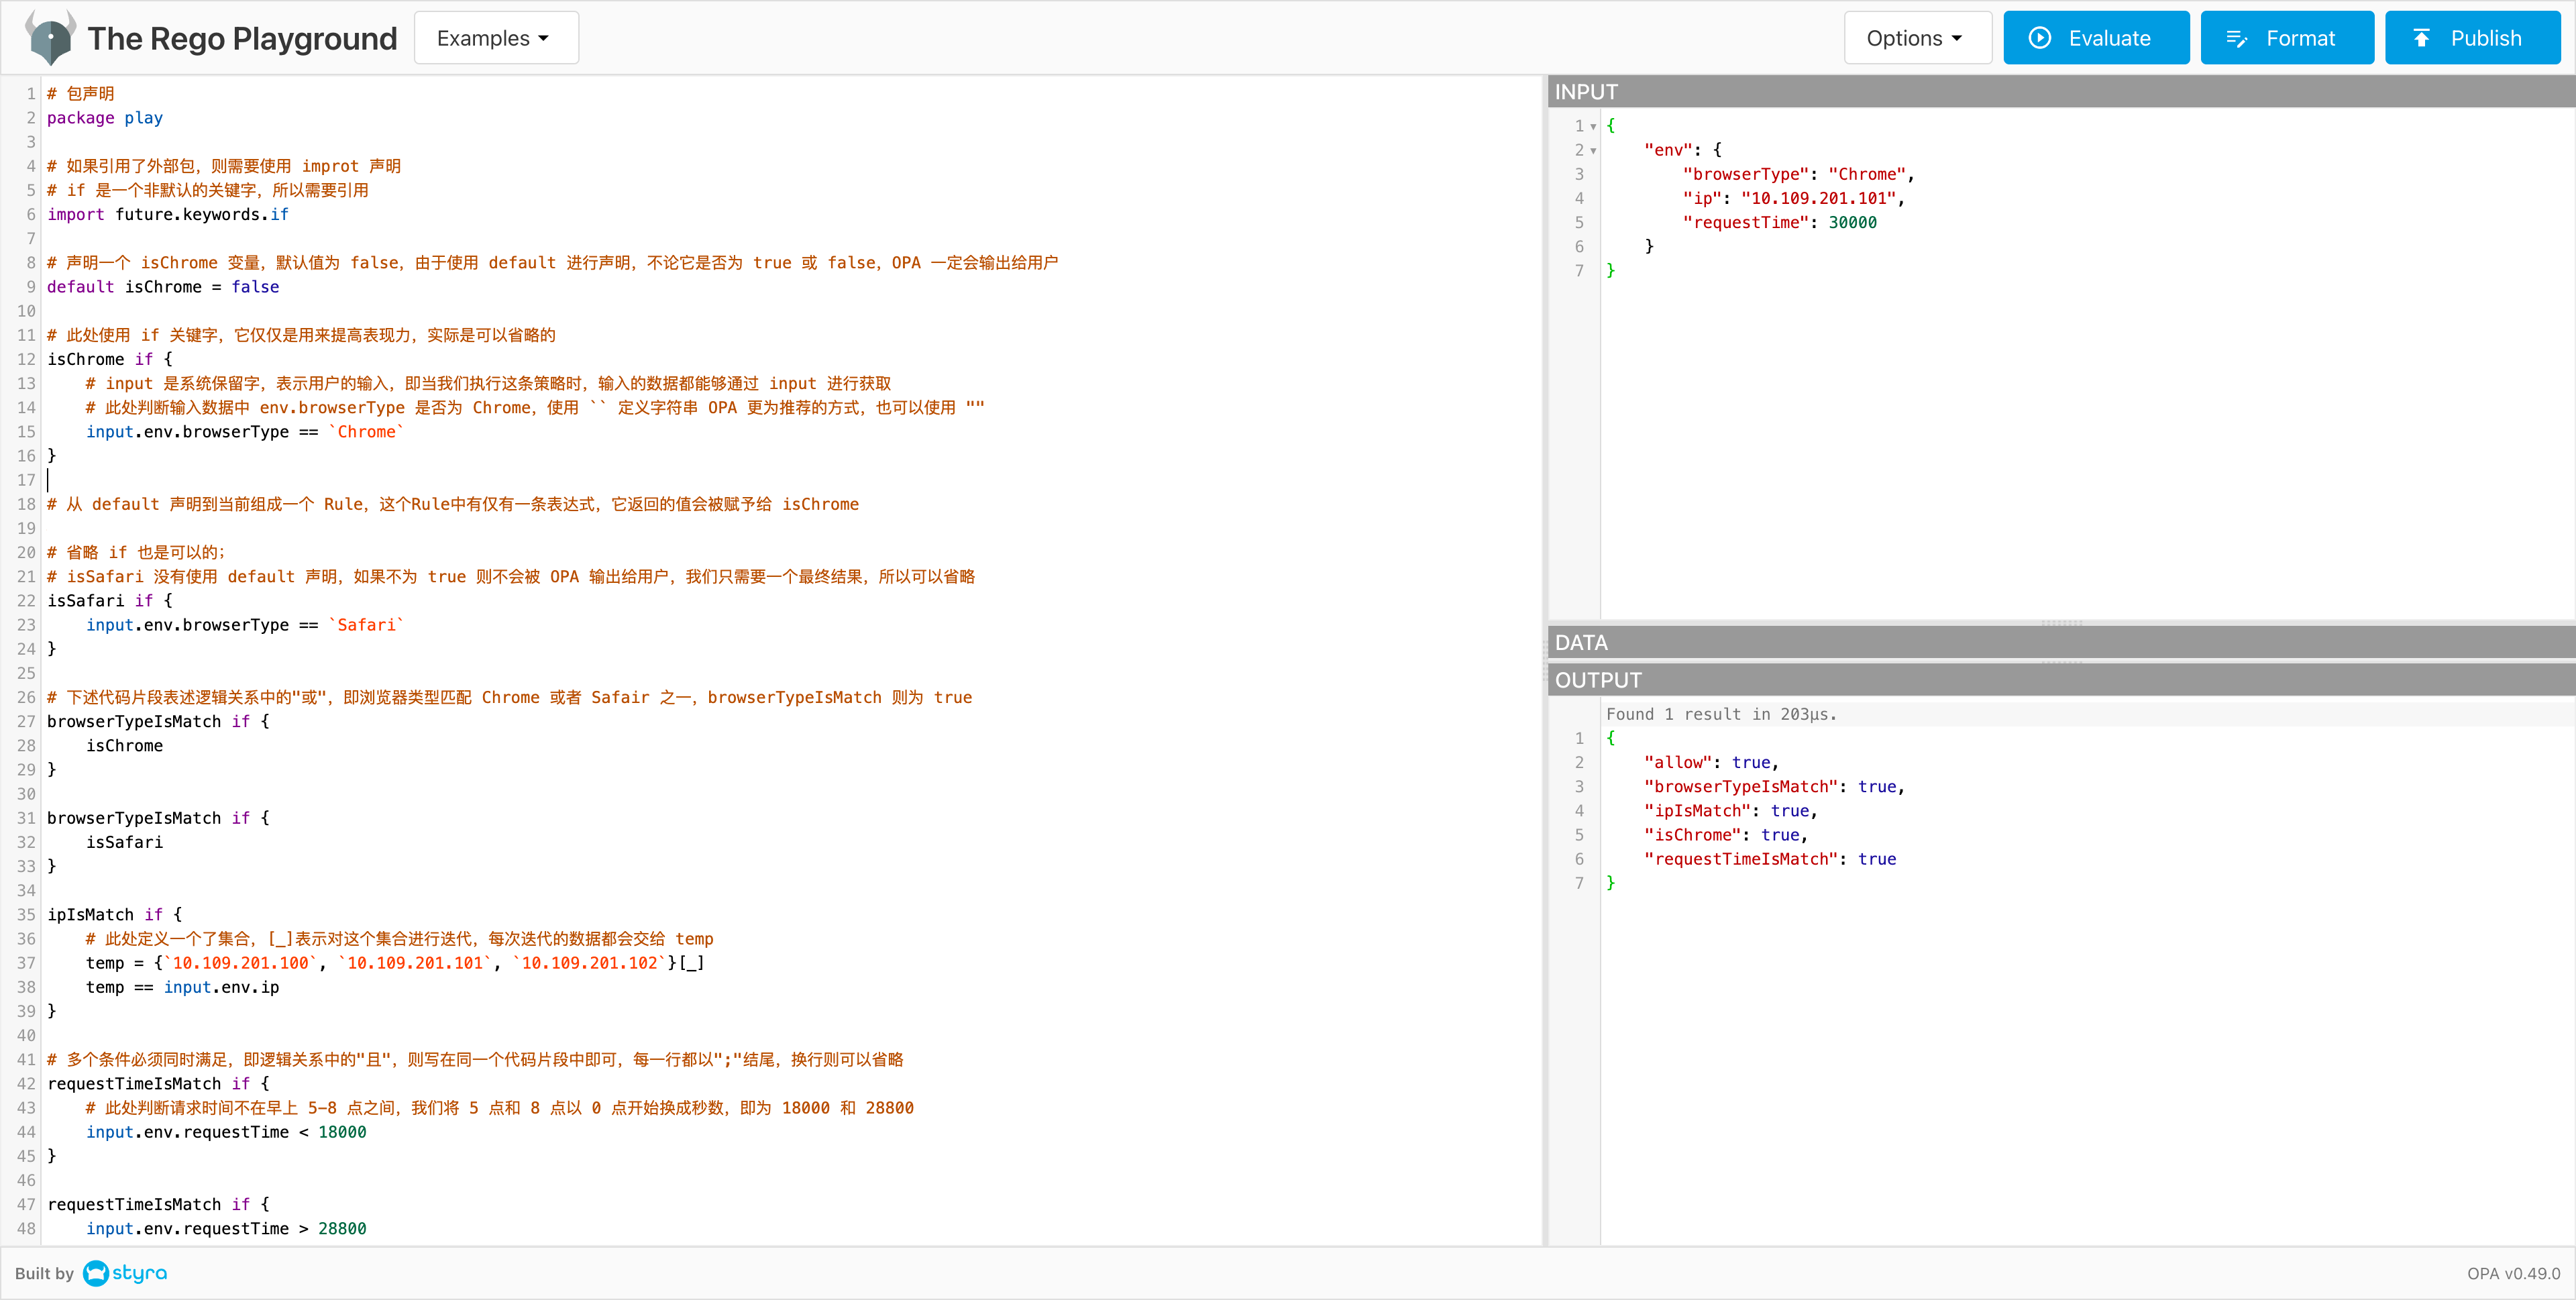
Based on this case, we use Rego to write as follows:
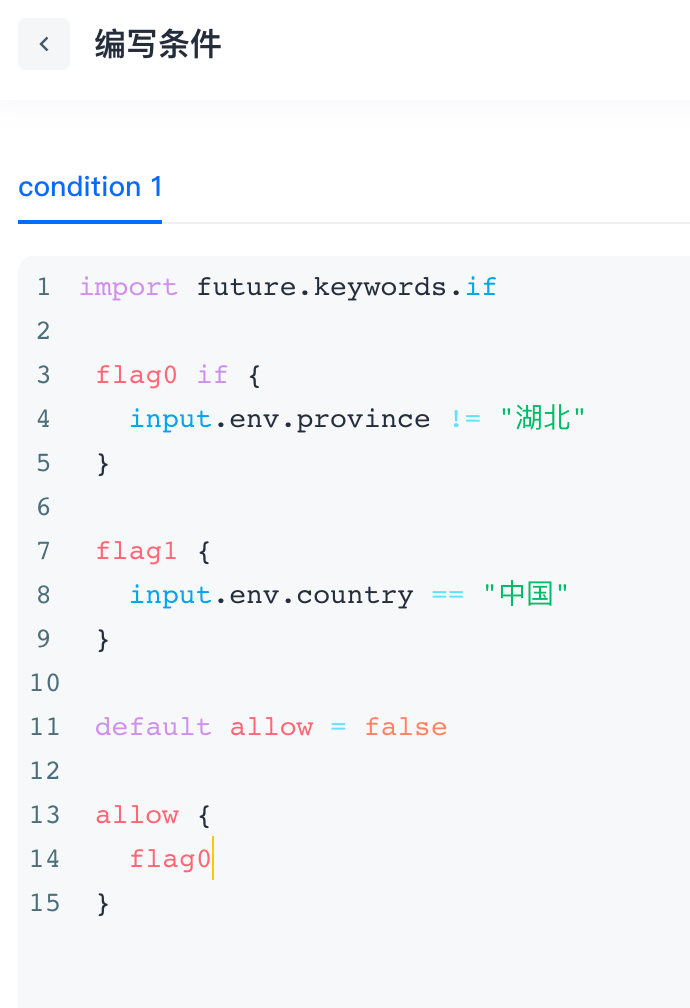
# Package declaration
package play

# If an external package is referenced, you need to use improt declaration
# if is a non-default keyword, so you need to reference
import future.keywords.if

# Declare an isChrome variable with a default value of false. Since default is used for declaration, OPA will output it to the user regardless of whether it is true or false
default isChrome = false

# The if keyword is used here to improve expressiveness and can actually be omitted
isChrome if {
        # input is a system reserved word, indicating user input, that is, when we execute this policy, the input data can be obtained through input
        # Here, we determine whether env.browserType in the input data is Chrome. Use `` to define the string OPA recommends more, or you can use ""
        input.env.browserType == `Chrome`
}

# From the default declaration to the current formation of a Rule, there is only one expression in this Rule, and the value it returns will be assigned to isChrome

# It is also possible to omit if;
# isSafari does not use the default declaration. If it is not true, it will not be output to the user by OPA. We only need a final result, so it can be omitted
isSafari if {
        input.env.browserType == `Safari`
}

# The following code snippet expresses the "or" in the logical relationship, that is, the browser type matches Chrome or Safari, and browserTypeIsMatch is true
browserTypeIsMatch if {
        isChrome
}

browserTypeIsMatch if {
        isSafari
}

ipIsMatch if {
        # A set is defined here, [_] means iterating over this set, and the data of each iteration will be given to temp
        temp = {`10.109.201.100`, `10.109.201.101`, `10.109.201.102`}[_]
        temp == input.env.ip
}

# Multiple conditions must be met at the same time, that is, the "and" in the logical relationship, then they can be written in the same code snippet, each line ends with ";", and line breaks can be omitted
requestTimeIsMatch if {
        # Here, we judge that the request time is not between 5-8 am. We convert 5 and 8 o'clock to seconds starting from 0 o'clock, that is, 18000 and 28800
        input.env.requestTime < 18000
}{
        input.env.requestTime > 28800
}

#
# To prevent inconsistency, we agree that each policy must use default to declare a variable named allow, so that we can get the execution result through the API
# Because the above 3 The logical relationship of the rules is "and", so a Boolean variable is defined to summarize the final results
# Because the default statement is used, OPA will definitely return it to us. Finally, to determine whether the entire condition is met, observe whether the value of allow is true
default allow = false

allow if {
        browserTypeIsMatch
        ipIsMatch
        requestTimeIsMatch
}
The official provides a Playgroud, which supports online execution. The entire interface window is divided into the following four parts:
- The entire left block is the
Policywindow, where Rego is used to write policies - The upper right is the
Inputwindow, where the external data required by the rule is defined, which can beJSONorYAMLdata format - The middle right is the
Datawindow. If the data required by the rule comes from a persistent database, we can bind its storage layer interface to the policy, but we don’t need it here, so there is no need to pay attention to it - The lower right is the
Outputwindow, OPA The result output area after making a strategic decision. In the playground method, all information will be output to us. There is no way to specify the query field value. The output in the official prompt example is a Boolean value.
We will execute the written Rego code in the Playground, as follows:
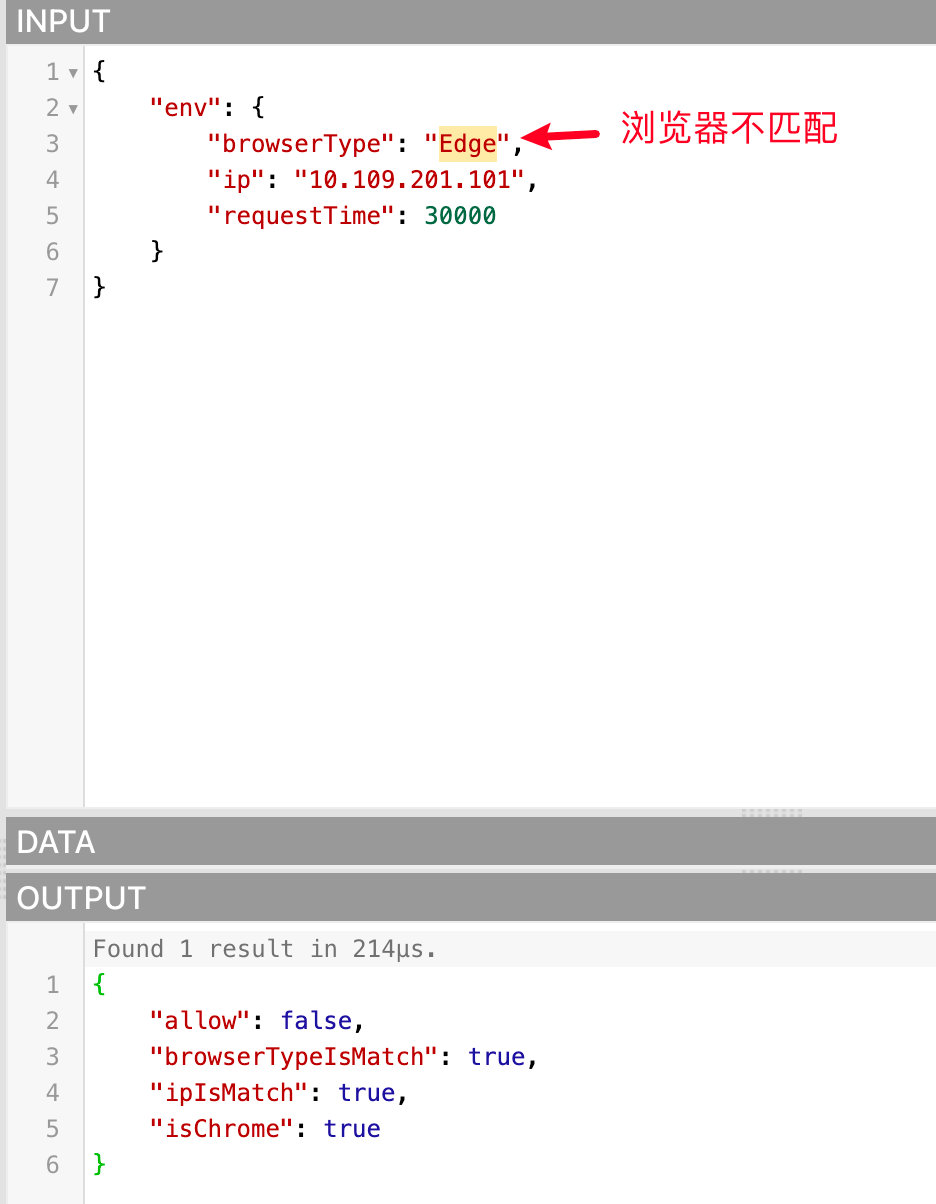
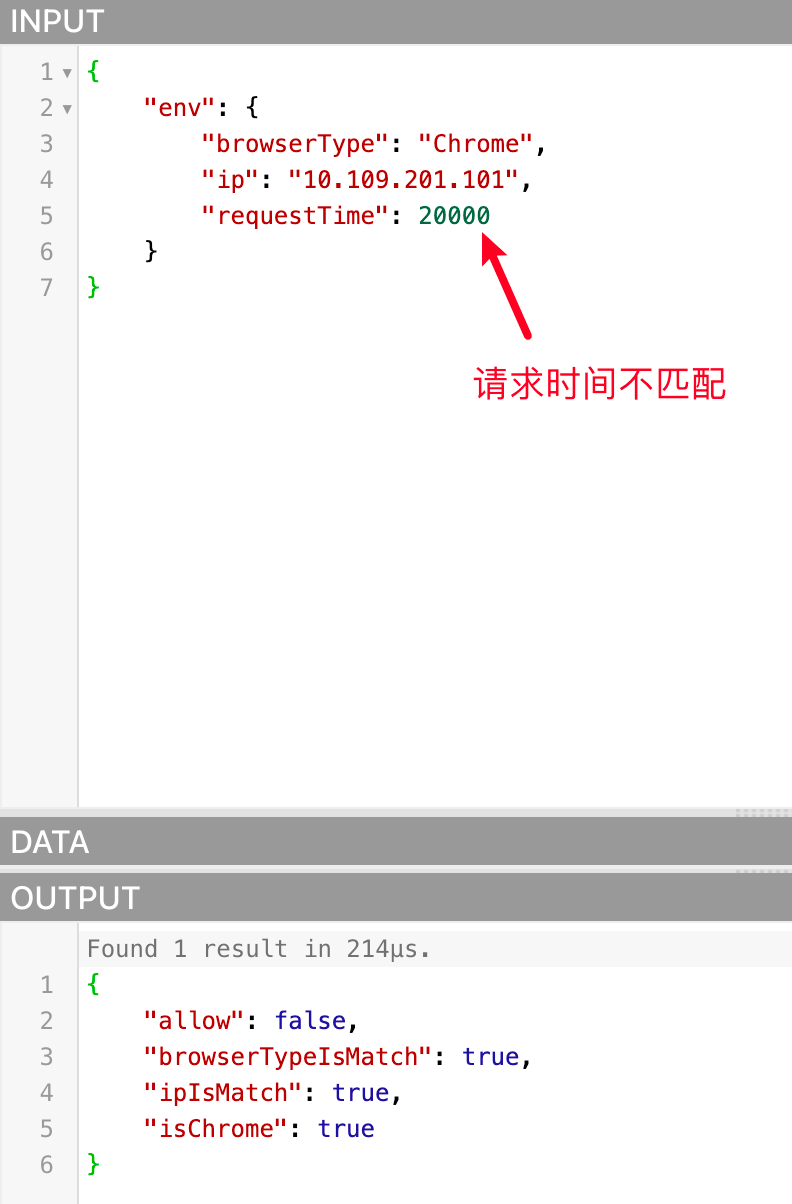
Because the data passed in are all qualified, allow is true. We can also try to pass in unmatched data to see if allow is false, as follows:
Notes on using Rego language to write conditions for data policies
packagedoes not need to be declared. Since we allow users to customize Rego to prevent conflicts with the same package name, it is generated by the program itself. Users do not need to pay attention to it and do not need to declare it- Some authentication APIs support passing in environment parameters related to this request. The data policy configures the conditions, and the program will pass these parameters to OPA. In the written Rego conditions, you can pass Rego The system reserved word
inputof the language is obtained with the parameter attribute name. These parameter names are as follows:- env: environment attribute
- ip (IP)
- city (city)
- province (province)
- country (country)
- deviceType (device type)
- systemType (system type)
- browserType (browser type)
- requestDate (request time, format: yyyy-mm-dd hh:mm:ss)
- requestTime (the sum of the hours, minutes, and seconds of the request time. This parameter will be added after calculation based on the requestDate in the request parameter during authentication)
- env: environment attribute
Example case
- Get the IP of this authentication request: input.env.ip
- Get the device type of this authentication request: input.env.deviceType
In the future, we may release more attributes, such as: user pool, application, user, etc., and the acquisition method is similar. For example, if the user attribute is released and the user name is obtained, it can be obtained through input.user.username
- Due to OPA The API that provides query policy execution results must pass in the variable name of a variable in the result, so we agree that the conditions written in Rego must use the default keyword to define a Boolean variable named allow. When we determine whether the condition is matched, we will query OPA for the value of the
allowvariable in the policy execution result. If it istrue, it means that the condition is matched and the authorization is established.
Rego code example
To reduce the cost of learning Rego for users, we provide some commonly used Rego code snippet examples based on the several conditions currently supported by data policies:
- The request address information is in Wuhan, Hubei Province, China
countryIsMatch {
   input.env.country == "China"
}

provinceIsMatch {
   input.env.province == "Beijing"
}

cityIsMatch {
   input.env.city == "Beijing"
}

default allow = false

allow {
   countryIsMatch
   provinceIsMatch
   cityIsMatch
}- 请求 IP 属于:10.109.201.100、10.109.201.101、10.109.201.102
ipIsMatch {
   temp = {`10.109.201.100`, `10.109.201.101`, `10.109.201.102`}[_]
   temp == input.env.ip
}

default allow = false

allow {
   ipIsMatch
}- 请求设备类型是 PC 或者 Mobile
deviceTypeIsMatch {
   input.env.deviceType == "PC"
}
{
   input.env.deviceType == "Mobile"
}

default allow = false

allow {
   deviceTypeIsMatch
}- The request time is between 0-8 am (convert 8 am to seconds starting from 0 am, which is 28800)
requestTimeIsMatch {
   input.env.requestTime >= 0
   input.env.requestTime <= 28800
}

default allow = false

allow {
   requestTimeIsMatch
}
Permission view
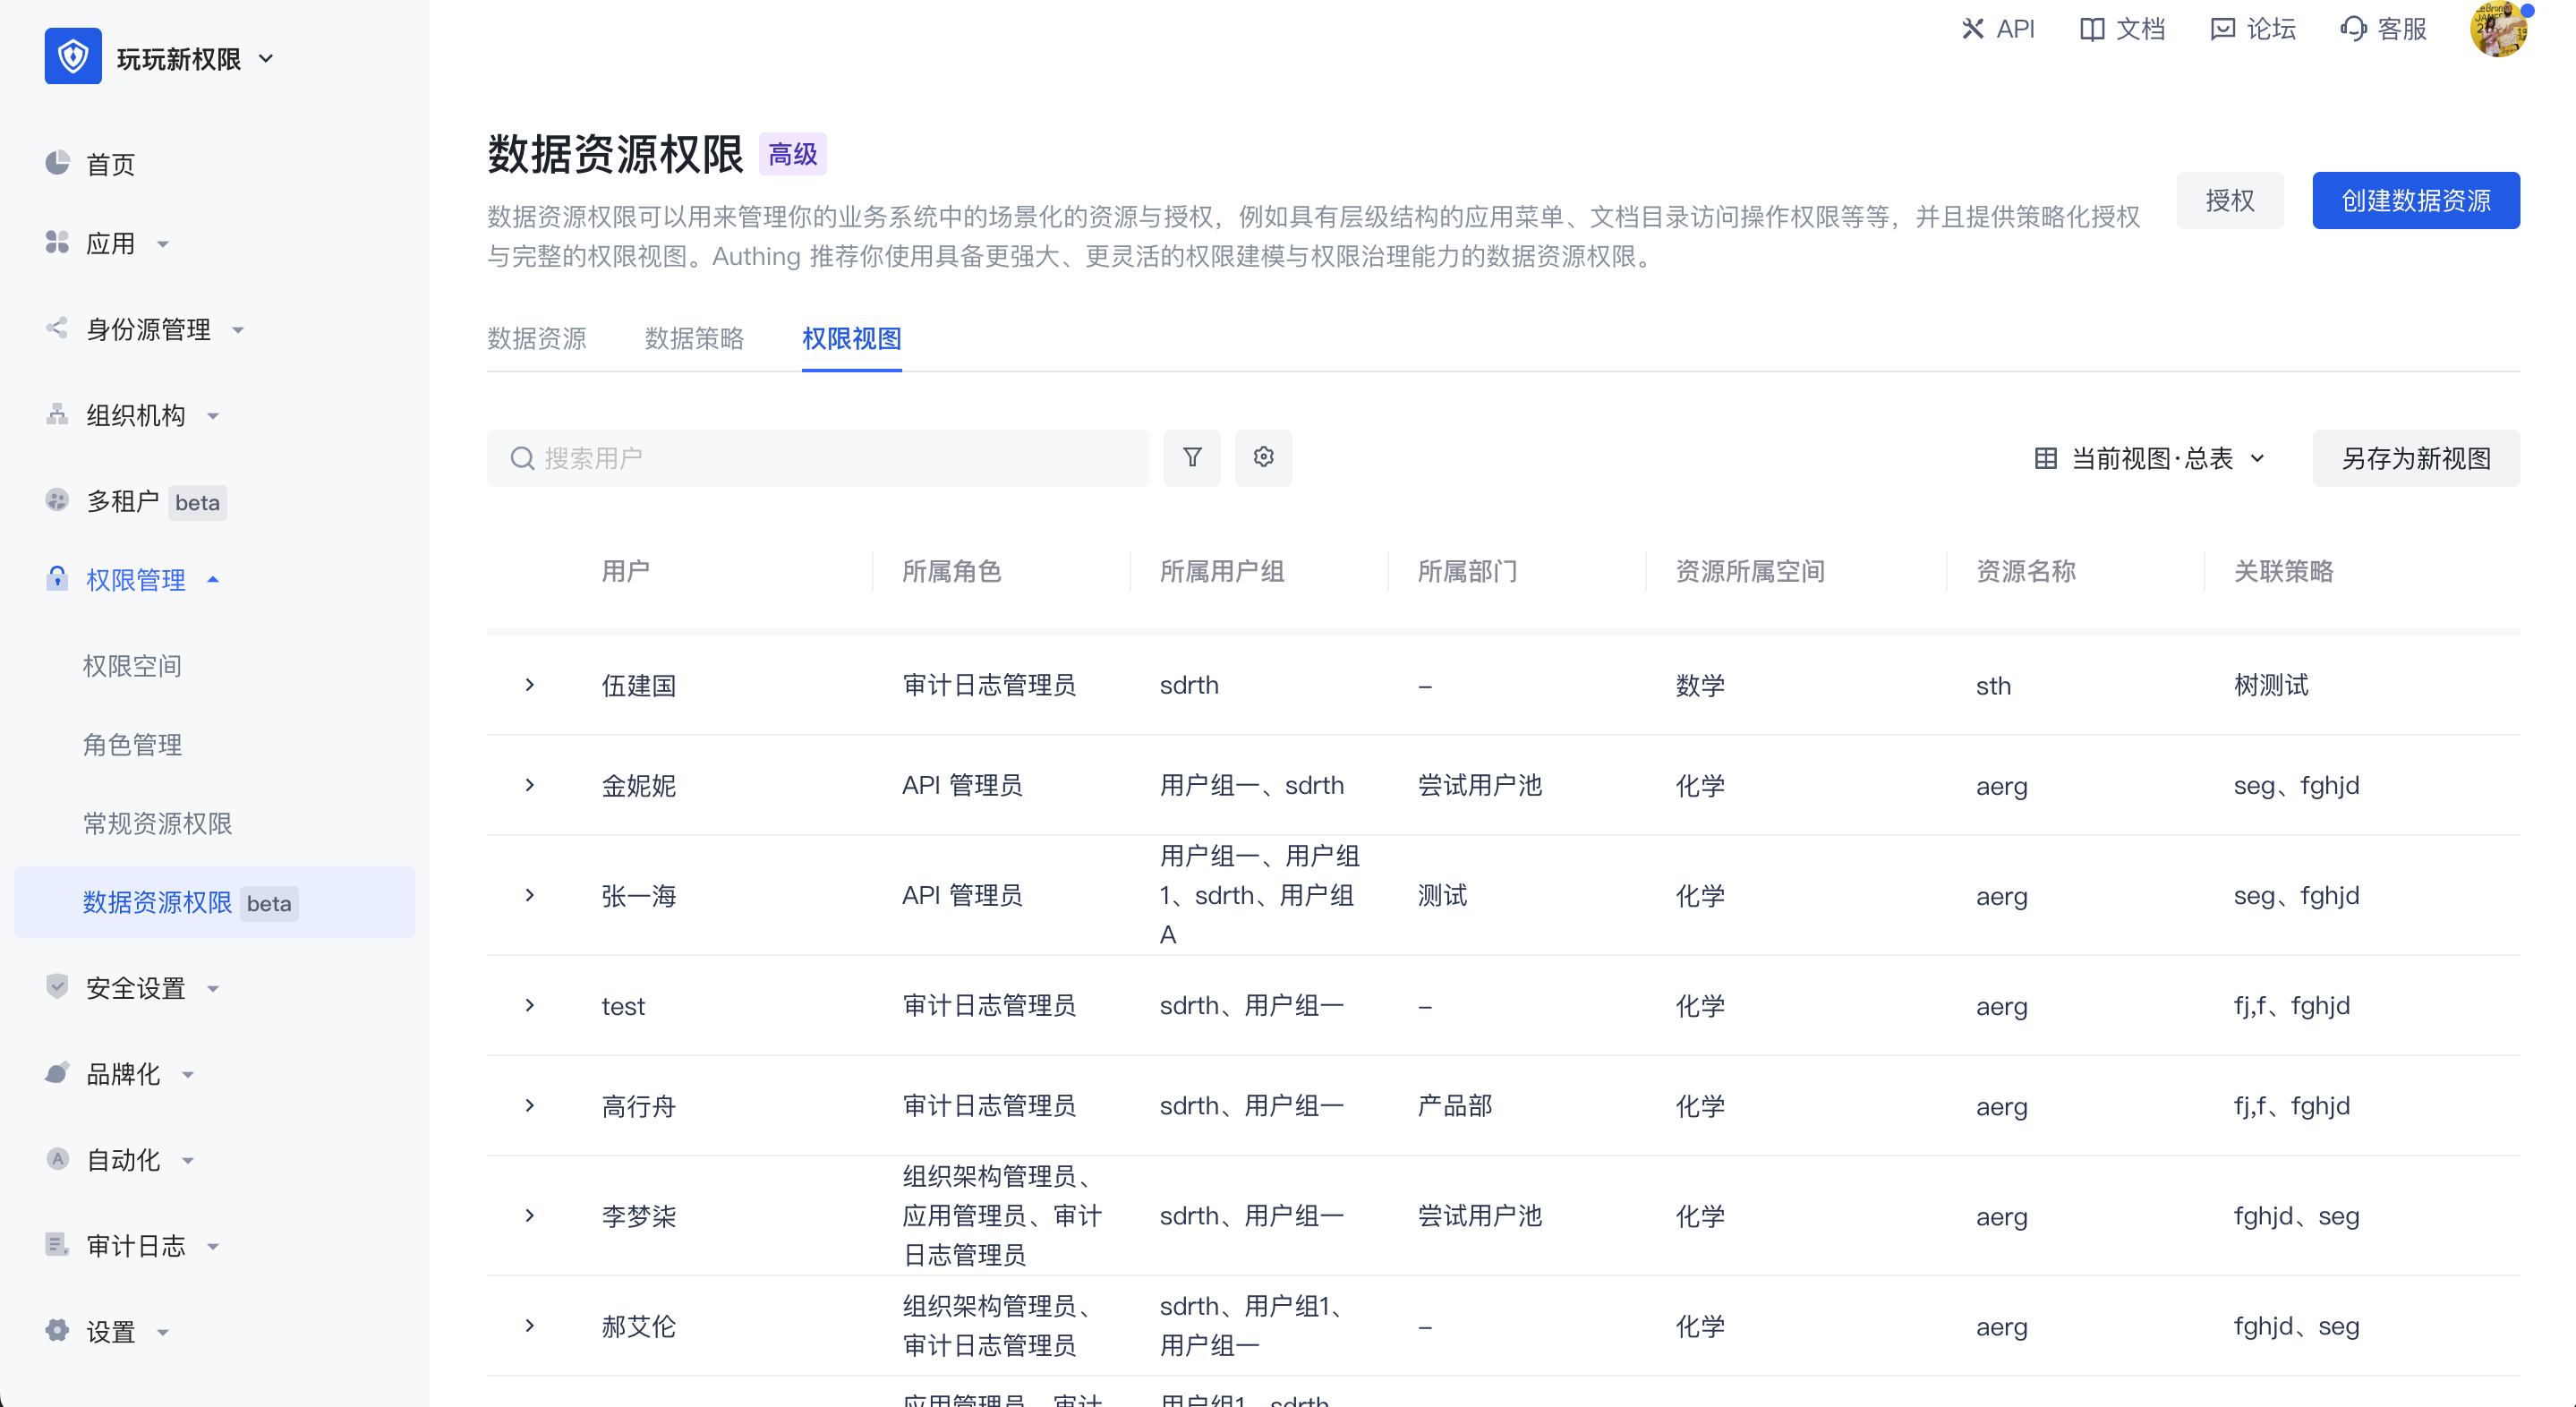
Permission view: In the permission view, the authorization relationship is calculated based on the user dimension. In the view, you can query which permissions each user has, which resources are corresponding to the policy, and which permission space is corresponding.
Administrators can use the permission view for permission auditing. Through data policies, resources are associated with users. No matter which user group the user belongs to, which role, or which department the user belongs to, the user's final permissions will eventually be presented in the user dimension.
In the permission view, it supports generating new permission views by filtering fields, saving as new views, and switching between views.