Authenticate the user
- Overview
- Authentication using account and password
- Authentication using SMS verification code
- Authentication using social login
- Authentication using QR code scanning
- Authentication in mini program
- One-click login using mobile phone number
- Implement single sign-on (SSO)
- Single sign-on on mobile
- Multi-factor authentication
- Extending the authentication process
- Personalizing the login box
Overview
No matter what type of application you are developing - internal employee IT system, toC account system or API exposed to other developers, user authentication is a crucial part of it. GenAuth provides a variety of authentication methods for developers to choose from.
WARNING
Note: Some browsers have begun to disable third-party cookies by default, which will affect some functions of GenAuth in some scenarios. For detailed description, please see: FAQ: How will browser disabling third-party cookies affect GenAuth functions?
The login experience is one of the most important user experiences that software developers need to consider. It is not an easy task to provide users with a seamless, convenient and secure authentication experience. Generally speaking, the login logic is also associated with registration, password reset, account association and other logic. More importantly, for many applications, it is important to enhance security in the form of strong and adaptive authentication during the login process.
GenAuth provides a lot of authentication methods for developers to choose and combine. Password policies, frequent login detection, custom authentication processes, etc. can be easily completed through the management console (these operations can basically also be completed through the Management API).
OIDC / OAuth2.0 / SAML / AD / LDAP / Social Login
GenAuth supports accessing your applications and user data through standard protocols such as OIDC, OAuth2.0, SAML, LDAP, etc. You can safely use GenAuth as your Identity Provider. If you use GenAuth as an Identity Provider, you can connect to other third-party Service Providers, such as logging in to Alibaba Cloud, AWS, Azure, Jira, etc.
GenAuth can also be used as a Service Provider to connect to third-party Identity Providers through standard protocols such as OIDC, OAuth2.0, SAML, LDAP, AD, etc. For example, you can log in to your application through Azure AD or local Windows AD. GenAuth can also use third-party social login to automatically pull the user information of social login users to your user directory.
You can learn about the implementation principles of OIDC, OAuth2.0, SAML, LDAP, and AD respectively.
Hosted login page authentication
Each user pool in GenAuth has an independent secondary domain name and an online login page. You can access this login page by visiting https://YOUR_DOMAIN.genauth.ai/login . You don't need to write a line of code to maintain the login page. You can make some customized configurations through the application configuration of the console.
You can try the sample authentication page provided by GenAuth.
Embedded login form authentication
GenAuth embedded login component is a lightweight, modern, and highly scalable front-end login component provided by GenAuth, which supports native JavaScript and the three major front-end frameworks of React, Vue, and Angular. This embedded login component is basically consistent with the login page hosted by GenAuth, and has strong customization capabilities. This component has built-in functions such as password reset, MFA, social login, and scan code login, all of which are highly configurable.
For details, see Use the embedded login component to complete authentication.
Auth SDK
GenAuth provides a lightweight, developer-friendly Auth SDK (supports JavaScript/Node, Java, Python, PHP, C#, etc.) for front-end developers, allowing you to implement your authentication logic more flexibly, quickly, and securely. This Auth SDK supports all authentication-related functions of GenAuth, including basic authentication, password reset, account binding, and all other functions. You can get the user's id_token through this SDK and pass it to downstream applications as the user's identity credential.
GenAuth supports SDKs in multiple programming languages including Java, JavaScript/Node.js, Python, PHP, C#, Swift, Go, Ruby, WeChat Mini Program, etc. You can choose the SDK you are familiar with:
Authentication API
The hosted login page, embedded login component, and Auth SDK underlying capabilities mentioned above are all supported by the Authentication API. The GenAuth Authentication API supports two calling methods: RESTful and GraphQL (endpoint is https://core.genauth.ai/graphql/v2), and you can also directly call the Authentication API to implement authentication logic.
Single Sign-On
Single Sign-On (SSO) is one of the more popular solutions for enterprise business integration. The definition of SSO is that in multiple application systems, users only need to log in once to access all mutually trusted application systems. We provide a dedicated SSO SDK based on which developers can quickly implement single sign-on between applications.
Use account and password authentication
In GenAuth, account and password are divided into the following three forms:
- Email + password login
- User name + password login
- Mobile phone number + password login
When providing users with account and password authentication methods, as an IT system administrator or developer, you also need to implement the following functions:
- Reset password: You can retrieve your password through the email verification code or mobile phone number verification code.
- Change password: You can reset your password through the existing password.
To use GenAuth to implement these functions, we provide three different access methods:
- [Use GenAuth to host the login page](#Use hosted login page), without a single line of code, you can experience it through sample-sso.genauth.ai.
- [Use the embedded login component provided by GenAuth](#Use the embedded login component), which can be integrated into your web and mobile projects. You don't need to implement the login form UI yourself.
- Use API & SDK, GenAuth provides two forms of APIs in RESTFul and GraphQL, as well as SDKs in more than 10 languages or frameworks, based on which you can customize the UI and authentication process.
Use the hosted login page
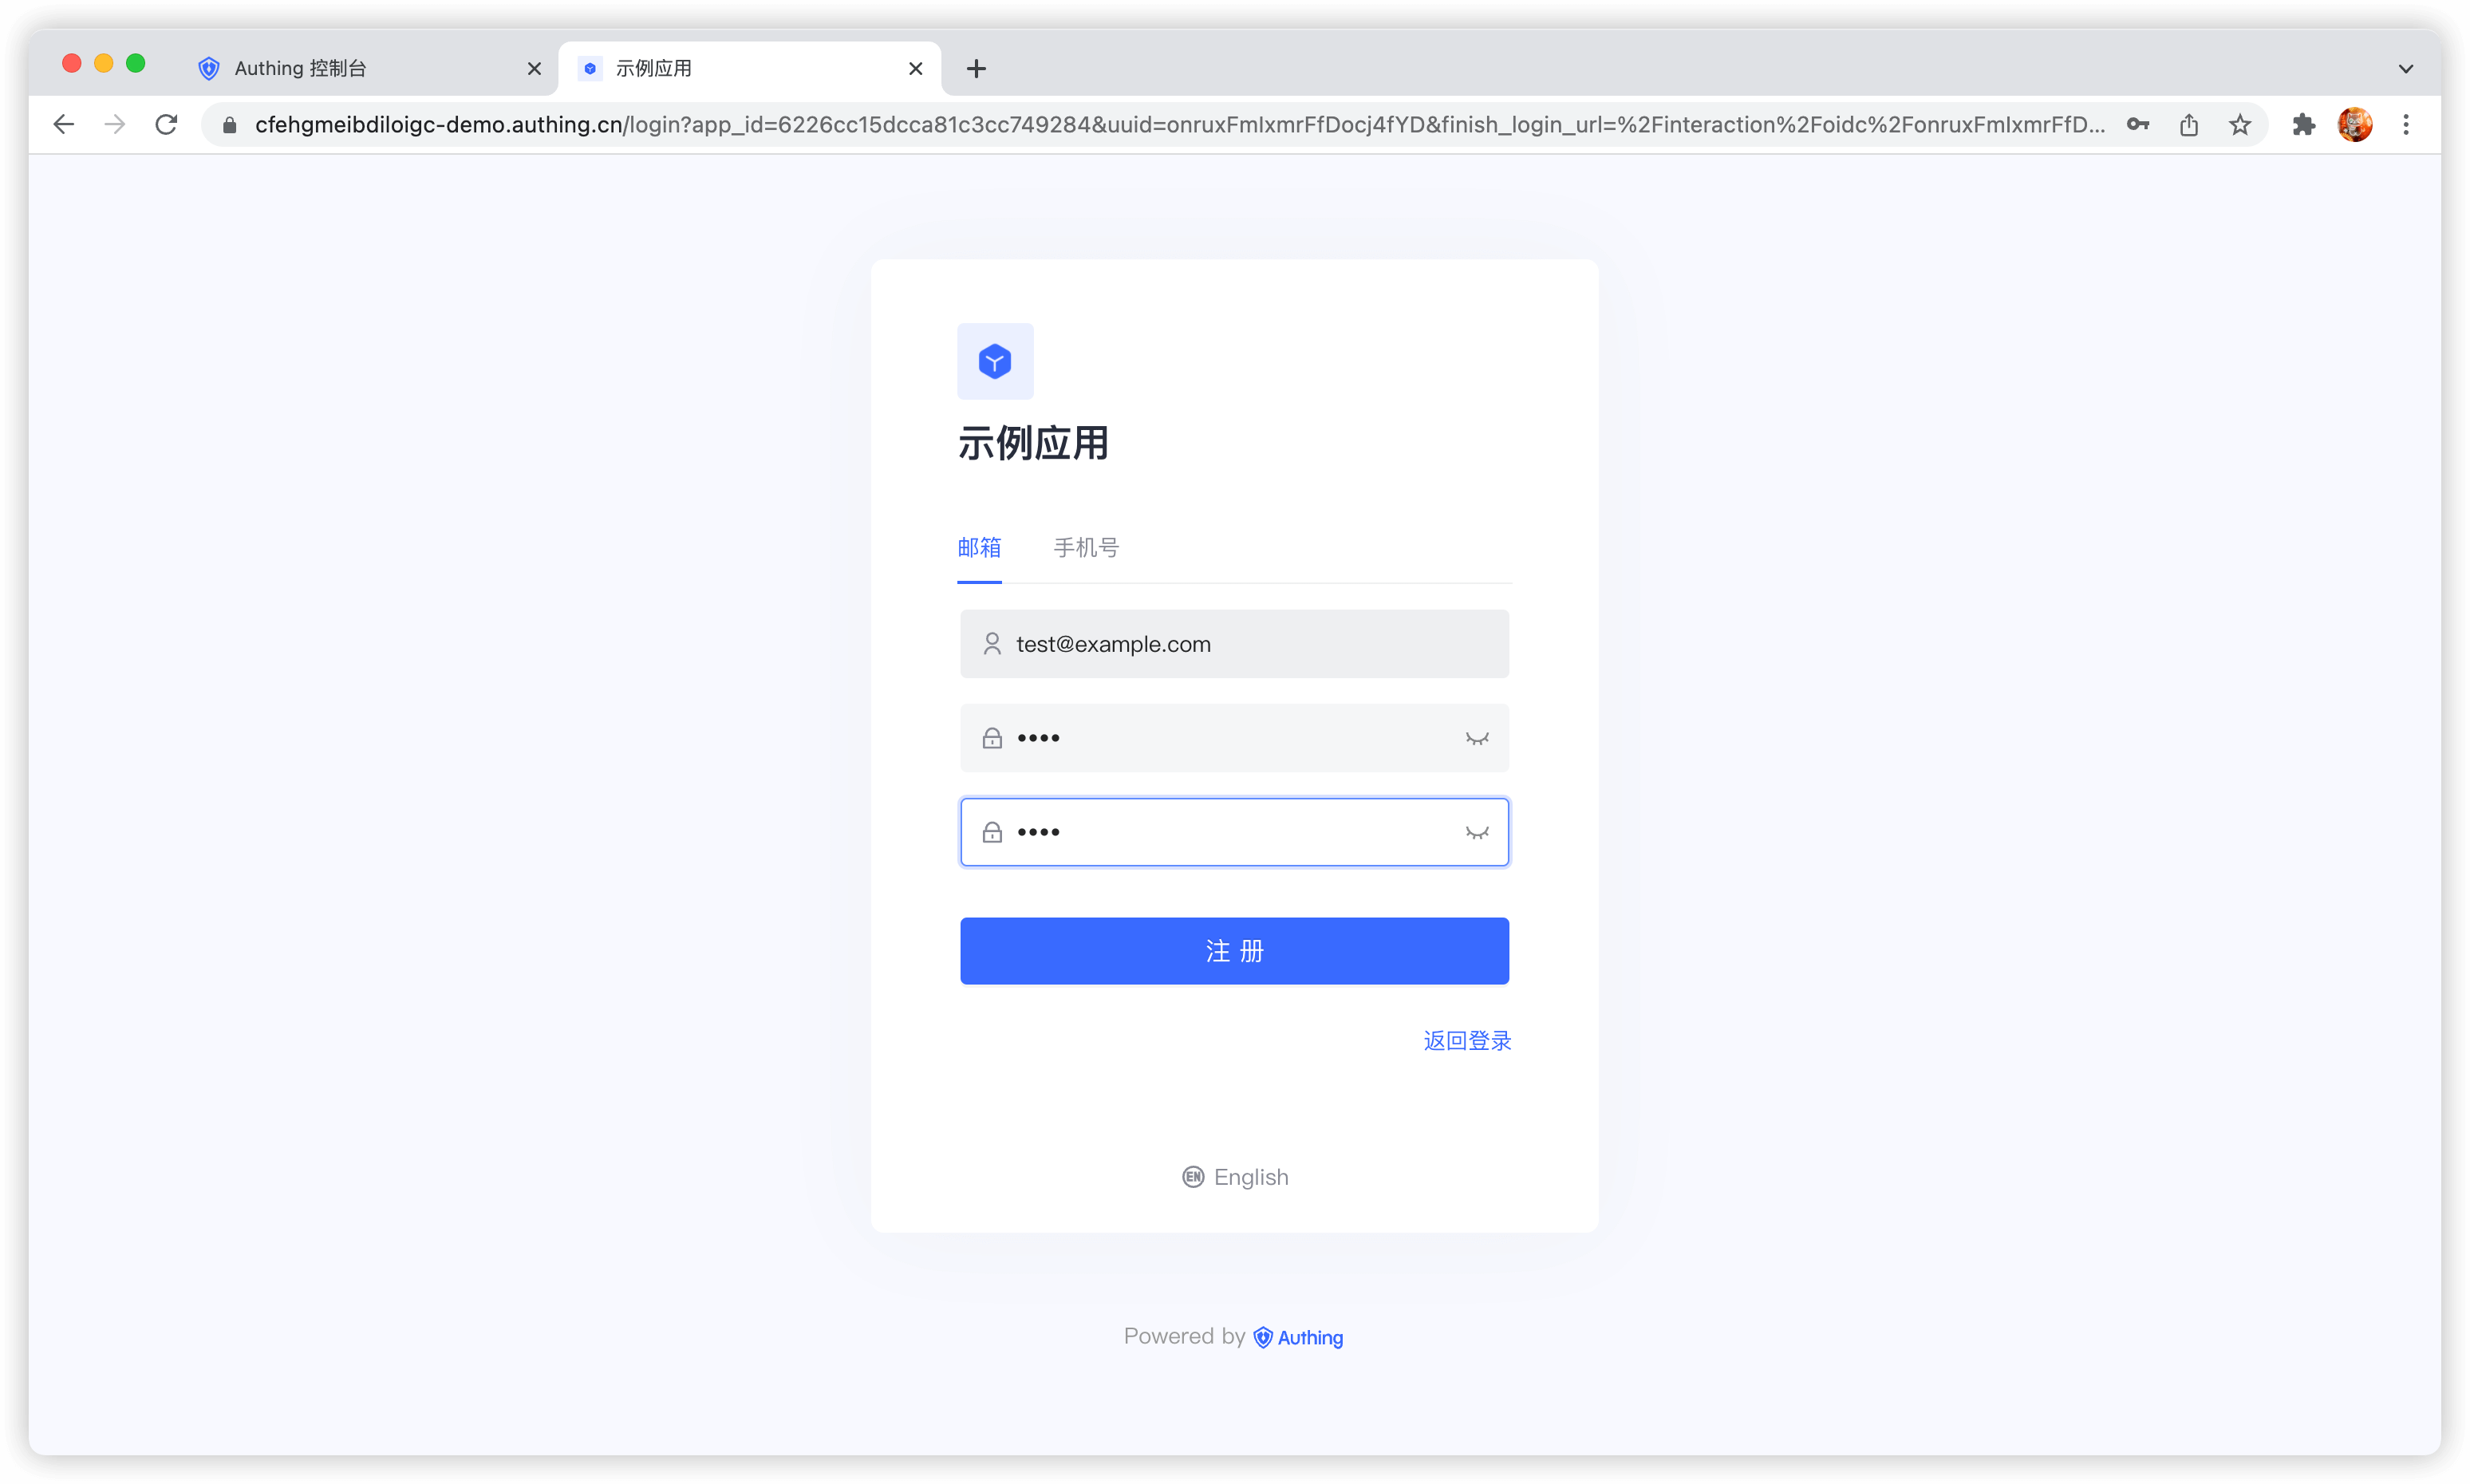
Registration
After the user successfully registers, the system will send a welcome email to the user's mailbox:
You can also turn off the option to send a welcome email when registering in the console Settings - Security Information - User Pool Security Configuration, and you can also modify the default welcome email template in the console Settings - Message Service.
After the user successfully registers, GenAuth will send a verification email to the user's email:
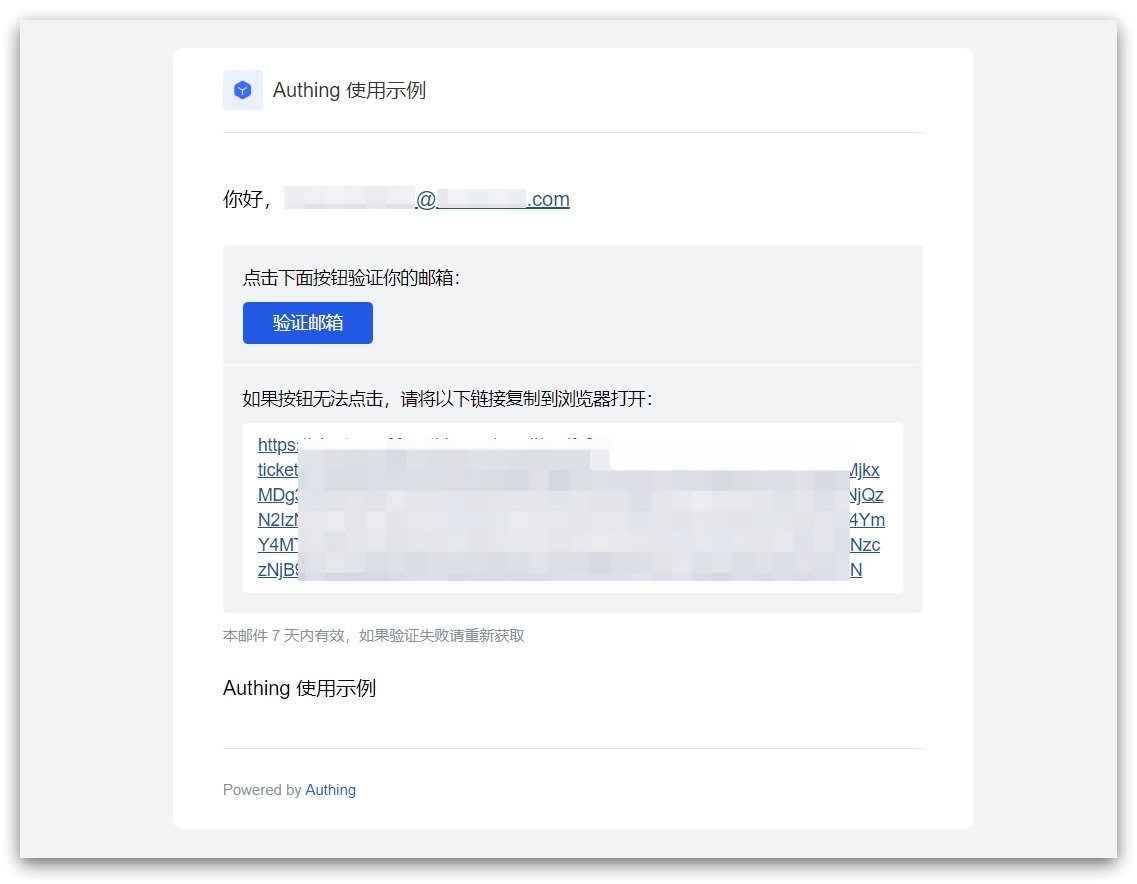
The user clicks the verification button to verify the email.
Login
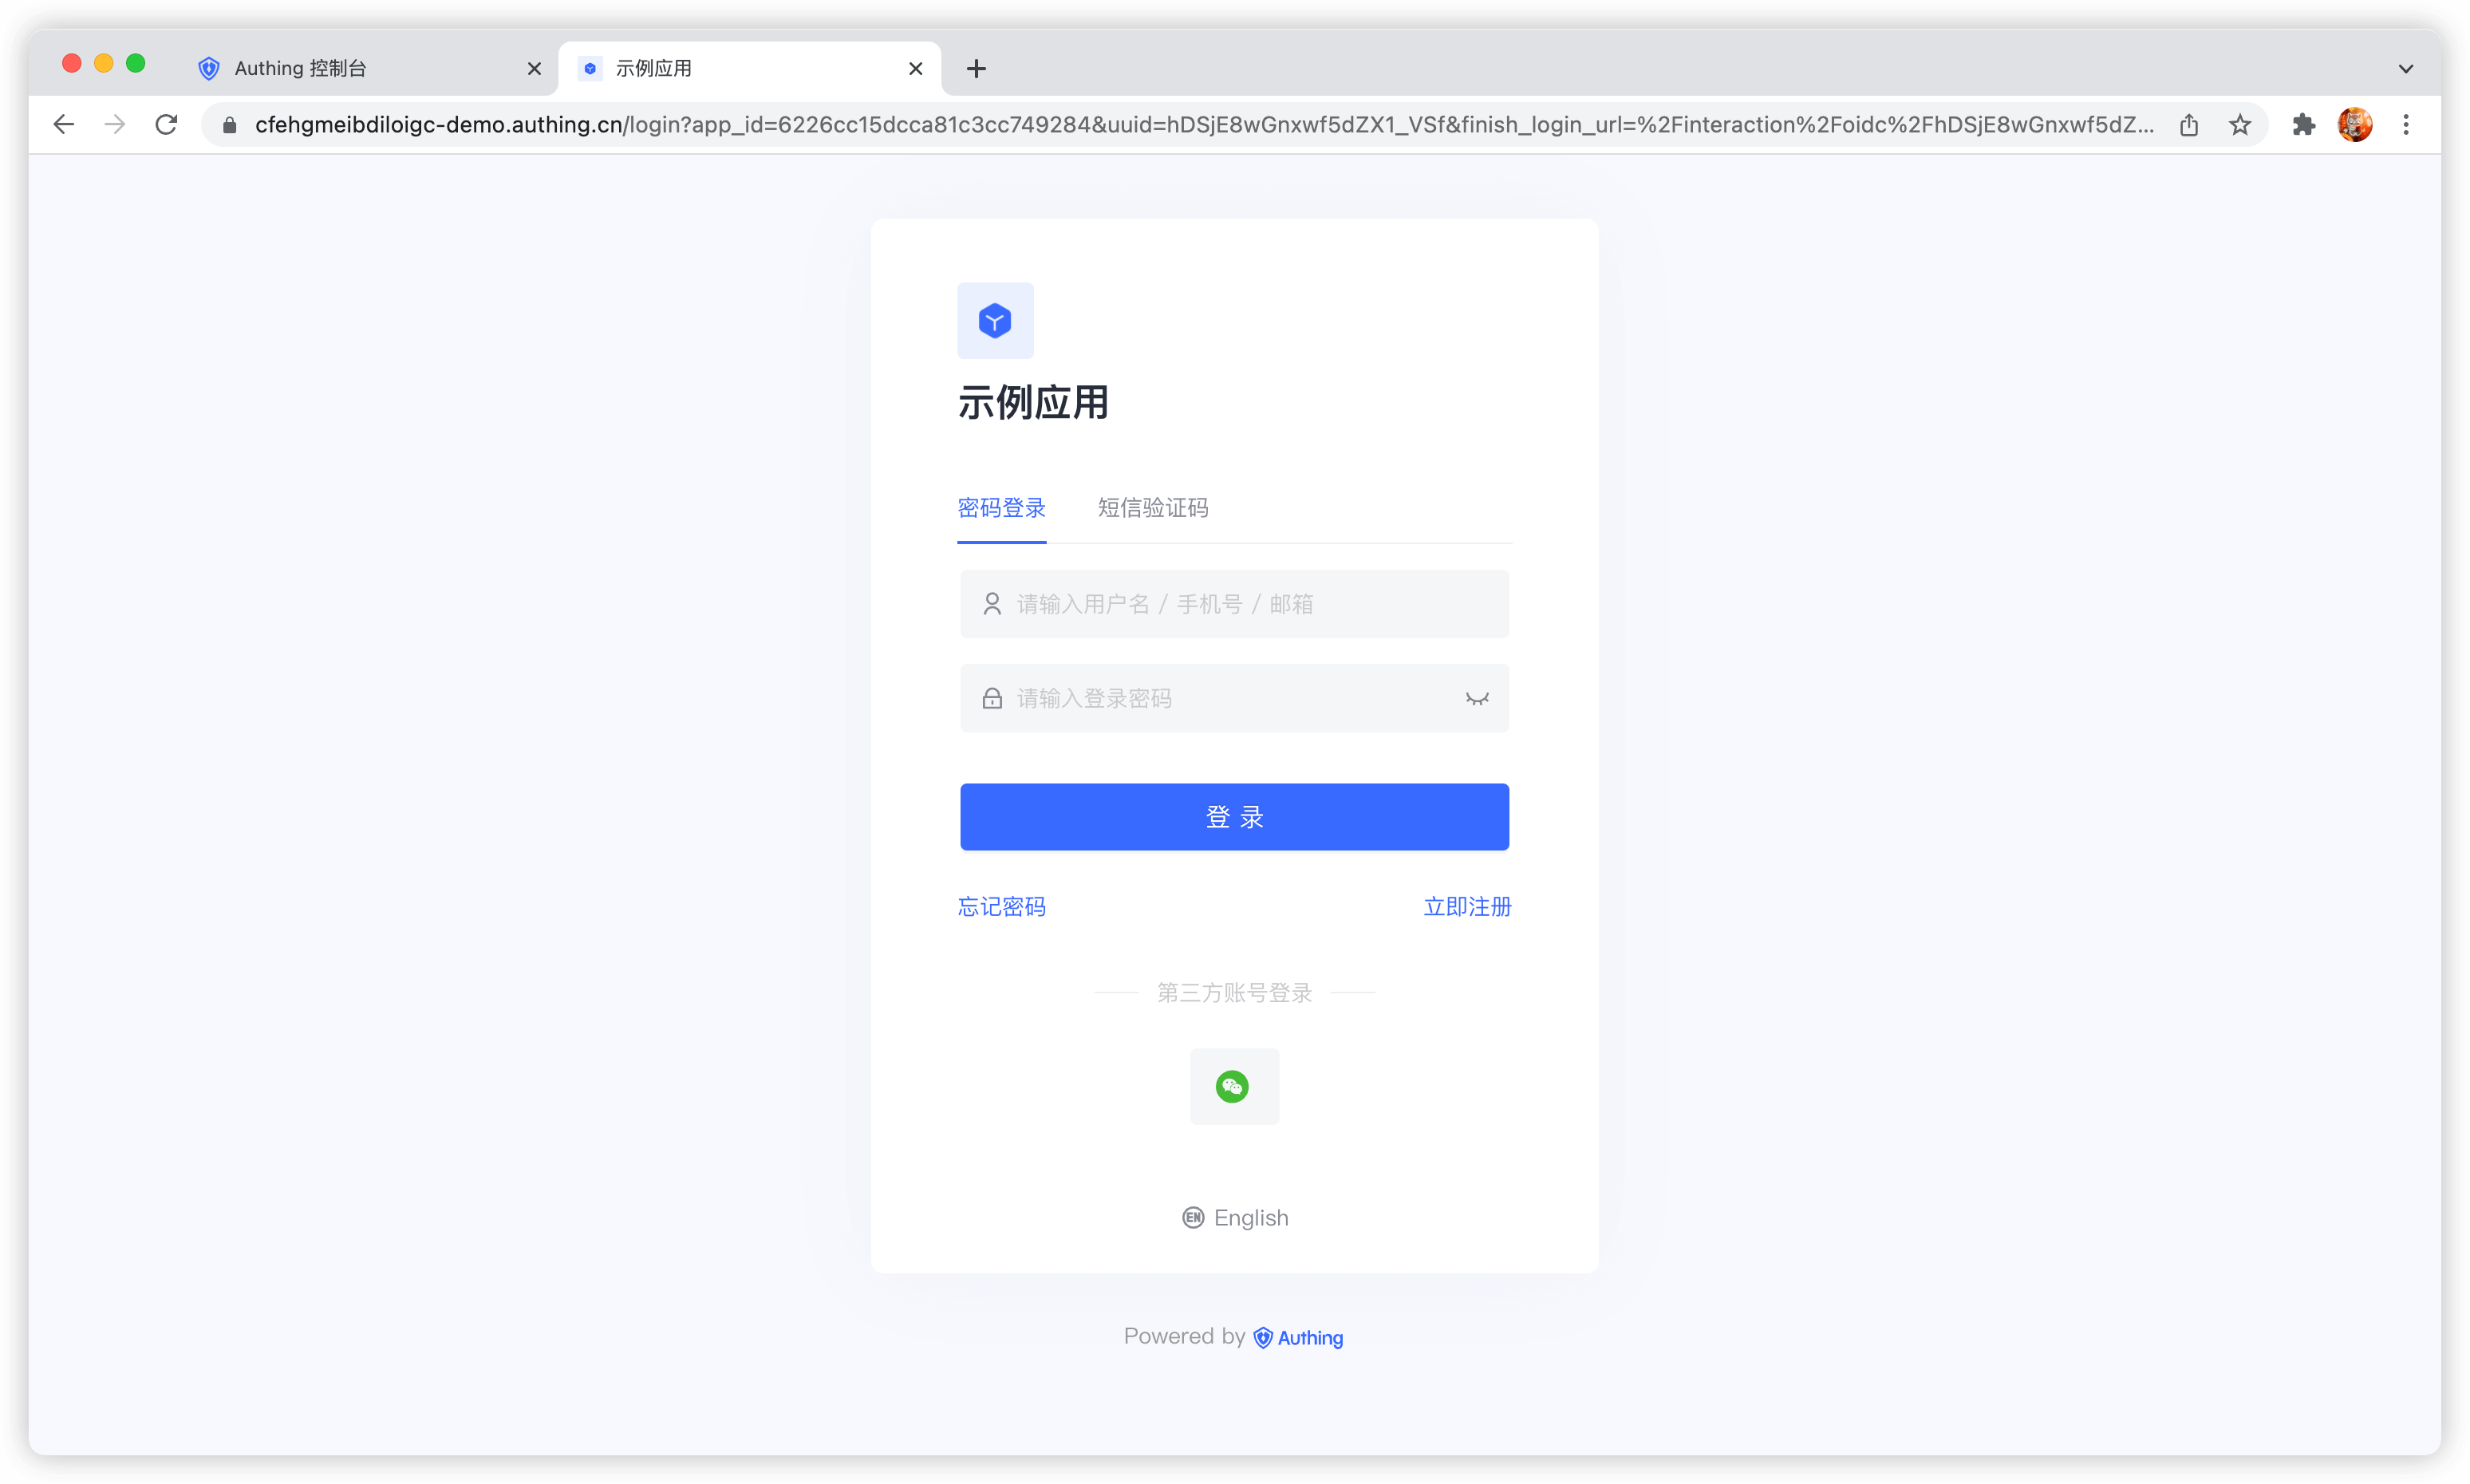
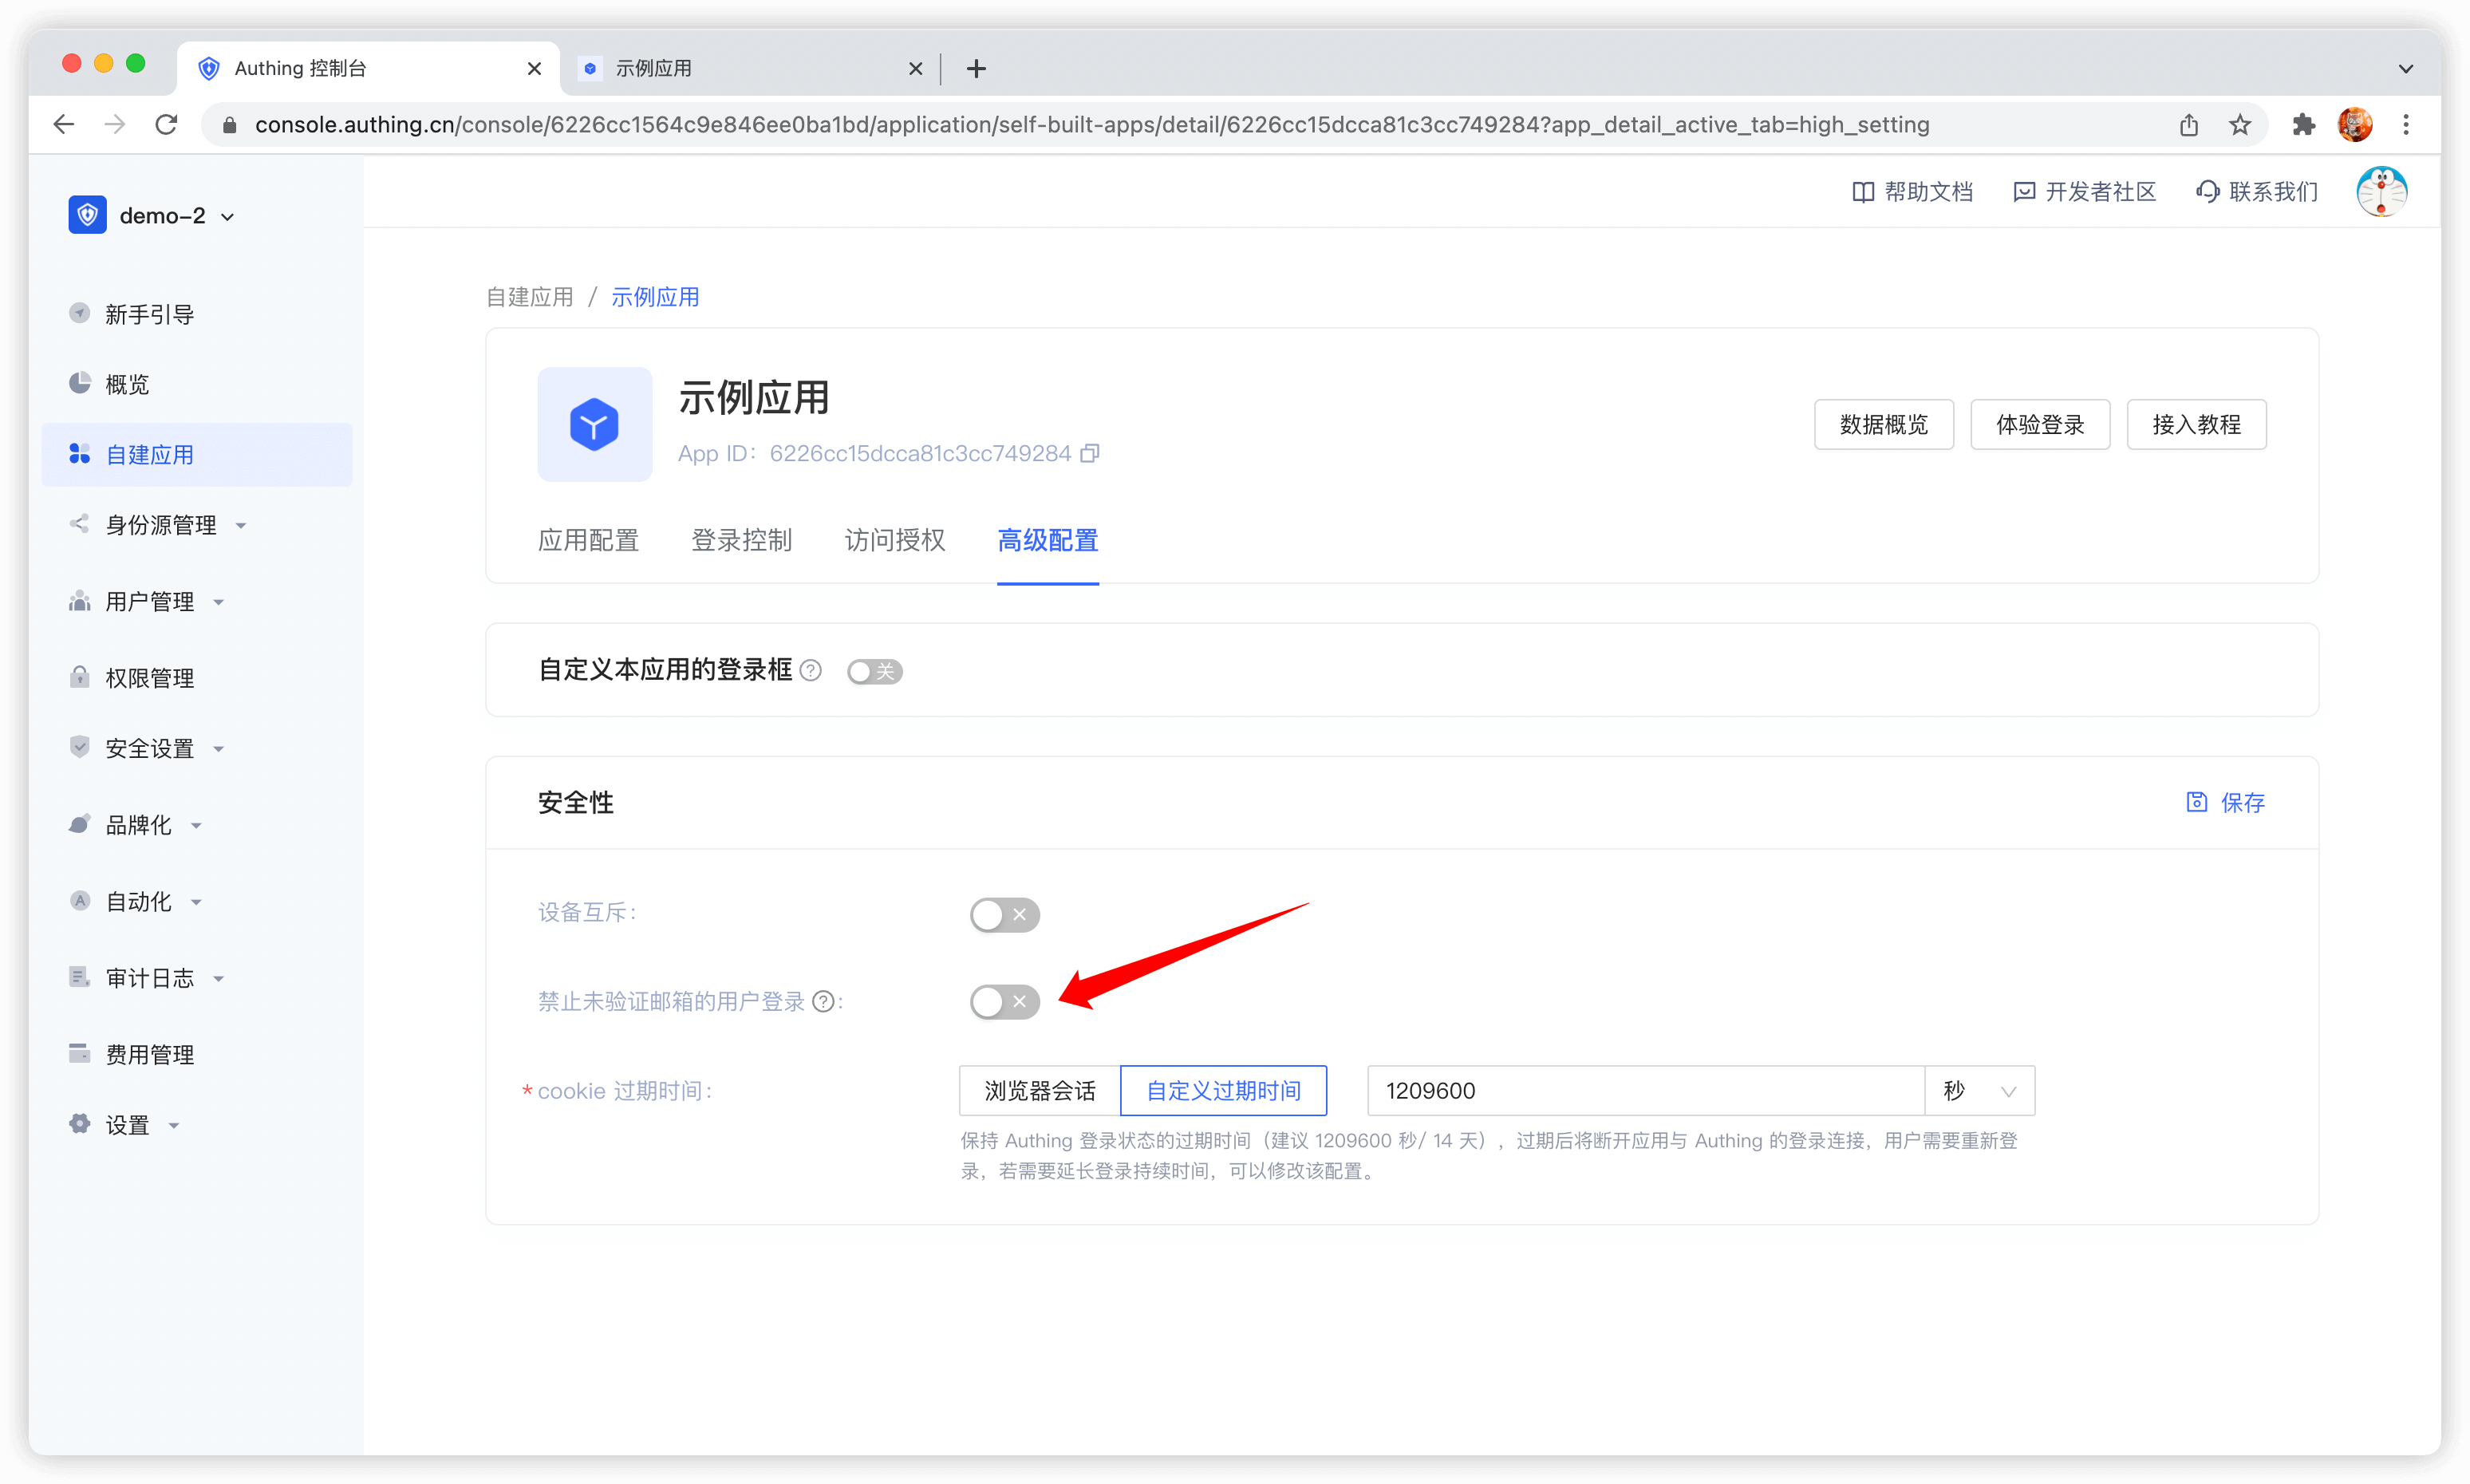
By default, accounts with unverified emails can log in. You can also modify this configuration in the application details:
After the user successfully logs in, the callback link you configured will be called back. You can get the user information here. For details, please see Use GenAuth Hosted Login Page to Complete Authentication.
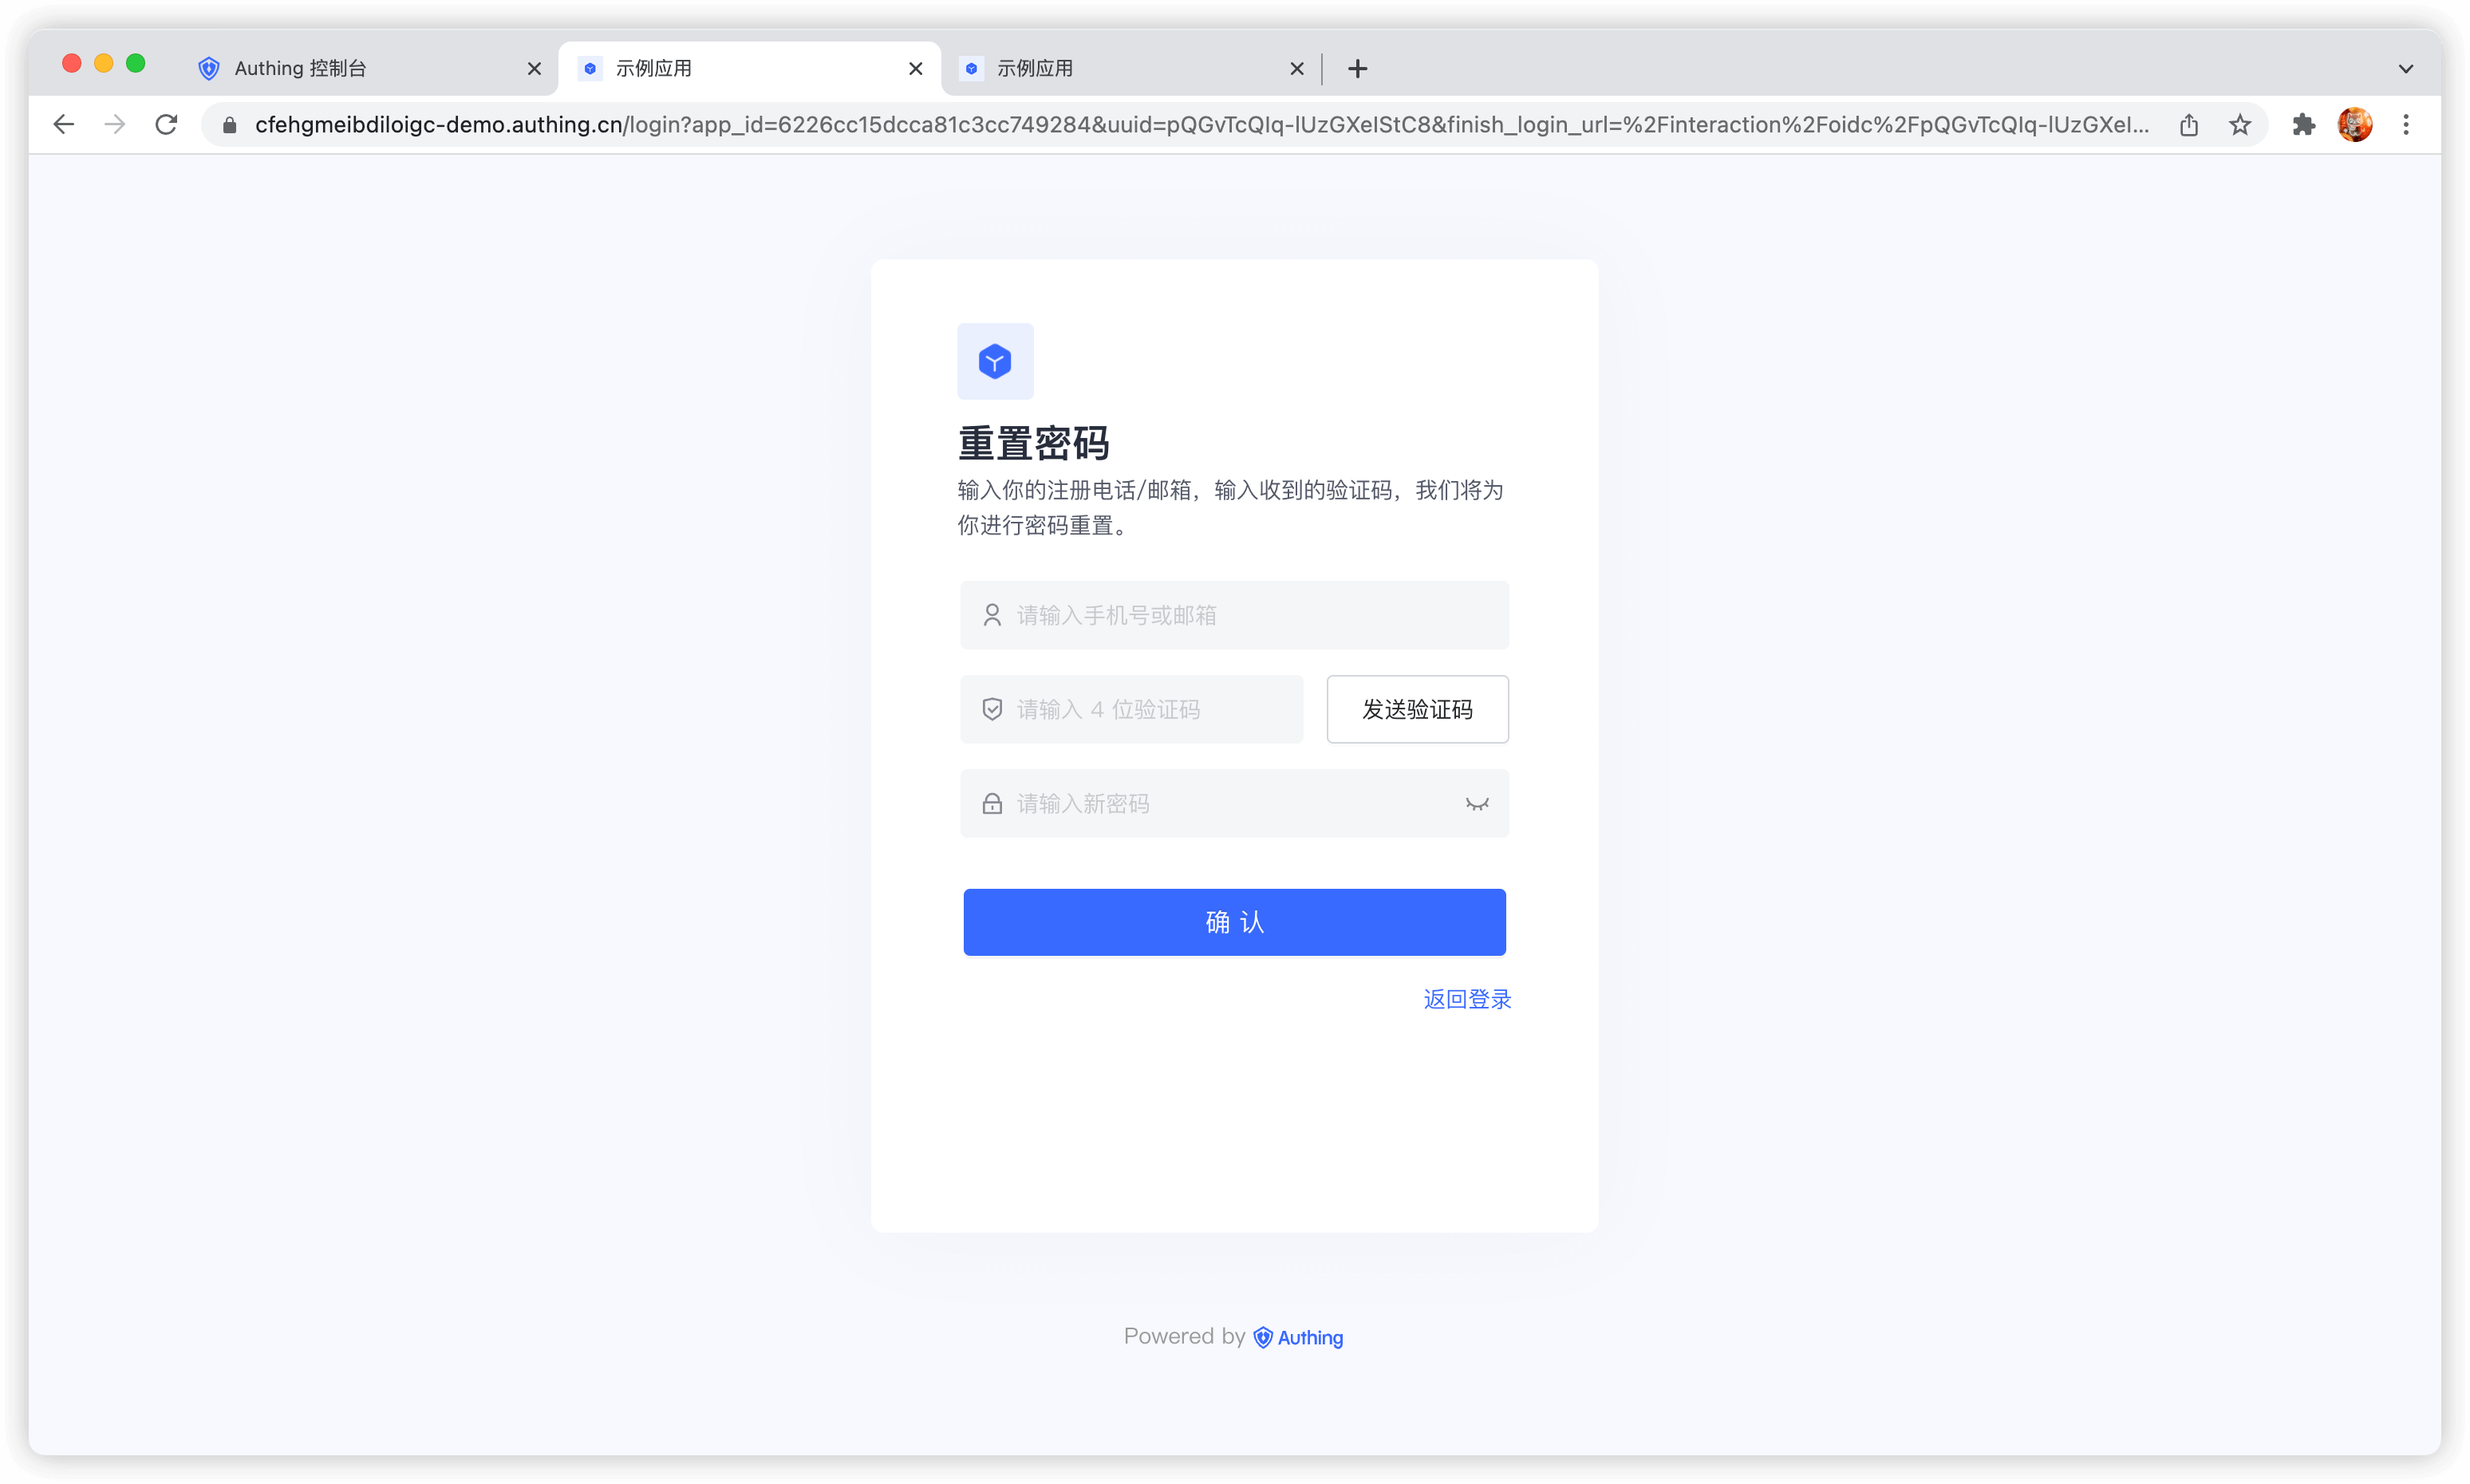
Reset Password
You can reset your password using the bound mobile phone number or email address.
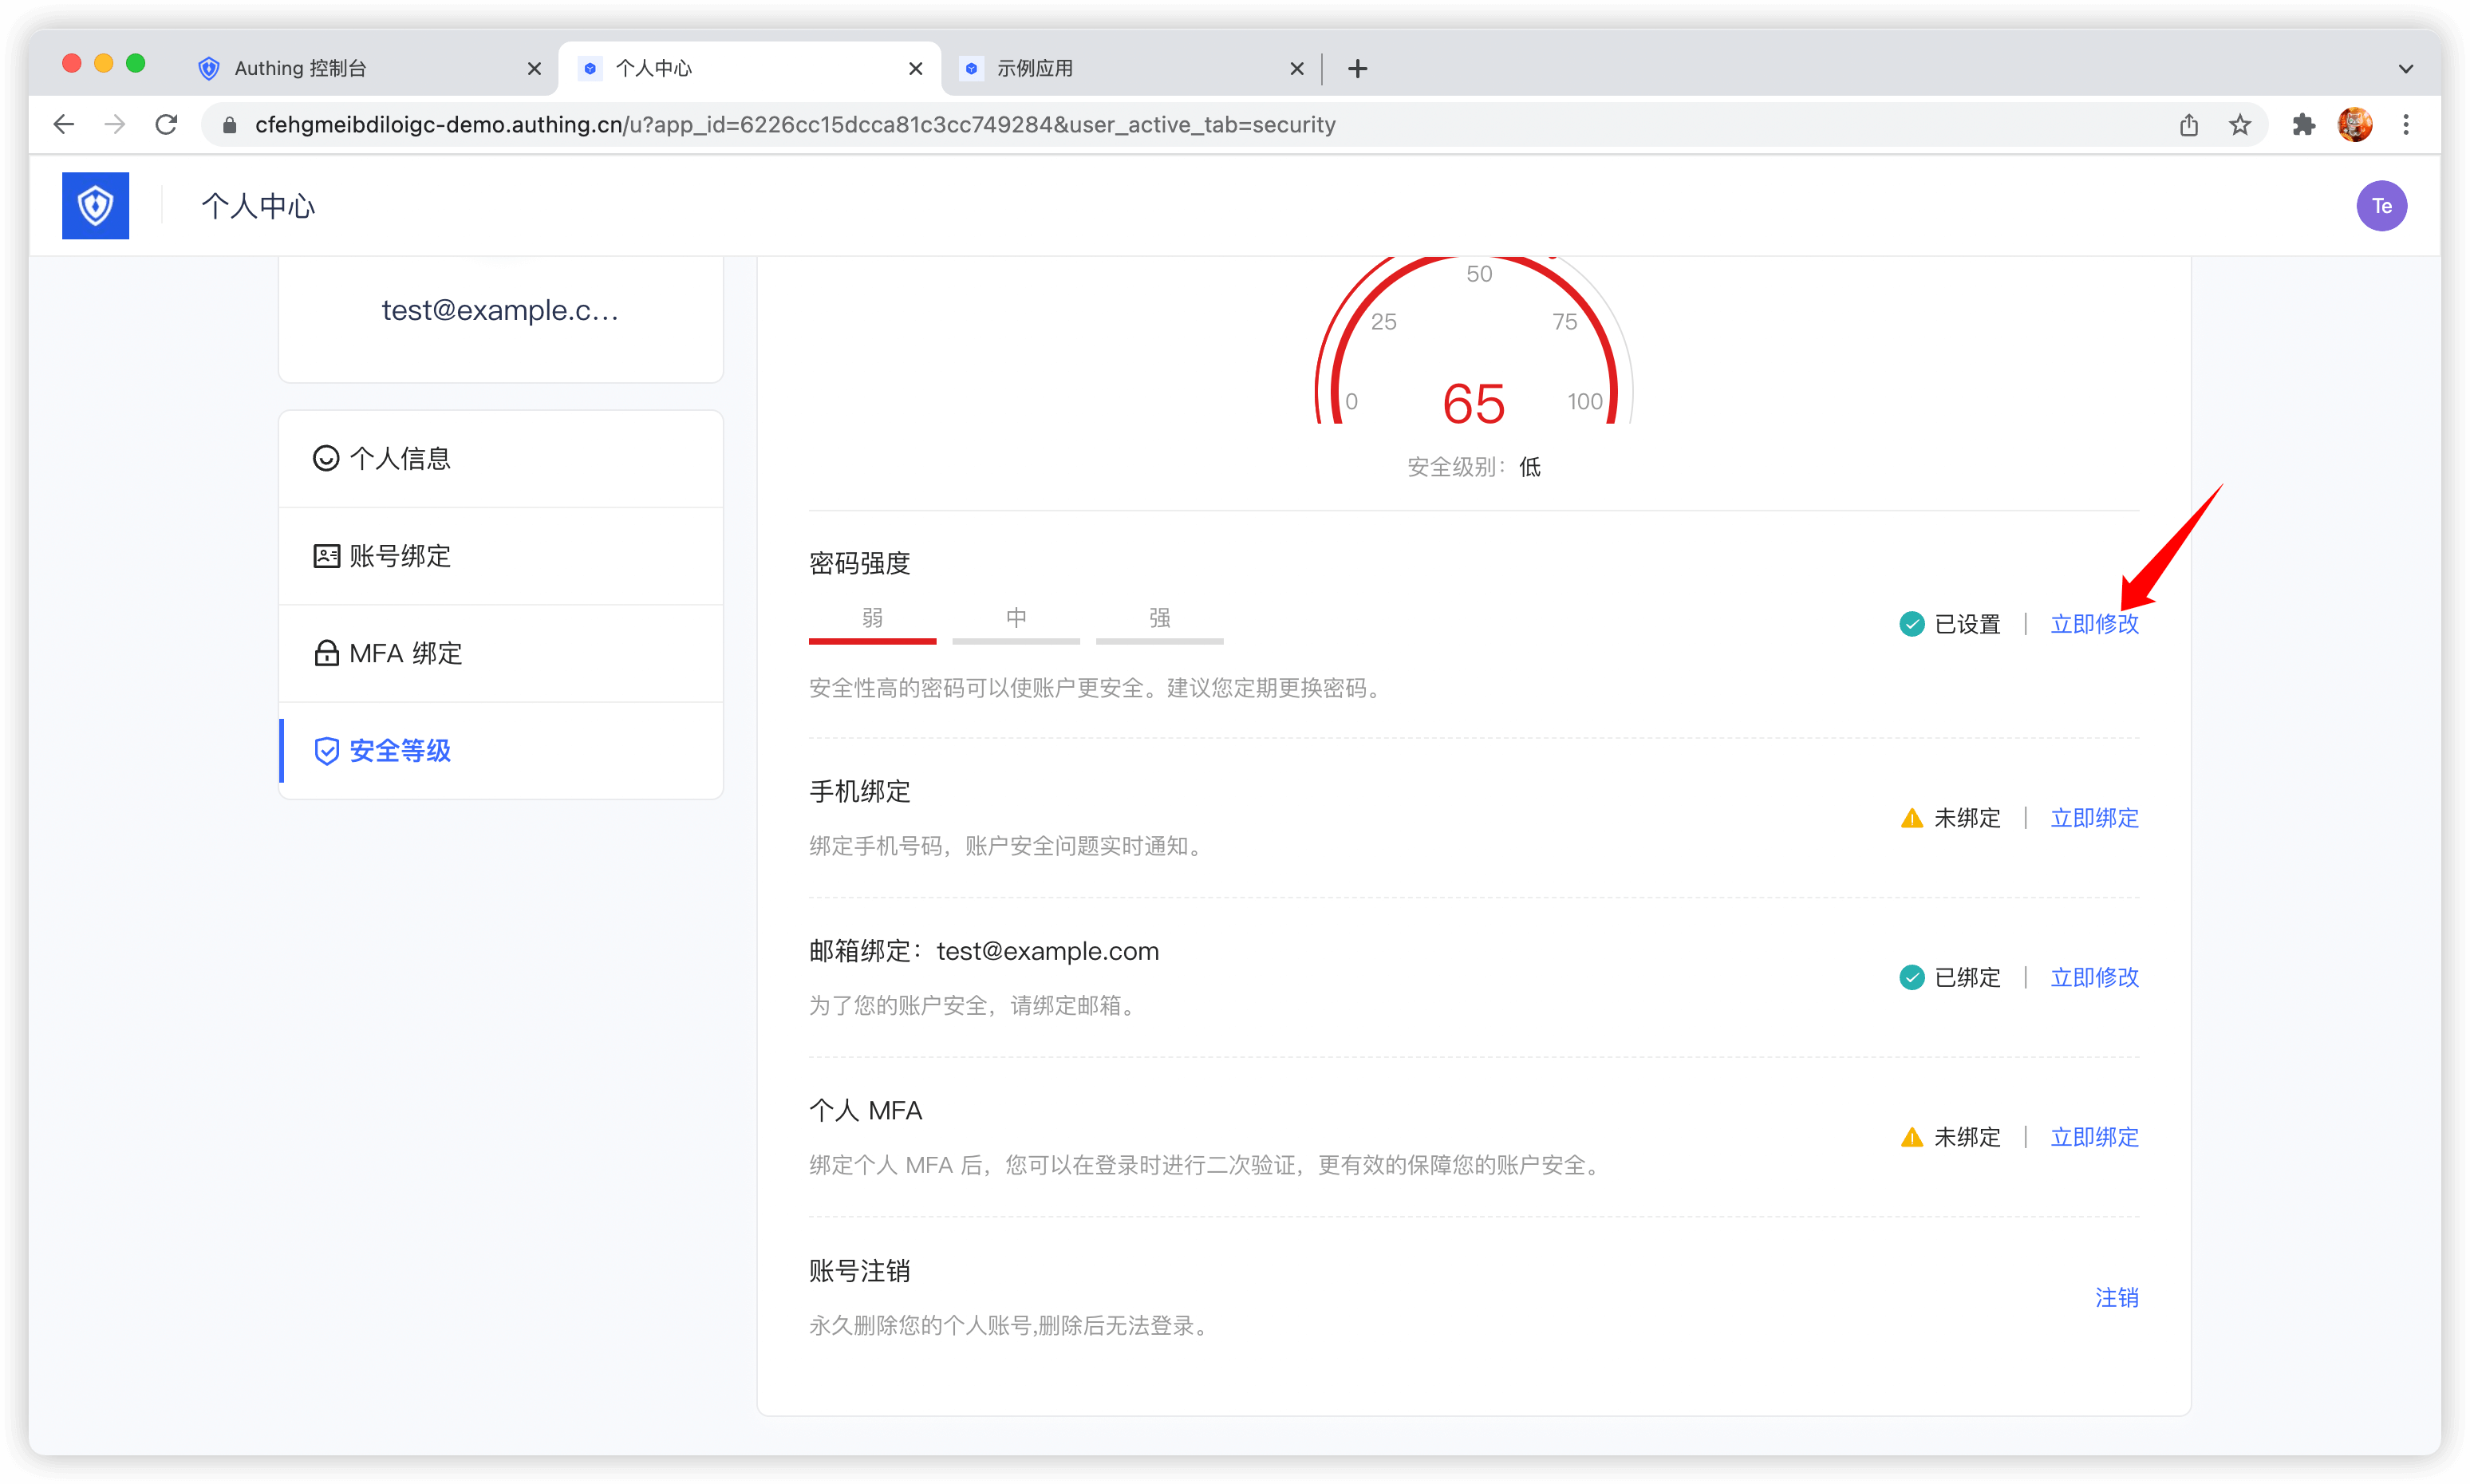
Change password
Users can change their passwords in the personal center:
Use embedded login component
The embedded login component and the online hosted login page are basically the same in style and interaction. The difference is that the online hosted login page is fully managed and maintained by GenAuth and is completely independent of your application, while the embedded login component can be embedded in your application.
For detailed usage, please see: Use the embedded login component to complete authentication .
Using the API & SDK
Register
register-by-email-passwordCode snippet: register-by-email-password
Login
login-by-email-passwordCode snippet: login-by-email-password
Reset password
reset-passwordCode snippet: reset-password
Change password
update-passwordCode snippet: update-password
Use SMS verification code authentication
Developers can use the standard login components and API & SDK provided by GenAuth to quickly implement a user system based on mobile phone numbers. You can also configure a mobile phone number whitelist in the console's User Management - Registration Whitelist, so that only mobile phone numbers in the whitelist can register and log in.
The verification code SMS will use the unified SMS template of GenAuth by default. If you want to customize the SMS template, you can configure a custom SMS template in the console's Settings - Message Service (currently supported SMS service providers are Chuanglan, Alibaba Cloud, and Tencent Cloud).
Use the hosted login page
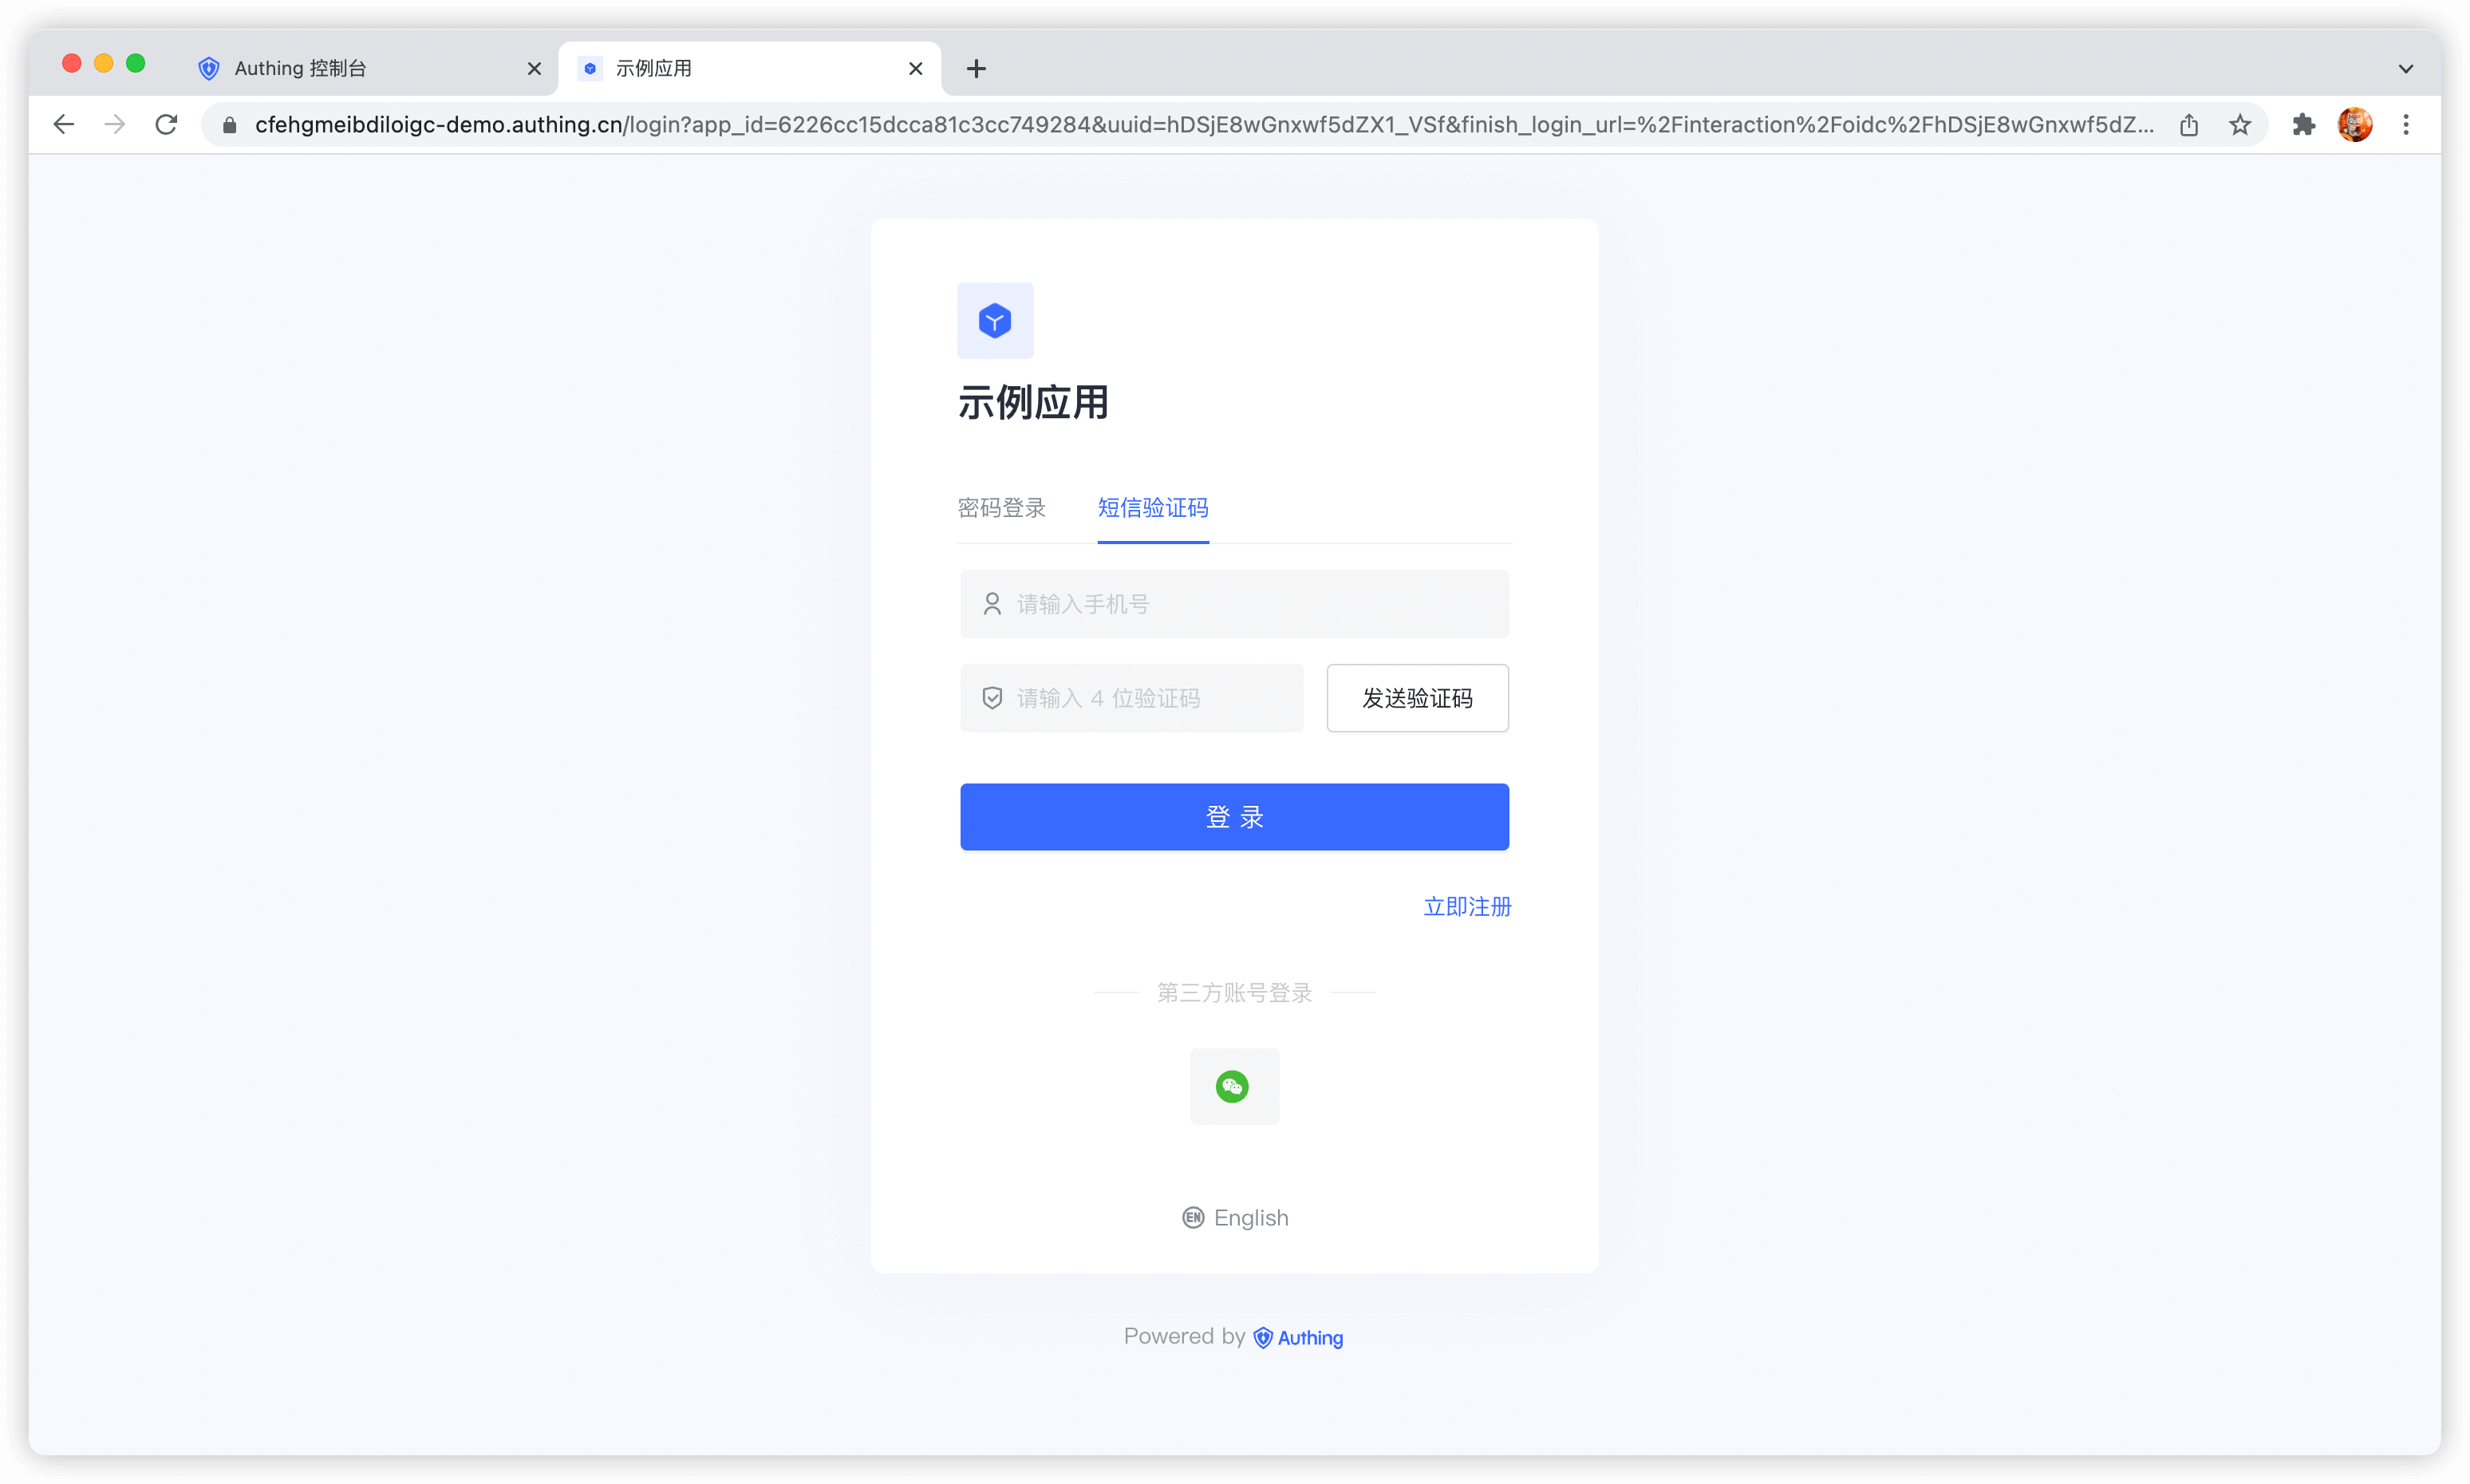
Login
Login with mobile phone number and password. If the user does not exist, an account will be automatically created.
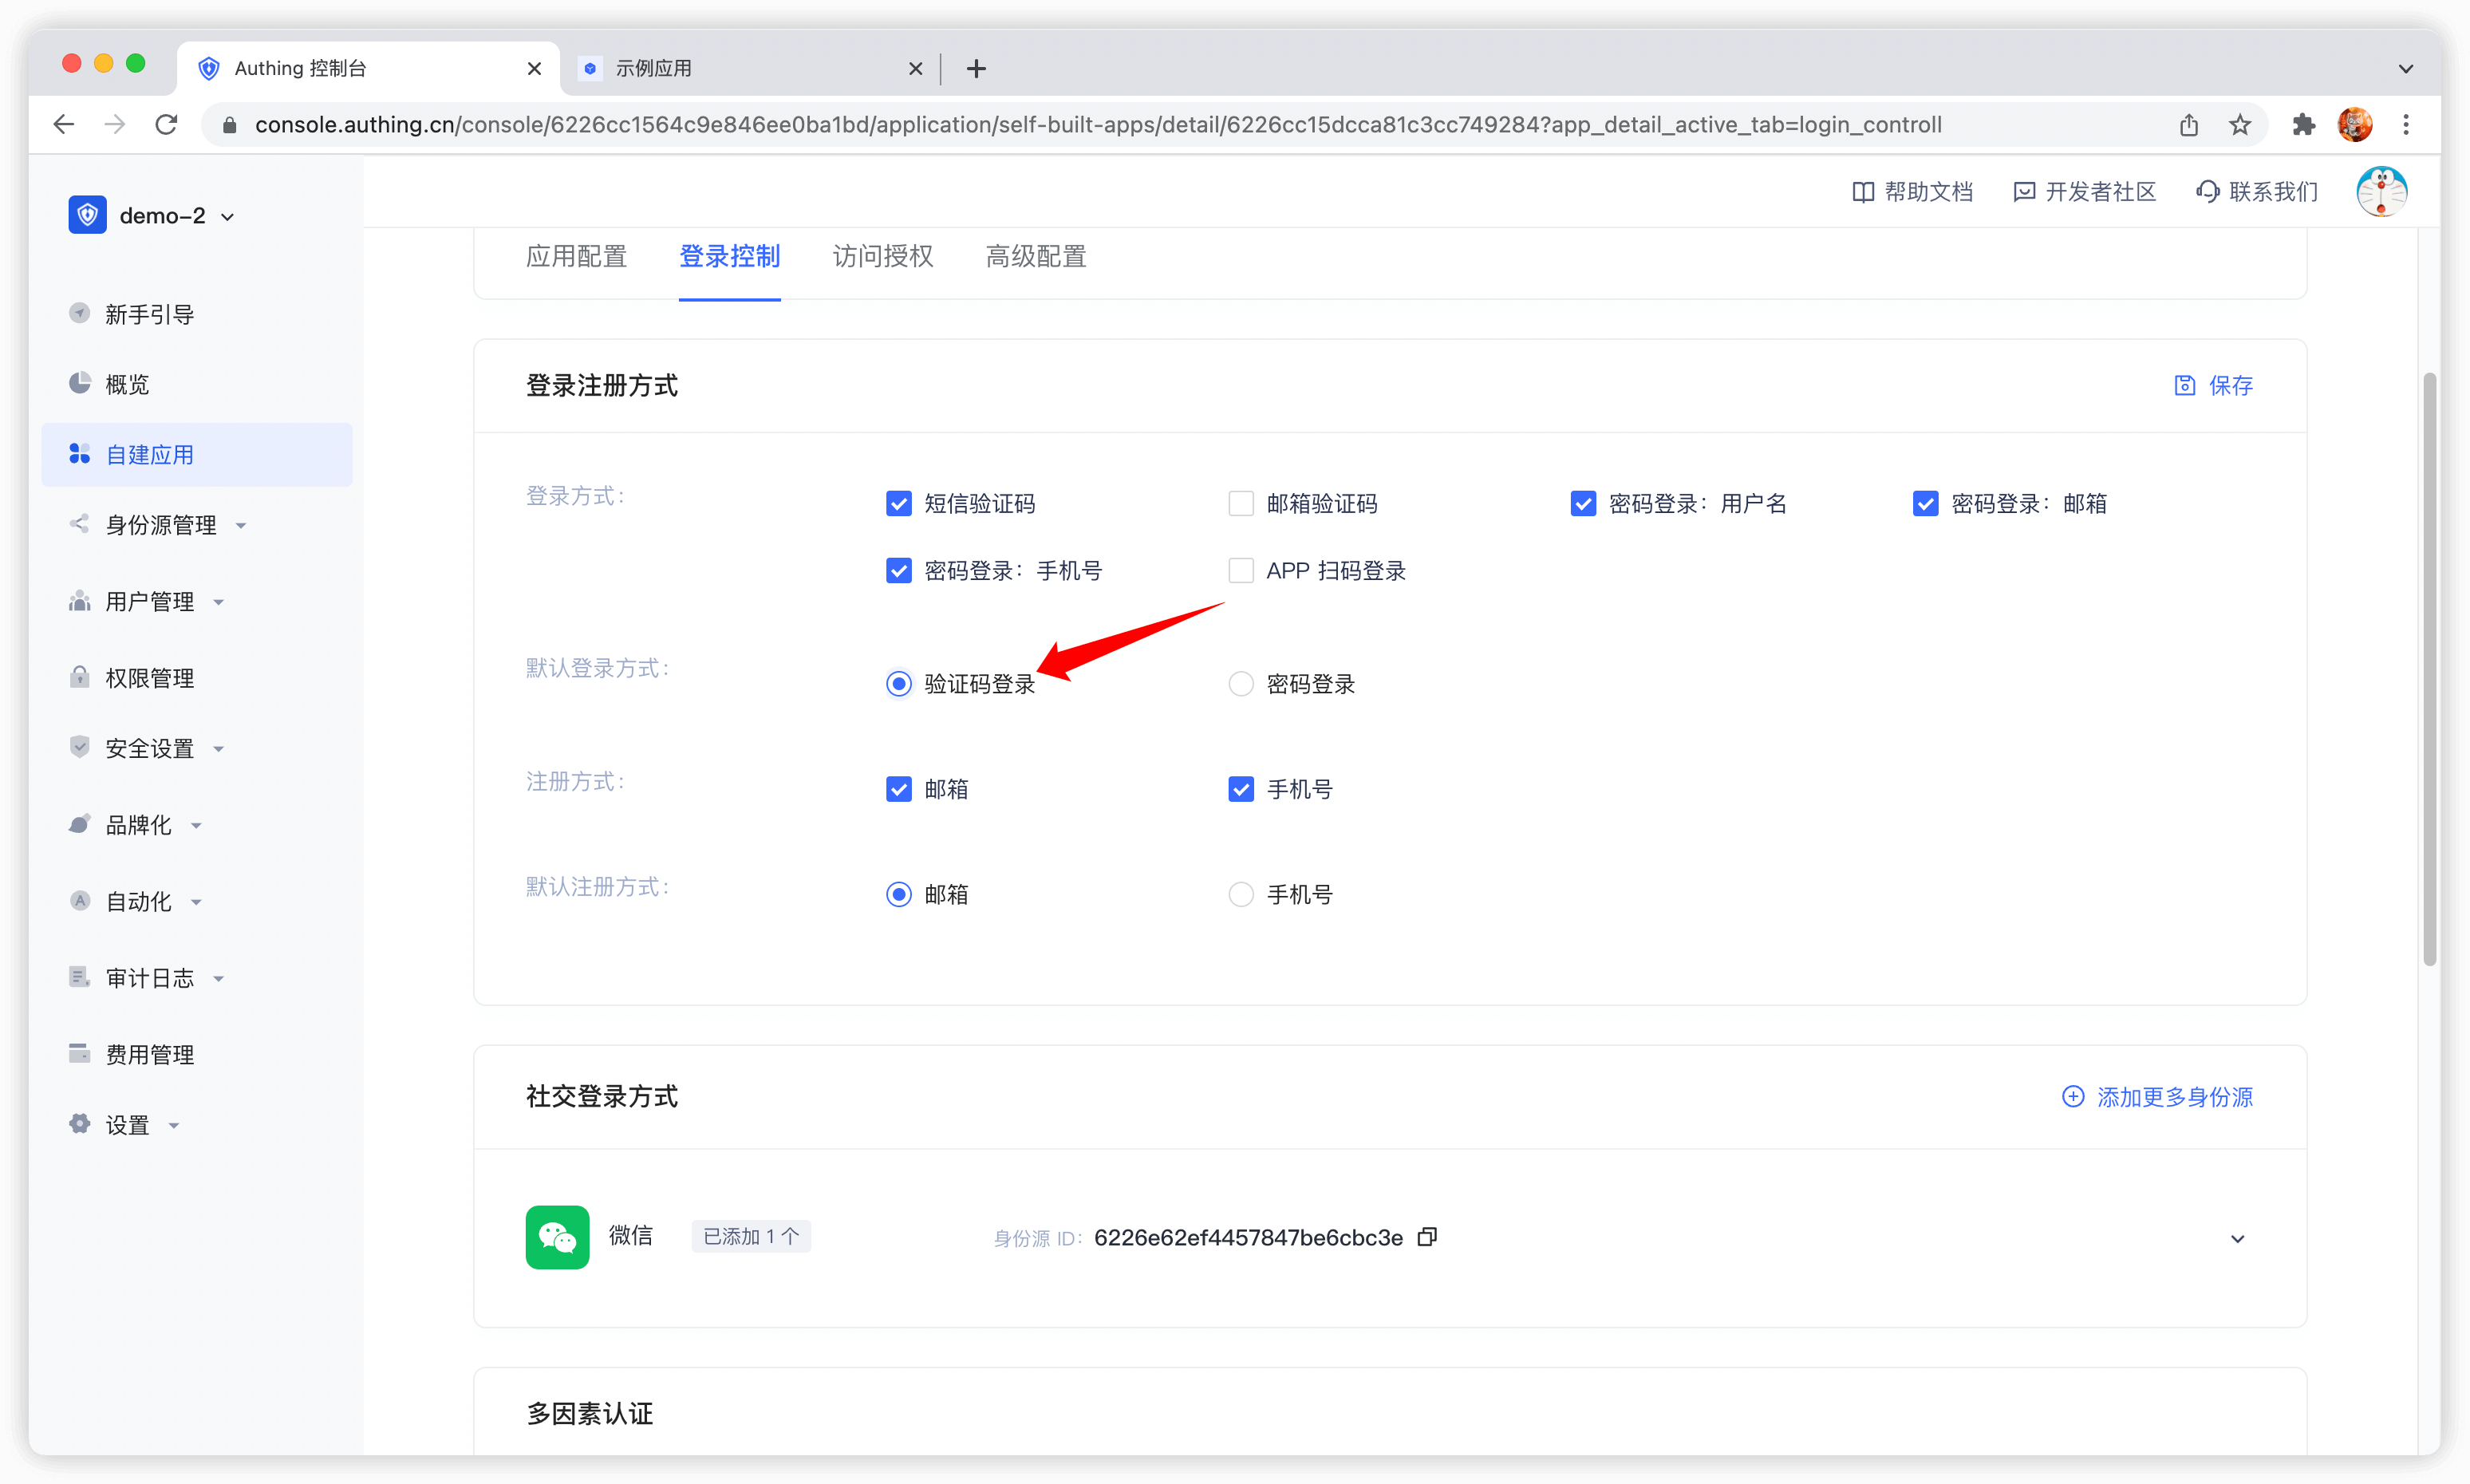
By default, the default login method of the application is password login. You can change it in the application configuration:
Register
Use the embedded login component
The embedded login component and the online hosted login page are basically the same in style and interaction. The difference is that the online hosted login page is fully managed and maintained by GenAuth and is completely independent of your application, while the embedded login component can be embedded in your application. For detailed usage, please see: Use the embedded login component to complete authentication.
Using API & SDK
Send SMS verification code
send-sms-codeCode snippet: send-sms-code
Login
login-by-phone-codeCode snippet: login-by-phone-code
Register
register-by-phone-codeCode snippet: register-by-phone-code
Use social login authentication
Social login refers to the process of users using social platform identity authentication information to authenticate and log in to third-party applications or websites. For example, people often use personal WeChat, QQ, Weibo and other social accounts to log in to Didi, NetEase Cloud Music, etc. Social login not only helps to simplify the user's login experience on third-party platforms, but also provides a simpler and more convenient way for users to create new accounts on third-party platforms. Whether for ordinary users or enterprises, social login has incomparable advantages.
Social login list
GenAuth currently supports nearly 20 social logins at home and abroad, such as WeChat, GitHub, Sign in with Apple, Alipay, etc. The following is a complete list:
| Social Login Method | Usage Scenario | Documentation |
|---|---|---|
| PC WeChat QR Code | PC Website | |
| WeChat Mobile | Mobile APP | |
| WeChat Web Authorization | WeChat Web Page | |
| WeChat Official Account Scanning | PC Website | |
| WeChat Mini Program | WeChat Mini Program | Documentation |
| WeChat PC Mini Program QR Code | PC Website | |
| WeChat Mini Program App Launch | Mobile APP | |
| Tencent QQ | PC Website | |
| Tencent QQ Mobile | Mobile APP | |
| Sina Weibo | PC Website | |
| Sina Weibo Mobile | Mobile APP | |
| GitHub | PC Website | |
| GitHub Mobile | Mobile APP | |
| PC Website | ||
| Facebook Mobile | Mobile APP | |
| PC Website | ||
| Twitter Mobile | Mobile APP | |
| Google Web | PC Website | |
| Google Mobile | Mobile APP | |
| Apple Web | PC Website | |
| Apple Mobile | Mobile APP | |
| Alipay Web | PC Website | |
| Alipay Mobile | Mobile APP | |
| Slack | PC Website | |
| Slack Mobile | Mobile APP | |
| Gitee | PC Website | |
| GitLab | PC Website | |
| GitLab Mobile | Mobile APP | |
| Baidu | PC Website | |
| Baidu Mobile | Mobile APP | |
| PC Website | ||
| LinkedIn Mobile | Mobile APP | |
| NetEase Yidun (One-click Login) | Mobile APP | |
| QingCloud | PC Website | |
| PC Website | ||
| Douyin Mobile | Mobile APP | |
| Douyin Mini Program | Mobile APP | Documentation |
| Kuaishou Mobile | Mobile APP | |
| Xiaomi Mobile | Mobile APP | |
| Line Mobile | Mobile APP |
Custom social login
GenAuth provides the ability to access custom OAuth2.0 identity providers. If you need to connect to a social login identity source that is not built into GenAuth, you can .
WeChat solution
GenAuth has a complete solution for the WeChat ecosystem. You can view the product introduction and read the Guide to connecting to the WeChat account system.
Choose the appropriate development access method
GenAuth Social login supports four access methods: Using JavaScript SDK, Using embedded login components, Using hosted login pages and Manually calling social login interfaces. Each different access method has its own advantages and disadvantages. You can choose the appropriate method according to your business needs.
Pros and cons comparison
The following is a comparison of the pros and cons of various methods:
| Access method | Advantages | Disadvantages | Recommended |
|---|---|---|---|
| Use JavaScript SDK | Easy access, only a few lines of code. Highest degree of customization. | ||
| Use embedded login component | Easy access, only a few lines of code. You can integrate this component into your application. Relatively high degree of customization | Yes | |
| Use hosted login page | Simple operation and maintenance, which is handled by GenAuth. Each user pool has an independent second-level domain name. | If you need to embed it in your application, you need to use the pop-up mode to log in, that is: after clicking the login button, a window will pop up with the login page hosted by GenAuth, or redirect the browser to the login page hosted by GenAuth. | Yes |
| Manually call the social login interface | You need to manually parse the user information from the URL. Access is relatively complicated and troublesome. | Not recommended |
Detailed access method
The following is the detailed access method for each method:
social-loginCode snippet: social-login
Use QR code scanning to log in
- Use self-built App to scan QR code to log in to the website
- Use mini program to scan QR code to log in to the website
Overview
With the popularity of mobile Internet, mobile phones have become a necessity in people's lives, and the way to complete authentication by scanning QR codes with mobile phones has become more and more common. More and more mobile applications have integrated the function of scanning QR codes to log in to PC-side website applications, which is a convenient and safe experience for users. With the help of the scanning code login capability provided by GenAuth, this function can be implemented quickly and safely.
To implement the use of self-built mobile applications to scan codes to log in to website applications, it can be roughly divided into the following steps:
- Generate a QR code on the Web side and start polling the latest scanning status.
- The user scans the code in the mobile APP and agrees to authorize the user information.
- The Web side receives the user information of the scanned user and the login is successful.
Step 1: Generate a QR code on the Web and poll the scanning status
On the Web, we recommend using the JavaScript SDK provided by GenAuth, which provides an interface for one-click QR code generation, polling the latest status, and callback after obtaining user information. Developers only need to specify the onSuccess callback function:
import { AuthenticationClient } from "authing-js-sdk";
const authenticationClient = new AuthenticationClient({
appId: "GEN_AUTH_APP_ID",
appHost: "https://xxx.genauth.ai",
});
authenticationClient.qrcode.startScanning("qrcode", {
onSuccess: (userInfo, ticket) => {
console.log(userInfo, ticket);
},
onError: (message) => onFail && onFail(`${message}`),
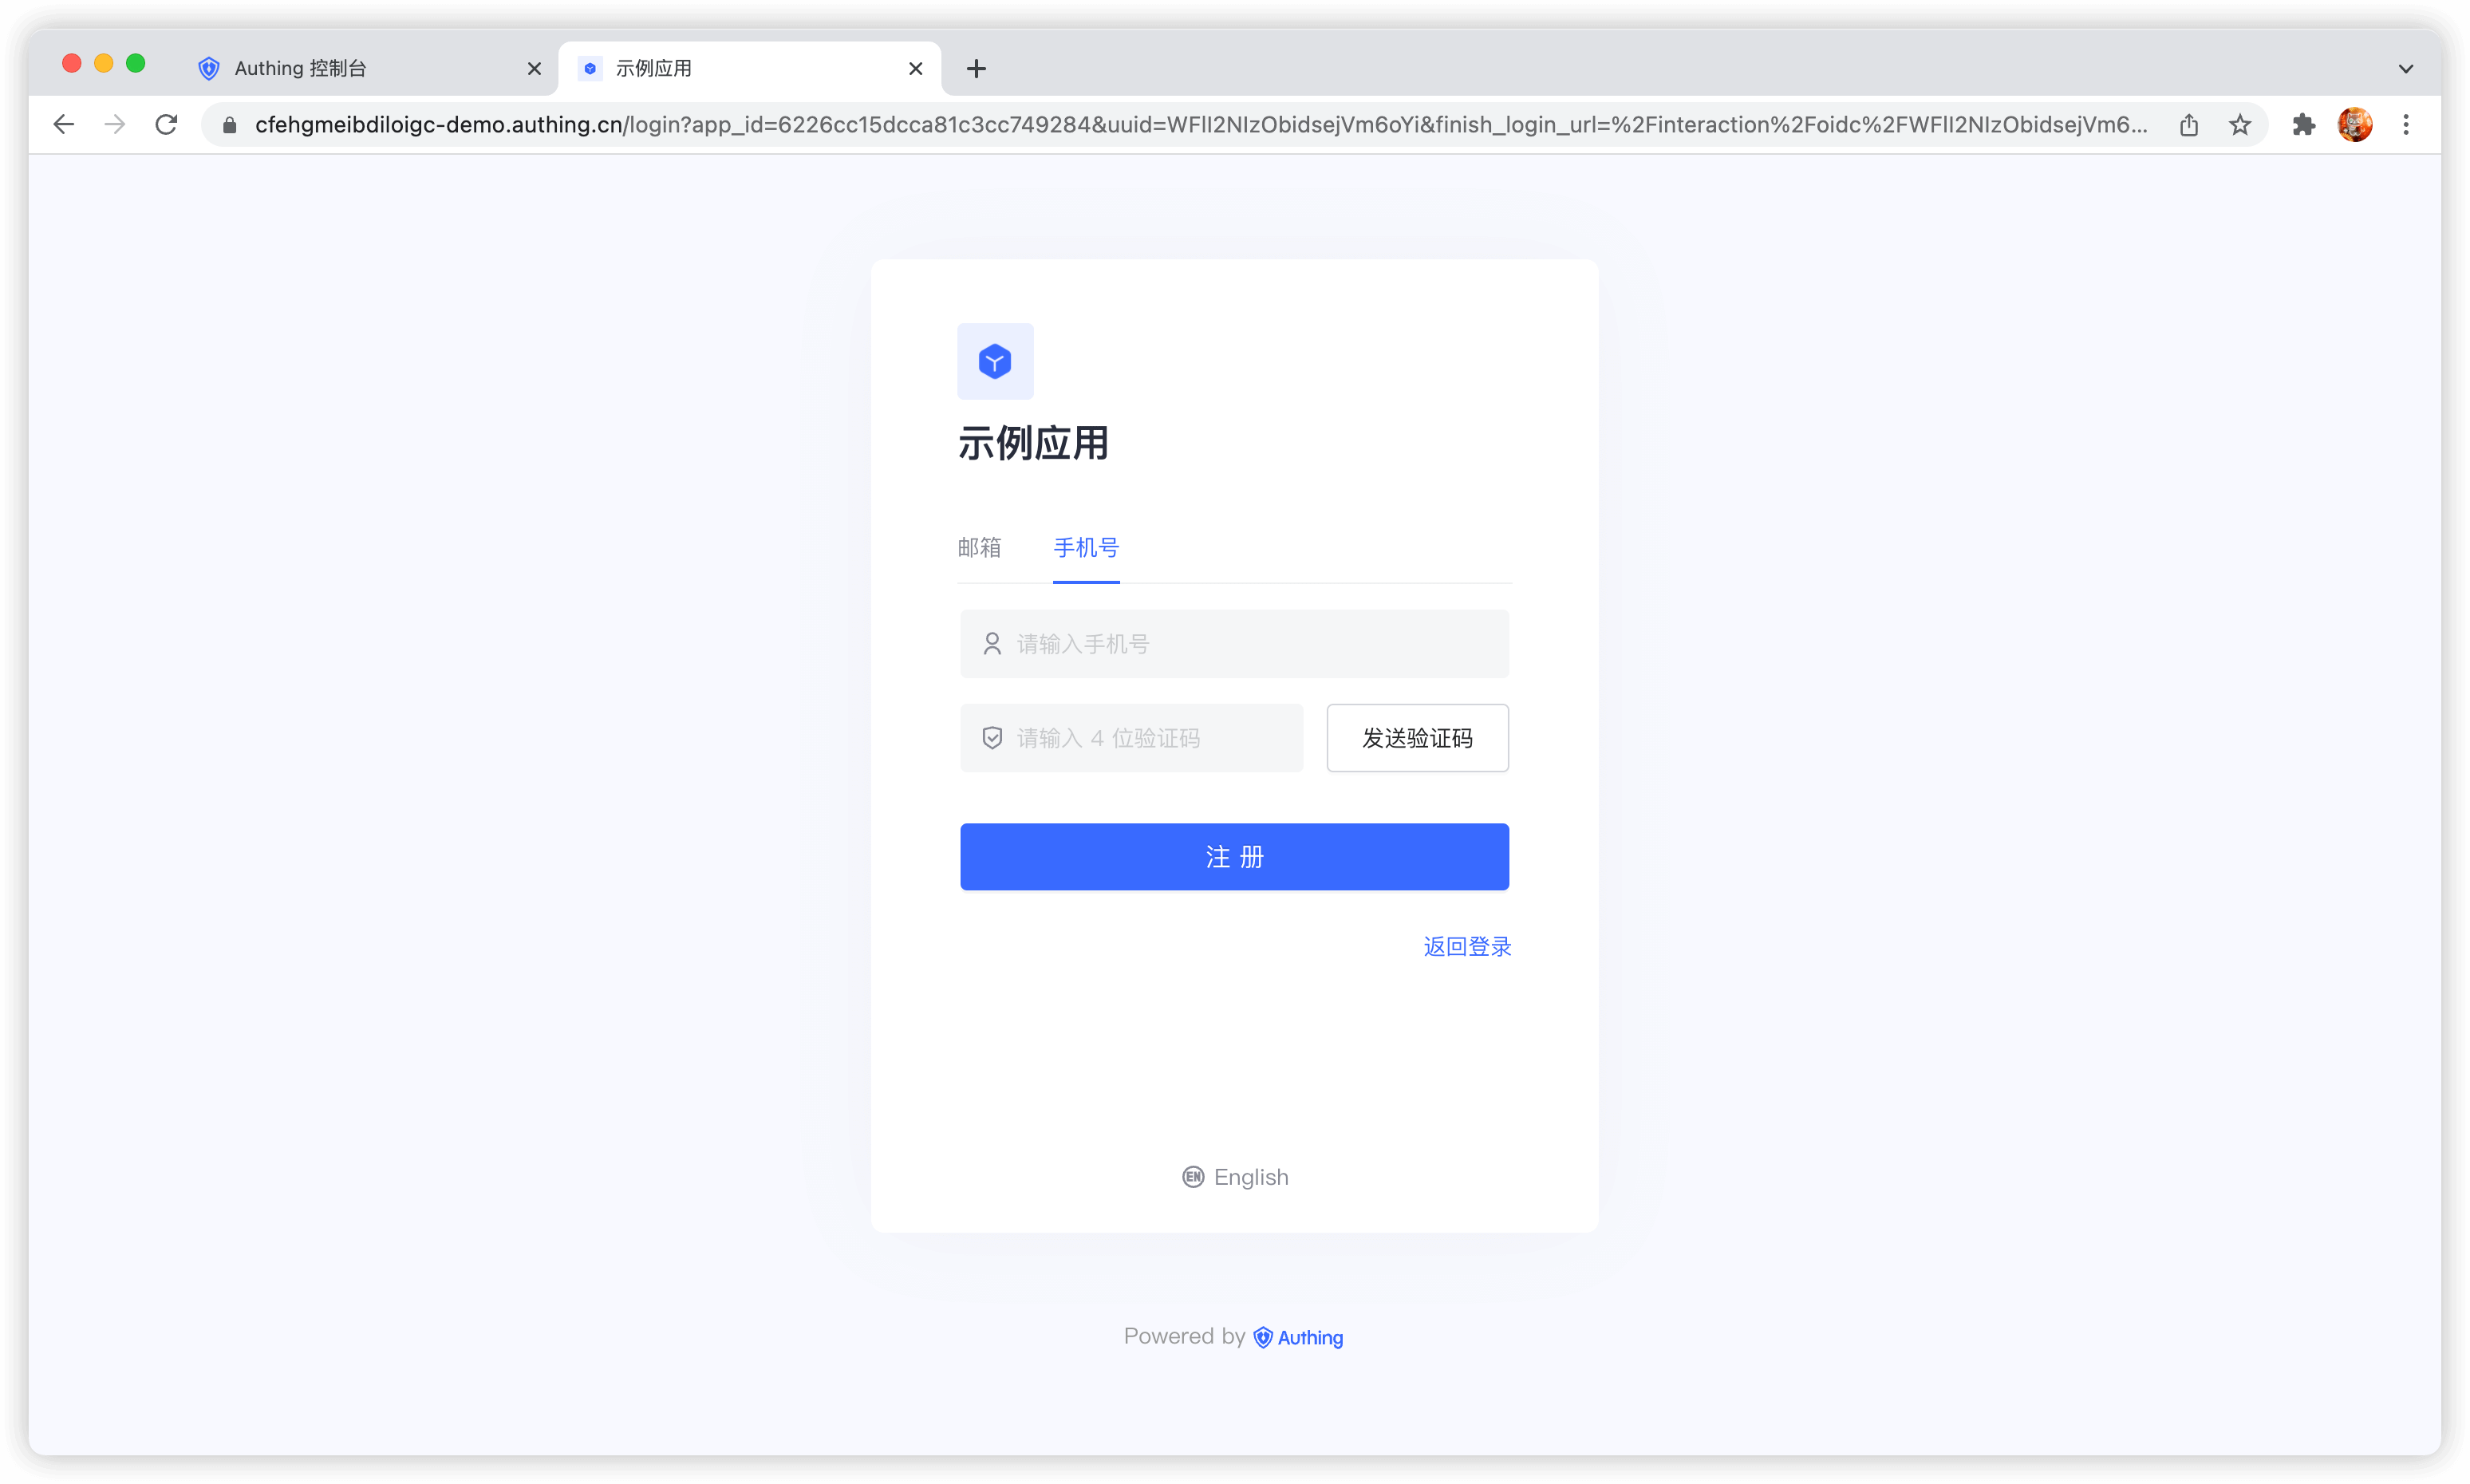
});After running, a QR code for scanning and logging in to the APP will be automatically generated:

After the code is scanned successfully, GenAuth will call back the onSuccess function passed in by the developer. The callback parameters include userInfo and ticket. ticket can be used to exchange for user information.
If you want to customize the UI or want more customization capabilities, you can check out the full API list or use other SDK methods.
Step 2: Scan the QR code of the mobile APP to authorize user information
The original information contained in the QR code generated by the web end is a string, which is converted to JSON as follows:
{
  "scene": "APP_AUTH",
  "random": "5e05f0c57fde537d950f7da5",
  "userPoolId": "5e04ae0d5f3cee22fb37612b",
  "createdAt": "2019-12-27T11:53:41.260Z",
  "expireAt": "2019-12-27T11:55:41.260Z",
  "customData": { "hello": "world" }
}
The meaning of the fields is as follows:
| Field name | Field meaning |
|---|---|
| scene | Scenario valueAPP_AUTH means APP scan code login |
| random | QR code IDThe mobile terminal completes the confirmation scan, consent authorization, and cancellation authorization based on this ID (Note: "Confirm scan code" here means that the mobile terminal marks that this QR code has been scanned, but the user has not taken the consent or cancellation action. For detailed status of the QR code, please see the full API list page). |
| userPoolId | User pool ID |
| createdAt | QR code creation time |
| expireAt | QR code expiration time |
| customData | User custom fieldFor how to add custom data, please see the full API list page. |
INFO
For information on how to scan and parse QR codes in iOS, you can view [Read QR codes using AVFoundation](https://github.com/darkjoin/Learning/wiki/Read QR codes using AVFoundation).
To implement APP scanning login on the Web side, first require the APP user to be logged in (this is natural), and bring the terminal user's token when calling the relevant interface. A total of three interfaces are required on the mobile side:
- Confirm scan code
- Agree to authorization
- Cancel authorization
INFO
For details of these three interfaces, please see the full interface list page.
The above three interfaces are provided by the mobile Android Guard SDK and iOS Guard SDK. Corresponding APIs:
Android: Please make sure that the mobile application has relied on and initialized the Android Guard SDK, and then use the Scan code authentication API in the scan code authentication process.
iOS: Please make sure that the mobile app has relied on and initialized the IOS Guard SDK, and then use the Scan Code Authentication API in the scan code authentication process.
After the mobile terminal confirms the scan code, the web will see relevant prompts.

After the mobile terminal agrees to the authorization, the entire login process is completed, and the developer can use the ticket to exchange for user information.
const authenticationClient = new AuthenticationClient({
  appId: "GEN_AUTH_APP_ID",
  appHost: "https://xxx.genauth.ai",
});
const user = await authenticationClient.qrcode.exchangeUserInfo("TICKET");
INFO
Step 3: Login successful
After obtaining the user information, you can get the user's identity credentials (the token field of the user information). You can carry this token in the subsequent request sent by the client to the backend server. Take axios as an example:
const axios = require("axios");
axios
  .get({
    url: "https://yourdomain.com/api/v1/your/resources",
    headers: {
      Authorization: "Bearer ID_TOKEN",
    },
  })
  .then((res) => {
    // custom codes
  });
In the backend interface, you need to check the legitimacy of this token to verify the user's identity. For details on the verification method, please see Verify User Identity Credentials (token). After identifying the user, you may also need to manage permissions for the user to determine whether the user has permission to operate the API.
List of complete interfaces for APP code scanning login
GenAuth provides a REST-based code scanning login interface that developers can call directly.
Generate QR code
https://core.genauth.ai/api/qrcode/geneThis interface will return the QR code ID (random) and QR code link.
Headers
| Name | Type | Description |
|---|---|---|
x-authing-userpool-idREQUIRED | string | User pool ID |
Body Parameters
| Name | Type | Description |
|---|---|---|
customeDataOPTIONAL | string | Custom data field, which will be written into the original data of the QR code. |
sceneREQUIRED | string | Scene value. It is a constant value, fill in APP_AUTH. |
Response
Field explanation:
- random: QR code unique mark, used for querying QR code status and user confirmation authorization interface.
- url: QR code image address.
- expiresIn: QR code validity period.
Field explanation:
- random: QR code unique mark, used for querying QR code status and user confirmation authorization interface.
- url: QR code image address.
- expiresIn: QR code validity period.
{
  "code": 200,
  "data": {
    "random": "SzZrszCJNCFfVBDUCKLDtAYNBR96SK",
    "expiresIn": 120,
    "url": "https://files.authing.co/user-contentsqrcode/5fae2648201cfd526f0ec354/SzZrszCJNCFfVBDUCKLDtAYNBR96SK.png"
  }
}
Generated QR code example:
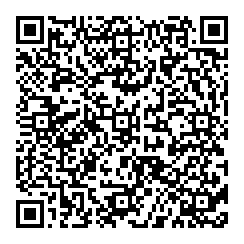
使用在线二维码解码工具 查看二维码数据如下:
{
  "scene": "APP_AUTH",
  "random": "SzZrszCJNCFfVBDUCKLDtAYNBR96SK",
  "userPoolId": "5fae2648201cfd526f0ec354",
  "createdAt": "2020-11-13T06:23:25.396Z",
  "expiresIn": 120,
  "customData": {}
}
Query QR code status
https://core.genauth.ai/api/qrcode/checkQuery Parameters
| Name | Type | Description |
|---|---|---|
randomREQUIRED | string | QR code ID. |
Response
{
  "code": 200,
  "message": "Query QR code status successfully!",
  "data": {
    "random": "SzZrszCJNCFfVBDUCKLDtAYNBR96SK",
    "userInfo": {},
    "status": 0,
    "ticket": null,
    "scannedUserId": null
  }
}
Request result field description:
- status
- 0: Not scanned.
- 1: Scanned but the user has not clicked to agree to authorization or cancel authorization. At this time, the user's avatar and nickname will be returned, but no other confidential information will be included. It can be used for front-end avatar display.
- 2: User agrees to authorization
- 3: User cancels authorization
- -1: Expired
- userInfo:
- By default, after the user scans the code, the nickname and avatar fields will be included
- Developers can also configure the return of complete user information (including login credentials token)
- ticket: used to exchange for complete user information. **This field will only appear after the user agrees to authorization. **See below for details.
Use ticket to exchange for user information
https://core.genauth.ai/api/qrcode/userinfoBody Parameters
| Name | Type | Description |
|---|---|---|
ticketREQUIRED | string | Ticket returned by the query QR code status interface |
Response
{
  "code": 200,
  "message": "Exchange for user information successfully",
  "data": {
    "id": "5e05bbf2d51b3761d5c71070",
    "email": "983132@qq.com",
    "emailVerified": false,
    "oauth": "",
    "username": "983132@qq.com",
    "nickname": "",
    "company": "",
    "photo": "https://usercontents.authing.co/authing-avatar.png",
    "token": "eyJhbGciOiJIUzI1NiIsInR5cCI6IkpXVCJ9.eyJkYXRhIjp7ImVtYWlsIjoiOTgzMTMyQHFxLmNvbSIsImlxxxxxxxxx",
    "phone": "",
    "tokenExpiredAt": "2020-01-11T08:08:18.000Z",
    "loginsCount": 1,
    "lastIp": "::1",
    "signedUp": "2019-12-27T08:08:18.115Z",
    "blocked": false,
    "isDeleted": false
  }
}
INFO
Note: By default, this interface is only allowed to be called on the server side, that is, after initialization with the user pool key.
The default validity period of the ticket is 300 seconds.
Developers can modify it in the GenAuth console Basic Configuration -> Basic Settings -> App Scan Code Login Web Custom Configuration. **For details, see Custom Configuration Item Page. **
APP-side mark scanned code
https://core.genauth.ai/api/qrcode/scannedThe APP side marks that the code has been scanned. After marking the code scanned, the web side will be able to obtain the nickname and avatar of the current user.
Headers
| Name | Type | Description |
|---|---|---|
x-authing-userpool-idREQUIRED | string | User pool ID |
AuthorizationREQUIRED | string | User login credentials. |
Body Parameters
| Name | Type | Description |
|---|---|---|
randomREQUIRED | string | QR code ID. |
Response
{
    code: 200,
    message: "QR code scanning confirmed successfully",
    data: {
        random: "", // Return as is
        status: 0,
        description: "xxxx",
    }
}
INFO
The APP needs to meet two conditions:
- The user must be logged in
- The user's user pool ID matches the QR code user pool ID.
APP side agrees to authorization
https://core.genauth.ai/api/qrcode/confirmAPP side agrees to authorization. Before calling this interface, you need to call the scanned interface first.
Headers
| Name | Type | Description |
|---|---|---|
x-authing-userpool-idREQUIRED | string | User pool ID |
AuthorizationREQUIRED | string | User login credentials. |
Body Parameters
| Name | Type | Description |
|---|---|---|
randomREQUIRED | string | QR code ID |
Response
{
    code: 200,
    message: "Authorization login successful",
    data: {
        random: "", // Return as is
        status: 1,
        description: "xxxx",
    }
}
INFO
The APP needs to meet two conditions:
- The user must be logged in
- The user's user pool ID matches the QR code user pool ID.
Cancel authorization on the APP
https://core.genauth.ai/api/qrcode/cancelApp end cancels authorization. Before calling this interface, you need to call the scanned interface first.
Headers
| Name | Type | Description |
|---|---|---|
x-authing-userpool-idREQUIRED | string | User pool ID |
AuthorizationREQUIRED | string | User login credentials. |
Body Parameters
| Name | Type | Description |
|---|---|---|
randomREQUIRED | string | QR code ID |
Response
{
    code: 200,
    message: "Cancel authorization successfully",
    data: {
        random: "", // Return as is
        status: -1,
        description: "xxxx",
    }
}
INFO
The APP needs to meet two conditions:
- The user must be logged in
- The user's user pool ID matches the QR code user pool ID.
Custom configuration items
GenAuth has always been committed to providing developers with a highly customized development experience, so we provide the following custom configuration items. Developers can balance security and convenience according to their business needs. Developers can customize the configuration in the GenAuth console Security Settings -> Basic Settings -> Login Settings -> App Scan Code Login Web Custom Configuration.
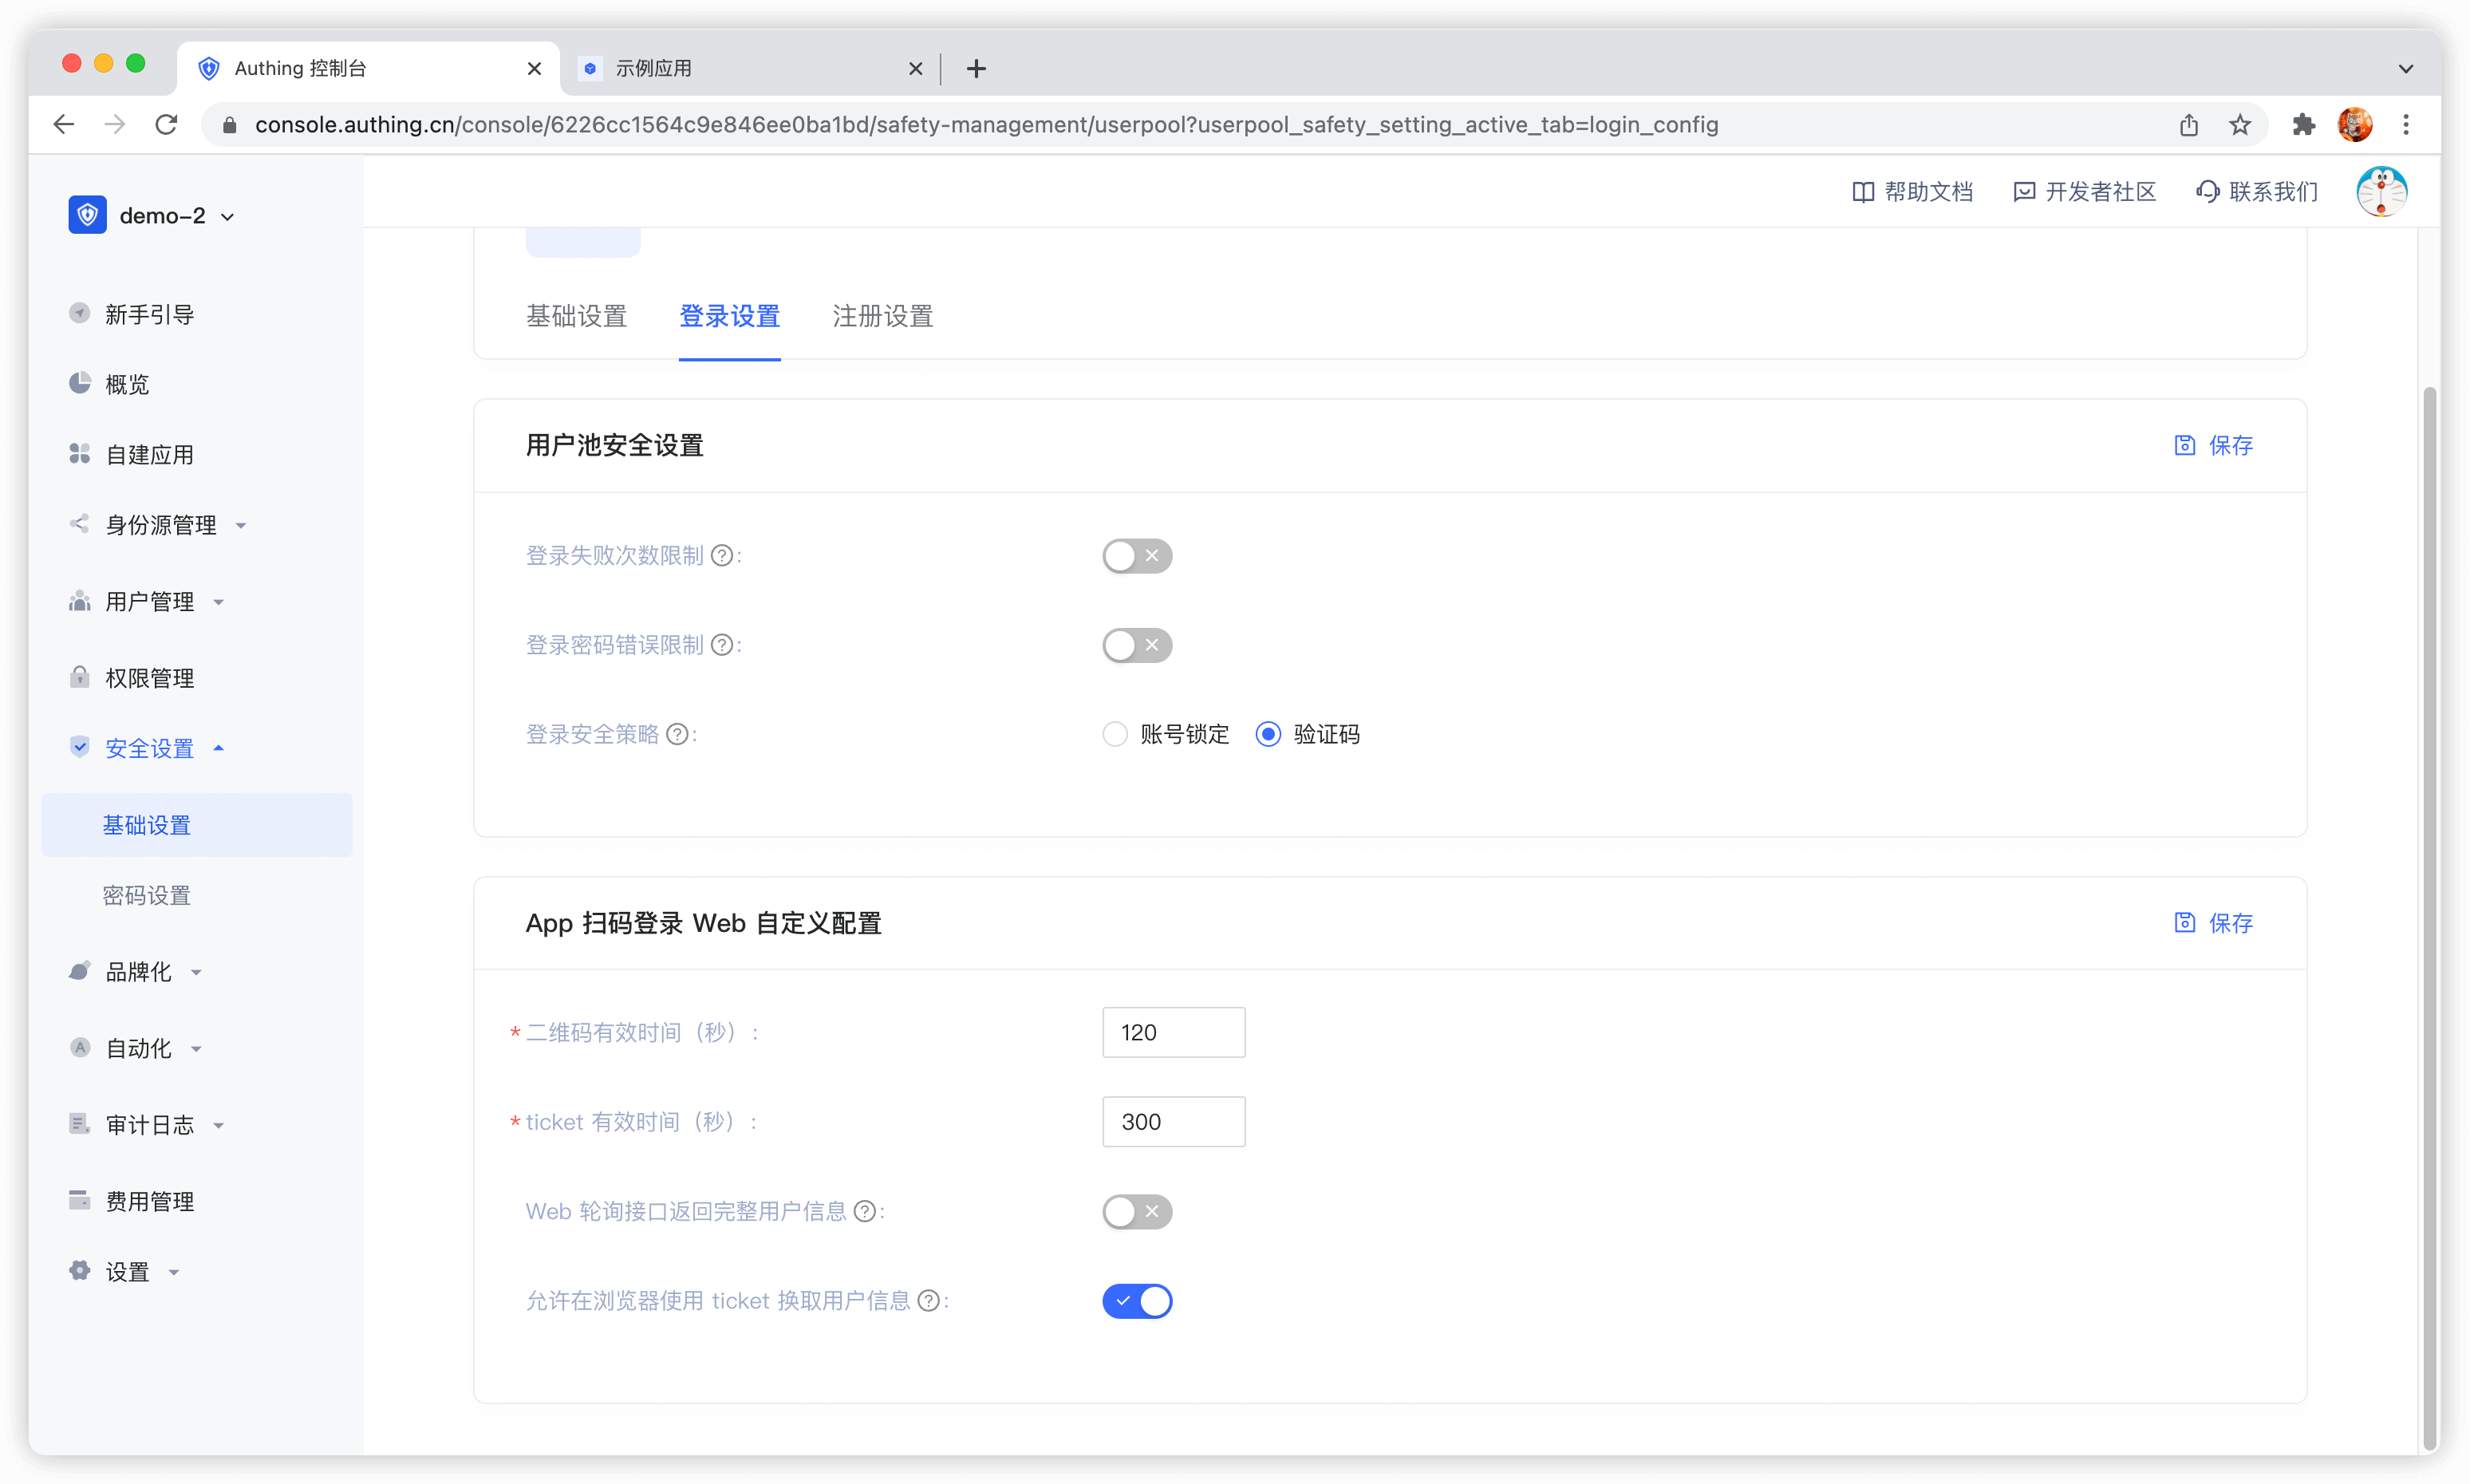
QR code validity period
Default 120 s.
Whether to return complete user information in the QR code status query interface
Default is not returned. Since the QR code status query interface has no permission verification, it means that returning user information (including login credentials token) directly in this interface is a security risk, so we recommend that developers follow the best practice: the QR code status query interface only returns the user nickname and avatar, and uses the ticket to exchange for user information.
Ticket validity period
The default is 300 seconds.
Is it allowed to use the ticket to exchange for user information in the browser?
Not allowed by default, it needs to be called on the server side, that is, it needs to be initialized with the user pool key. Click to learn how to initialize the backend SDK.
A typical usage scenario is: after the user scans the code to agree to the authorization, the developer gets the ticket and sends it to his own backend, uses the backend SDK to exchange for user information, and then redirects to the logged-in page, and writes the user information to localStorage.
Use Mini Program to scan QR code to log in to the website
The Mini Program to scan QR code to log in to the website is a groundbreaking design of GenAuth. After enabling scanning QR code to log in in GenAuth, you can obtain the official real-name user information of WeChat. Users can complete registration or login with their real number with one-click authorization, and establish an account system based on mobile phone numbers for developers.
- Application scenario: PC website;
- Overview: Display the Mini Program QR code in the PC website application, and then use WeChat to scan the QR code to log in to the application;
- Advantages: You can obtain the mobile phone number and real-name information of WeChat users;
You can click here to experience the Mini Program scan code login.

For the complete access process, please see: Log in by scanning the QR code on the PC website using the mini program.
Authentication in Mini Program
In Mini Program, in addition to basic operations such as obtaining and modifying user information, logging in with email and mobile phone numbers, and adding user-defined fields, you can also use methods unique to the Mini Program environment such as Getting user mobile phone numbers through WeChat authorization, Login with WeChat authorization, and Login with WeChat-authorized mobile phone numbers.
Configure Mini Program login in GenAuth
In order to use GenAuth Mini Program SDK in Mini Program, you need to apply for a Mini Program in WeChat Open Platform and fill in the configuration of the Mini Program in GenAuth console.
For details, please see: [Configure applet login in GenAuth](https://docs.genauth.ai/reference/sdk-for-wxapp#Configure applet login in -localeConfig-brandName-).
Import GenAuth applet SDK
For detailed installation process, please see: Install applet SDK.
The first step is to initialize AuthenticationClient, which requires passing in AppId (application ID):
You can view your application list in Application in the console.
const { AuthenticationClient } = require("authing-wxapp-sdk");

const authing = new AuthenticationClient({
  appId: "GEN_AUTH_APP_ID",
});
Next, you can use the AuthenticationClient method, such as using WeChat authorization login:
const { code } = await wx.login();
const data = await authing.loginByCode(code);- If the user logs in to the mini program for the first time, and the user has not logged in using the WeChat application bound to the same subject as the mini program, a new account will be created.
- If the user logs in to the mini program for the first time, but the user has logged in using the WeChat application bound to the same subject as the mini program, the corresponding WeChat account will be returned.
For more information, see: Mini Program SDK.
One-click login with mobile phone number
One-click login with mobile phone number is an extremely convenient authentication method provided by the three major operators.
Currently GenAuth supports access to this capability through NetEase Yidun, which integrates the one-click login SDK of the three major operators and provides a unified mobile application interface. You can quickly complete the access in the following three steps.
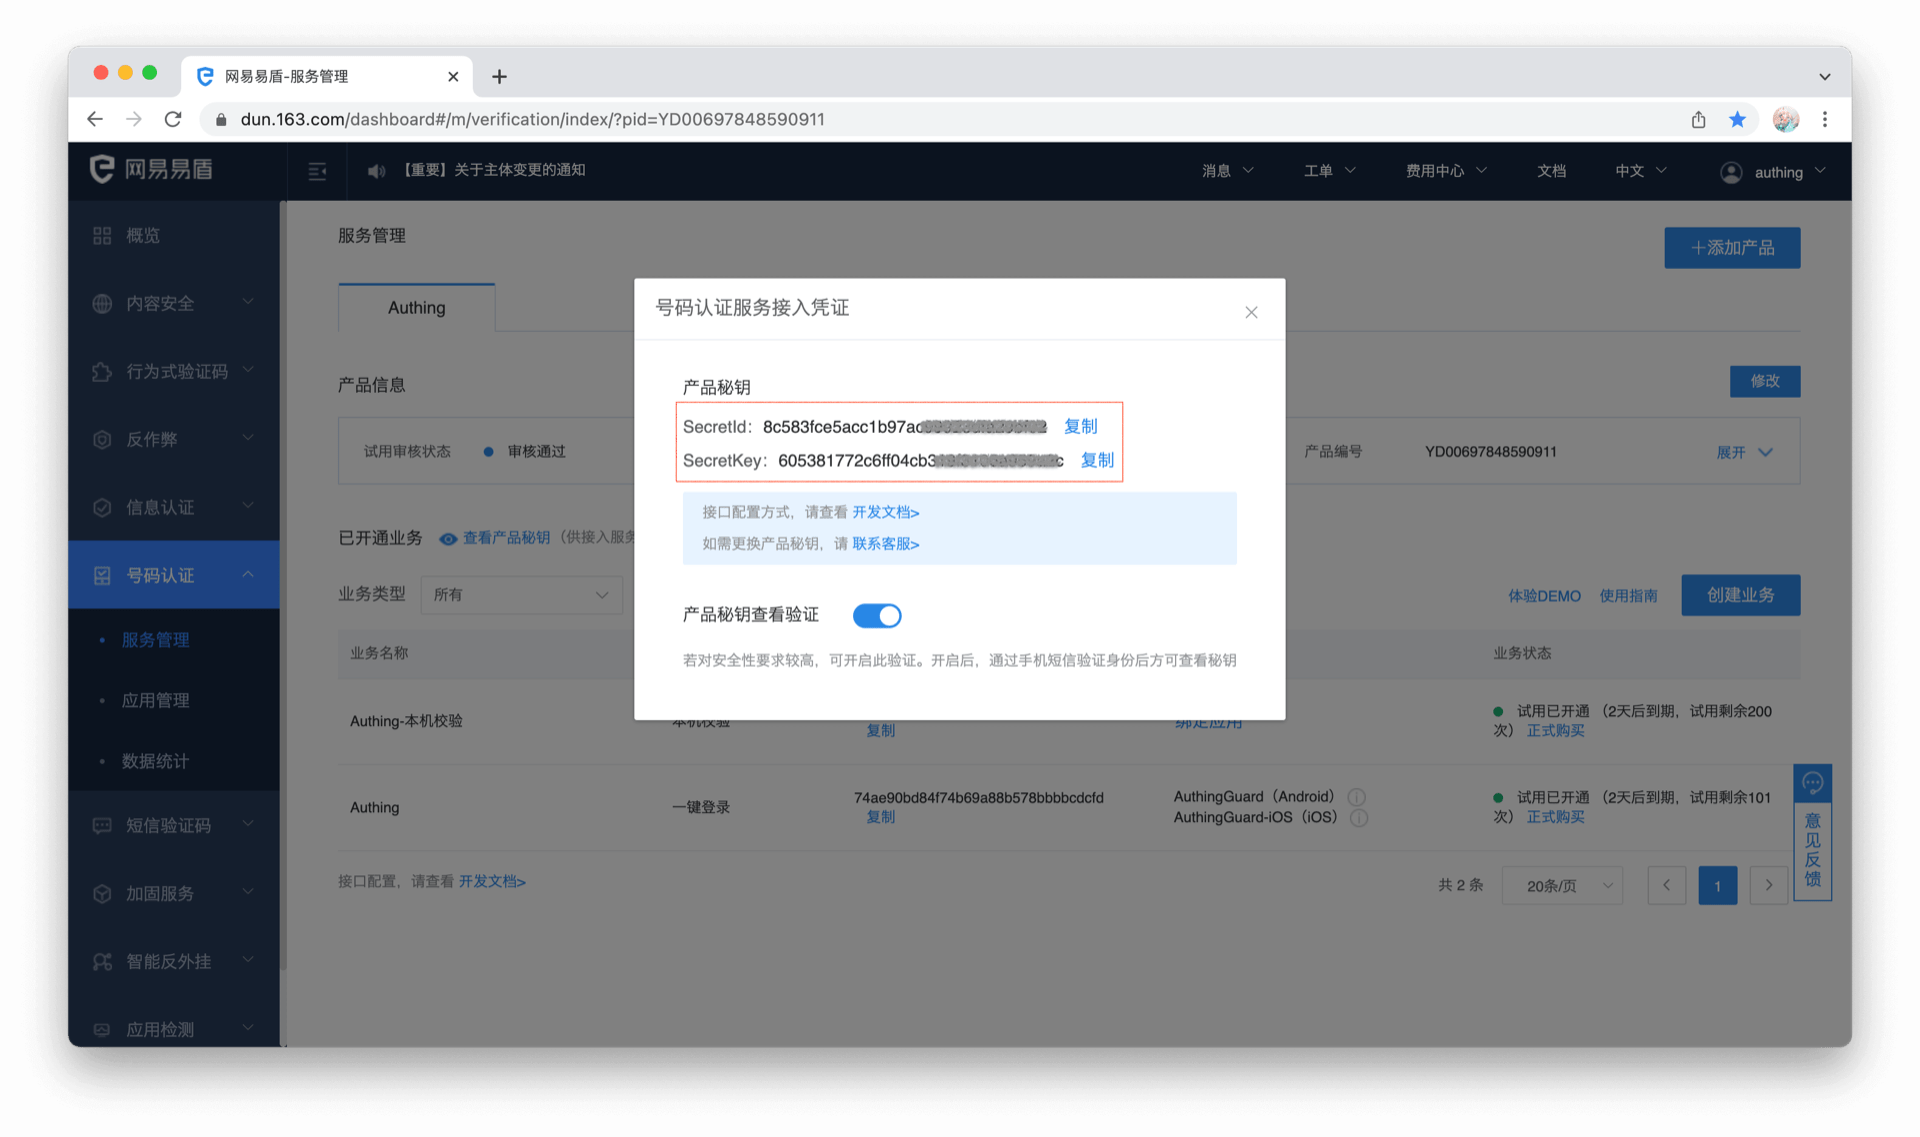
STEP1: Yidun backend configuration
Refer to Yidun Document to create an application, set the package name, and upload the signature
Copy business ID, SecretId, SecretKey
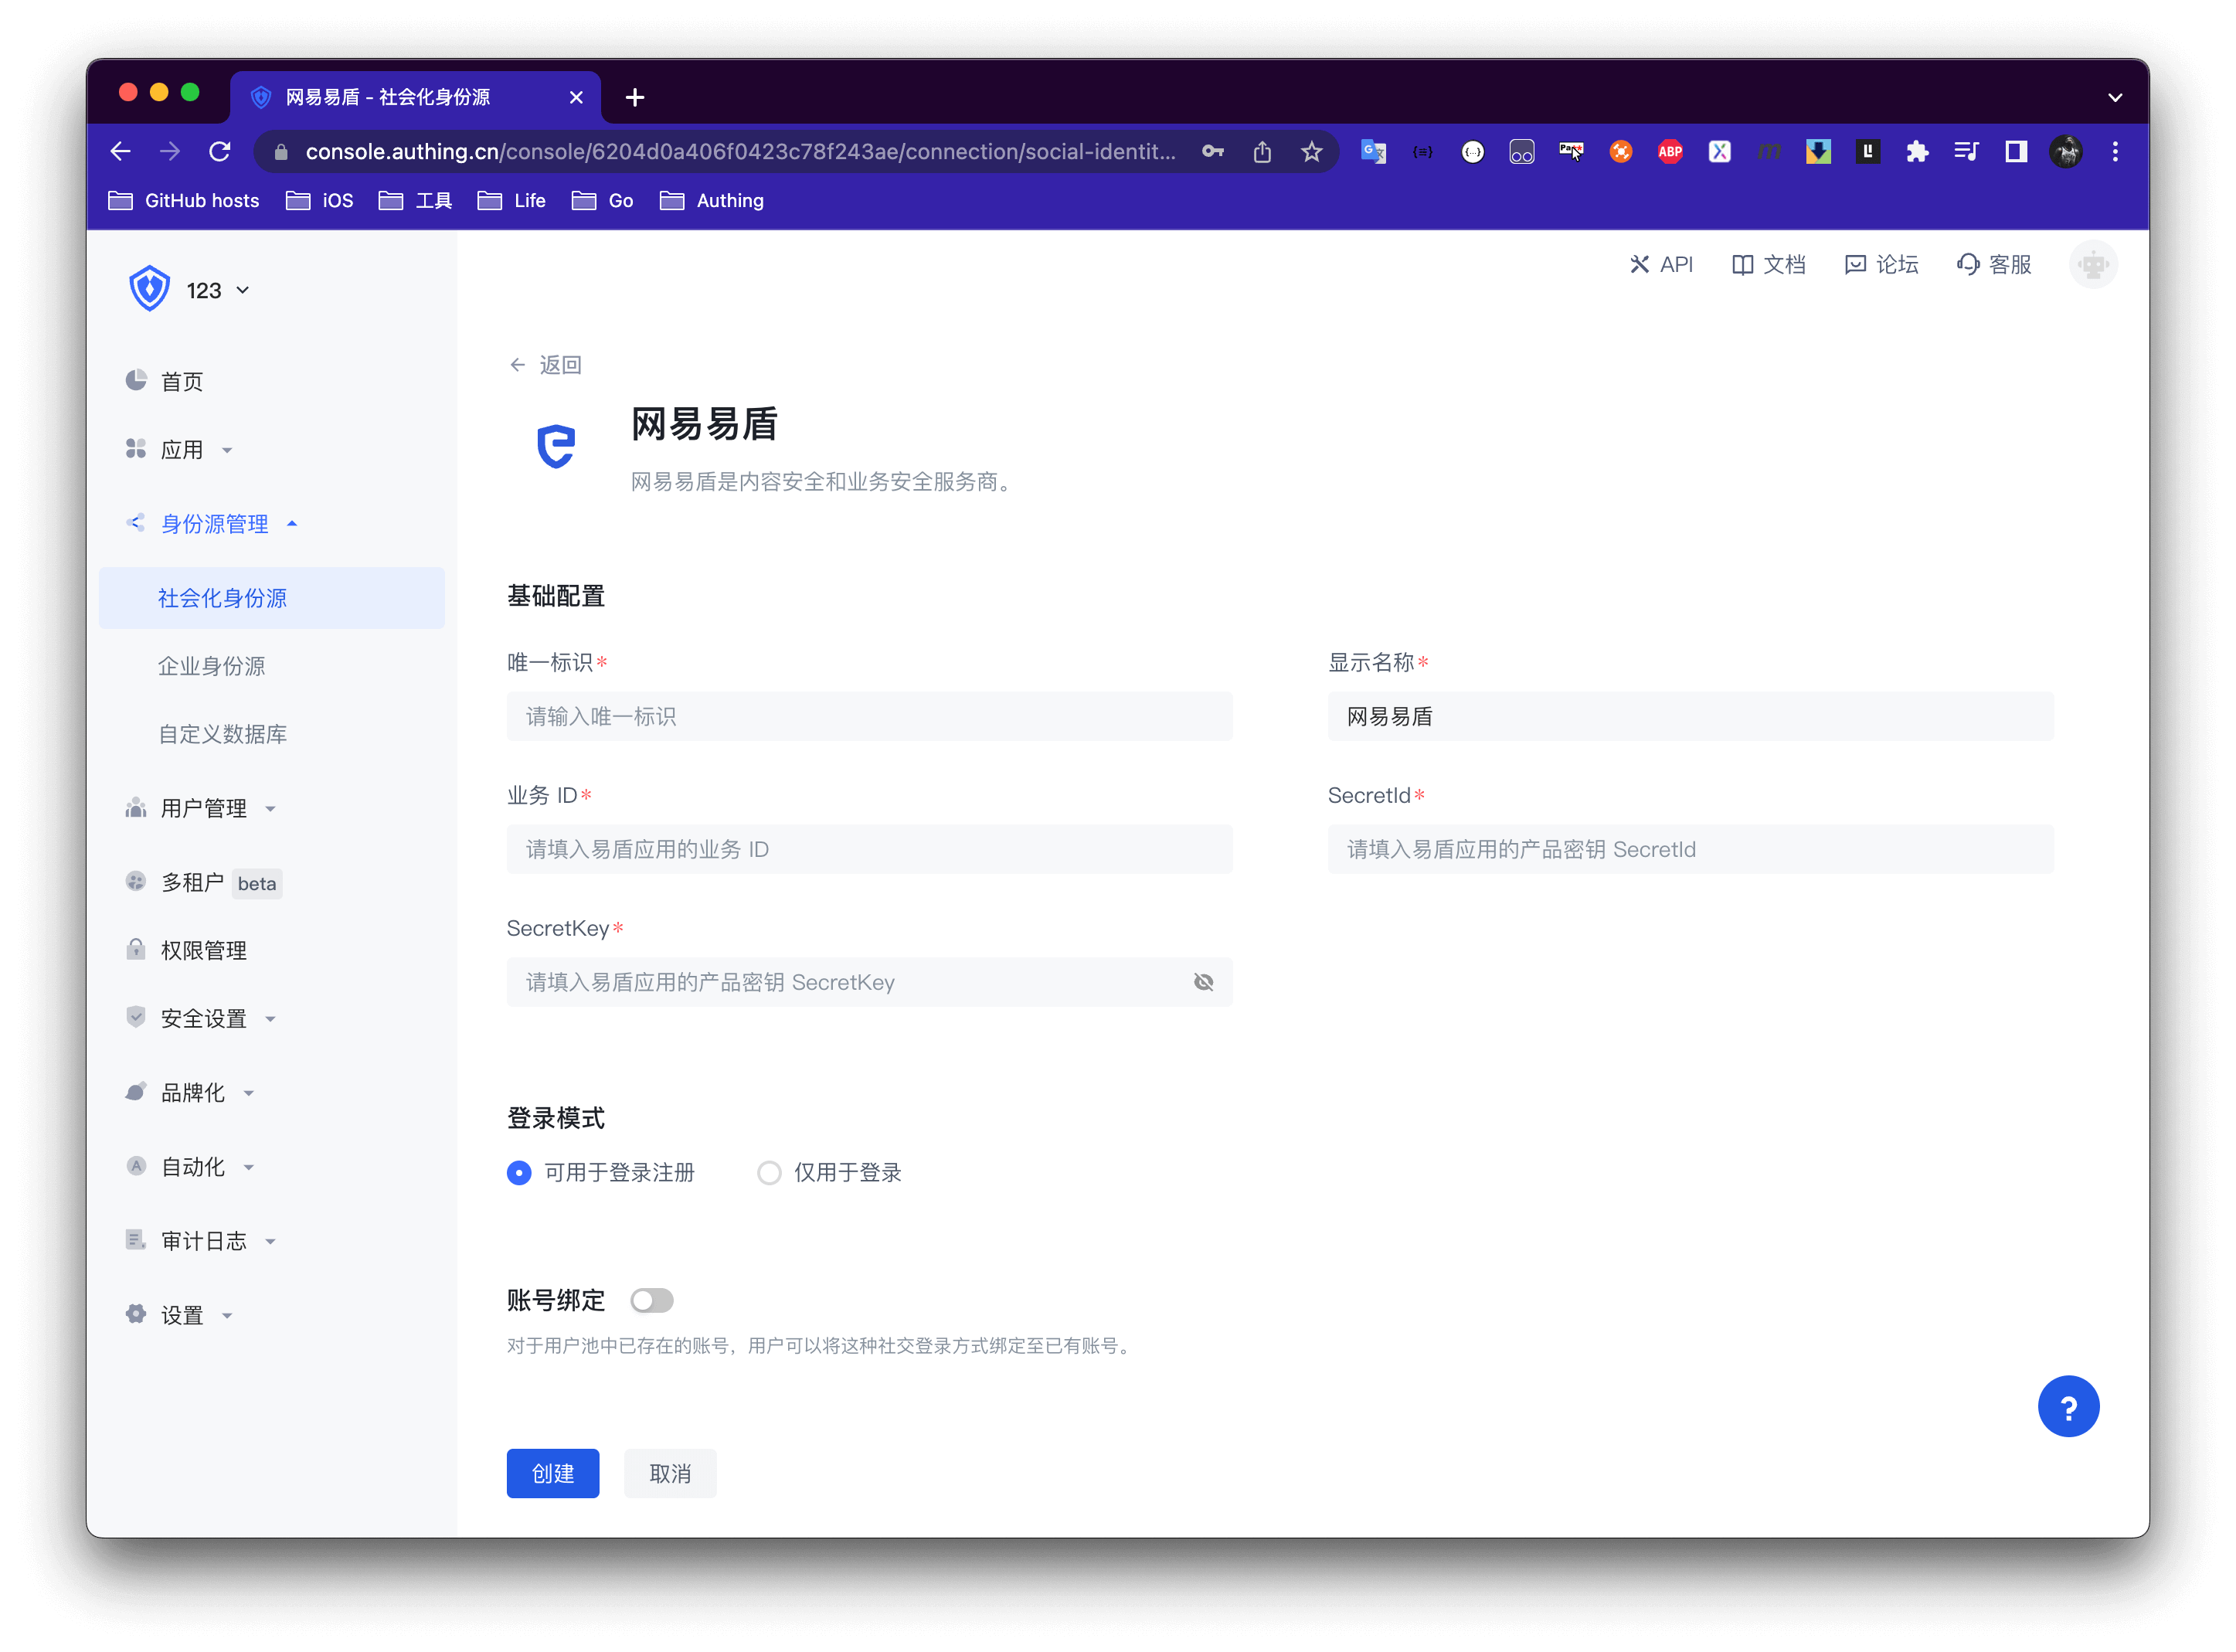
STEP2: GenAuth backend configuration
Create a social identity source
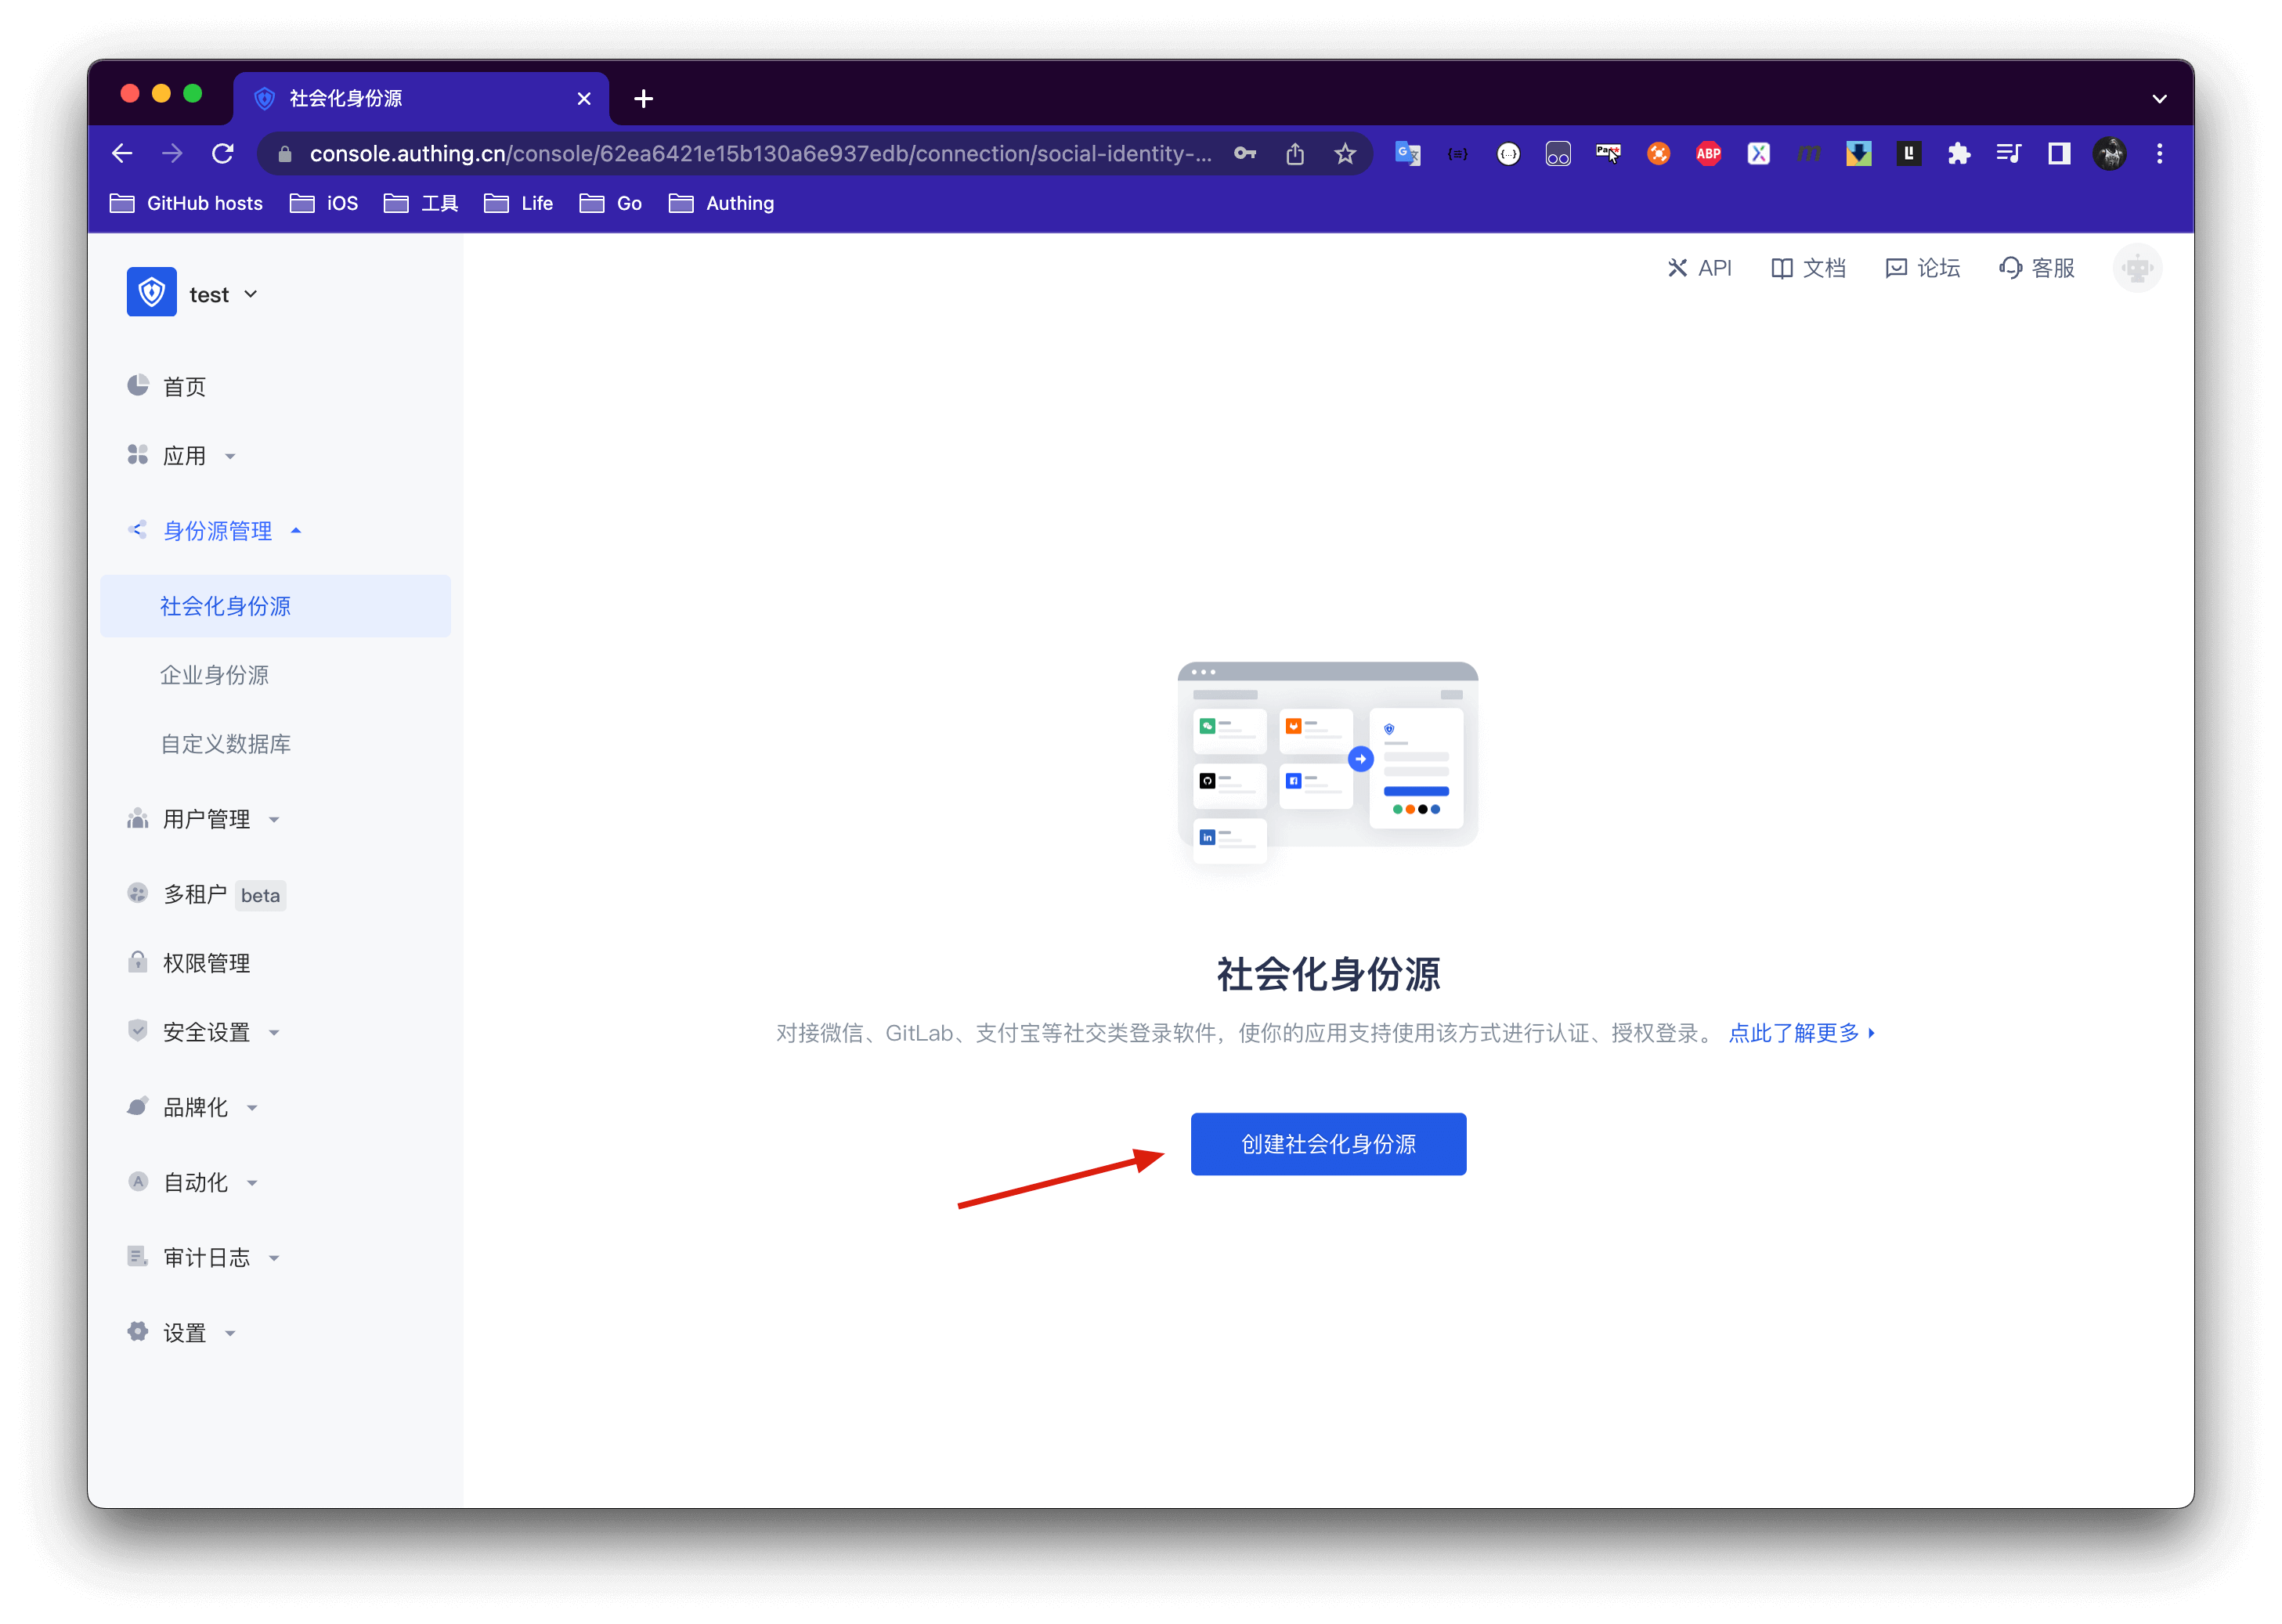
Select NetEase Yidun

Fill in the Yidun backend information into the GenAuth console
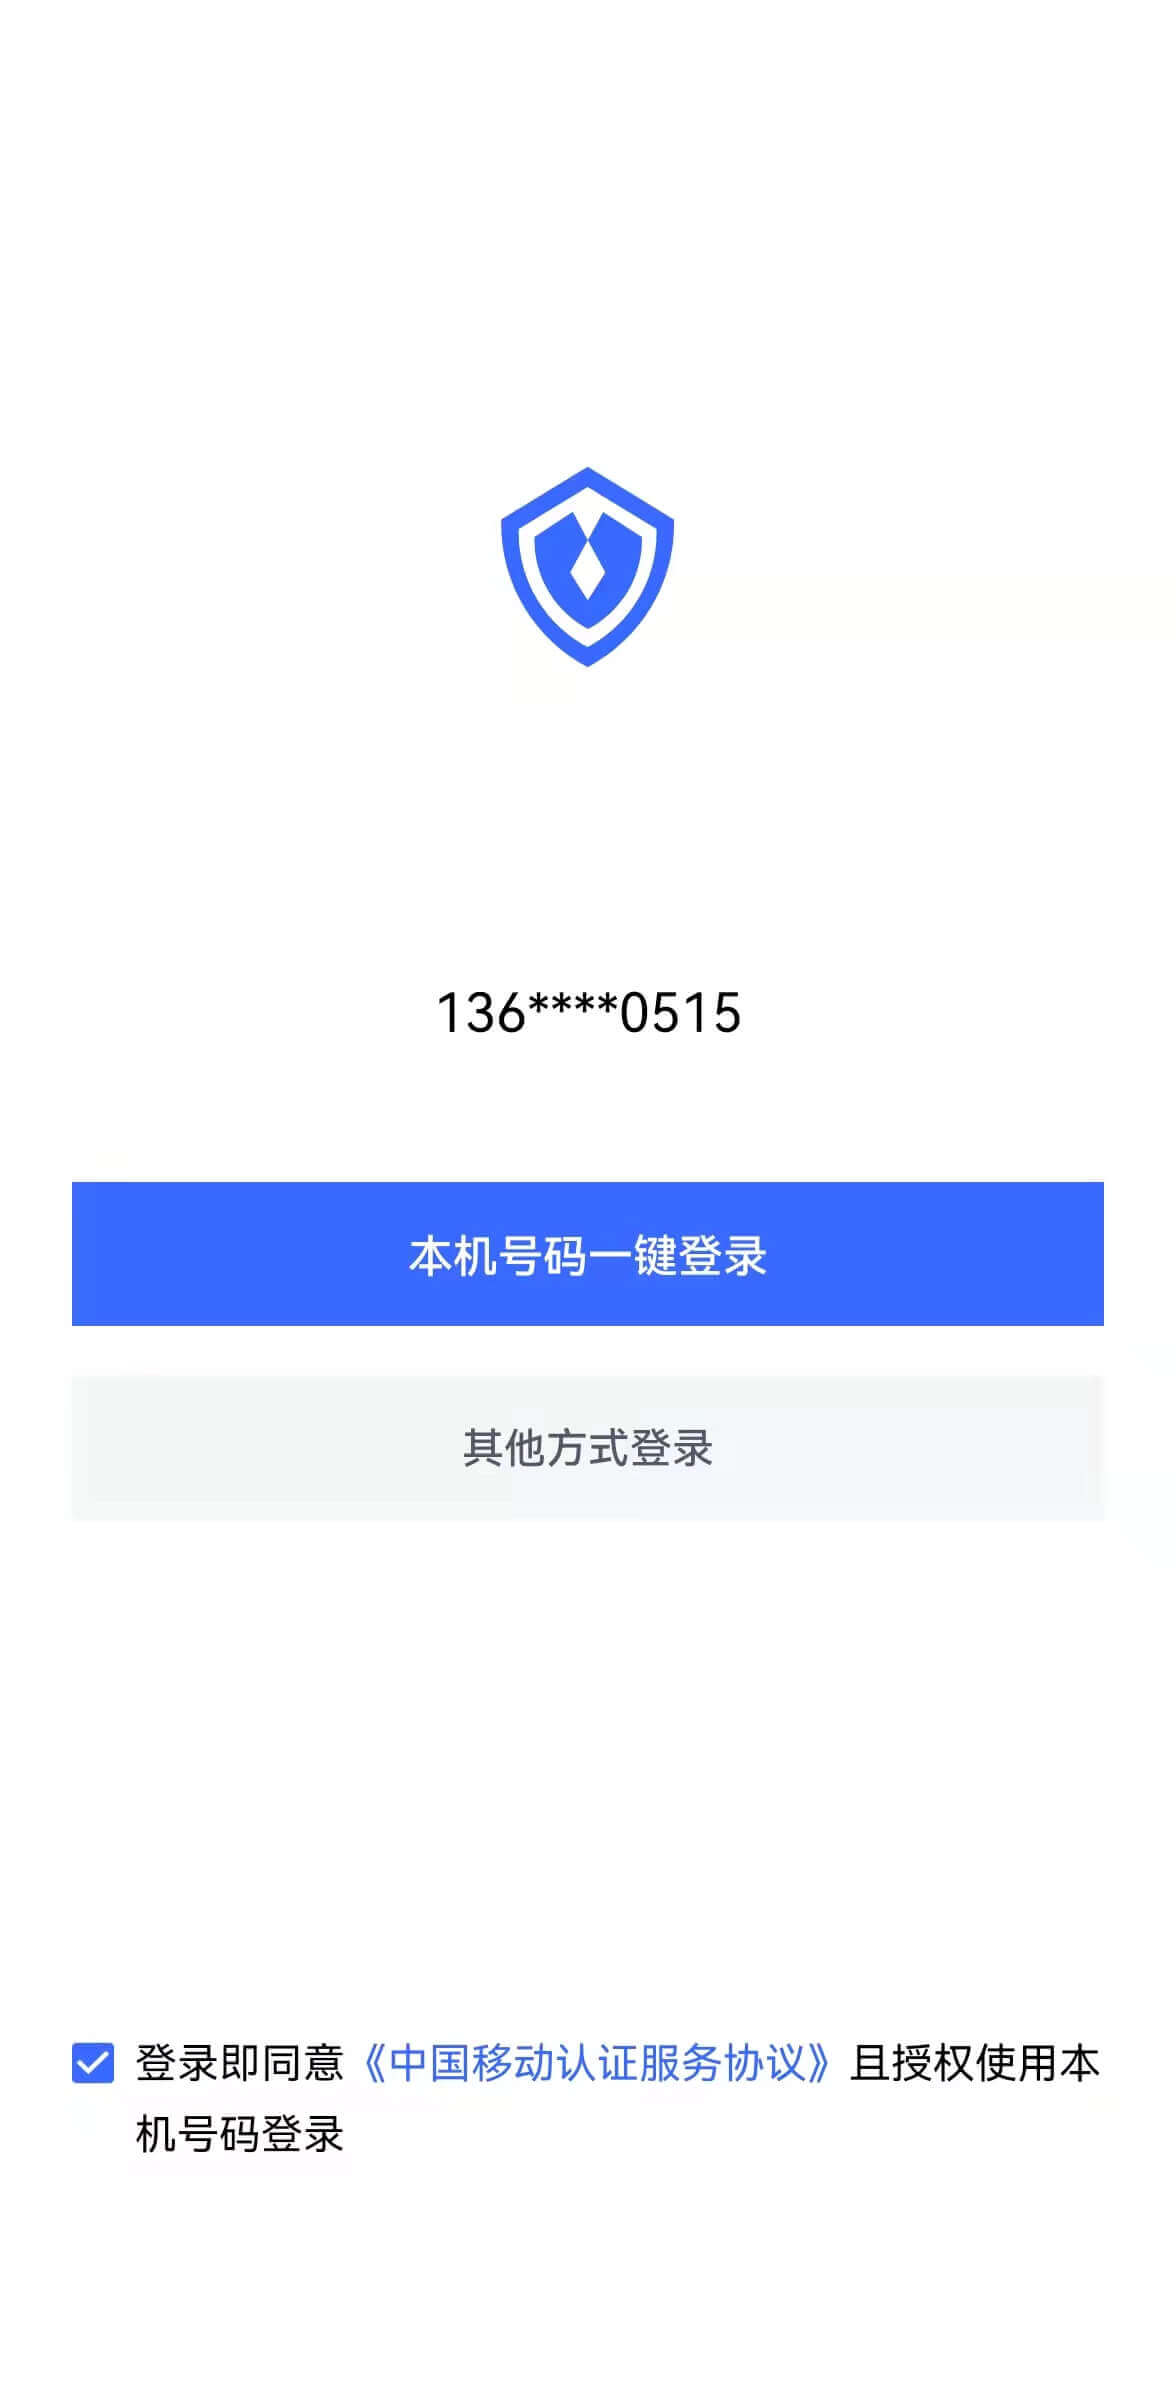
STEP3: Mobile integration
With the SDK we provide, developers only need one line of code to integrate the one-click login function. Please refer to:
The effect after successful integration is as follows
Implementing Single Sign-On on Mobile
Mobile Application Single Sign-On (Single Sign On) is similar to traditional Web-side SSO, which means that in multiple application systems, users only need to log in once to access all mutually trusted application systems.
GenAuth currently supports two forms of mobile terminal single sign-on:
- Automatically detect the login status of associated applications on the same device
- Invoke associated apps to exchange user information
Automatic detection method
The automatic detection method, similar to the Meituan App, can detect the relevant user as long as one of all mutually trusted systems on the same device is in the login state, and prompt the user whether to use the account to log in, thereby achieving single sign-on.
As shown below:

You can view the demonstration in this video:
For specific access methods, please see: Automatic detection and login on mobile terminals.
App-awakening method
App-awakening method refers to calling application B in application A, and the user agrees to authorize login in application B, and then jumps to application A, and application A obtains user information in some way. This mode is under development.
Extend the authentication process
- Add user-defined fields
- Add role-defined fields
- Add extended fields to IdToken
- Use a custom database to authenticate users
- Use Pipeline to extend the authentication process
- Use Webhook to listen to authentication events
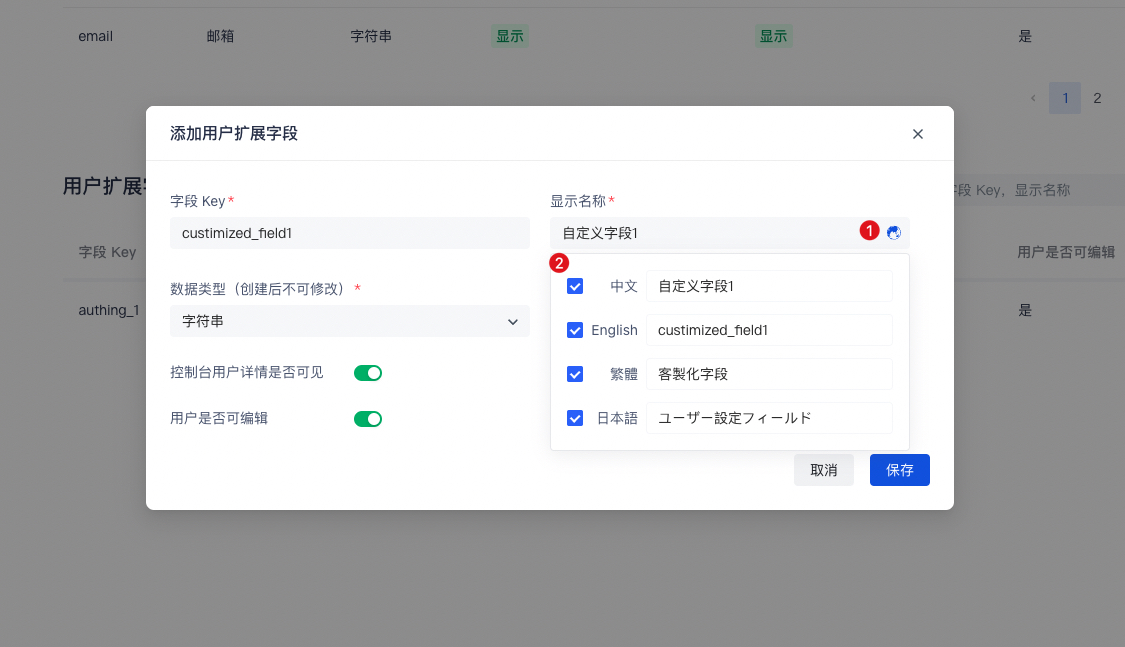
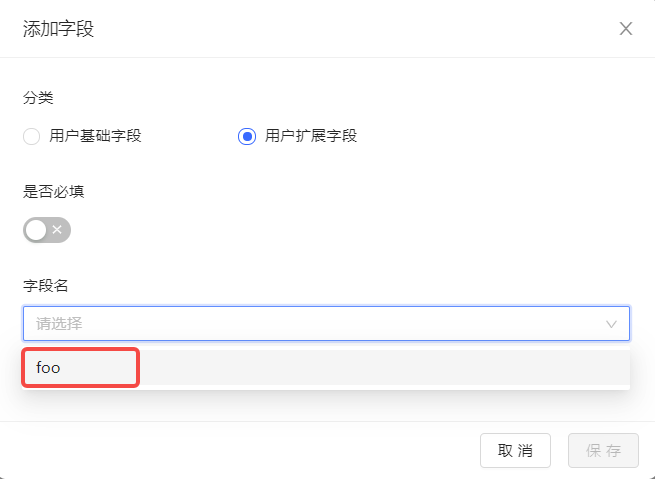
Add user-defined fields
User-defined fields are additional fields that can be added to user objects in addition to basic user fields. Developers can store a small amount of business-related data by setting custom fields.
You can configure custom user fields on the Settings->Field Management->User Field Management page.
The following types of custom fields can be defined:
- String
- Numeric
- Date
- Boolean
- Object
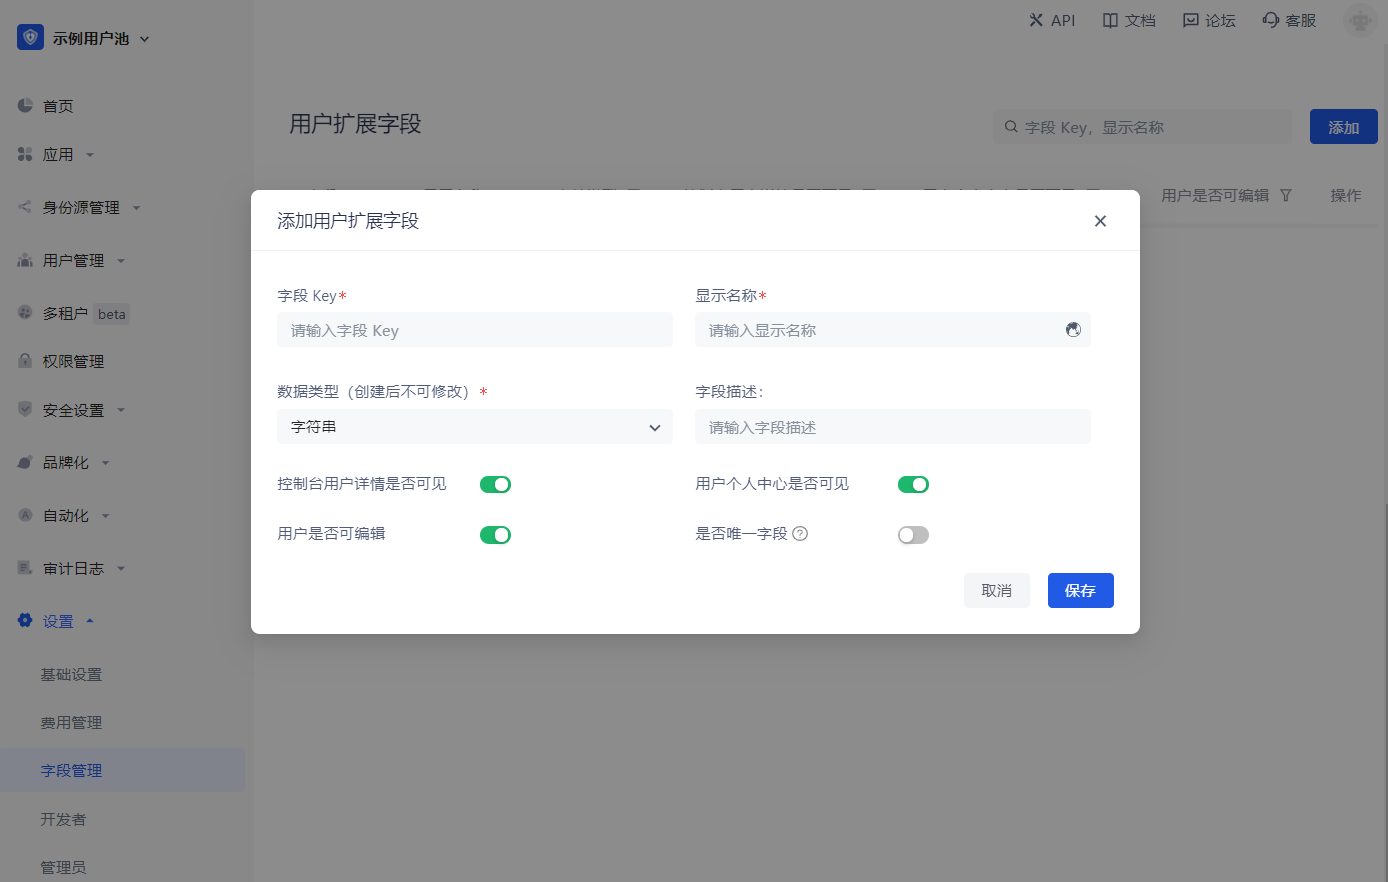
When naming a newly created custom field, you can edit the display name of the field in multiple language environments:
- Edit directly in the input box under "Display Name" to get the default displayed field name
- Check "Chinese" and edit the field display name in the Chinese environment
- Check "English" and edit the field display name in the English environment
- Check "Traditional" and edit the field display name in the Traditional Chinese environment
- Check "Japanese" and edit the field display name in the Japanese environment
In particular, if the display environment of the field is not included in the above four language environments, it will be displayed using the "Default Display Field Name" you configured.
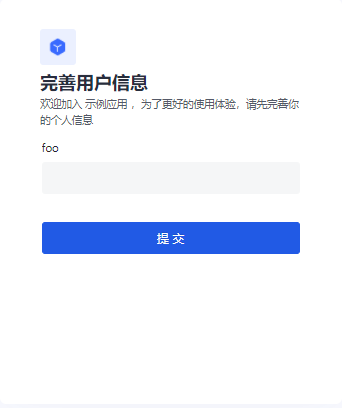
After configuring custom fields, you can enable the registration information completion page of the application and let users complete the information of these custom fields.
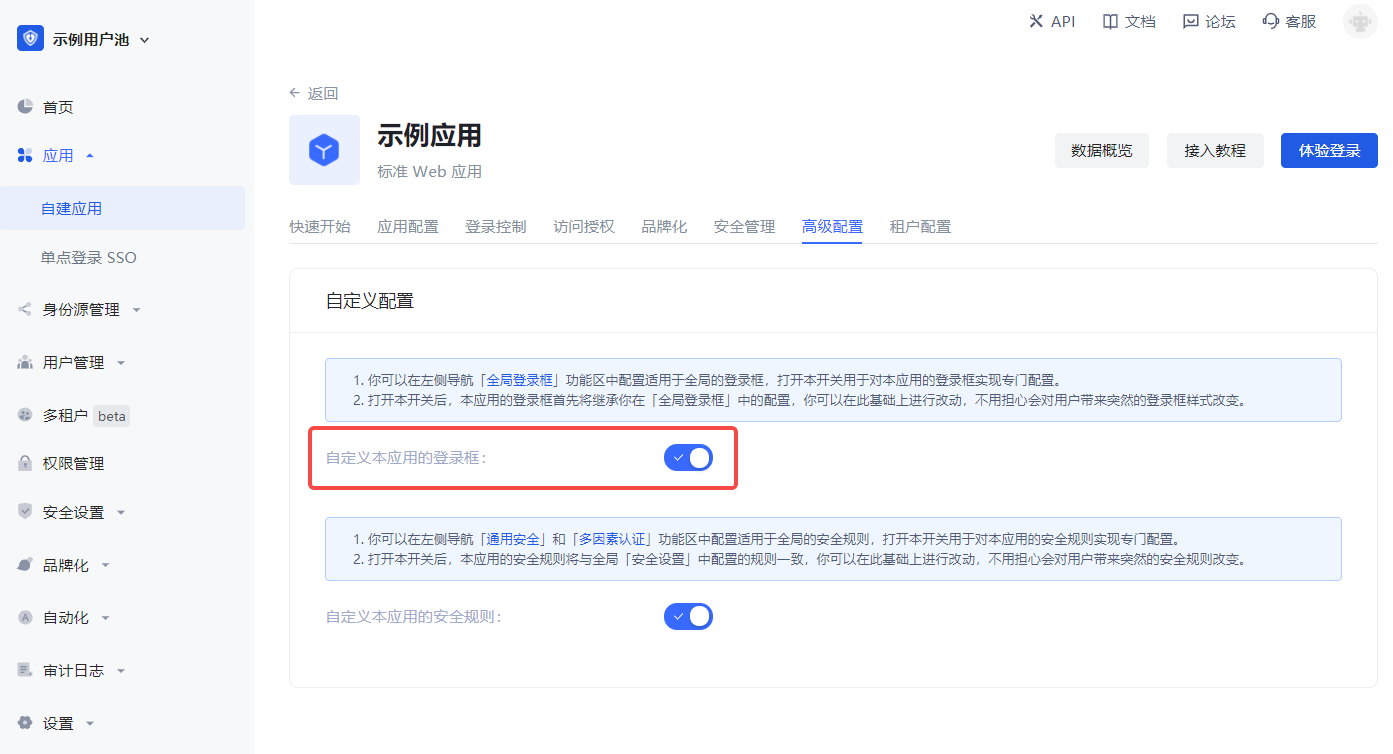
On the App Details - Advanced Configuration page, enable Customize the login box of this application
Then switch to Branding, check the Enable registration information completion switch, and then select the custom field you just added:
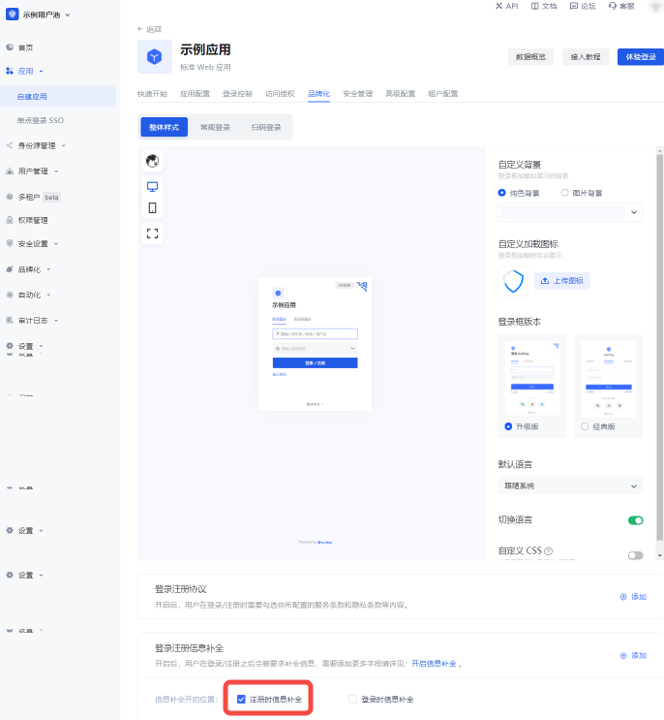
You can choose text, password, number, date, color, email and image for input type, which will determine the final display style of the page.
Click Save and then visit the login page of the application.
After the user clicks "Register", he will be redirected to the following registration information completion page:
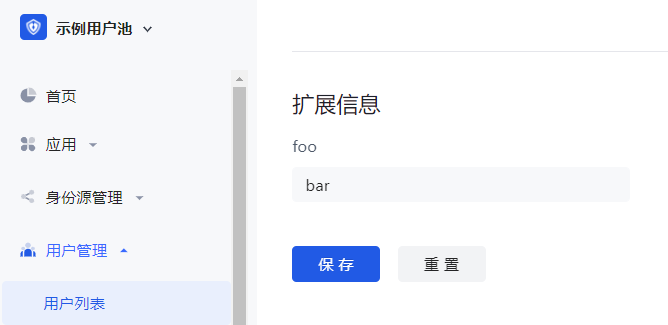
After the user successfully registers, you can see the custom field value just entered by the user on the user details page:
Add role custom fields
Role custom fields are additional fields that can be added to roles in addition to basic role fields. Developers can store small amounts of business-related data by setting custom fields.
You can add, edit, search (search by Key and Display Name) and delete role extension fields in the Settings->Field Management->Role Field Management tab.
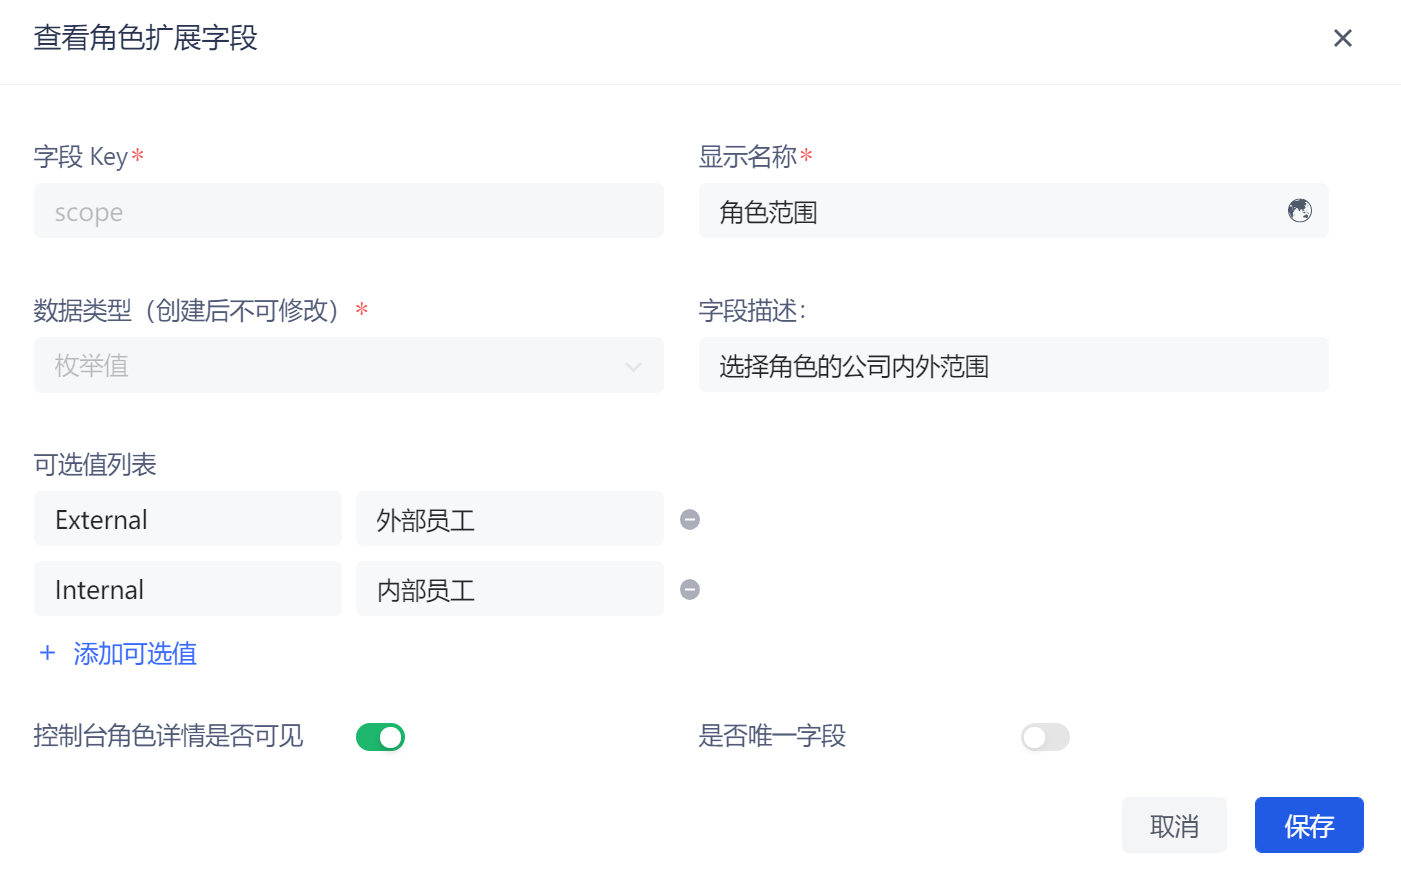
To add role extension fields, perform the following steps:
Click the Add button to add a role extension field.
Enter the Field Key, Display Name, select the Data Type, and enter the Field Description.
INFO
You can define the following types of custom fields:
- String
- Number
- Boolean
- Enumeration
- Date
- Select whether to enable the Console Role Details Visible switch (enabled by default).
INFO
If the Is console role details visible switch is turned on, when viewing the details of a role on the Role Management page under the console permission module, you can view and set the role custom fields on the Extended Field tab.
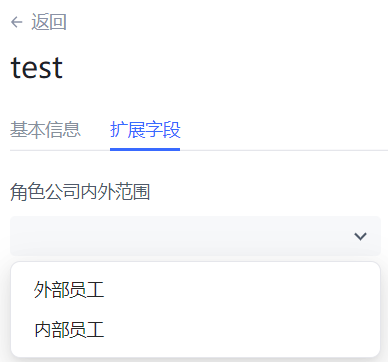
For String / Number data types, you can choose whether to turn on Is the unique field (if turned on, it means to ensure that the extended field is unique in the user pool).
Click the Save button.
Add extended fields to IdToken
What is IdToken
id_token is equivalent to the user's ID card. The developer's front-end should carry id_token when accessing the back-end interface. Developer server needs to verify the id_token passed by the front-end. You can use the key of the OIDC application or the public key of the OIDC application to verify the signature, and then you can get the user ID and basic information corresponding to this token. For example code, see: [Use application key to verify Token](/en/genauth/guides/basics/#merged-guides-basics-authenticate-first-user-how-to-validate-user-token application key to verify-hs256-algorithm-signed-token).
In GenAuth, the token field of user information is an IdToken.
Default fields of IdToken
An OIDC IdToken contains the following fields by default, refer to the OIDC specification:
| Field name | Meaning |
|---|---|
| sub | Abbreviation of subject, which is the user ID |
| name | given name |
| given_name | given name |
| family_name | surname |
| middle_name | middle name |
| nickname | nickname |
| preferred_username | preferred name |
| profile | basic information |
| picture | avatar |
| website | website link |
| email_verified | whether the email is verified |
| gender | gender |
| birthdate | birthday |
| zoneinfo | time zone |
| locale | region |
| phone_number | Phone number |
| phone_number_verified | Verified phone number |
| address | Address |
| formatted | Detailed address |
| street_address | Street address |
| locality | City |
| region | Province |
| postal_code | Postal code |
| country | Country |
| updated_at | Information update time |
Add extended fields to IdToken
You can use the Pipeline capability of GenAuth to insert a custom code snippet in the user authentication process and add a custom IdToken field to the user. For example, in the following example, we add the field KEY to the user's id_token, with the value VALUE:
async function pipe(user, context, callback) {
  user.addToken('KEY', 'VALUE')
  callback(null, user, context)
}
You can parse
id_tokenon this website.
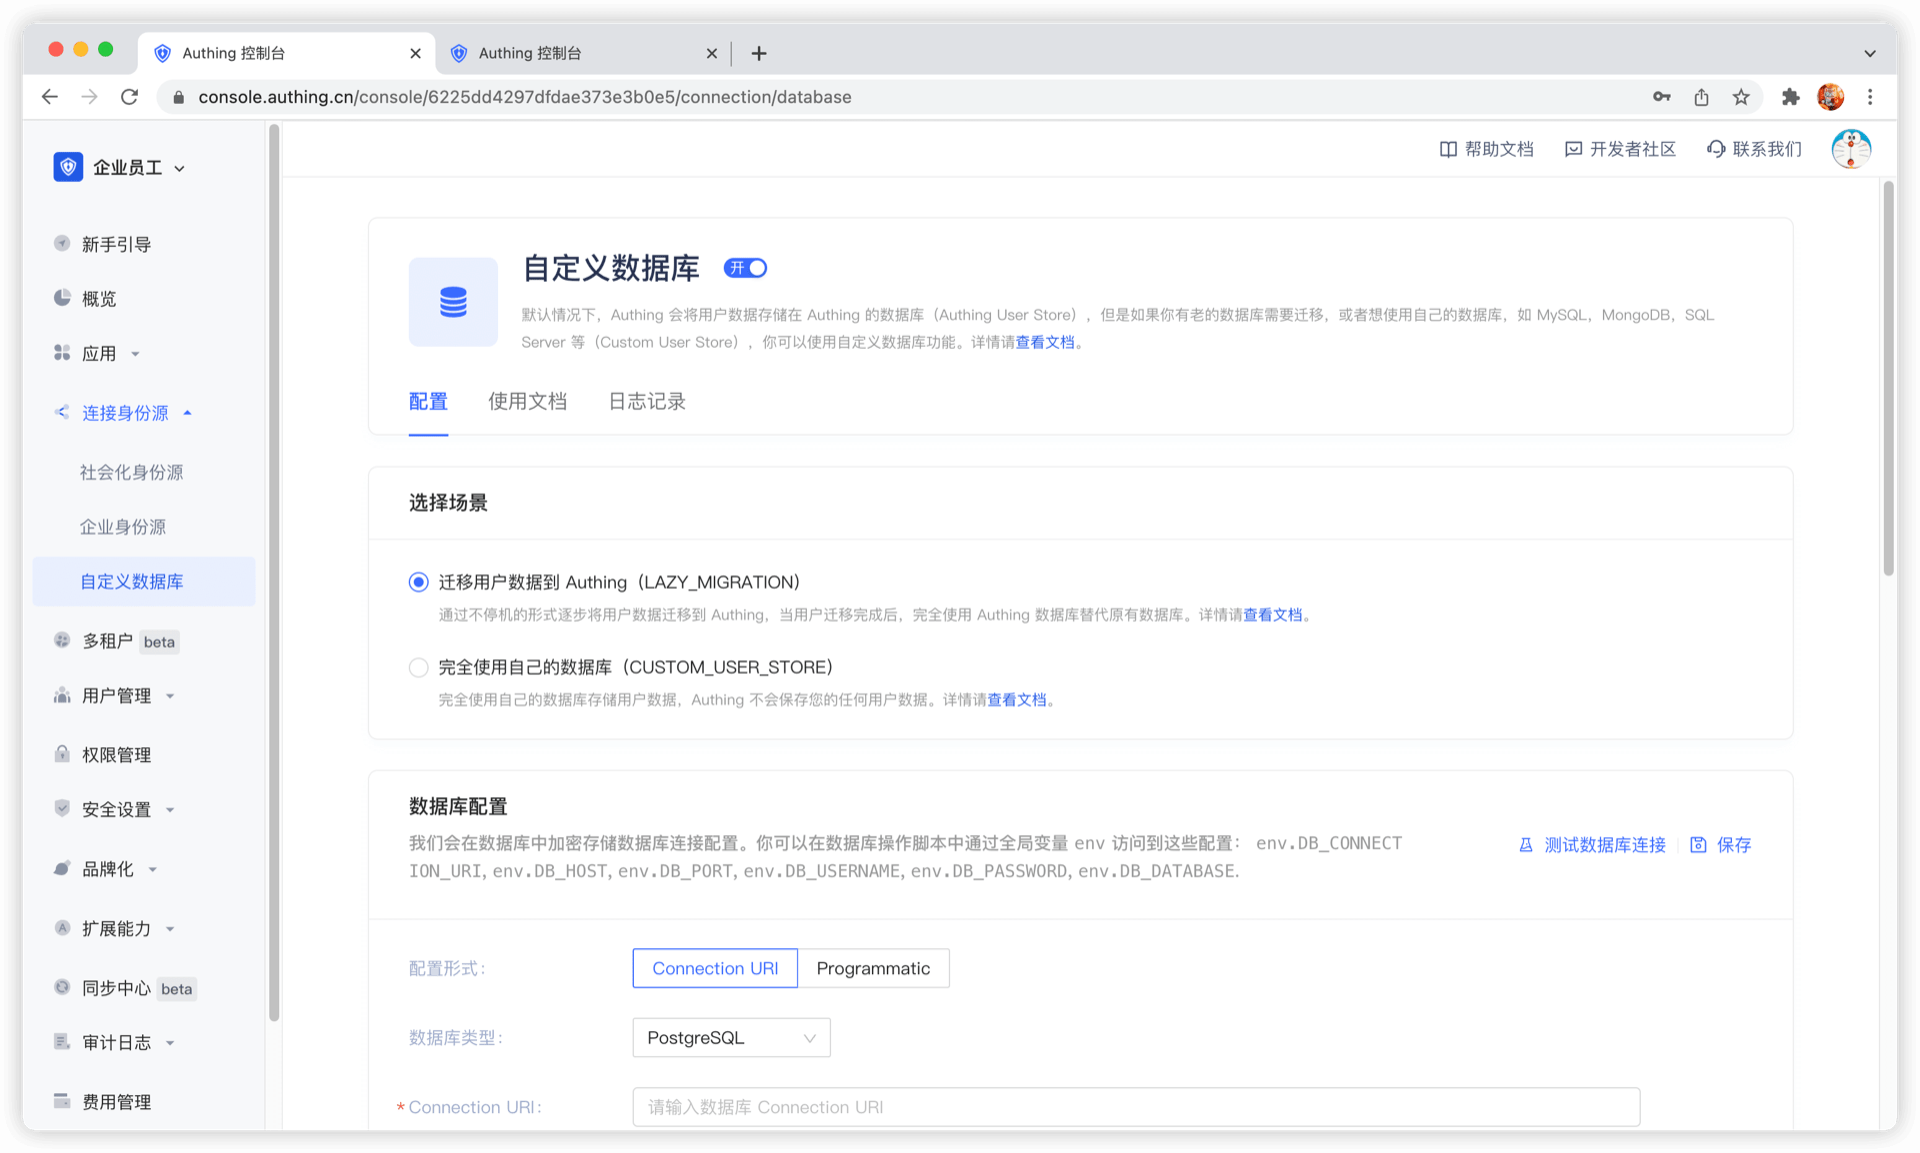
Use a custom database to authenticate users
Using a custom database can meet the needs of the following scenarios:
- Use your own database to save user data: Use your own database to save user data. In this mode, GenAuth will not store any of your user information.
- Lazy migration of users to GenAuth: This mode of migrating users is called lazy migration. In simple terms, the principle is as follows: At the beginning, all the original user data is in your database. When the user tries to log in to GenAuth for the first time, GenAuth will search and verify the user in your database through the custom database script you configured. If successful, the user will be migrated to GenAuth; when the user logs in for the second time, it will be verified using the GenAuth database; when all users have logged in at least once, it means that the migration task is completed.
You can configure a custom database by going to the GenAuth console Connect Identity Source - Custom Database page to enable a custom database connection. For details, see Using a Custom Database.
Use Pipeline to extend the authentication process
GenAuth Pipeline is a set of user-defined JavaScript codes running in the cloud, which allows developers to extend and customize GenAuth capabilities.
GenAuth Pipeline functions are all user-defined, and we also provide rich function templates to help developers quickly get started with development.
At the same time, Pipeline is a set of functions. The difference from ordinary Hooks is that the function data in the entire process of Pipeline can be passed to each other to achieve the same effect as industrial assembly lines. This design pattern can make the developer's custom functions more modular and easy to manage.
GenAuth Pipeline backend uses serverless architecture. All user-defined codes run in the cloud to ensure isolation between different tenants. At the same time, it can be elastically scaled, which not only ensures security, but also improves operating efficiency.

You can use GenAuth Pipeline to achieve the following functions:
- Whitelist mechanism: such as registered email suffix whitelist, registered IP whitelist, etc.
- Event notification: such as sending group notifications after user registration, user login IP abnormality notification, etc.
- Permission control: such as adding users to a user group based on their email addresses after they log in.
- Extending user fields: such as adding custom Metadata to the requesting user, etc.
- Custom token: such as adding custom fields to the token, etc.
- ... and more, the imagination space is endless.
For example, through the following code, we can implement the logic of disallowing email registration that does not end with example.com:
async function pipe(user, context, callback) {
  const { email } = context.request.body;
  // Non-email registration method
  if (!email) {
    return callback(null, user, context);
  }
  if (!email.endsWith("example.com")) {
    return callback(new Error("Access denied."));
  }
  return callback(null, user, context);
}
For more application scenarios and detailed documents, please see this.
Use Webhook to listen to authentication events
Webhooks allows you to listen to user registration, login and other behaviors, so as to perform some custom processing on them. When your user logs in, registers, changes password, and verifies MFA (for a detailed list of events, see [List of events supported by Webhook](/en/genauth/guides/extensibility/#merged-guides-webhook events)), an HTTP POST request will be sent to the remote HTTP URL you configured, where you can complete related event processing, such as:
- After the user registers at GenAuth, synchronize the user information to the OA system;
- After the user modifies the user information, synchronize the changes in the user information to the OA system;
- After the user's email is verified, add corresponding points to the user, etc.
For more details, see Webhooks.
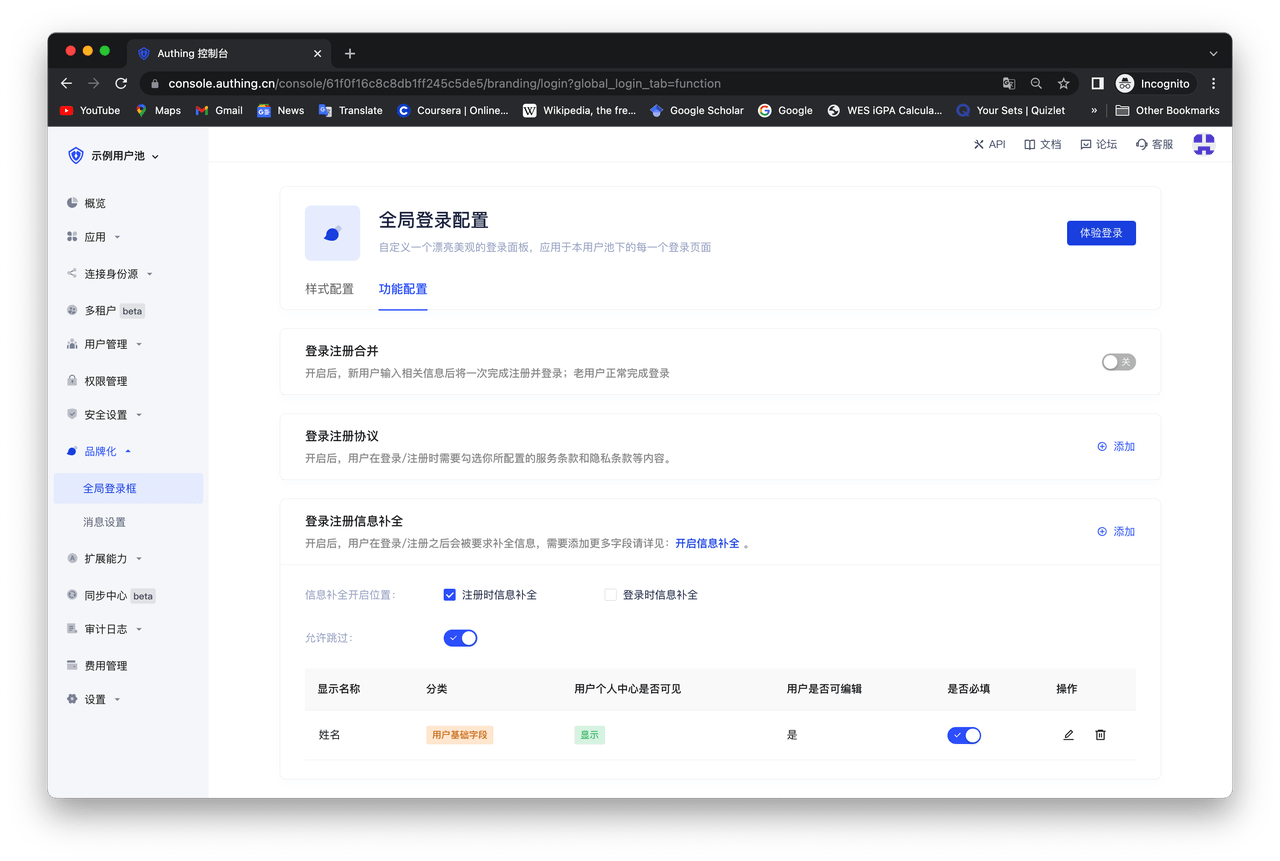
Personalize the login box
You can personalize the login box for the entire user pool in the "Branding" section of the GenAuth console, including the "Single Sign-On SSO" login box and the login boxes of all self-built applications in the user pool.
In the "Global Login Box", you can perform relevant "Style Configuration" and "Function Configuration" as needed. Specific features include:
Style configuration
- Login box version selection: How to switch to the new version of Guard | GenAuth document
- Custom background: Change the background of the login box loading and display
- Custom loading icon: Change the icon when the login box is loading
- Hide corporate identity source login
- Hide social login
- Hide forgotten password
- Custom CSS

Function configuration
- Login and registration merge: After turning it on, new users will complete the registration and login at once after entering relevant information; old users will complete the login normally.
- Login and registration agreement: After turning it on, users need to check the terms of service and privacy terms you configured when logging in/registering.
- Login and registration information completion: After turning it on, users will be asked to complete the information after logging in/registering. If you need to add more fields, please see: Add custom user fields.
If you want to customize the login box of a self-built application independently of the global one, you can do this:
First, find the "Advanced Configuration" area and turn on the "Customize this application's login box" switch. After turning on this switch, the login box of this application will first inherit your configuration in the "Global Login Box". You can make changes based on this without worrying about causing sudden changes to the login box style for users. 
After turning on this switch, you can configure it independently in the "Branding" function area of the self-built application. 