Authorization
In the previous section, we introduced Authentication and Permission Management. Authentication is the process of identifying the identity of the requester, and permission management is the process of determining who has which operation permissions. After determining the user's identity and the permissions the user has, the next thing we need to do is to safely grant the user permissions.
Meaning of Authorization
In the General Field, authorization is the process by which leaders provide employees and subordinates with more autonomy to achieve organizational goals.
In the Computer Field, authorization is the power granted to an entity by the approval authority designated by the information system to process, store or transmit information.
In the Authentication Field, authorization refers to a mechanism in which the client can access server resources in a limited manner after identity authentication.
Why do we need "authorization"?
In the user system that has been built, when your API needs to determine whether the current access user can access the current resource, you need to build your own permission system. Authorization is a very important concept in the permission system. It refers to the process of determining what permissions a user has, which is completely different from authentication.
For enterprises, authorization can clarify the relationship between organizational members, make responsibilities and boundaries clearer, and facilitate company management; at the same time, authorization can ensure data security and prevent risks. Different permissions allow different operations, which can prevent accidents such as user damage, data leakage, and misoperation; authorization can improve the efficiency of decision-making. Excellent authorization and permission management make the system easier to operate and improve the work efficiency of employees.
From the product perspective, authorization can ensure the use security and data security of the product system, prevent illegal operations and data leakage; authorization can also improve the operability of the system and enhance user experience; in addition, good authorization functions will enhance product value and make it more competitive in the market.
Authorization mode
There are two main authorization modes, namely, the authorization code mode based on the OIDC process and the centralized verification of user authorization through the API interface to the authorization center.
Authorization mode based on OIDC framework
OIDC framework is a secure, lightweight, standard authorization system used to help resource parties, callers, and resource owners complete the authorization process. If the resource owner is not involved in the authorization process, the client_credentials mode can be used. This mode is generally used in the M2M mode of the backend server. You can create a programmatic access account on the application details page and obtain a pair of AK and SK. You need to give it to the caller.
You can use OIDC's client_credentials mode to request an access_token with a specific scope:
curl --request POST \
  --url https://${YOUR_GEN_AUTH_DOMAIN}/oidc/token \
  --header 'accept: application/json' \
  --header 'cache-control: no-cache' \
  --header 'content-type: application/x-www-form-urlencoded' \
  --data 'grant_type=client_credentials&scope=customScope&client_id=AK&client_secret=SK'
GenAuth dynamically determines which permissions to issue based on the resource and context requested by the caller. And returns the rejected scope:
{
  "access_token": "...",
  "token_type": "Bearer",
  "expires_in": 3599,
  "scope": "user",
  "scope_rejected": "xxx yyy"
}
scope is a list of permissions that the access_token has, separated by spaces. You can use the scope in the backend to determine which permissions the user has.
When the authorization process involves the resource owner's participation in authorization, the authorization code mode in the OIDC framework can be used. You need to put the permission item in the scope parameter of the link that initiates the authorization, for example:
https://${YOUR_GEN_AUTH_DOMAIN}/oidc/auth?client_id={Programming access account AK}&scope=openid book:read book:delete&redirect_uri={Your business callback address}&state={Random string}&response_type=codeYou need to let the resource owner click the link, then go to the login page, the resource holder authenticates his identity, and authorizes the resource to the caller. After completing the authentication and authorization, the browser will jump to the business callback address and pass the code authorization code through the URL. The caller can use this code authorization code to GenAuth to exchange for an authorized AccessToken to obtain the resources of the resource party.
The code for exchanging the code for token is as follows:
curl --request POST \
  --url https://${YOUR_GEN_AUTH_DOMAIN}/oidc/token \
  --header 'Content-Type: application/x-www-form-urlencoded' \
  --data client_id={Programming access account AK} \
  --data client_secret={Programming access account SK} \
  --data grant_type=authorization_code \
  --data redirect_uri={Callback address} \
  --data code={Authorization code}
Similarly, GenAuth will dynamically determine the permissions of the AccessToken issued based on the resources and context requested by the caller. Denied permissions will not appear in the scope:
{
  "access_token": "...",
  "token_type": "Bearer",
  "expires_in": 3599,
  "scope": "openid book:read"
}
Of course, the resource party must verify whether the caller carries an AccessToken with permissions before returning the resource. When all checks are passed, the resource can be safely returned.
Using the Permission API
In addition to using the client_credentials mode of OIDC, you can also use the general permission API to create roles, authorize roles, and determine whether a user has a certain permission. We support SDKs in languages such as Node.js, Python, Java, PHP, and C#. Click here for details.
User-permitted resource authorization
Suppose your company is a social communication company. Now there is another company that wants to develop a chat record sorting and exporting tool by calling your business API and has signed a cooperation agreement with your company. Now you want to safely authorize user information to this company. You expect:
- API calls are only open to partner companies.
- Different partners have different access rights and can access different business APIs.
- Before the partner company obtains its own company's user data from the business API, it must first obtain the user's consent.
- If the cooperation is terminated in the future or changes occur, it is hoped that the permissions for certain data can be revoked or completely disabled.
Permission management and allocation
First, create two users in GenAuth. They are user1@123.com and user2@123.com.
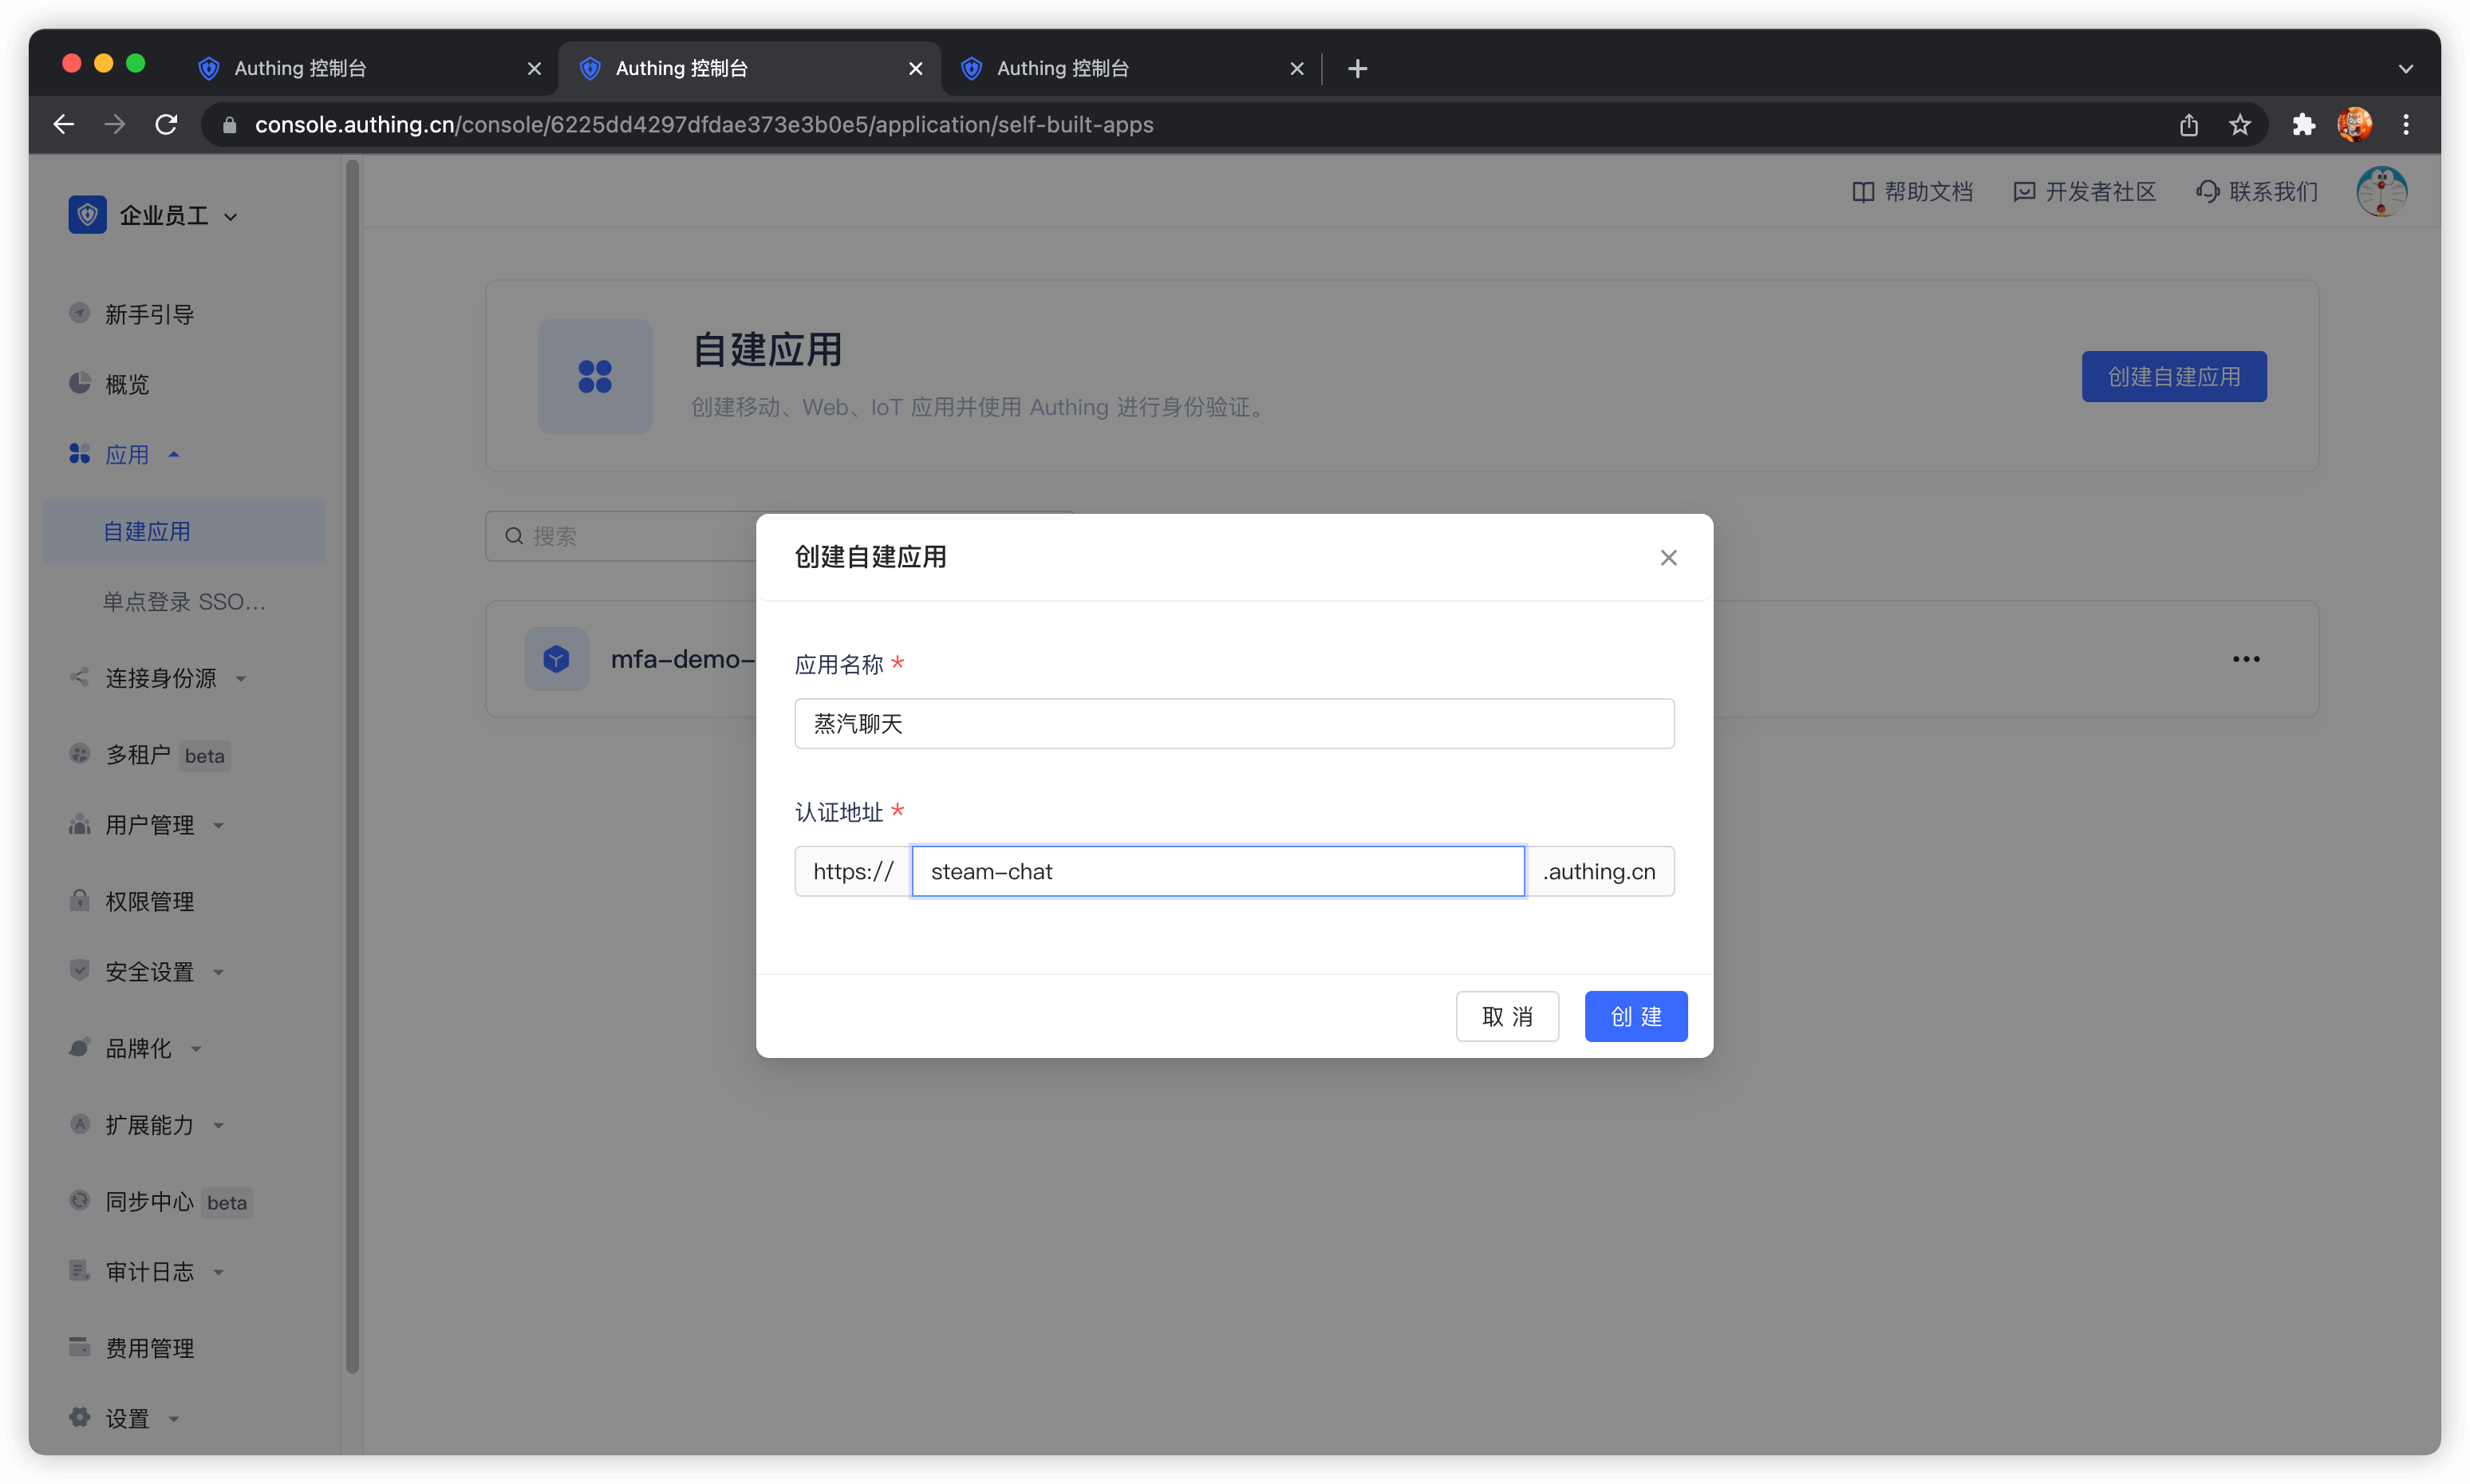
Create an application in GenAuth. Assuming that our social software is called "Steam Chat", the application name is called "Steam Chat".
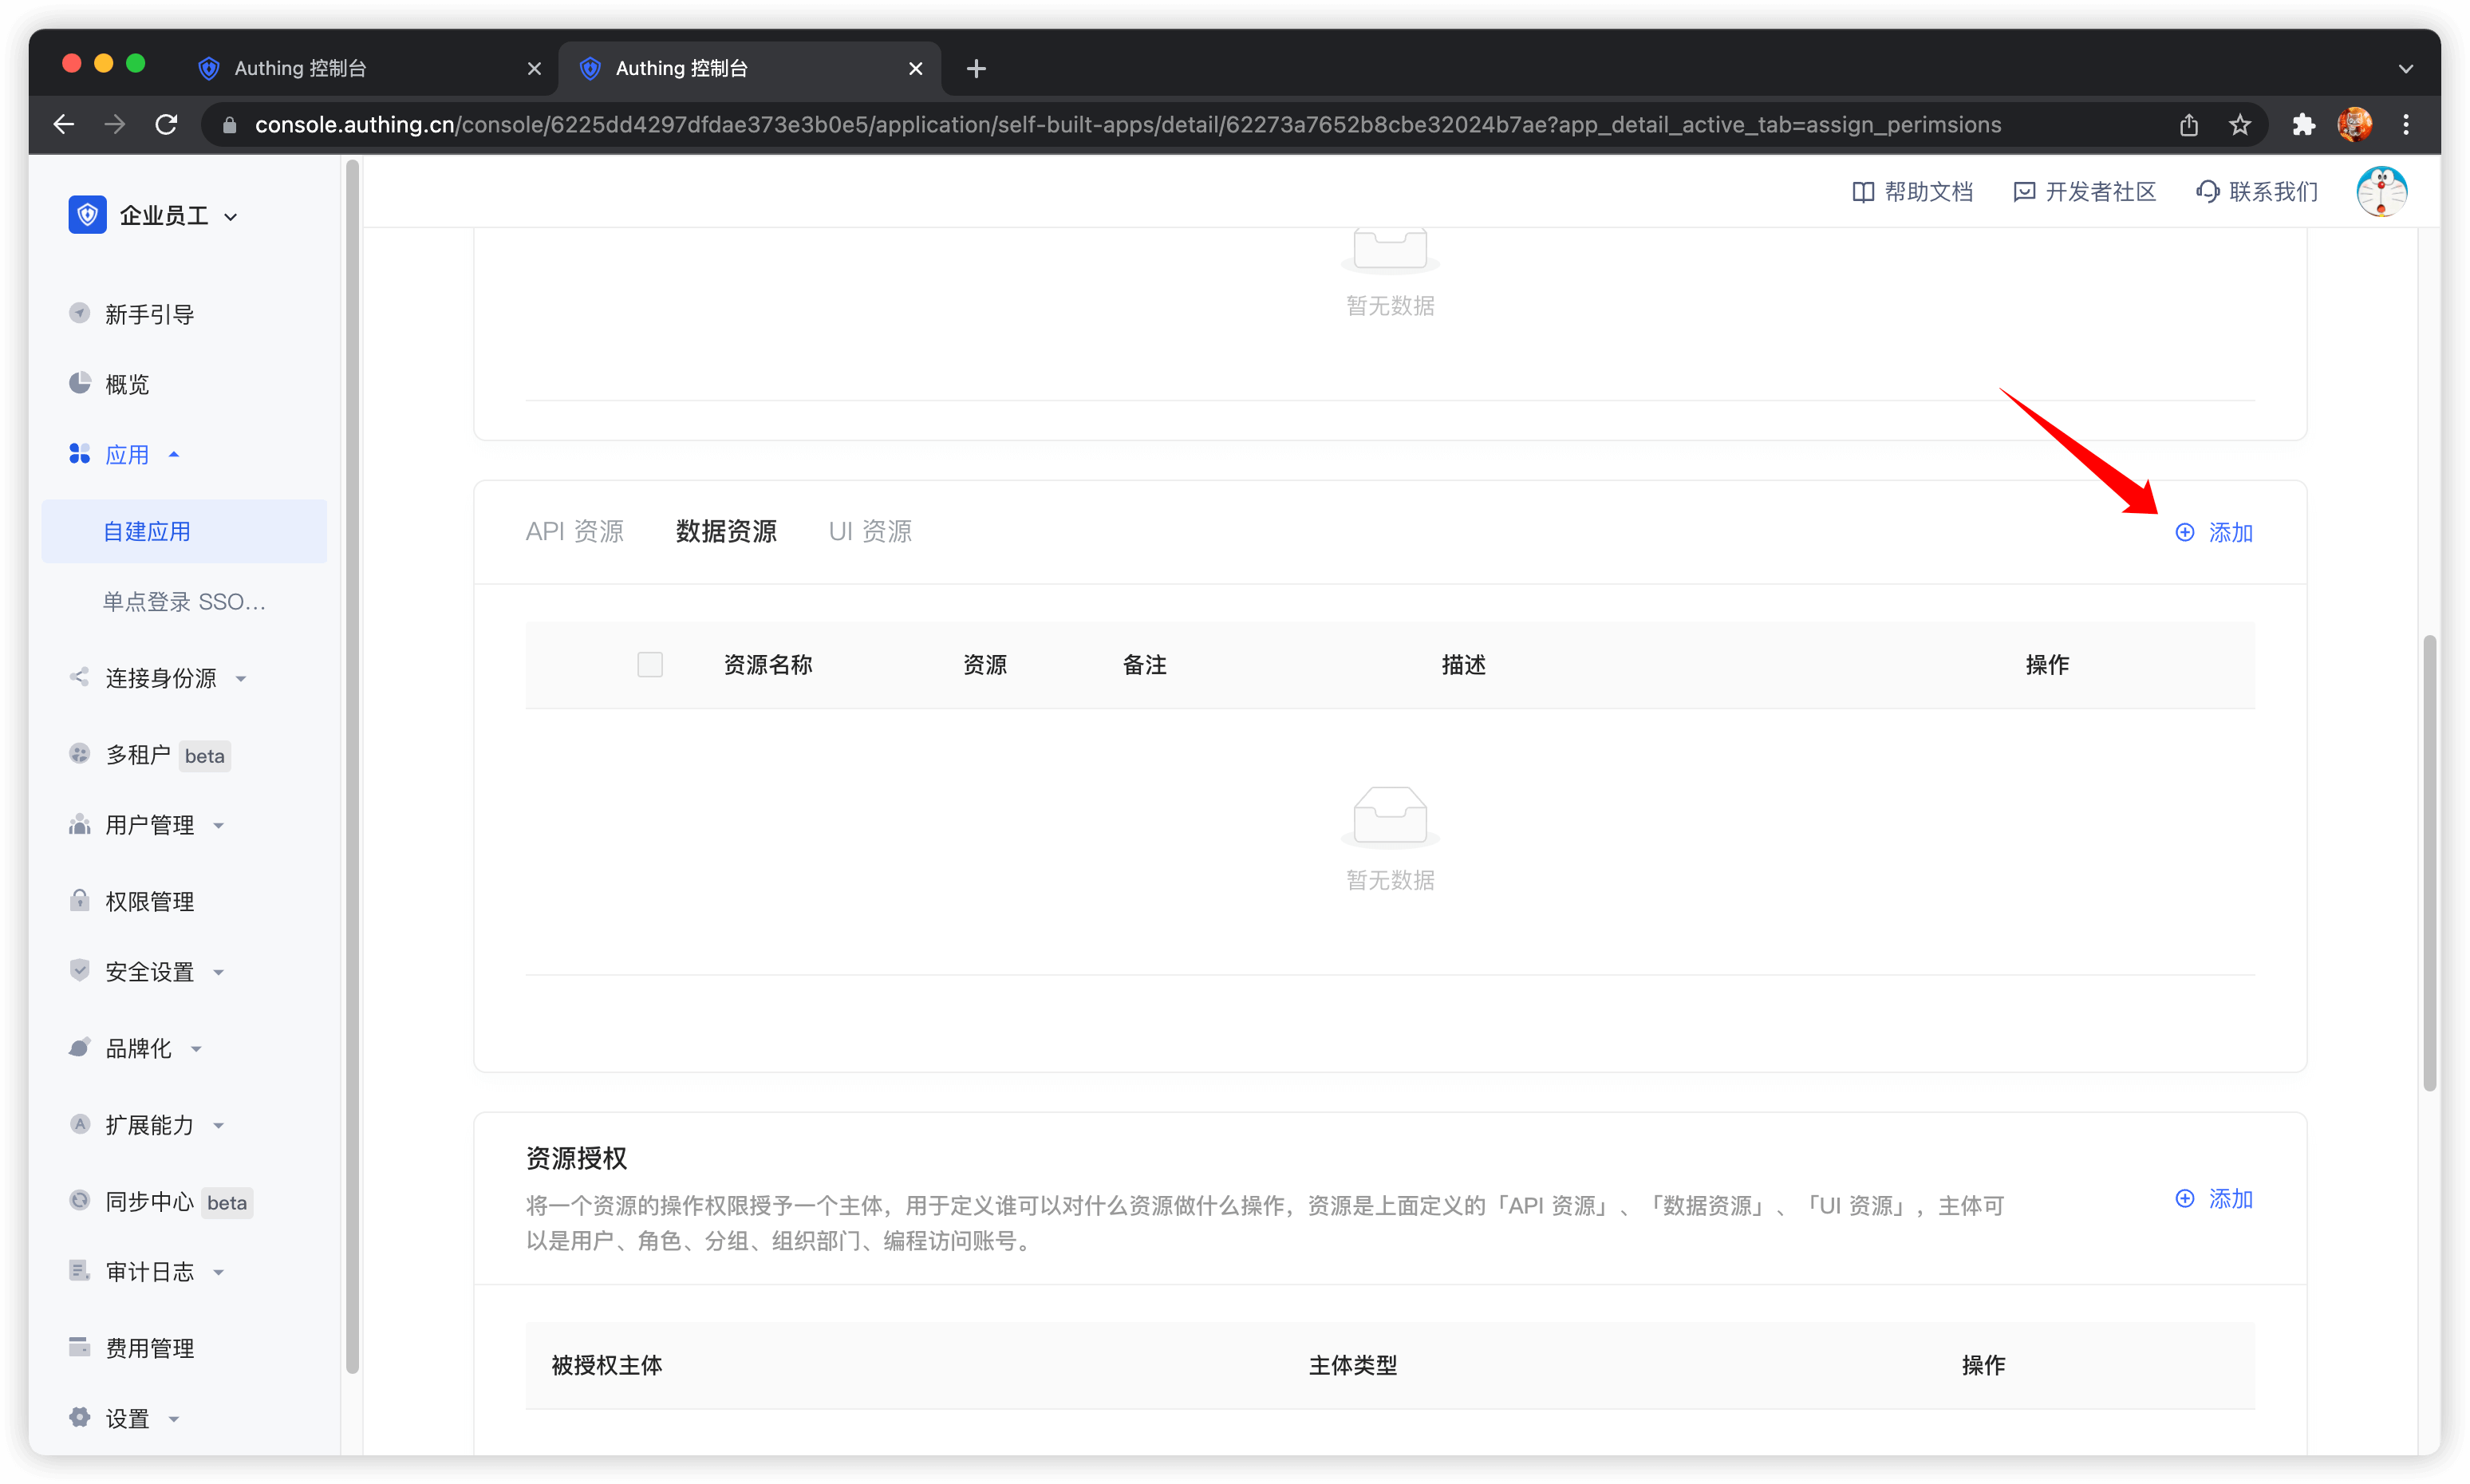
In the application details, click the Access Authorization tab, switch to the Data Resources tab, and then click Add.
There is no essential difference between API resources, data resources, and UI resources. The types are only used to distinguish them at the management level. Creating a good resource classification can help administrators quickly focus on different resources.
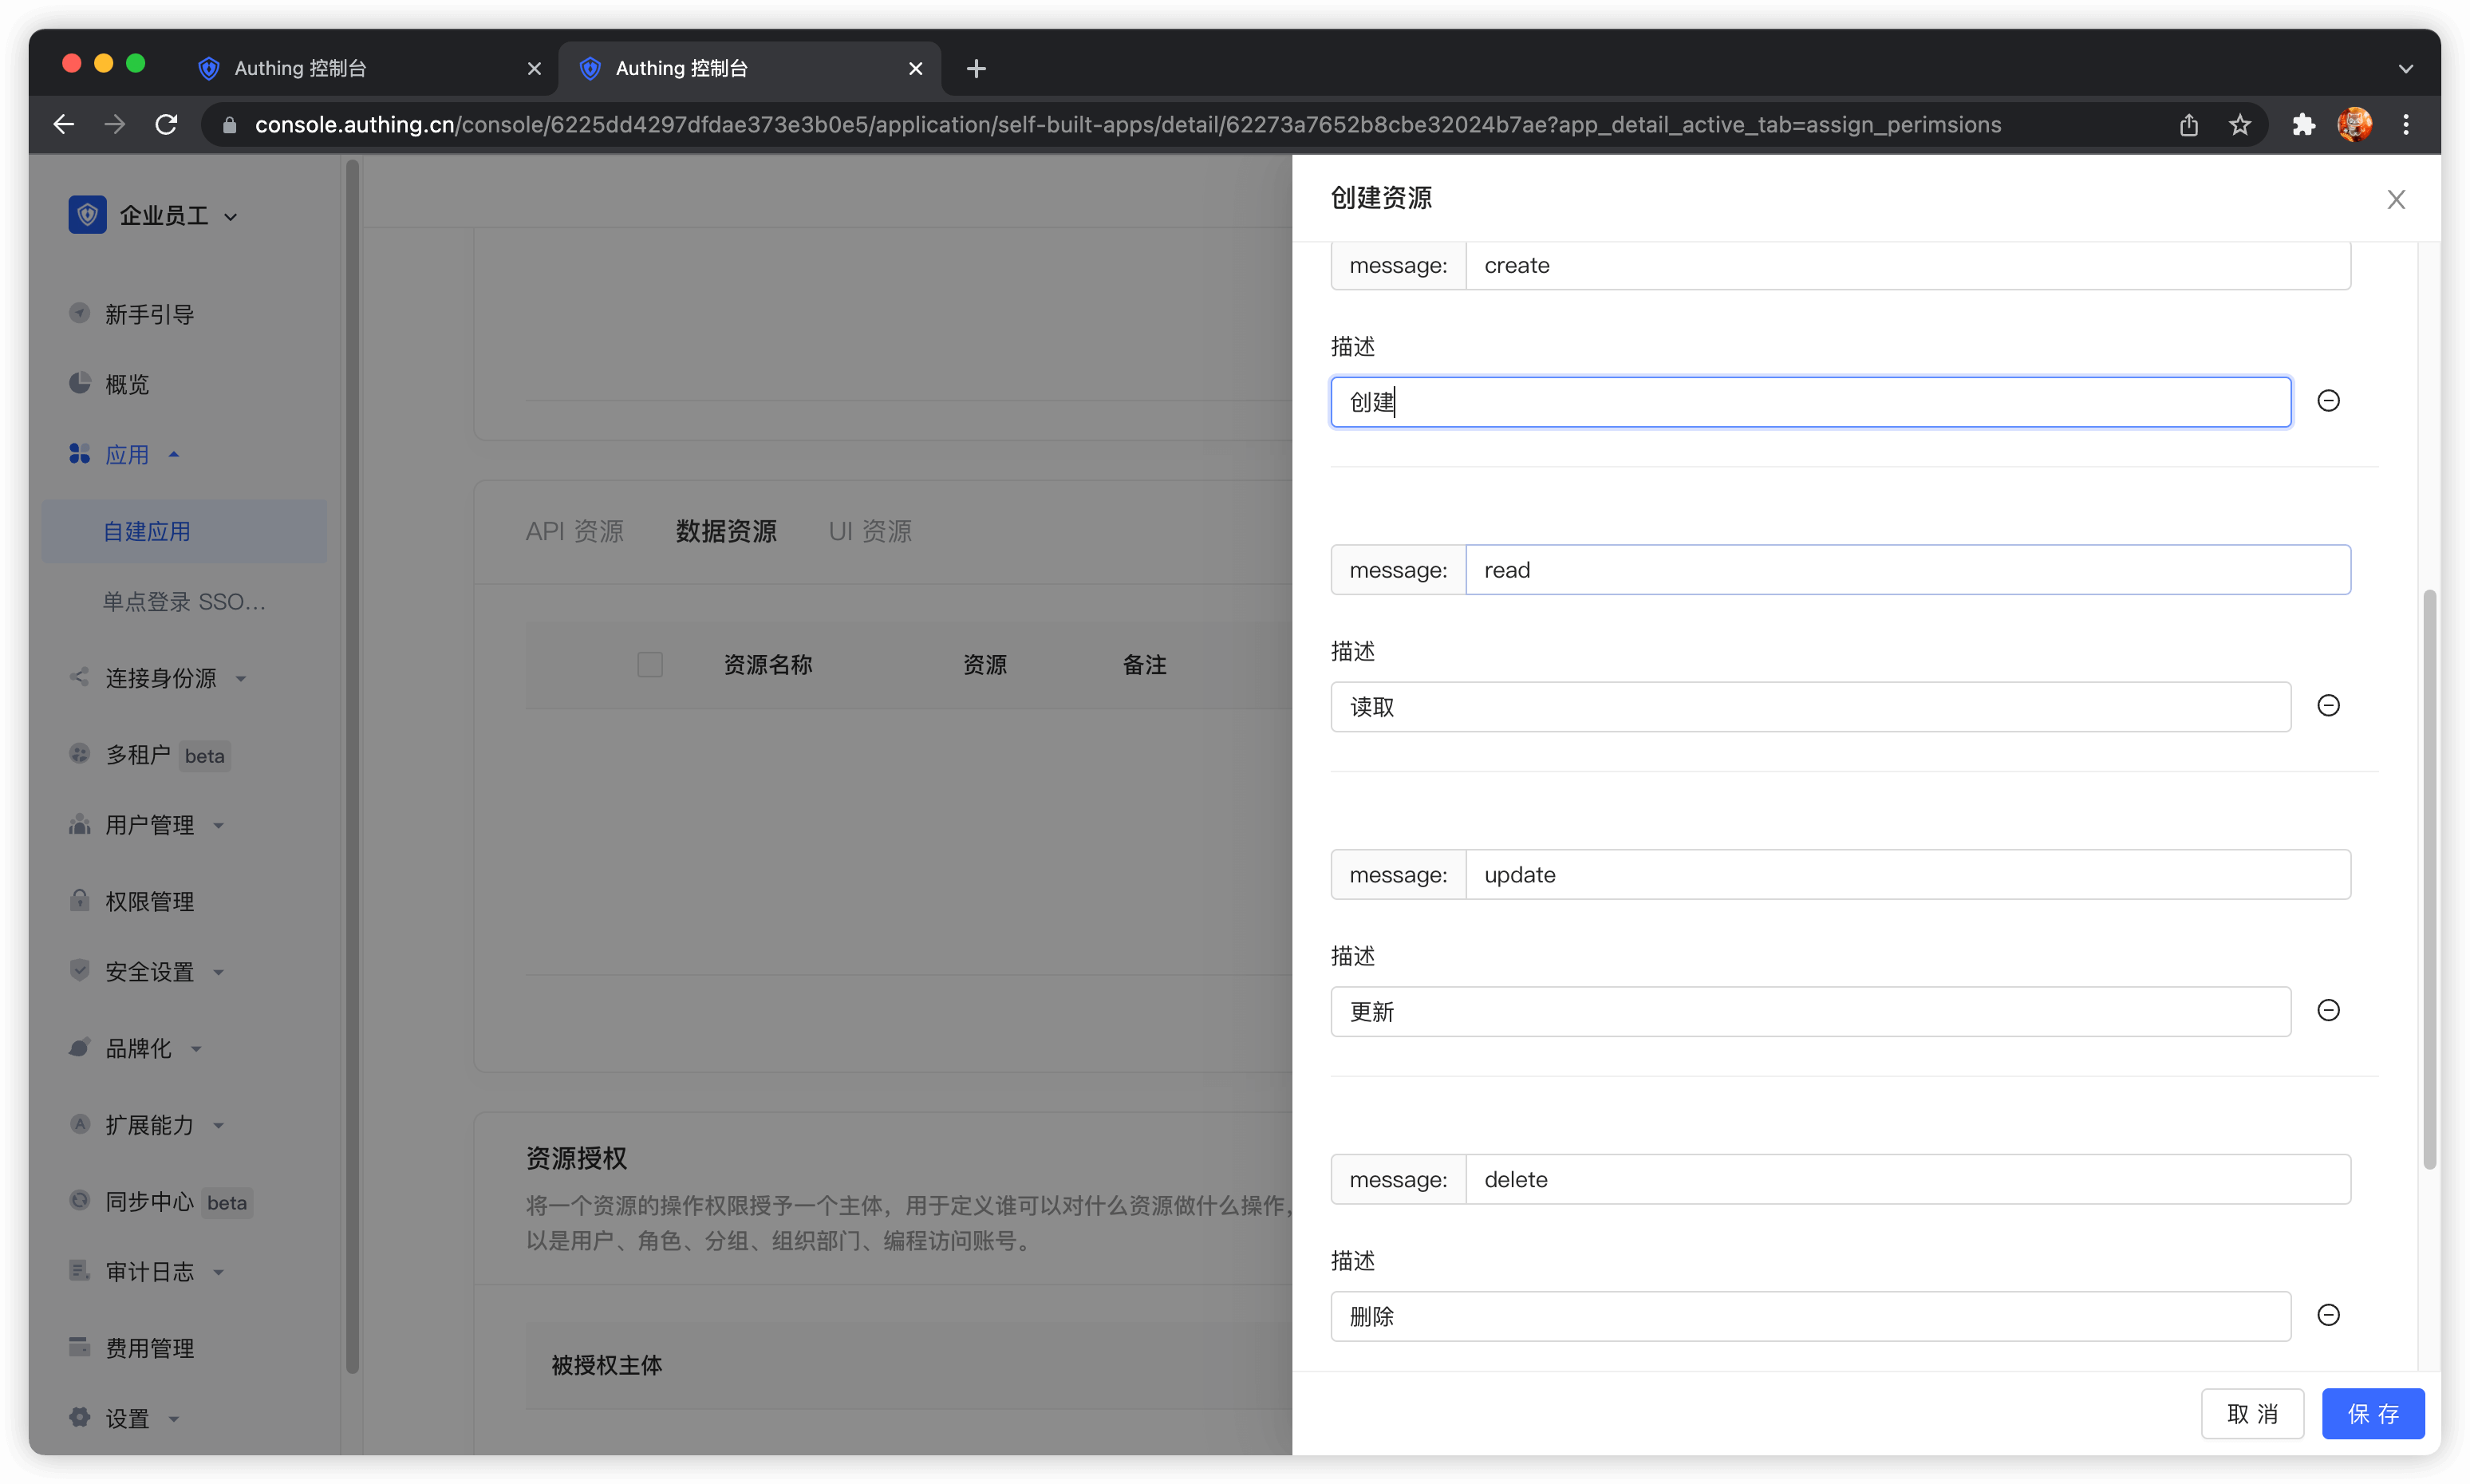
We create a chat data resource, define several operations such as add, delete, modify, and query, and finally click Save.
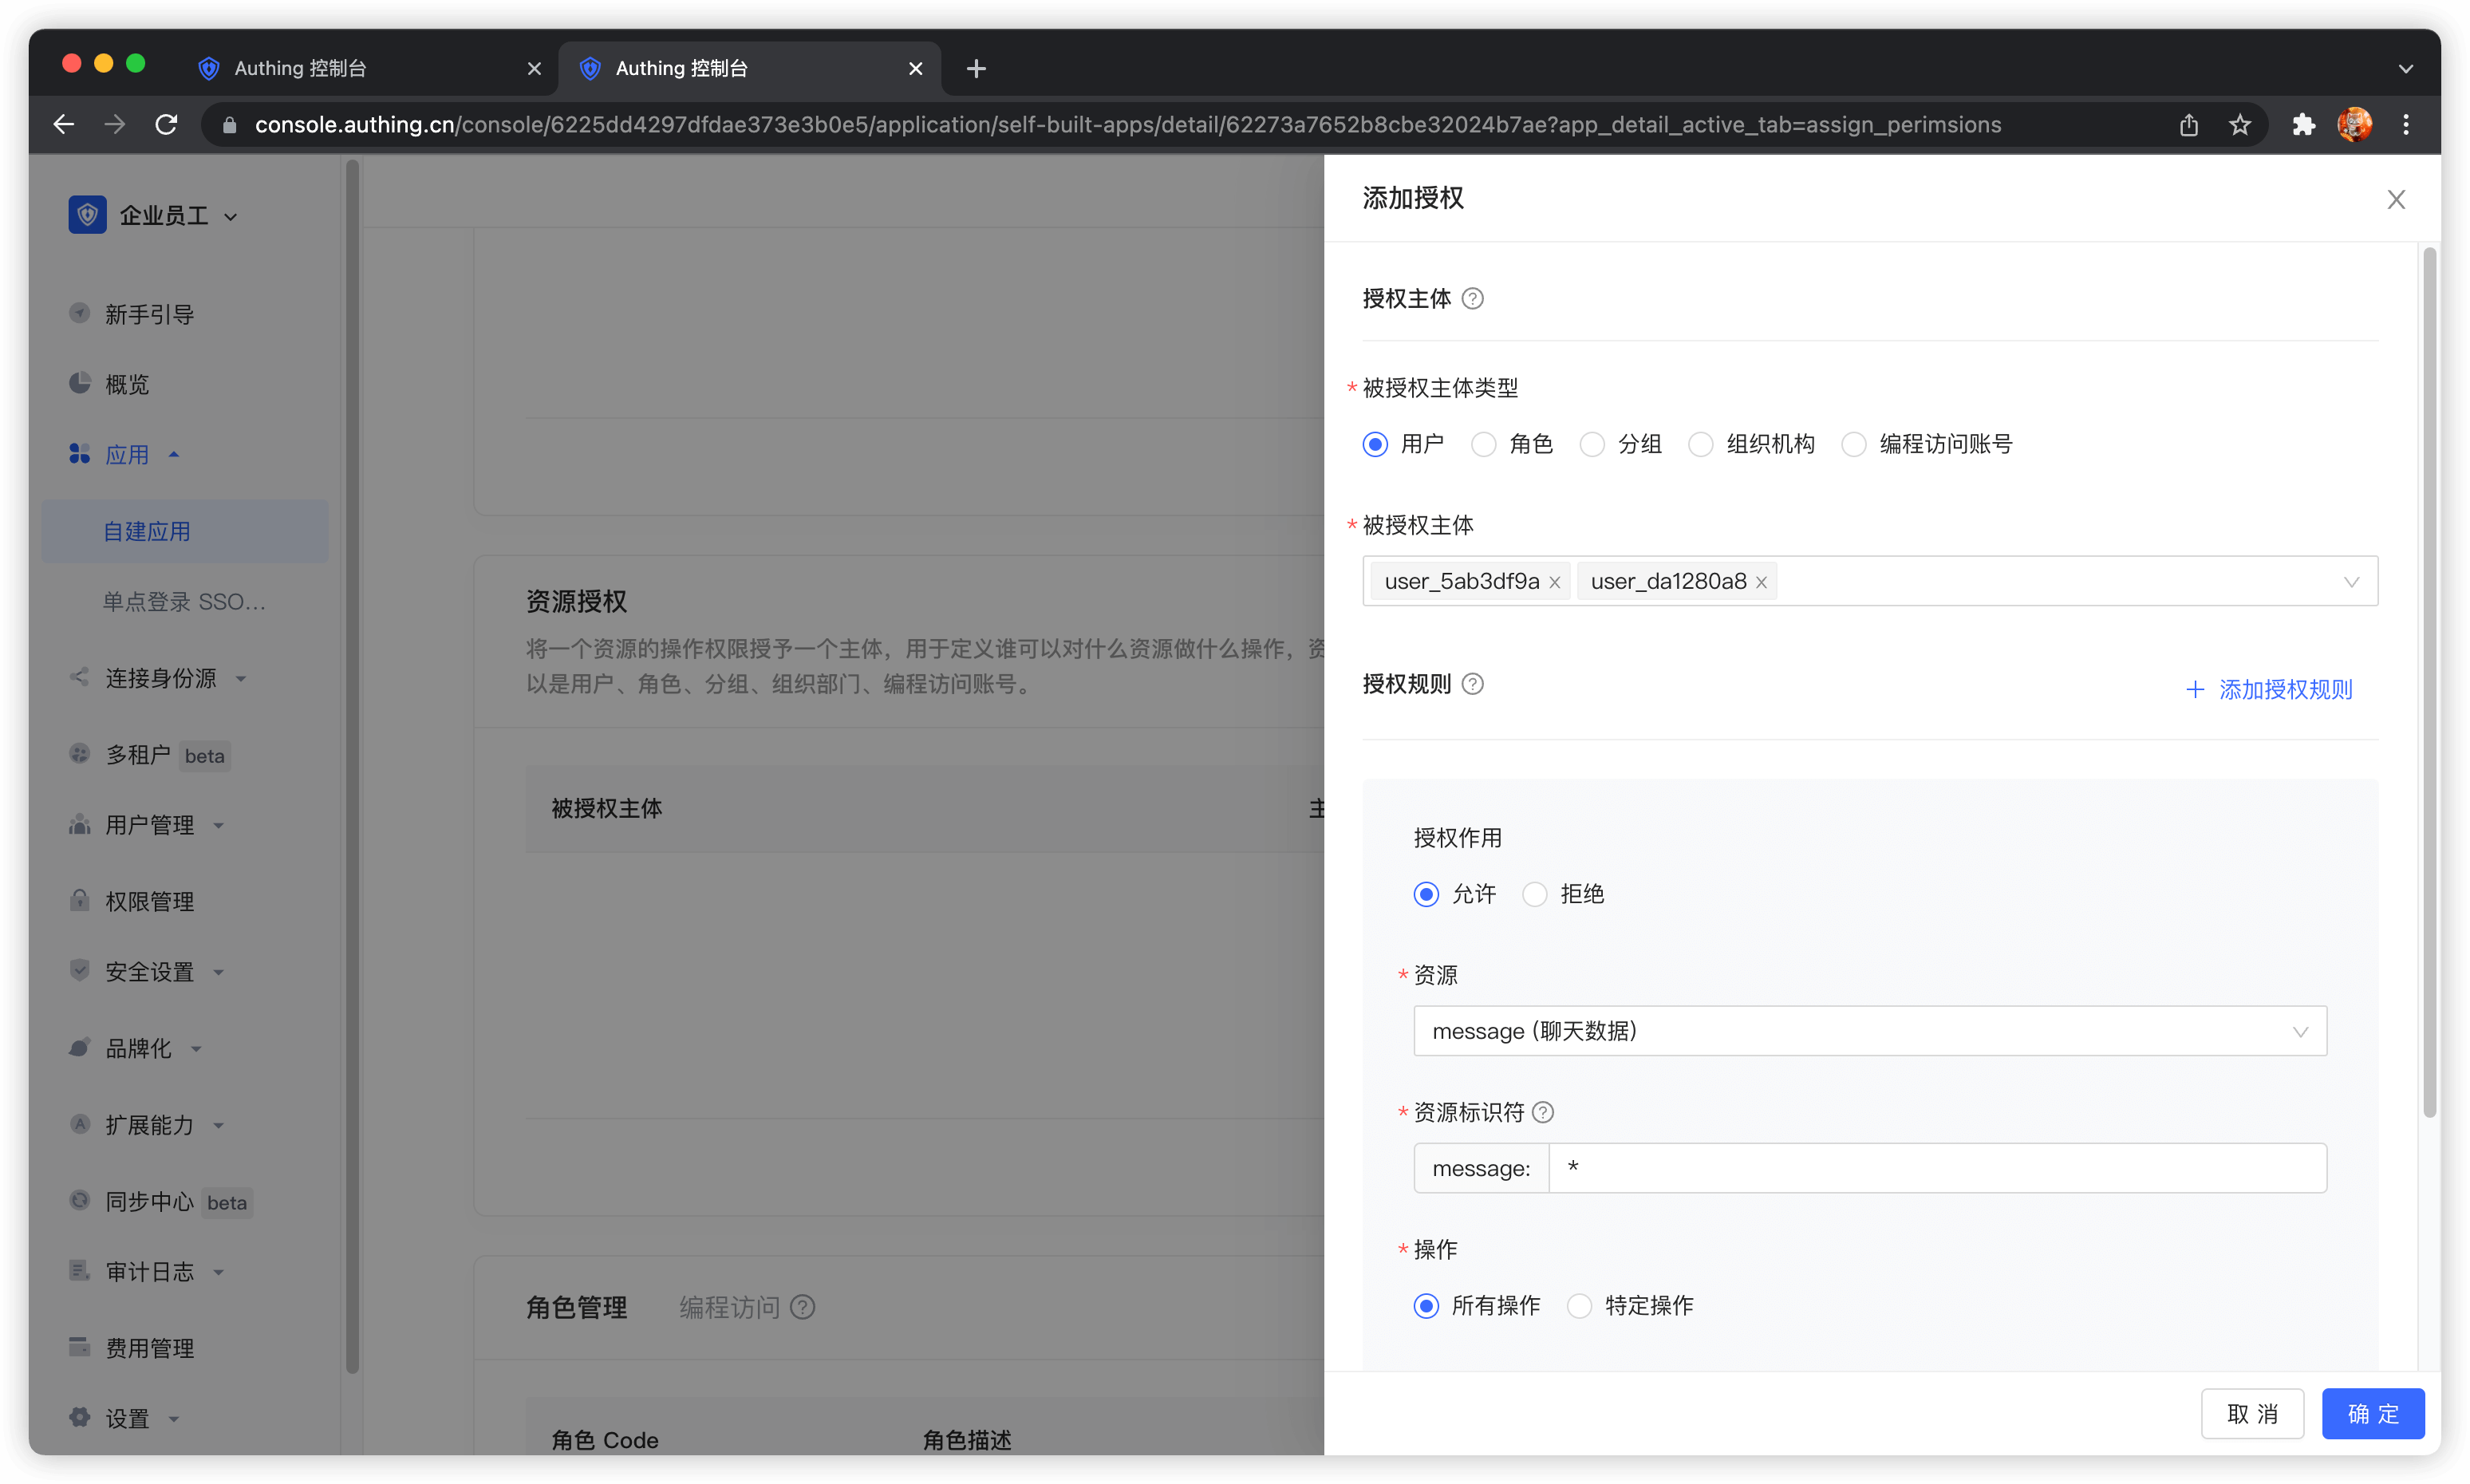
Then add authorization rules in Resource Authorization.
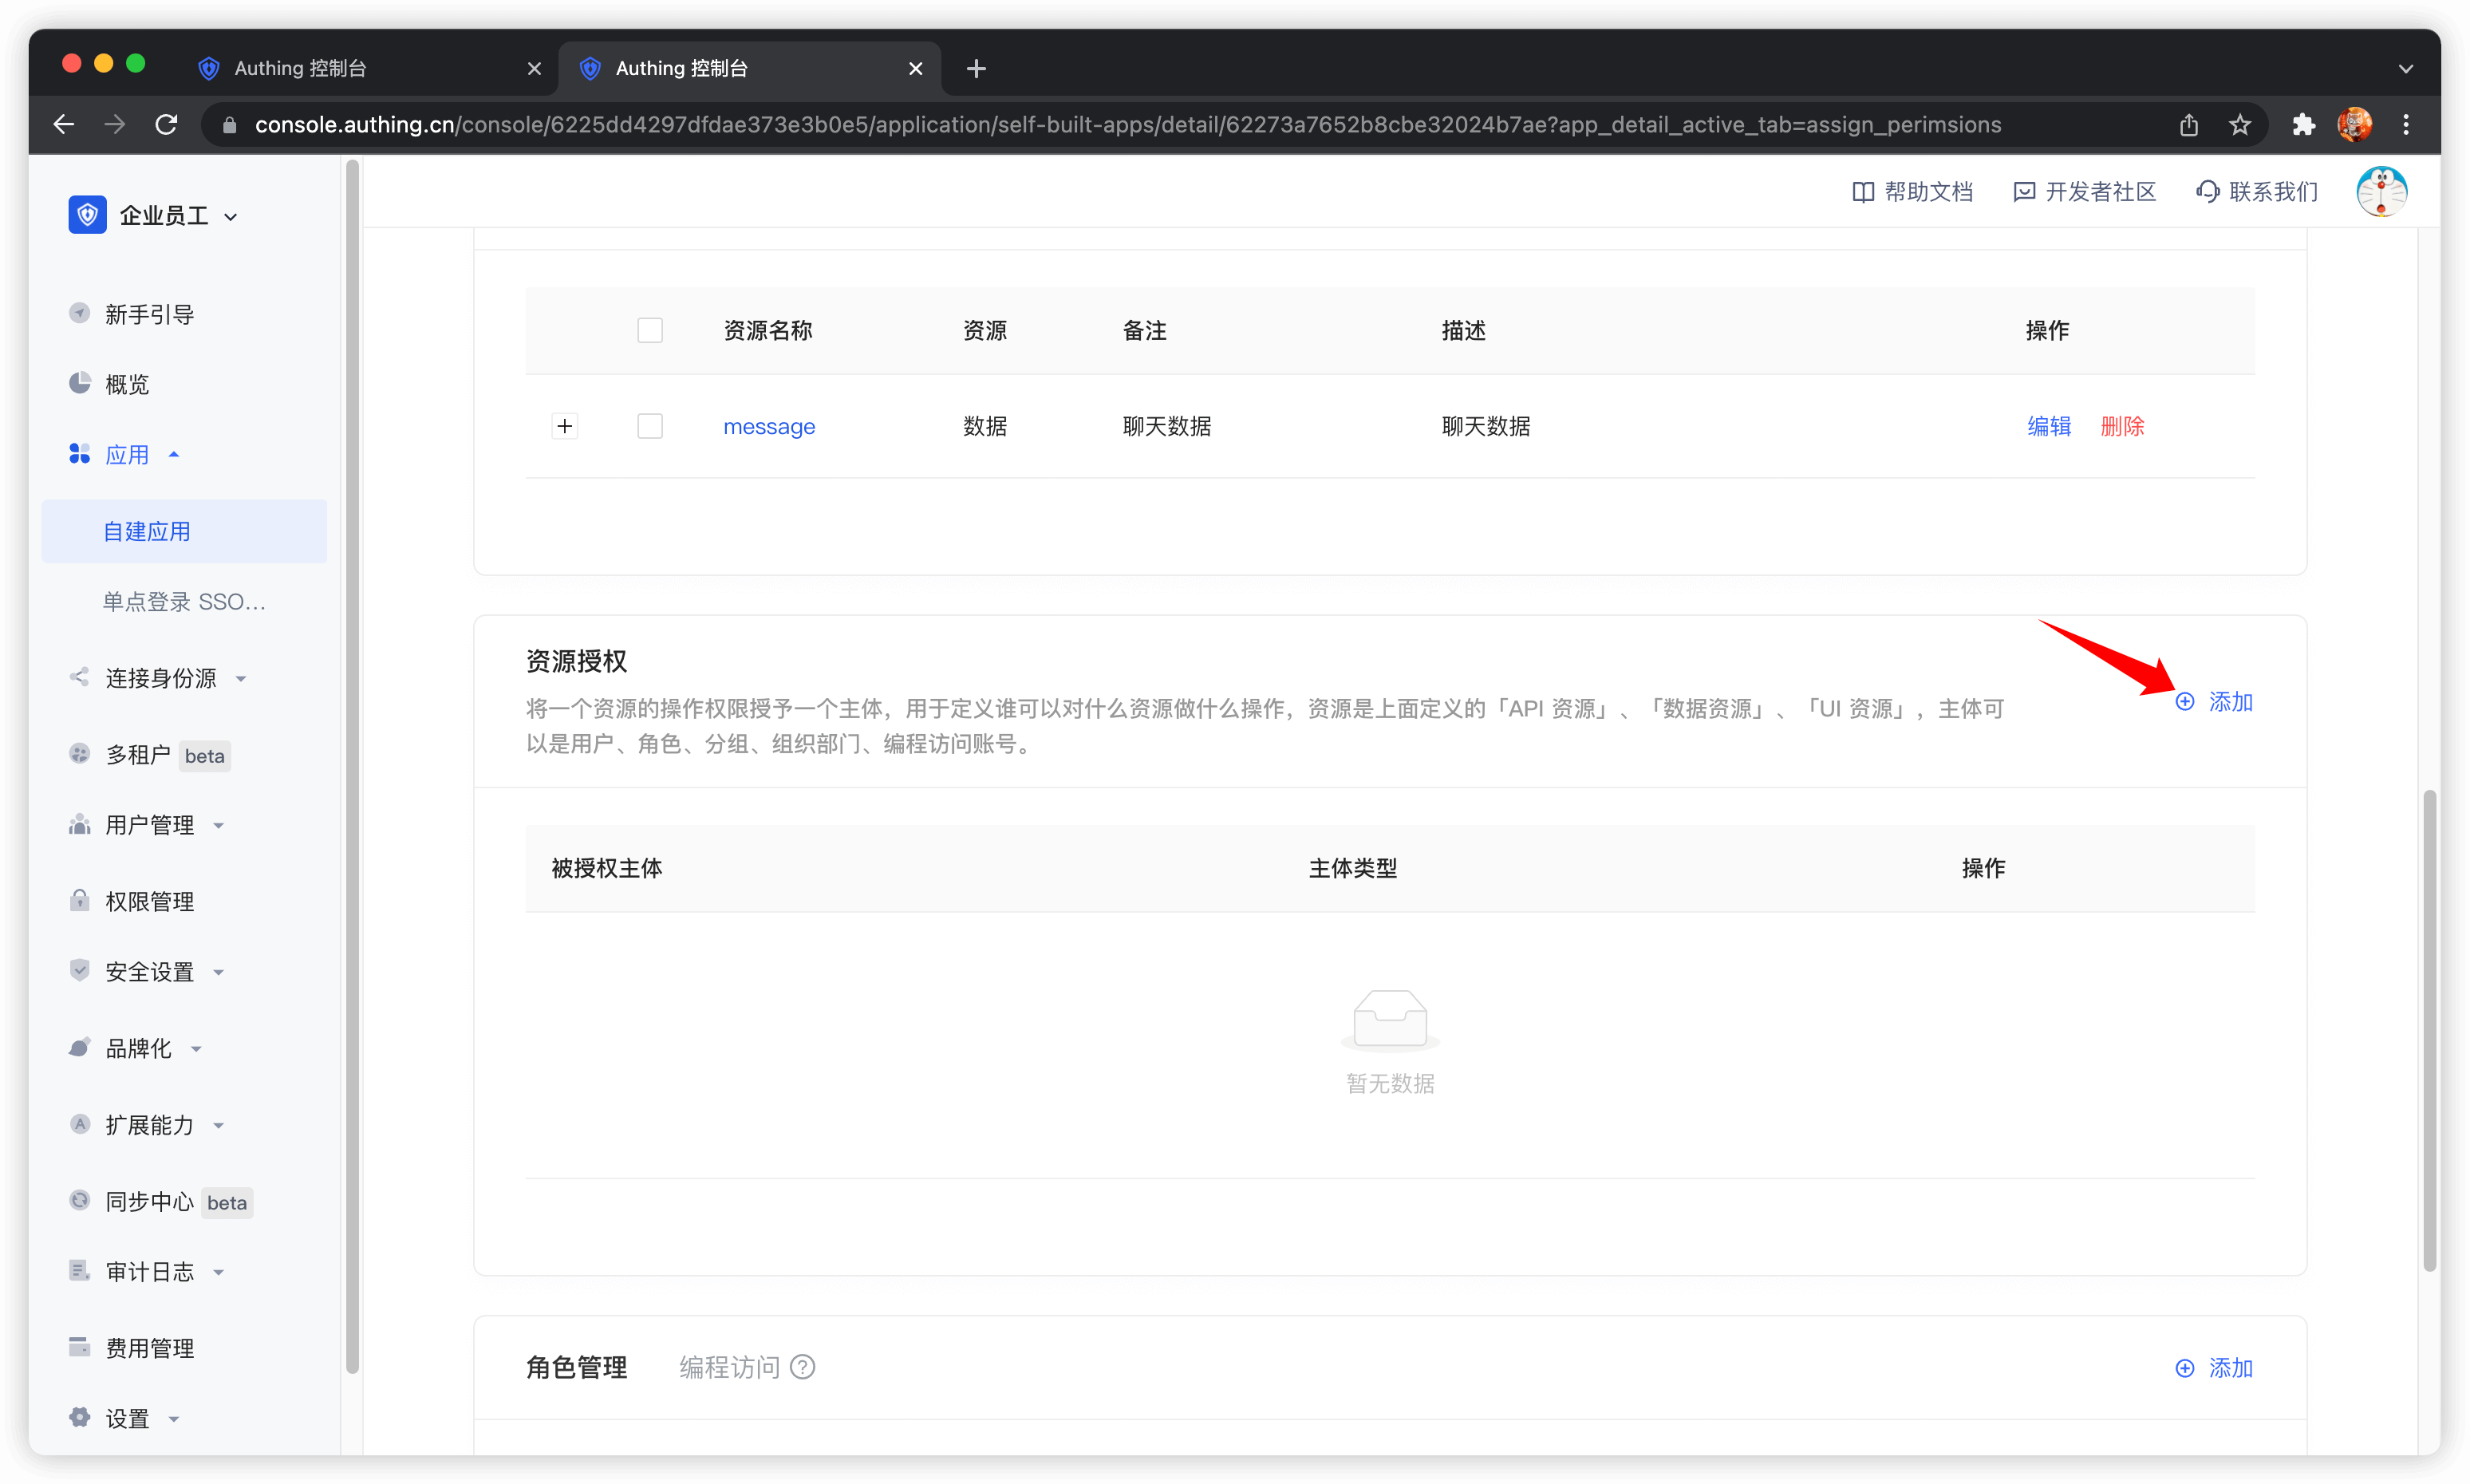
Authorized Subject Select user1@123.com and user2@123.com, Resource Type Select Chat Data, and then click OK.
At this point, the administrator's permission management operations are all completed.
Then we create a programmatic access account, which will be handed over to the caller in the future.
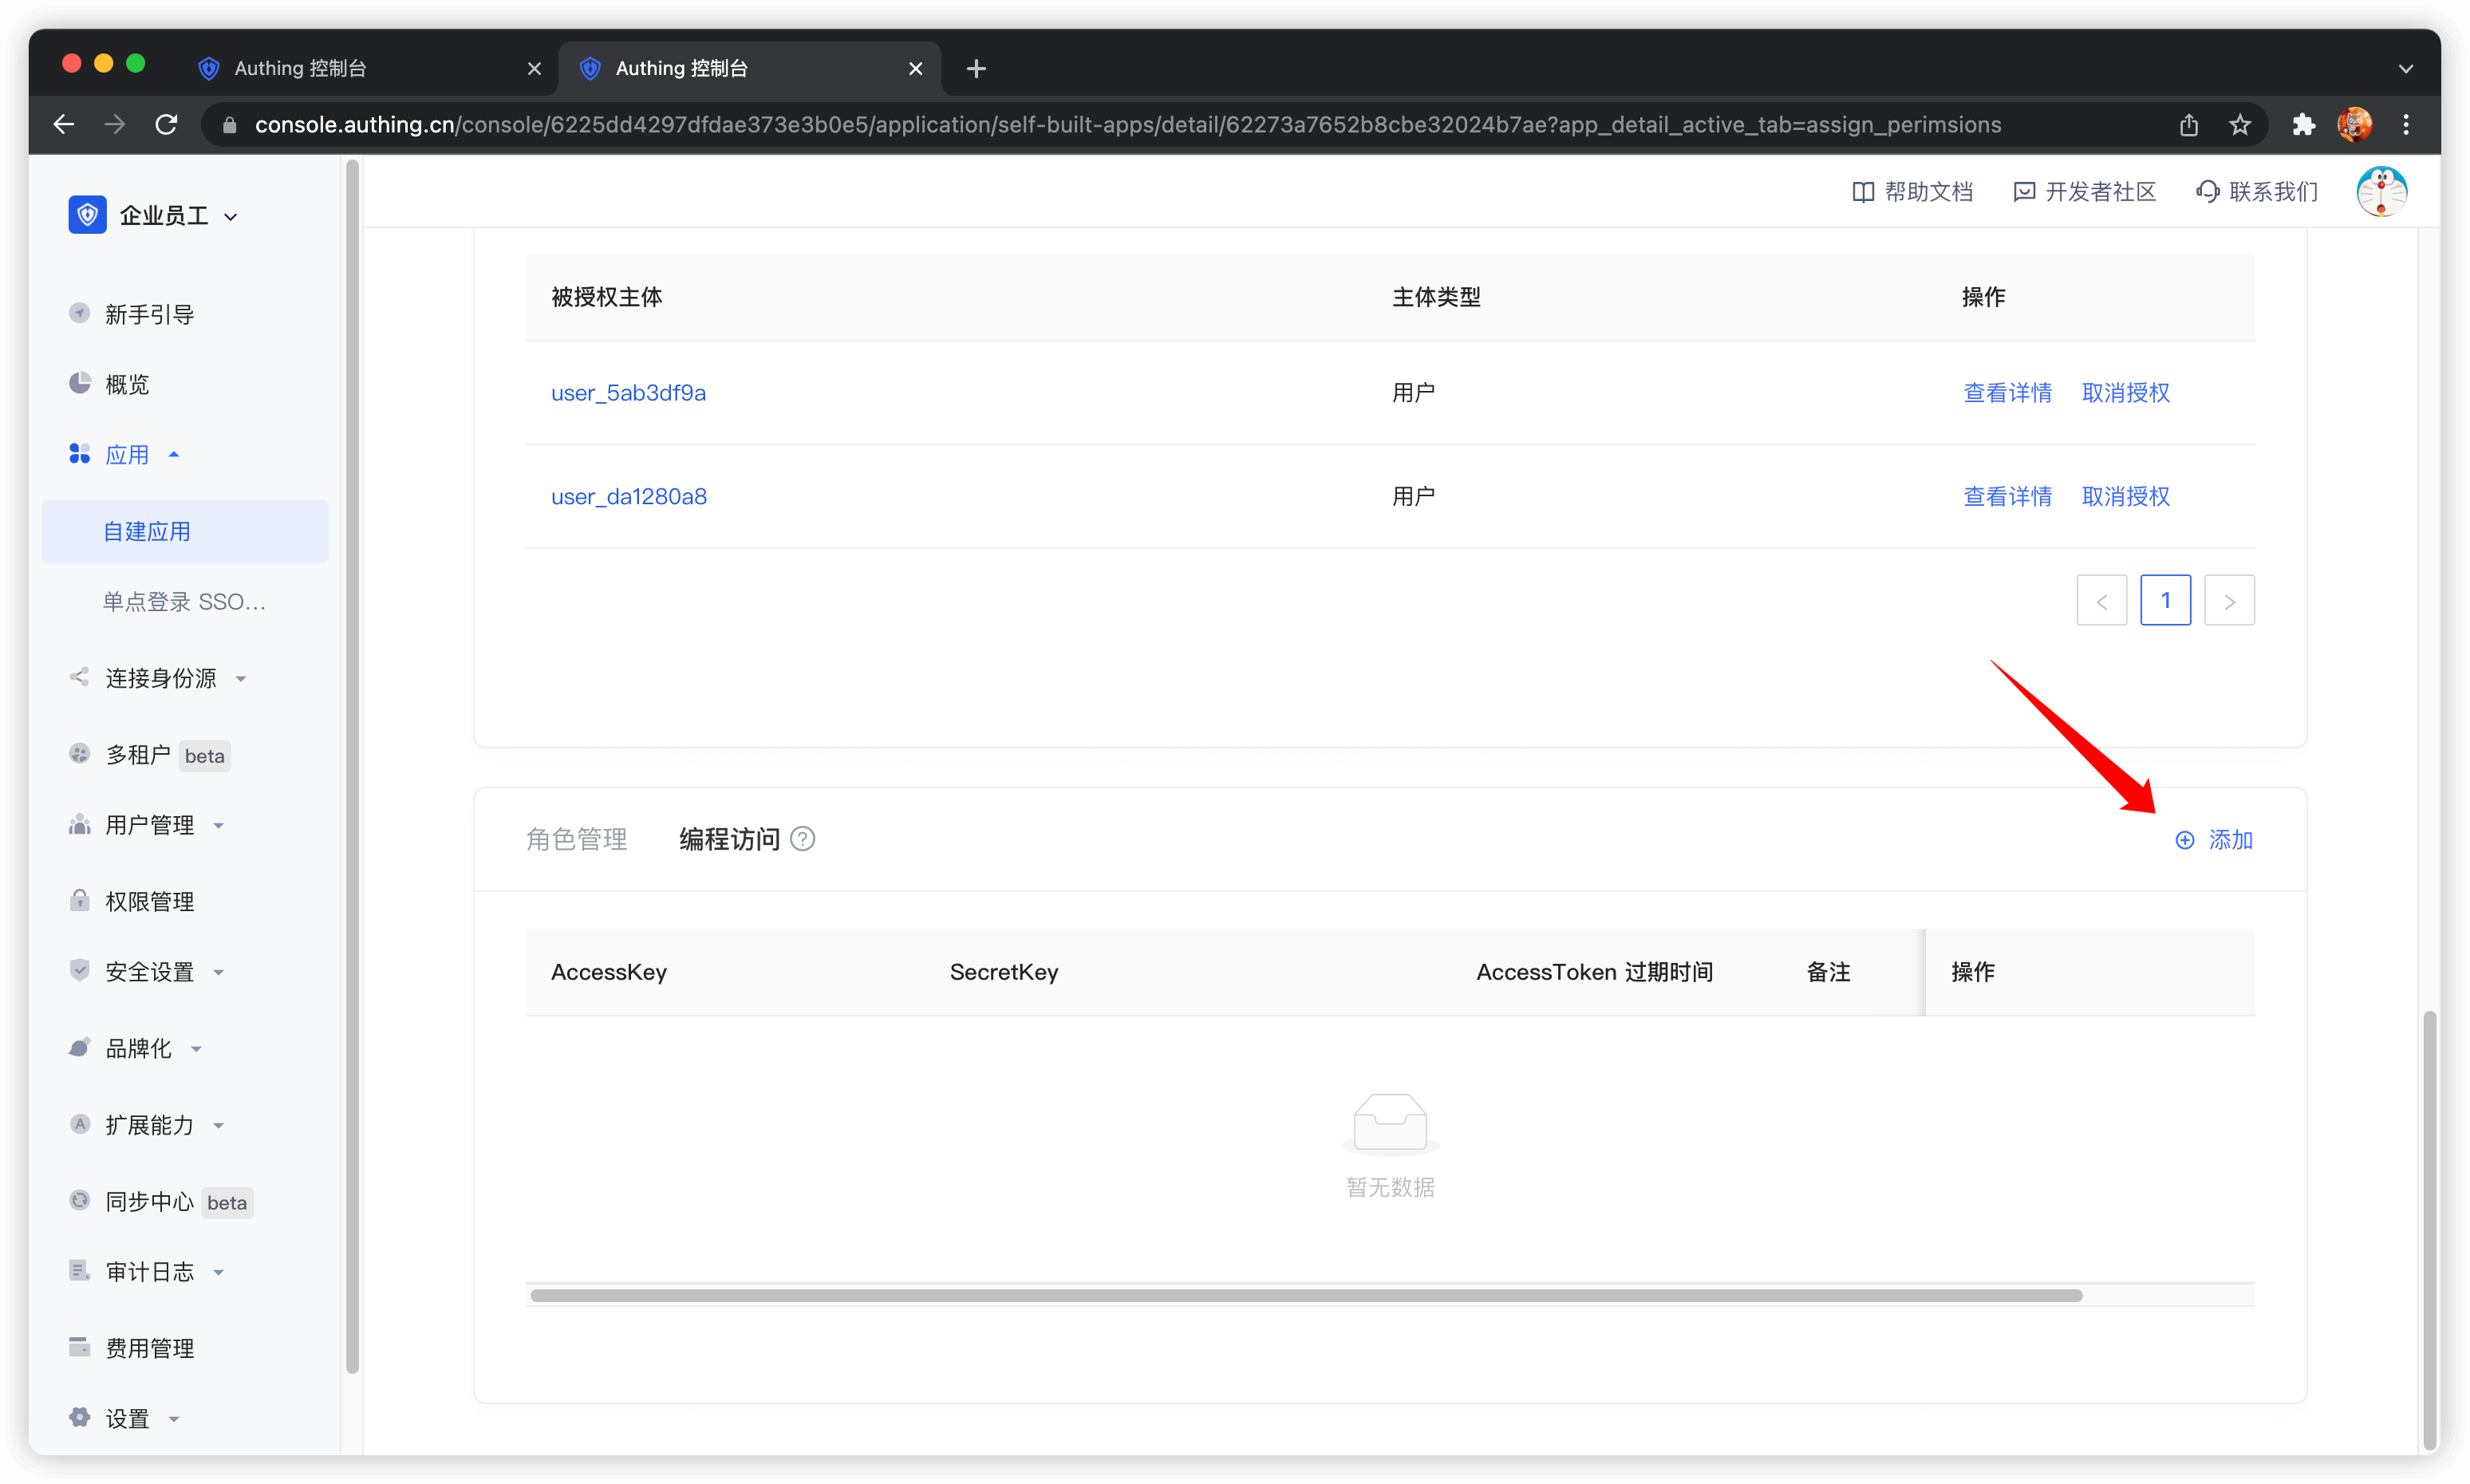
If the programmatic access account is deleted, the caller will lose the ability to obtain user authorization.
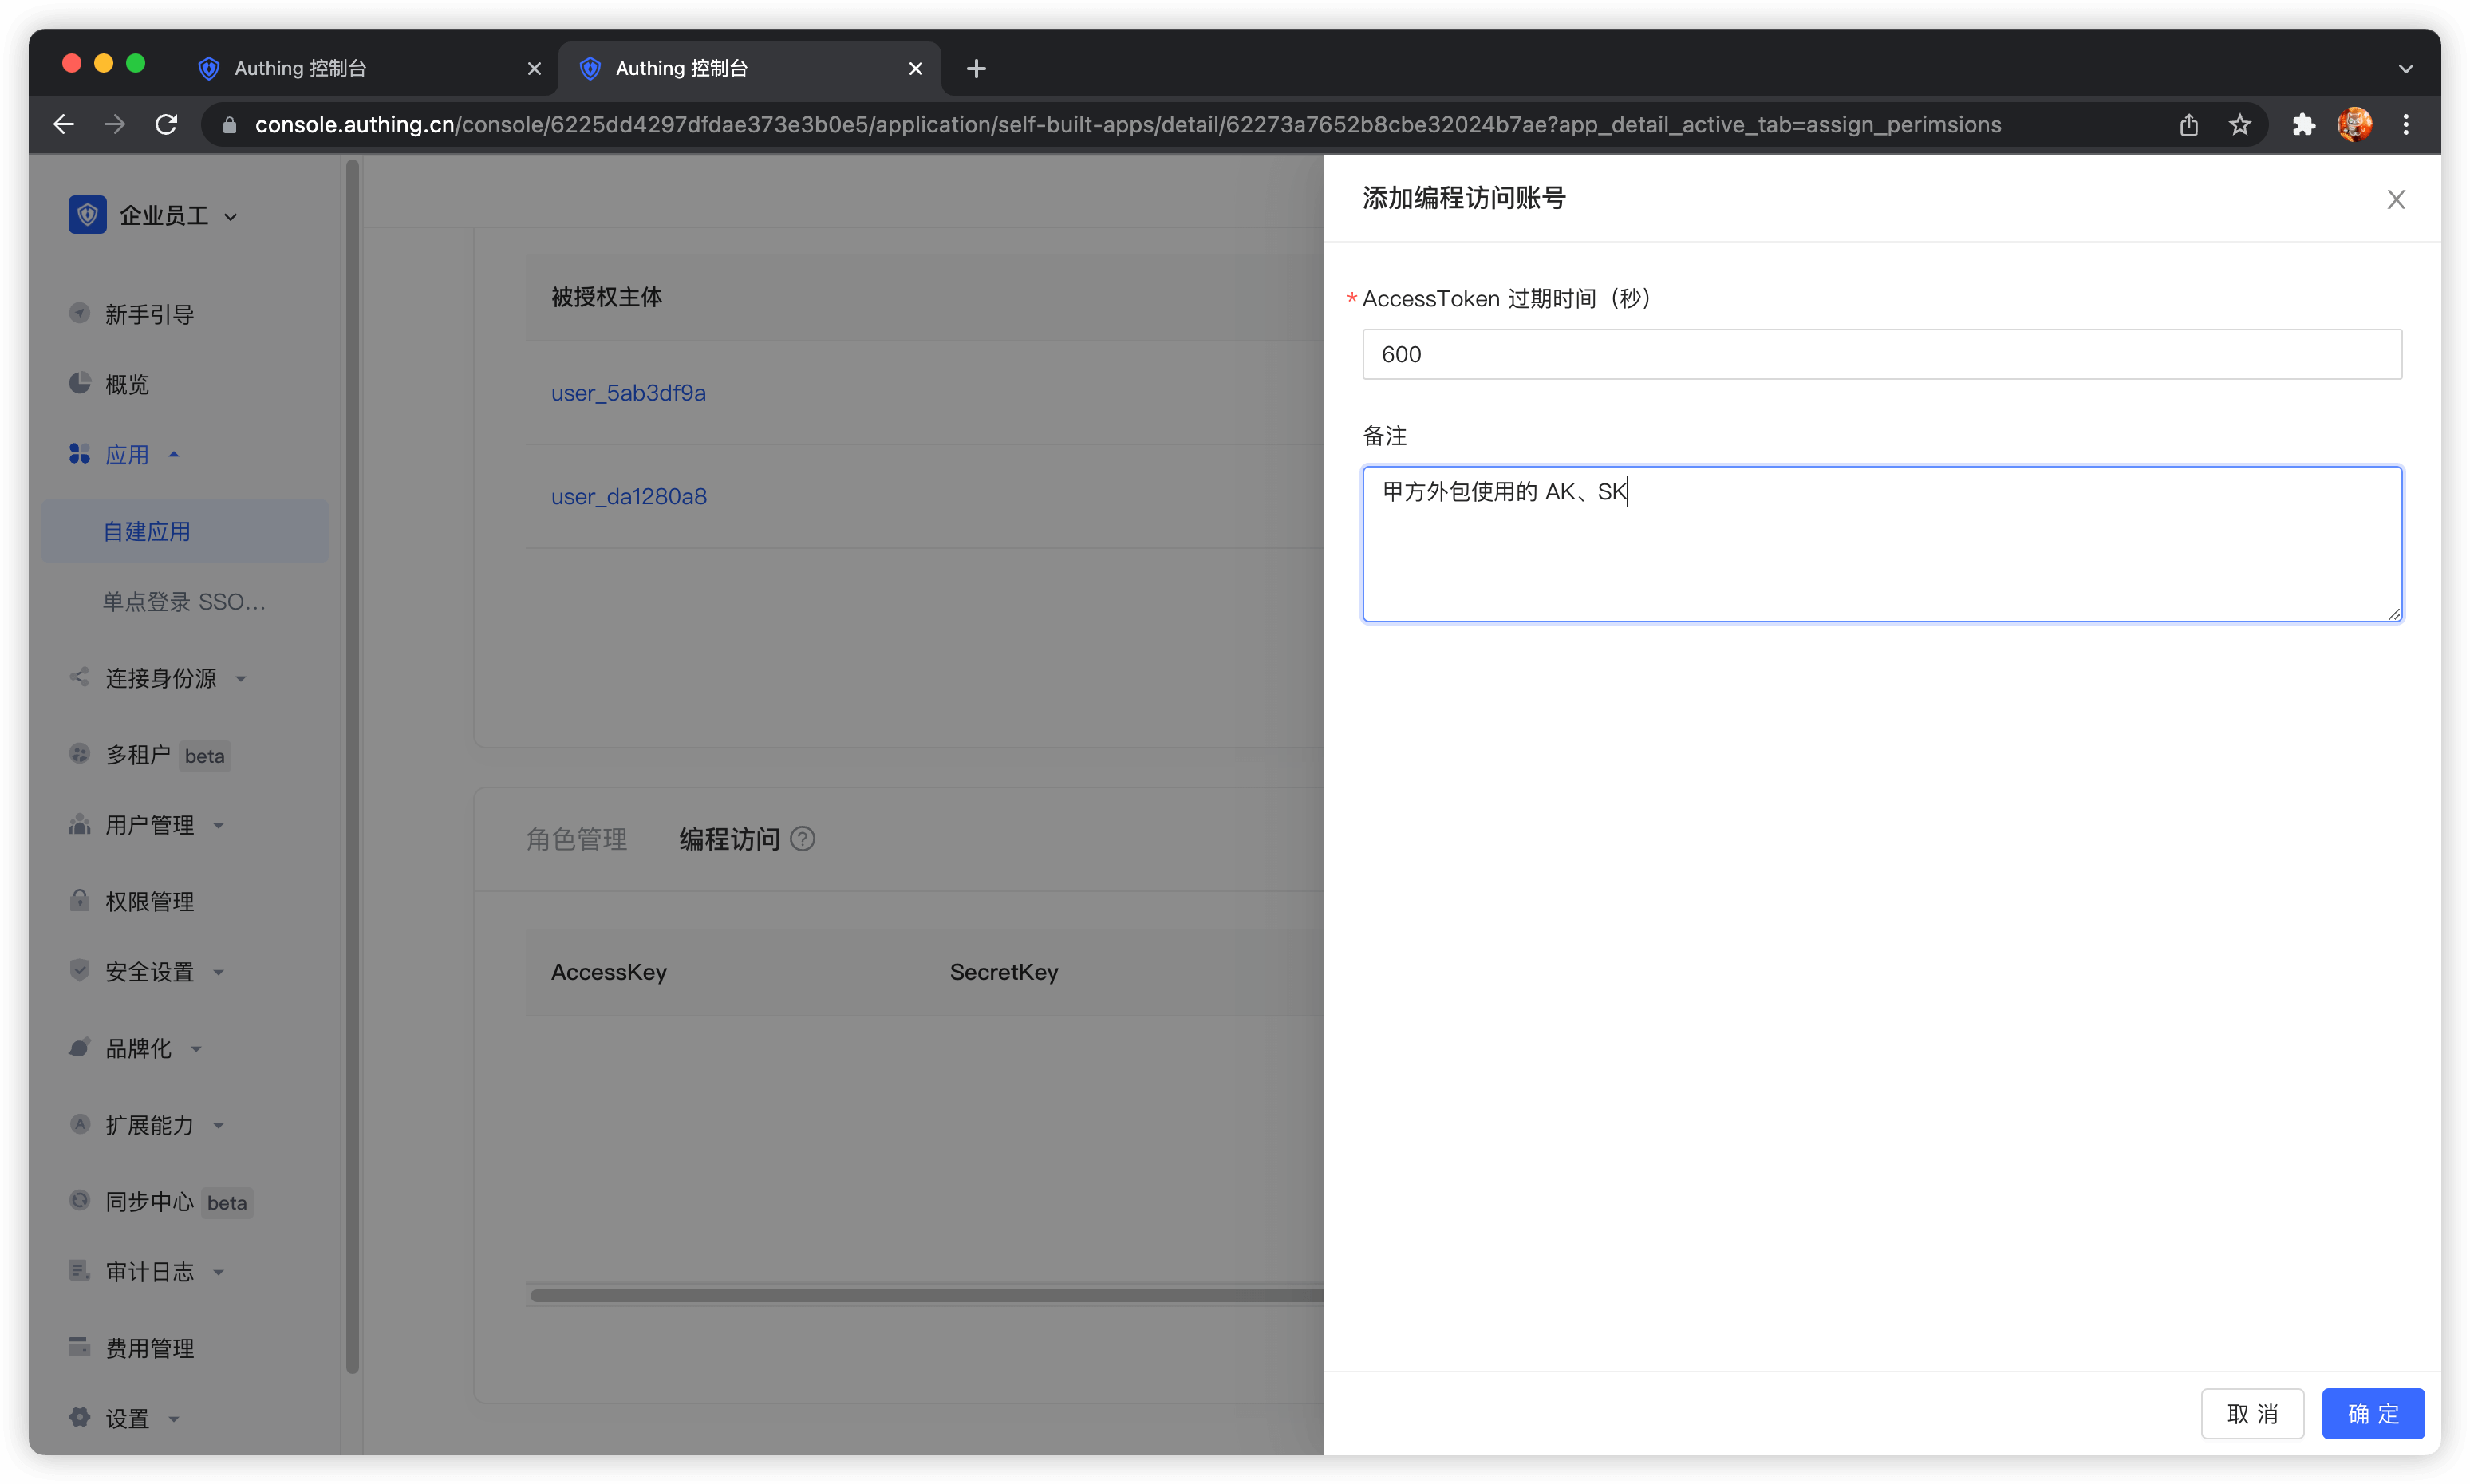
AccessToken expiration time
When you create a programmatic access account, you need to specify the AccessToken expiration time. GenAuth uses the RS256 signature algorithm to sign when issuing AccessToken to ensure that AccessToken cannot be tampered with.
Token signature is part of JWT. For more information, please refer to JWT Interpretation and Use.
RS256 is an asymmetric signature algorithm. GenAuth holds the private key to sign the token, and the consumer of JWT uses the public key to verify the signature. The RS256 signature algorithm has the following benefits:
- Anyone can verify the signature using the application public key, and the signer must be GenAuth.
- There is no risk of private key leakage. If you use HS256 but leak the application key, you need to refresh the key and redeploy all APIs. For more information about signature issues, please refer to Verify Token.
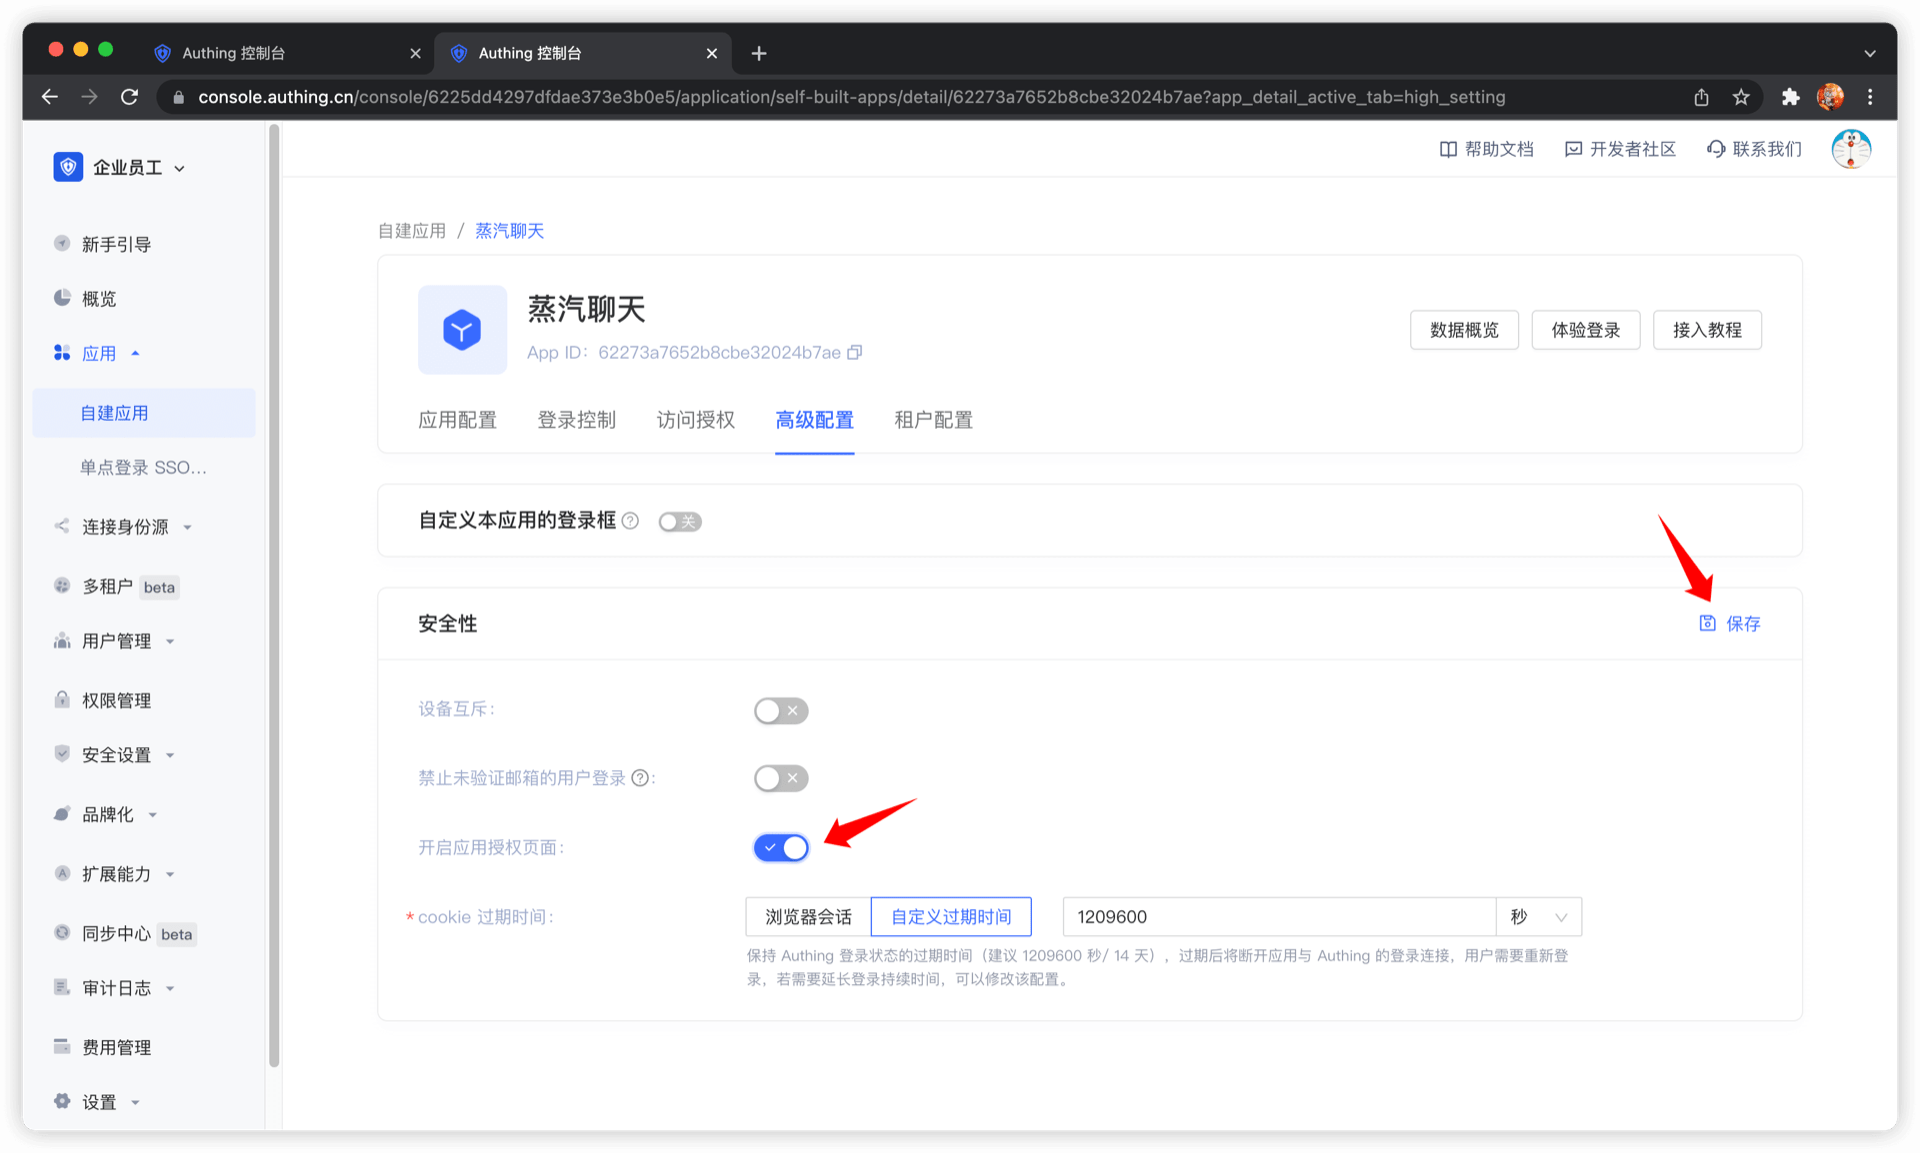
Display the confirmation page
When business software and identity data are not controlled by the same party, as an identity provider, you need to show the [Confirmation](https://docs.genauth.ai/docs/concepts/authentication-vs-authorization#Authentication Authorization Confirmation and Authentication) page to users. In this case, your company controls the identity data and your partner company controls the business software, so when they obtain user data, you as an identity provider are obliged to inform end users which user data (such as mobile phone number, email address) and resource permissions other companies need to obtain.
You can open the application authorization page in Console > Application > Application Details > "Advanced Configuration" tab.
Get an AccessToken with permissions
The caller needs to obtain resource authorization from the resource party through OIDC authorization code mode. The user of the resource party will participate in the authorization process. After the user's authorization, GenAuth will issue an AccessToken with permission scope and the subject is the resource holder. First, you need to splice the authorization link:
https://{application domain name}.genauth.ai/oidc/auth?client_id={application ID}&response_type=code&scope=openid email message&redirect_uri={caller business address}&state={random string}The scope parameter can be filled with the resource and corresponding operation defined in the above steps. The specific format is as follows.
Scope permission item specification
GenAuth scope permission items are separated by spaces, and the format of each item is resource identifier: resource operation.
The following are all scope formats supported by GenAuth:
book:1:read means the read permission for the book resource numbered 1
book:*:read means the read permission for all book resources
book:read means the read permission for all book resources
book:*:* means all operation permissions for all book resources
book:* means all operation permissions for all book resources
book means all operation permissions for all book resources
*:*:* means all operation permissions for all resources
*:* means all operation permissions for all resources
* means all operation permissions for all resources
For example, the message resource and the create operation of the message resource are defined above, and the message:create content can be filled in the scope here.
The caller should guide the user to click this link. After the user clicks, he will jump to the authentication page.
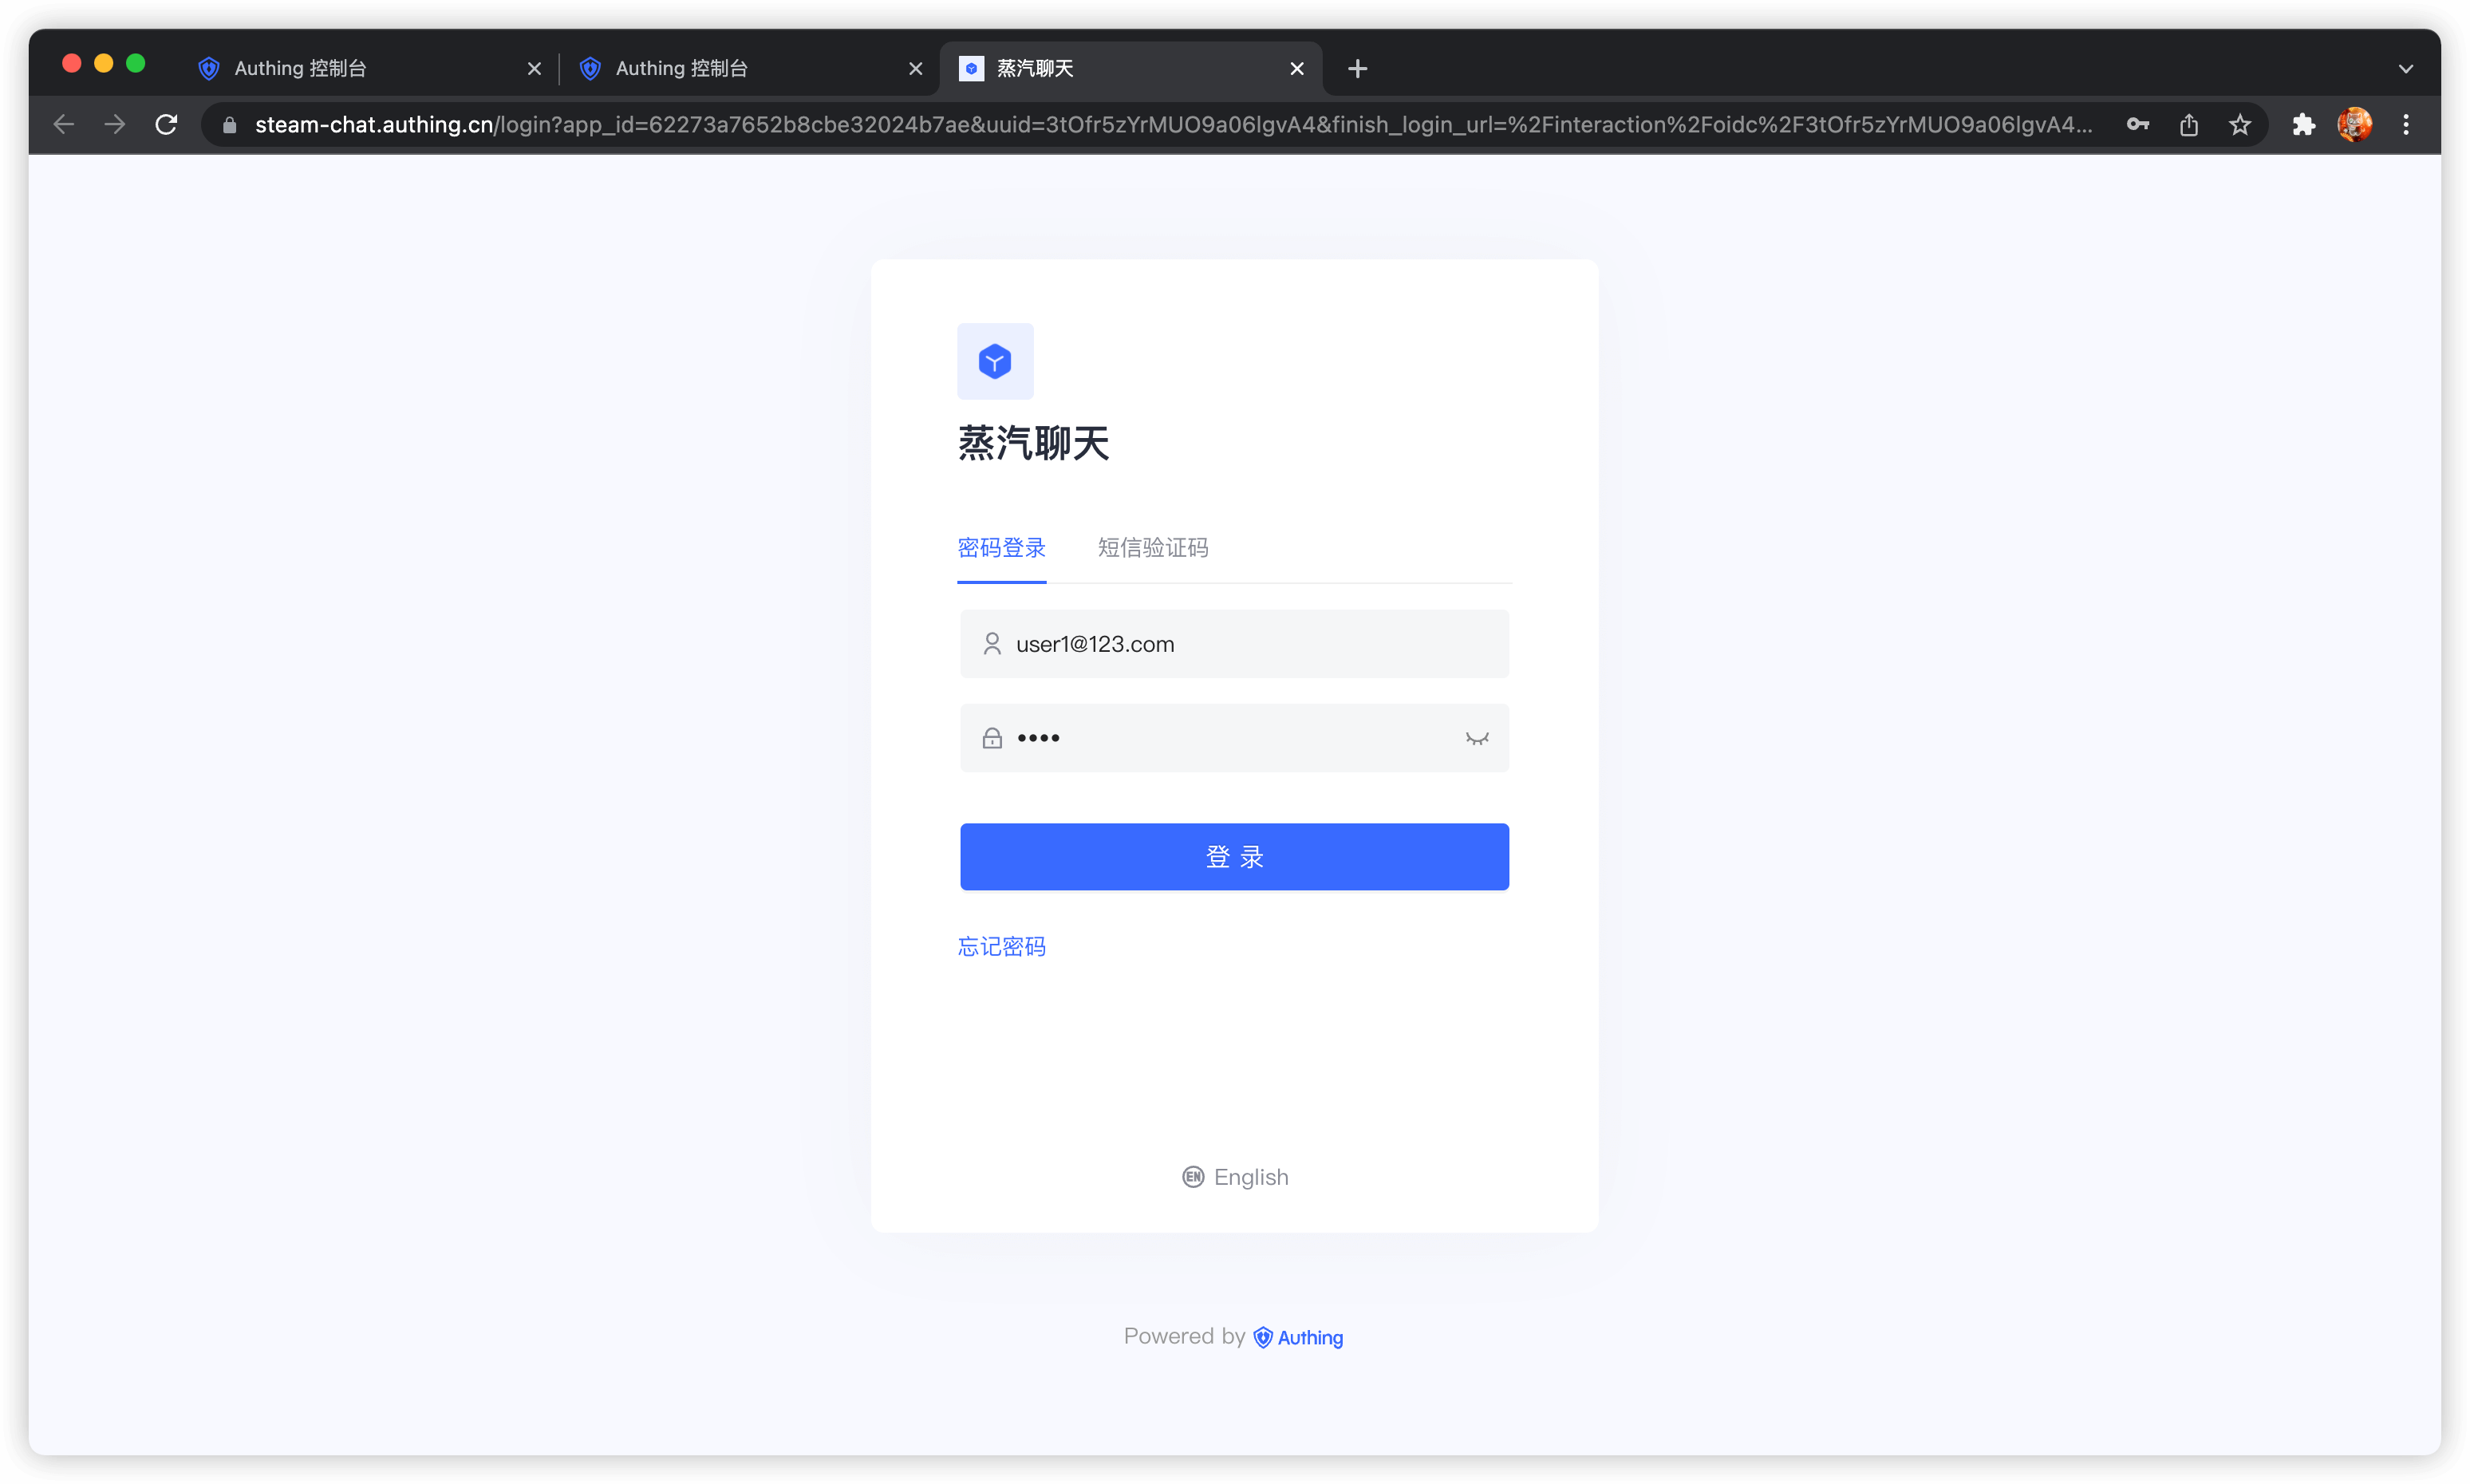
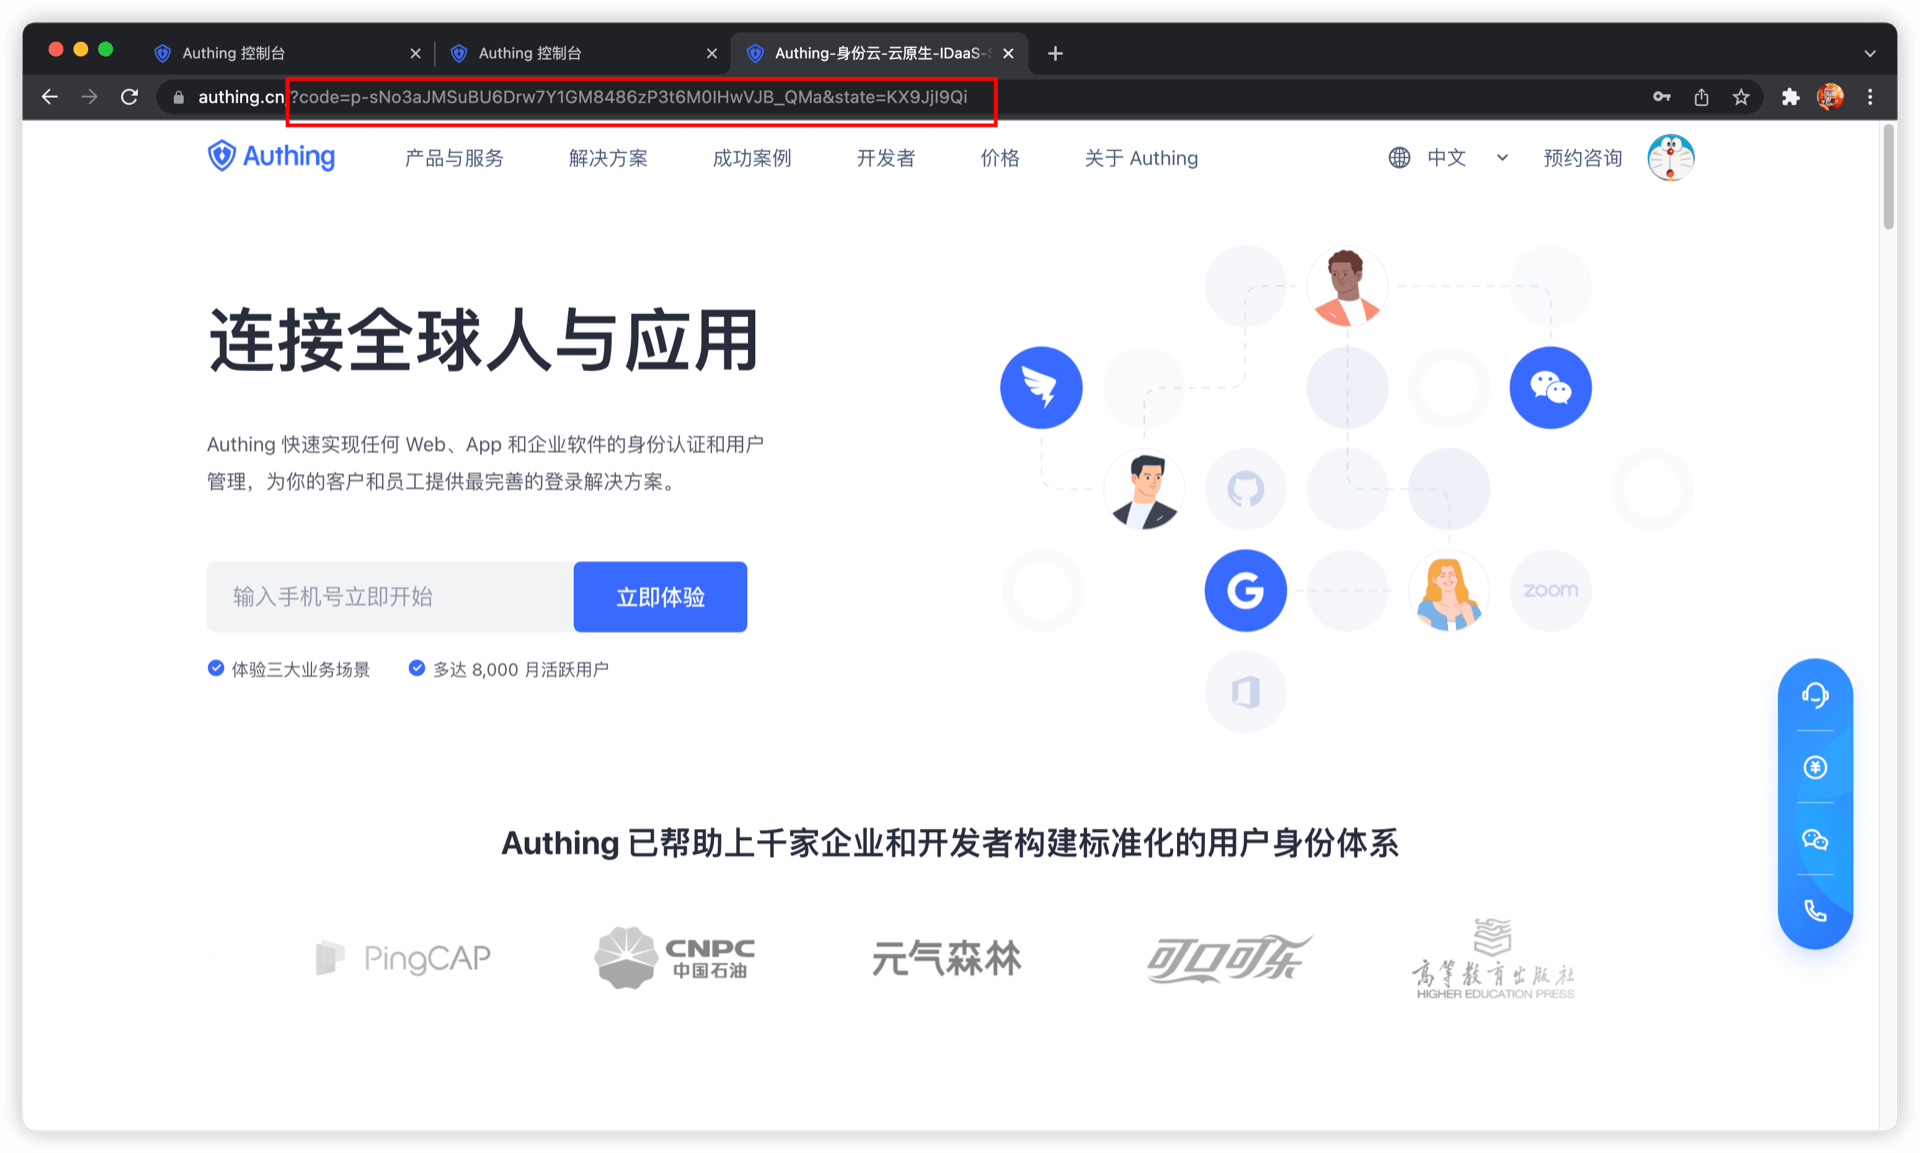
After the user completes the login, the user will be redirected to the caller's business address. The URL carries the authorization code parameter.
Next, you need to use the authorization code code and the Key and Secret of the programmatic access account to exchange for the user's AccessToken and IdToken. For more information about the OIDC authorization code mode, please see the [document](https://docs.genauth.ai/authentication/oidc/oidc-authorization#Use the authorization code mode-authorization-code-flow).
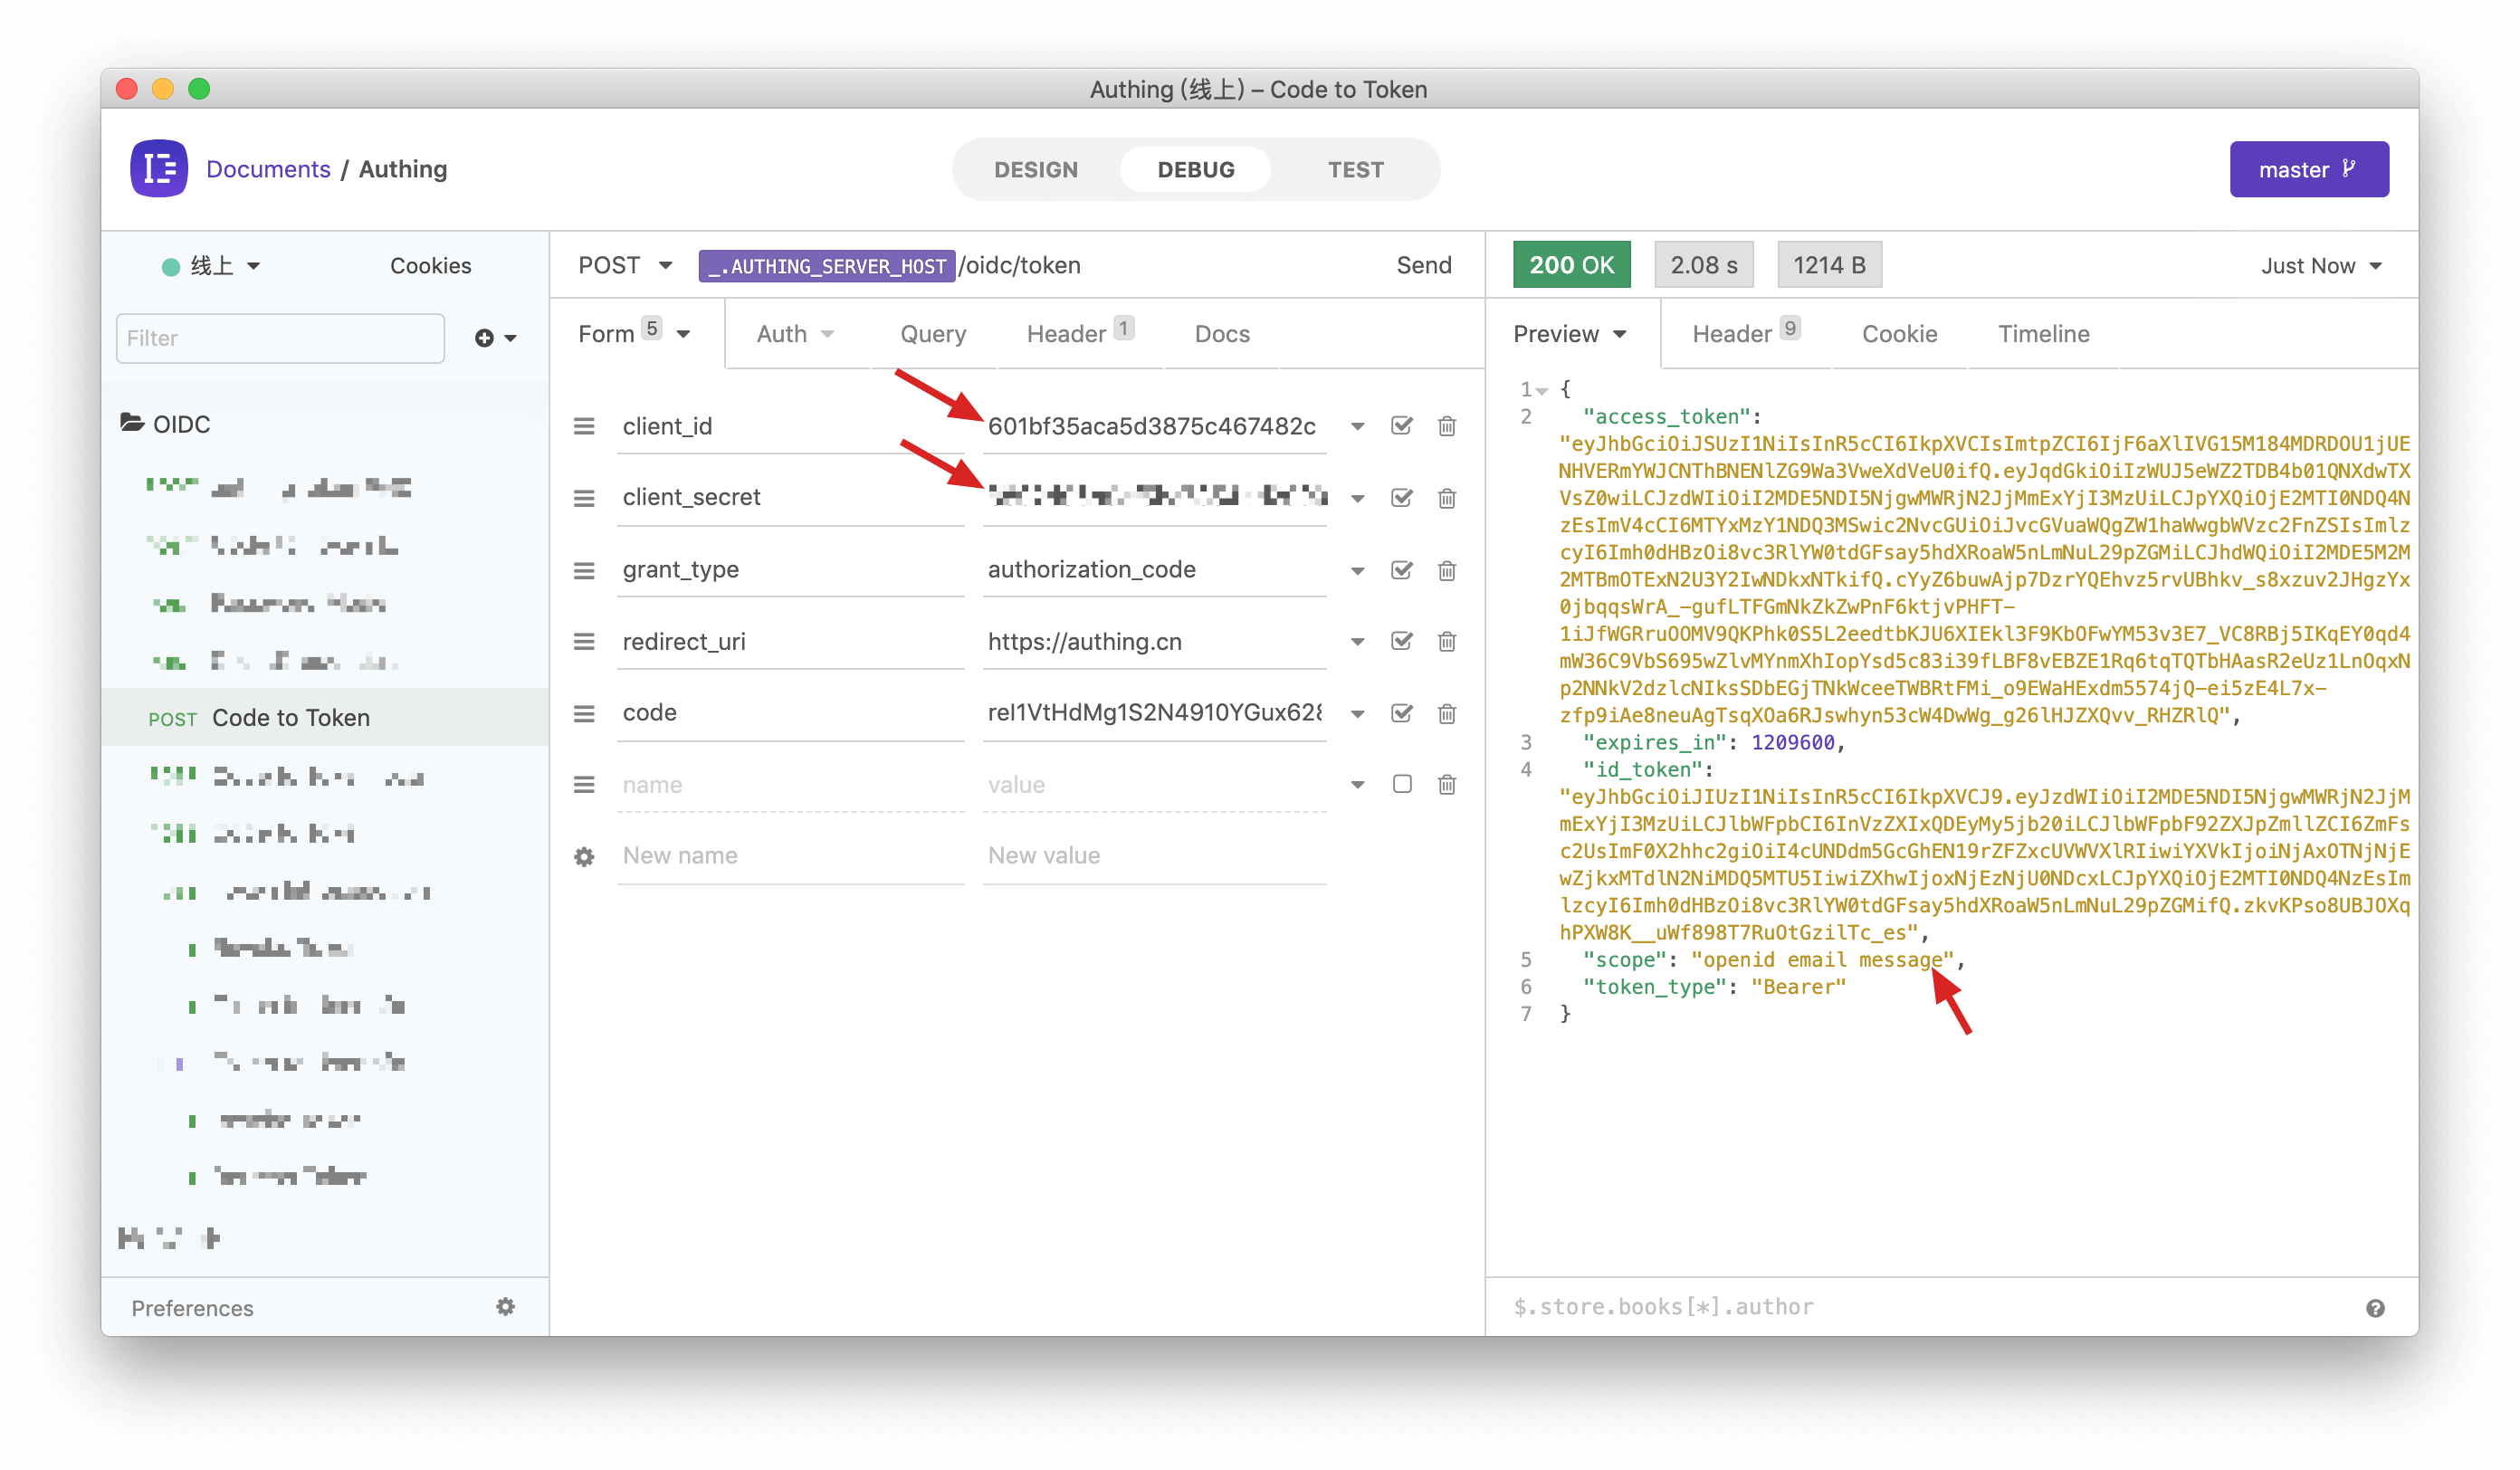
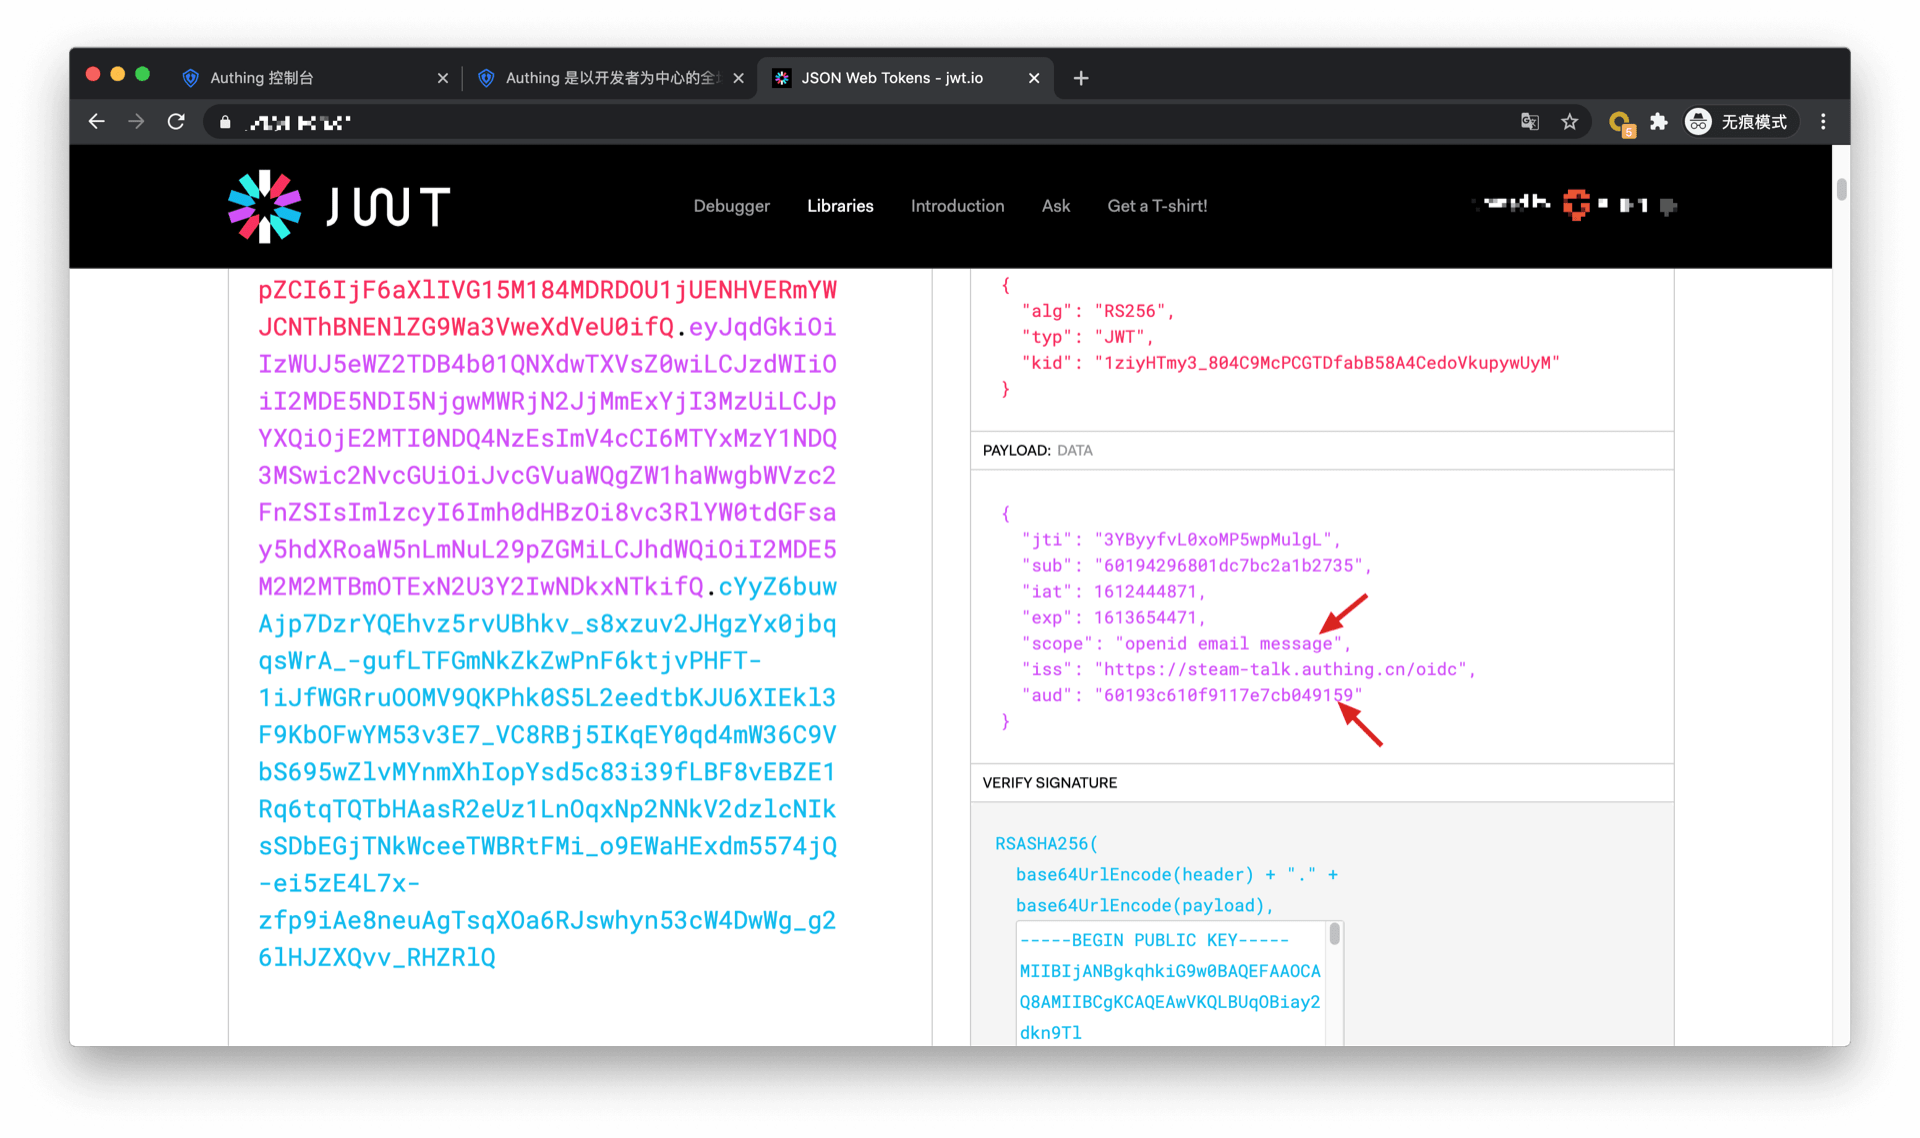
You can see that the user's AccessToken has the message permission scope. The audience (aud) of the token is the programmatic access account Key. The meaning of AccessToken is: the caller aud has the scope permission of resource owner sub, and the issuer iss. The resource party can perform permission verification based on the information in the AccessToken.
Add API authentication interceptor
After defining the API in GenAuth, you need to add an API authentication interceptor to your actual business API interface. For protected resources, only visitors with a valid AccessToken and the required permissions are allowed. The code example is as follows:
var express = require("express");
var app = express();
var jwt = require("express-jwt");
var jwks = require("jwks-rsa");
var port = process.env.PORT || 8080;
var jwtCheck = jwt({
  secret: jwks.expressJwtSecret({
    cache: true,
    rateLimit: true,
    jwksRequestsPerMinute: 5,
    jwksUri: "https://{app domain name}.genauth.ai/oidc/.well-known/jwks.json",
  }),
  audience: "{programming access account ID}",
  issuer: "https://{app domain name}.genauth.ai/oidc",
  algorithms: ["RS256"],
});
// Check the legitimacy of AccessToken
app.use(jwtCheck);

app.post("/article", function (req, res) {
  // Check if AccessToken has the required permissions
  if (!req.user.scope.split(" ").incldues("write:article")) {
    return res.status(401).json({ code: 401, message: "Unauthorized" });
  }
  res.send("Secured Resource");
});

app.listen(port);
For more information about Token verification, please refer to Verify Token.
Frequently Asked Questions
What does it mean if the user refuses authorization?
If you open the authorization page and the user clicks "Reject" on the authorization page. Then the initiator of the authentication authorization request (in this case, your partner company) cannot obtain any user information and Token of the user.
What should I do after the user refuses authorization?
If you are an application developer, you should guide users to click "Allow" and inform them that their data and permissions will not be abused. If the user clicks "Reject", GenAuth will redirect the browser to the application's business callback address (the same as the success address), carrying error and error_description parameters in the URL query. If your backend receives the error parameter, you can show the user a friendly login failure page and guide the user to re-initiate authentication and authorization.
The sample code for handling user refusal of authorization is as follows:
app.get("/oidc/callback", async (req, res) => {
  if (req.query.error) {
    // You can record logs
    console.log("User cancels authorization, login failed");
    // You can render the failure page, tell the user to click the Allow Authorization button, and guide the user to re-initiate login
    res.render("login-error", {
      error: req.query.error,
      error_description: req.query.error_description,
    });
  } else {
    // ...Normal login logic...
  }
});
If you are an identity provider and are responsible for managing user data, you don't need to do anything when the user refuses authorization.
M2M Authorization
M2M (Machine to Machine) authorization is no user involvement between applications. When you want to partially open your business API to others (such as your outsourcer), the outsourcer needs to first M2M authorization before they can access your business API. Suppose your company wants to develop a large-screen display of some data, and there are several outsourcers involved. You want to authorize the API access rights of some non-core data to the outsourcer, so that the outsourcer can complete this part of the non-core development. At this time, M2M authorization is required, because this process does not require user participation. We only need to determine which outsourcer the visitor is and which interfaces he has access to.
The following is the architecture diagram of this scenario. The outsourcer first obtains the Access Token from GenAuth, and then uses the Access Token to access the API interface of the company's service: 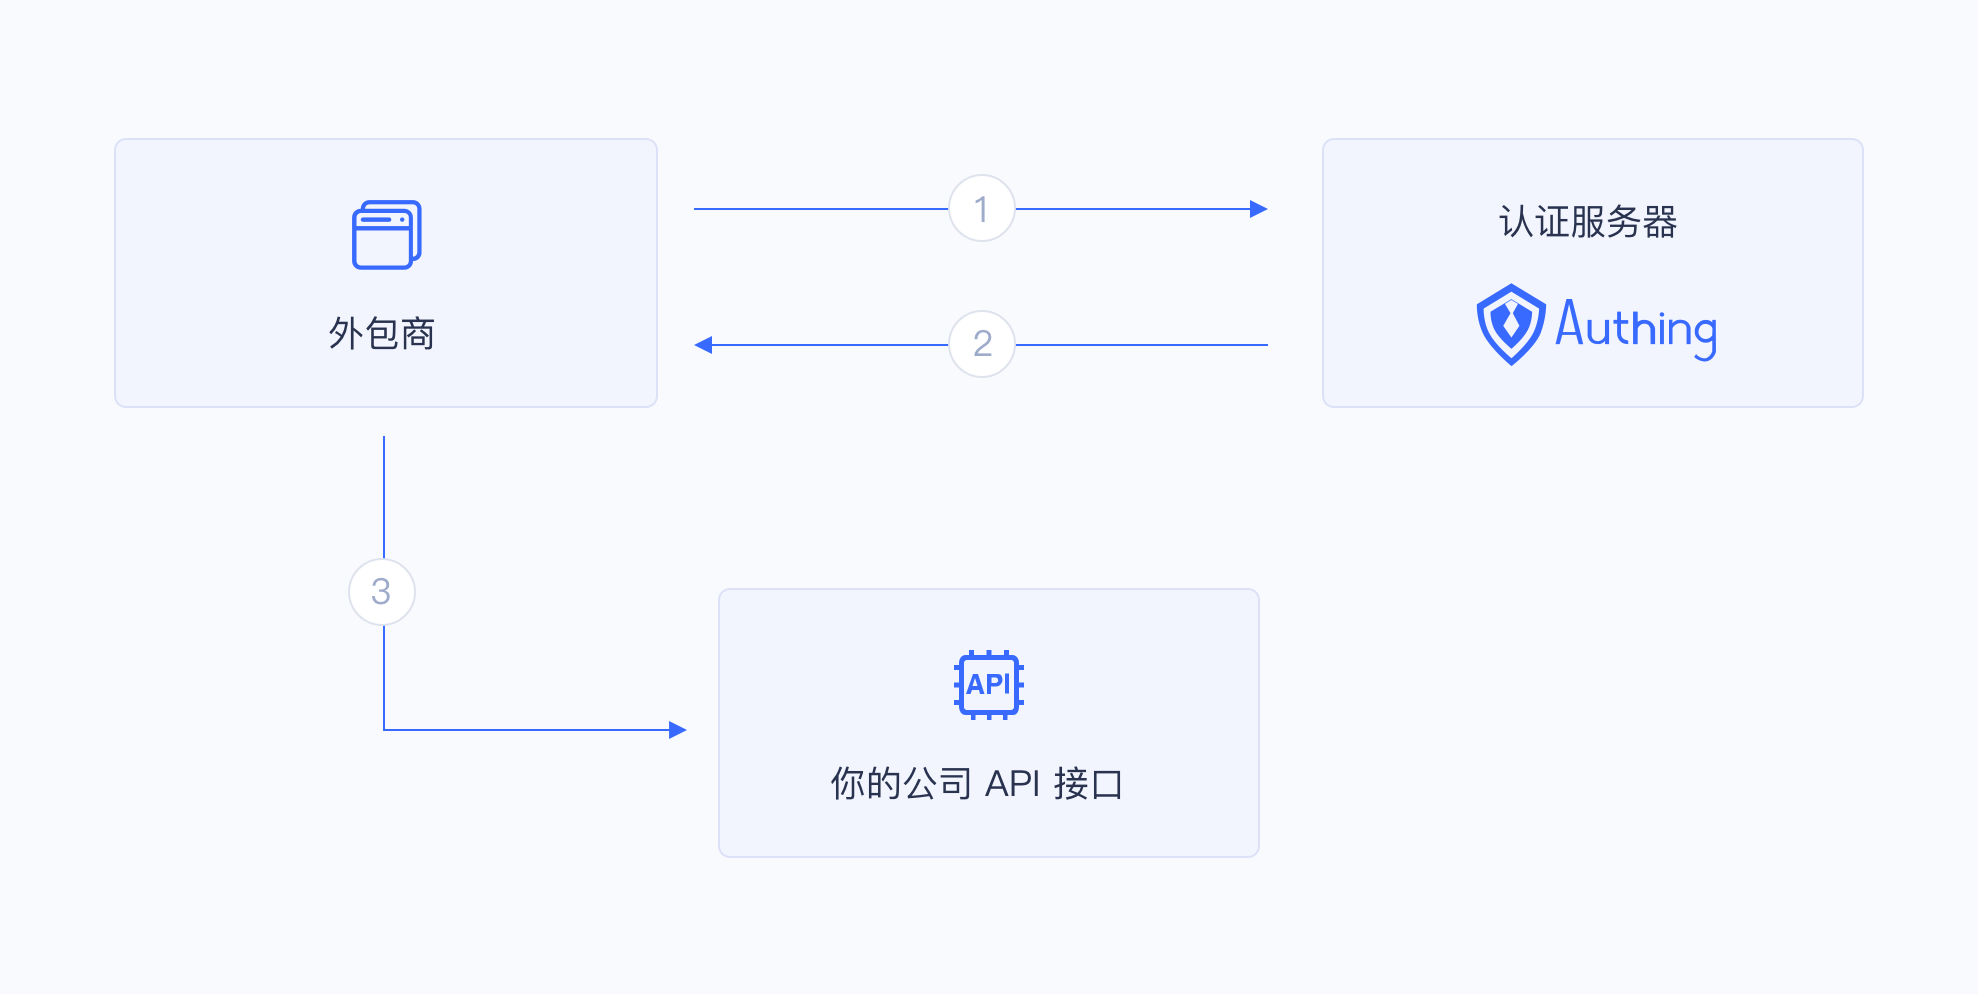
Permission management and allocation
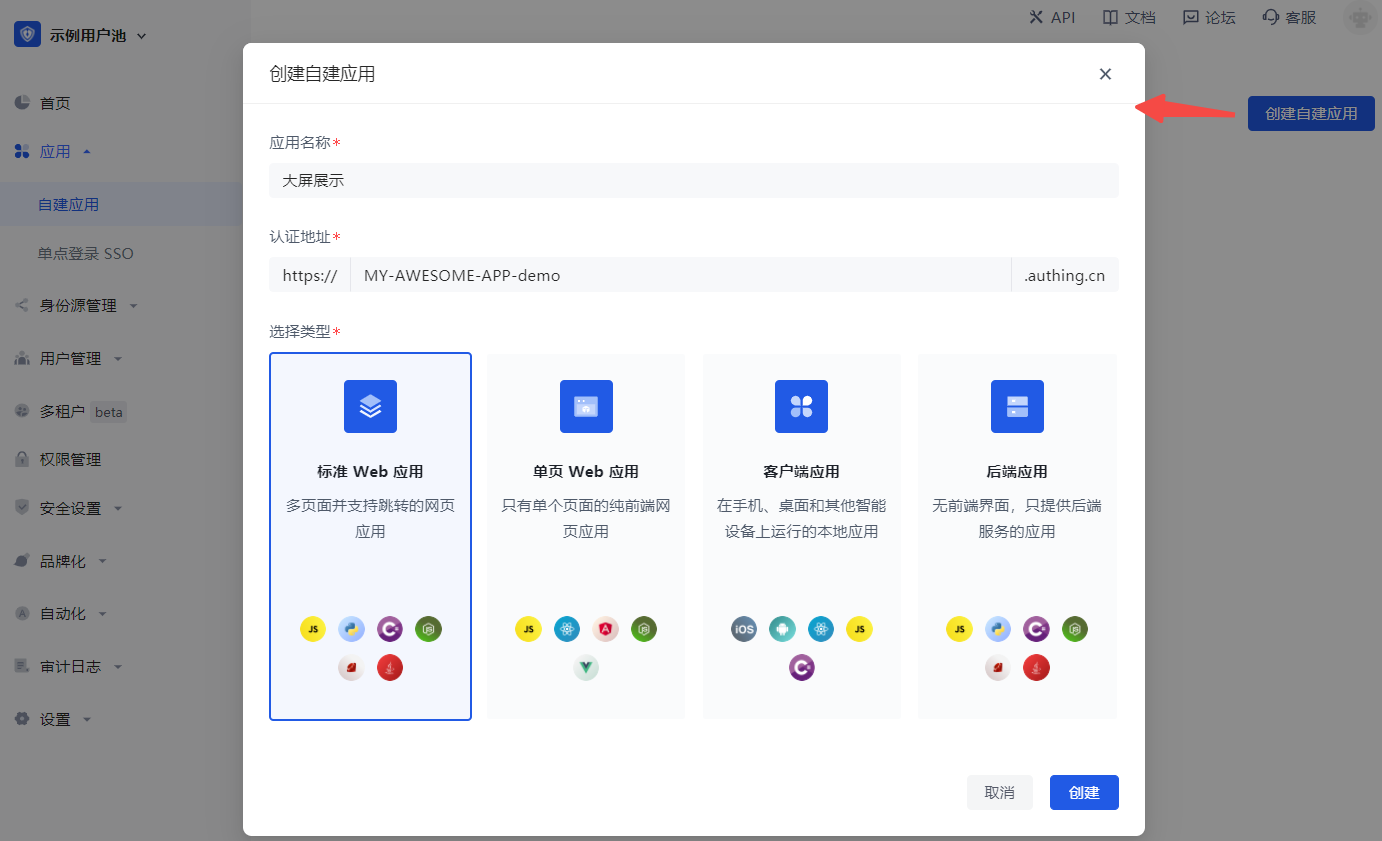
Create an application in GenAuth called "Big Screen Display".
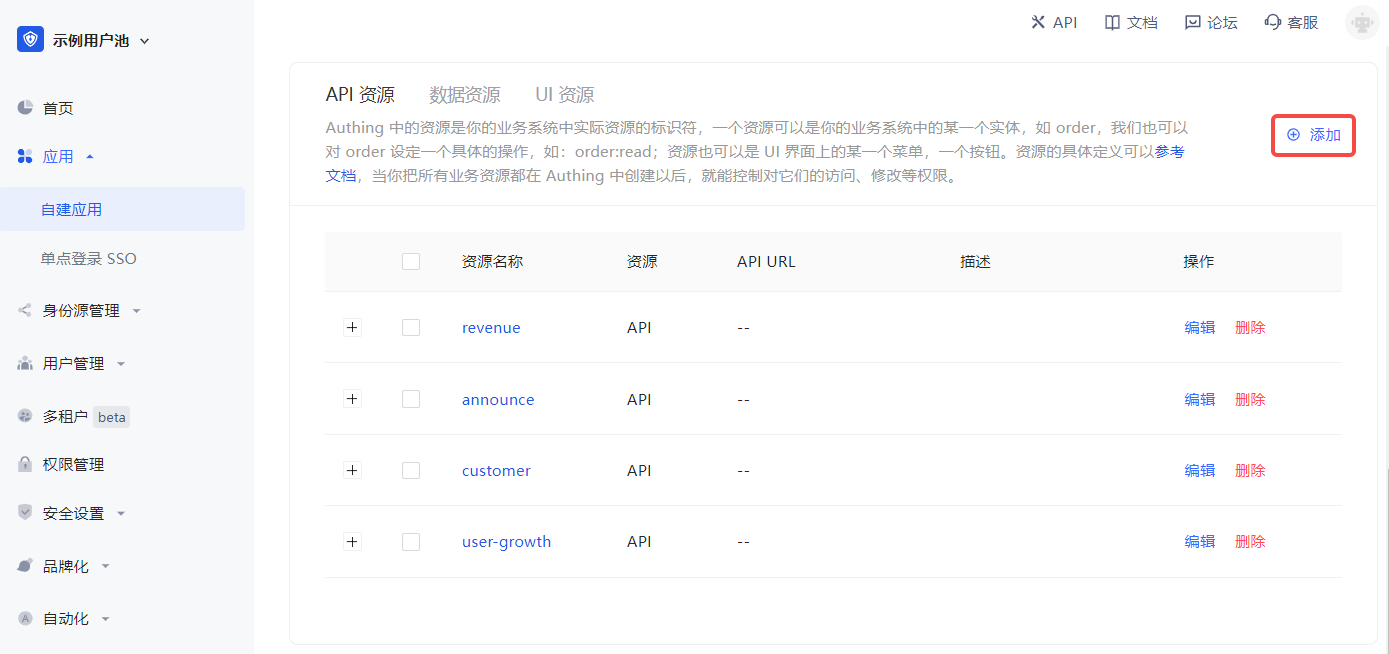
Define some resources under the "Big Screen Display" application (Access Authorization->API Resources), each of which corresponds to the actual resources in the "Big Screen Display" application. Here we add some resources, including user growth, customer, announcement, and revenue. The name of these resources is API scope.
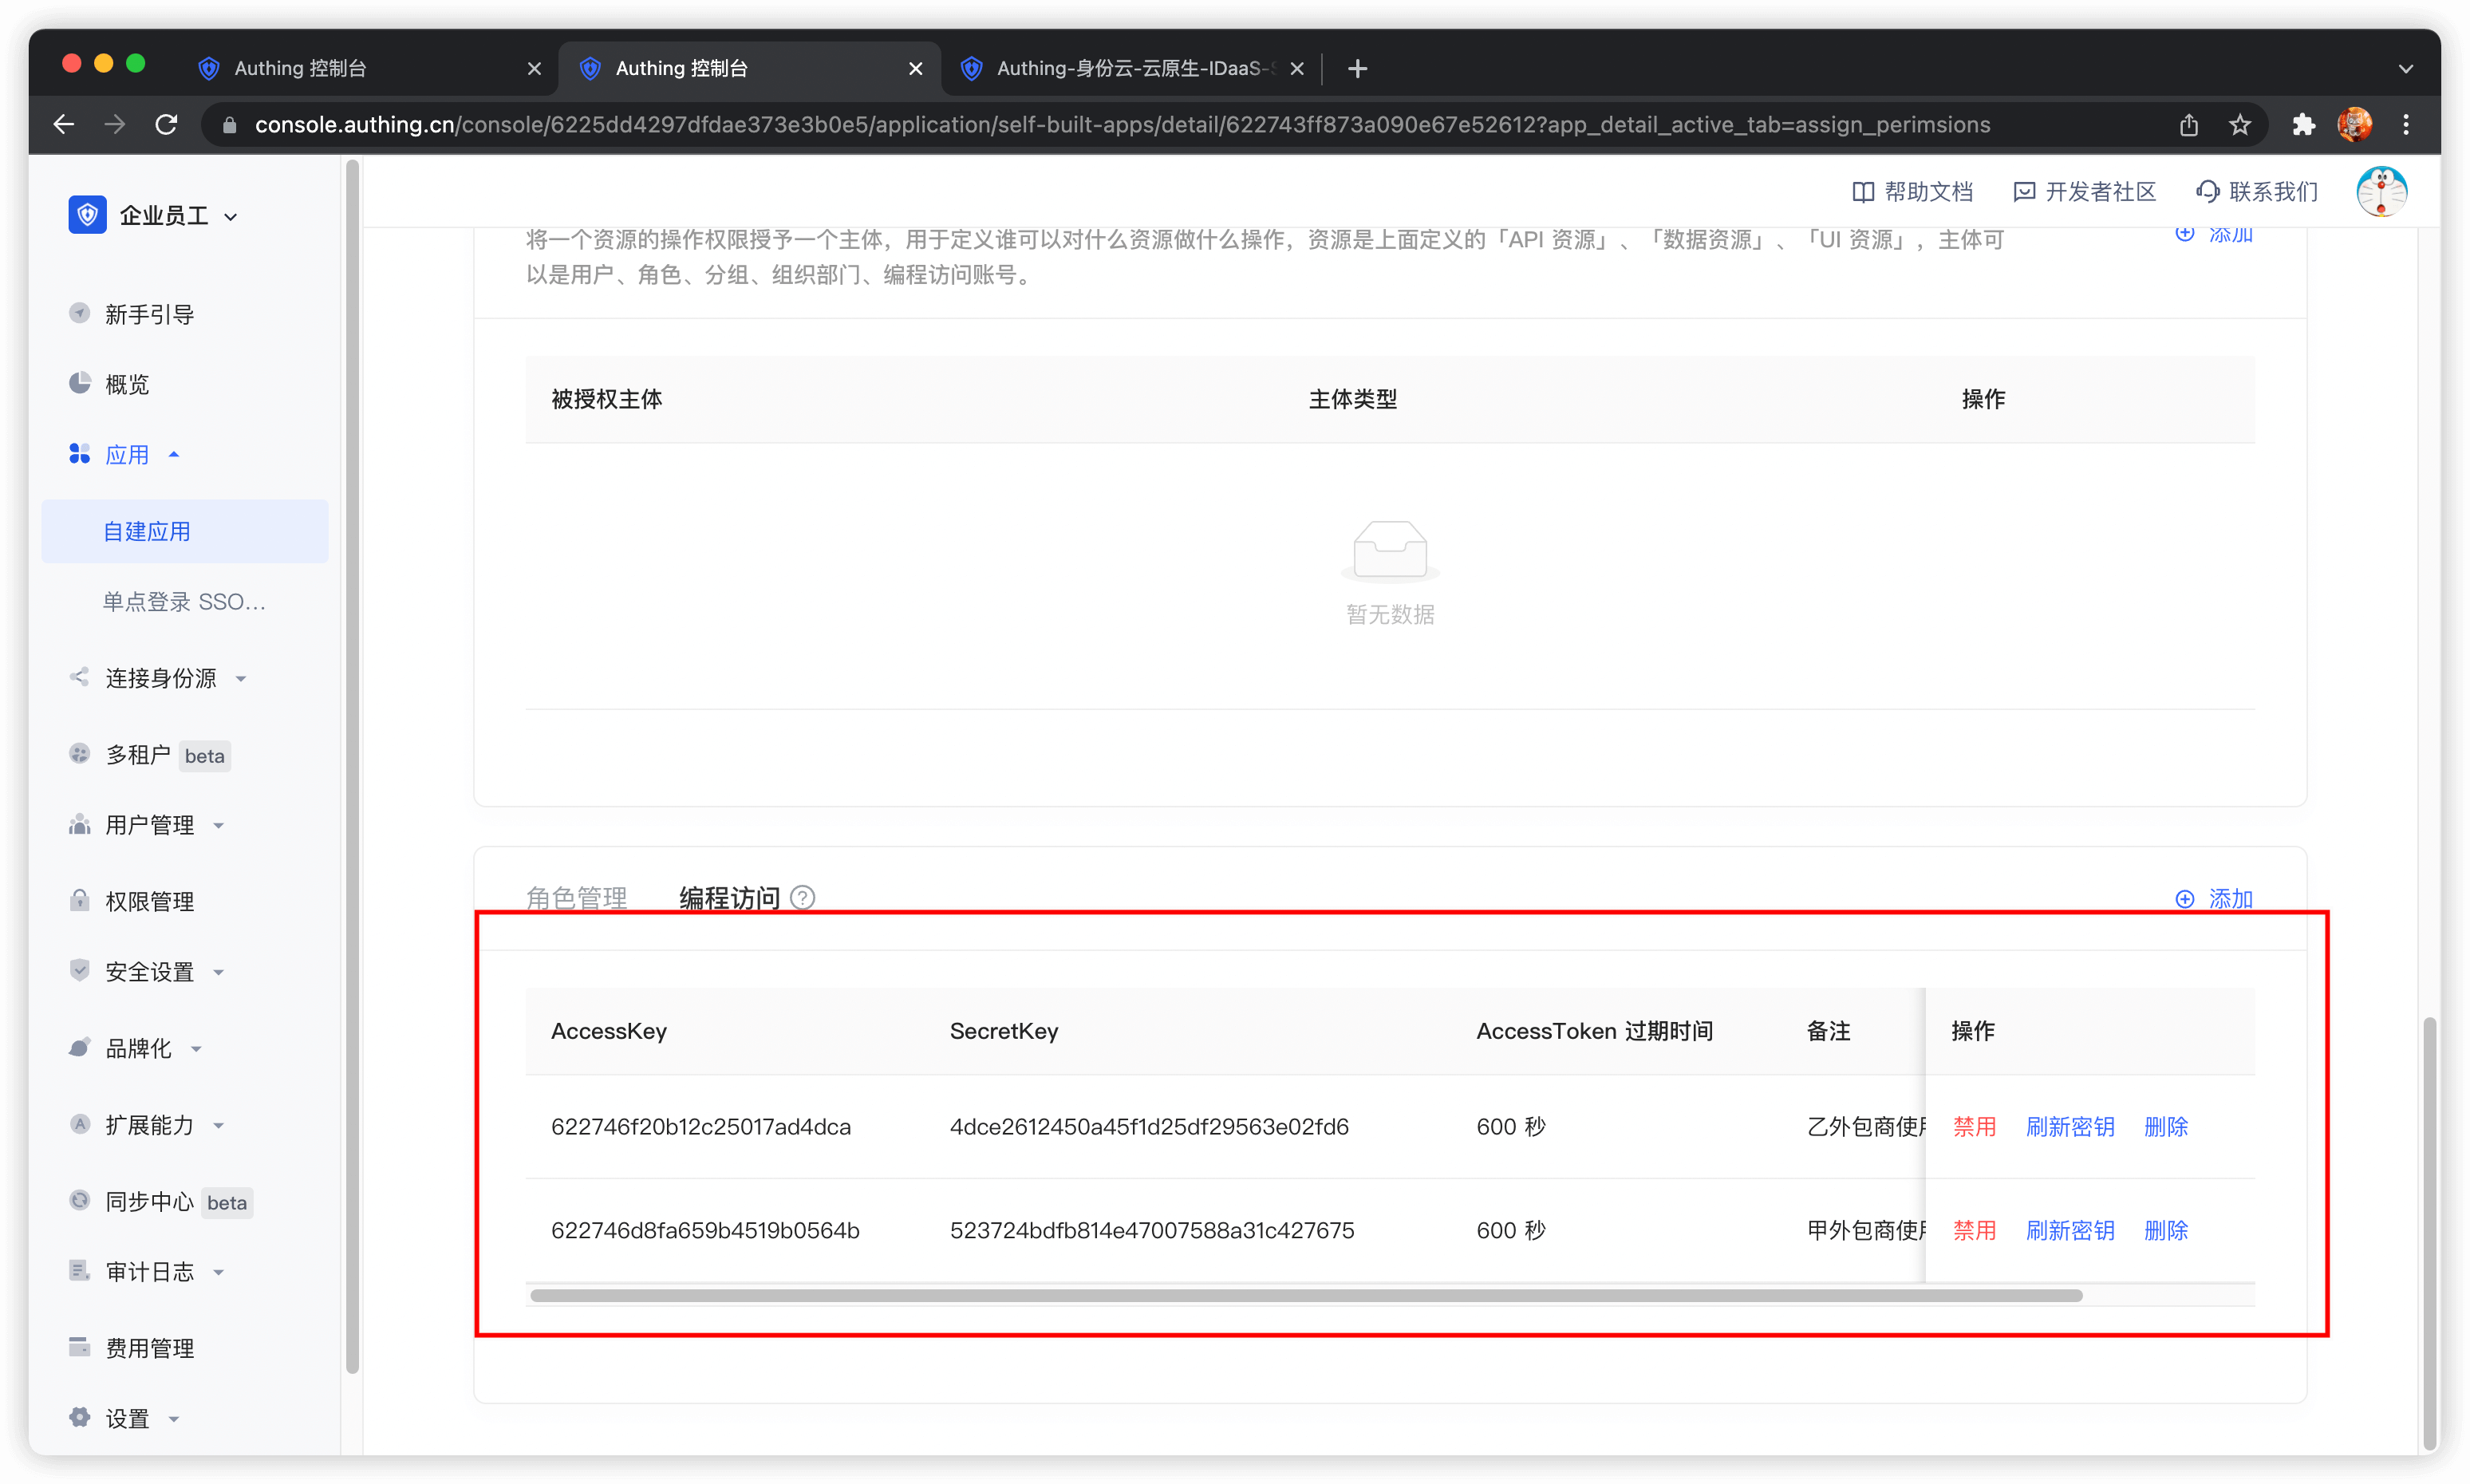
After defining the resources and operations, add a programming access account to the application. The programming access account is the caller of the current application API interface. Programmatic access account has a pair of AK and SK, which are used to give to outsourcers to call the "Large Screen Display" application interface. We can give AK and SK with different permissions to different outsourcers, so that they have different permissions and can access different APIs.
Create two programmatic access accounts, fill in the AccessToken expiration time and remarks, and click OK.

If the programmatic access account is deleted, the caller will lose the ability to obtain user authorization.
AccessToken expiration time
When you create a programmatic access account, you need to specify the AccessToken expiration time. GenAuth uses the RS256 signature algorithm to sign when issuing AccessToken to ensure that AccessToken cannot be tampered with.
Token signature is part of JWT. For more information, please refer to JWT Explanation and Use.
RS256 is an asymmetric signature algorithm. GenAuth holds the private key to sign the token, and the consumer of JWT uses the public key to verify the signature. The RS256 signature algorithm has the following benefits:
- Anyone can verify the signature using the application public key, and the signer must be GenAuth.
- No risk of private key leakage. If you use HS256 but leak the application key, you need to refresh the key and redeploy all APIs.
For more information about signature issues, please refer to Verify Token.
We have just created two programmatic access accounts, which will need to be handed over to outsourcers in the future.
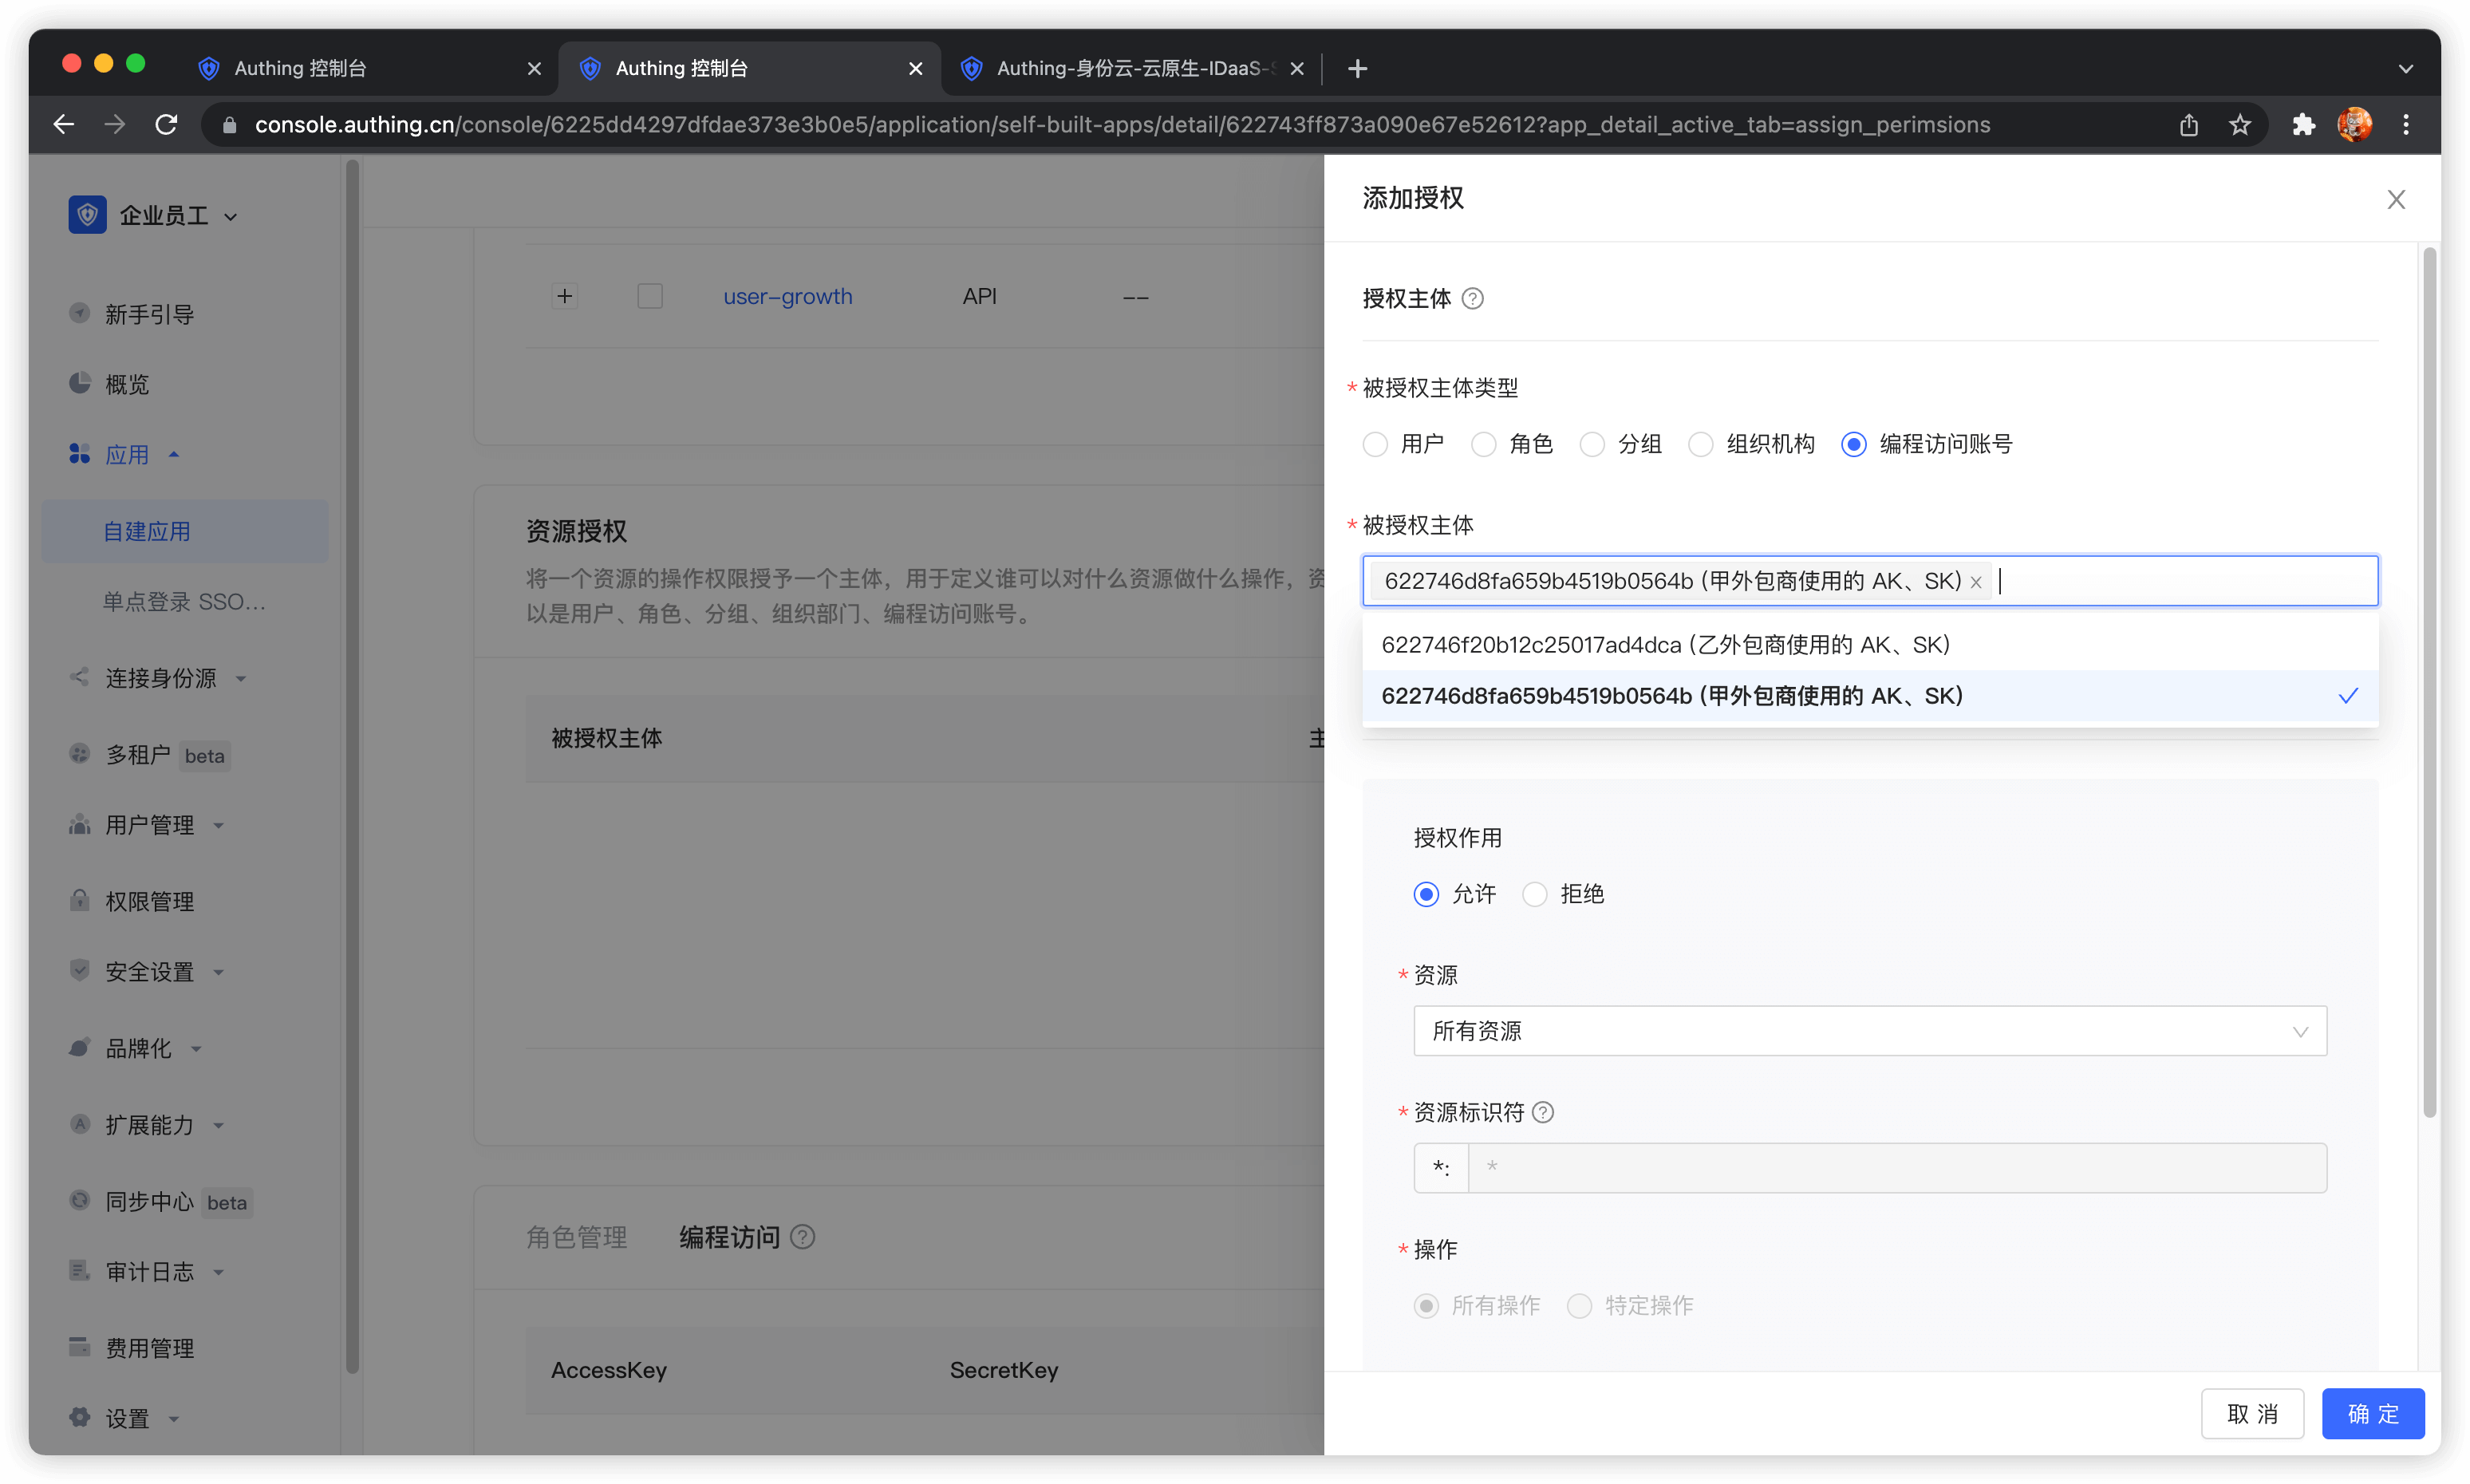
Next, we need to grant them resource permissions. In the Resource Authorization tab, click Add.
Select Programming access account as the authorized subject type, and then select the programming access account of outsourcing company A.
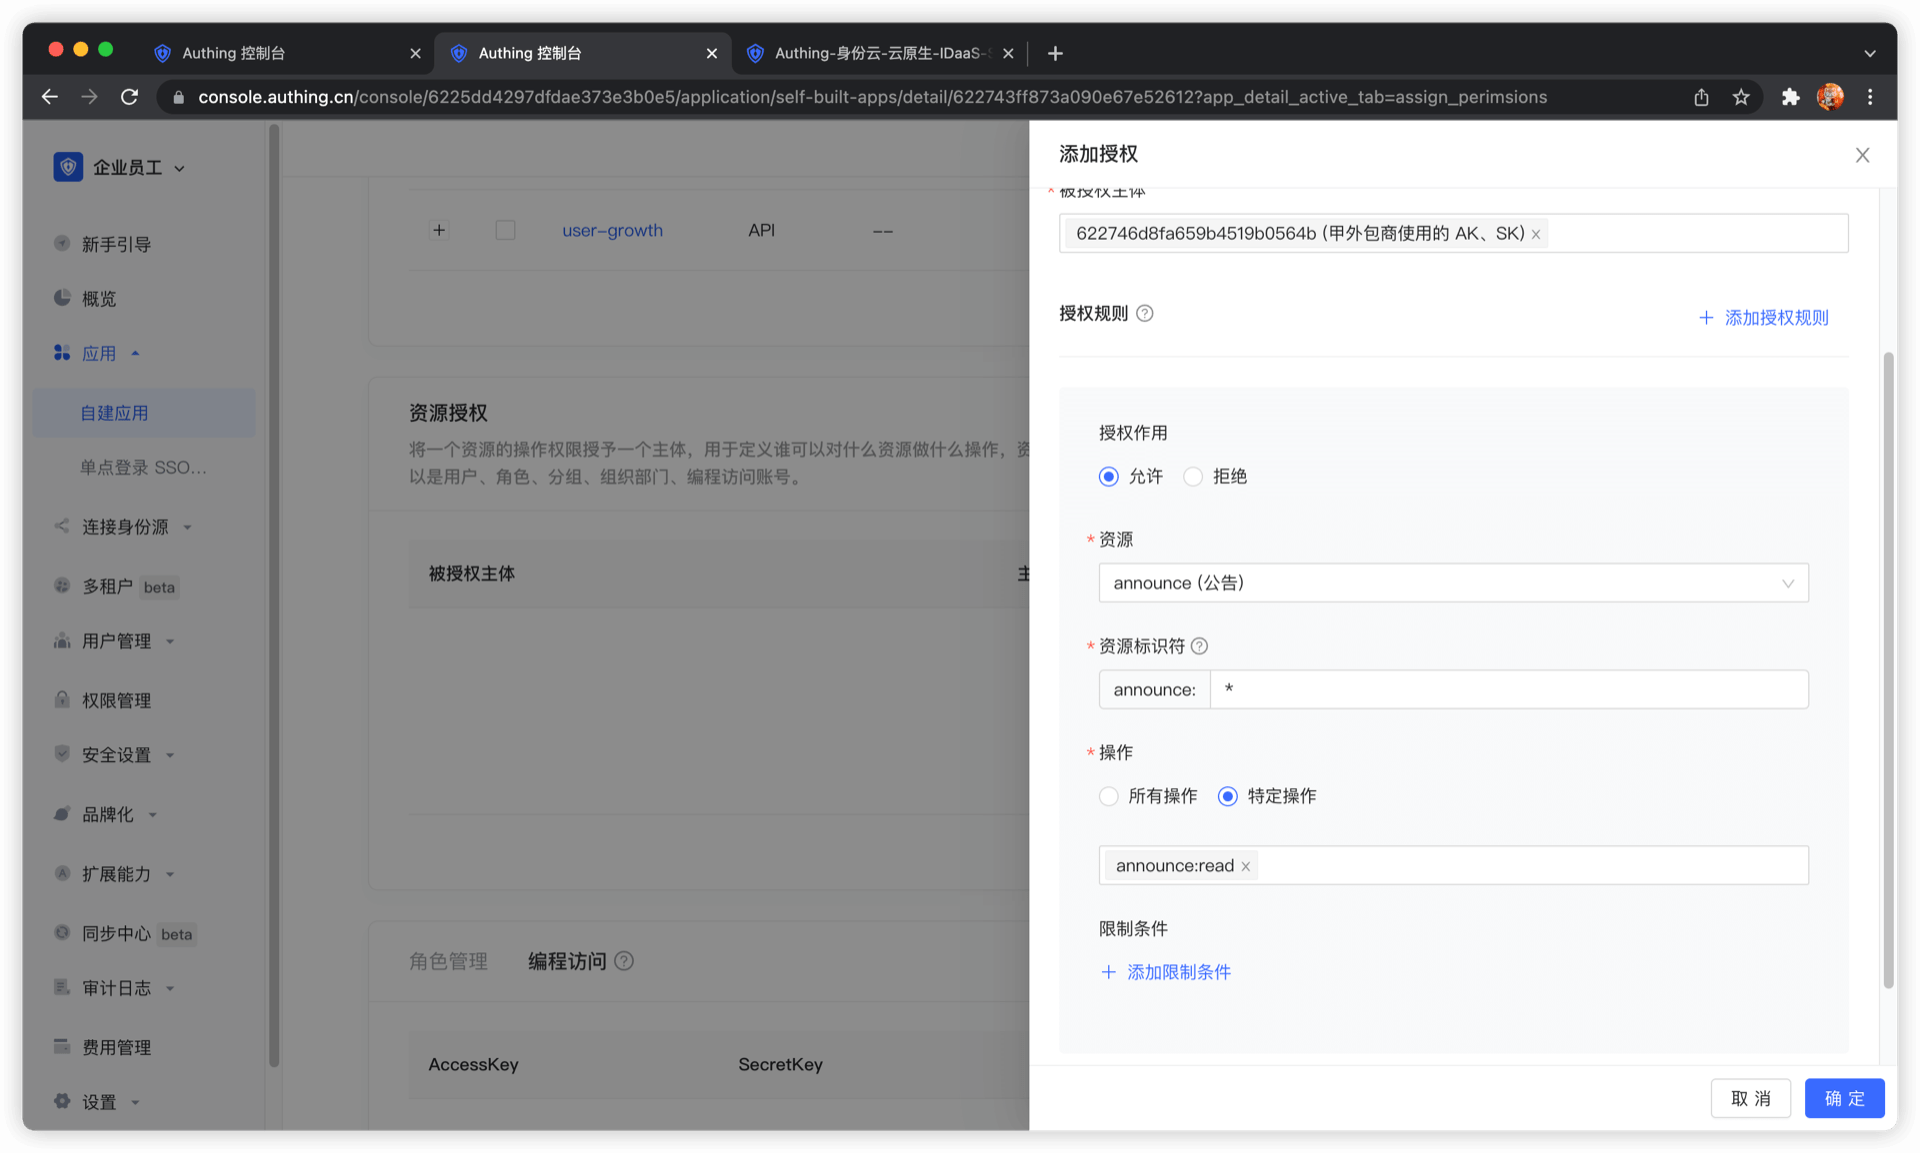
In the authorization rule, select Announcement Information for Resource Type, fill in * for Resource Identifier to authorize all announcement resources, select specific operation for operation, and then select announce:read operation. Finally, click OK. The purpose of this rule is to authorize Outsourcing Company A to read all announcement information resources.
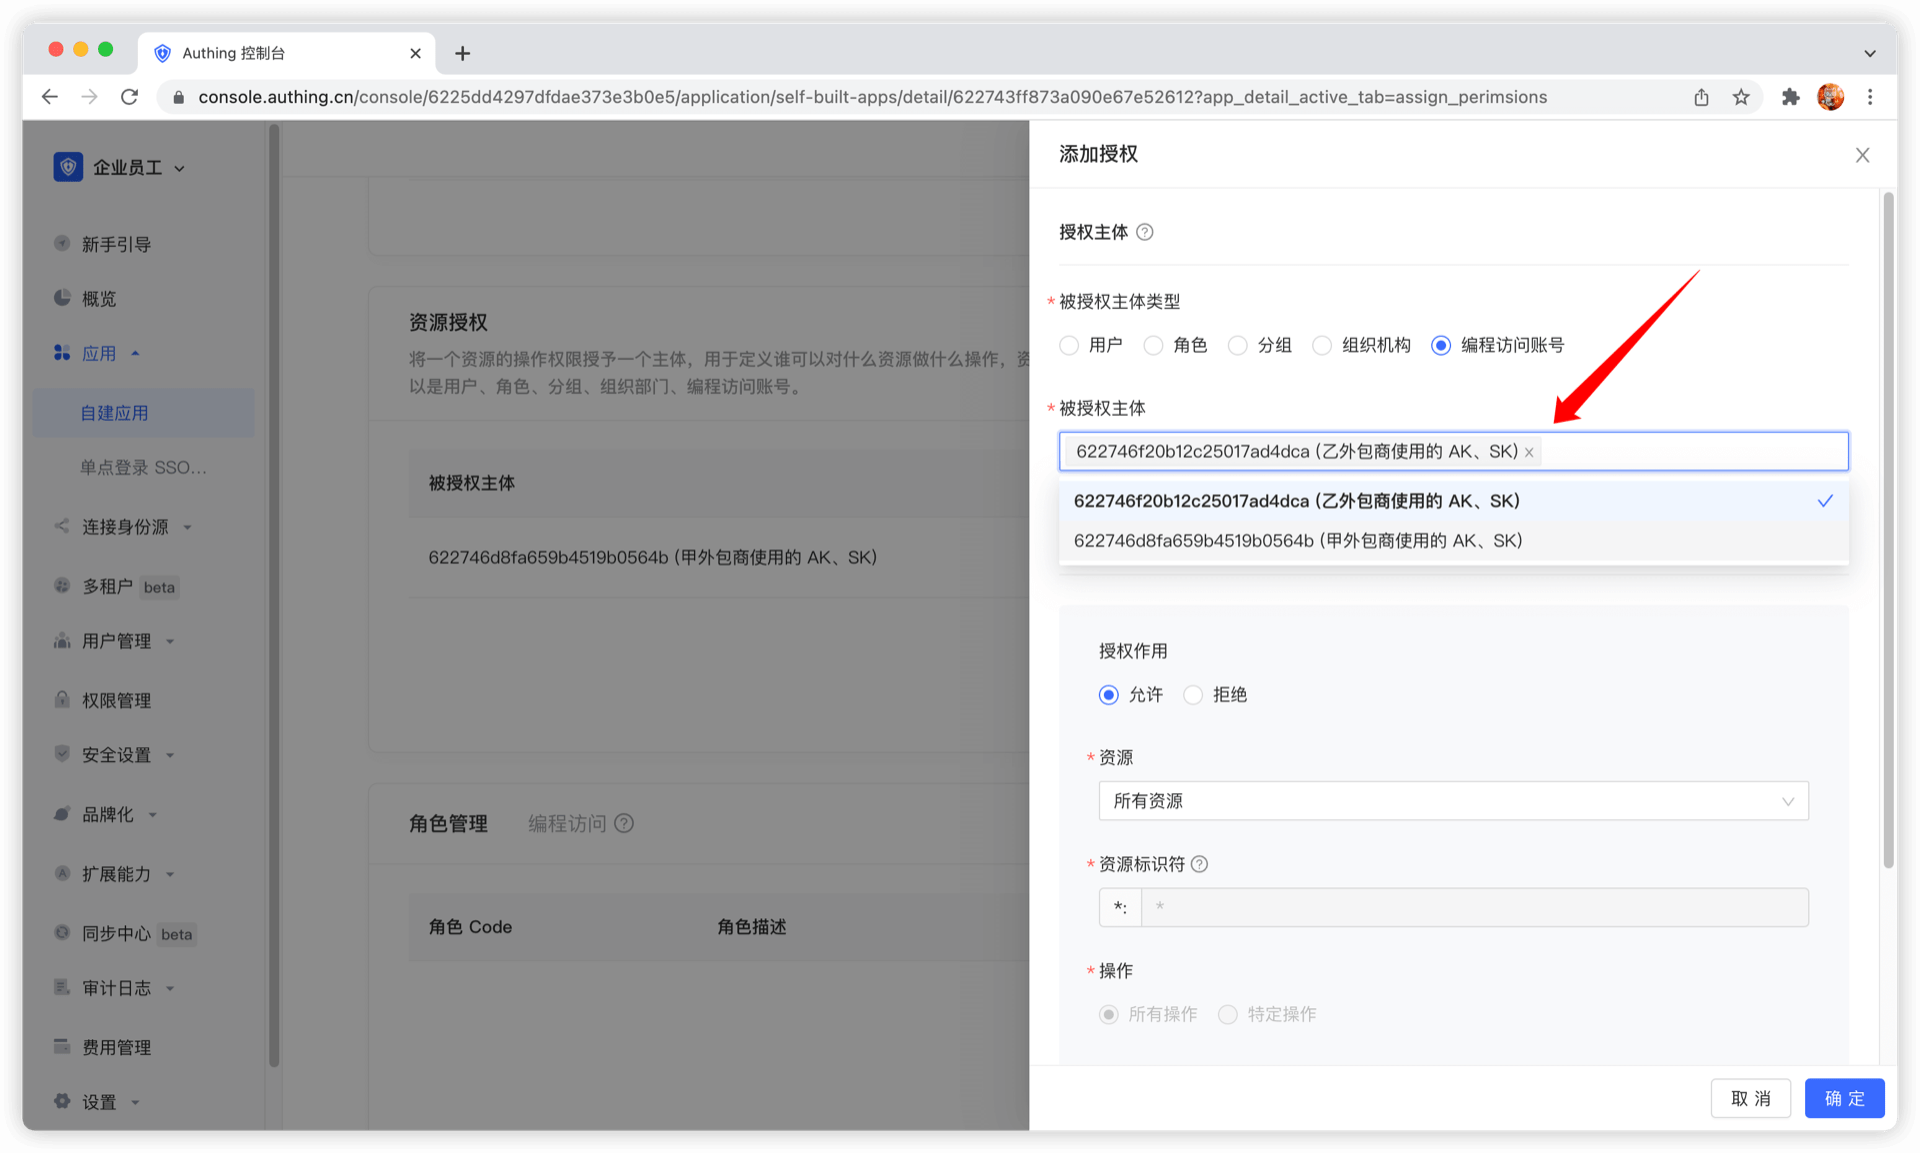
Next, we add authorization for Outsourcing Company B. First, select Outsourcing Company B's programming access account.
Next, we need to add three rules:
- Authorize Outsourcing Company B to have all operation permissions for user growth data in 2019. Click Add Authorization Rule in the upper right corner to add multiple rules.
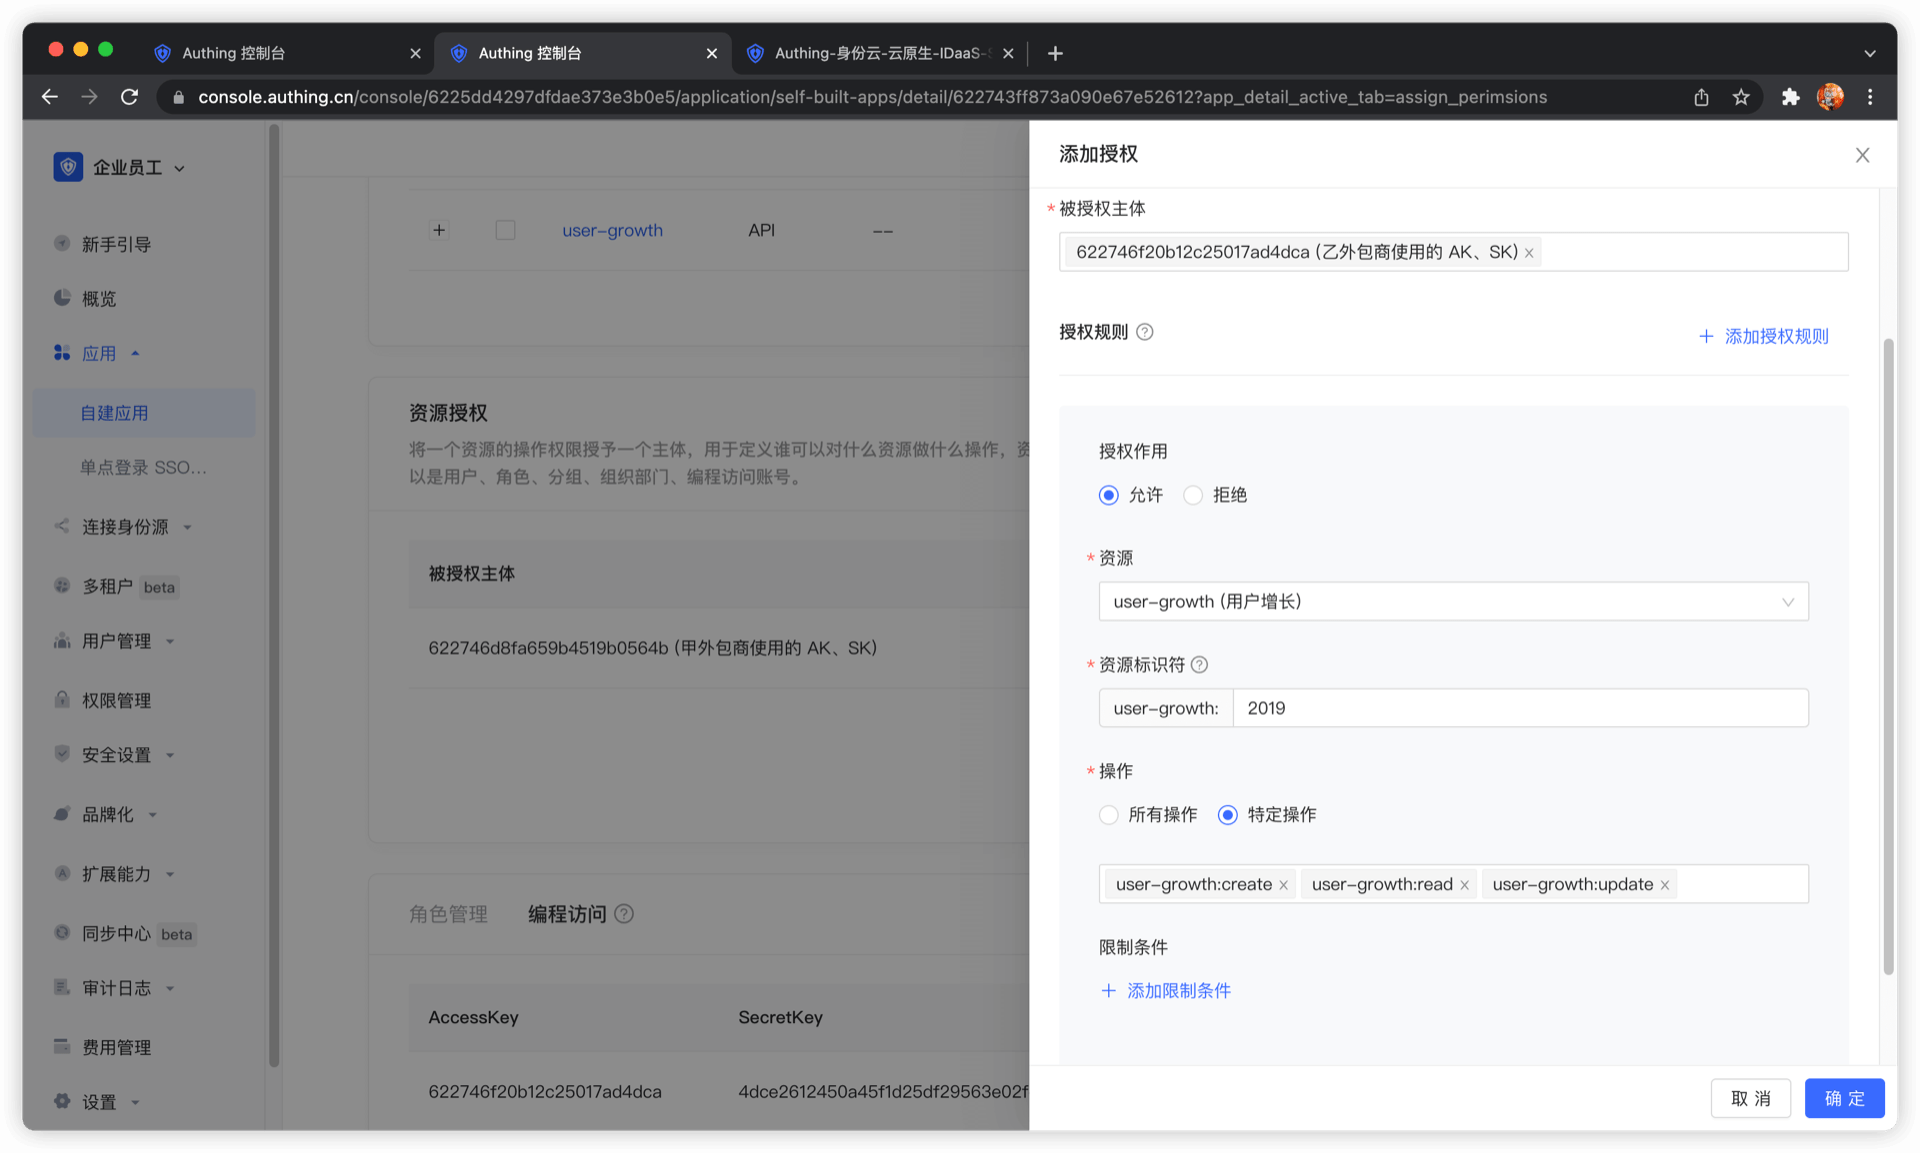
- Authorize Outsourcing Company B to create, read, and modify all revenue records.
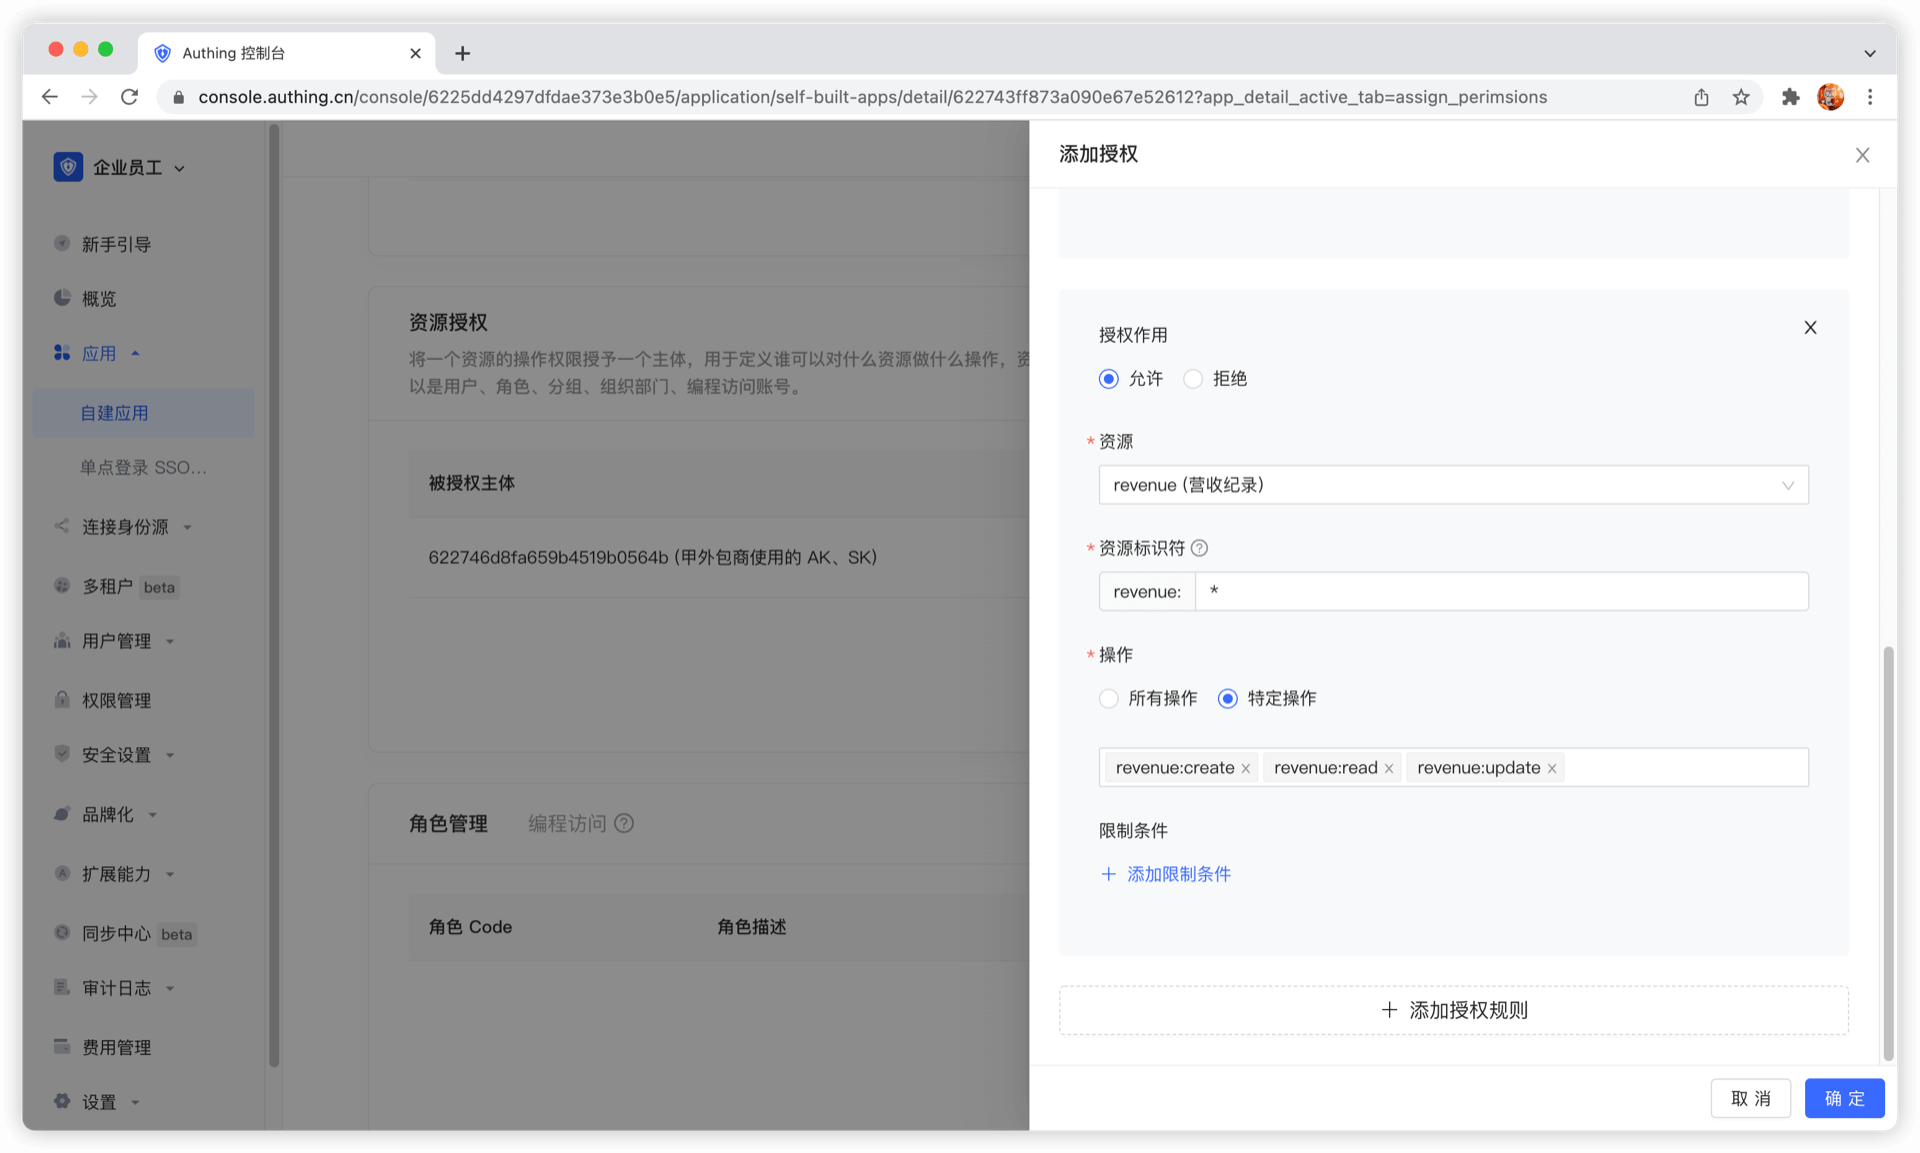
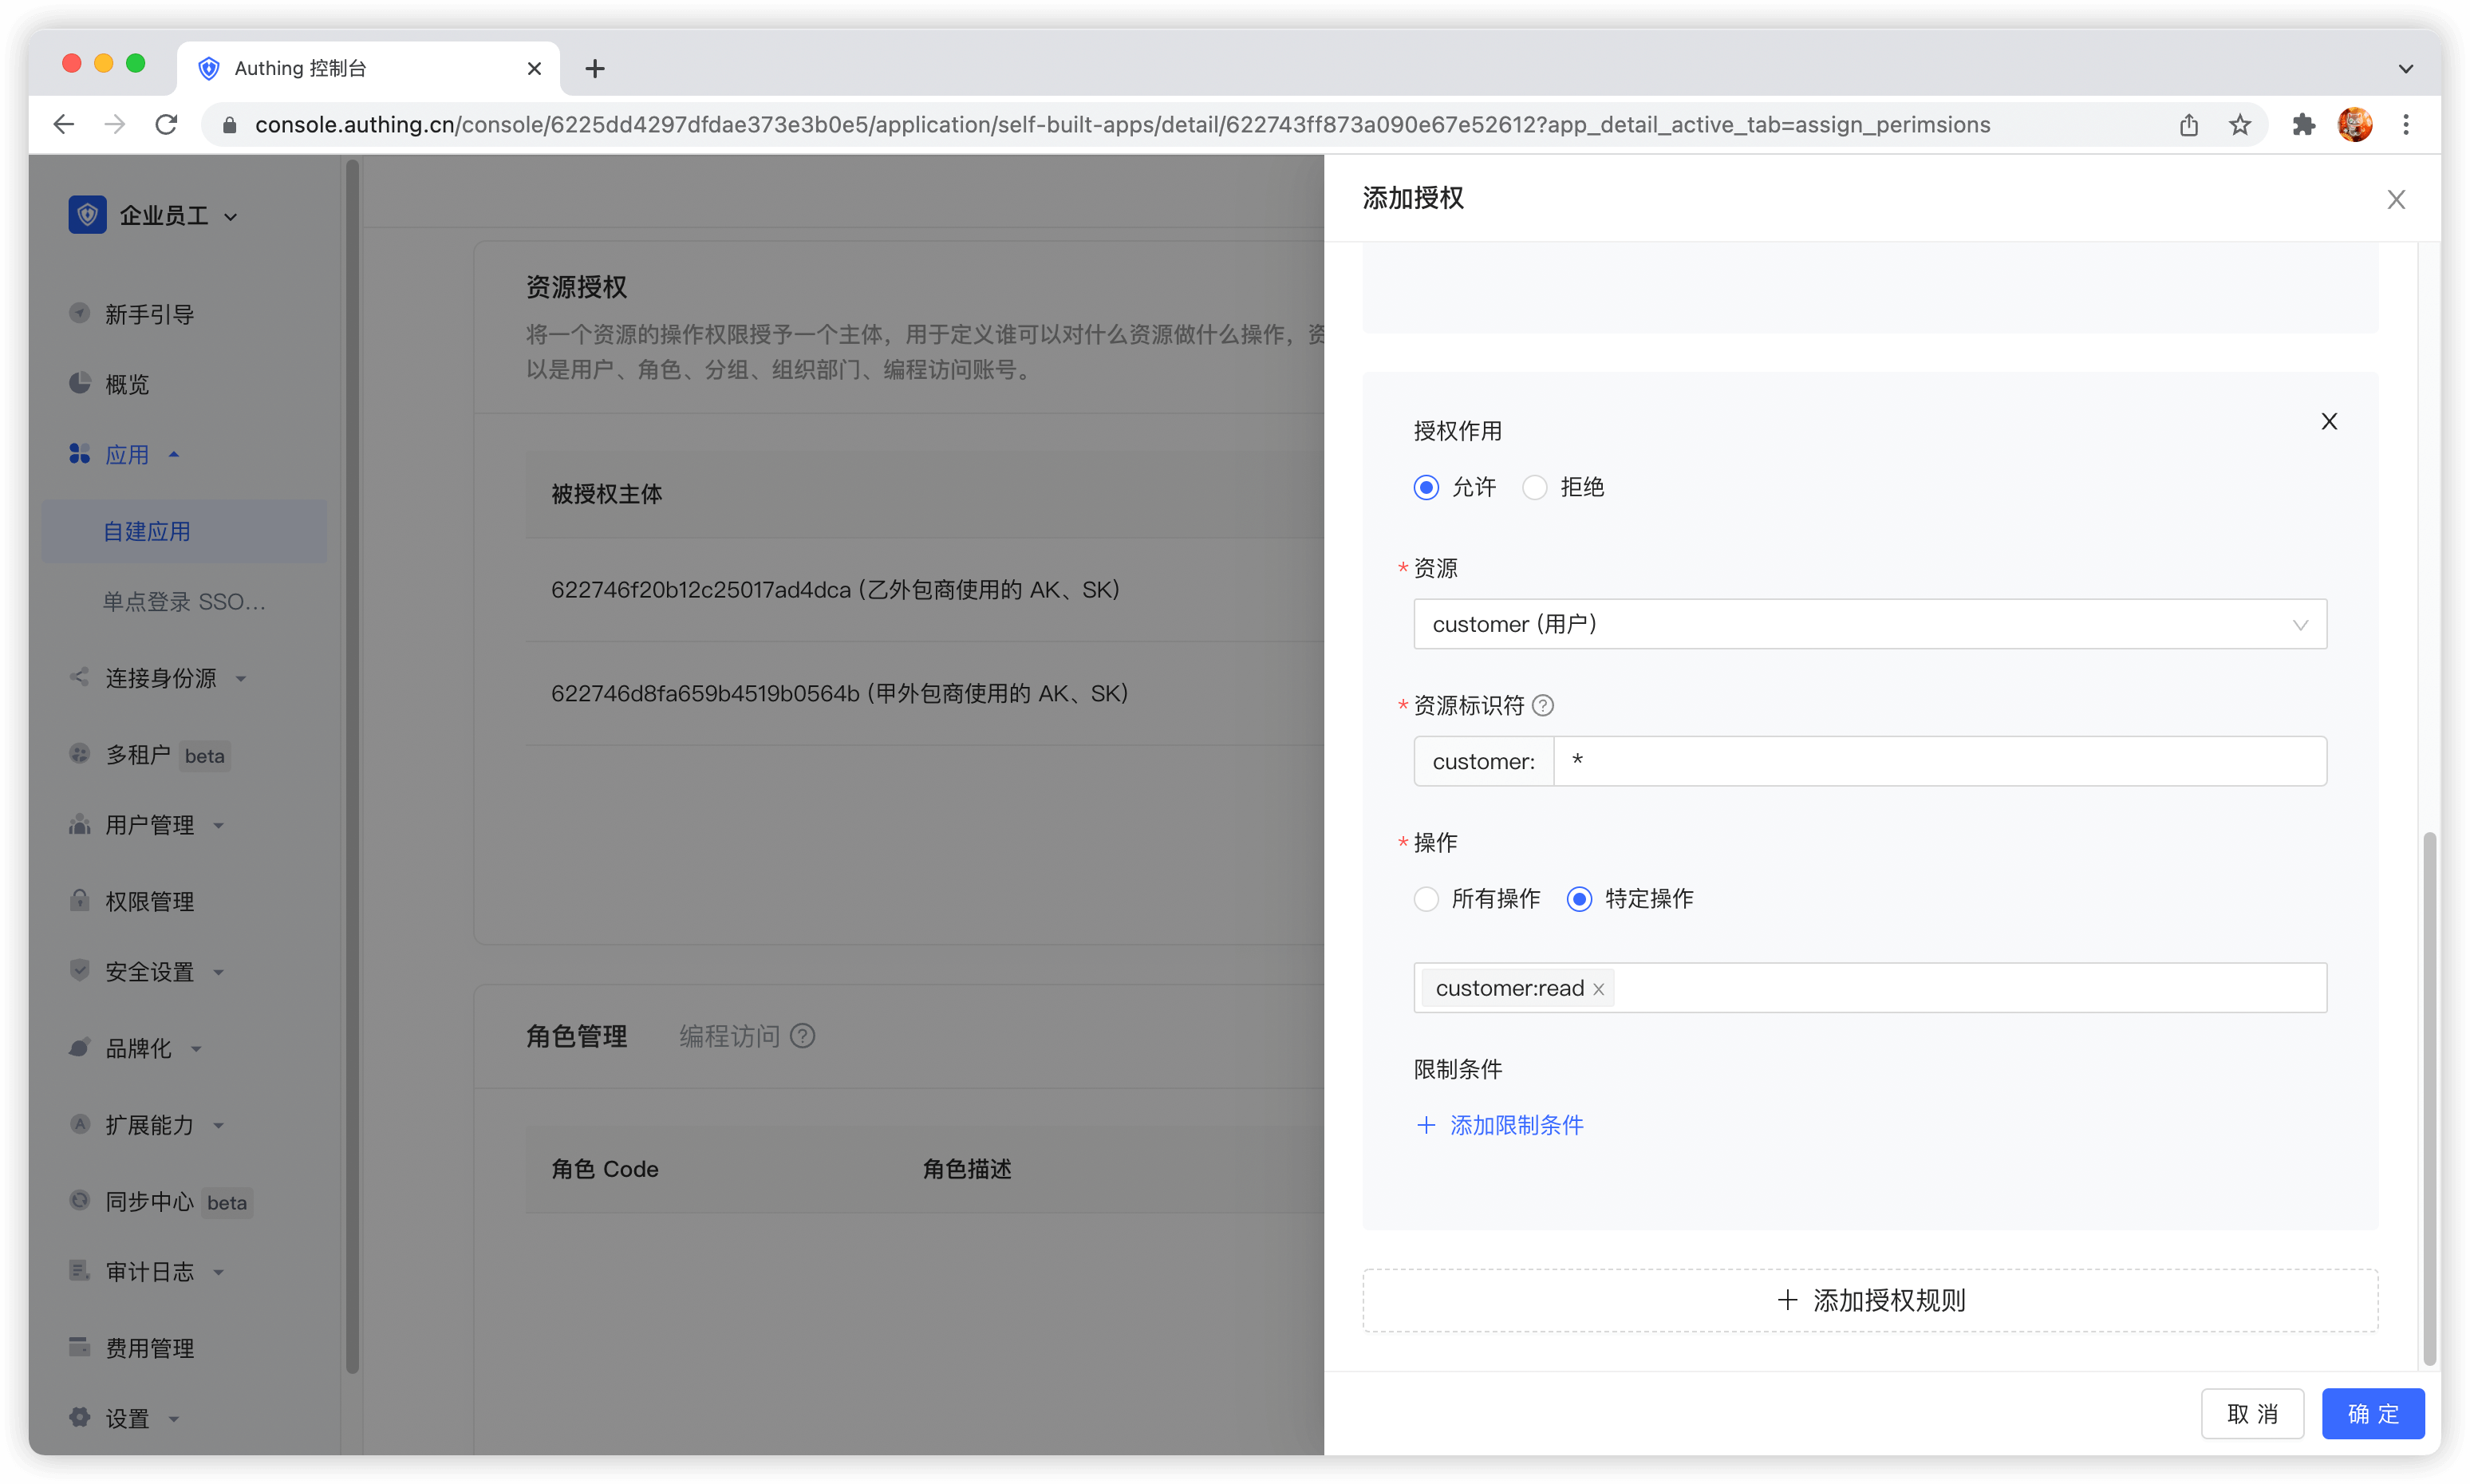
- Authorize Outsourcer B to read all customer records.
The administrator's permission management operation is now complete. Next, we will conduct M2M authorization best practices from the perspectives of the caller and resource party.
Get an AccessToken with permissions
The OIDC authorization framework provides many authorization modes. In this scenario, obtaining user growth information belongs to M2M (machine-to-machine) authorization. There is no user participation. The caller accesses the API interface of the resource server as its own identity. Here, the OIDC ClientCredentials mode is required.
Through the OIDC ClientCredentials authorization mode, the caller needs to provide GenAuth with his ClientCredentials (that is, the Key and Secret of the programmatic access account) and the permission scope to be requested (that is, the resource identifier) to directly obtain an AccessToken with the API permission.
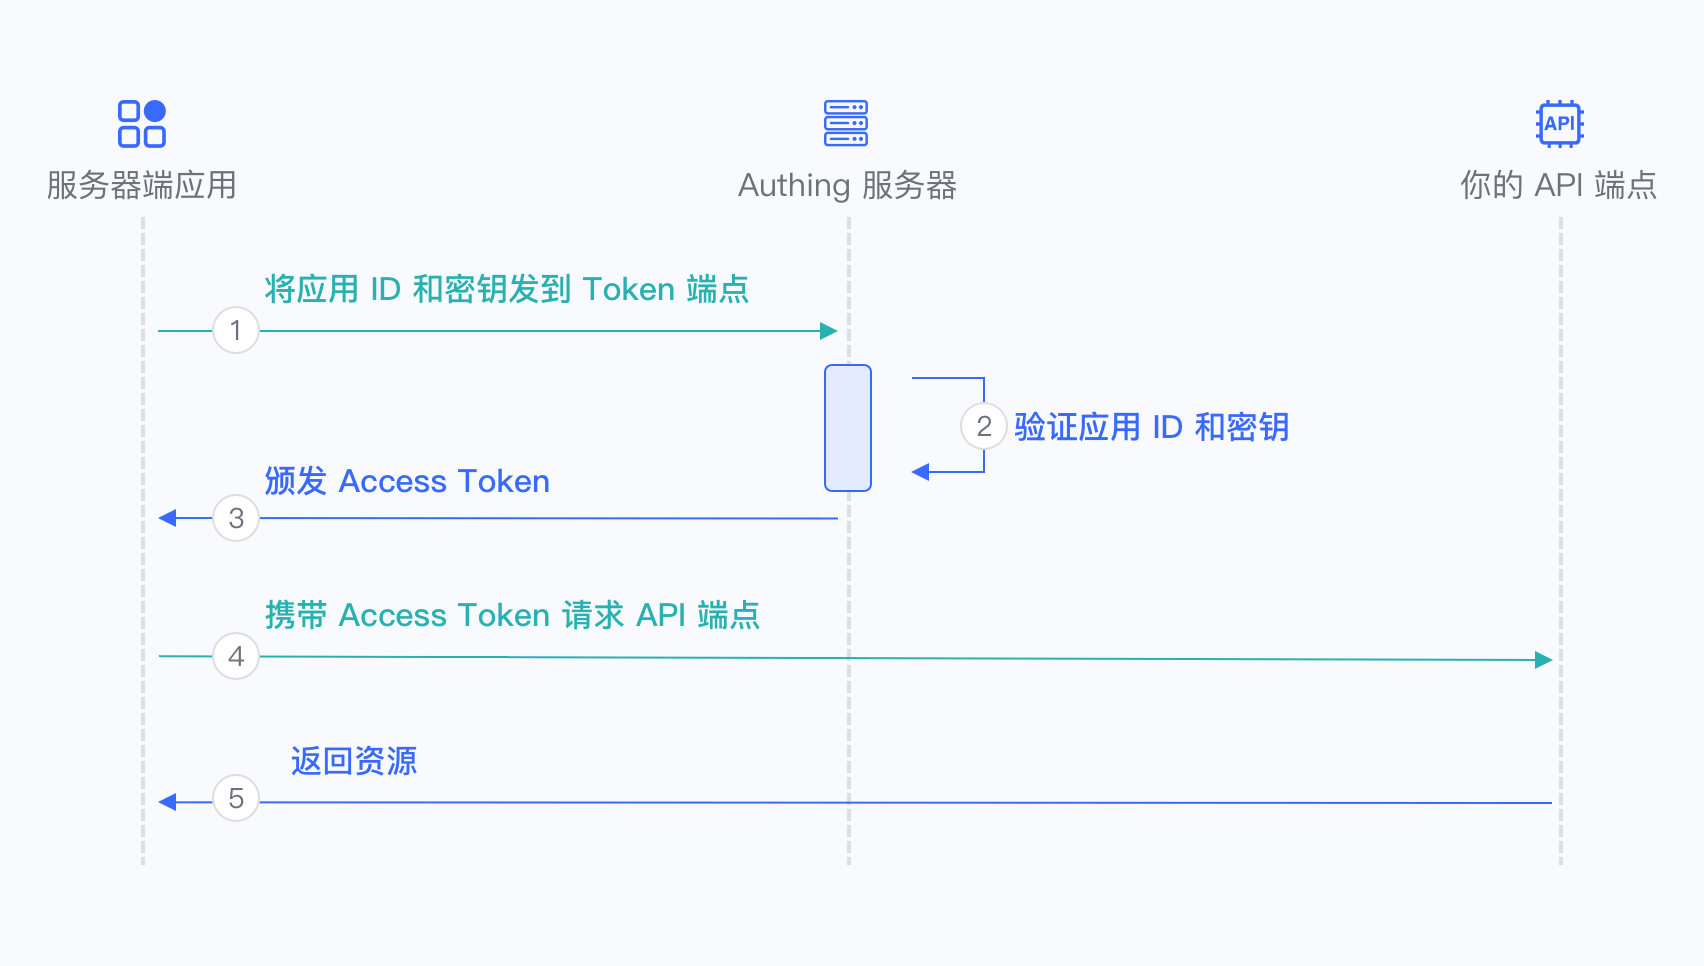
- The caller sends the Key and Secret of the programmatic access account and the scope of the permission project to be requested to GenAuth.
- GenAuth verifies the programmatic access account Key and Secret.
- GenAuth verifies the scope permission project according to the permission rules configured by the administrator and issues an AccessToken with access resource permission. The denied permission scope will not appear in the AccessToken.
- The caller accesses the resource server with the AccessToken.
- The resource server returns the protected resource.
In order to access the protected API interface, the caller must first obtain an AccessToken with permission. To do this, the caller needs to send a POST request to the following address.
Request address: https://{application domain name}.genauth.ai/oidc/token
Parameter description:
| Parameter name | Description |
|---|---|
| grant_type | Fill in client_credentials. |
| client_id | Programmatic access account Key. |
| client_secret | Programmatic access account Secret. |
| scope | Requested permission items. Each permission item is in the format of resource identifier: operation separated by spaces. |
Response result:
{
  "access_token": "eyJhbGciOiJSUzI1NiIsInR5cCI6IkpXVCIsImtpZCI6IjF6aXlIVG15M184MDRDOU1jUENHVERmYWJCNThBNEN lZG9Wa3VweXdVeU0ifQ.eyJqdGkiOiJ2S1ZGV3FKemltTm5MSTlYZy0zam0iLCJpYXQiOjE2MTI1MDA2OTgsImV4 cCI6MTYxMjUwNDI5OCwic2NvcGUiOiJib29rIiwiaXNzIjoiaHR0cHM6Ly9zdGVhbS10YWxrLmF1dGhpbmcuY24v b2lkYyIsImF1ZCI6IjYwMWJmMzVhY2E1ZDM4NzVjNDY3NDgyYyIsImF6cCI6IjYwMTkzYzYxMGY5MTE3ZTdjYjA0O TE1OSJ9.DS0l6zdlr_bGLqmDQRxvHUL4fmyLS5je6bqUCSSo06OIWSfcDZMZAqH5aYXP7Hzm4SiT6sfOCP_IiPSO xJPgFPYAmQTPSvJ5e6zs9jNeZyep_O6NWjlOGbDirskZE1pSZO_16ceiFr3jprSp13ff6O6Fa9YkY-8b_L3ouDqK htb_4051pWZif-VzgXSkmvflTmqauJul9b5PzaeGWL-PKOrHrUiHjJwf9wqtR-3C8voFmi9pmxrUJYGSJoxwcxxS EceUY3d9oJU3v7e6FOnT_EMxfQCrAgzXR21bOitsAutOVXg1N9H0QJiNBESorCcj6yi1fVePTeDI5nY6xj9oDw",
  "expires_in": 3600,
  "token_type": "Bearer",
  "scope": "book",
  "rejected_scope": "message table"
}
Sample code:
const axios = require("axios").default;
const options = {
method: "POST",
url: "https://{application domain name}.genauth.ai/oidc/token",
headers: { "content-type": "application/x-www-form-urlencoded" },
data: {
grant_type: "client_credentials",
client_id: "{programming access account Key}",
client_secret: "{programming access account Secret}",
scope: "{authorization items, space separated}",
},
};
axios
.request(options)
.then(function (response) {
console.log(response.data);
})
.catch(function (error) {
console.error(error);
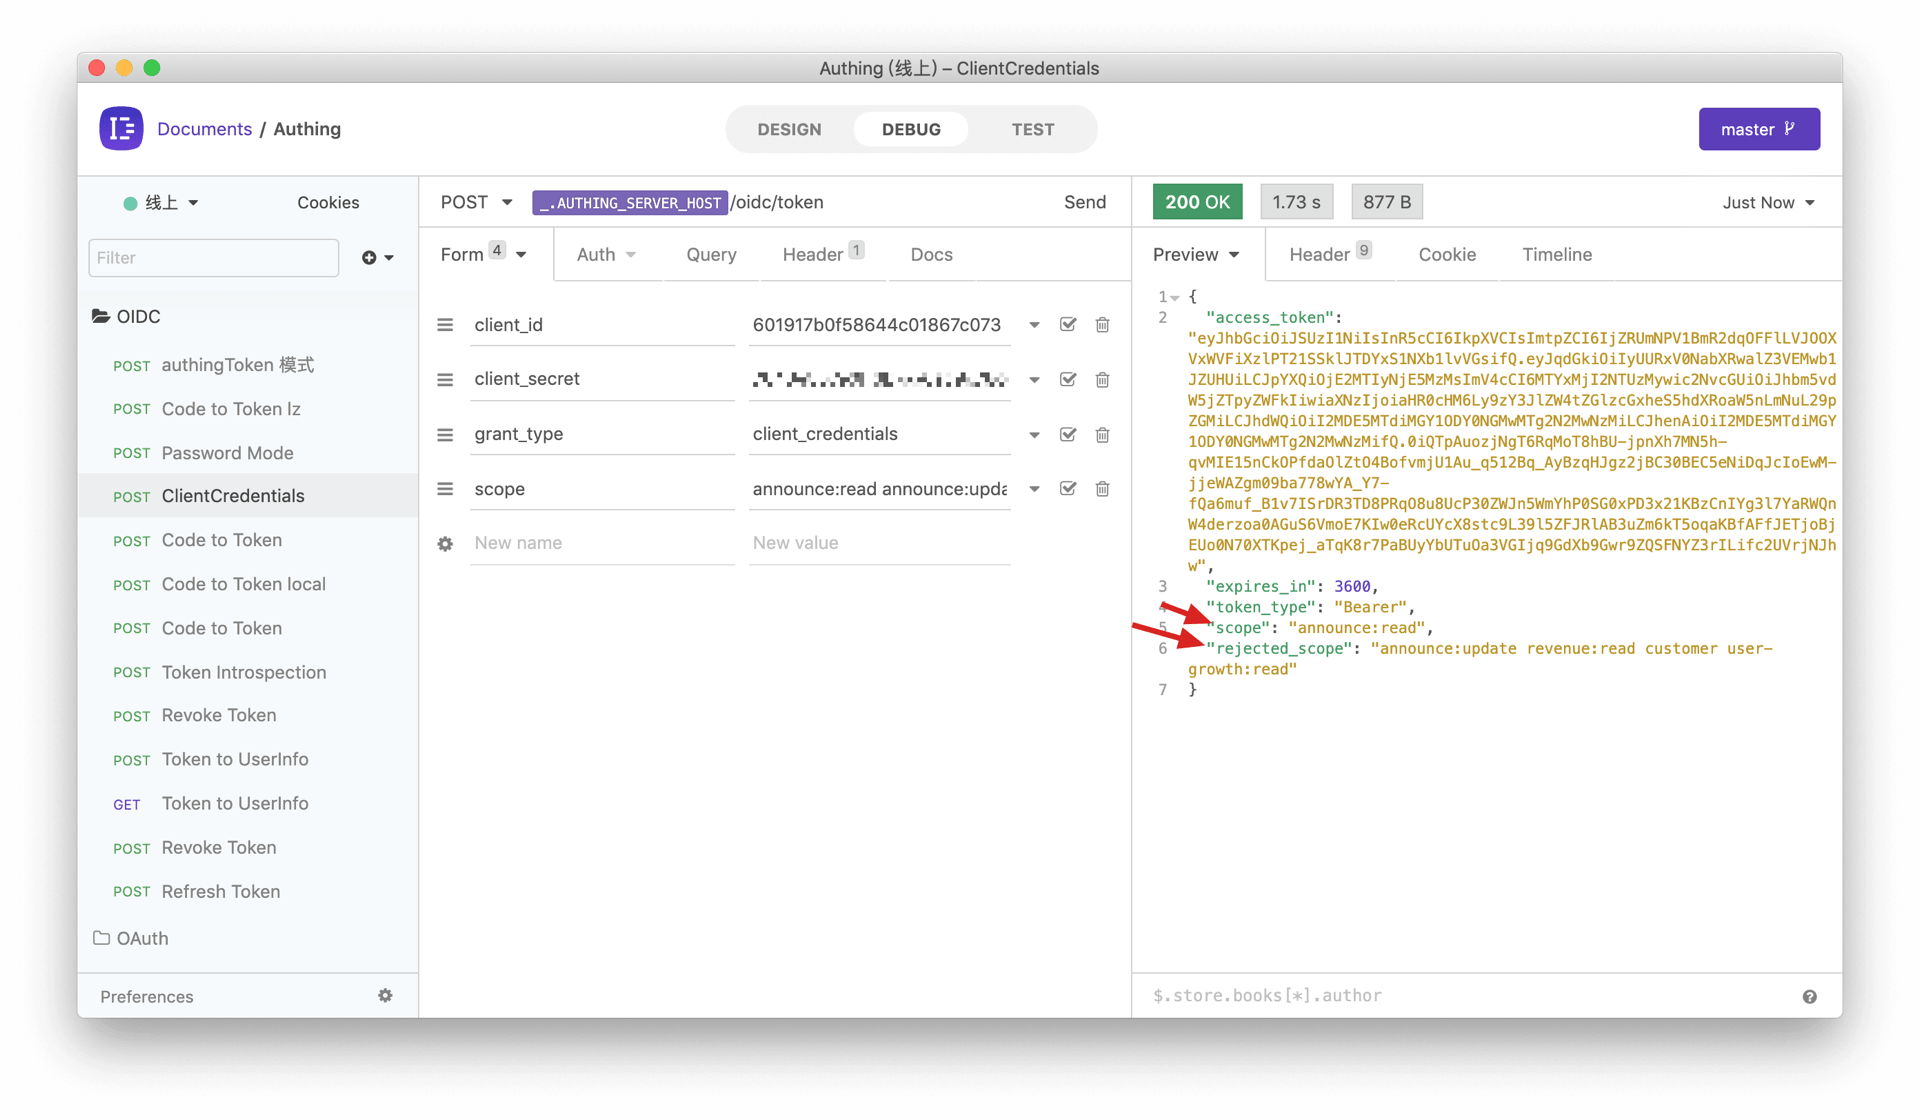
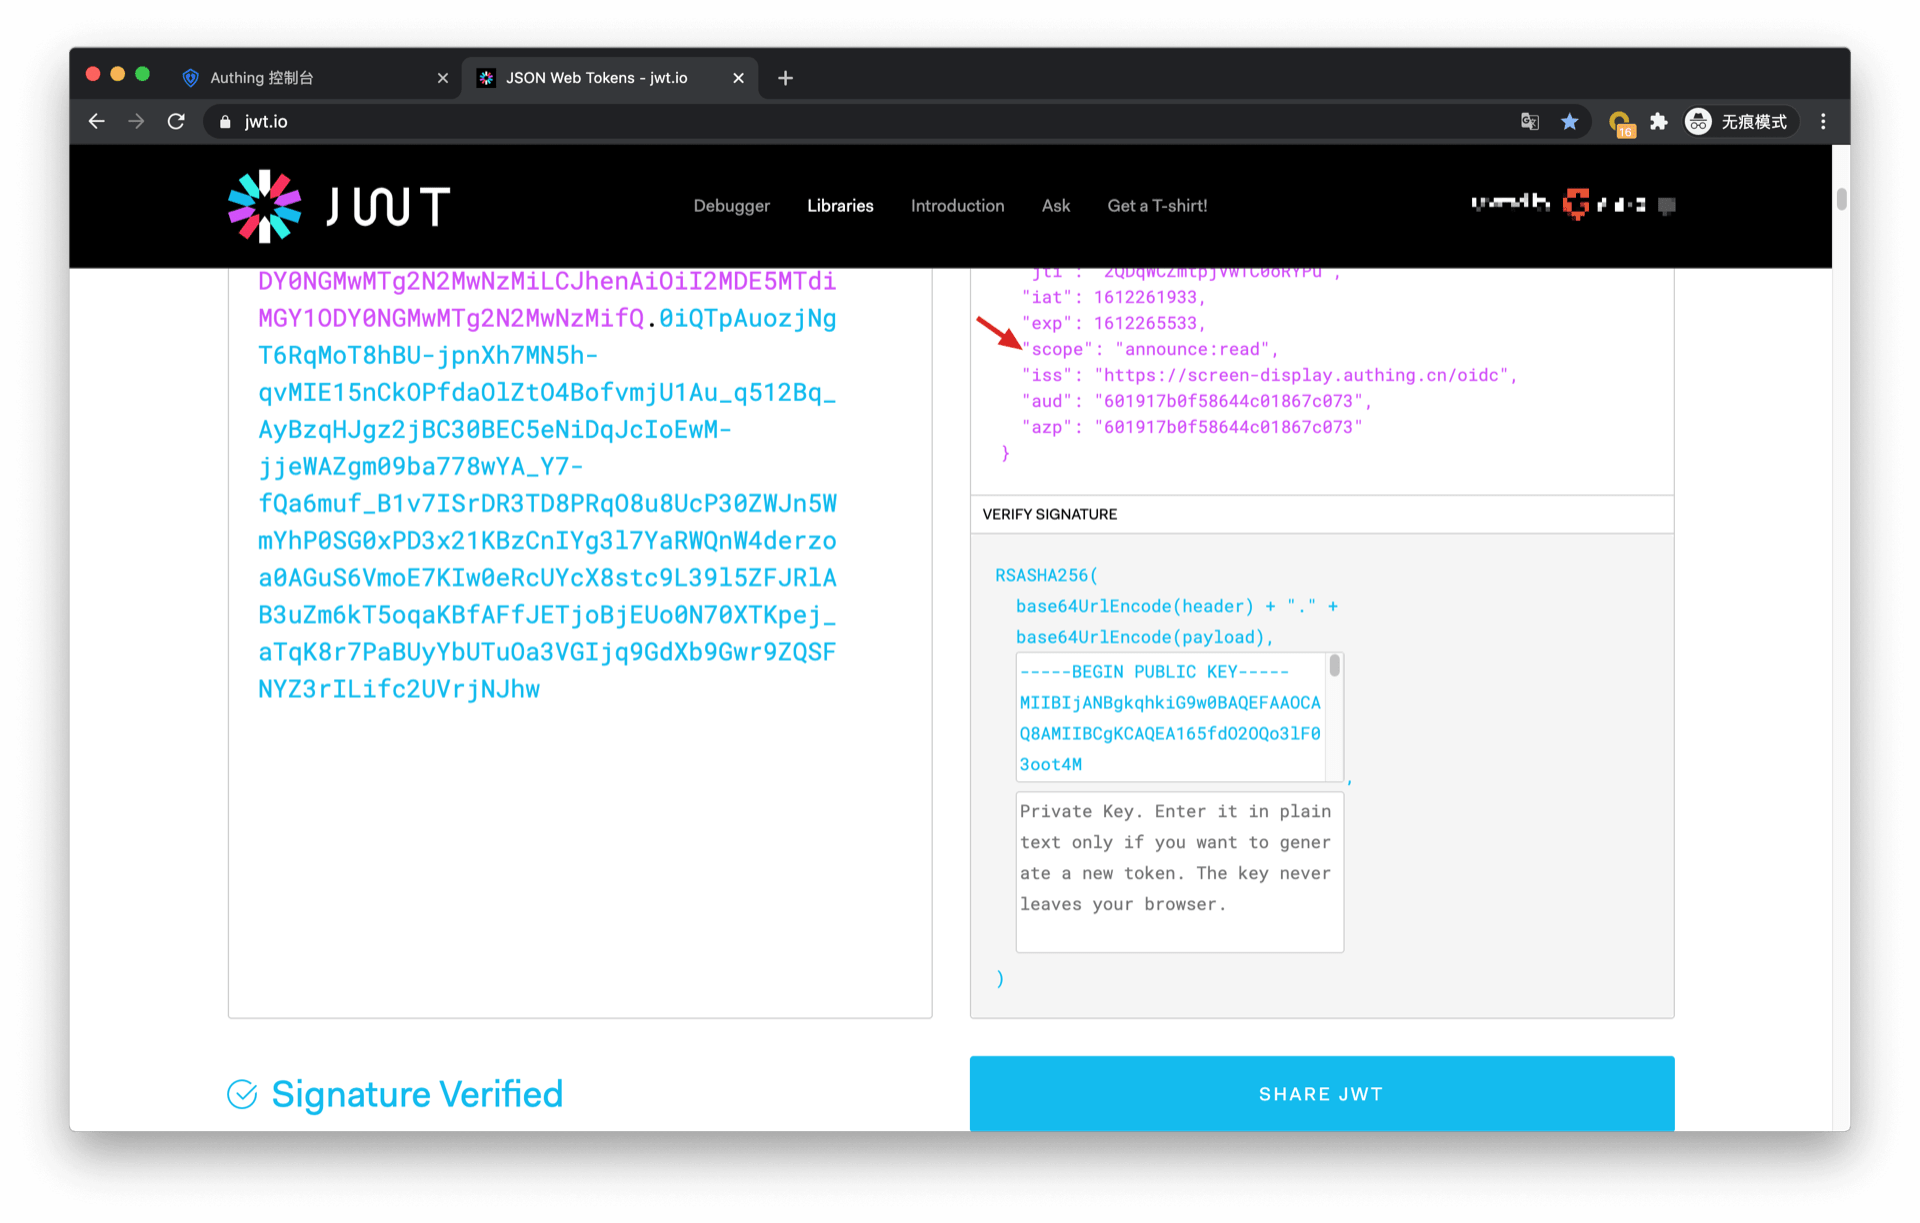
});We only grant the read permission of announcement information to outsourcing company A. If outsourcing company A requests authorization with other scopes, for example: announce:read announce:update revenue:read customer user-growth:read. GenAuth will reject all permissions except announce:read. The following is the result returned when outsourcing company A requests authorization. The rejected permissions are in rejected_scope.
The information in AccessToken contains the scope of permissions:
Let's look at the authorization of outsourcer B. If outsourcer B wants to request the following scopes: user-growth:2020:read user-growth:2019:* user-growth:2019:read revenue:create revenue:*:read customer:read
The return result of GenAuth is as follows:
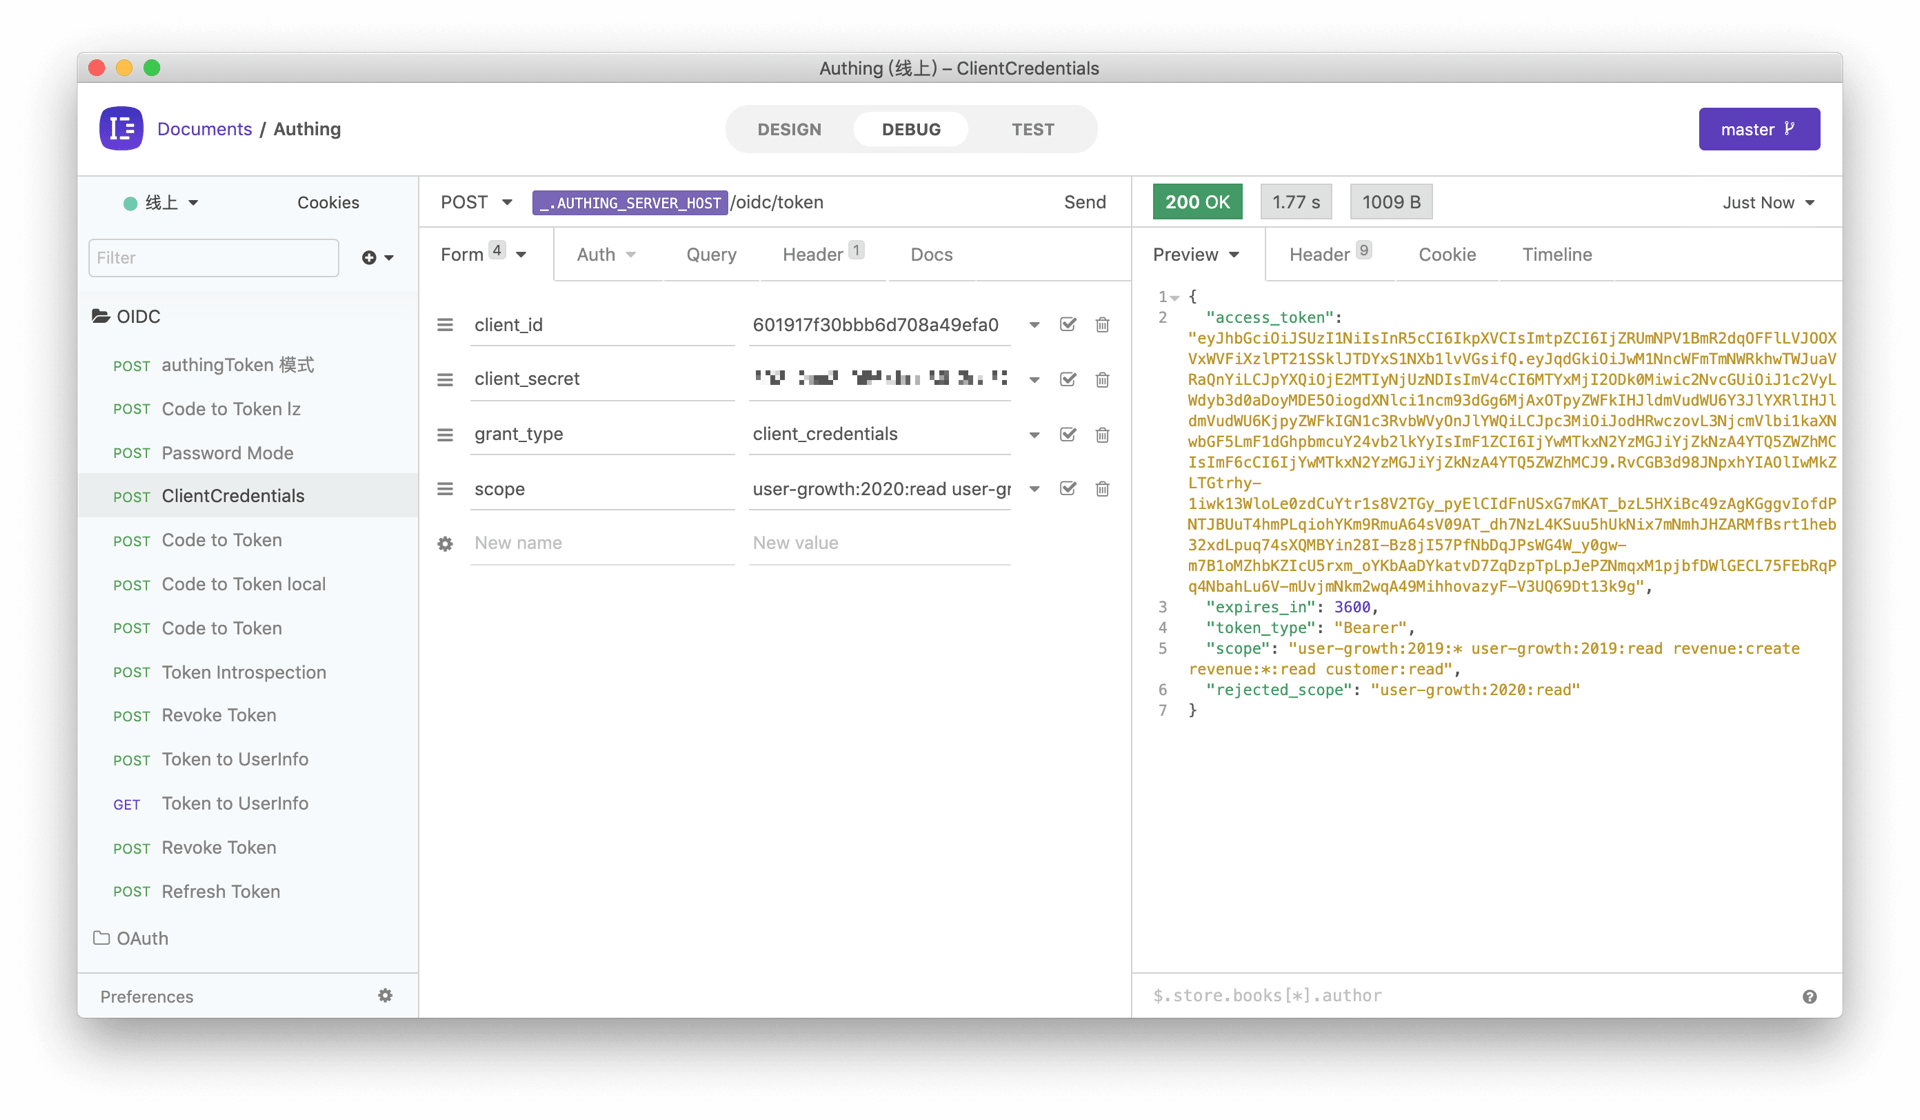
It should be noted that the administrator only authorized all permissions for the 2019 user growth data to outsourcer B, so when requesting the scope of the 2020 user growth data, it was rejected.
Scope permission item specification
GenAuth scope permission items are separated by spaces, and the format of each item is resource identifier:resource operation.
The following are all scope formats supported by GenAuth:
book:1:read means read permission for book resource numbered 1
book:*:read means read permission for all book resources
book:read means read permission for all book resources
book:*:* means all operation permissions for all book resources
book:* means all operation permissions for all book resources
book means all operation permissions for all book resources
*:*:* means all operation permissions for all resources
*:* means all operation permissions for all resources
* means all operation permissions for all resources
Add API authentication interceptor
After defining the API in GenAuth, you need to add an API authentication interceptor to your actual business API interface. For protected resources, only visitors with a valid AccessToken and the required permissions are allowed. The code example is as follows:
var express = require("express");
var app = express();
var jwt = require("express-jwt");
var jwks = require("jwks-rsa");
var port = process.env.PORT || 8080;
var jwtCheck = jwt({
  secret: jwks.expressJwtSecret({
    cache: true,
    rateLimit: true,
    jwksRequestsPerMinute: 5,
    jwksUri: "https://{app domain name}.genauth.ai/oidc/.well-known/jwks.json",
  }),
  audience: "{programming access account ID}",
  issuer: "https://{app domain name}.genauth.ai/oidc",
  algorithms: ["RS256"],
});
// Check the legitimacy of AccessToken
app.use(jwtCheck);

app.post("/article", function (req, res) {
  // Check if AccessToken has the required permissions
  if (!req.user.scope.split(" ").incldues("write:article")) {
    return res.status(401).json({ code: 401, message: "Unauthorized" });
  }
  res.send("Secured Resource");
});

app.listen(port);
For more information about Token verification, please refer to Verify Token.