Branding
Global Login Box
Path: Branding->Global Login Box
INFO
For information about the GenAuth user pool version that supports the "Global Login Box" feature benefit, please check the Official Website "Pricing" Page. If your version does not support this benefit and you want to try it, you can activate the trial period. For an introduction to the trial period and how to activate it, please check Trial Period.
Branding is one of the modules that GenAuth pays the most attention to, providing users with very powerful customization functions.
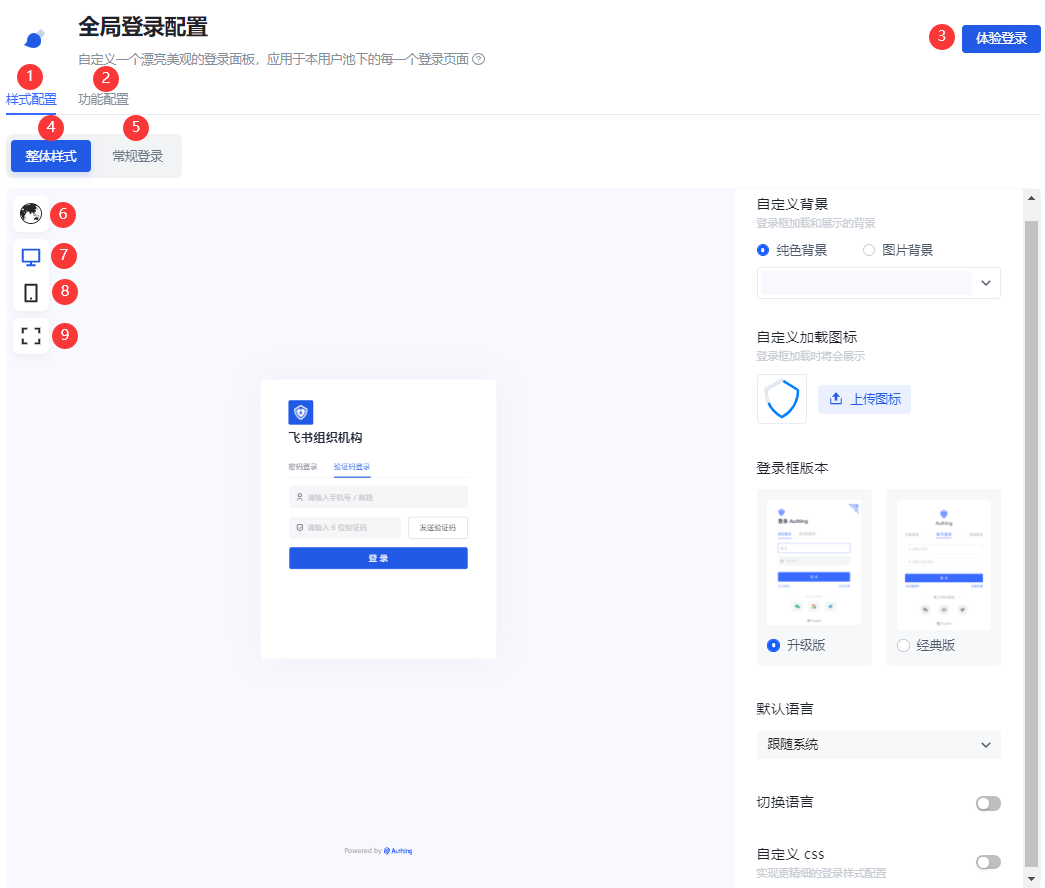
The following figure is an overview of the global login configuration.
| No. | Description |
|---|---|
| 1 | Style configuration: You can configure the login box style. |
| 2 | Function configuration, you can configure the login registration agreement and login registration information completion. |
| 3 | Experience login. |
| 4 | Overall style: Including login box style configuration and display page. |
| 5 | General login: Configure the display and hiding of forgotten password, enterprise account login and social account login entrance. |
| 6 | Login box preview language, including Follow the system, Simplified Chinese, Traditional Chinese, English, Japanese. |
| 7 | Web preview. |
| 8 | Mobile preview. |
| 9 | Full screen display, only applicable to web preview; click again to restore the original size. |
INFO
GenAuth All branding configurations in the console will be read by applications that do not have the custom login box function enabled under this user pool.
Style configuration
You can configure the display style of the login box here.
Overall style
The overall style applies to the entire process of application login/registration, including one-time authentication, two-time authentication, and information completion.
Administrators can customize the login/registration page background, loading icon, login box version, display language, CSS, etc. on the Overall style page.
Custom background
Administrators can set the login box display background to a solid color, or upload an image and use it as the background.
INFO
When uploading an image, make sure the image size does not exceed 2M.
Custom loading icon
Administrators can customize the icon displayed when the login box is loading in this module.
To delete the current loading icon, just click the checkbox and confirm the deletion.
![]()
Login box version
Administrators can choose between Upgraded version and Classic version login box configuration pages, with the default being the upgraded version.
INFO
Starting from August 2022, newly created user pools will not support switching to the classic login box. All of our feature updates and performance maintenance will also be completed based on the upgraded login box. For user pools created before this point in time, the classic login box you are using will not be affected.
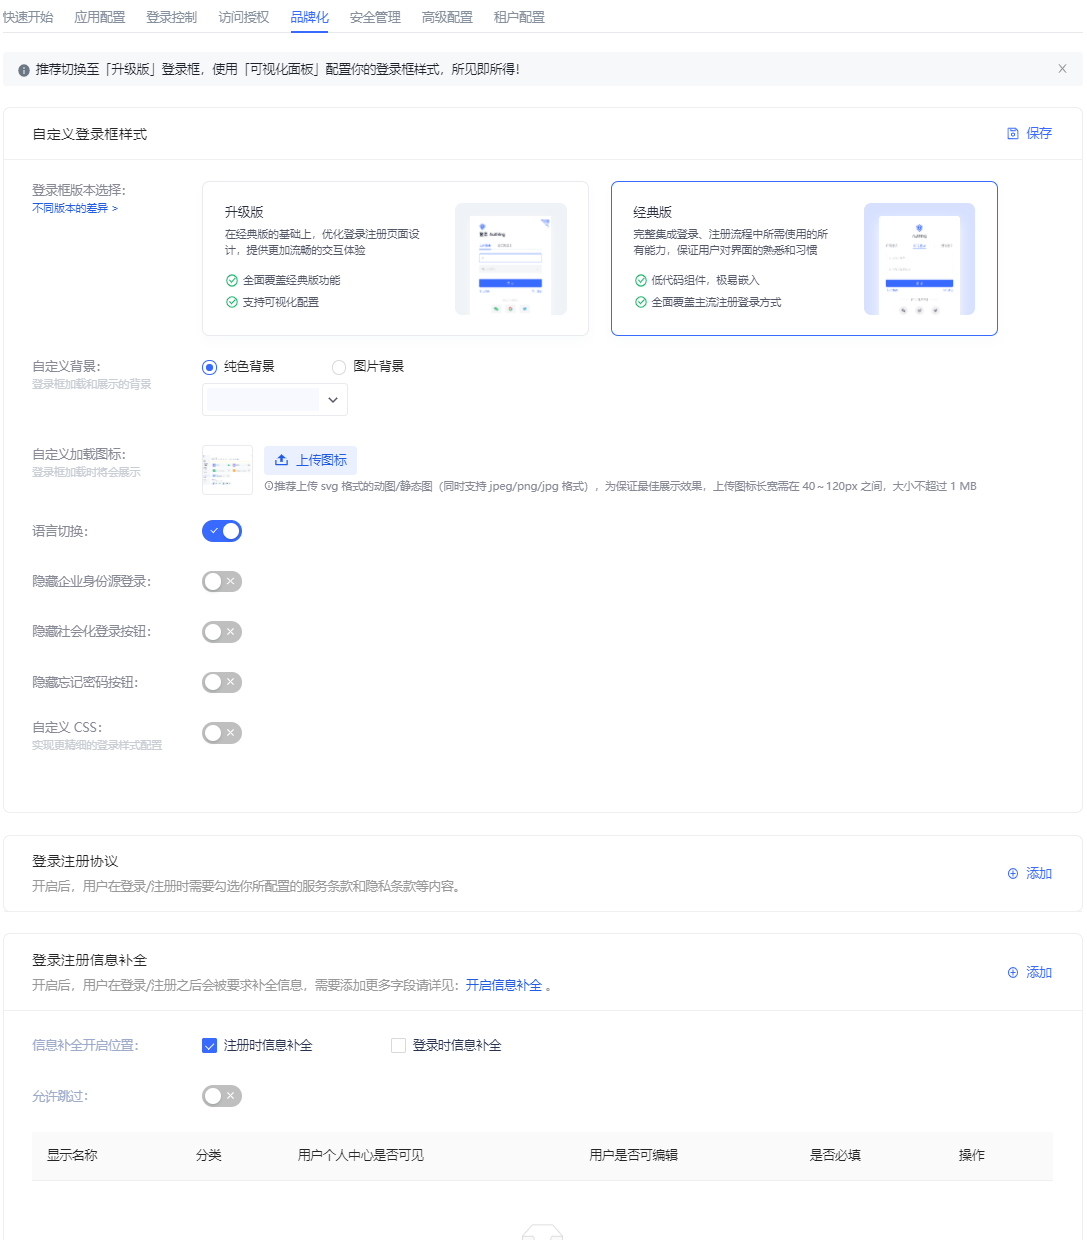
The following figure is the classic version configuration page:
Default language
Define the display language of the login box:
- Follow the system The display language of the login box may be different from the system language of the application after login. Administrators can set the display language of the login box to follow the system language of the application to improve the user login experience.
- Simplified Chinese
- Traditional Chinese
- English
- 日本語
Switch language
Administrators can use the Switch language switch to define whether to display the language switch option at the bottom of the login box, so that users can customize the display language of the login box. If this switch is turned off, users cannot customize the display language of the login box. At this time, the interface display language is the one configured by the administrator in Default language.
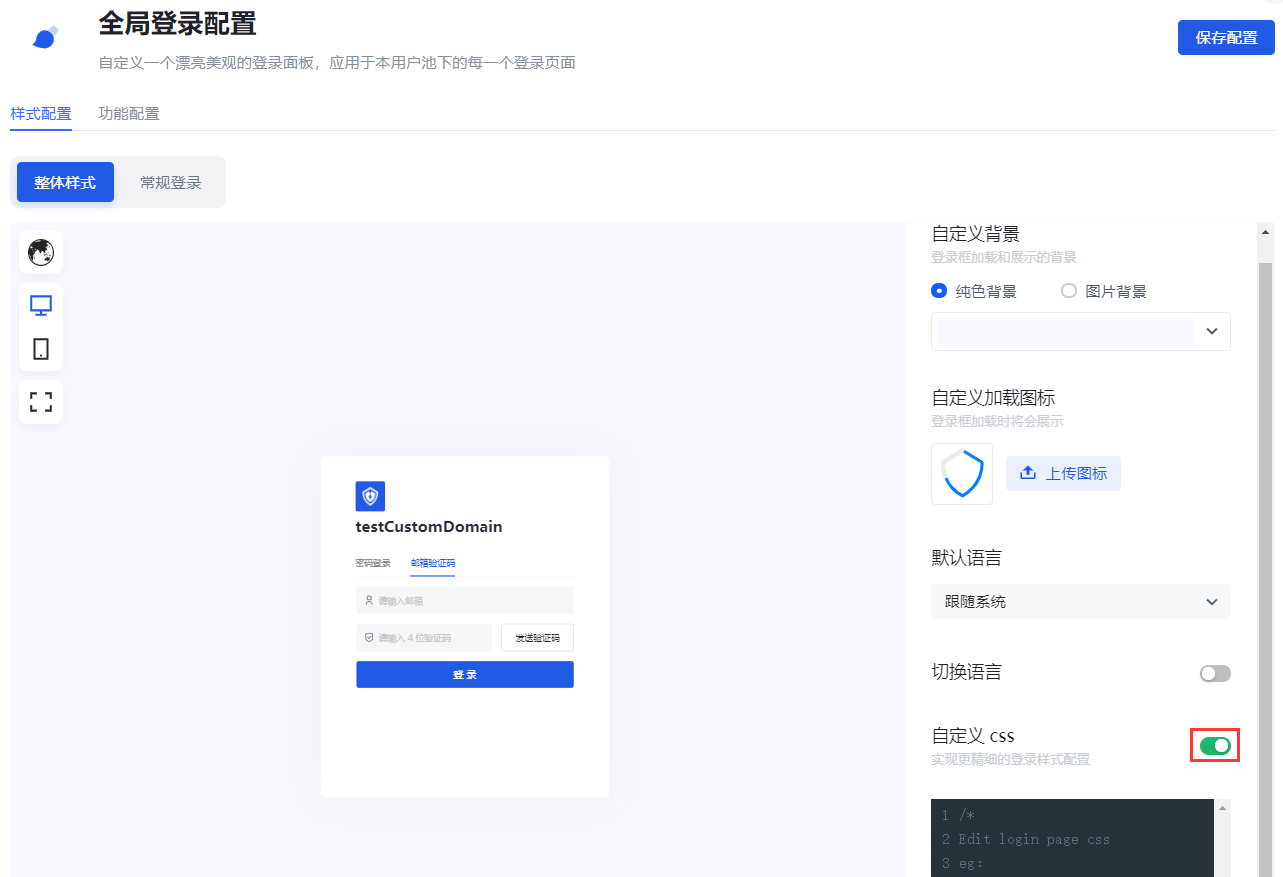
Custom css
Custom css can achieve more detailed control over the hosted login page to meet user expectations for the login page. By customizing CSS, you can customize the login box with some advanced styles, such as changing the background color:
.authing-guard-layout {
  background: gray;
}
To configure a personalized login box through custom CSS, you need to turn on the Custom CSS switch in the Overall Style tab.
Customizing CSS has the following points to note:
- Try to control the scope of the specified CSS, and its generation rule depends on the last level of routing. If you only want to style the login page, you can add
.loginbefore all CSS selectors, such as.loginfor the/loginpage.

- Try to specify the guard rendering node to be modified, common rendering nodes such as:
- .g2-view-login
- .g2-view-register
- .g2-forget-password
- .g2-need-help
- ...As shown in the figure below, the class name
.g2-view-loginindicates that guard is in the login node. Carrying this class name as the front selector, its style will only take effect in the login node.
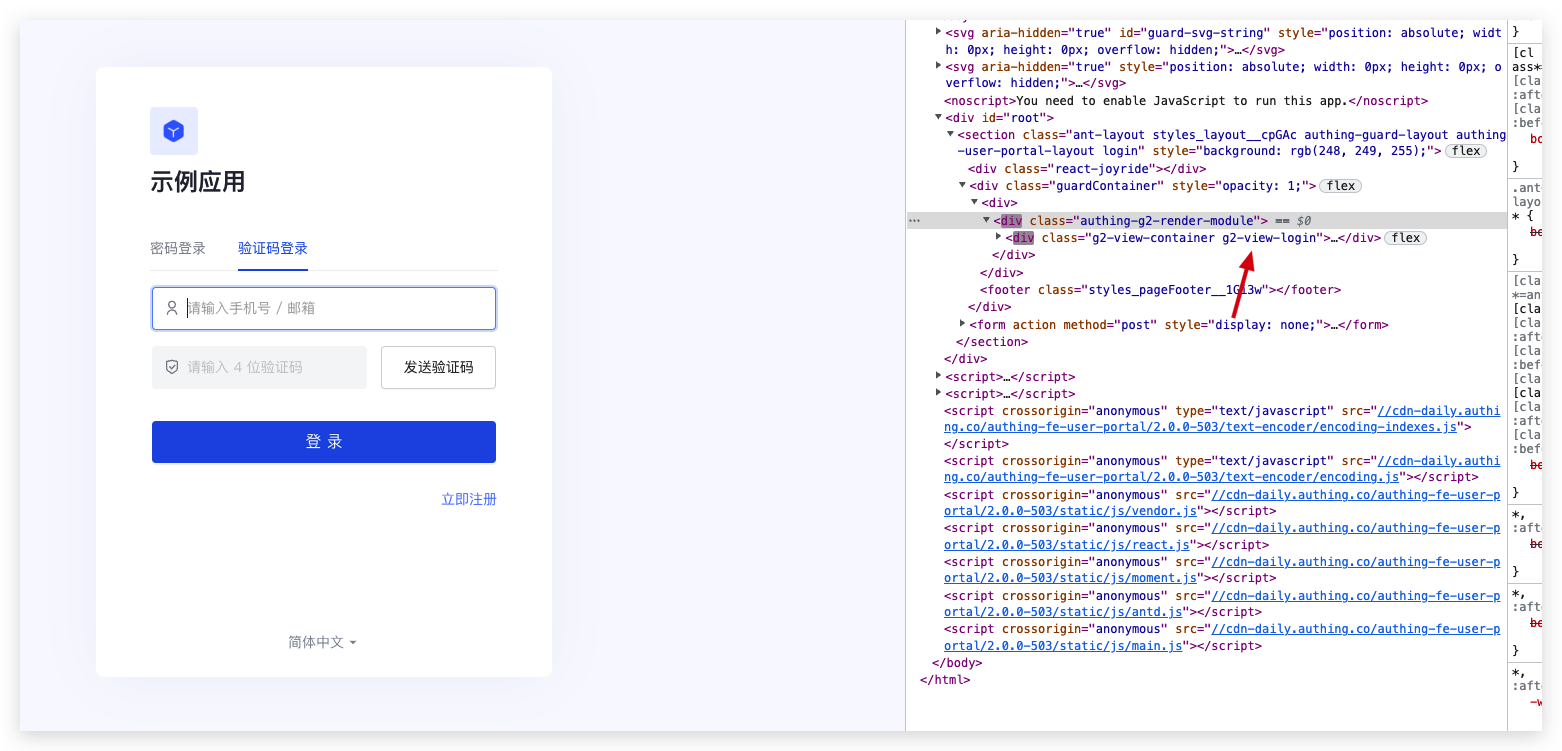
The specific css class name can be viewed through the Chrome console on the login interface of GenAuth. The dom tags that need custom styles all provide fixed class names. Class names with hash cannot be used because they change frequently.
Try to select elements accurately. If the dom hierarchy is very deep, it is recommended to use copy selector and use it with the first and second preceding selectors.
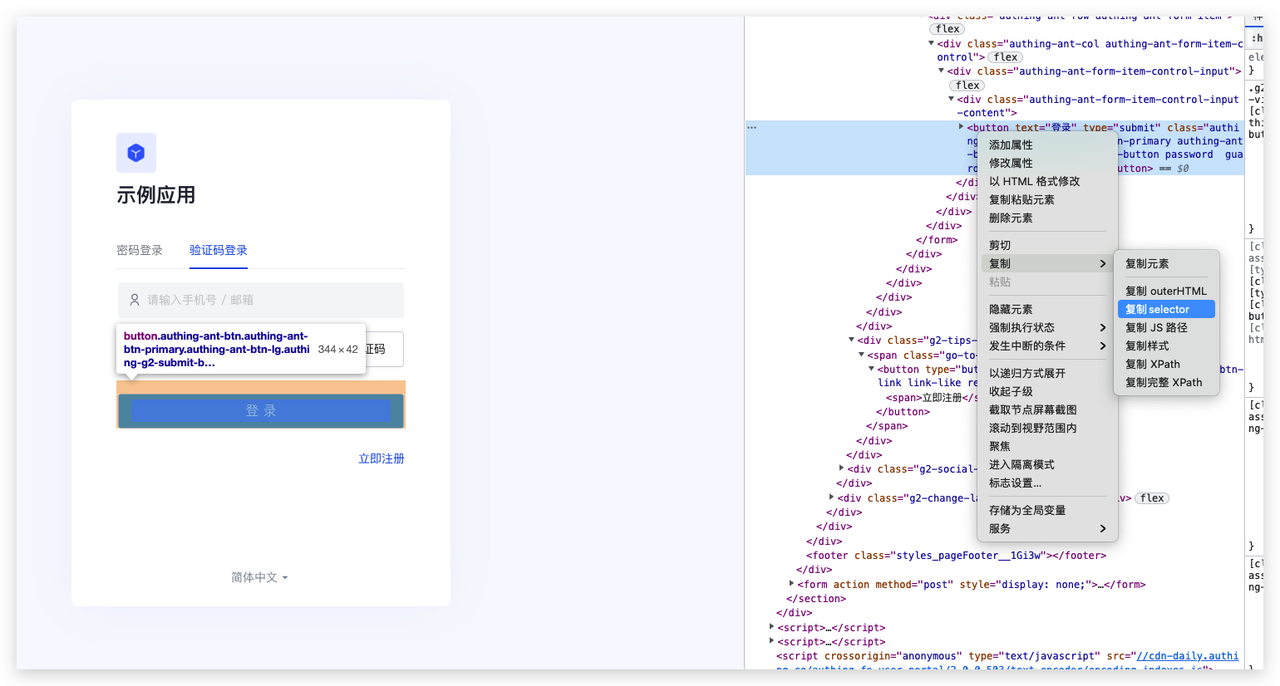
INFO
Guard has been iterating and expanding its functions to better serve users. During this development process, there may be dom structure adjustments and class name deprecations. If it affects user-defined css, please contact our developers for css adjustments.
General login
The so-called General login refers to password login and verification code login. This section will introduce the Forgot password, Enterprise account login, Social account login hide/show switches that are only applicable to general login.

Forgot password
Administrators can define whether to display the Forgot password component in the login box. After turning it on, users can click this button to reset their password when they forget their login password.
Enterprise account login
INFO
Enterprise account login hide/show switch works only if a third-party enterprise login method has been added and enabled. Otherwise, even if the switch is turned on, the enterprise account login entrance cannot be displayed in the login box. For more information on adding enterprise login methods, see Connecting enterprise identity sources.
Administrators can define whether to display other enterprise account login entrances in the login box. After turning it on, users can log in using other enterprise application accounts.
Social Account Login
INFO
Social Account Login The prerequisite for the hide/show switch to work is that third-party social login methods have been added and enabled. Otherwise, even if the switch is turned on, the social account login entrance cannot be displayed in the login box. For more information on adding social login methods, see Connecting Social Identity Sources.
Administrators can define whether to display third-party social account login entrances in the login box. After turning it on, users can log in using third-party social accounts.
Scan QR code login
GenAuth supports users to log in by scanning QR codes on the mobile terminal. In addition to using mobile APP to scan QR codes, you can also use mobile third-party enterprise identity sources or social identity sources to scan QR codes.
Administrators can configure whether to enable enterprise account login and social account login here. After turning it on, users can see it on the scan code login page.
Enterprise account login
Same as [Regular login Enterprise account login](#Enterprise account login).
Social account login
Same as [Regular login Social account login](#Social account login).
Function configuration
Login and registration agreement
When users register, you need to let them understand and agree to your terms of service to help you avoid legal risks. To this end, GenAuth provides the Login and registration agreement function.
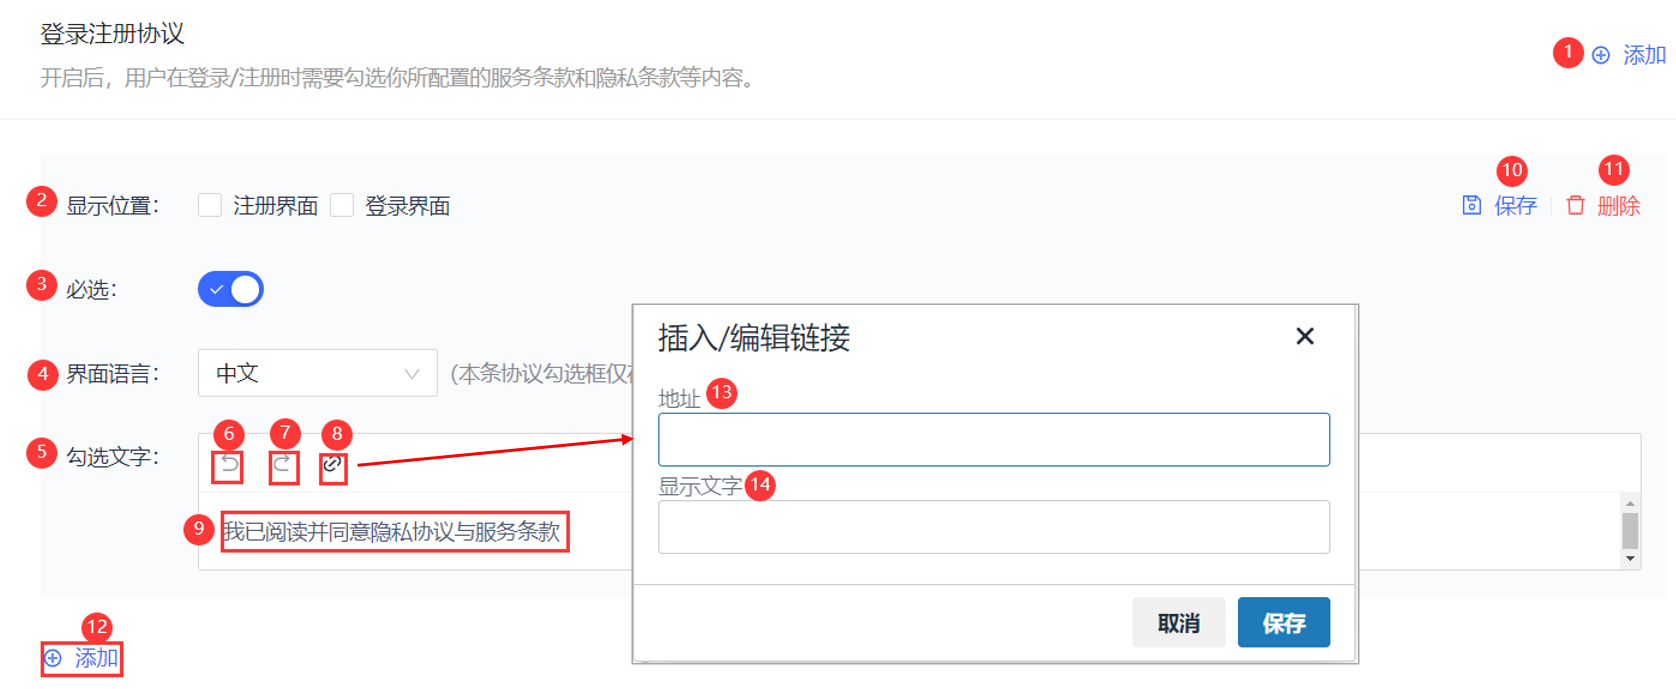
| Serial number | Field | Description |
|---|---|---|
| 1 | Add | Click to add a new registration agreement. |
| 2 | Display location | The location where the agreement is presented: on the Registration interface or the Login interface. Note: Multiple selection is supported. |
| 3 | Required | Enabled by default when adding a registration agreement. |
| 4 | Interface language | Note: The currently configured agreement will only be displayed in the selected language interface. You can click the Add button under the agreement adding panel to add different language versions of the registration agreement for the login box in different languages. |
| 5 | Check text | You can configure the registration agreement title and content here. |
| 6 | Undo | Undo the modification of the registration agreement title and content. |
| 7 | Redo | Restore the modification of the registration agreement title and content. |
| 8 | Agreement content | Click to configure the specific agreement content. |
| 9 | Registration Agreement Prompt | You can configure the registration agreement prompt to be viewed and checked here, which is visible when the user logs in/registers. |
| 10 | Save | Save configuration and modification. |
| 11 | Delete | Delete the current registration agreement configuration. |
| 12 | Add | Same as 1. |
| 13 | Address | The agreement content can be an external link: that is, you have deployed the page with the detailed content of the agreement, just enter the page address directly, and the user will jump to the link you configured when clicking the agreement title. |
| 14 | Display Text | You can configure the agreement content title corresponding to the external link here. |
To enable this function, perform the following steps:
In the Branding->Function Configuration->Login Registration Agreement module, click the Add button in the upper right corner. Open the agreement addition panel below.
Check Show Location.
Select the interface language applicable to the registration agreement.
Configure the agreement content.
Click the Save button to save the current configuration.
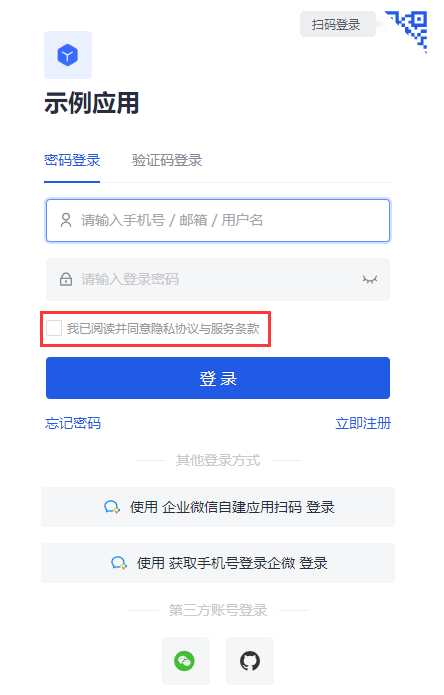
After the configuration is completed, you can see the registration agreement on the registration interface. When logging in/registering, users need to review and check the terms of service and privacy terms you configured:
Login registration information completion
Users usually need to provide personal information such as mobile phone number/email address when logging in and registering. In addition to these general personal information, administrators can specify users to complete specific information to complete login/registration for business data collection.
Administrators can specify the information to be completed (i.e. fields) in the console Branding->Function Configuration->Login Registration Information Completion module.
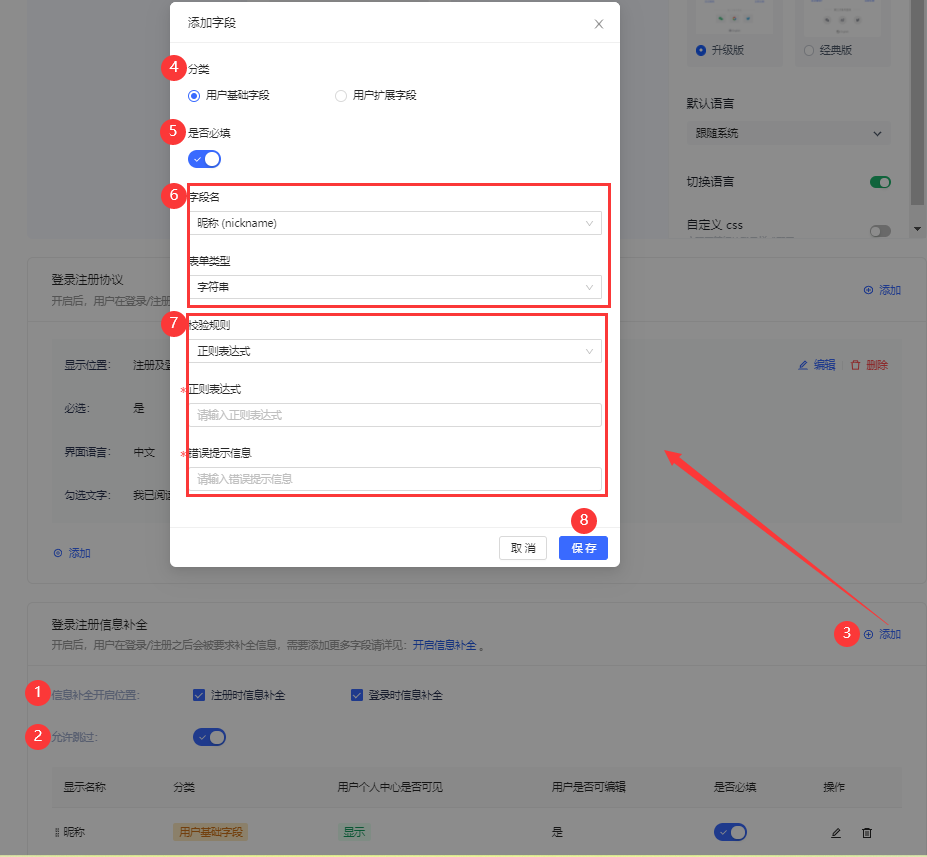
To configure the information to be completed, perform the following steps:
Select Information completion start position: Information completion during registration and/or Information completion during login.
Specify whether the user can skip the completion window when logging in/registering.
INFO
If the Allow skip switch is turned on, a Skip button will appear in the upper right corner of the completion window when the user logs in to complete the completion, and the user can click the button to skip the completion.
If the Allow skip switch is turned off, the Skip button will not appear in the completion window.
In the Login and registration information completion module, click the Add button in the upper right corner to add the fields to be completed. Open the Add field pop-up window.
Select the category of fields to be completed: User basic fields, User extended fields.
INFO
Administrators can view user basic fields and user extended fields in Settings->Field Management.
Administrators can only edit user basic fields, and cannot add or delete them.
- Specify whether the current field to be completed is Required.
INFO
After turning on Required, users must complete the required fields when logging in/registering.
If the completion information has been provided when the user logs in/registers (such as mobile phone number, email address), regardless of whether the completion information is specified as Required, it will not appear in the completion window, that is, only the currently empty fields will appear in the completion window.
- Select the field to be completed.
INFO
Field name is linked to Category, and the data source is synchronized with the User Basic Field list and User Extended Field list in Settings->Field Management.
If the supplementary information is a user extended field, it needs to be configured in advance in the Field Management menu. For details on user extended field configuration, please refer to Add Custom User Fields.
After selecting a field, the Form Type below is automatically displayed, which is consistent with the Data Type of the field in Field Management and cannot be modified.
- Specify Validation Rules, including two options:
- No validation
- Regular expression: Enter the Regular expression and Error message below (required).
- Click Save.
INFO
You can edit or delete the current field by clicking the corresponding button in the Operation column of the target field row in the supplementary field list.
For the created completion fields, click the Edit button to modify only Required and Validation Rules.
Configure email service and template
INFO
For information about the GenAuth user pool version that supports the various benefits of the "Message Settings" function, please check the Official Website "Pricing" page. If your version does not support this benefit and you want to try it, you can activate the trial period. For an introduction to the trial period and how to activate it, please check Trial Period.
Email is an email sending service provided by GenAuth for users who register using "email". After entering any application, click the button as shown below to enter the email management panel:
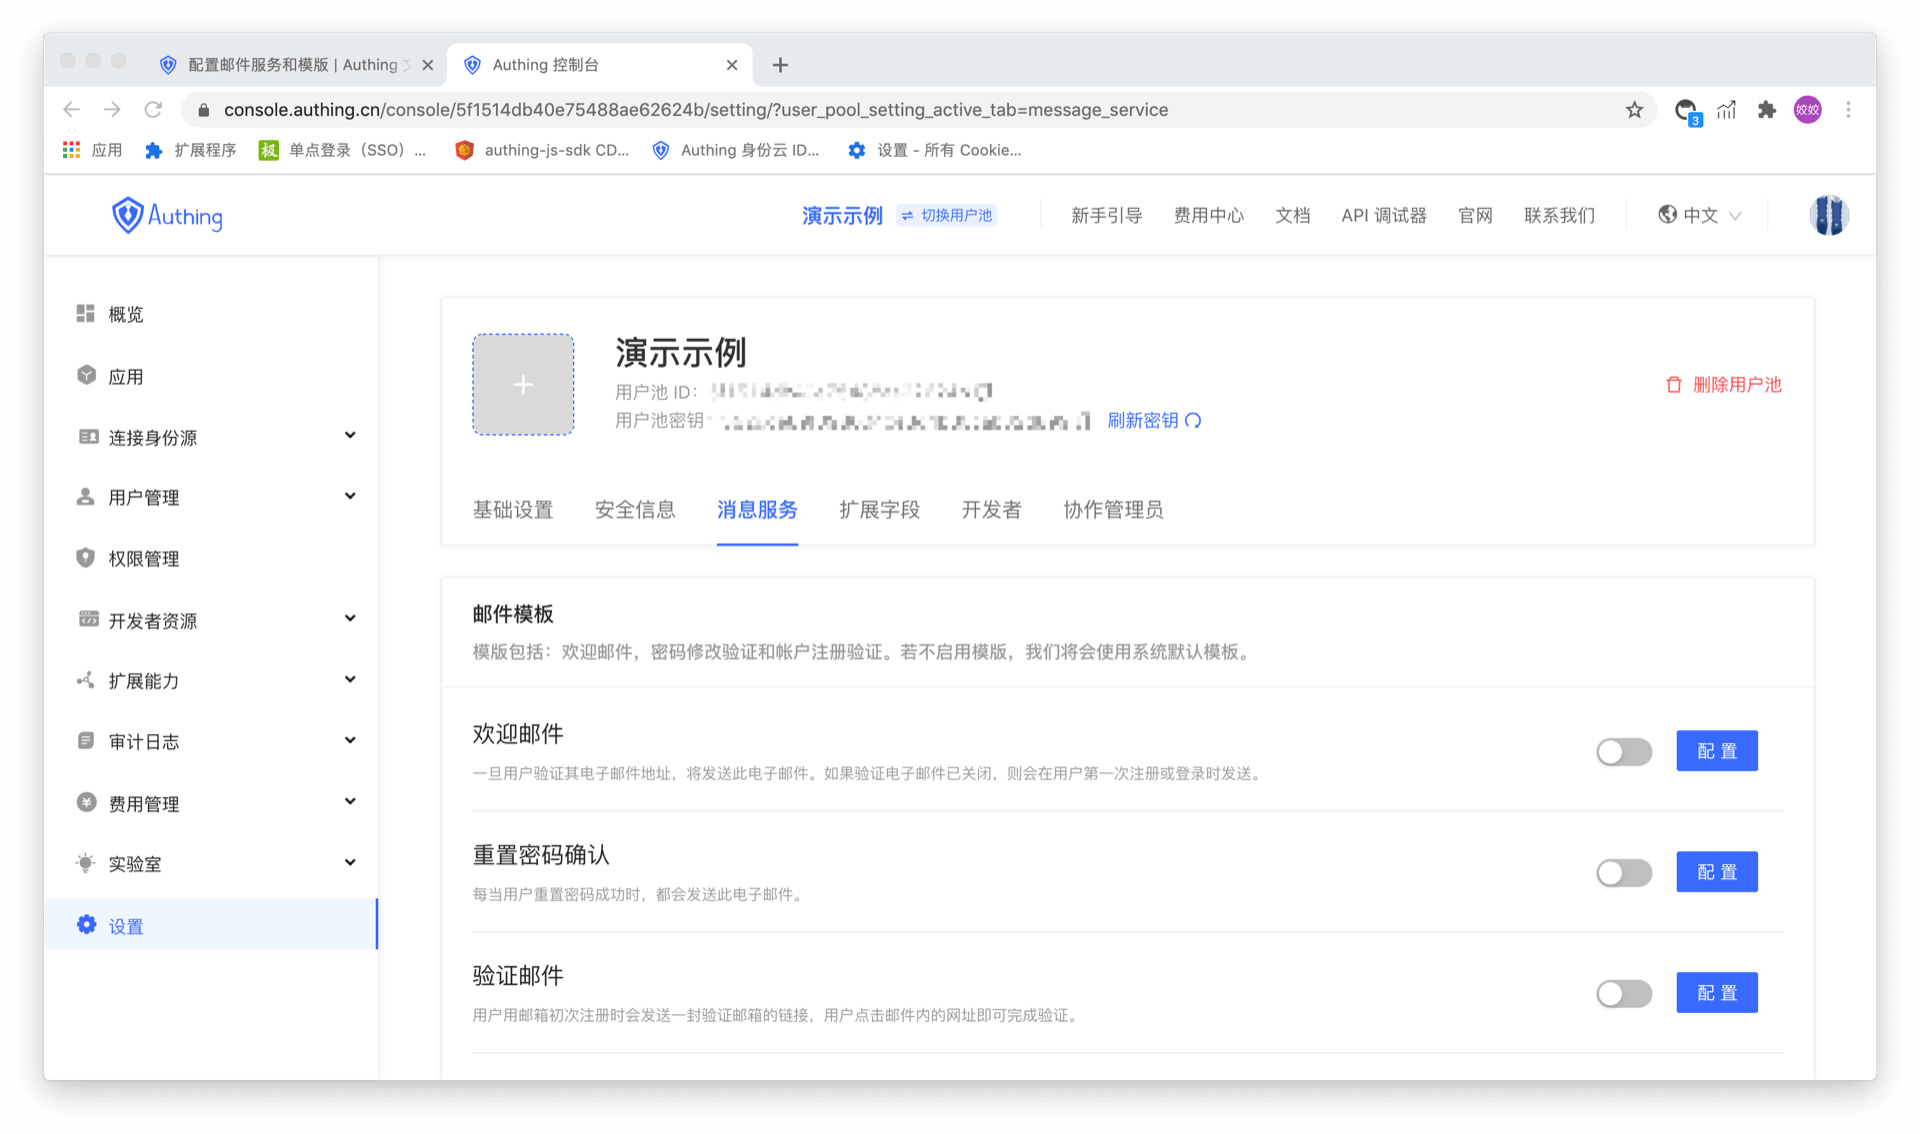
Manage email templates
Six types of email templates can be configured in the email template, namely:
- Welcome email - This email will be sent if the user registers using an email address
- Reset password confirmation - This email will be sent every time the user successfully resets the password.
- Verification email - When the user registers with an email address, a verification email will be sent to the user to verify the email address. The user can complete the verification by clicking the link in the email address.
- Modify bound email - This email will be sent every time the user needs to modify the bound email address and send a verification code.
- Reset password - Every time the user forgets the password, the system will send this password reset email, and a verification code will be attached to the email. The user can reset the password after submitting the verification code and new password.
- Change password - Every time the user requests to change the password, this email will be sent, and a verification code will be attached to the email. The user needs to fill in this verification code to complete the password change.
As shown in the figure below:
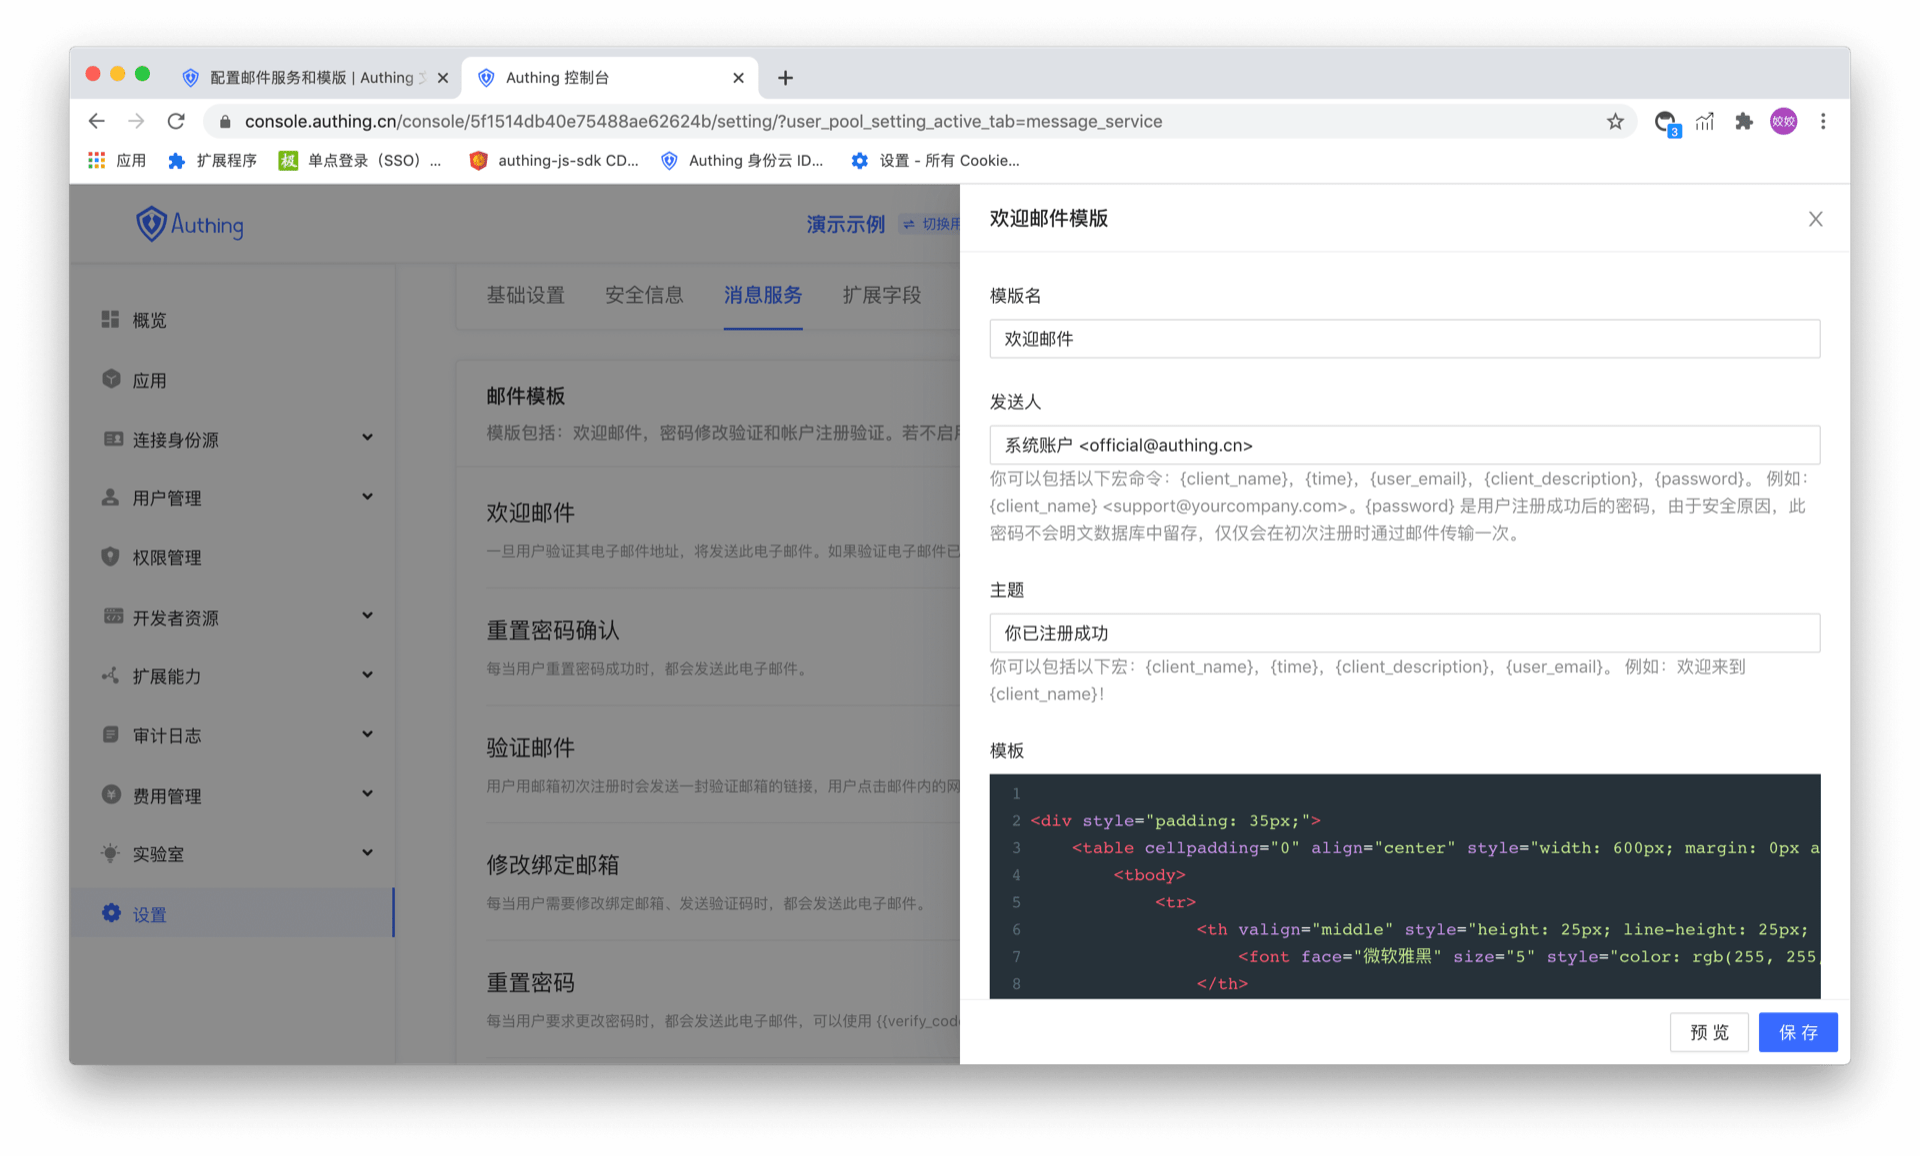
Email macro command
Macros are used to generate some dynamic content, such as:
<div style="padding: 35px;">
  <table
    cellpadding="0"
    align="center"
    style="width: 600px; margin: 0px auto; text-align: left; position: relative; border-top-left-radius: 5px; border-top-right-radius: 5px; border-bottom-right-radius: 5px; border-bottom-left-radius: 5px; font-size: 14px; font-family:微软雅黑, 黑体; line-height: 1.5; box-shadow: rgb(153, 153, 153) 0px 0px 5px; border-collapse: collapse; background-position: initial initial; background-repeat: initial initial;background:#fff;"
  >
    <tbody>
      <tr>
        <th
          valign="middle"
          style="height: 25px; line-height: 25px; padding: 15px 35px; border-bottom-color: rgba(18, 24, 37, 0.87); background-color: #484f60; border-bottom-color: #C46200; background-color: #484f60; border-top-left-radius: 5px; border-top-right-radius: 5px; border-bottom-right-radius: 0px; border-bottom-left-radius: 0px;"
        >
          <font face="微软雅黑" size="5" style="color: rgb(255, 255, 255); "
            >{{app_name}}
          </font>
        </th>
      </tr>
      <tr>
        <td>
          <div style="padding:25px 35px 40px; background-color:#fff;">
            <h2 style="margin: 5px 0px; ">
              <font color="#333333" style="line-height: 20px; "
                ><font style="line-height: 22px; " size="4"
                  >Hi,{{user_email}}</font
                ></font
              >
            </h2>
            <p>Welcome to {{app_name}}</p>
            <p>{{app_description}}</p>
            <p align="right">{{app_name}} 团队</p>
            <p align="right">{{TIME}}</p>
          </div>
        </td>
      </tr>
    </tbody>
  </table>
</div>
In this email, {{app_name}}, {{app_description}}, {{TIME}}, {{user_email}} are all macro commands. After parsing this email in GenAuth, the result will be similar to the following:
All currently supported macro commands are listed in the following table:
| Macro Command | Function |
|---|---|
| {{subject_name}} | Email Subject |
| {{client_name}} | Sender |
| {{app_name}} | GenAuth Application Name |
| {{app_description}} | GenAuth Application Description |
| {{app_logo}} | GenAuth Application LOGO |
| {{user_email}} | User Email |
| {{user_display_name}} | User Display Name |
| {{user_name}} | User name |
| {{username}} | User name |
| {{password}} | User login password |
| {{app_domain}} | Application login address |
| {{invite_link}} | Invite link address when inviting users |
| {{inviter_name}} | Inviter name when inviting users |
| {{verify_code}} | Verification code when sending email verification code |
| {{verify_link}} | Email verification address |
| {{expires_in}} | Email verification address validity period |
| {{password_effective_time}} | Password effective time |
| {{update_password_link}} | Password change link address |
| {{email_effective_time}} | Email effective time |
| {{login_url}} | New account login address |
| {{tenant_name}} | Tenant name |
| {{tenant_logo}} | Tenant LOGO |
| {{tenant_domain}} | Tenant domain name |
| {{host_url}} | Tenant management address |
| {{admin_name}} | Administrator name |
| {{userpool_name}} | User pool name |
| {{userpool_logo}} | User pool LOGO |
| {{ip}} | User login IP |
| {{country}} | User login country |
| {{province}} | User login province |
| {{city}} | User login city |
| {{datetime}} | User login time |
| {{userPoolName}} | User pool name |
| {{workflowName}} | Workflow name |
| {{errorTime}} | Workflow execution error time |
| {{taskName}} | Workflow task name |
| {{workflowExecuteLogUrl}} | Workflow execution log address |
| {{errorReason}} | Workflow execution failure reason |
| {{workflowInstanceId}} | Workflow execution ID |
| {{failedCount}} | Workflow execution failed error data count |
Configure third-party mail service
Our built-in mail sending server uses Alibaba Cloud Enterprise Mailbox. If you want to customize the mail server, you can set it on this page:
config-email-providerCode snippet: config-email-provider
Configure SMS service
SMS verification allows users to log in using a one-time password sent to their mobile phone via SMS. GenAuth By default, the SMS service provided by the platform is used. We also support custom configuration of BlueCloud SMS service, Alibaba Cloud SMS service and Tencent Cloud SMS service.
Domestic SMS service
Use default SMS service
- The default SMS service template is: verification code {S1}, which is valid for {S2} minutes. Please do not disclose it to others.
- The verification code is valid for 5 minutes.
- The SMS interface QPS is 100.
- It is recommended to use Small login to obtain a mobile phone number for free on the web.
Configure custom SMS service providers
We currently support the following SMS service providers:
- Alibaba Cloud SMS Service
- Chuanglan 253 SMS Service
- Tencent Cloud SMS Service
config-sms-providerCode snippet: config-sms-provider
International SMS Service
International SMS service mainly supports SMS verification of overseas mobile phone numbers.
Configure custom international SMS service providers
We currently support the following international SMS service providers:
- Alibaba Cloud
- Alibaba Cloud International
config-int-sms-providerCode snippet: config-int-sms-provider
Custom Domain Name
INFO
For information about the GenAuth user pool version that supports the "Custom Domain Name" feature benefit, please check the Official Website "Pricing" page. If your version does not support this benefit and you want to try it, you can activate the trial period. For an introduction to the trial period and how to activate it, please check Trial Period.
Why use a custom domain name?
In your GenAuth user pool, the application panel will have a default domain name default.genauth.ai. After completing the configuration of the custom domain name, your users can visit login.your_domain.cn to always complete the login within the domain name. Custom domains can enhance your brand awareness and allow users to always use the application services provided under your domain name.
Use the custom domain name function provided by GenAuth
Path: **Branding->Custom Domain Name **
INFO
For this function, there are several important notes:
- Version benefits: GenAuth currently supports configuring custom domain names for your application panel in B2B (Premium Edition and above) and B2E (Premium Edition and above) user pool scenarios. If you are a newly registered user, you can also use this function freely during the trial period. For more detailed version benefits, please check the official website "Price" page.
- After configuring your custom domain name, the default domain name provided by GenAuth will still be effective. When accessing the original domain name, it will also jump to the custom domain name you configured to complete the login. .
- At the moment when the custom domain name configuration is completed, if a user is using the original domain name to log in, his login status will not be affected; when he logs in again, he will complete the login under the custom domain name .
- When using embedded login (GenAuth Guard) / GenAuth SDK to implement login, you can also use the default domain name provided by GenAuth or configure a custom domain name.
Configure your custom domain name
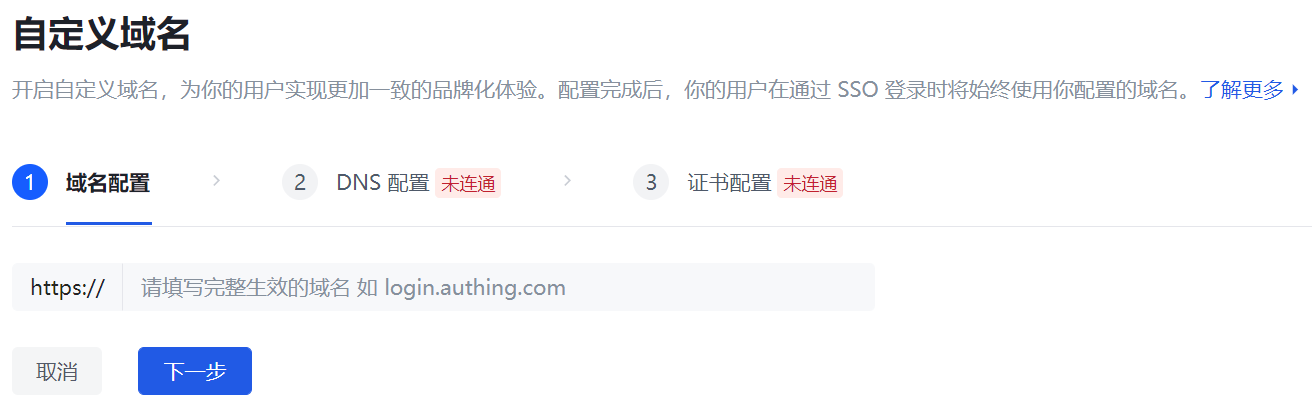
It only takes three steps to configure a custom domain name in GenAuth:
Step 1: Enter a valid domain name
INFO
Your custom domain name must comply with the domain name standard specifications. For details, please refer to RFC Domain Name Standard Specifications.
Prepare a domain name. If you don’t have your own domain name, you can go to a domain name registrar platform (such as Alibaba Cloud, Tencent Cloud, Huawei Cloud, etc.) to purchase your own domain name.
Filing. According to Ministry of Industry and Information Technology's "Internet Information Service Management Measures" (State Council Order No. 292), the website cannot point to a server in mainland China to open access before the filing is completed. If your website is hosted on a node server in mainland China, you must apply for Internet Content Provider (ICP) registration. If the website server is not in mainland China, you do not need to apply for registration. For compliance reasons, custom domain names used in GenAuth must first be registered before they can be used.
Enter the domain name. After ensuring that the domain name format is correct, legal and effective, fill in your domain name in the input box and click Next.
Step 2: Add a new CNAME to your domain name server
- After filling in the valid domain name information, GenAuth will generate the corresponding TXT and CNAME information. You need to go to the DNS service provider to add TXT and CNAME records, copy and paste the relevant information on this page to your DNS server, and point the domain name to the domain name corresponding to GenAuth.
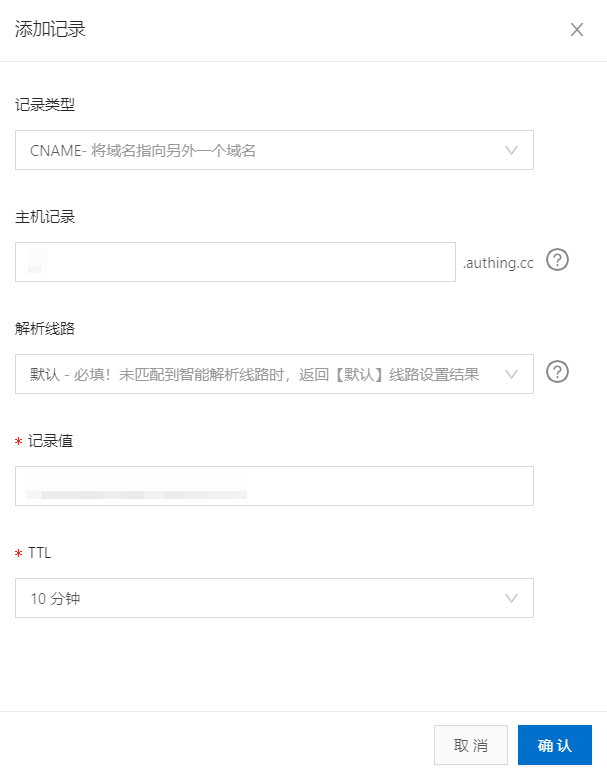
Example: Alibaba Cloud Console DNS Configuration Page - CNAME Record
INFO
The steps for adding TXT and CNAME records in different DNS servers are slightly different. You can refer to: Create a new CNAME pointing to GenAuth in Alibaba Cloud.
- After ensuring that the current information is configured and effective in your domain name server, return to GenAuth Custom Domain Name->DNS Configuration and click Connectivity Test.
INFO
Generally speaking, it takes a few minutes for a valid CNAME information to take effect after it is added to the DNS server. Therefore, if your connectivity test fails, please wait and try again.
- After the connectivity test is completed, click Next.
Step 3: Fill in valid SSL certificate information
For security reasons, GenAuth currently only supports domain names under the https protocol. To ensure that the domain name can be accessed normally, you need to find your SSL certificate in the domain name server and download it.
Due to the wide variety of certificate information provided by different service providers, you need to find the following two pieces of information:
- Signed certificate
- Signed private key
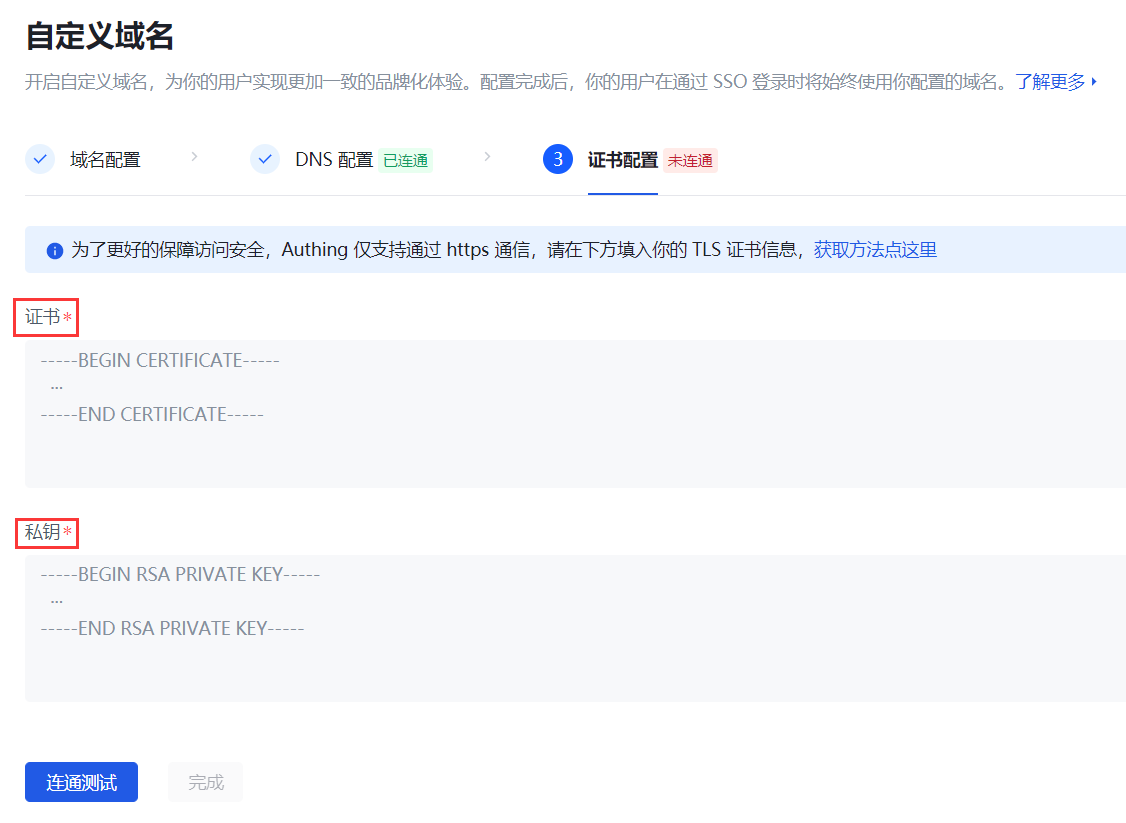
- Upload the signed certificate . Certificates are usually files with the extension of
.crtor.pem. Use a text editor to open the certificate file and you can see that the content starts withBEGIN CERTIFICATEand ends withEND CERTIFICATE. After confirming the certificate content format, directly copy and paste the certificate content into the signature certificate input box. The format of the signature certificate is:
----- BEGIN CERTIFICATE-----
Signature certificate body
----- END CERTIFICATE------ Upload the signature private key . The private key is usually a file with an extension such as
.keyor.pem. Use a text editor to open the certificate file and you can see that the content starts withBEGIN PRIVATE KEYand ends withEND PRIVATE KEY. After confirming the certificate content format, directly copy and paste the certificate content into the signature private key input box. The format of the certificate private key is:
-----BEGIN RSA PRIVATE KEY-----
Signature certificate private key body
----- END RSA PRIVATE KEY-----
After completing the configuration of the above two parts of information, click Connectivity Test. We will verify whether the certificate you configured corresponds to the domain name you configured in the first step, and verify whether this certificate is still valid.
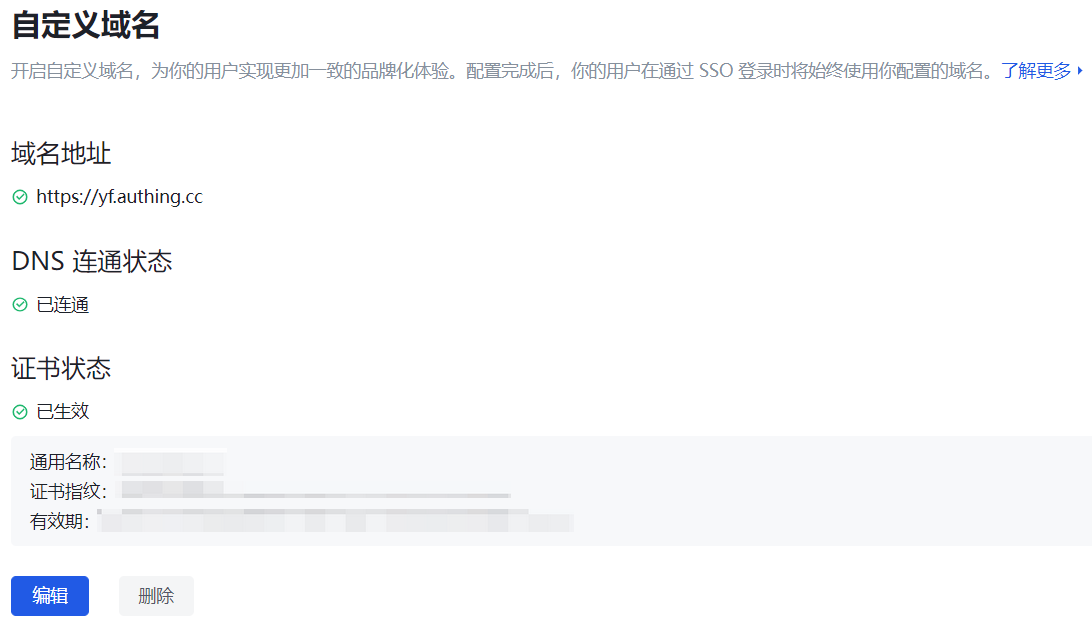
After the connectivity test passes, click Finish. Your custom domain name will take effect immediately!
Related function configuration
Before you start using a custom domain name, you need to make some modifications to the existing function configuration to ensure that the custom domain name you configured is effective for all existing functions.
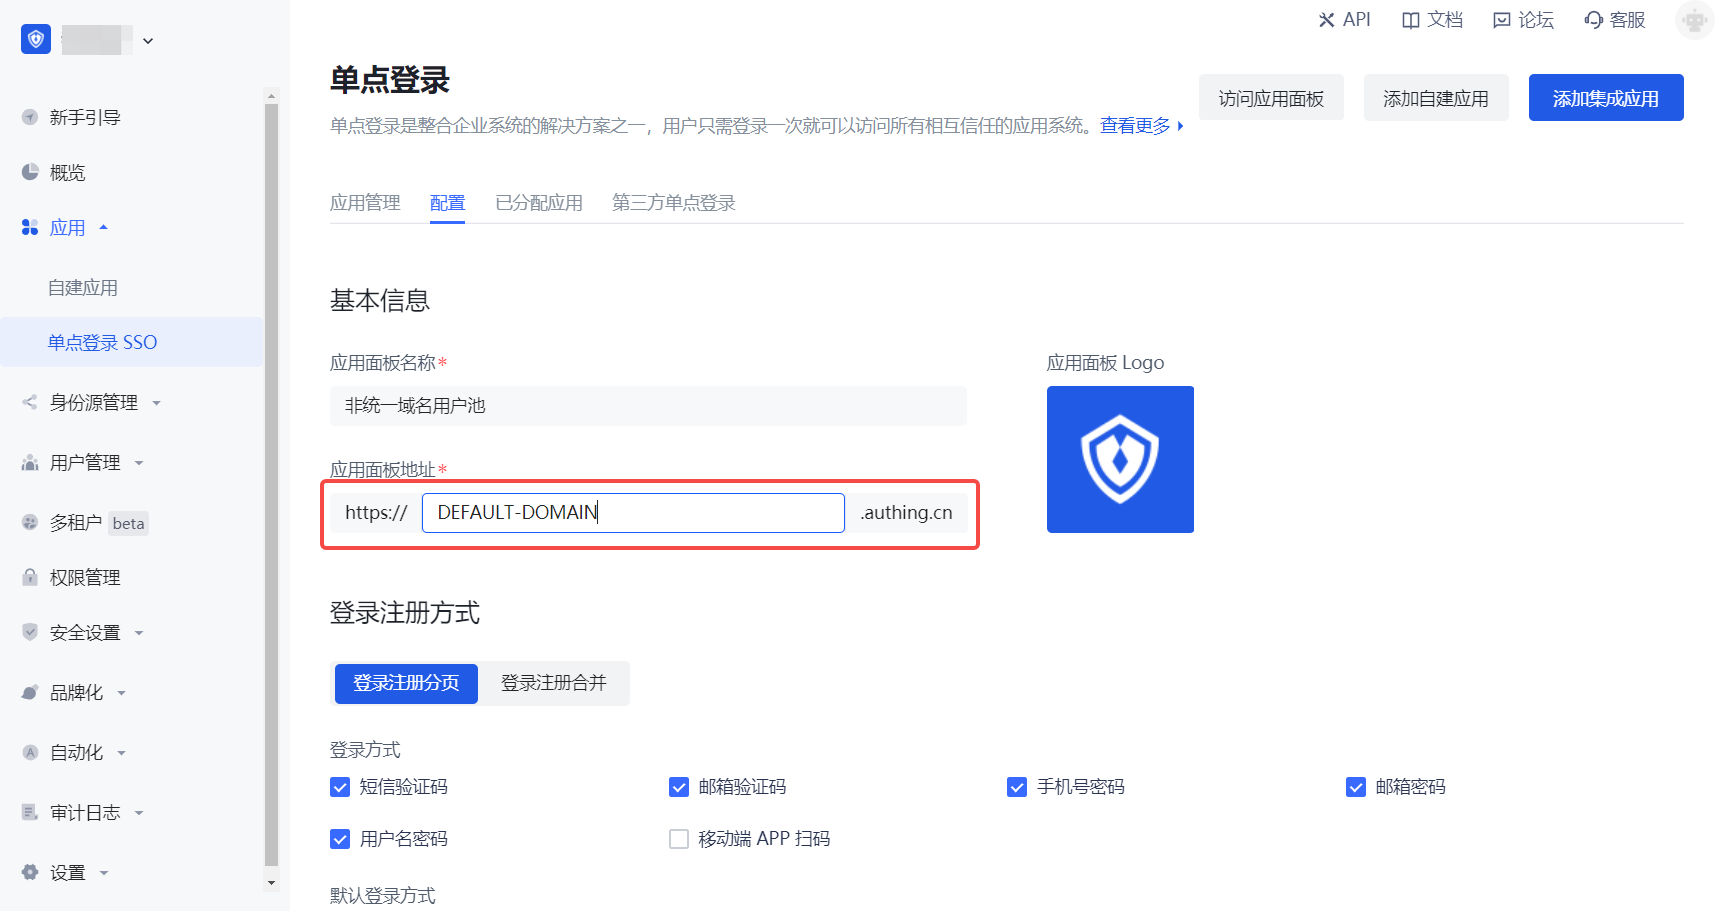
User pool using a unified domain name
In a user pool that does not use a unified domain name, after the custom domain name is configured, it will only take effect on the authentication address of the application panel (i.e. single sign-on SSO):
In a user pool that uses a unified domain name, after the custom domain name is configured, all applications in the user pool (including the application panel, integrated applications, and all self-built applications) use a unified, user pool-level domain name. Therefore, after the custom domain name is configured, it will take effect on all applications in the user pool.
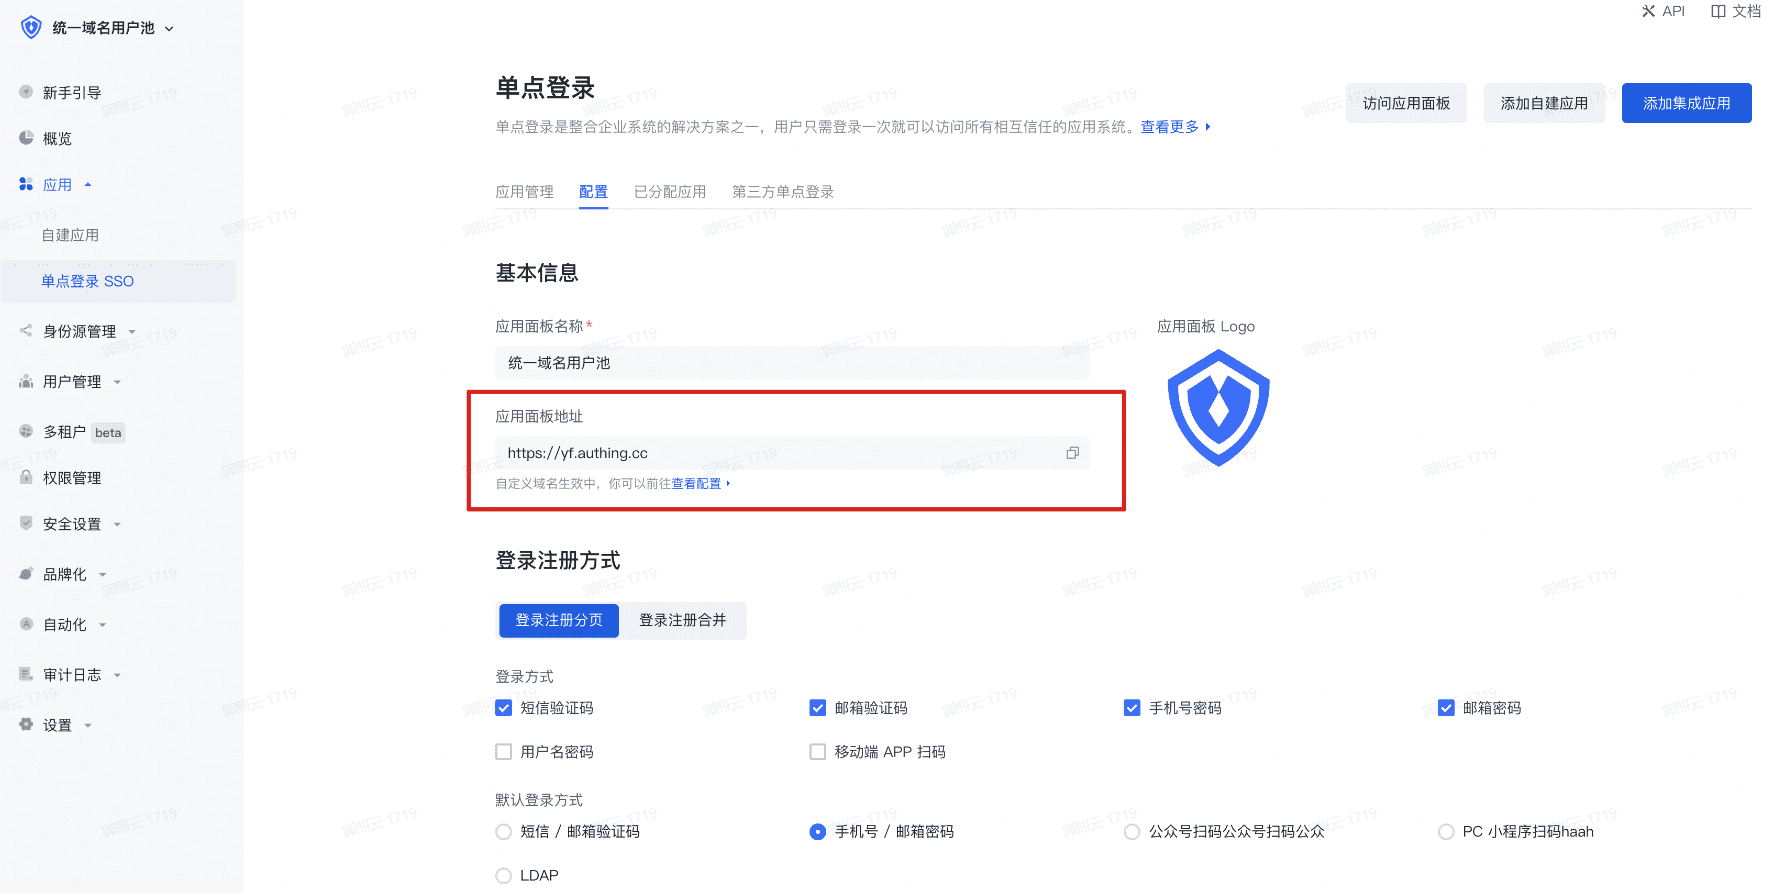
If you are not sure whether to use a unified domain name user pool, please go to Learn when to use a unified domain name user pool.
Email templates involving application domains
When you start using a custom domain, the parts of the pre-set email templates involving application domains will be updated to the custom domain name. The scenarios involved in sending emails include:
- Welcome email
- First email login verification
- Console initiated verification
- Password expiration reminder
- Administrator password reset reminder
- Account password change reminder
- Send login address to internal administrators
- Send login address to tenant administrators
Custom SMS templates
Unfortunately, due to legal regulations, third-party SMS service providers need to first register your custom domain name on the platform when allowing the use of SMS templates. Therefore, we do not support you using custom domain names while using custom SMS services. Such configuration will cause SMS to fail to send normally.
If you are using the built-in SMS service of GenAuth, you do not need to worry about this and can use it normally.
Third-party identity source login (social identity source, enterprise identity source)
If you are using GenAuth's third-party identity source (social identity source/enterprise identity source), in order to ensure that these identity sources can still be used normally under custom domain names, you need to update the login address contained in your application code.
GenAuth API Calls
All requests (i.e. getting a token, and actually calling the API) must use the same domain. Tokens obtained with a custom domain must be used under the same domain name.
If you use the authentication flow with a custom domain to request an access token to access the Admin API, you must also use the custom domain to call the Admin API endpoints.
POST https://mycustomdomain.cn/oidc/token
... // other parameters
...
audience:https://YOUR_APP.genauth.ai/api/v3/
Your access token request should be similar to:
GET https://mycustomdomain.com/api/v3/clients
Headers:
Authorization: Bearer <access_token>
SAML-related function configuration
For integrated applications that have completed SAML configuration in the console and added SAML applications to the application panel, if a custom domain name has been configured, to make it effective, you need to re-download the SAML metadata document** (the newly configured custom domain name will be directly updated to the value of entityID) to replace the metadata configured on Alibaba Cloud.
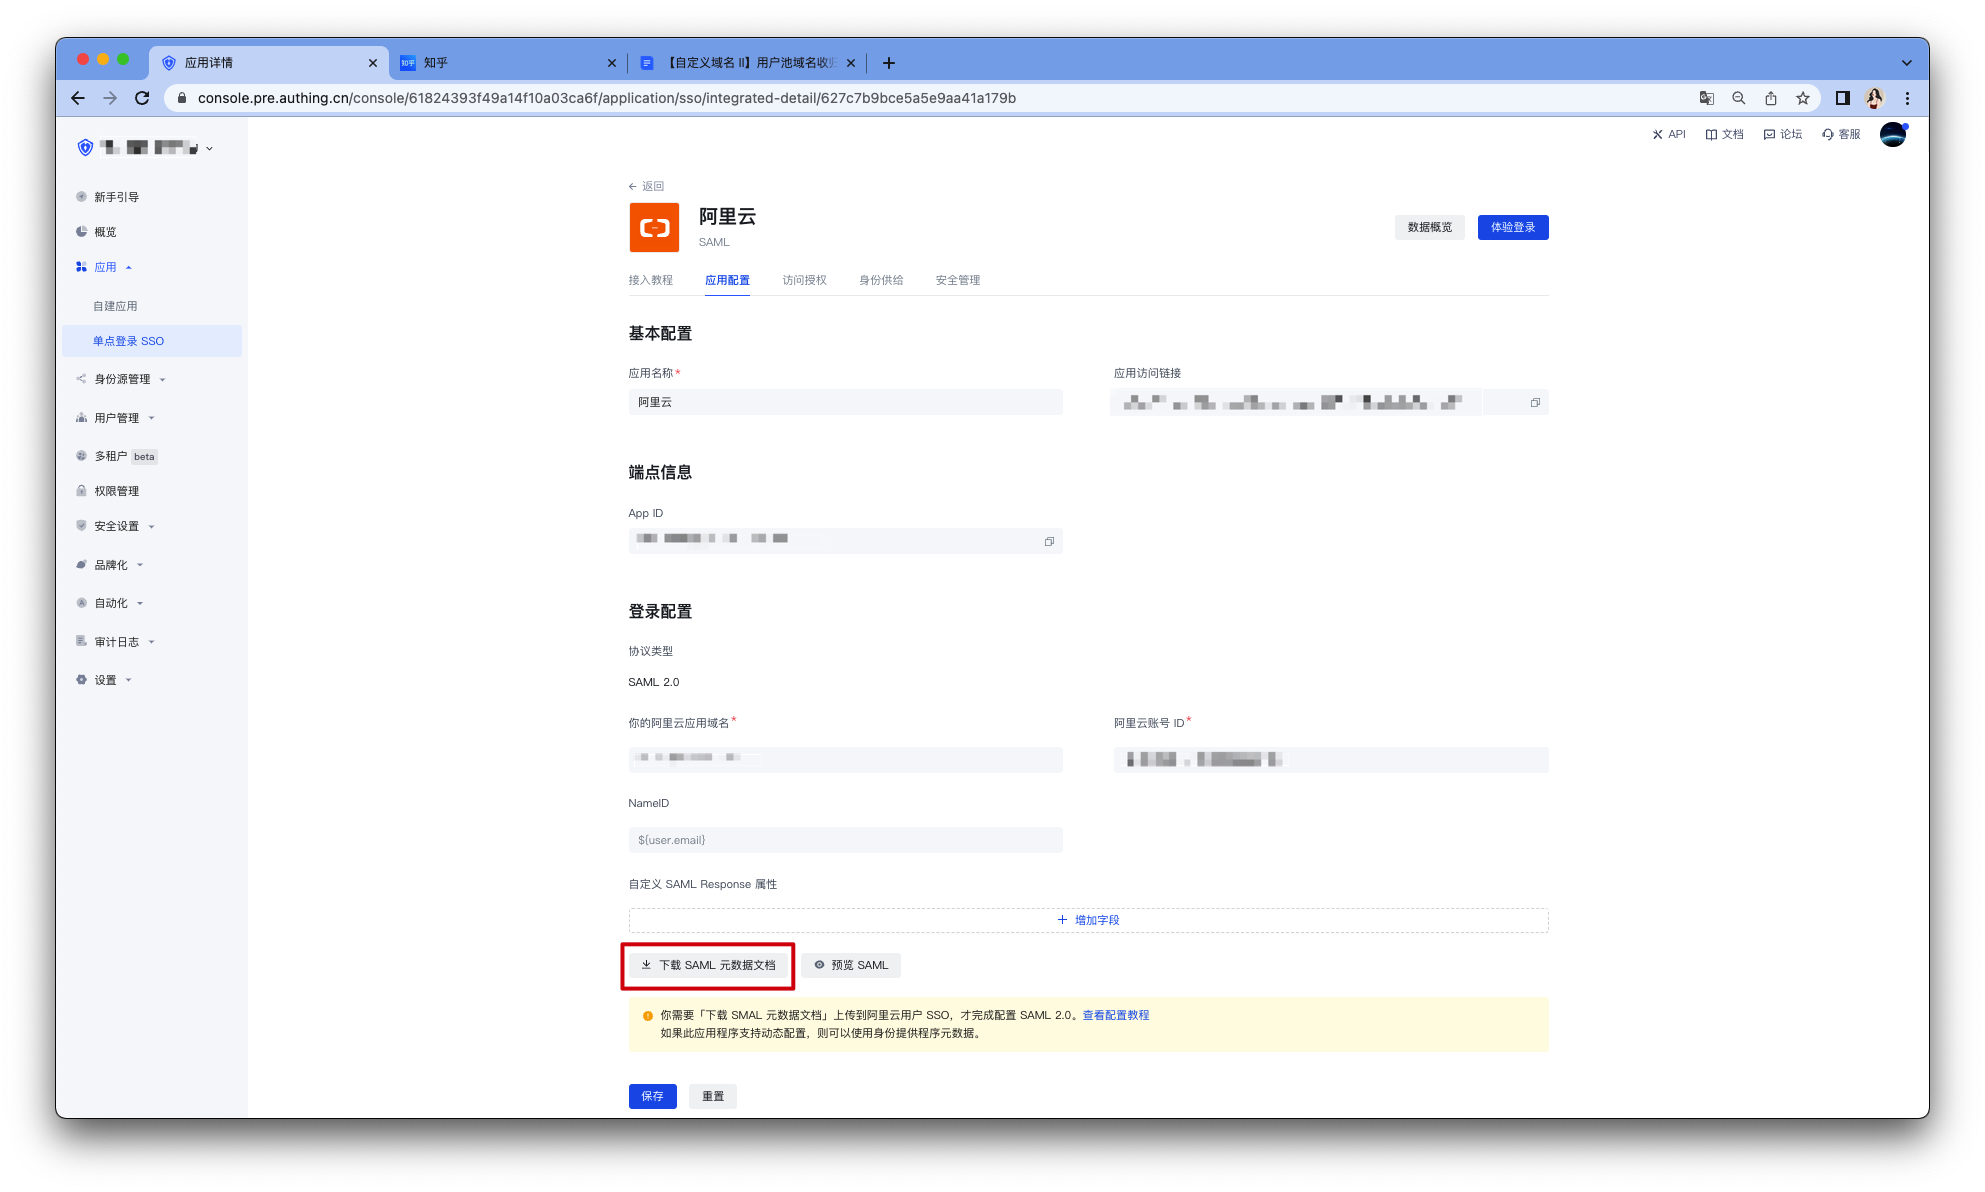
Download SAML metadata document - Console
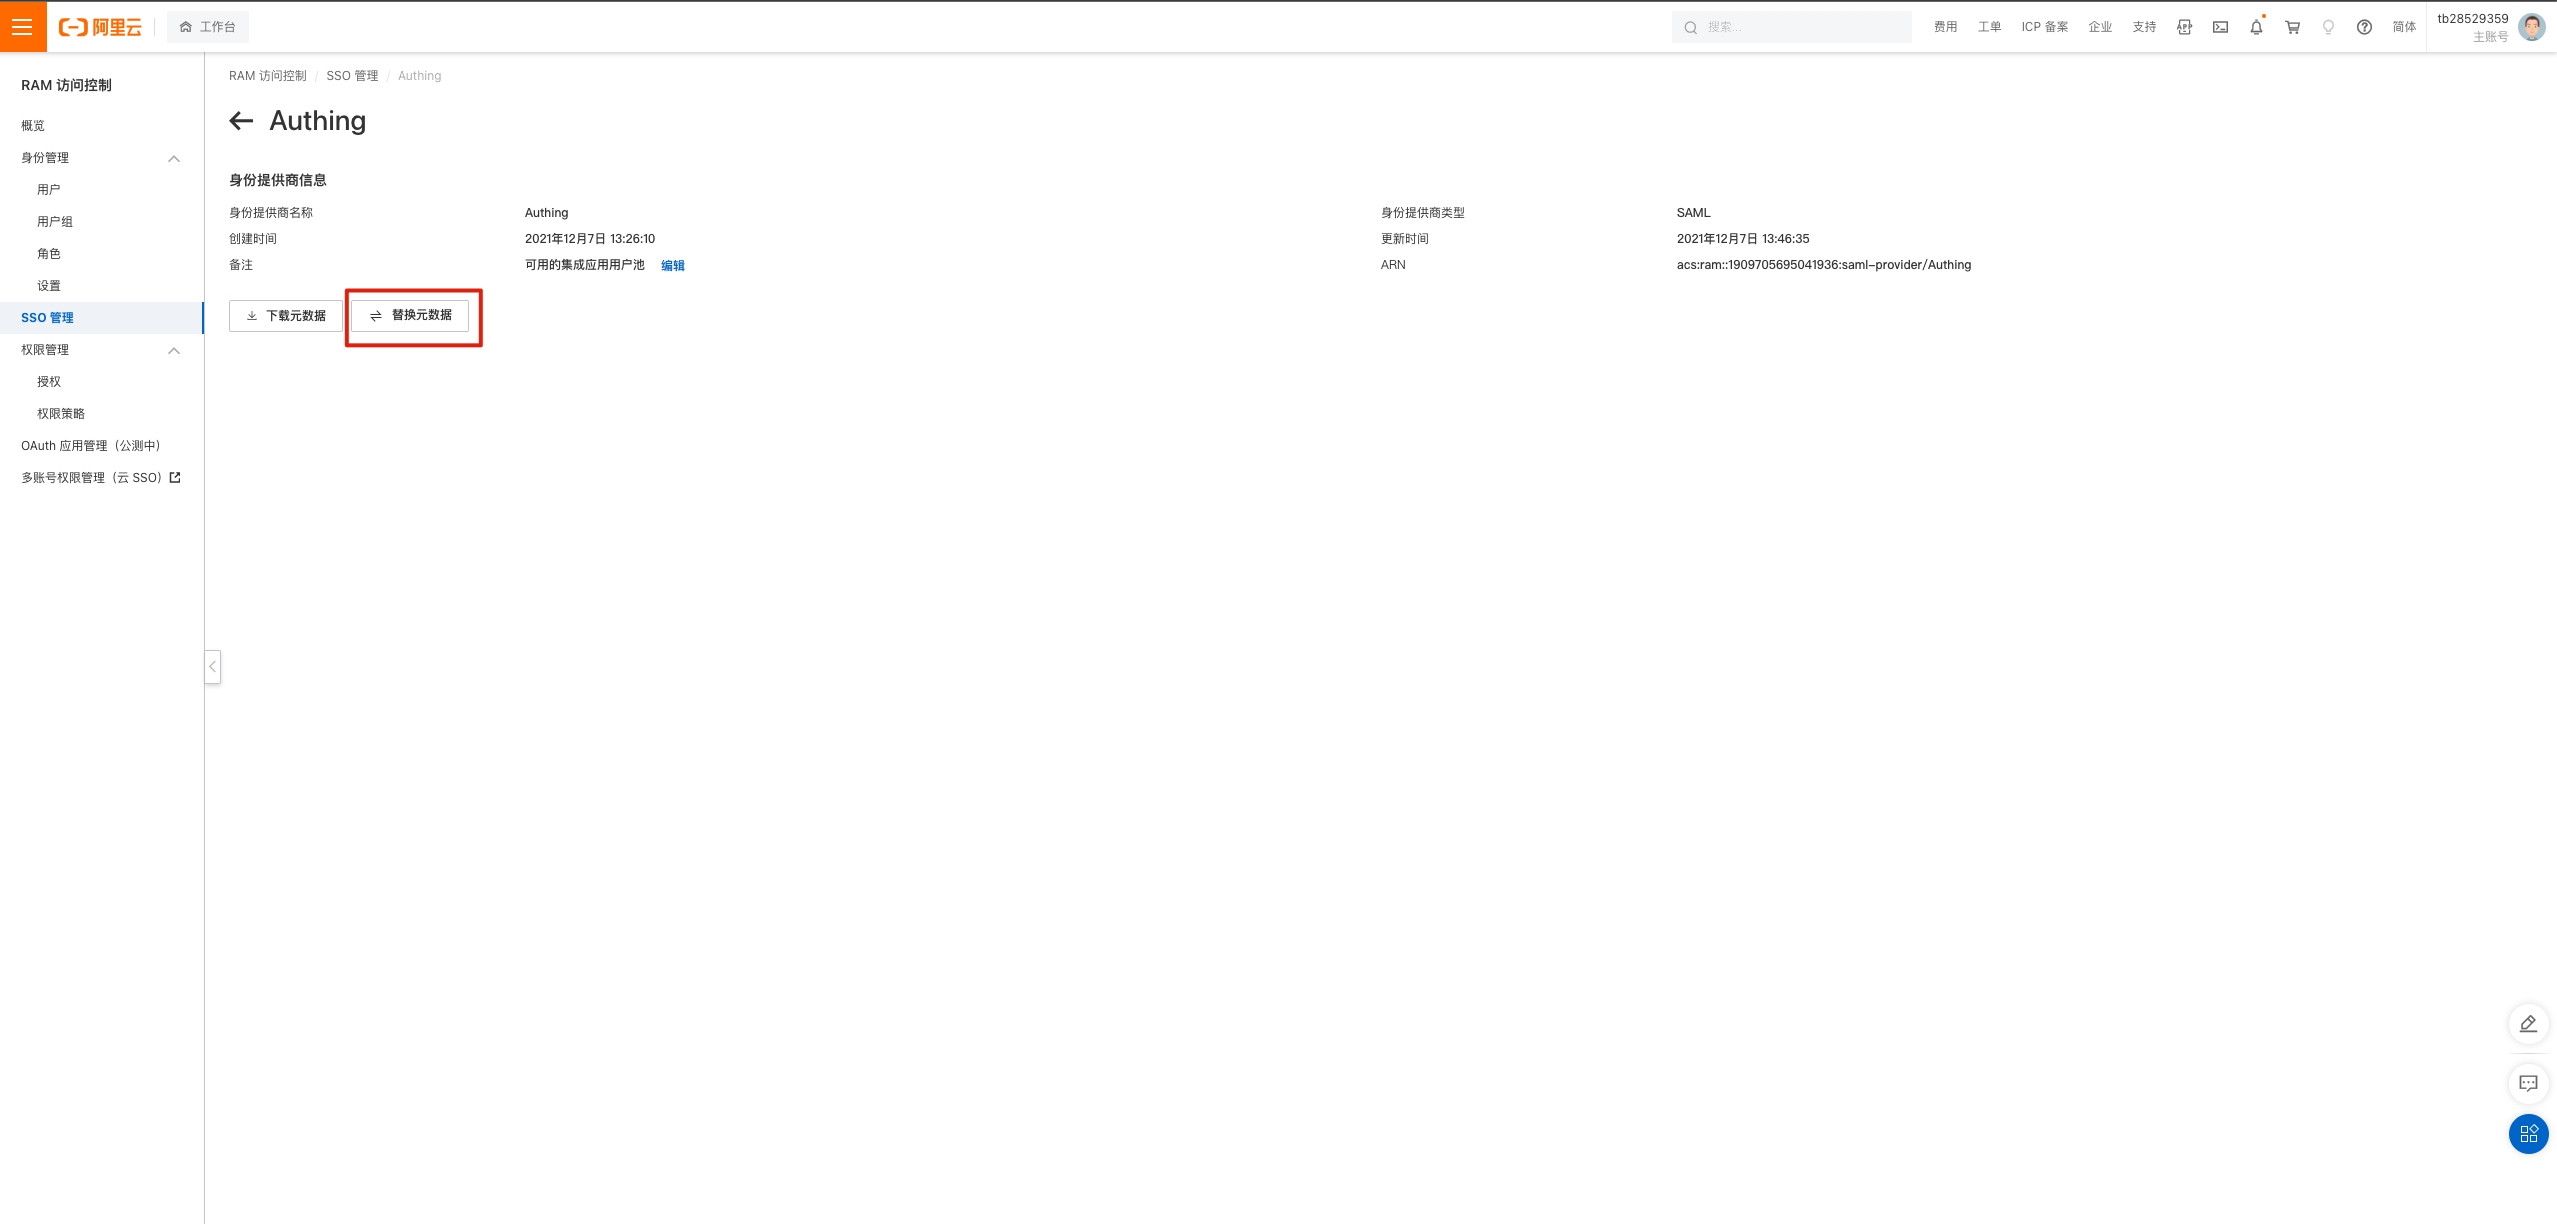
Replace SAML metadata document - Alibaba Cloud Workbench
Private deployment
Currently, we do not support custom domain names in private scenarios. If you have special needs, please contact your service support team.
Common operations
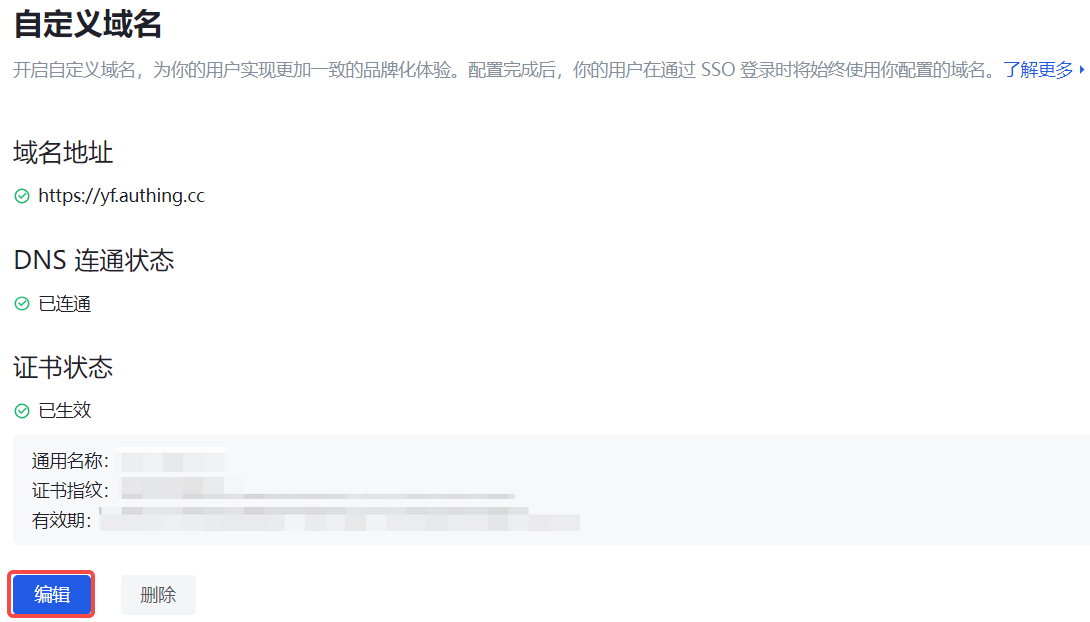
Update SSL certificate
Each SSL certificate has its own expiration date. If you find that the SSL certificate is about to expire, you can click Edit to modify it. After updating the certificate information, you need to re-test the connectivity. After it takes effect, your custom domain name can continue to be used normally.
Change custom domain name
If you need to change the custom domain name, you need to delete the existing domain name and start over. If the current custom domain name is in effect, then after you delete this custom domain name, users currently accessing under this domain name will not be able to continue to use your application service, and need to close this page and log in again.
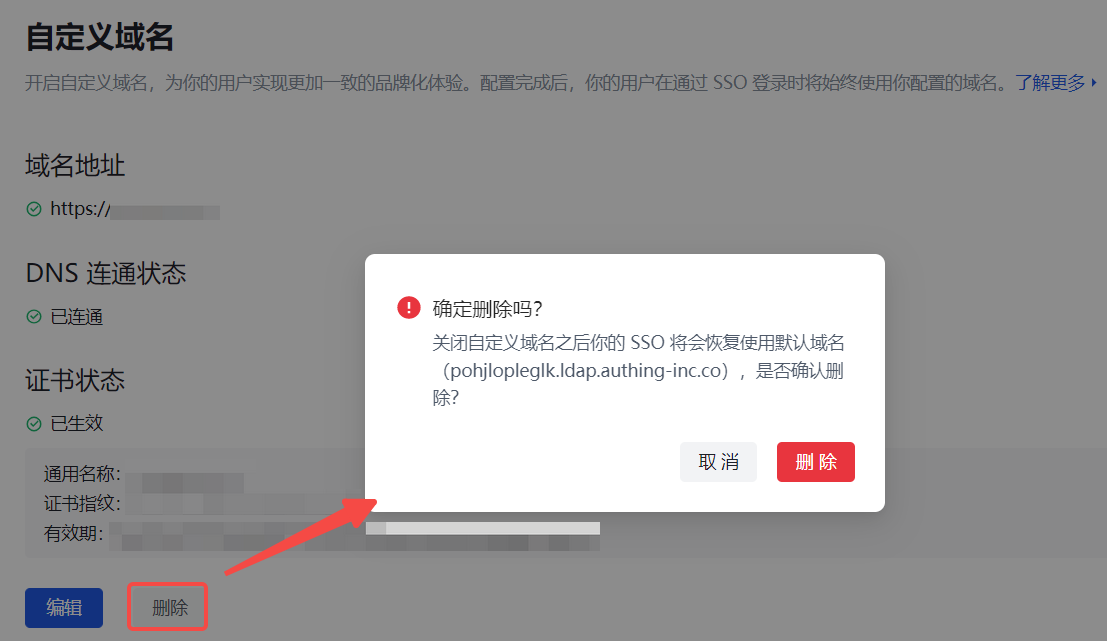
Stop using a custom domain name
If you want to restore the default domain name, you need to delete the currently configured domain name. If the current custom domain name is in effect, then when you delete this custom domain name, users currently accessing under this domain name will not be affected, and need to log in again after refreshing the interface.
Application panel configuration
Path: Branding->Application panel
Application panel is a carrier for displaying and accessing various applications that can use Single Sign-On SSO within the user pool. Enterprise administrators can add various applications required by employees or target end users to the application panel to achieve single sign-on (SSO) for employees/end users to each application, improve work efficiency and ensure information security.
Application panel configuration supports modifying the panel name, logo, address, style, background and other information of the application panel. You can also build a beautiful and brand-friendly application panel by customizing css. More fine-grained branding configuration of the application panel can deepen the brand awareness of end users within the organization; or enhance credibility when used as an external business system, and further expand the applicable scenarios of the single sign-on panel.
INFO
To use the Branding->App Panel function, the user pool must have enabled Single Sign-On SSO value-added functions
Basic Settings
Enterprise administrators or administrators with GenAuth console permissions can enter the console Branding->App Panel->Basic Settings to modify the basic information of the application panel:
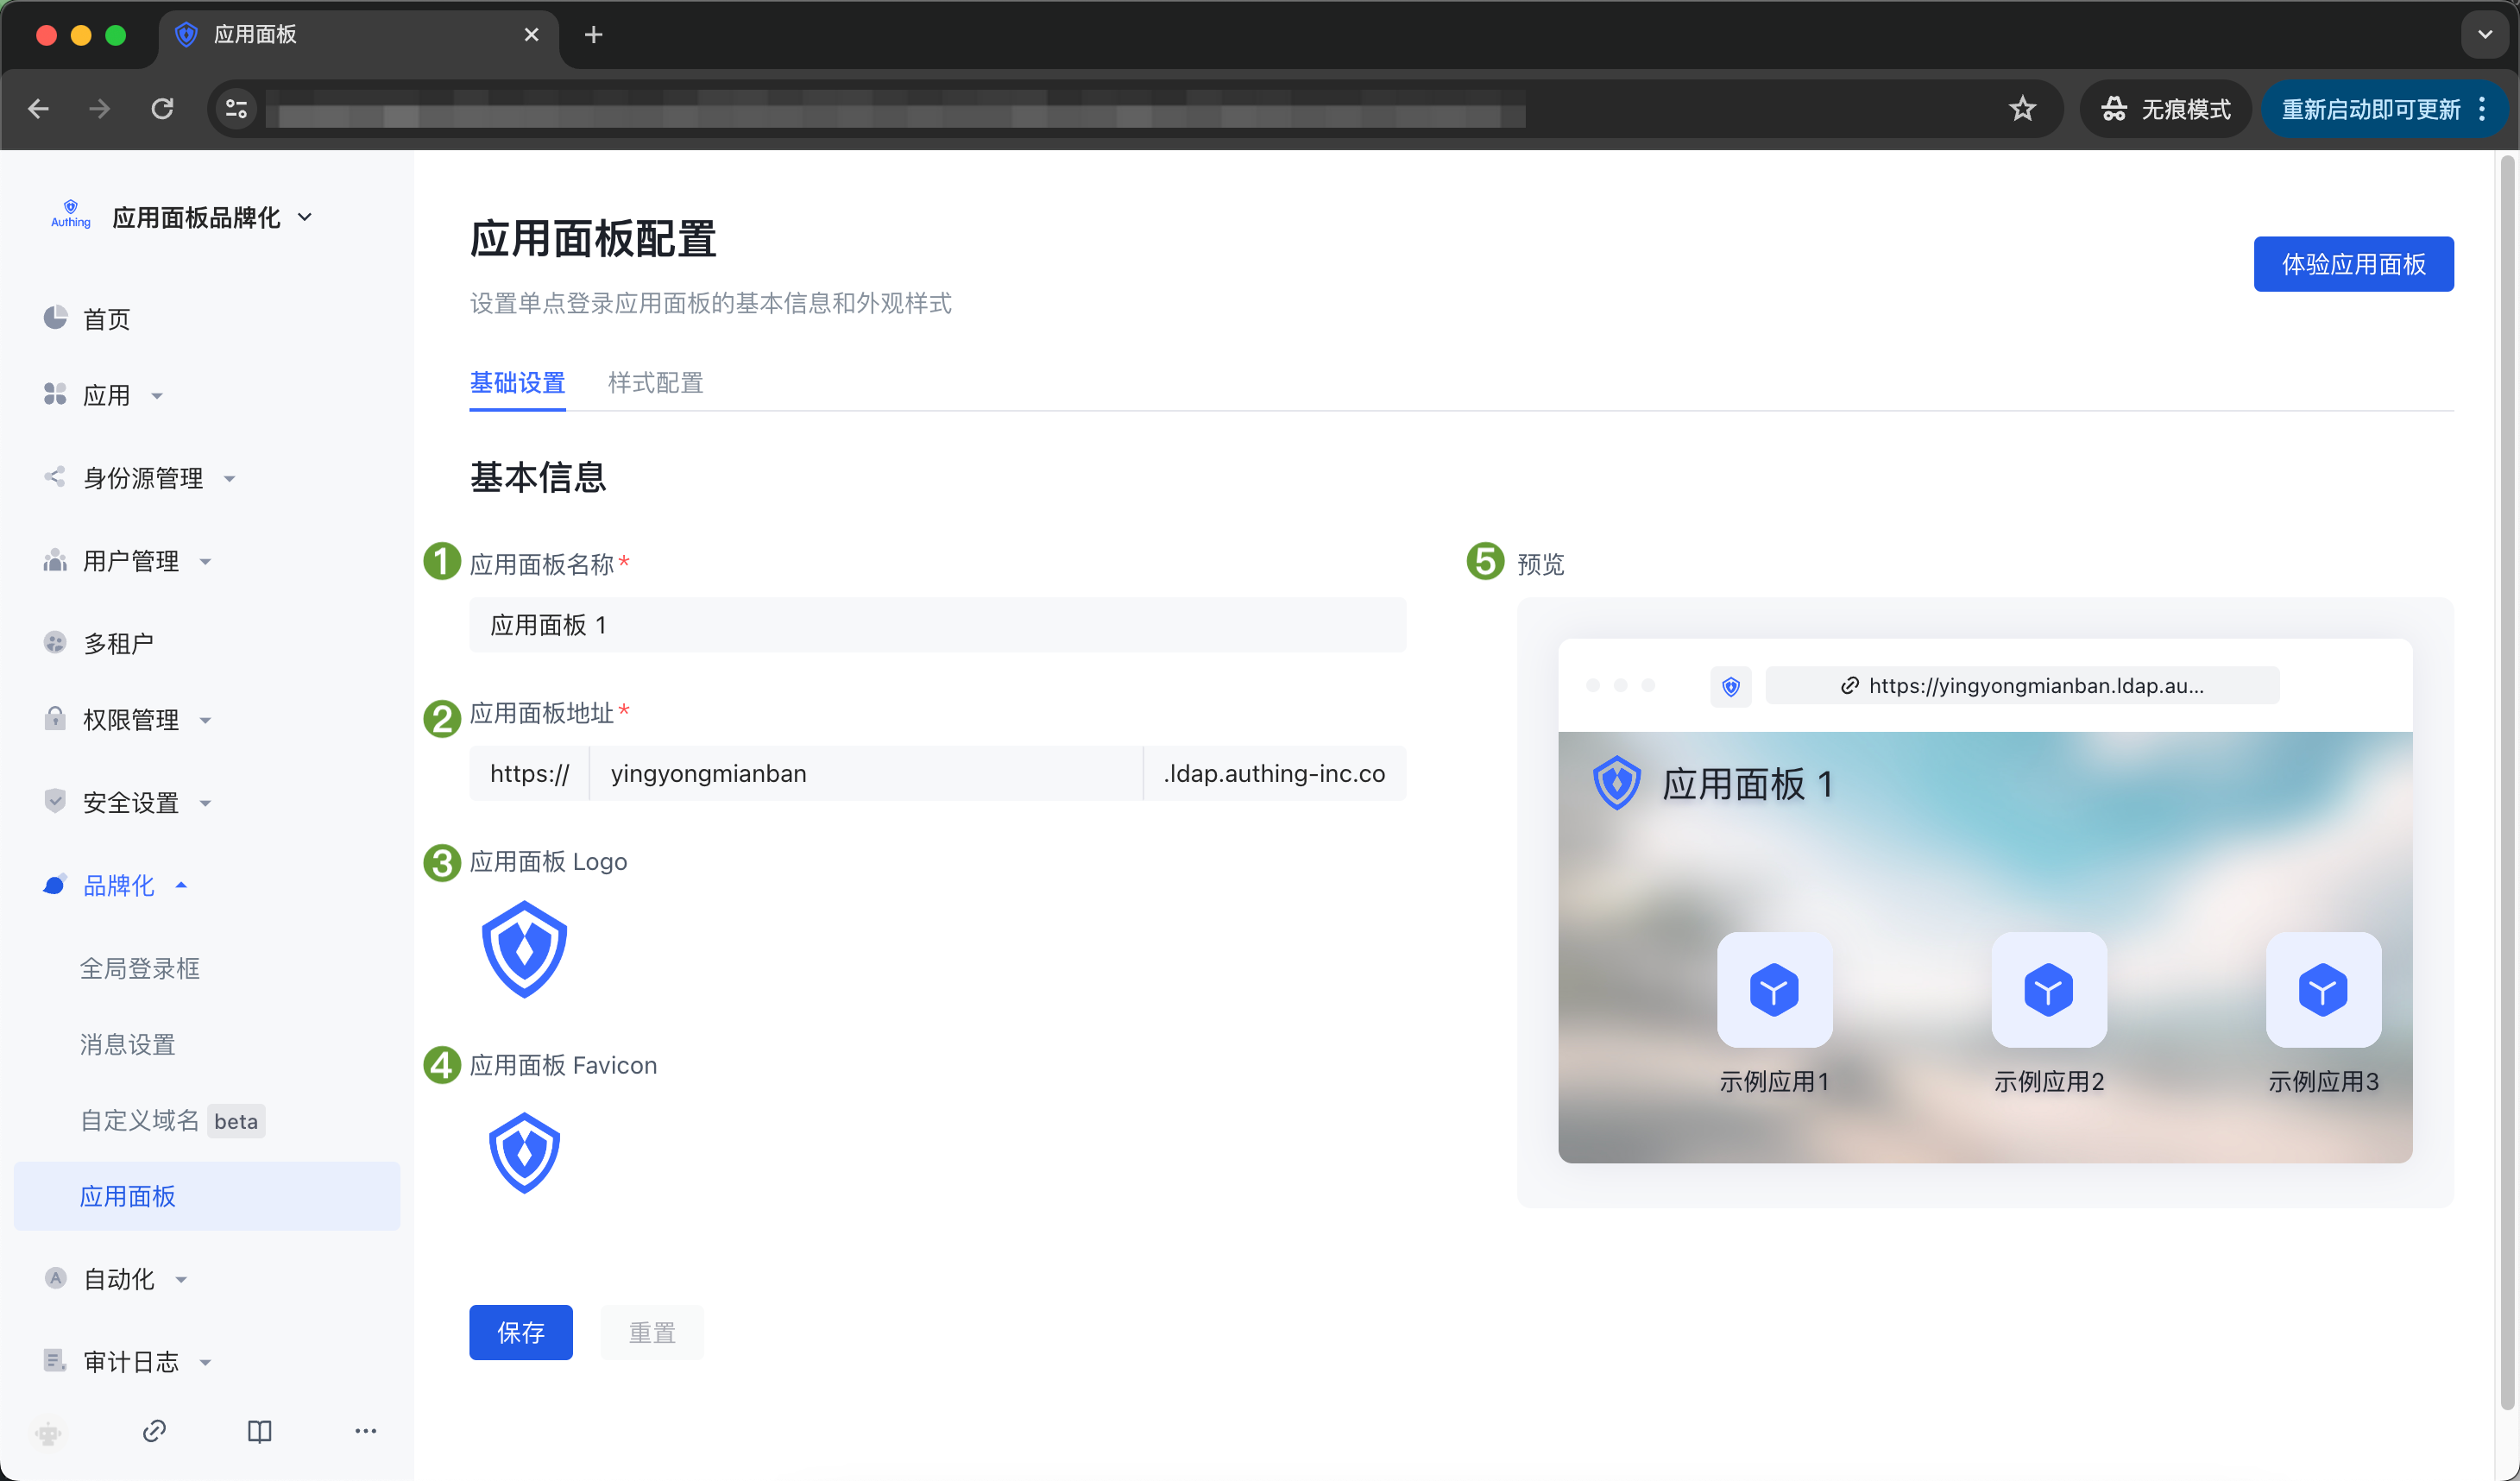
| Serial number | Name | Function description |
|---|---|---|
| 1 | App Panel Name | Customize the name of the App Panel that the end user sees after logging into the App Panel. The name is located in the upper left corner of the App Panel in the initial state. |
| 2 | App Panel Address | Customize the App Panel access address. After editing here, the end user logs in to the App Panel with this address. |
| 3 | App Panel Logo | You can upload an image as the App Panel Logo. The Logo is located in the upper left corner of the App Panel in the initial state. |
| 4 | App Panel Favicon | You can upload an image as the browser tab favicon of the App Panel. |
| 5 | Preview | Preview 1 - 4 customized content here |
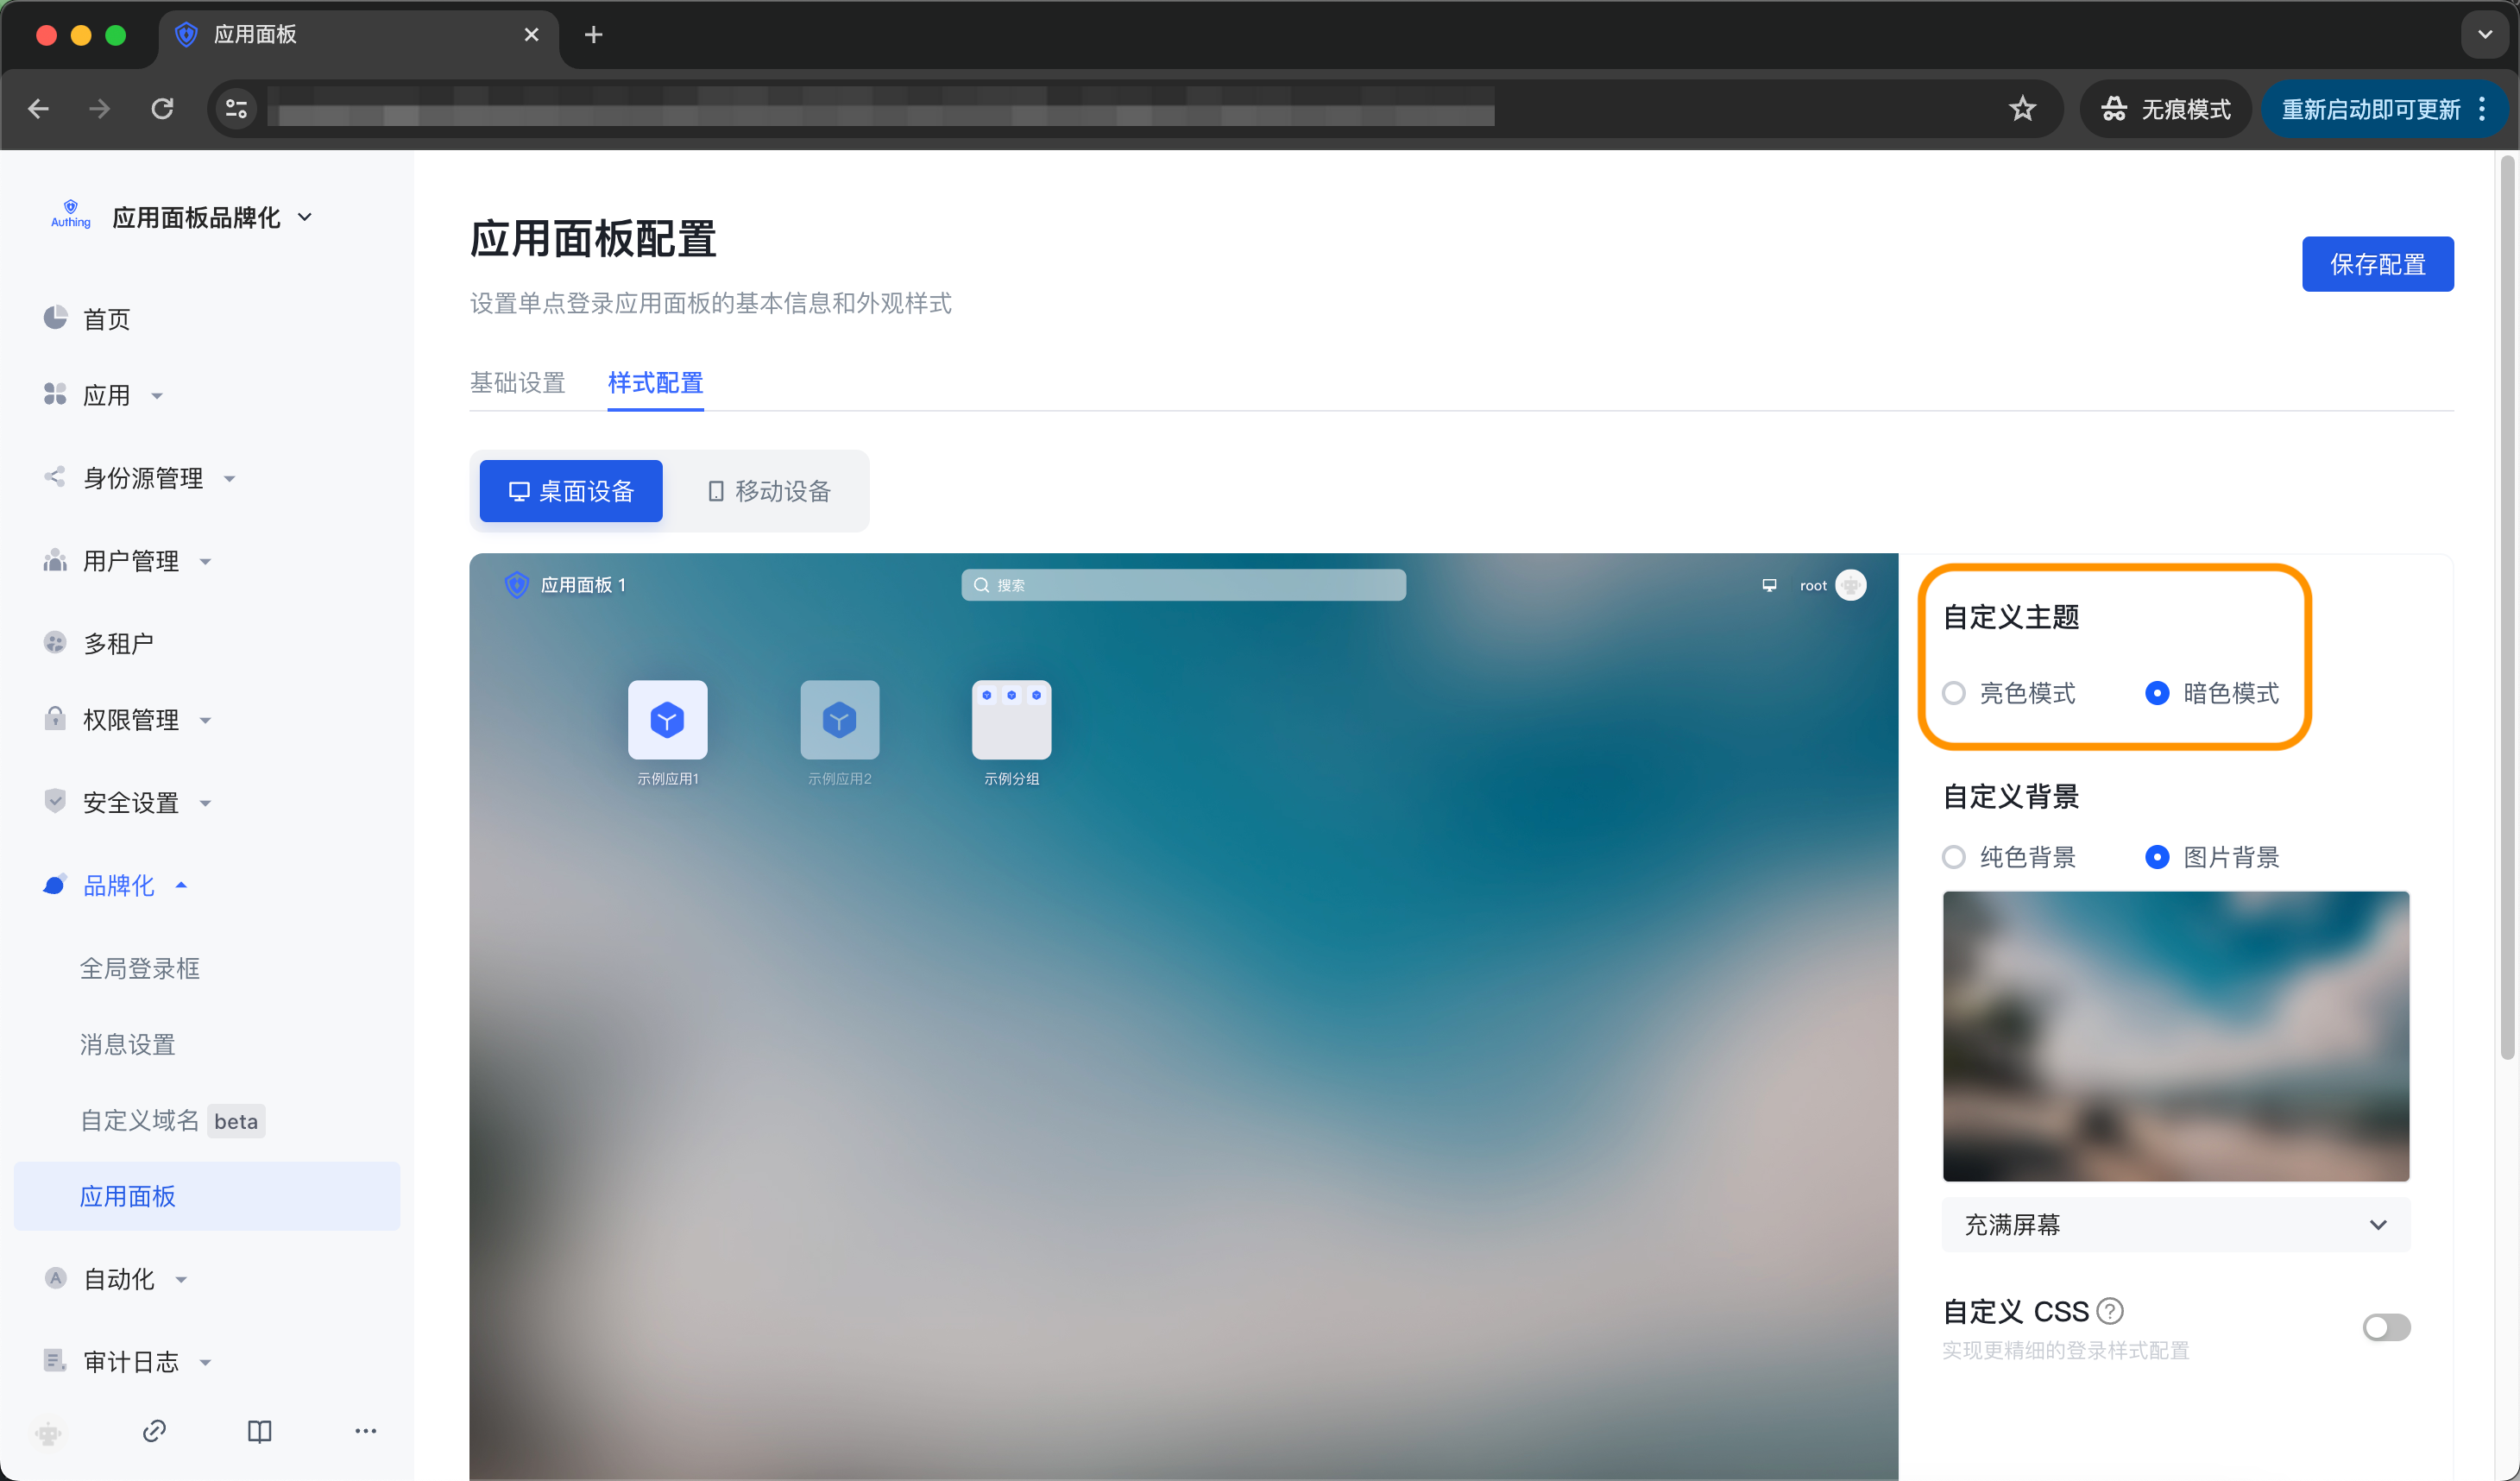
Style Configuration
The style configuration of the App Panel is divided into desktop device style and mobile device style. Desktop devices support custom themes, custom backgrounds, and custom css; mobile devices support custom backgrounds and custom css.
Custom App Panel Theme
Administrators can choose two themes for the App Panel: Light Mode and Dark Mode. Both themes preset a set of color and background style configurations for the App Panel; you can also edit custom colors and background styles based on this. The default theme is dark mode.
Custom background
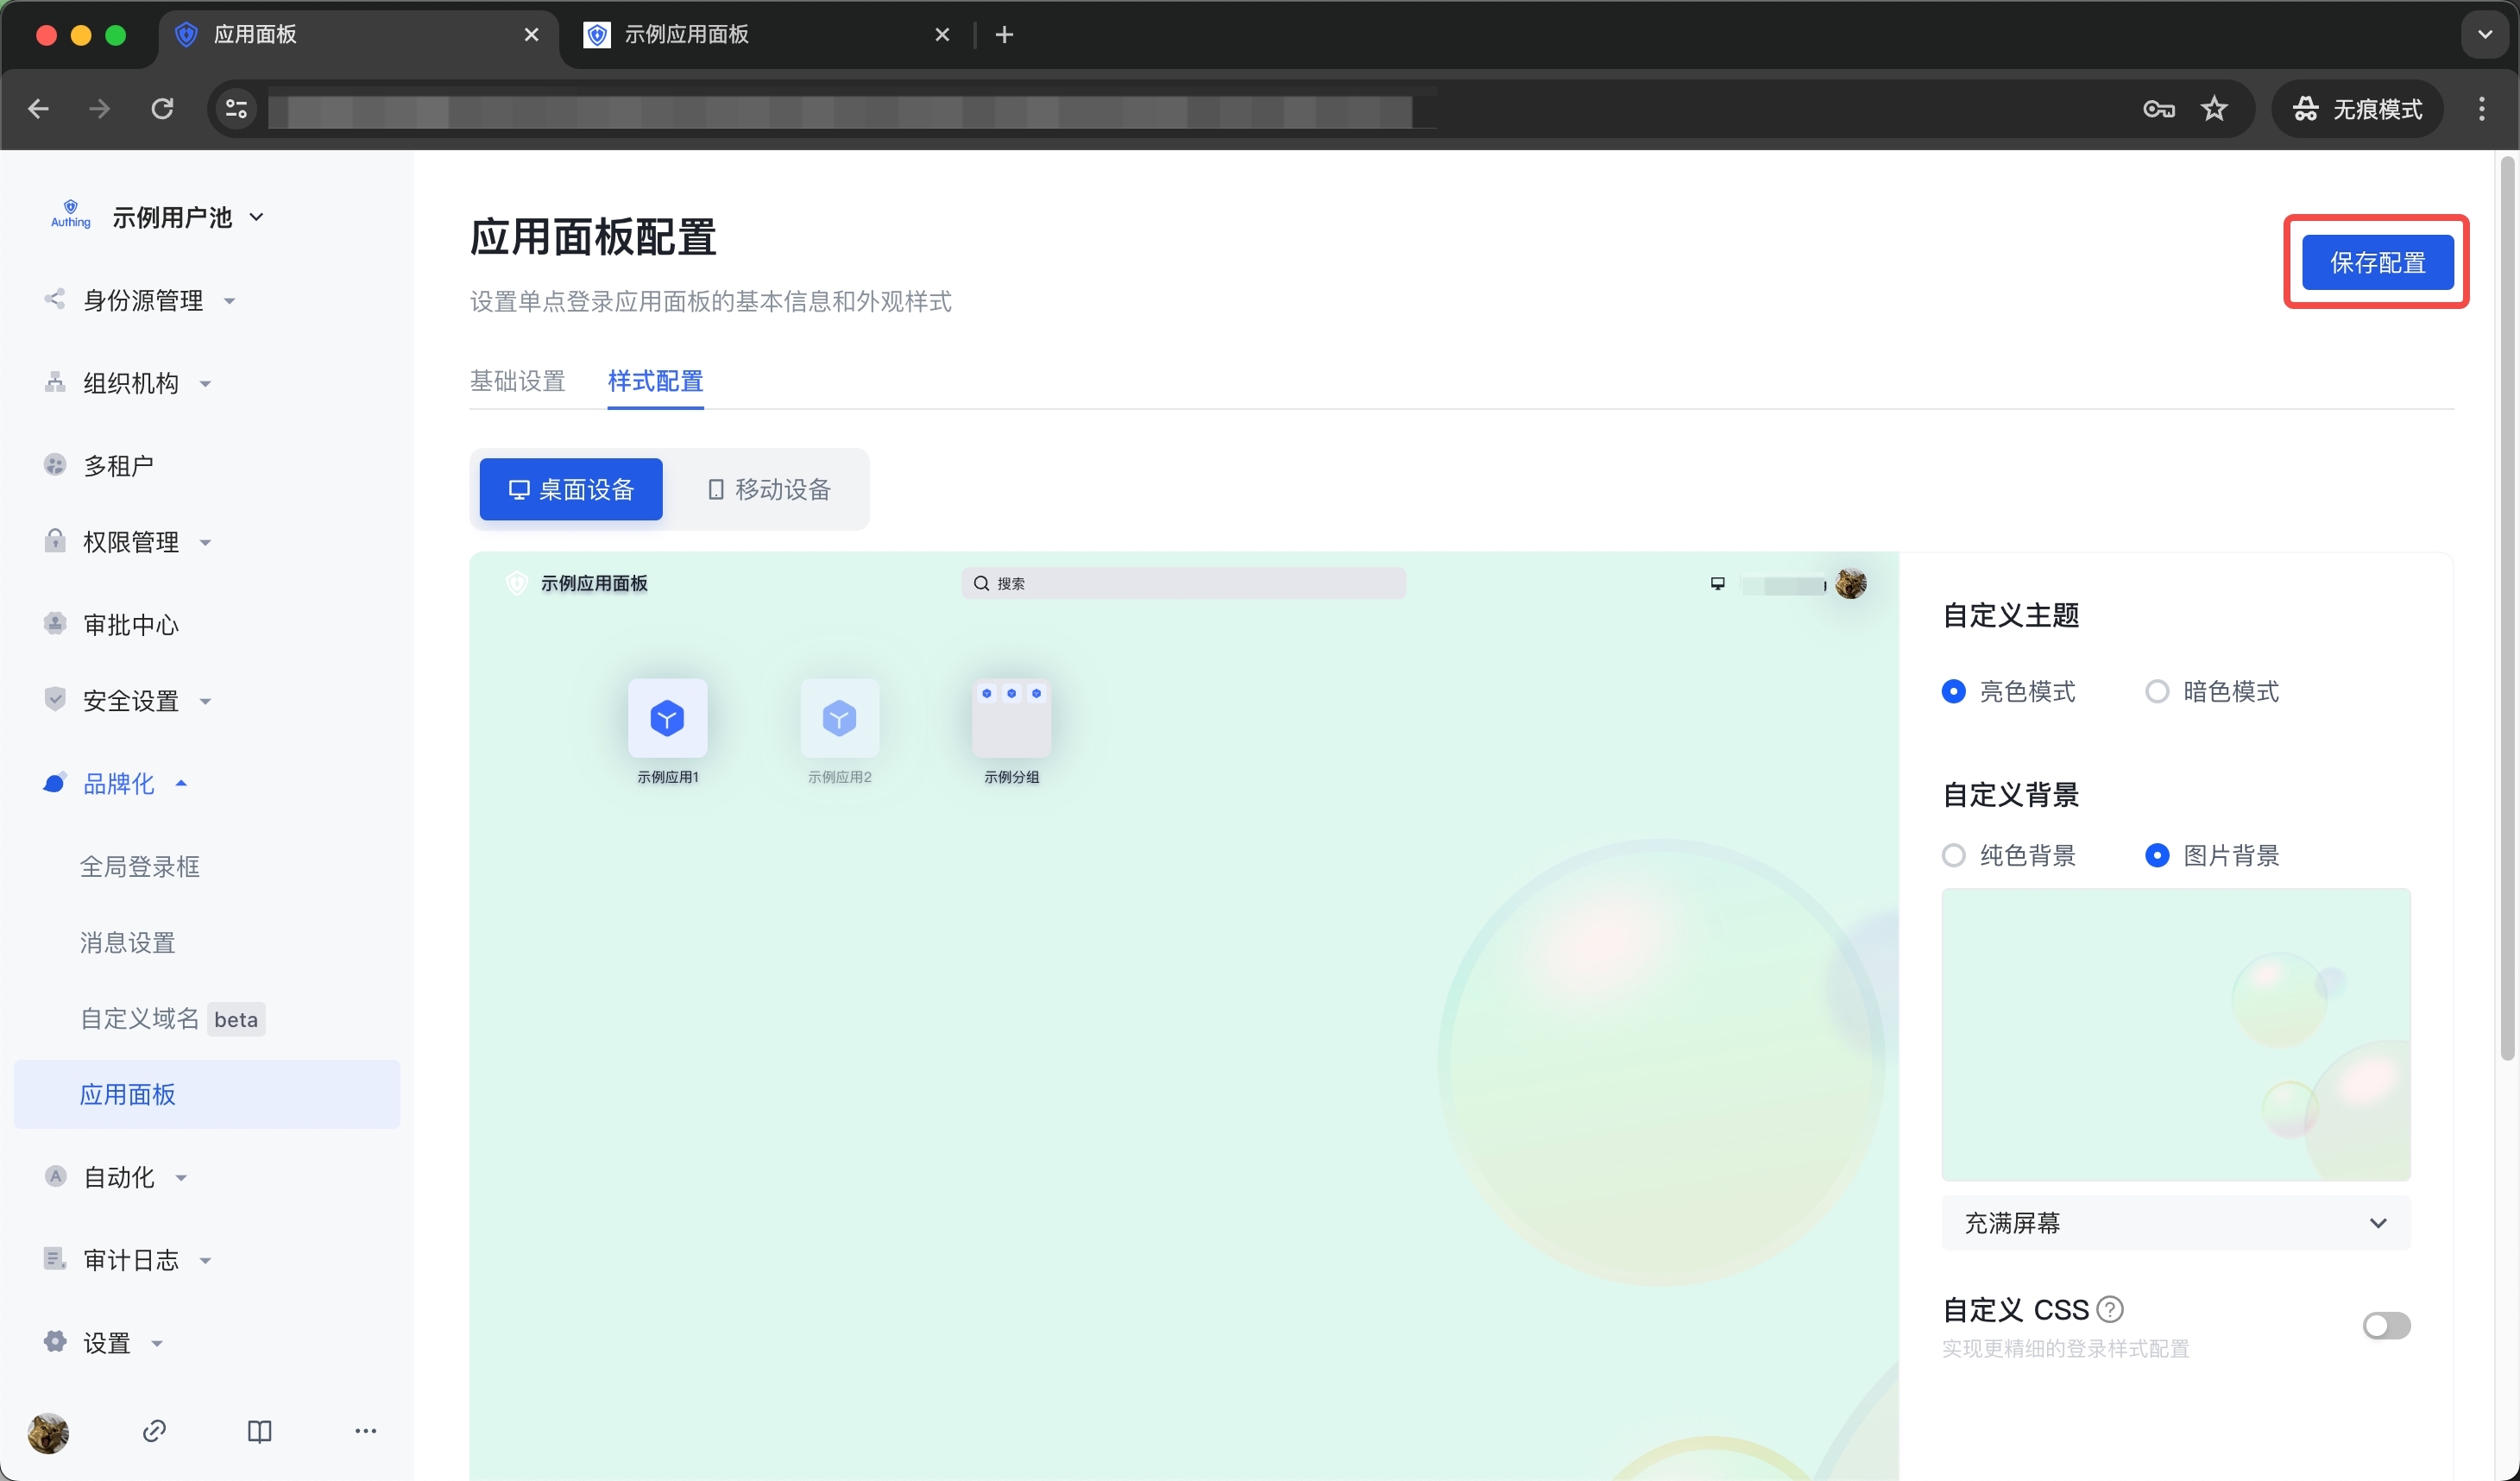
Administrators can set the background of the application panel to any solid color; or upload a picture as the background of the application panel. Here you can customize the background image that fits the corporate brand image/marketing needs. Taking desktop devices as an example, the operation steps are as follows:
- Prepare a desktop device size background image
- Open Branding->Application Panel->Style Configuration, select Desktop Device->Custom Background->Image Background
- Hover the mouse over the image box, click [Retransmit], upload the image from the local computer, and view the preview effect
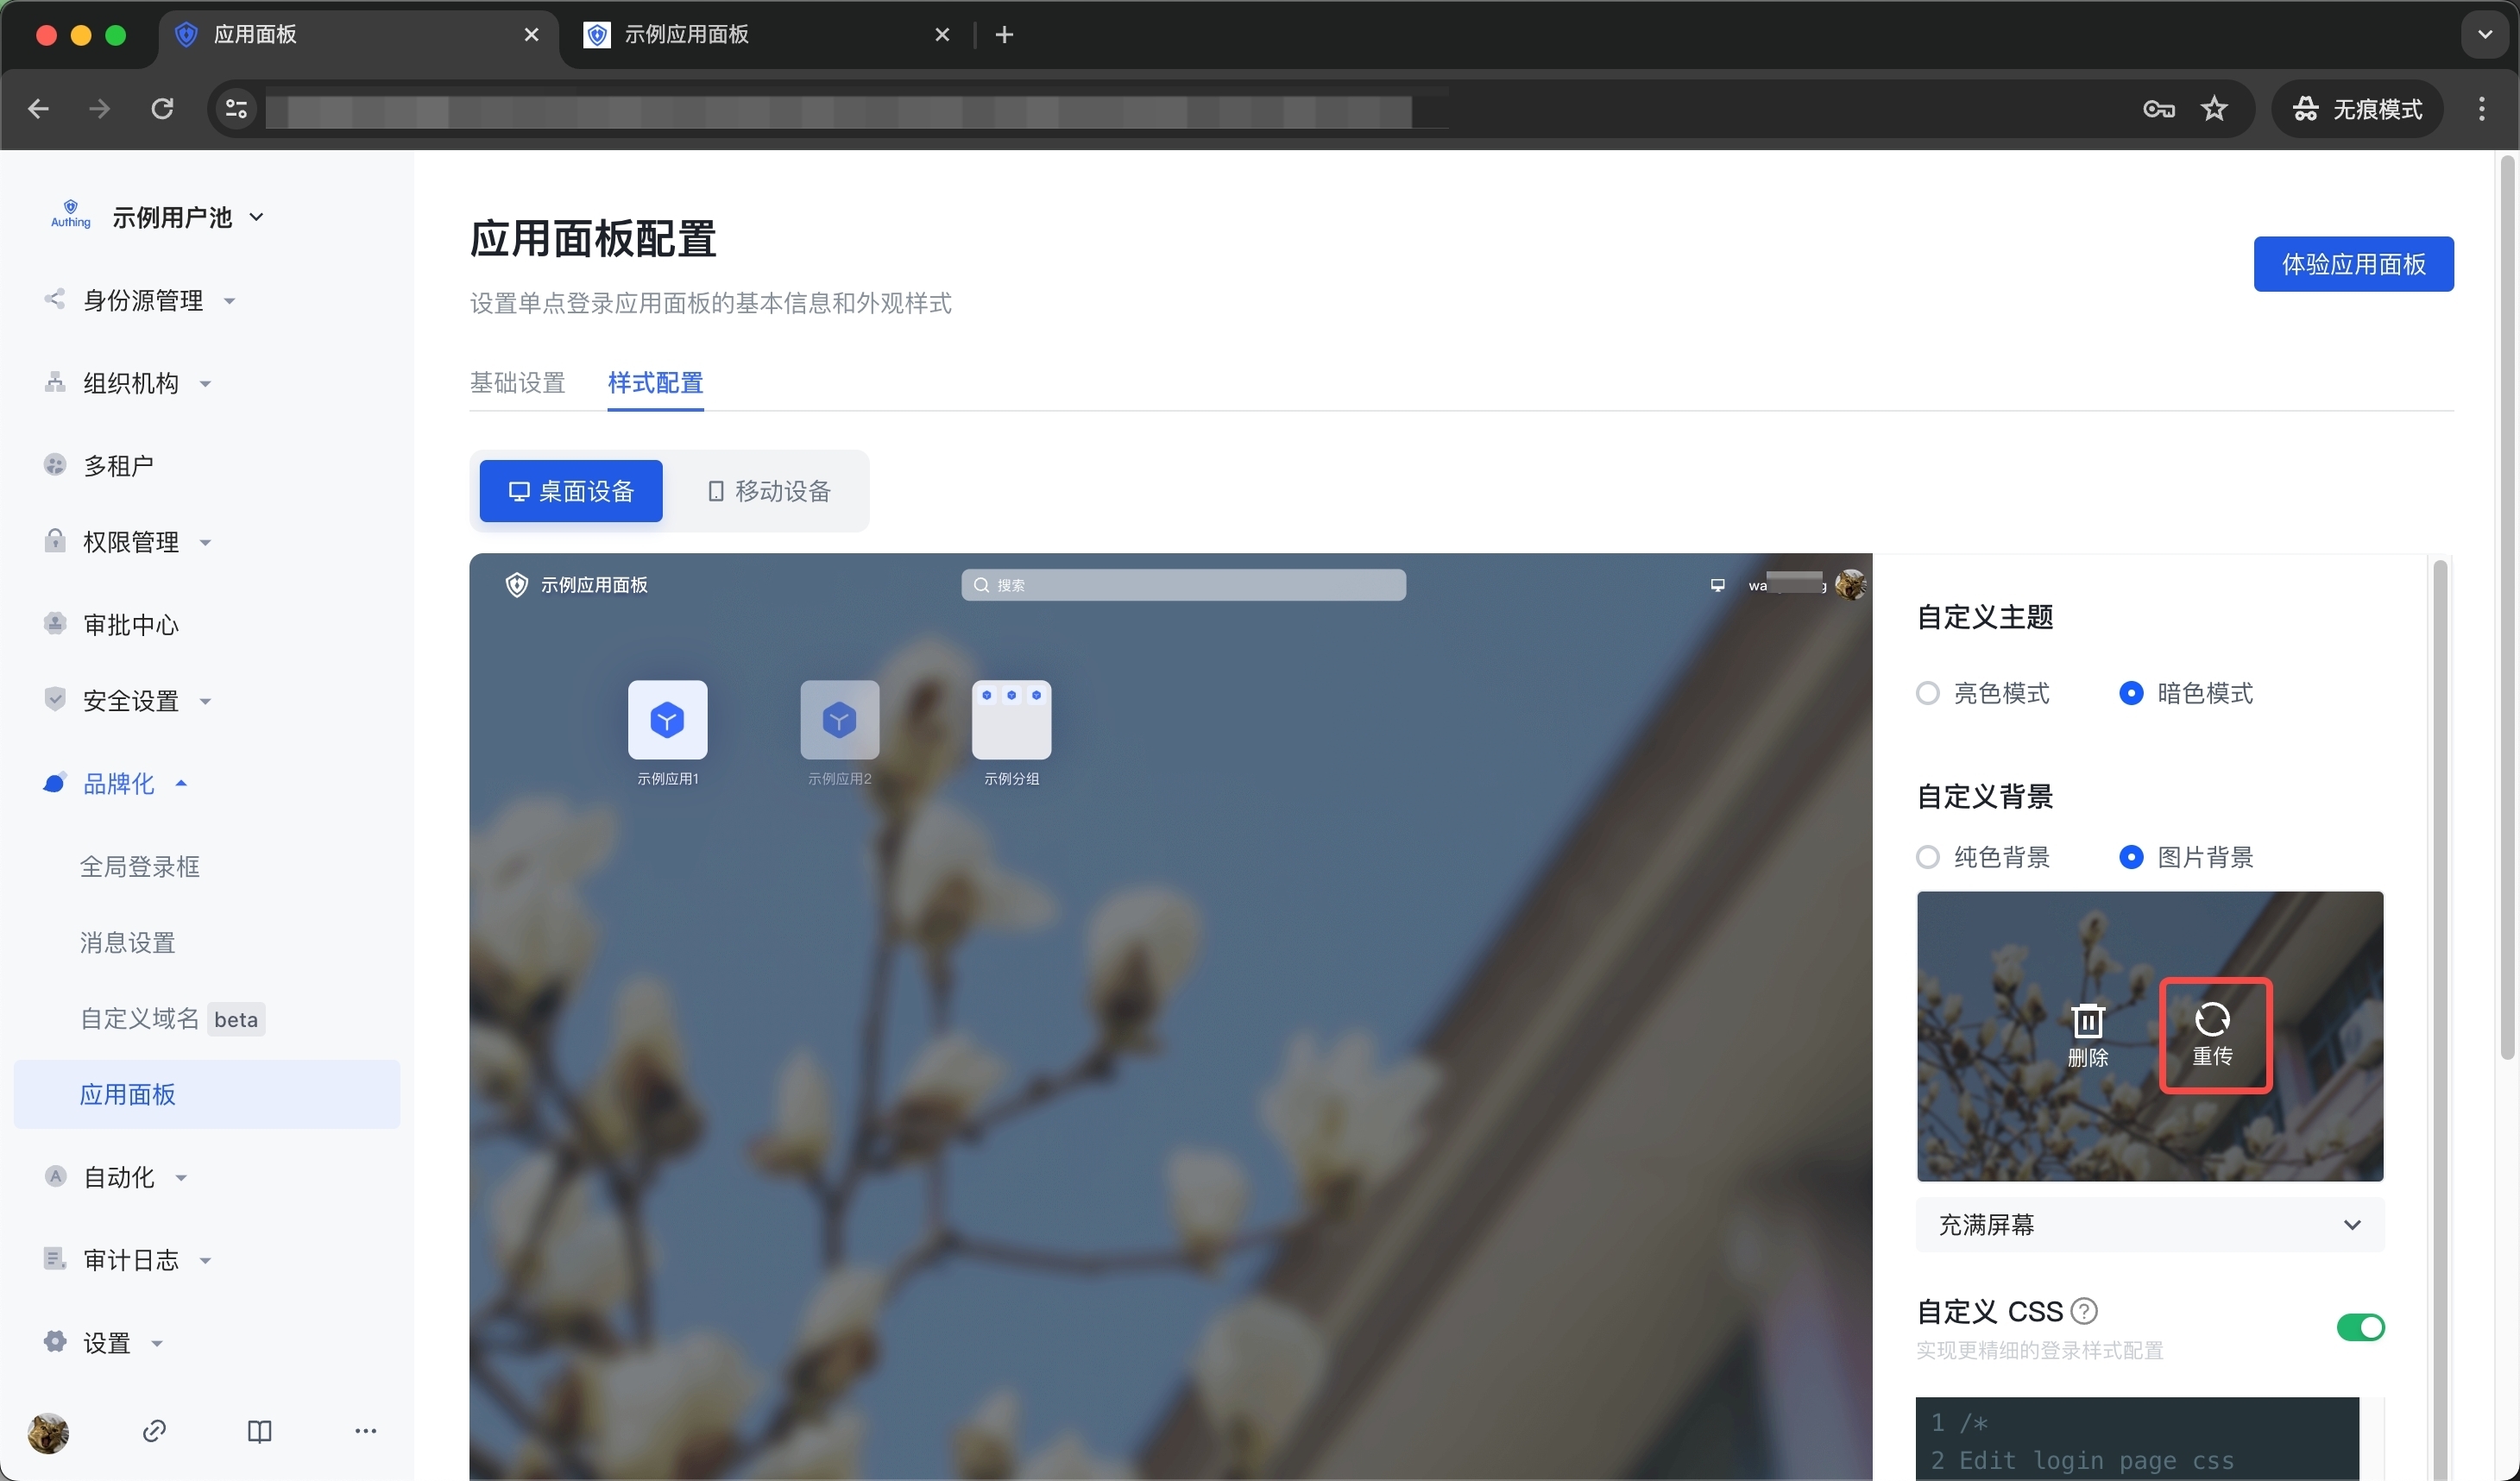
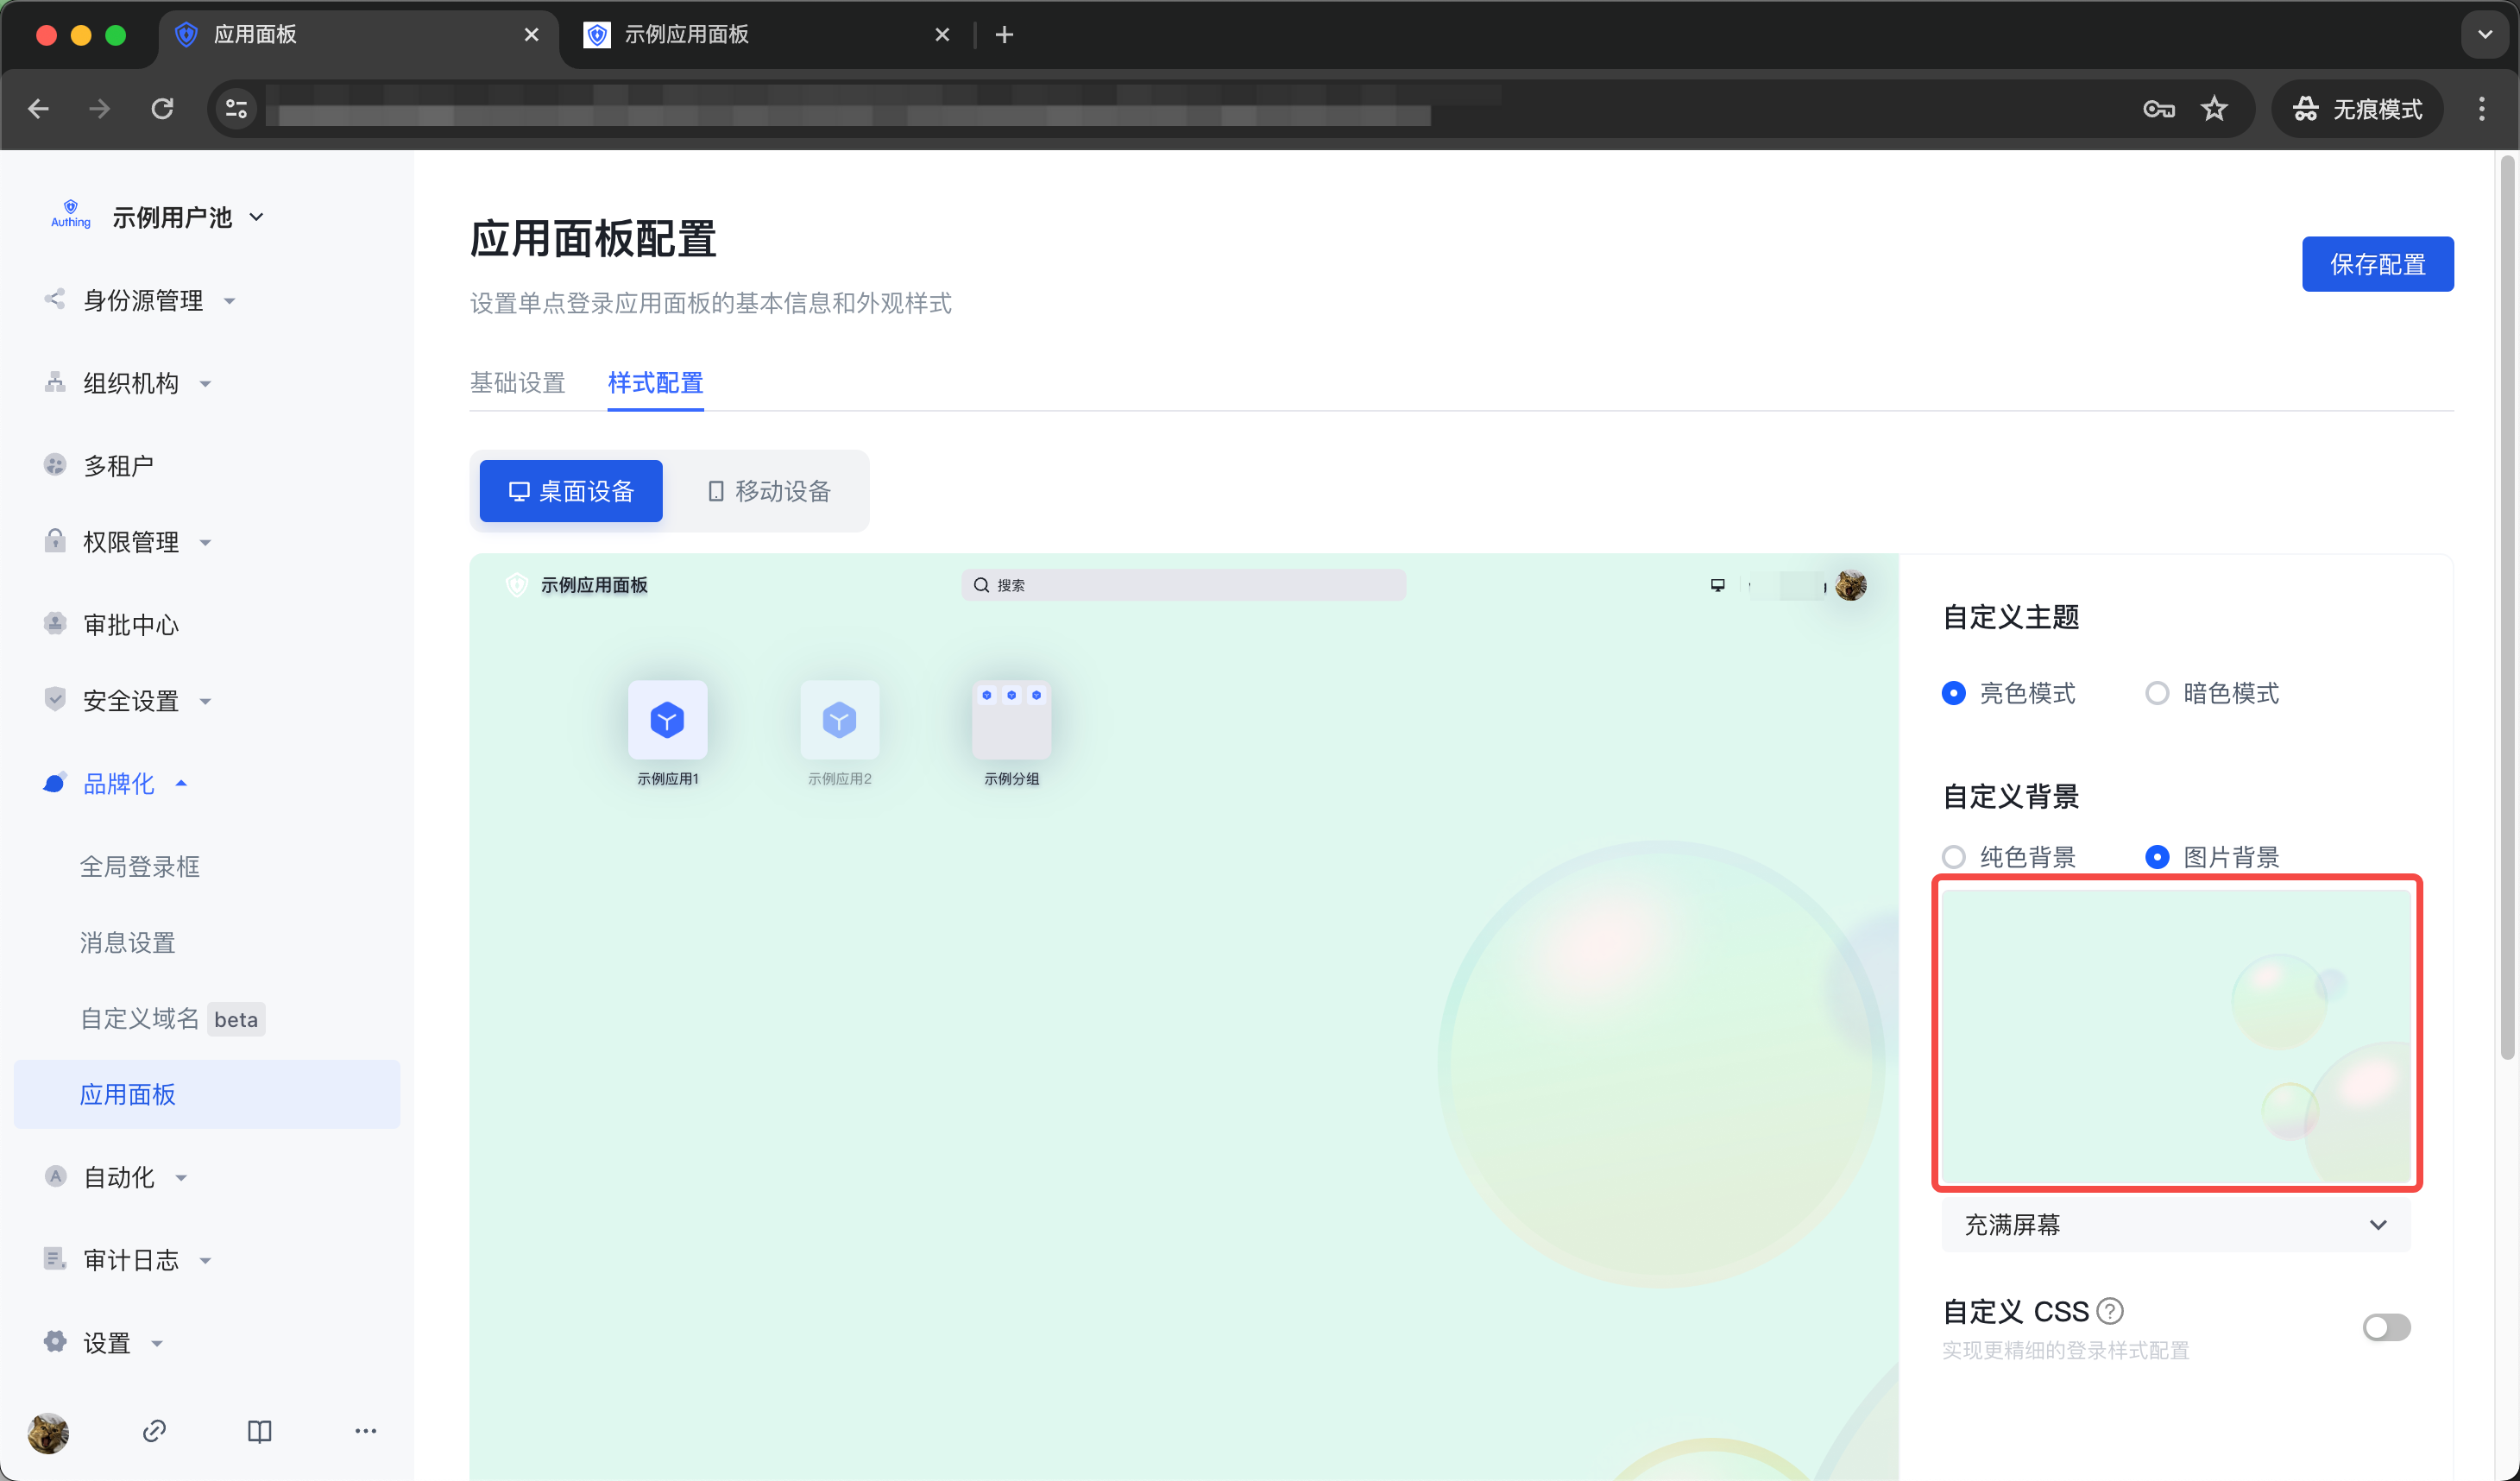
- Click the button [Save Configuration] on the right side of the page header. After saving successfully, you can log in to the application panel to experience it.
INFO
When uploading images, make sure the image size does not exceed 2M.
Custom CSS
To customize the application panel frame through custom CSS, you need to turn on the Custom CSS switch in the Style Configuration tab.
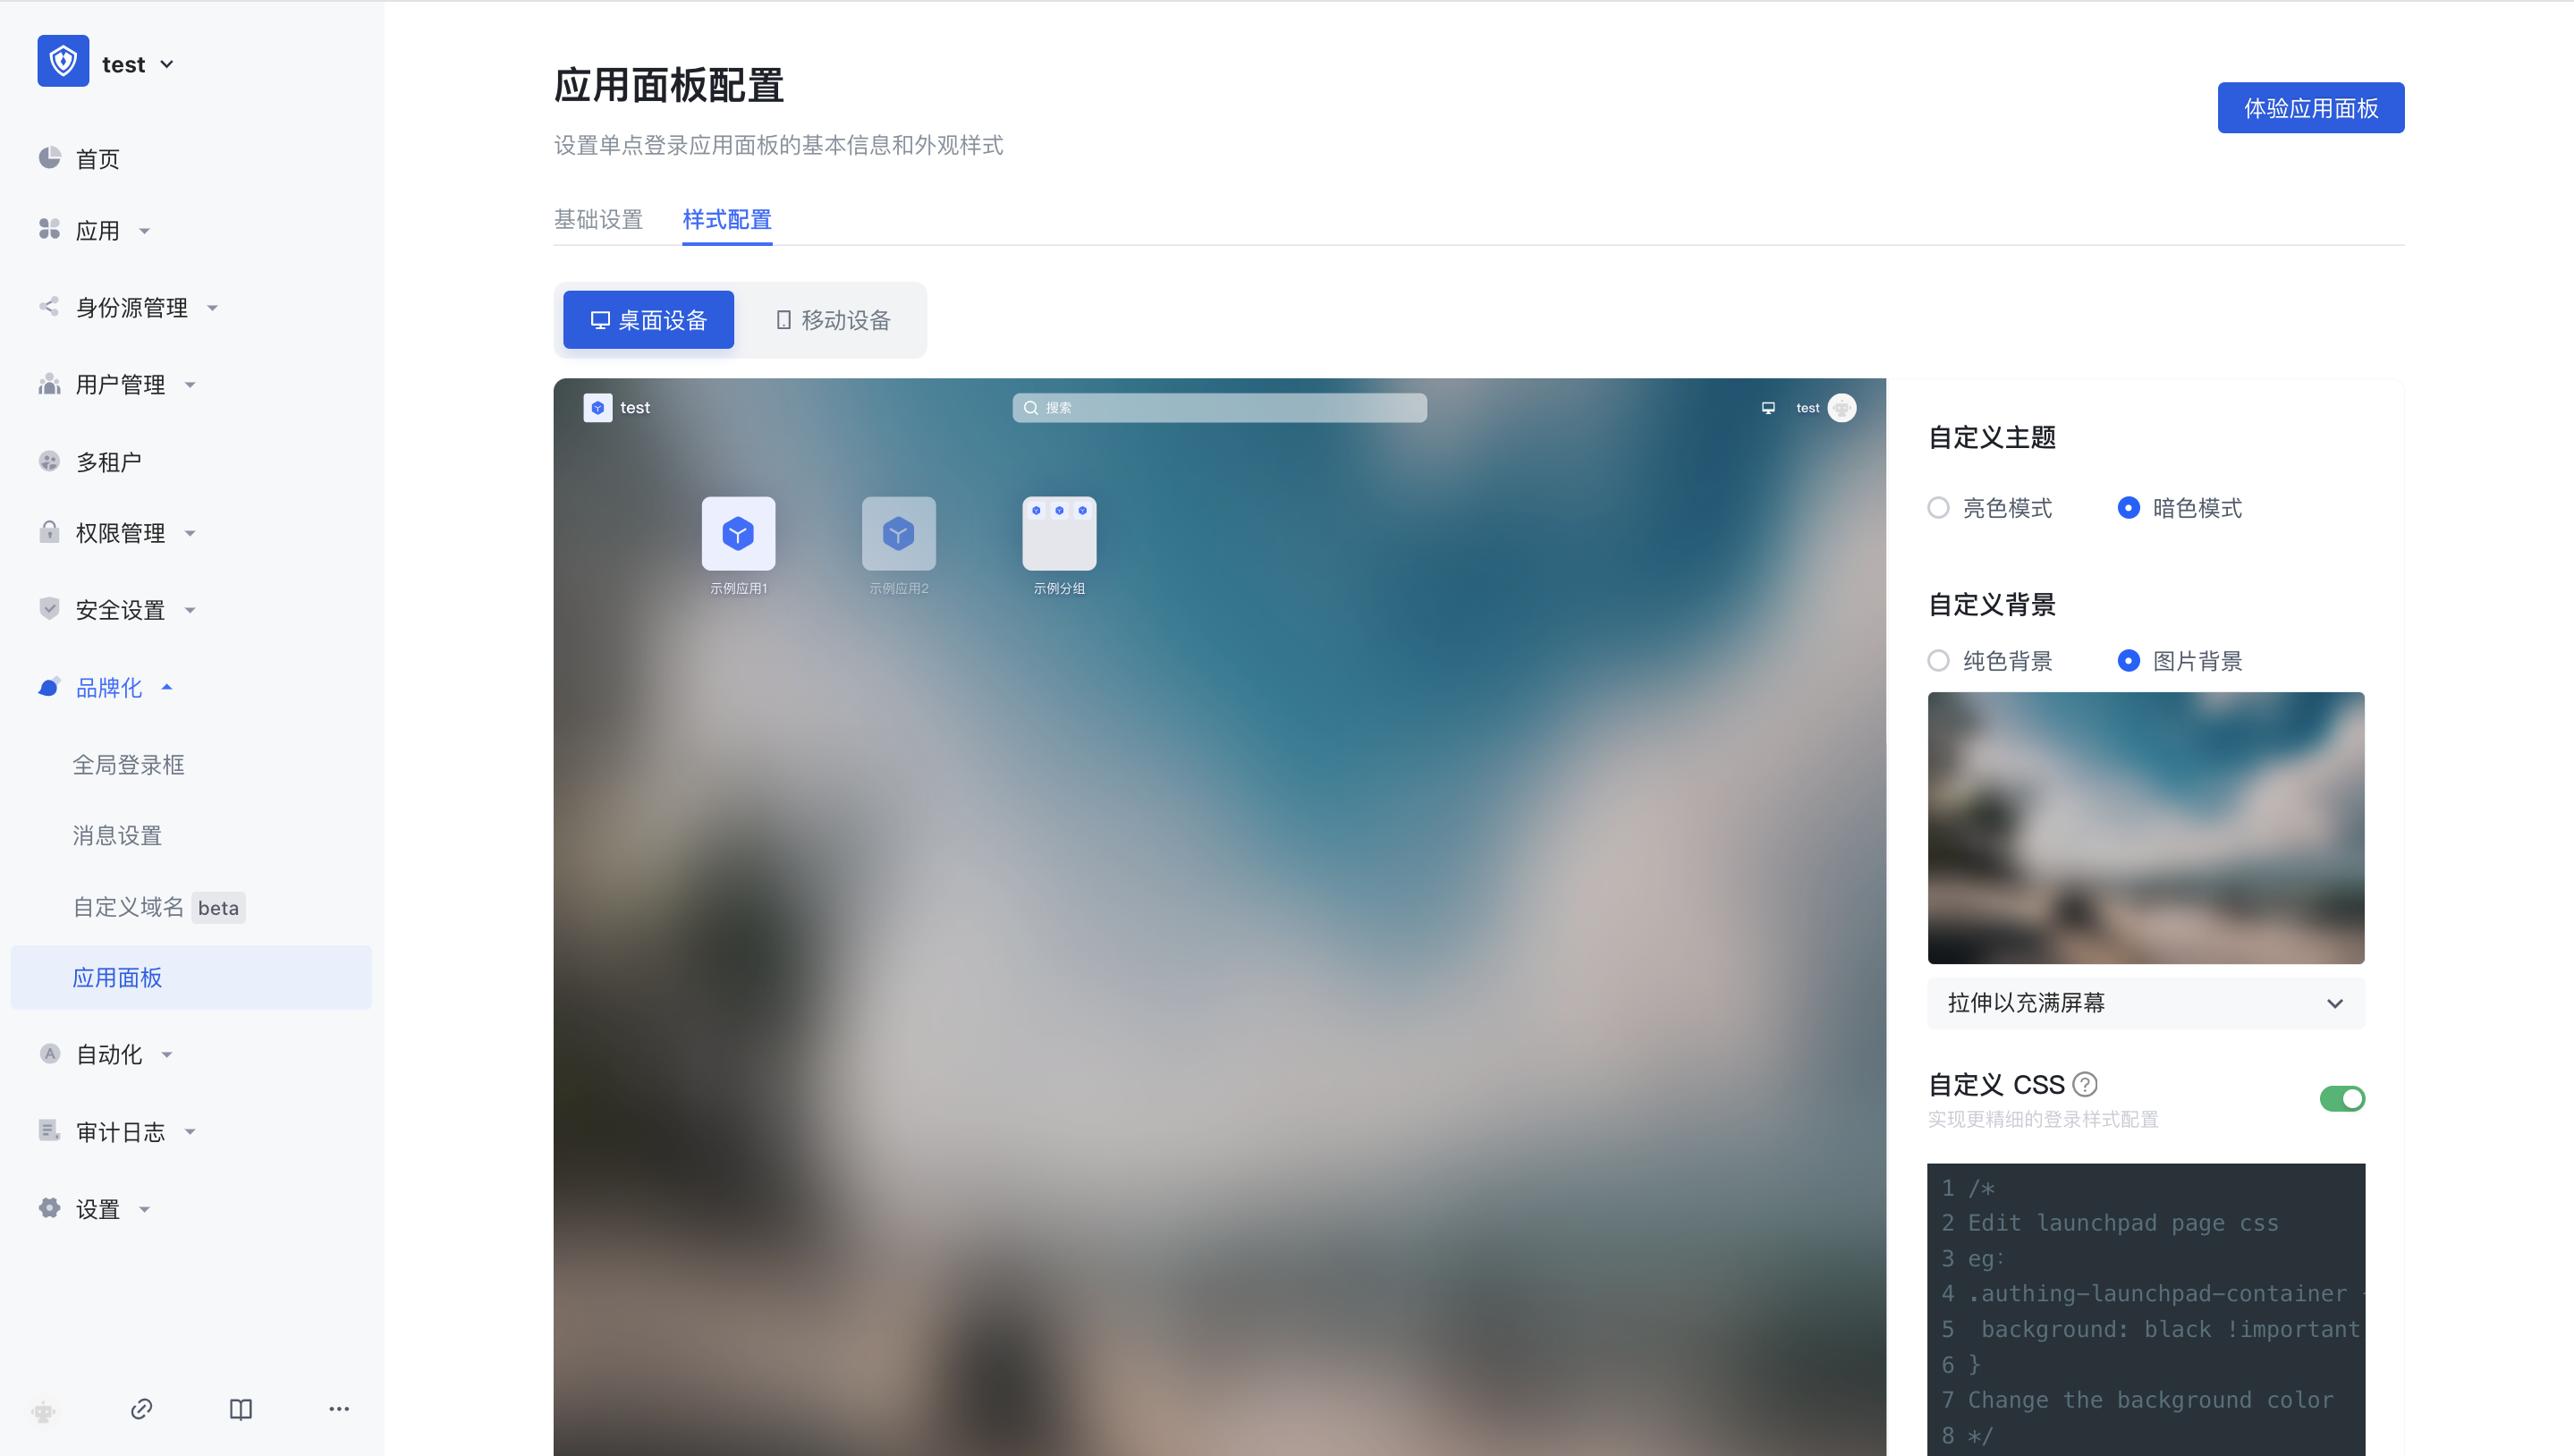 Custom CSS can achieve more detailed appearance control of the hosted application panel page to meet the expectations of your enterprise employees or end users for the application panel. By customizing CSS, you can make some advanced custom styles for the application panel frame, such as background and position of specific elements.
 - Take modifying the background color as an example:
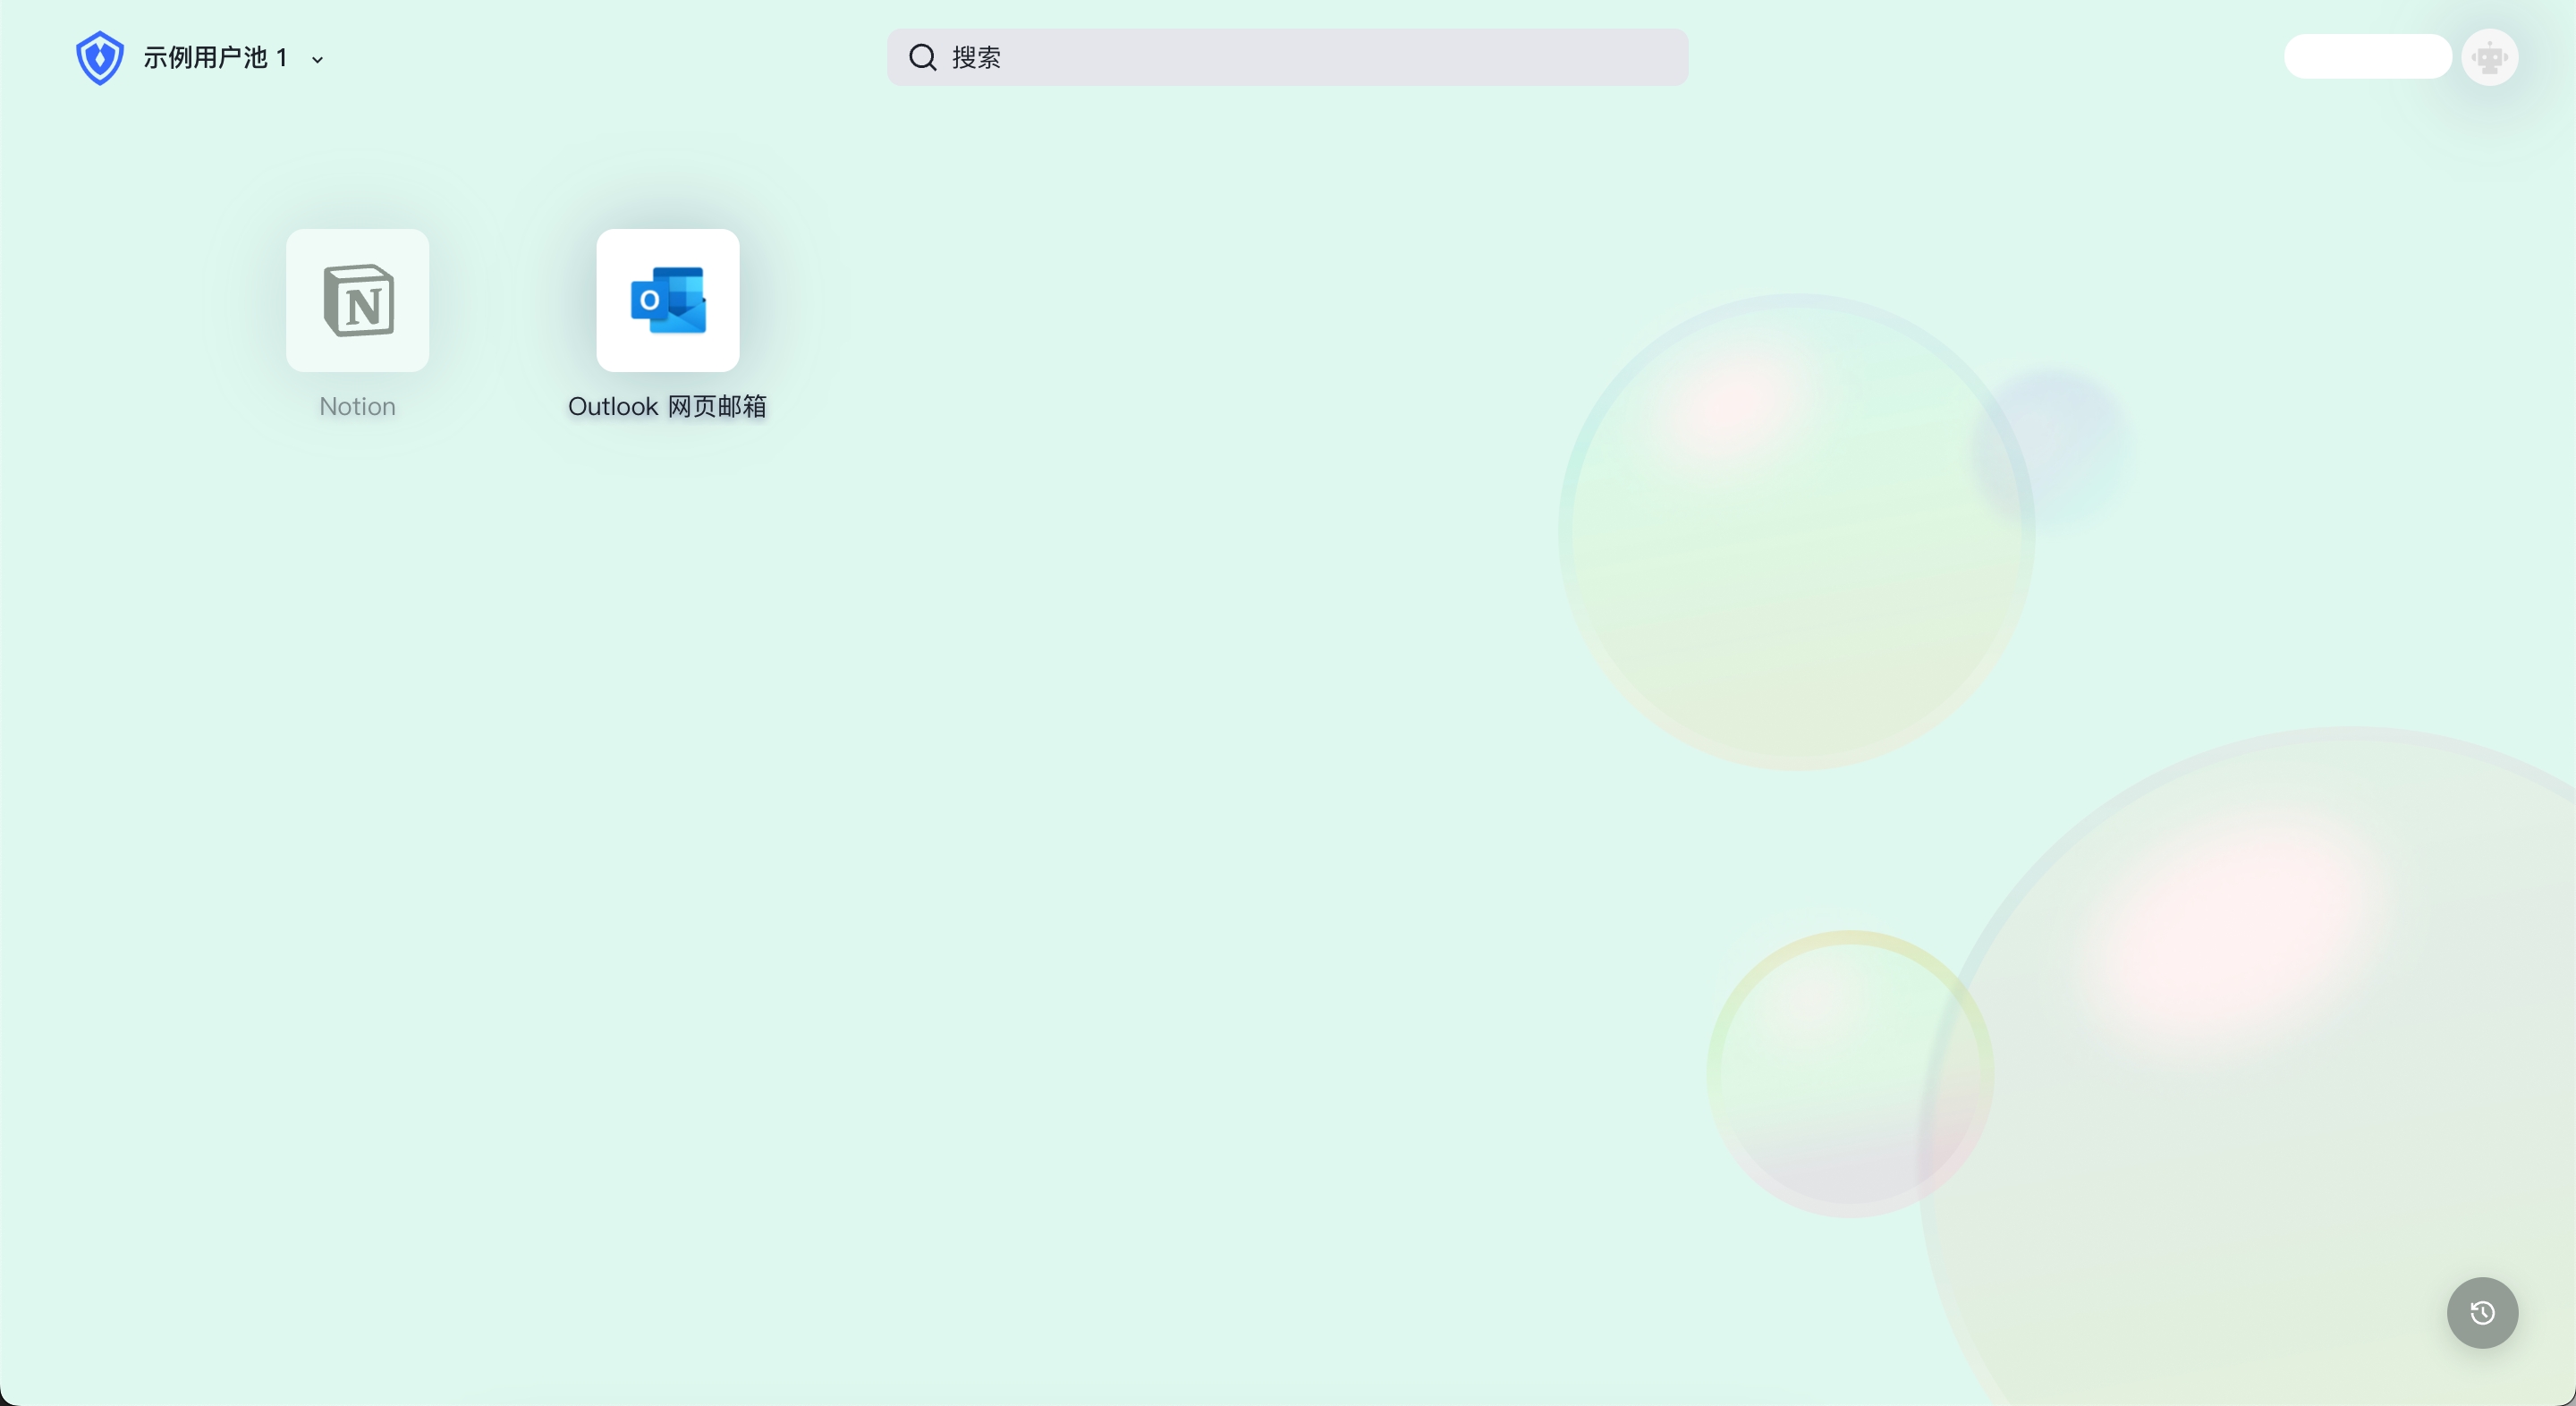
.authing-launchpad-container {
  background: #f5f7fa !important;
}
The effect is as follows: 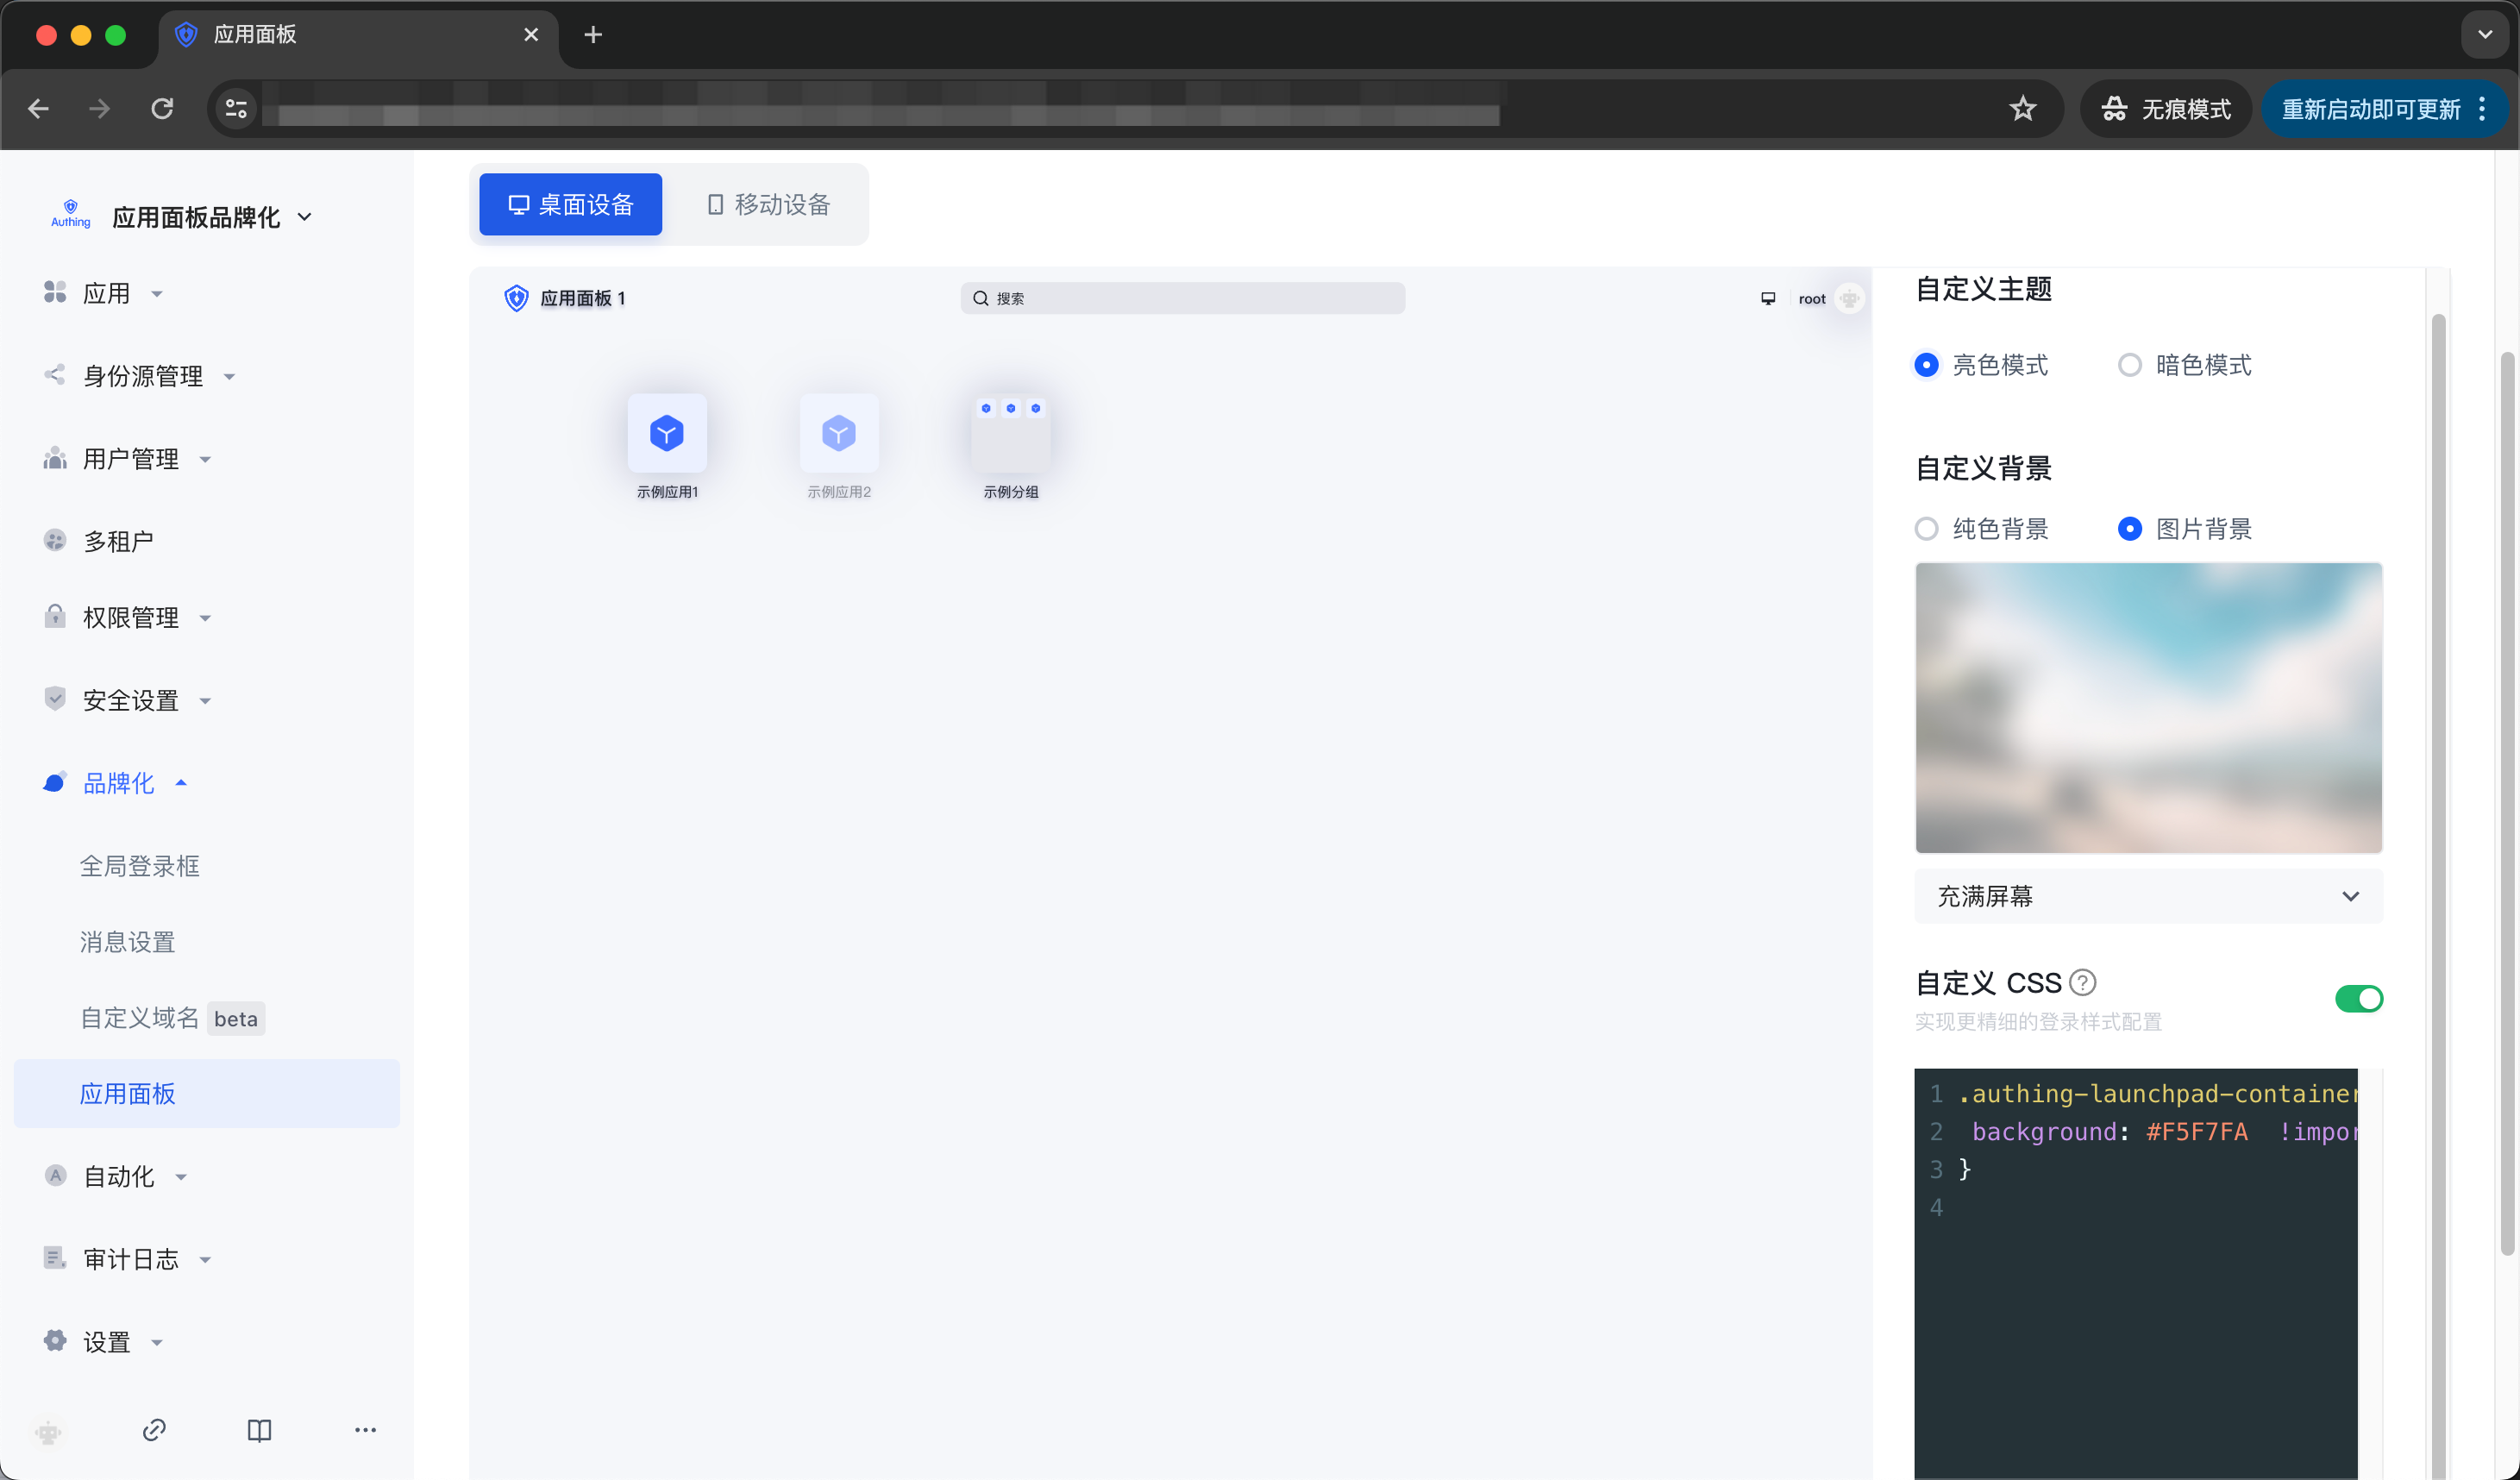
- Take modifying the position of page elements as an example:
.authing-launchpad-header {
  position: absolute;
  bottom: 0px;
}
The effect is as follows: 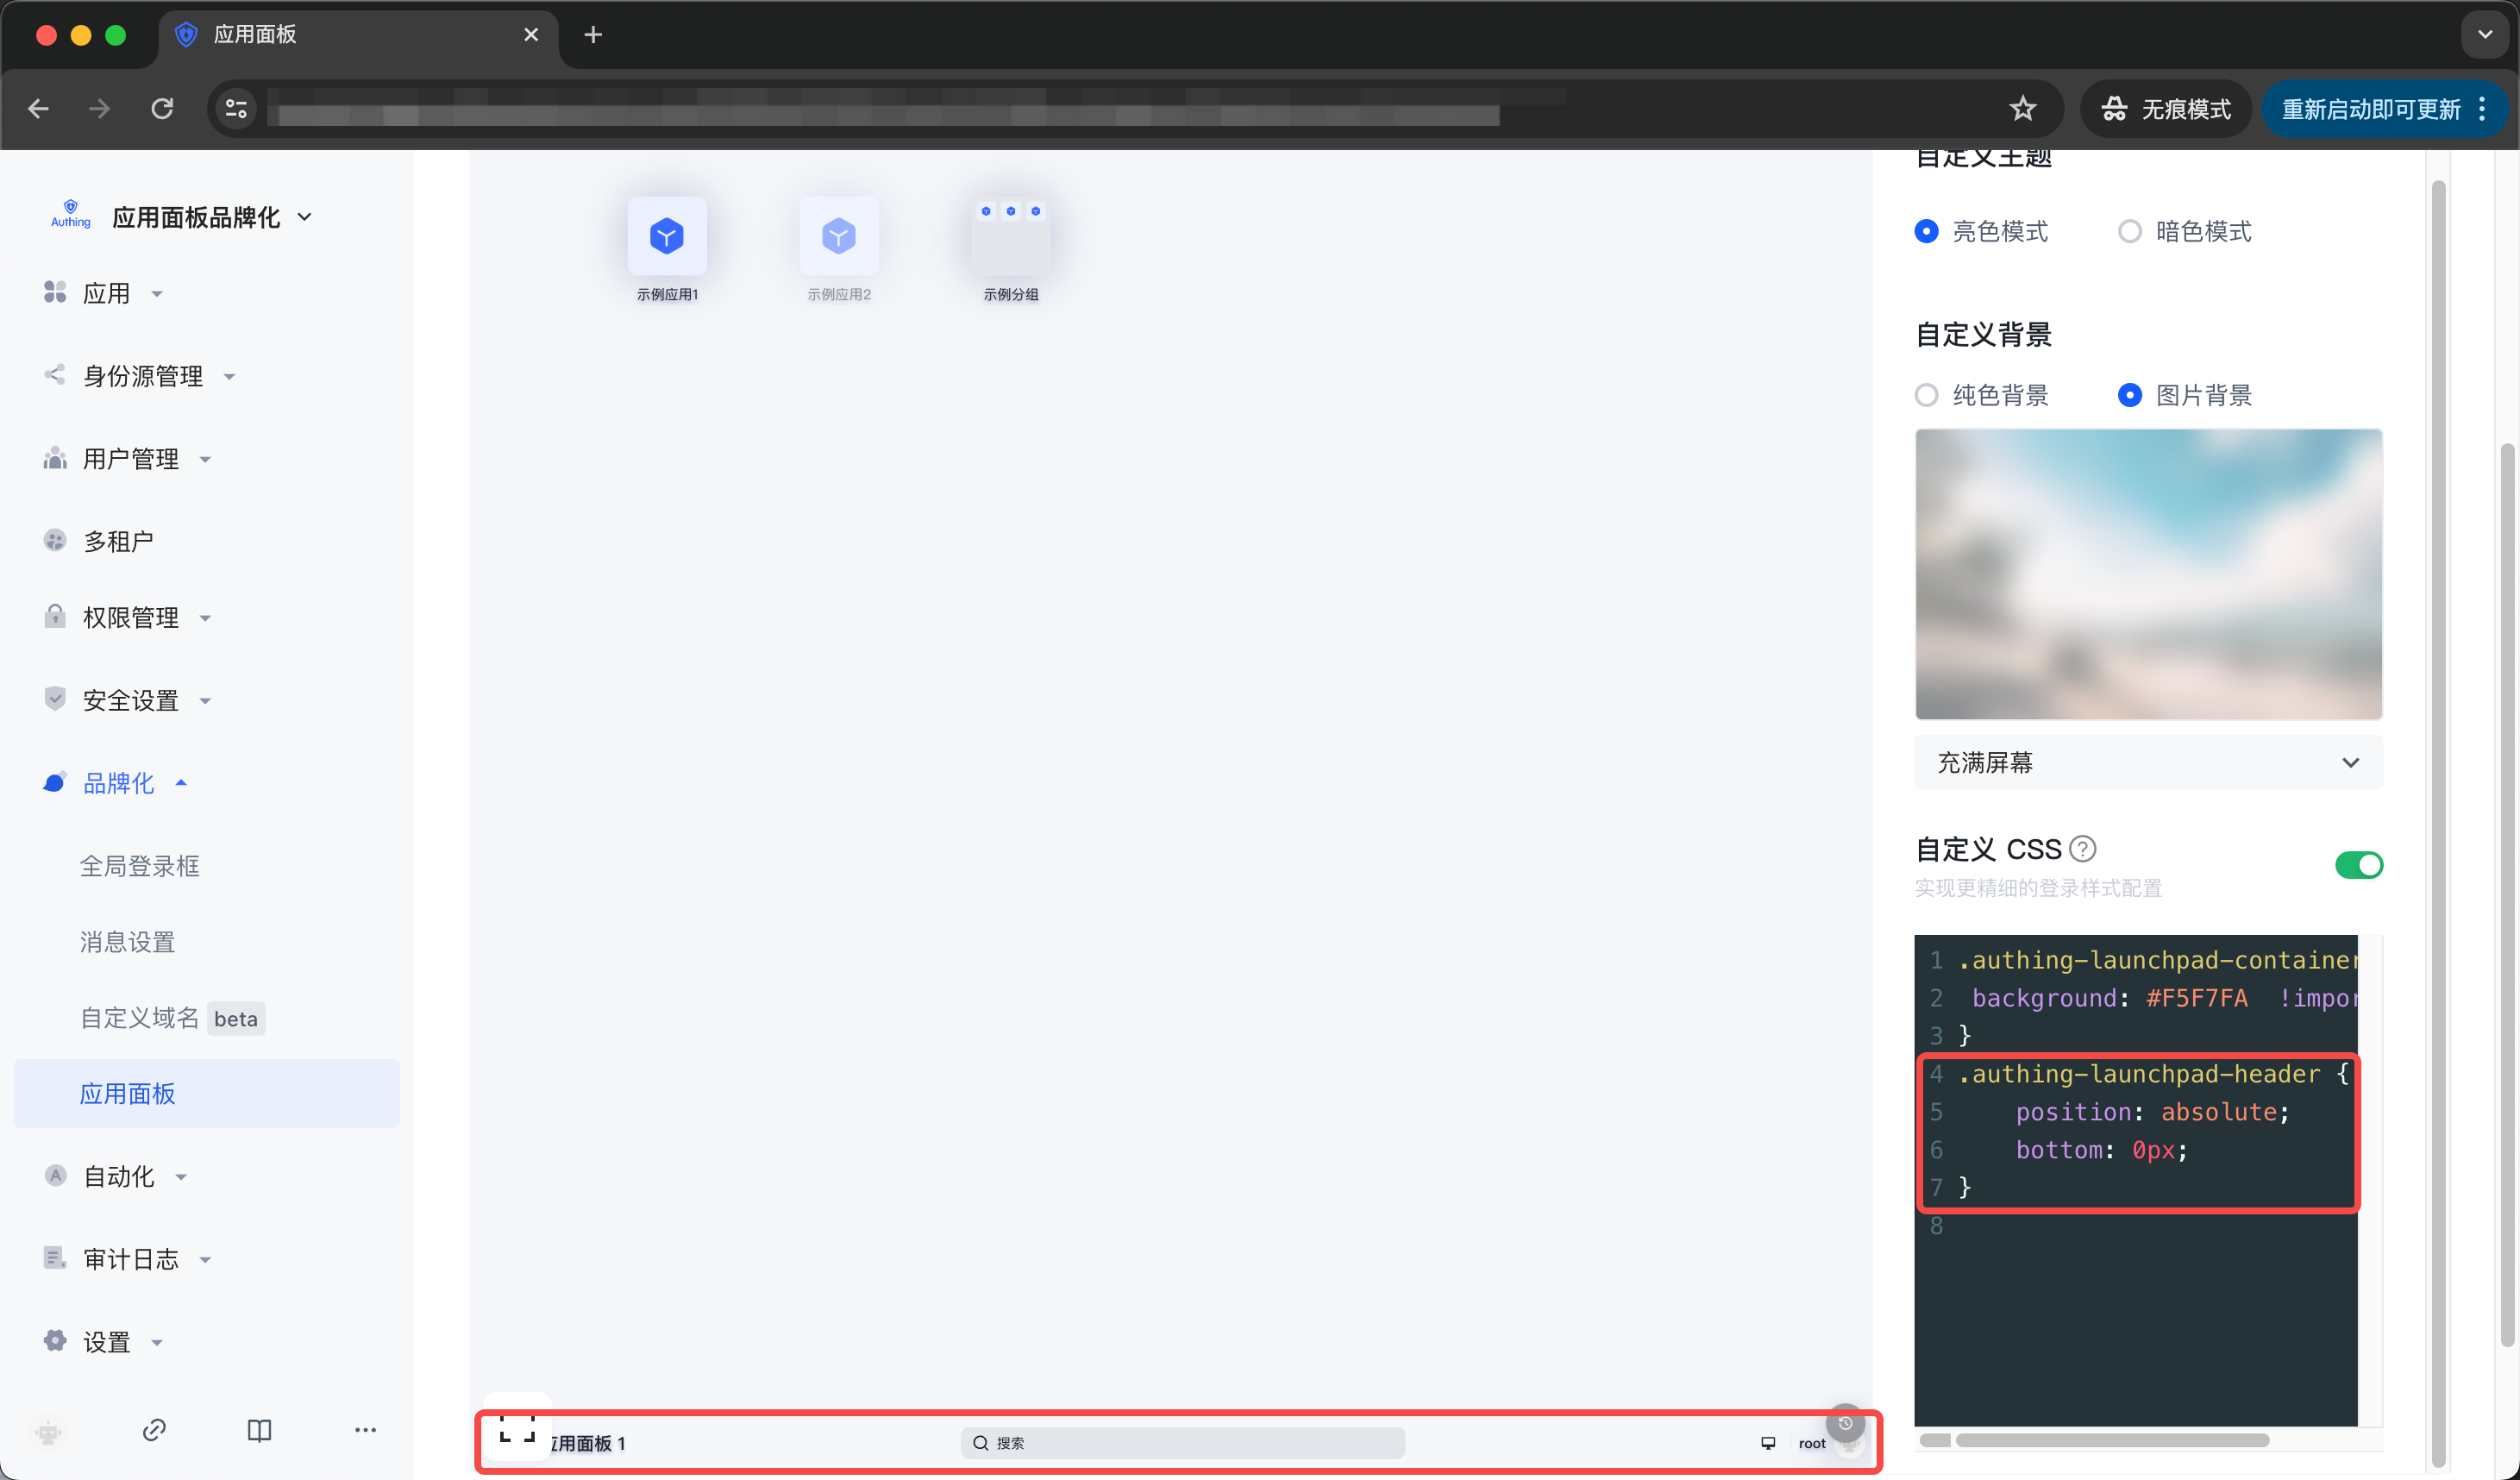
Customizing CSS has the following precautions:####
- Try to control the scope of the specified CSS, and its generation rule depends on the last level of routing. If you only want to style the application panel page, you can add
.launchpadbefore all css selectors, such as.launchpadfor the/loginpage.
 * Try to specify the control panel rendering node to be modified. Common rendering nodes on the PC side are as follows: * .authing-launchpad-container * .authing-launchpad-header * .authing-launchpad-main
 - Try to specify the control panel rendering node to be modified. Common rendering nodes on the mobile side are as follows:
- .authing-launchpad-m-content
- .authing-launchpad-m-content
- .authing-launchpad-m-content-container
- ...
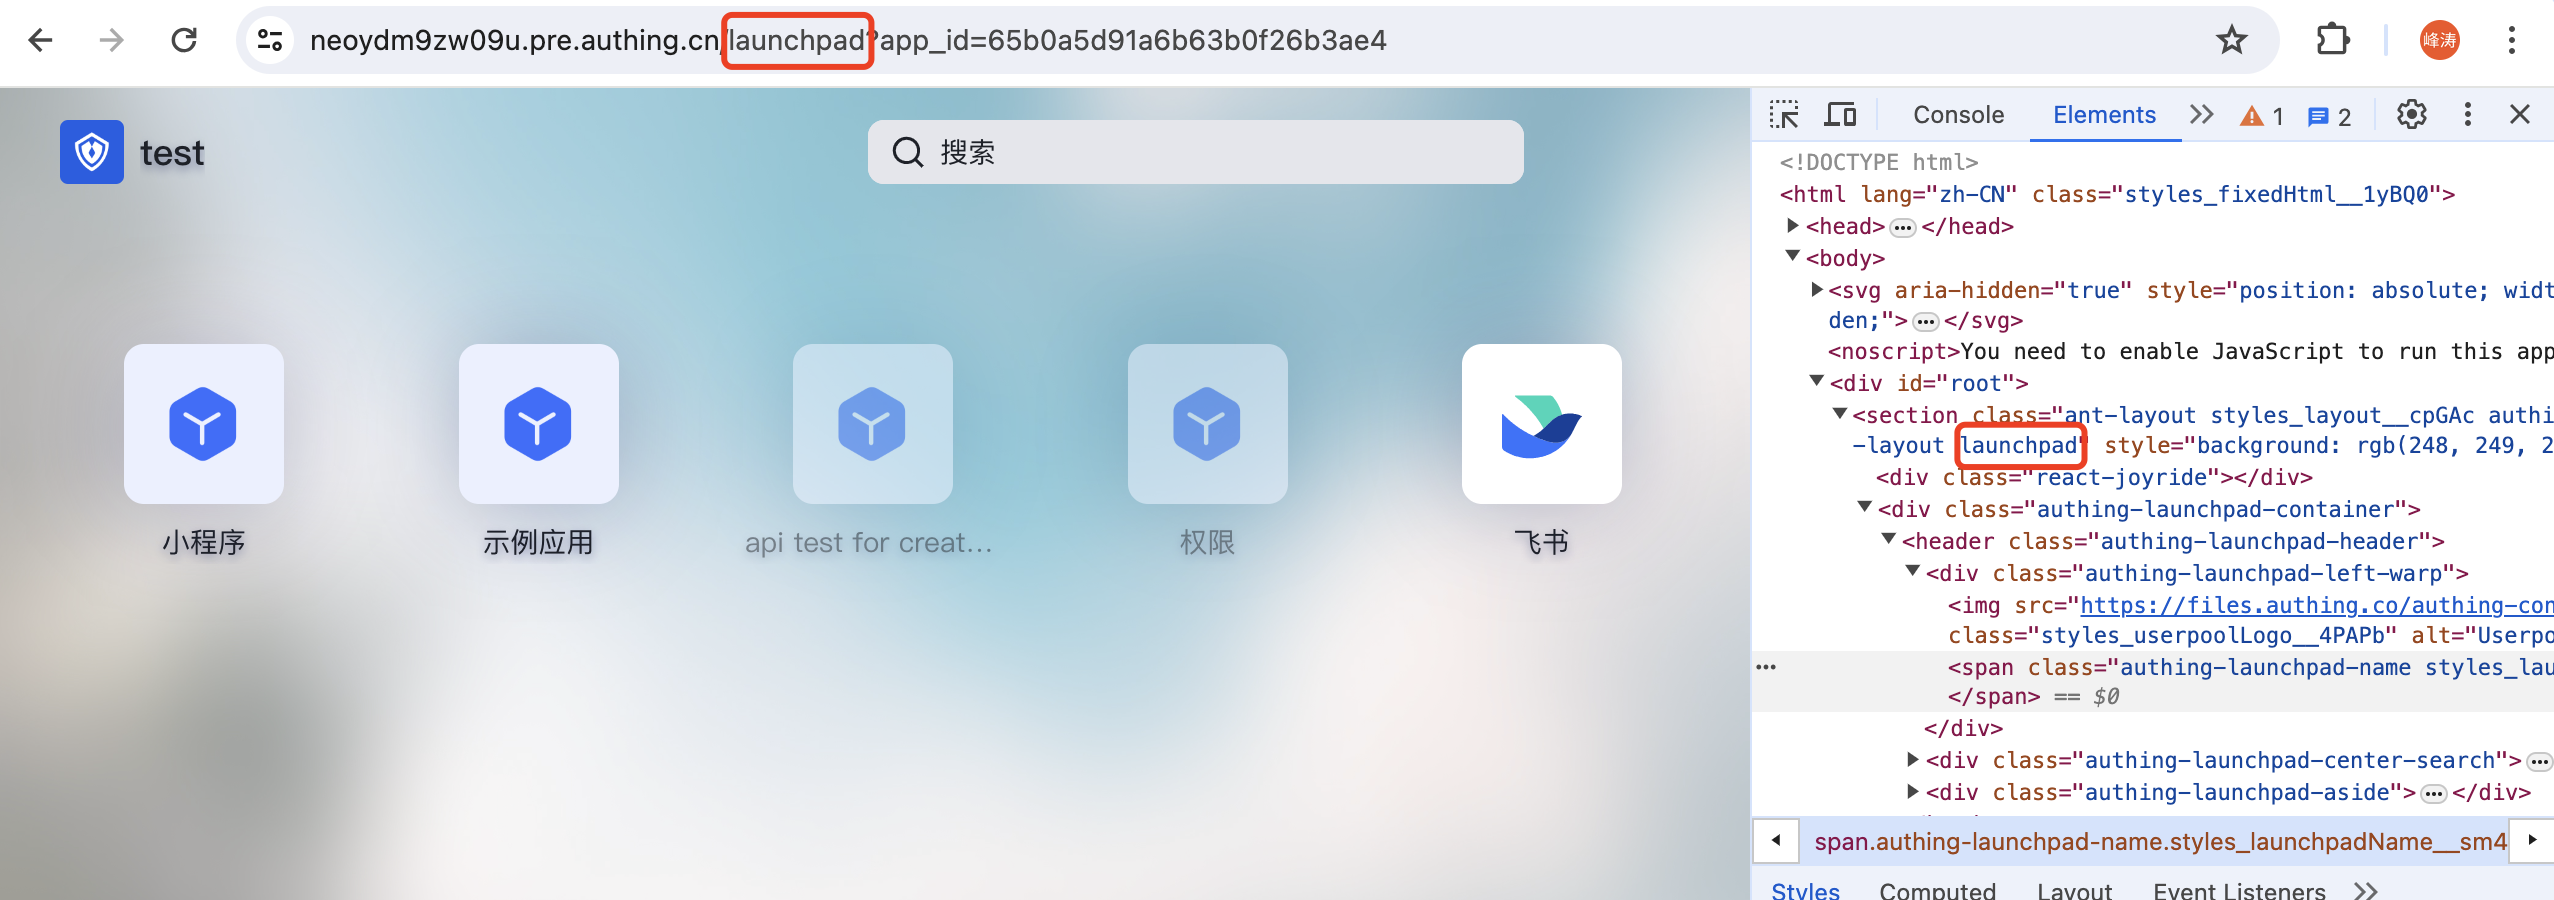
As shown in the figure below, the class name .authing-launchpad-container indicates that the launchpad is in the application panel node. Carrying this class name as the front selector, its style will only take effect in the application panel node.
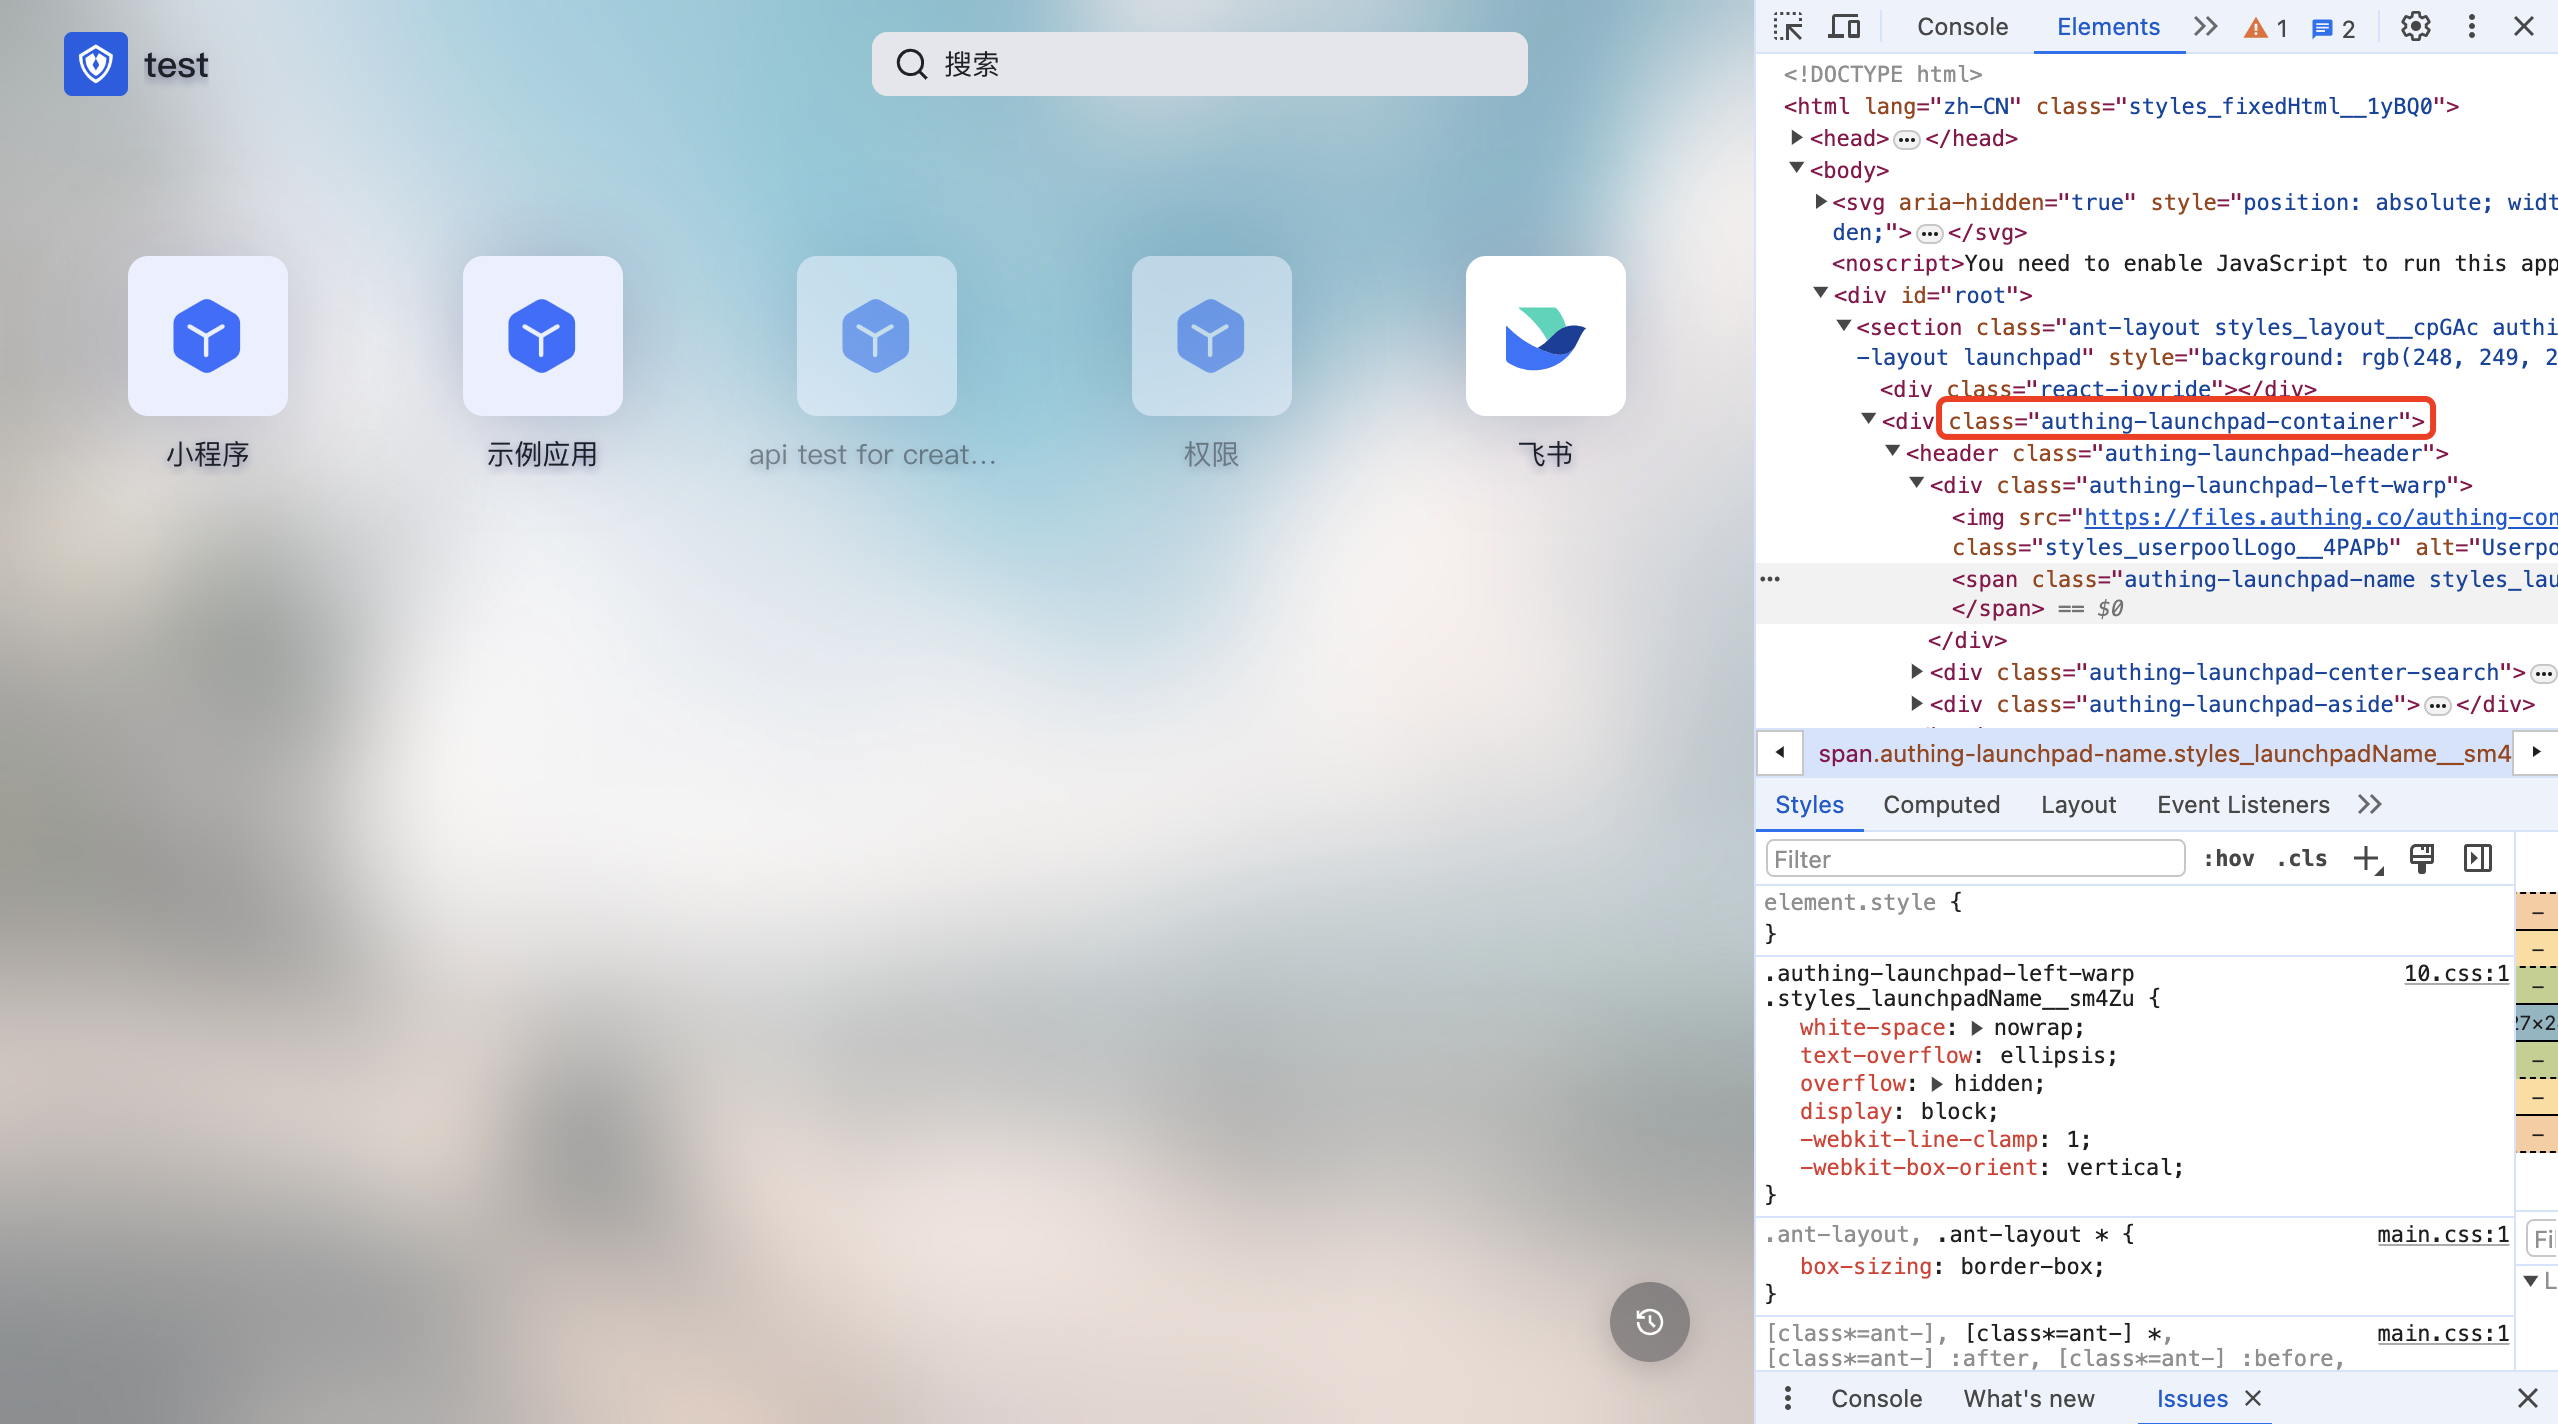 * The specific css class name can be viewed through the Chrome console in the application panel interface of GenAuth. The DOM tags that need custom styles are all provided with fixed class names. Class names with hash cannot be used because they change frequently.
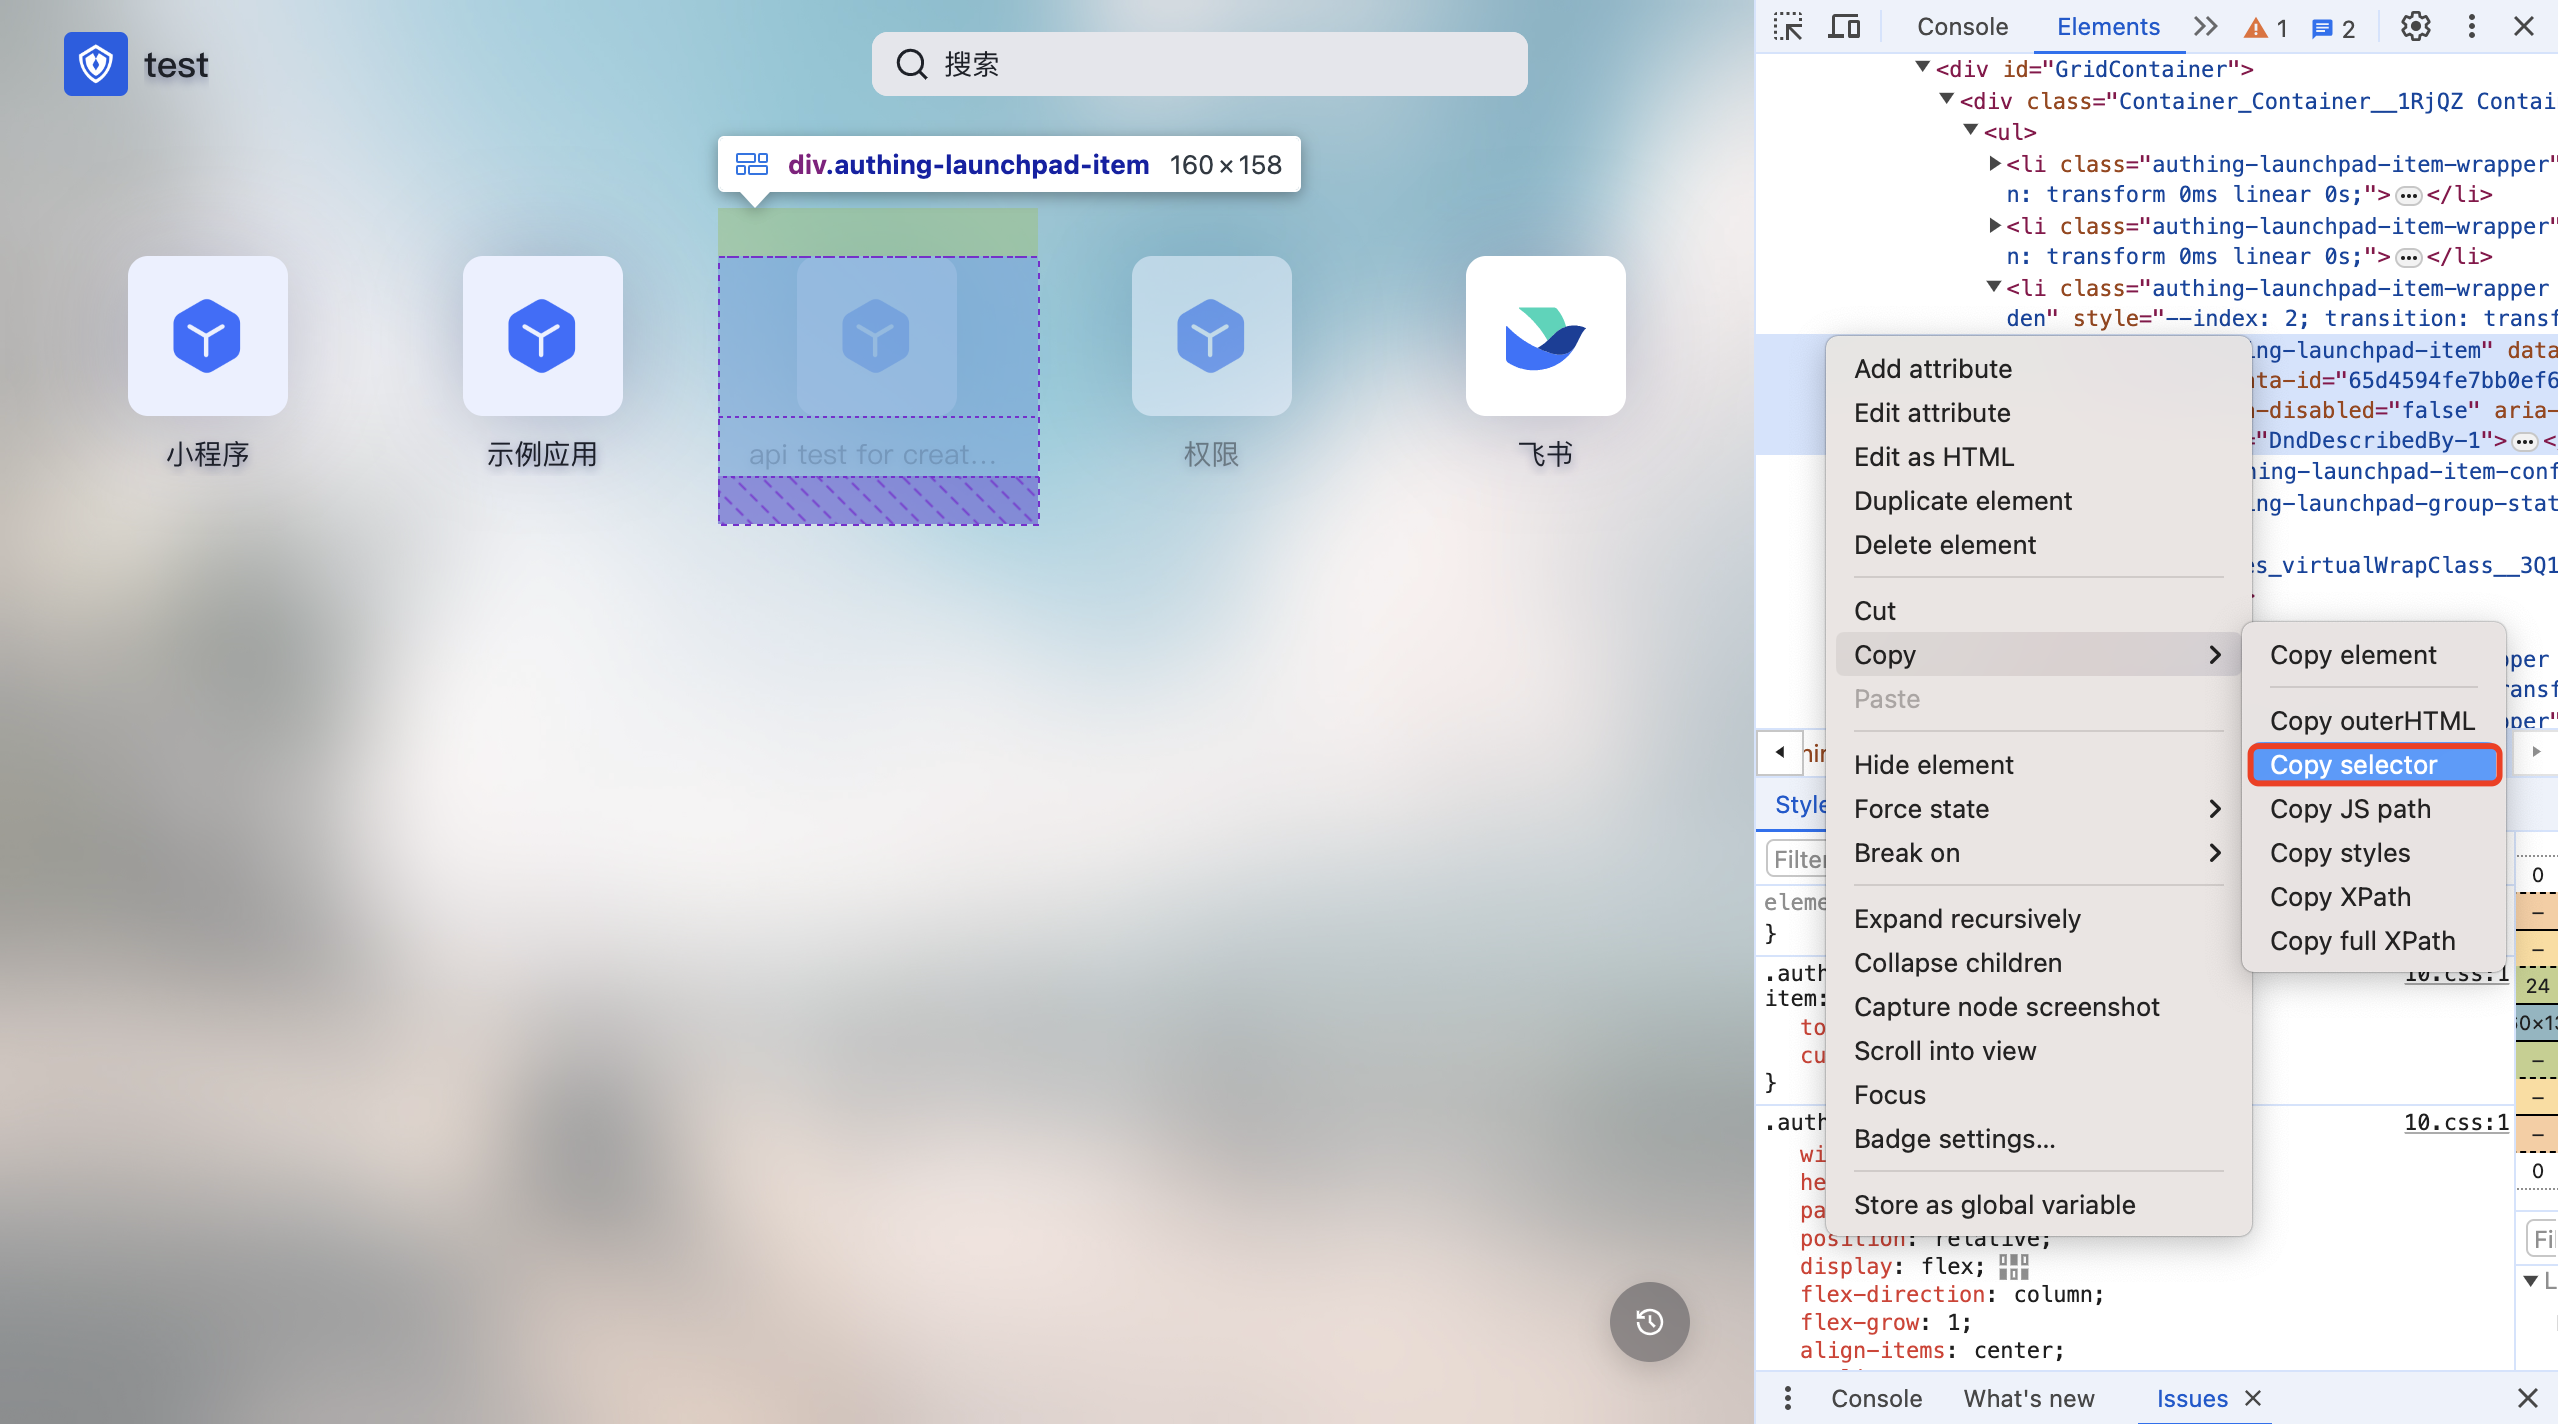
 - Try to select elements accurately. If the DOM hierarchy is very deep, it is recommended to use copy selector and use it with the first and second preceding selectors.
INFO
Application Panel has been iterating and expanding its functions to better serve users. During this development process, there may be DOM structure adjustments and class name deprecations. If it affects the user's customized CSS style, please contact our developers to adjust the CSS.