Quick Start
Quick Start: Authenticating Your First User
- Overview
- Authenticating with a hosted login page
- Authenticating with the embedded login component
- Authenticating with the API & SDK
- Validating user credentials (tokens)
- Manage user permissions
- Log out
- What you may need next
Overview
When using GenAuth for user authentication, you do not need to implement user management logic yourself. All related operations (such as creating and deleting users, configuring login processes, resetting passwords, etc.) can be completed through the GenAuth console hosted login page, API & SDK. User information will be securely stored in the GenAuth cloud database. You do not need to save an additional user profile, but directly use the user information stored in GenAuth to meet your business needs. To do this, you need to first join your business data with the GenAuth user table.
There are several ways to use GenAuth to access the user authentication process:
- Use GenAuth to host the login page.
- Use the embedded login component provided by GenAuth, which can be integrated into your web and mobile projects. You do not need to implement the login form UI yourself.
- Use API & SDK, GenAuth provides two forms of APIs in RESTFul and GraphQL, as well as SDKs in more than 10 languages or frameworks, based on which you can customize the UI and authentication process.
GenAuth can be integrated into various scenarios such as standard web applications, single-page web applications, client applications, and backend applications. You can read the access methods for different scenarios separately:
- Integrate GenAuth in standard web applications?
- Integrate GenAuth in single-page web applications?
- Integrate GenAuth in client applications?
After the user successfully logs in, you also need to:
- Learn how to identify the current user's identity on the backend?
- Learn how to grant roles and permissions to users for fine-grained permission control?
- Learn how to implement the logout operation?
Complete authentication using a hosted login page
GenAuth hosted login page is the simplest and most secure way to integrate. This is because the login process is maintained by GenAuth and secured by GenAuth. For application integration, it is recommended to use the login process hosted by GenAuth. Your business system redirects users to the GenAuth login page, where the user authenticates and then redirects back to the application login callback URL configured in the console. This design is considered a security best practice. In terms of custom configuration, the hosted mode provides custom configuration of the login registration form, which can be customized through console configuration and CSS.
This document will introduce how to use the GenAuth hosted login page to quickly implement a complete user authentication process.
Step 1: Create a user pool
User pool is the smallest unit of your user system isolation. You can divide users in different scenarios into different user pools. Each user pool can have users and applications, and the permissions, applications, and organizations between different user pools are completely isolated.
If you don't have a GenAuth developer account, you need to register a GenAuth developer account in the console first. After registration, you will be guided to create your own user pool.
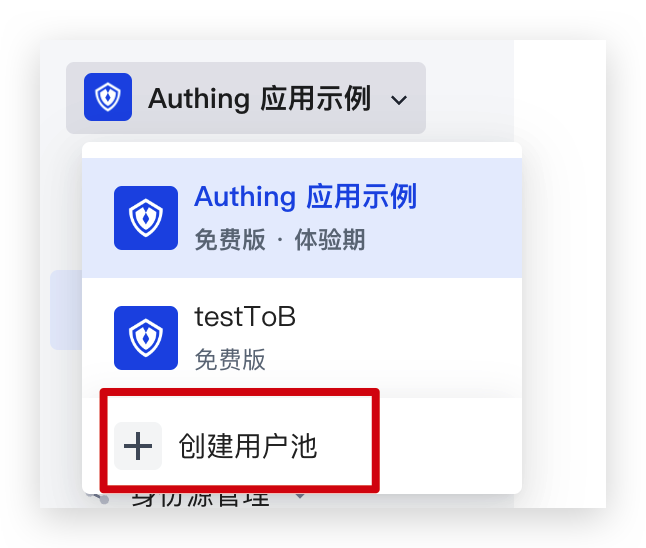
If you already have an account and want to create another user pool, you can click the drop-down button at the top of the left navigation bar:
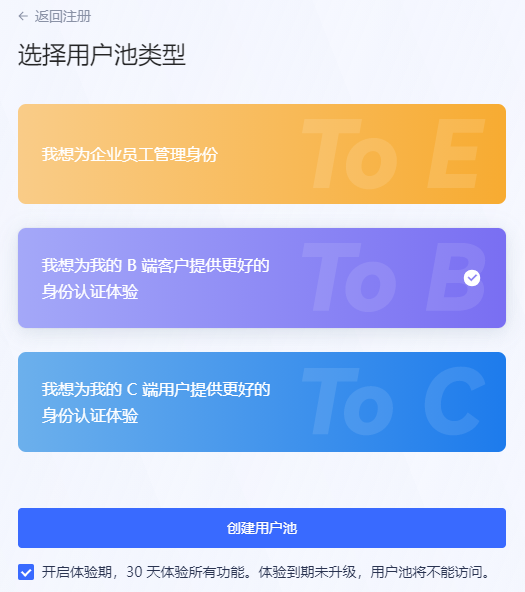
Select the user pool type:
For details on creating a user pool, please refer to [How to create a user pool for new and old users](/en/genauth/guides/basics/#merged-guides-basics-trial-admin user opening trial period).
Step 2: Create an application
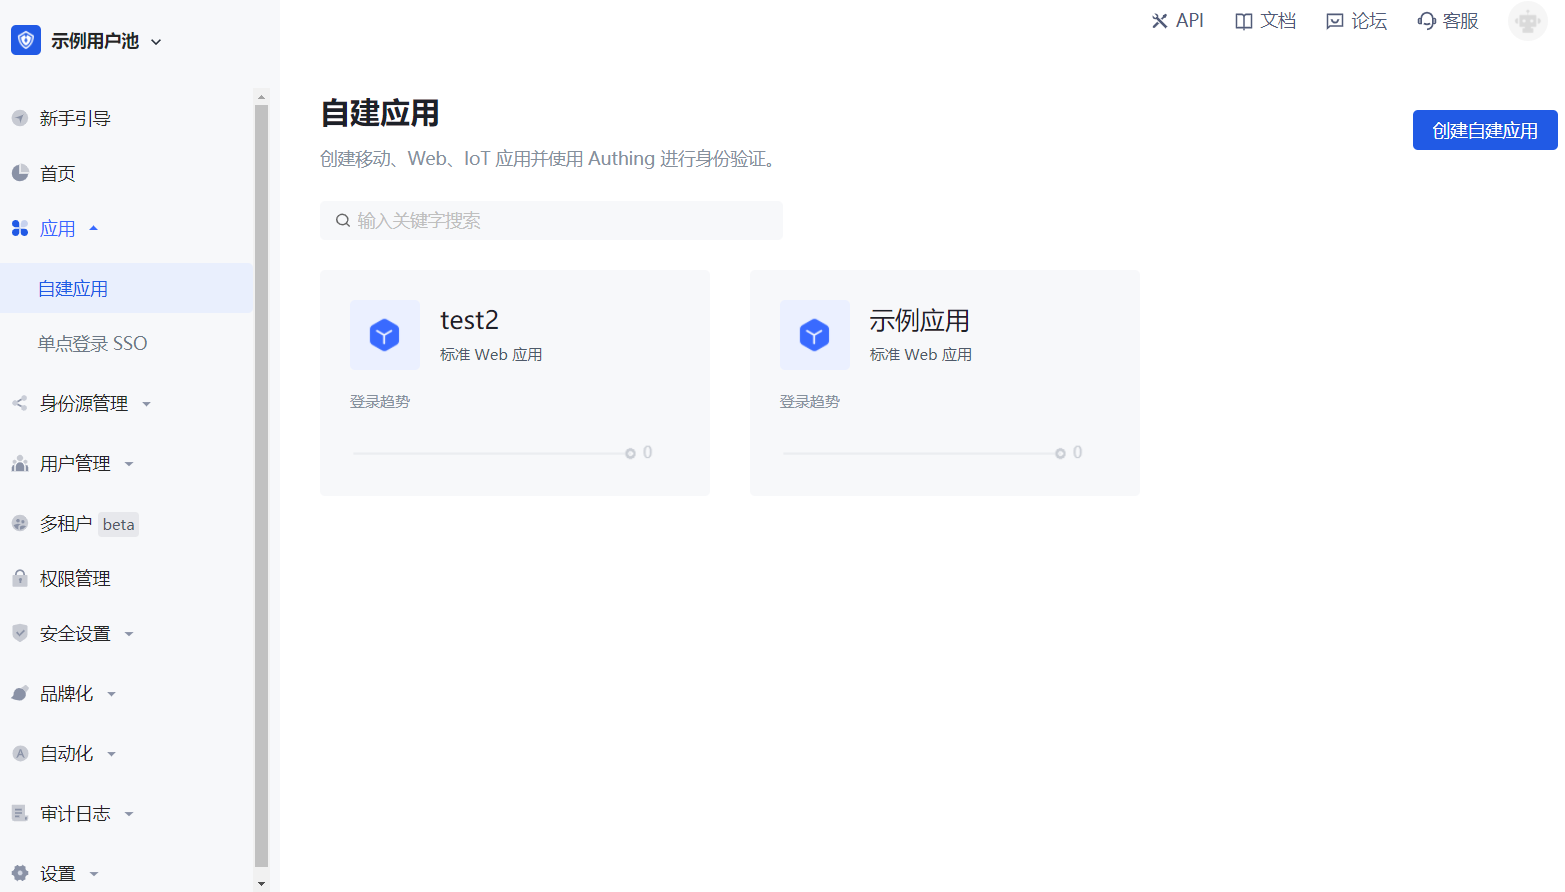
On the console Application->Self-built application page, you can view your own application list:
For details on creating and configuring self-built applications, please refer to Self-built application overview .
After the application is successfully created, click the Experience Login button on the right to experience logging into the application:
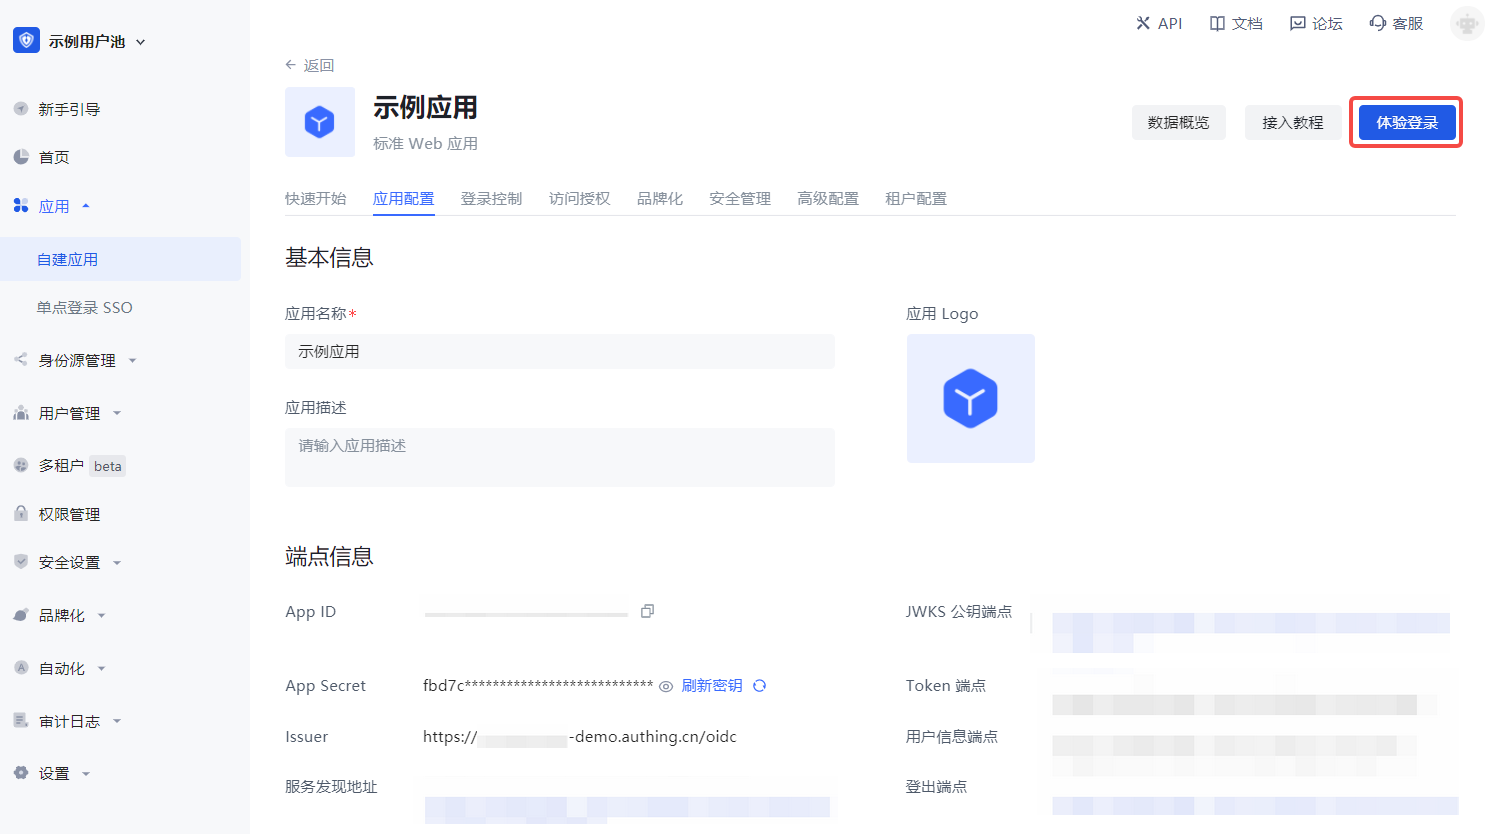
In the new window that pops up, you can see this GenAuth hosted online login page, which integrates login, registration, forgotten password, social login, MFA and other functions:

For details on creating and configuring applications, please refer to Self-built application overview.
Step 3: Create a user
Click Register now, select Password registration, enter your email address and password, confirm your password again, check the box to agree to the privacy and terms of service, and click the Register button.
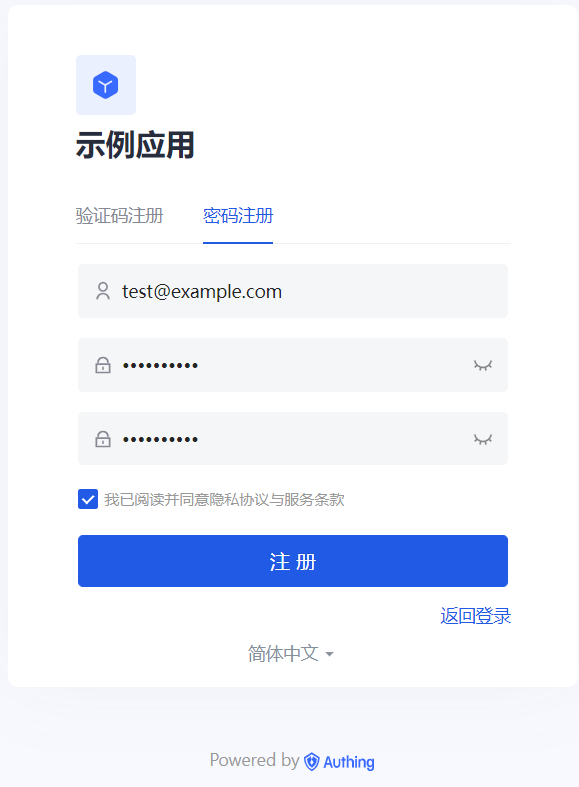
After successful registration, you can see the user on the User List page of the console (under the User Management menu of the console).
Step 4: Experience Login
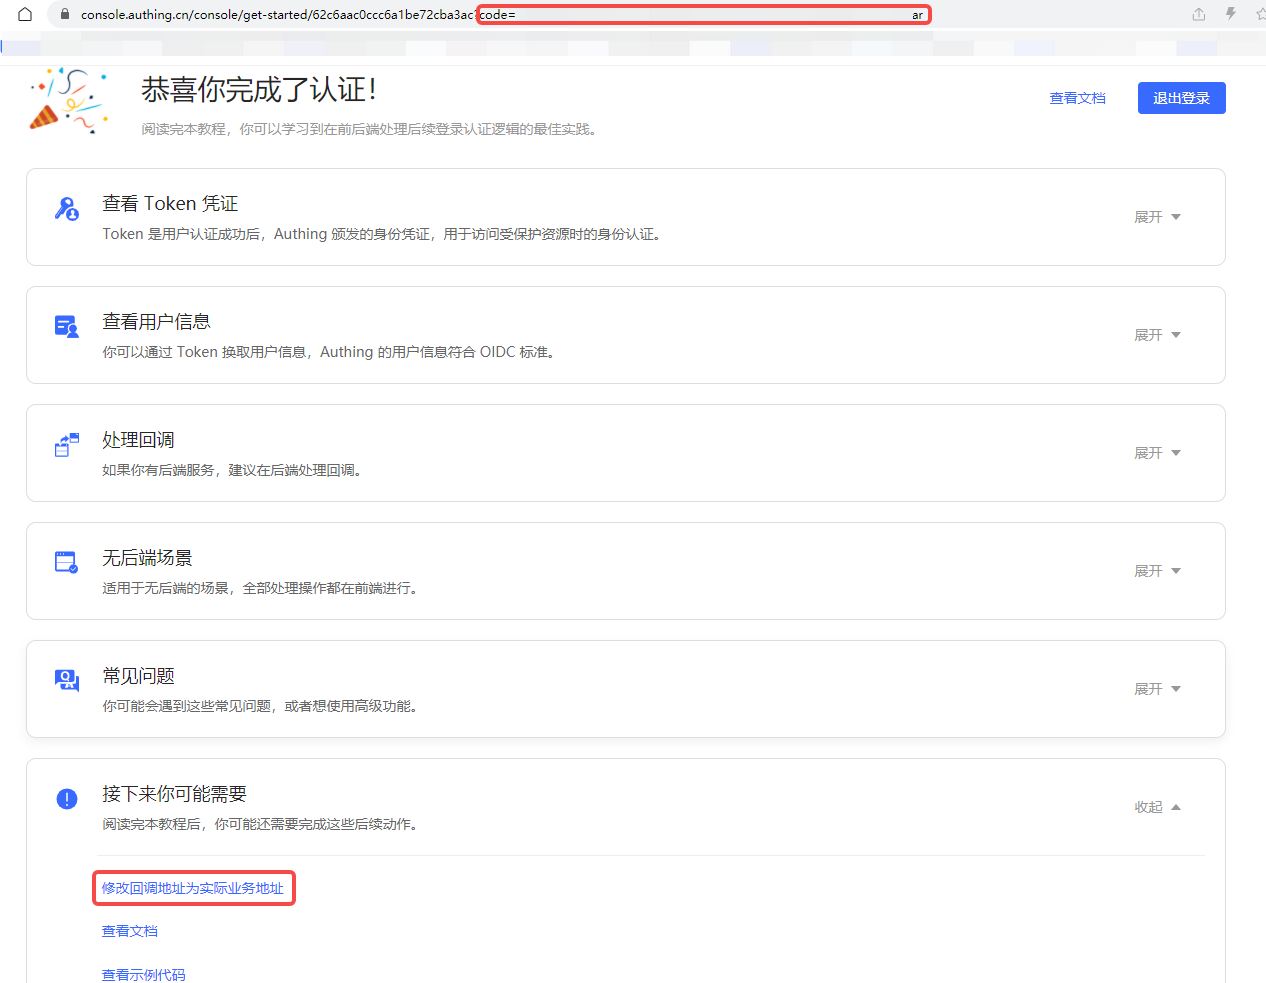
Go back to the login page, enter the email and password of the account you just created, and click Login. After successful login, you will jump to a callback guidance page (on this page you can view the subsequent detailed guidance process and best practices, it is recommended to read it in full). You can see that the URL contains the code query parameter. We will use this code to exchange for token in the next step.
Step 5: Use Code to Exchange Token
In actual applications, you need to change the callback address to the actual business address, which needs to be a backend address.
After getting code, you need to use code to exchange for user information. The Node.js sample code is as follows:
const axios = require("axios");
const qs = require("querystring");
const code2tokenResponse = await axios.post(
  // Change to your application domain name
  "https://GEN_AUTH_APP_HOST/oidc/token",
  qs.stringify({
    code,
    client_id: "GEN_AUTH_APP_ID",
    client_secret: "GEN_AUTH_APP_SECRET",
    grant_type: "authorization_code",
    redirect_uri: "GEN_AUTH_APP_REDIRECTURI",
  }),
  {
    headers: {
      "Content-Type": "application/x-www-form-urlencoded",
    },
  }
);
const { id_token, access_token } = code2tokenResponse.data;
The returned data includes id_token and access_token. In simple terms, id_token is equivalent to the user's identity credential; access_token is the key that allows access to resources. For the difference between Access Token and ID Token, please refer to Access Token vs Id Token.
{
  "access_token": "eyJhbGciOiJSUzI1NiIsInR5cCI6IkpXVCIsImtpZCI6IldZU3ZYbVhFRnZCaXcyNW1DTi1rMDZKeDk3d08xNVNlZGIwNjFhcWZ2WFEifQ.eyJqdGkiOiJJWWpZMzR3Y1hfX0tOX2NlbVdleHEiLCJzdWIiOiI1ZWU5YzRmYjM3Mjg5MGE4MTUyOTE4NzMiLCJpYXQiOjE2MTQ0MjE4NjMsImV4cCI6MTYxNTYzMTQ2Mywic2NvcGUiOiJvcGVuaWQgcHJvZmlsZSBlbWFpbCBwaG9uZSIsImlzcyI6Imh0dHBzOi8vc2FtcGxlLWFwcC5hdXRoaW5nLmNuL29pZGMiLCJhdWQiOiI2MDA1M2I3NDE2NDc4ZGUyZTg4ZmFiNDMifQ.XKy6WTE4naogVaz60-u4L3B4O3l_tYBFnOd80089L-6Hm1bCjOaCY14lV4BN11HgZ_JbikrhE4-_SgbaAVIEsK0NC5P22Naz6as_mDv2tAVgH7eVAKKAHIUQQnWGB890KMY0ptRQXOtSI5Ge06LH1Qq3jPvDR-TklwlY8Kg2S1-oxqDQoZuwZxc5b2BC84M3uLYd5mskkVyGdXOtTBtaGhmn2gxUJ_OhqEVAVpsC_QZRi70D3jup1seG_oADXz11ViVP4EtzYx4jy_3CJLkBBZXGoBY6zzrEI02GPT0CXkKzBDQGymcXKK2FEWpeMYmgkKFTT2ZoI_WcsHrLeNJu7Q",
  "expires_in": 1209600,
  "id_token": "eyJhbGciOiJIUzI1NiIsInR5cCI6IkpXVCJ9.eyJzdWIiOiI1ZWU5YzRmYjM3Mjg5MGE4MTUyOTE4NzMiLCJiaXJ0aGRhdGUiOiIiLCJmYW1pbHlfbmFtZSI6IiIsImdlbmRlciI6Ik0iLCJnaXZlbl9uYW1lIjoiIiwibG9jYWxlIjoiemhfQ04iLCJtaWRkbGVfbmFtZSI6IiIsIm5hbWUiOiIiLCJuaWNrbmFtZSI6IuW7lumVv-axnyIsInBpY3R1cmUiOiJodHRwczovL3RoaXJkd3gucWxvZ28uY24vbW1vcGVuL3ZpXzMyL0diUUtQMElGdlZOOENmd2UyQ0FPbzFBcW1FWnF1RXVUamhSVEZTRVdIaWJHbkhLaWFjY3RpY3J3VE50OUc4U3hOUG5MUzEwcmJBdFFYRGVKZkJ6VEEwb0p3LzEzMiIsInByZWZlcnJlZF91c2VybmFtZSI6IiIsInByb2ZpbGUiOiIiLCJ1cGRhdGVkX2F0IjoiMjAyMS0wMi0yN1QxMDoyOTo0MC4zNzFaIiwid2Vic2l0ZSI6IiIsInpvbmVpbmZvIjoiIiwiZW1haWwiOm51bGwsImVtYWlsX3ZlcmlmaWVkIjpmYWxzZSwicGhvbmVfbnVtYmVyIjpudWxsLCJwaG9uZV9udW1iZXJfdmVyaWZpZWQiOmZhbHNlLCJub25jZSI6IjVEdVdSRFZGRkUiLCJhdF9oYXNoIjoiaEdsRmh1YnZhbkNGSGNXc3RtVEtfQSIsImF1ZCI6IjYwMDUzYjc0MTY0NzhkZTJlODhmYWI0MyIsImV4cCI6MTYxNTYzMTQ2MywiaWF0IjoxNjE0NDIxODYzLCJpc3MiOiJodHRwczovL3NhbXBsZS1hcHAuYXV0aGluZy5jbi9vaWRjIn0.32N4cdIf0p7fiGEM6sPS6PH1JPtIwF3Ee4PUaCt6eXU",
  "scope": "openid profile email phone",
  "token_type": "Bearer"
}
After decoding the id_token, the sample data is as follows. The meaning of each field can be found in the id_token mentioned above:
{
  "sub": "5ee9c4fb372890a815291873", // Abbreviation of subject, which is the user ID
  "birthdate": "",
  "family_name": "",
  "gender": "M",
  "given_name": "",
  "locale": "zh_CN",
  "middle_name": "",
  "name": "",
  "nickname": "Nickname",
  "picture": "https://thirdwx.qlogo.cn/mmopen/vi_32/GbQKP0IFvVN8Cfwe2CAOo1AqmEZquEuTjhRTFSEWHibGnHKiaccticrwTNt9G8SxNPnLS10rbAtQXDeJfBzTA0oJw/132",
  "preferred_username": "",
  "profile": "",
  "updated_at": "2021-02-27T10:29:40.371Z",
  "website": "",
  "zoneinfo": "",
  "email": null,
  "email_verified": false,
  "phone_number": null,
  "phone_number_verified": false
}
You can use the access_token obtained in the previous step to obtain the user's detailed information. The sample code is as follows:
const axios = require("axios");
const token2UserInfoResponse = await axios.get(
  "https://sample-app.genauth.ai/oidc/me?access_token=" + access_token
);
console.log(token2UserInfoResponse.data);
After that, you need to pass the id_token back to the frontend, which should save the id_token and carry it with it every time it requests the backend interface. The backend interface should first verify the legitimacy of the id_token sent by the frontend, and then process the user request. For details on verifying the legitimacy of the token, see How to verify user identity credentials (token).
INFO
How to deal with scenarios without a backend?
The aforementioned Code to Token needs to be completed on the backend. If you are in a scenario without a backend, you can use the following two modes:
Use OIDC implicit mode
Find your application in the console Application->Self-built Application, turn on implicit mode in Application Configuration->Other Configuration->Authorization Configuration->Authorization Mode, and check id_token token return type, then let your users initiate login using the following address:
GET https://sample-app.genauth.ai/oidc/auth?client_id=GEN_AUTH_APP_ID&redirect_uri={callback address}&scope=openid%20profile&response_type=id_token%20token&state={random string}&nonce={random string}GenAuth directly returns id_token and access_token to the callback address in the form of URL hash (self-built application Application Configuration tab Authentication Configuration module), for example:
https://example.com/#id_token=eyJhbGciOiJIUzI1NiIsInR5cCI6IkpXVCJ9.eyJzdWIiOiI1Y2QwMjZlZjNlZDlmOTRkODBmZTM2YWUiLCJub25jZSI6IjE4MzEyODkiLCJzaWQiOiI4YzgzN2I5My01OTNlLTQzZjctYWMzNC0yYjRmZDU3ZGFhMTciLCJhdF9oYXNoIjoiVFFtbFlEVTVPZGF1Zjl0U0V KdHY5USIsInNfaGFzaCI6Ind3SDNXclV2b0hiSUp5TWVZVHU4bHciLCJhdWQiOiI1ZDAxZTM4OTk4NWY4MWM2YzFkZDMxZGUiLCJleHAiOjE1NjA0MDkzNjgsIml hdCI6MTU2MDQwNTc2OCwiaXNzIjoiaHR0cHM6Ly9vYXV0aC5hdXRoaW5nLmNuL29hdXRoL29pZGMifQ.T9M0s6rk4Teq6VOOBRIElgHK9KyM3q0ZJj2aS0VD_Fw& access_token=eyJhbGciOiJIUzI1NiIsInR5cCI6IkpXVCJ9.eyJqdGkiOiI3OE9XcVJNVXJEUXpMMXpHVzVtUWoiLCJzdWIiOiI1Y2QwMjZlZjNlZDlmOTRkO DBmZTM2YWUiLCJpc3MiOiJodHRwczovL29hdXRoLmF1dGhpbmcuY24vb2F1dGgvb2lkYyIsImlhdCI6MTU2MDQwNTc2OCwiZXhwIjoxNTYwNDA5MzY4LCJzY29wZ SI6Im9wZW5pZCBwcm9maWxlIiwiYXVkIjoiNWQwMWUzODk5ODVmODFjNmMxZGQzMWRlIn0.mR0MZDwlZWGRMsAZjQ27sDFFqYoDgZ6WHTK4C7JbML4&expires_in=3600&token_type=Bearer&state=jazz&session_state=26ec053be9f47d68dc430f84b97efb1095469fe10169a9e00ef4092718714b8bYou can extract the id_token from the url hash, and then you can decode the id_token to get the user information. For details, please see How to validate user credentials (token).
Using GenAuth Web SDK
GenAuth provides another simple way to obtain user information on the front end without handling callbacks or other configuration.
For detailed usage, please see Single Sign-On (SSO).
Visit the Personal Center
Each application created in GenAuth has a built-in personal center page for end users, the address is {YOUR_APP_DOMAIN}/u, such as "https://sample-app.genauth.ai/u", you can directly access this address through the browser.

Here, end users can view and modify their personal information, change passwords, bind email and mobile phone numbers, bind MFA, etc.
Using the login component
In the above process, we use the hosted login page operated by GenAuth. At the same time, we also provide Login components that support various mainstream web frameworks. Compared with online login pages, login components are more flexible and have stronger customization capabilities. You can integrate them into your own pages. For more information about login components, please refer to Use the embedded login component to complete authentication.
Using the API & SDK
So far, you have learned how to quickly implement the core login and registration process with the help of GenAuth's hosted login page. If you want stronger customization requirements, you can also use the API & SDK provided by GenAuth. For detailed procedures, see Use API & SDK to complete authentication.
Complete authentication using the embedded login component
The embedded login component (Guard) is considered to be the best balance between flexibility and integration. This mode is recommended if the integration requires a deeper level of customization or if hosted mode cannot be used in some scenarios where the front-end and back-end are separated. The embedded login component is built and updated by GenAuth, uses industry best practice security design, and only requires a few lines of JavaScript code to integrate into your project. It can be loaded directly from CDN or NPM, or built from source code. GenAuth login components also provide multiple integration modes for Javascript native, React, Vue, and Angular, which can be seamlessly integrated in any of your projects and enjoy a high degree of customization flexibility. For more detailed introduction, please see Integrate GenAuth Guard.
INFO
You can check Hosted Login Page vs Embeddable Login Component to understand the difference between the GenAuth hosted login page and the embedded login component.
Embedded Login Component Introduction
The GenAuth embedded login component integrates the following functions:
- Login: including account and password login (including mobile phone number + password, email + password, username + password), verification code login (SMS verification code, email verification code) and mobile APP scan code.
- Registration: including mobile phone verification code registration and username and password registration.
- Social login, such as GitHub login (need to be configured in the background first).
- APP scan code login (need to connect to APP scan code login first).
- Mini program scan code login (need to be configured in the background first).
- Enterprise identity source login (need to configure the enterprise identity source).
- Forgot password and reset password.
- MFA authentication.
It has the following features:
- Lightweight: All resources packaged together are only a few hundred kb;
- Responsive: Compatible with mobile and PC web pages;
- Customizable: Can support complete UI customization functions.
Access process of different front-end frameworks
No matter which framework you use, you need to use the application's appId, please go to the console to obtain first. For the location of APP ID, please refer to Application Configuration.
ui-components-exampleCode snippet: ui-components-example
Verify whether the user's Token is valid on the back end
The token field of the user information is a standard OIDC IdToken. You can verify this token on the back end using the application's ID and Secret.
Example token As follows:
eyJhbGciOiJIUzI1NiIsInR5cCI6IkpXVCJ9.eyJzdWIiOiI1ZjIxNTFiZWFlNWE4YjRjZTZiMGJhZTkiLCJiaXJ0aGRhdGUiOiIiLCJmYW1pbHlfbmFtZSI6IiIsImdlbmRlciI6IiIsImdpdmVuX25hbWUiOiIiLCJsb2 NhbGUiOiIiLCJtaWRkbGVfbmFtZSI6IiIsIm5hbWUiOiIiLCJuaWNrbmFtZSI6IiIsInBpY3R1cmUiOiJodHRwcz ovL3VzZXJjb250ZW50cy5hdXRoaW5nLmNuL2F1dGhpbmctYXZhdGFyLnBuZyIsInByZWZlcnJlZF91c2VybmFtZSI 6InRlc3RAZXhhbXBsZS5jb20iLCJwcm9maWxlIjoiIiwidXBkYXRlZF9hdCI6IjIwMjEtMDEtMThUMDc6NDg6NTU uNzgxWiIsIndlYnNpdGUiOiIiLCJ6b25laW5mbyI6IiIsImFkZHJlc3MiOnsiY291bnRyeSI6IiIsInBvc3RhbF9j b2RlIjoiIiwicmVnaW9uIjoiIiwiZm9ybWF0dGVkIjoiIn0sInBob25lX251bWJlciI6bnVsbCwicGhvbmVfbnVt YmVyX3ZlcmlmaWVkIjpmYWxzZSwiZW1haWwiOiJ0ZXN0QGV4YW1wbGUuY29tIiwiZW1haWxfdmVyaWZpZWQiOmZhb HNlLCJkYXRhIjp7InR5cGUiOiJ1c2VyIiwidXNlclBvb2xJZCI6IjVhOWZhMjZjZjg2MzVhMDAwMTg1NTI4YyIsI mFwcElkIjoiNjAwNTNiNzQxNjQ3OGRlMmU4OGZhYjQzIiwiaWQiOiI1ZjIxNTFiZWFlNWE4YjRjZTZiMGJhZTkiLC J1c2VySWQiOiI1ZjIxNTFiZWFlNWE4YjRjZTZiMGJhZTkiLCJfaWQiOiI1ZjIxNTFiZWFlNWE4YjRjZTZiMGJhZT kiLCJwaG9uZSI6bnVsbCwiZW1haWwiOiJ0ZXN0QGV4YW1wbGUuY29tIiwidXNlcm5hbWUiOiJ0ZXN0QGV4YW1wbGU uY29tIiwidW5pb25pZCI6bnVsbCwib3BlbmlkIjpudWxsLCJjbGllbnRJZCI6IjVhOWZhMjZjZjg2MzVhMDAwMTg 1NTI4YyJ9LCJ1c2VycG9vbF9pZCI6IjVhOWZhMjZjZjg2MzVhMDAwMTg1NTI4YyIsImF1ZCI6IjYwMDUzYjc0MTY0 NzhkZTJlODhmYWI0MyIsImV4cCI6MTYxMjE2NTg4OCwiaWF0IjoxNjEwOTU2Mjg4LCJpc3MiOiJodHRwczovL3NhbXBsZS1hcHAuYXV0aGluZy5jbi9vaWRjIn0.SNyGBffF-zBqDQFINGxUJZrWSAADHQhbEOsKvnH4SLgYou can Decode this ID Token in JWT.IO (domestic users can visit this mirror site):
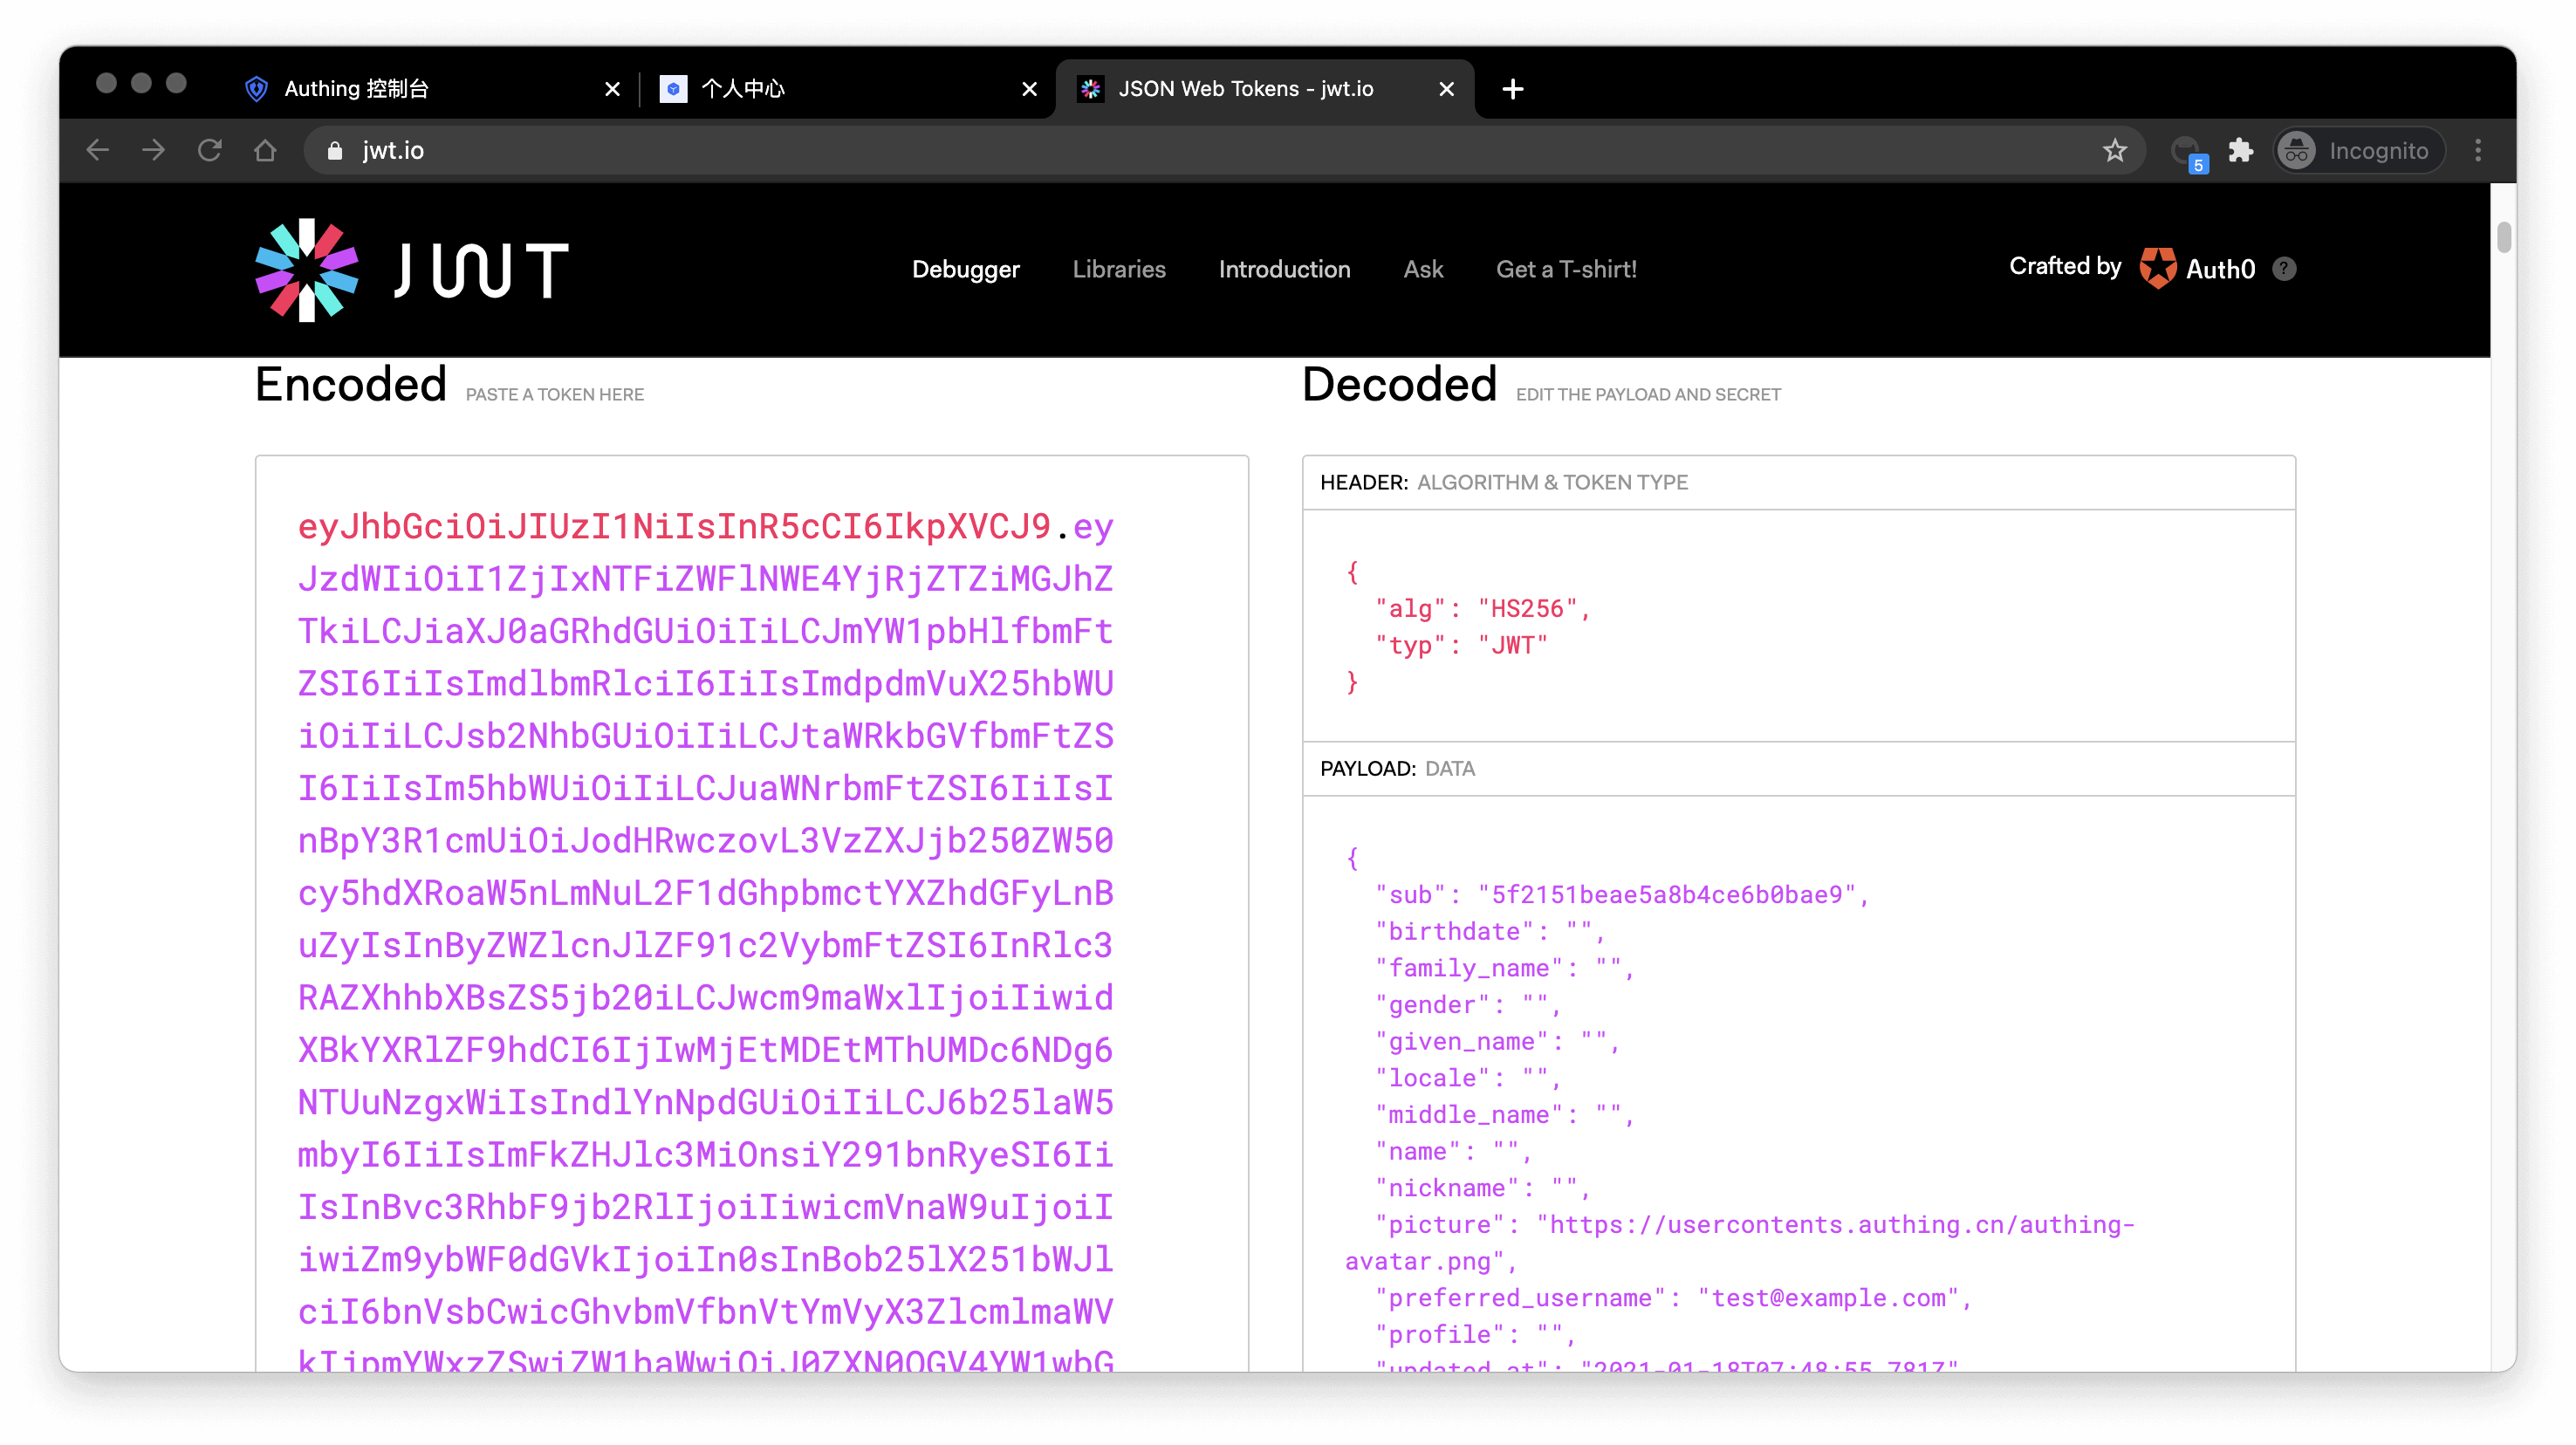
The sub field is the user's ID, and the aud field is the application's ID. You can learn the detailed meaning of each field of OIDC IdToken through Microsoft identity platform ID tokens.
Basically all languages provide libraries for verifying IdToken. Taking Node.js as an example, you can use JSON Web Token to verify IdToken:
const jwt = require("jsonwebtoken");

try {
  const data = jwt.verify("YOUR_ID_TOKEN", "YOUR_APP_SECRET");
} catch (error) {
  // token might be invalid or expired
  console.error(error);
}
If the verification is successful, you can get the user's unique ID through the sub field, and then you can combine the user ID with your own business! If you need to grant different roles and permissions to different users, you can learn how to grant roles and permissions to users for fine-grained permission control.
Detailed parameter and event list
GenAuth embedded login component supports high customization. In addition to customizing basic configurations such as title and logo, you can also configure different login methods and fully customize the style through custom CSS. In addition to successful login events, GenAuth embedded login component also encapsulates successful registration, login failure, login registration method switching and other events. For detailed documents, please see Login Component (Guard) Documentation.
Use API & SDK to complete authentication
In the previous guide, you have learned how to use GenAuth hosted login page and embedded login component to implement the login and registration process. In addition, we also provide HTTP APIs in RESTful and GraphQL, as well as SDKs in more than ten different languages and frameworks. You can flexibly combine the authentication process you need based on these API & SDK resources.
Select a familiar SDK
GenAuth supports SDKs in multiple programming languages including Java, JavaScript/Node.js, Python, PHP, C#, Swift, Go, Ruby, WeChat Mini Program, etc. You can choose the SDK you are familiar with:
Initialize SDK
init-sdkCode snippet: init-sdk
Use SDK to authenticate users
Take the mobile phone verification code login (if the user account does not exist, an account will be created first) as an example:
First send the SMS verification code
send-sms-codeCode snippet: send-sms-code
Then use the mobile phone verification code to log in:
login-by-phone-codeCode snippet: login-by-phone-code
After successful login, you can get the user information of the user, where token is the user's identity credential. You should bring it with you when accessing your backend resources, and then verify the identity of this token on the backend.
Verify user token
The token field of the user information is a standard OIDC IdToken. You can use application ID and Secret on the backend to verify this token.
Example token As follows:
eyJhbGciOiJIUzI1NiIsInR5cCI6IkpXVCJ9.eyJzdWIiOiI1ZjIxNTFiZWFlNWE4YjRjZTZiMGJhZTkiLCJiaXJ0aGRhdGUiOiIiLCJmYW1pbHlfbmFtZSI6IiIsImdlbmRlciI6IiIsImdpdmVuX25hbWUiOiIiLCJsb2NhbGUiOiI iLCJtaWRkbGVfbmFtZSI6IiIsIm5hbWUiOiIiLCJuaWNrbmFtZSI6IiIsInBpY3R1cmUiOiJodHRwczovL3VzZXJjb25 0ZW50cy5hdXRoaW5nLmNuL2F1dGhpbmctYXZhdGFyLnBuZyIsInByZWZlcnJlZF91c2VybmFtZSI6InRlc3RAZXhhbXBs ZS5jb20iLCJwcm9maWxlIjoiIiwidXBkYXRlZF9hdCI6IjIwMjEtMDEtMThUMDc6NDg6NTUuNzgxWiIsIndlYnNpdGUi OiIiLCJ6b25laW5mbyI6IiIsImFkZHJlc3MiOnsiY291bnRyeSI6IiIsInBvc3RhbF9jb2RlIjoiIiwicmVnaW9uIjoiI iwiZm9ybWF0dGVkIjoiIn0sInBob25lX251bWJlciI6bnVsbCwicGhvbmVfbnVtYmVyX3ZlcmlmaWVkIjpmYWxzZSwiZ W1haWwiOiJ0ZXN0QGV4YW1wbGUuY29tIiwiZW1haWxfdmVyaWZpZWQiOmZhbHNlLCJkYXRhIjp7InR5cGUiOiJ1c2VyIi widXNlclBvb2xJZCI6IjVhOWZhMjZjZjg2MzVhMDAwMTg1NTI4YyIsImFwcElkIjoiNjAwNTNiNzQxNjQ3OGRlMmU4OG ZhYjQzIiwiaWQiOiI1ZjIxNTFiZWFlNWE4YjRjZTZiMGJhZTkiLCJ1c2VySWQiOiI1ZjIxNTFiZWFlNWE4YjRjZTZiMGJ hZTkiLCJfaWQiOiI1ZjIxNTFiZWFlNWE4YjRjZTZiMGJhZTkiLCJwaG9uZSI6bnVsbCwiZW1haWwiOiJ0ZXN0QGV4YW1 wbGUuY29tIiwidXNlcm5hbWUiOiJ0ZXN0QGV4YW1wbGUuY29tIiwidW5pb25pZCI6bnVsbCwib3BlbmlkIjpudWxsLCJj bGllbnRJZCI6IjVhOWZhMjZjZjg2MzVhMDAwMTg1NTI4YyJ9LCJ1c2VycG9vbF9pZCI6IjVhOWZhMjZjZjg2MzVhMDAw MTg1NTI4YyIsImF1ZCI6IjYwMDUzYjc0MTY0NzhkZTJlODhmYWI0MyIsImV4cCI6MTYxMjE2NTg4OCwiaWF0IjoxNjEwO TU2Mjg4LCJpc3MiOiJodHRwczovL3NhbXBsZS1hcHAuYXV0aGluZy5jbi9vaWRjIn0.SNyGBffF-zBqDQFINGxUJZrWSAADHQhbEOsKvnH4SLgYou can decode this on this website (domestic users can access this mirror site) IdToken:
Basically all languages provide libraries for verifying IdToken. You can choose the language you are familiar with:
verify-id-tokenCode snippet: verify-id-token
If the verification is successful, you can get the user information of the id_token, where the sub field is the user's ID and the aud field is the application's ID. You can click here to learn about the detailed meaning of each field of IdToken.
Next
After identifying the user, you may also need to manage the user's permissions to determine whether the user has the permission to operate this API.
Verify user identity credentials (token)
When your user successfully logs in, GenAuth will issue an OIDC IdToken as an identity credential for the user. For verification methods, please refer to the Verification Token Document.
An example decoded OIDC IdToken is as follows:
{
  sub: '5f719946524ee1099229496b', // Abbreviation of subject, which is the user ID
  birthdate: null,
  family_name: null,
  gender: 'U',
  given_name: null,
  locale: null,
  middle_name: null,
  name: null,
  nickname: null,
  picture: 'https://files.authing.co/user-contents/photos/9a9dc4d7-e756-45b1-81d8-095a28e476c6.jpg',
  preferred_username: 'test1',
  profile: null,
  updated_at: '2020-09-30T07:12:19.401Z',
  website: null,
  zoneinfo: null,
  email: 'test1@123.com',
  email_verified: false,
  phone_number: null,
  phone_number_verified: false,
  nonce: 'E65b1QoUYt',
  at_hash: 'B3IgOYDDa0Pz8v1_9qZrAw',
  aud: '5f17a529f64fb009b794a2ff',
  exp: 1601453558,
  iat: 1601449959,
  iss: 'https://oidc1.genauth.ai/oidc'
}
Where sub is the unique identifier of the ID Token, usually the user ID.
Manage user permissions
When you have built a user system, at some point your API needs to determine whether the current user can access the current resource. At this time, you need to build your own permission system. A very important concept in the permission system is authorization. Authorization refers to the process of determining what permissions a user has, which is completely different from authentication (for the concepts and associations of authentication and authorization, please refer to Authentication and Authorization).
Currently, the two widely used permission models are role-based access control (RBAC) and attribute-based access control (ABAC). Each has its own advantages and disadvantages: the RBAC model is simpler to build, but its disadvantage is that it cannot authorize resources in a fine-grained manner (it authorizes a certain type of resource rather than a specific resource); the ABAC model is relatively complex to build, and the learning cost is relatively high. Its advantages are fine-grained and dynamic execution based on context.
In the permission system of GenAuth, we implement the role permission inheritance of the RBAC model through the two objects of user and role. On top of this, we can also dynamically and fine-grainedly authorize around attributes, thus realizing the ABAC permission model. At the same time, in order to meet the design requirements of complex organizational structures in large systems, we combine resource, role, and permission authorization into a permission group:
You can quickly build a permission model suitable for your business scenario based on the powerful and flexible permission system of GenAuth. Let's take a simple scenario in reality as an example.
Permission model introduction
What is role-based access control (RBAC)
Role-based access control (RBAC for short) refers to authorizing relevant permissions through the user's role (Role). In short, this is more flexible, efficient, and scalable than directly granting user permissions.

When using RBAC, by analyzing the actual situation of system users, different roles are granted to them based on common responsibilities and needs. You can grant one or more roles to a user, and each role has one or more permissions. This relationship between user-role and role-permission allows us to no longer manage individual users separately. Users inherit the required permissions from the granted roles.
Take a simple scenario (Gitlab's permission system) as an example. There are three roles in the user system: Admin, Maintainer, and Operator. These three roles have different permissions. For example, only Admin has the permission to create and delete code repositories, while other roles do not have them.
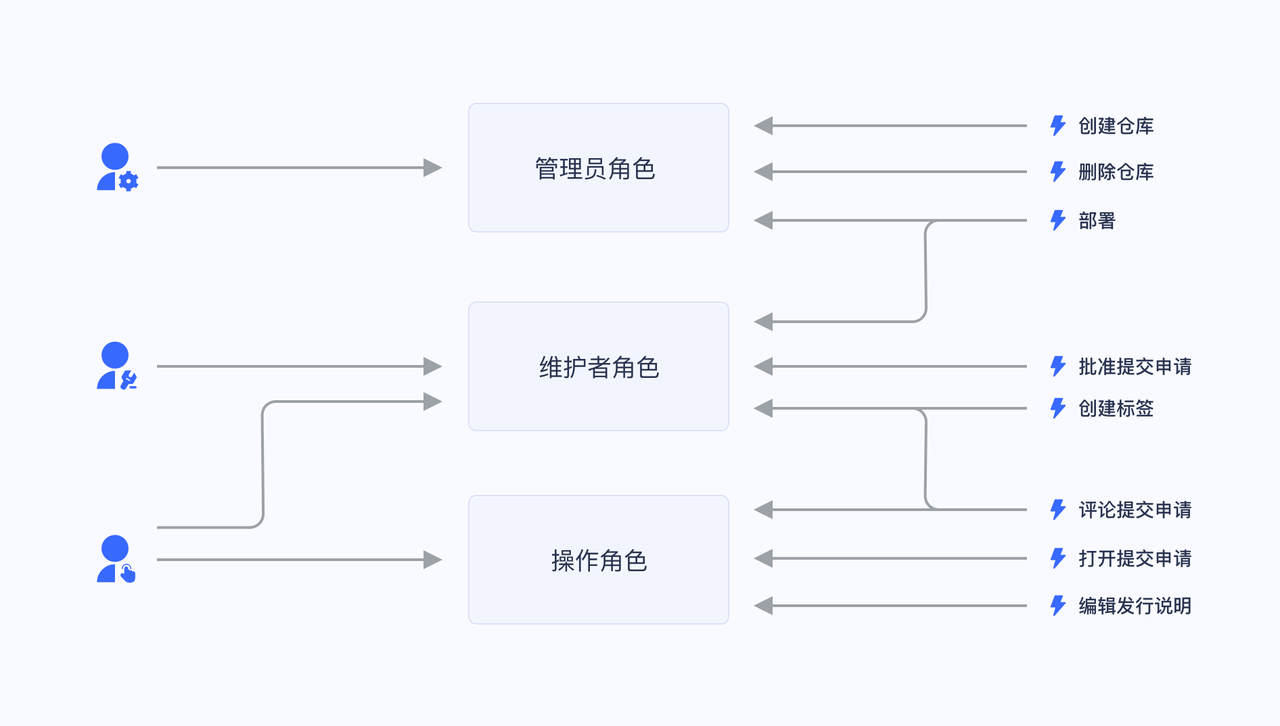
We grant a user the role of "Admin", and he has the two permissions of "Create code repository" and "Delete code repository".
Not directly granting user authorization policies is for future scalability considerations. For example, if there are multiple users with the same permissions, we need to assign the same permissions to these users separately when assigning them, and modify the permissions of these users one by one when modifying them. After we have roles, we only need to define permissions for the role, assign different roles to different users, and then we only need to modify the permissions of the role to automatically modify the permissions of all users in the role.
What is Attribute-Based Access Control (ABAC)
Attribute-Based Access Control (ABAC) is a flexible authorization model that controls whether there is permission to operate an object through one or a group of attributes. ABAC attributes are generally divided into four categories: user attributes (such as user age), environment attributes (such as current time), operation attributes (such as reading) and object attributes (such as an article, also known as resource attributes), so in theory, very flexible permission control can be achieved: 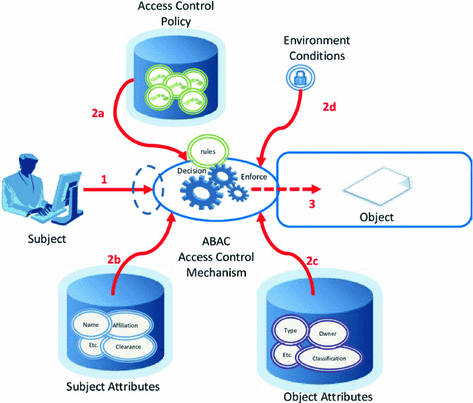
Under the ABAC permission model, you can easily implement the following permission control logic:
- Authorize editing of a specific book by A;
- When the department to which a document belongs is the same as the department of the user, the user can access the document;
- When the user is the owner of a document and the status of the document is a draft, the user can edit the document;
- People in the A department are prohibited from accessing the B system before 9 am;
- It is prohibited to access the A system as an administrator in places other than Shanghai;
There are several common points in the above logic:
- Specific to a certain resource rather than a certain type;
- Specific to a certain operation;
- It can dynamically execute policies based on the context of the request (such as time, geographic location, resource tag);
If it is condensed into one sentence, **You can authorize a specific permission for a resource in a fine-grained manner under what circumstances. **
Authorization mode introduction
GenAuth supports two authorization modes:
- Through the [Authorization Code Mode](/en/genauth/concepts/oidc/#merged-concepts-oidc-choose-flow Code Mode) based on the OAuth 2.0 process.
- Authorize users through the permission API.
Implement the permission model with GenAuth
Below, we take the mode of calling the permission API as an example.
Create a role
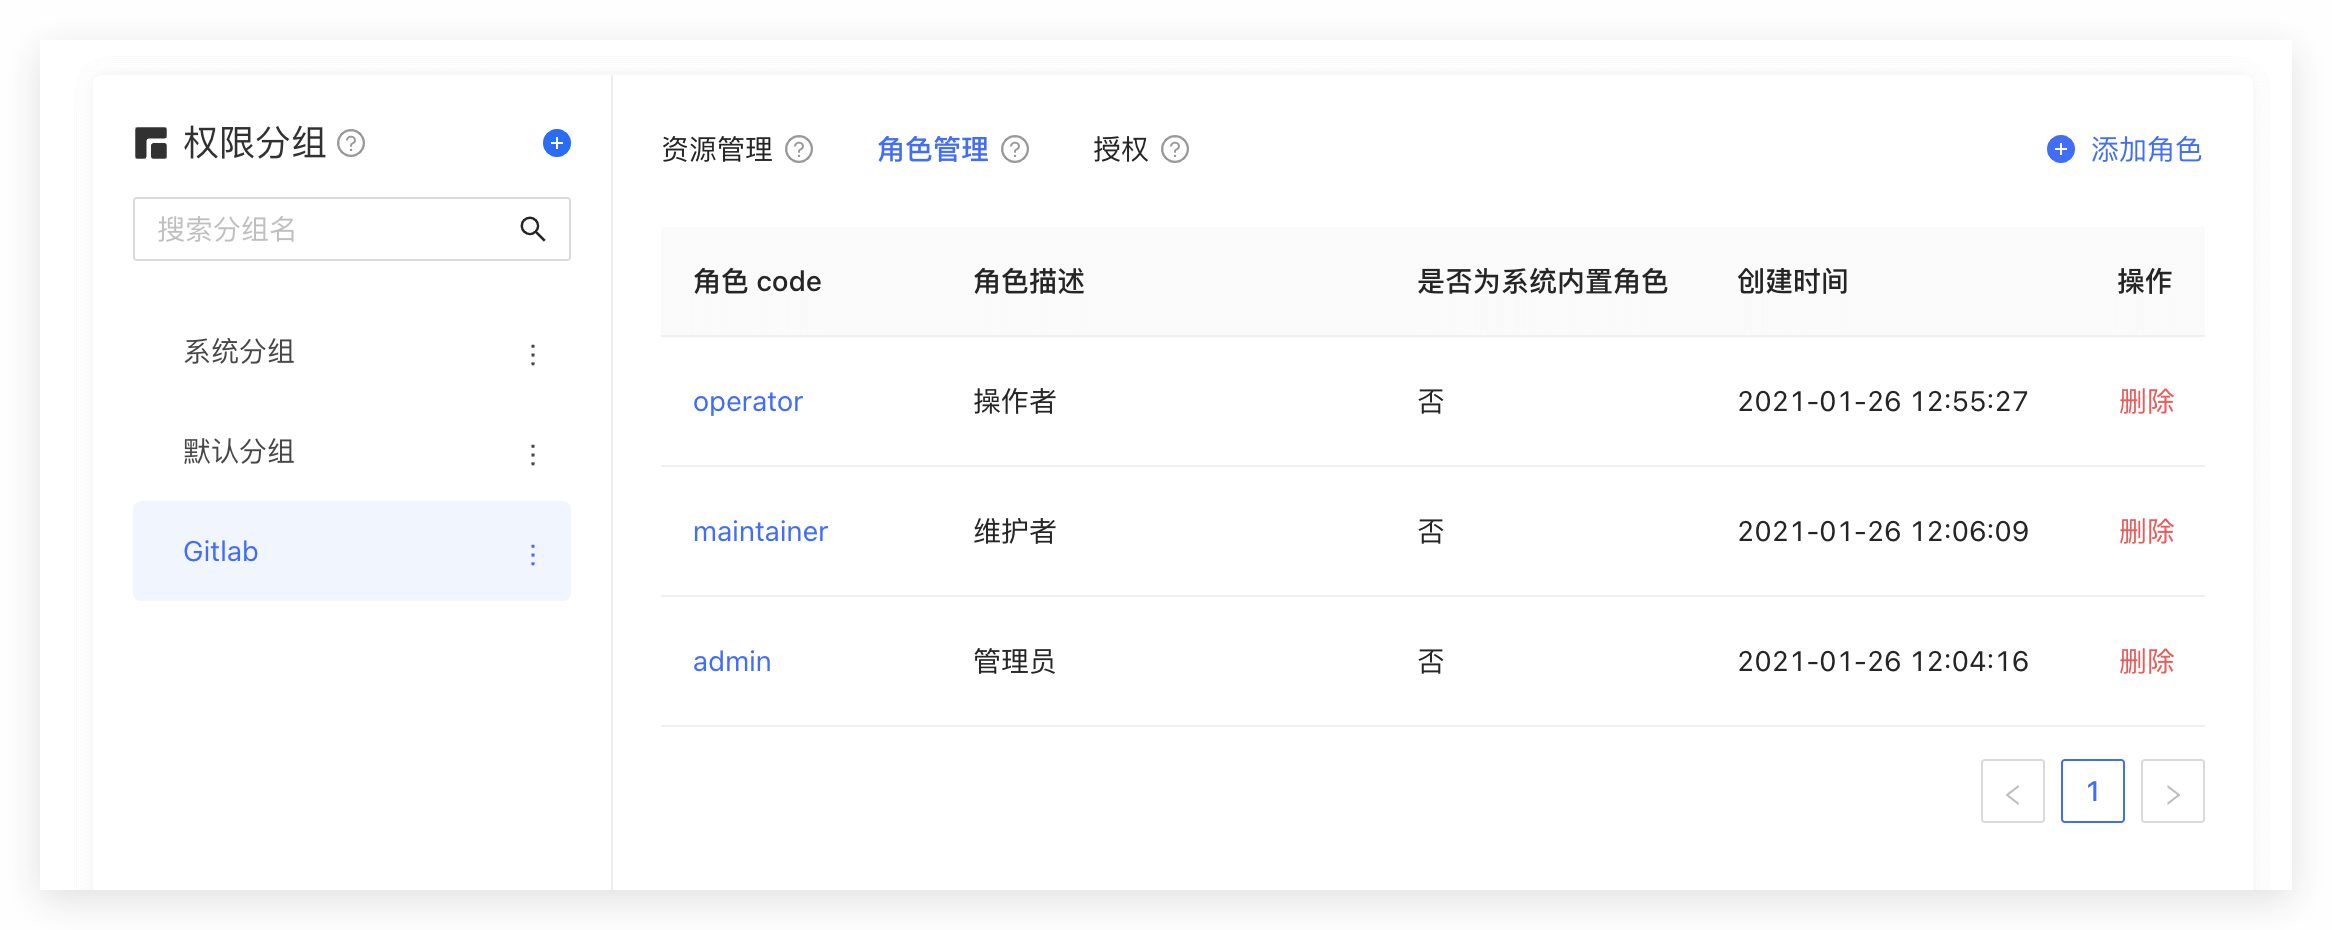
You can use the GenAuth console to create a role: In Permission Management - Role Management, click the Add Role button:
- Role code: The unique identifier of the role, which can only contain English letters, numbers, underscores _, and dashes -. Here we fill in admin.
- Role description: Description of the role. Here we fill in administrator.
Create three roles:
You can also use API & SDK to create roles. For details, see Role Management SDK.
Authorize user roles
On the role details page, you can authorize this role to users. You can search for users by username, phone number, email address, or nickname:

After selecting a user, click Confirm. You can view a list of users authorized with this role.
You can also use API & SDK to grant roles to users. For details, see Role Management SDK.
Control permissions by user roles in the backend
After the user successfully authenticates and obtains the token, you can parse the current user's ID. Next, you can use the API & SDK we provide to obtain the roles granted to the user in the backend. Here we take Node.js as an example:
First, get a list of all roles granted to the user:
import { ManagementClient } from "authing-js-sdk";

const managementClient = new ManagementClient({
  userPoolId: "YOUR_USERPOOL_ID",
  secret: "YOUR_USERPOOL_SECRET",
});
const { totalCount, list } = await managementClient.users.listRoles("USER_ID");
After obtaining all the roles of the user, we can determine whether the user has the devops role:
if (!list.map((role) => role.code).includes("devops")) {
  throw new Error("No permission to operate!");
}
Create resources
In the previous step, we controlled permissions by whether the user has a certain role. This permission control is still relatively coarse-grained because it only determines whether the user has a certain role, but not whether he has a specific permission. GenAuth Based on the role-based access control model (RBAC), more fine-grained authorization can be performed around resources.
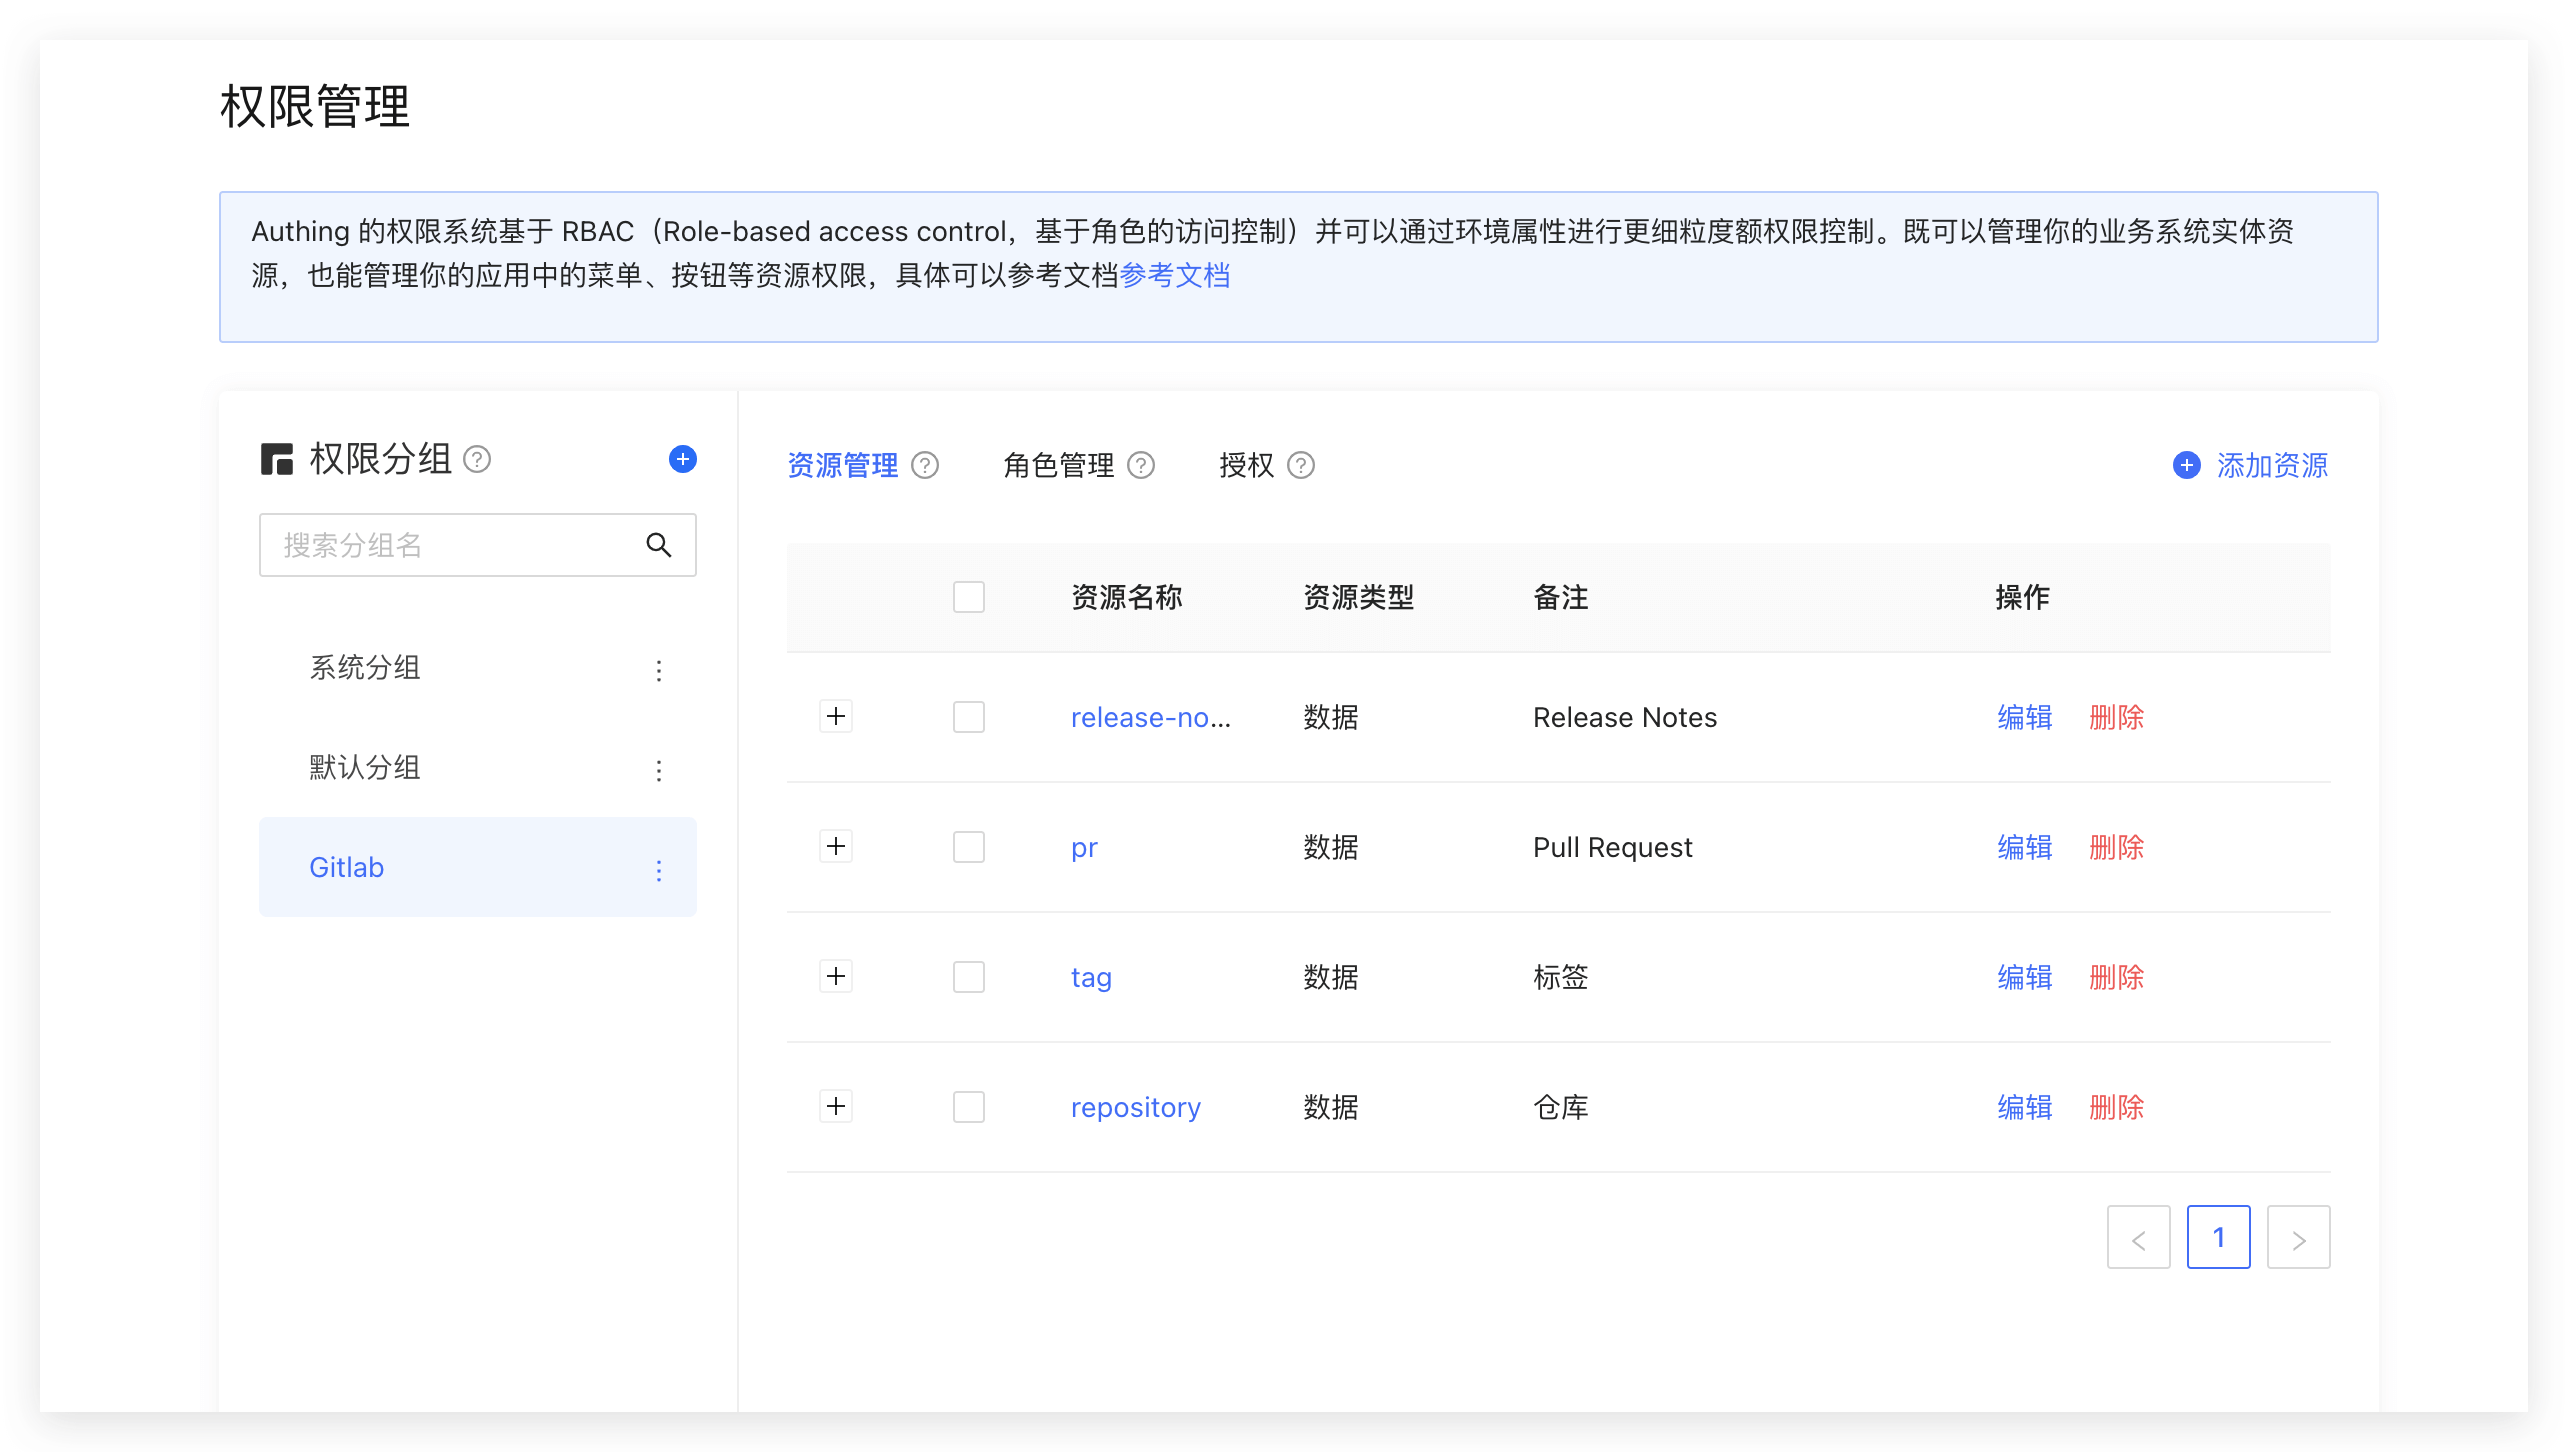
You can abstract some objects of the system into resources, and define some operations on these resources. For example, in the scenario of this article, Repository, Tag, PR, and Release Notes are all resources, and these resources have corresponding operations:
- Repository: create, delete, etc.
- PR: open, comment, merge, etc.
- Tag: create, delete, etc.
- Release Notes: create, read, edit, delete, etc.
We create these resources in GenAuth:
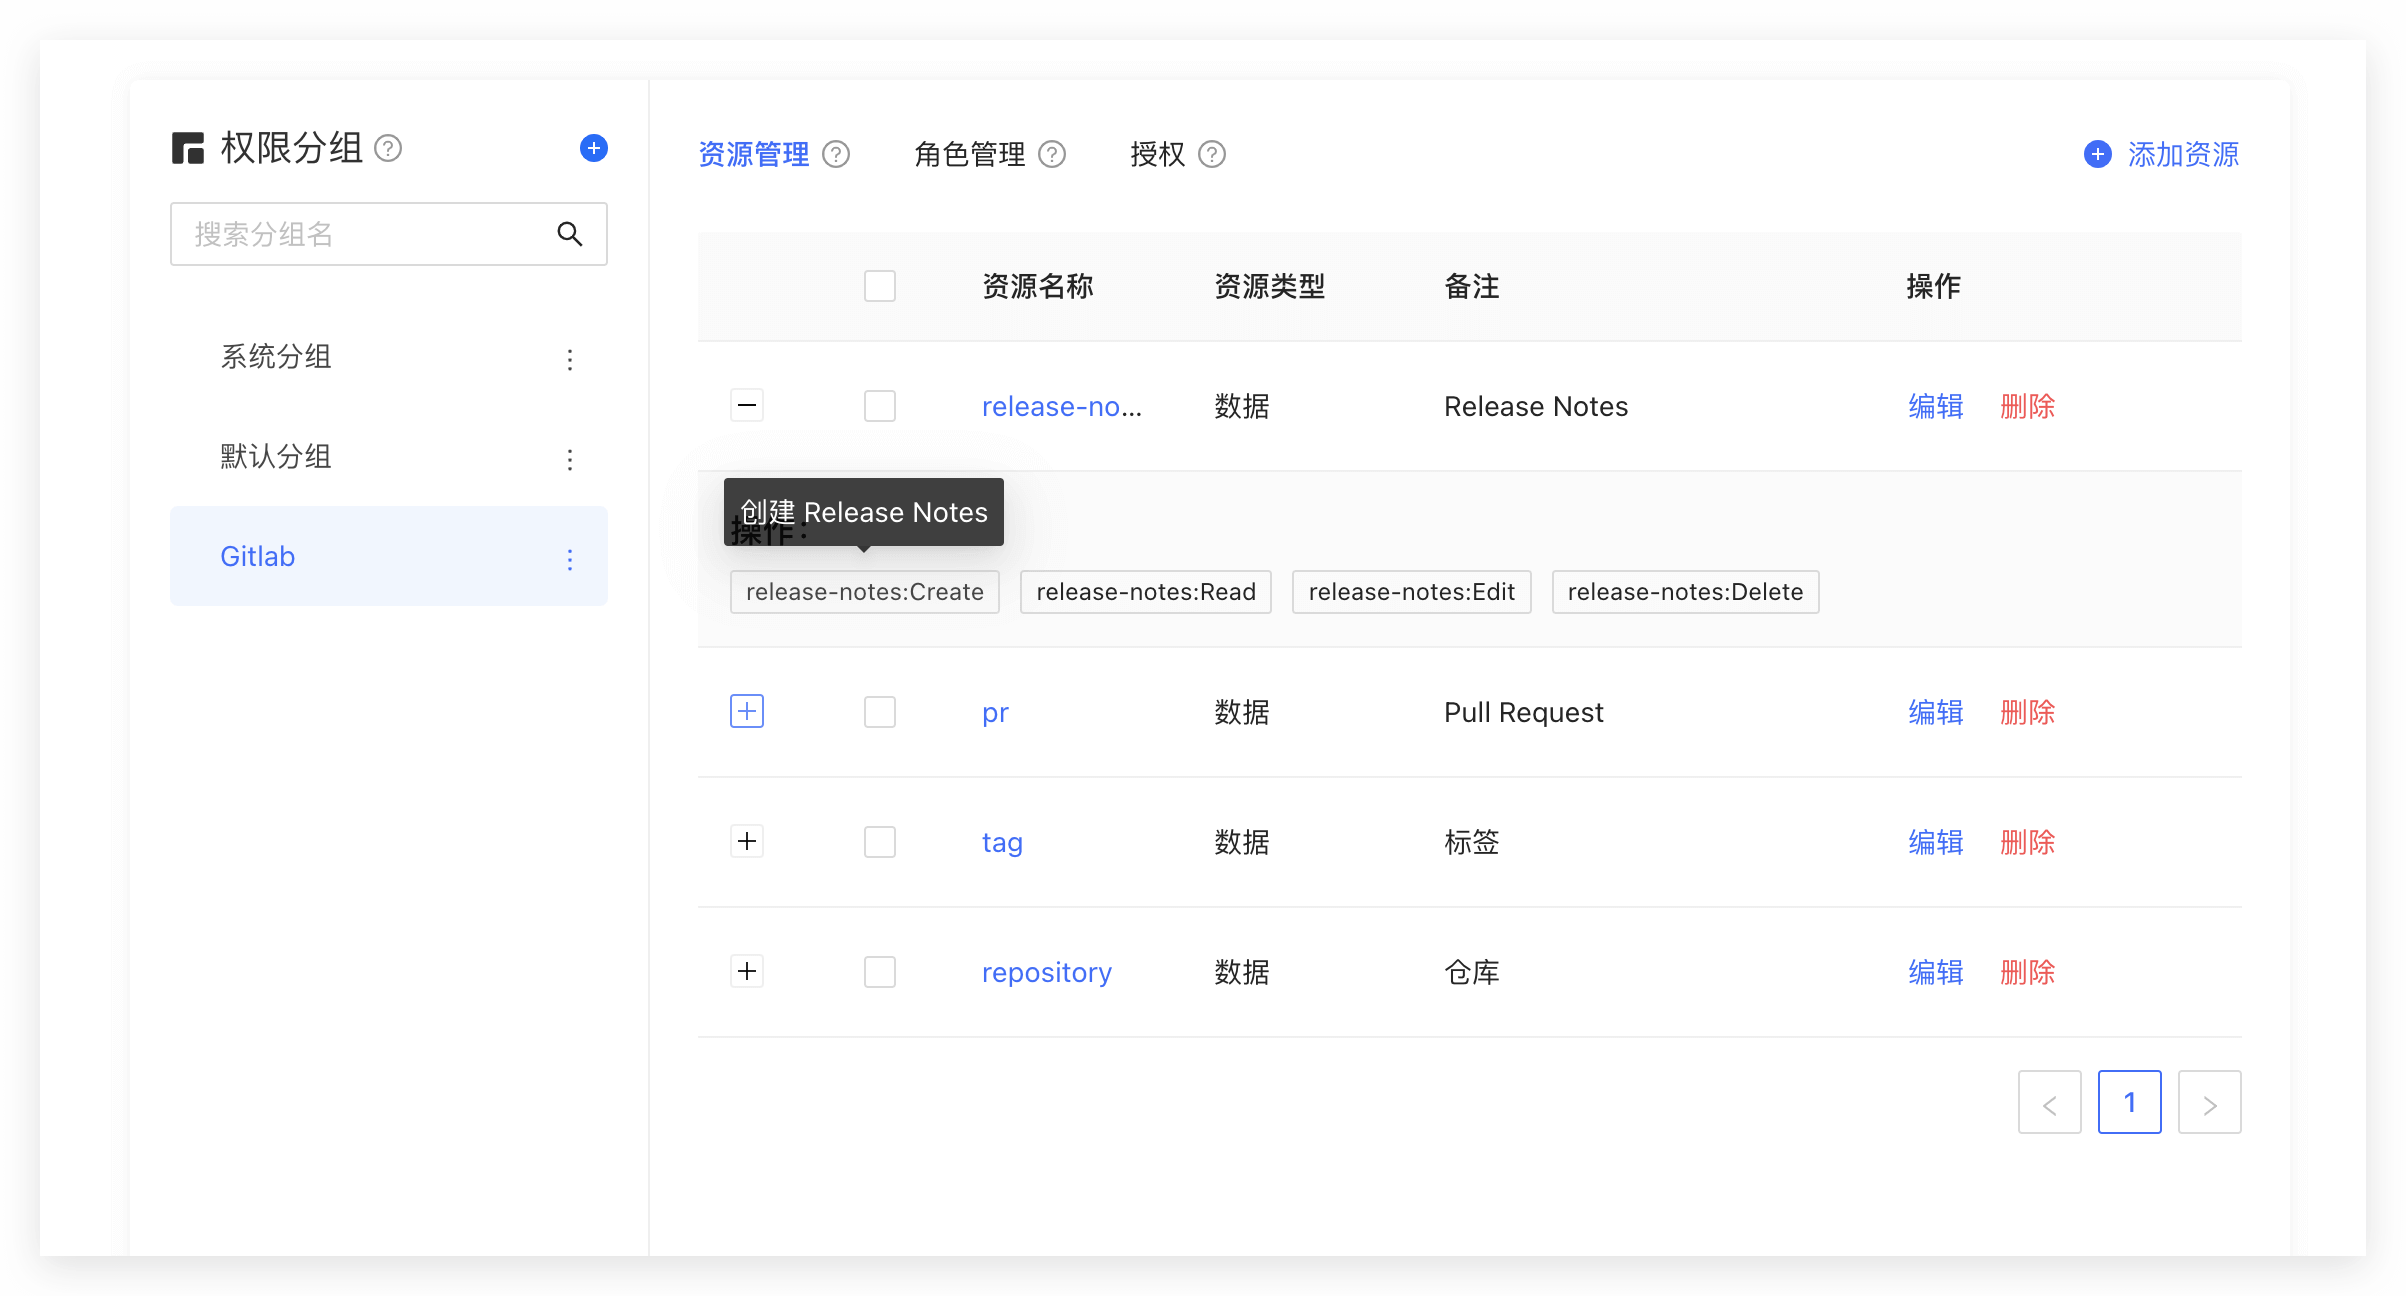
Authorize roles to operate resources
And GenAuth also supports authorization to users and roles. If a user is in a certain role, he will also inherit the permissions authorized by this role. Therefore, GenAuth can not only implement the standard RBAC permission model, but also perform more fine-grained and dynamic permission control on this basis. For example, in the following example, we grant the admin role the Create and Delete permissions for the repository resource:
Determine whether the user has permissions on the backend
In the previous step, we authorized a user (role) to have specific operation permissions for a specific resource through resource authorization. When we perform interface authentication on the backend, we can make more fine-grained judgments:
First, initialize the Management SDK:
Here we take the Node SDK as an example. We also support SDKs in Python, Java, C#, PHP, etc. For details, please click here.
import { ManagementClient } from "authing-js-sdk";

const managementClient = new ManagementClient({
  userPoolId: "YOUR_USERPOOL_ID",
  secret: "YOUR_USERPOOL_SECRET",
});
Call the managementClient.acl.isAllowed method with the following parameters:
- userId: user ID. Users can be directly authorized to operate specific resources or inherit the permissions authorized by the role.
- resource: resource identifier, such as
repository:123represents the code repository with ID 123, andrepository:\*represents the code repository resource. - action: specific operation, such as
repository:Deleterepresents the operation of deleting the code repository. - options: other options, optional
- options.namespace, resource permission group code
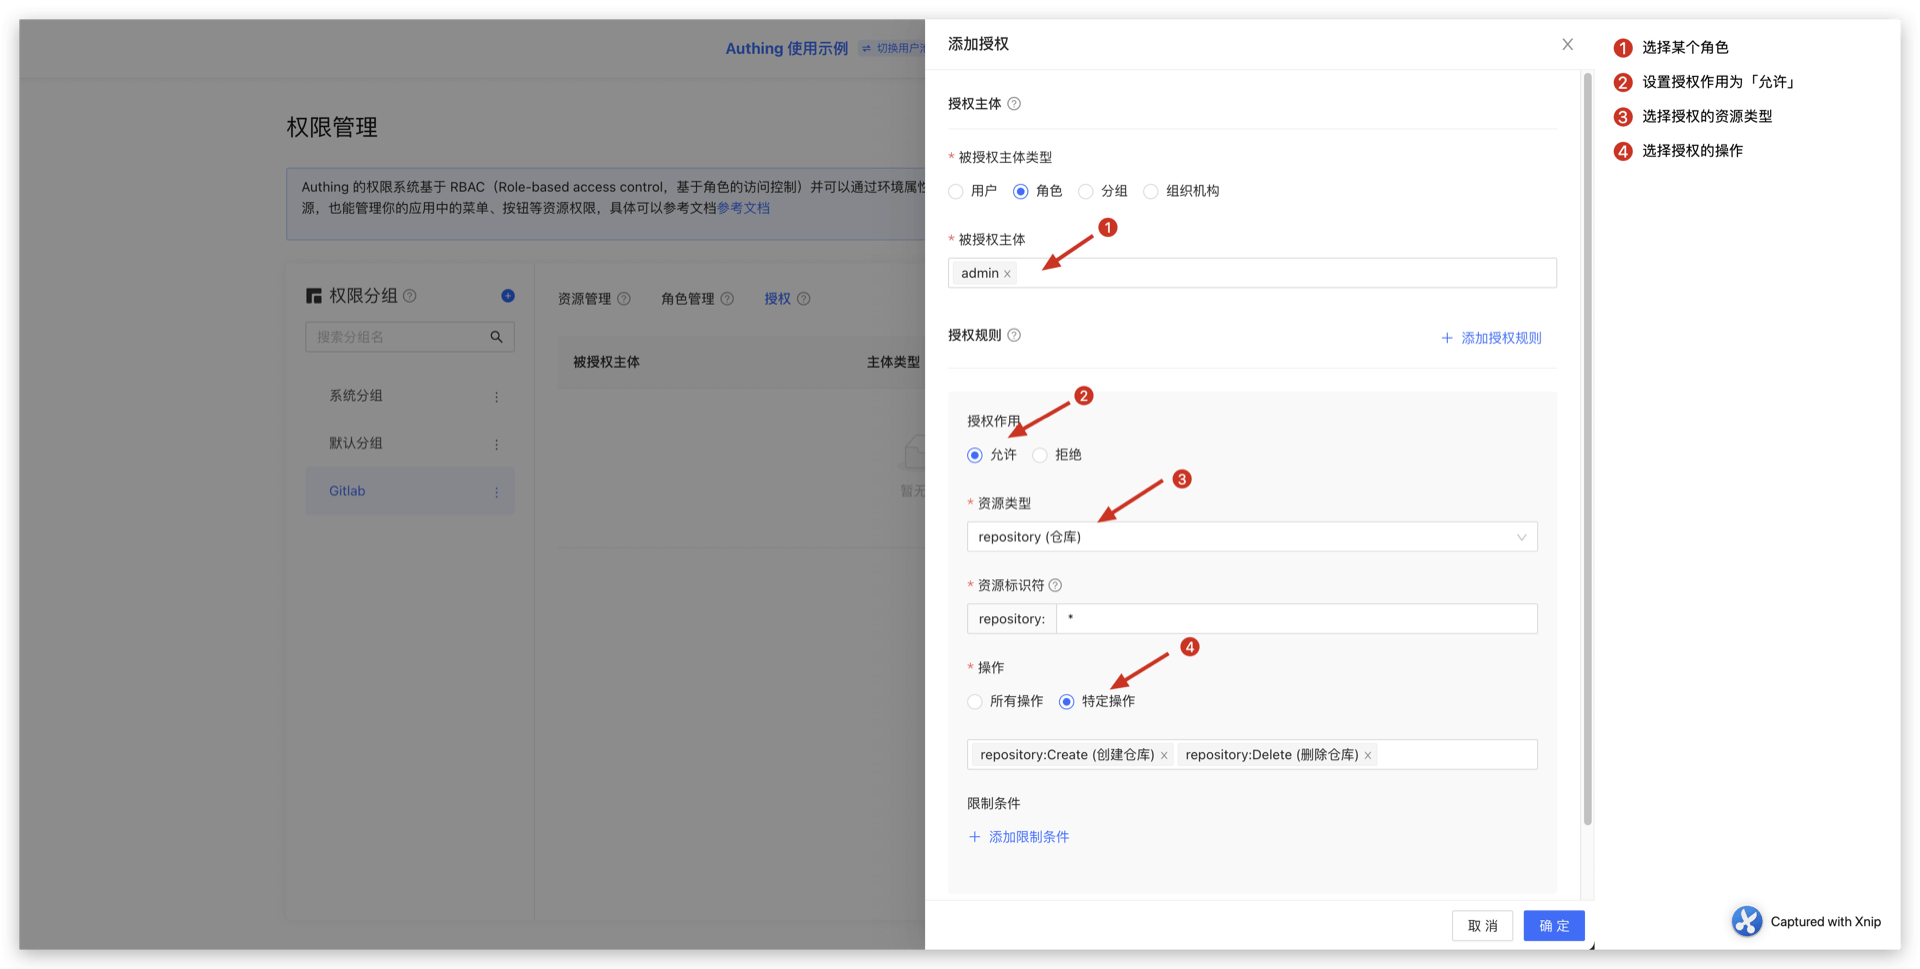
const { totalCount, list } = await managementClient.acl.isAllowed(
  "USER_ID",
  "repository:123",
  "repository:Delete"
);
GenAuth The policy engine will dynamically execute the policy according to the permission policy you configured, and finally return true or false. You only need to judge whether the user has the operation permission based on the return value.
Summary
This article starts with the simplest RBAC permission model, and then implements how to implement a more fine-grained and dynamic ABAC permission model on top of it. The whole process is gradual. You can gradually migrate to the ABAC permission model as the complexity of your business continues to increase.
Logout
GenAuth supports multiple ways to log out:
- [Logout from the personal center](#Logout from the personal center): This method is suitable for scenarios where you use the online personal center hosted by GenAuth;
- [Logout from the front end](#Logout from the front end): This method is suitable for almost any scenario;
- [Logout from the back end](#Logout from the back end): This method is suitable for scenarios where administrators call APIs to force users to log out;
- [Force users to log out](#Force users to log out): This method is suitable for scenarios where administrators use the console to force users to log out.
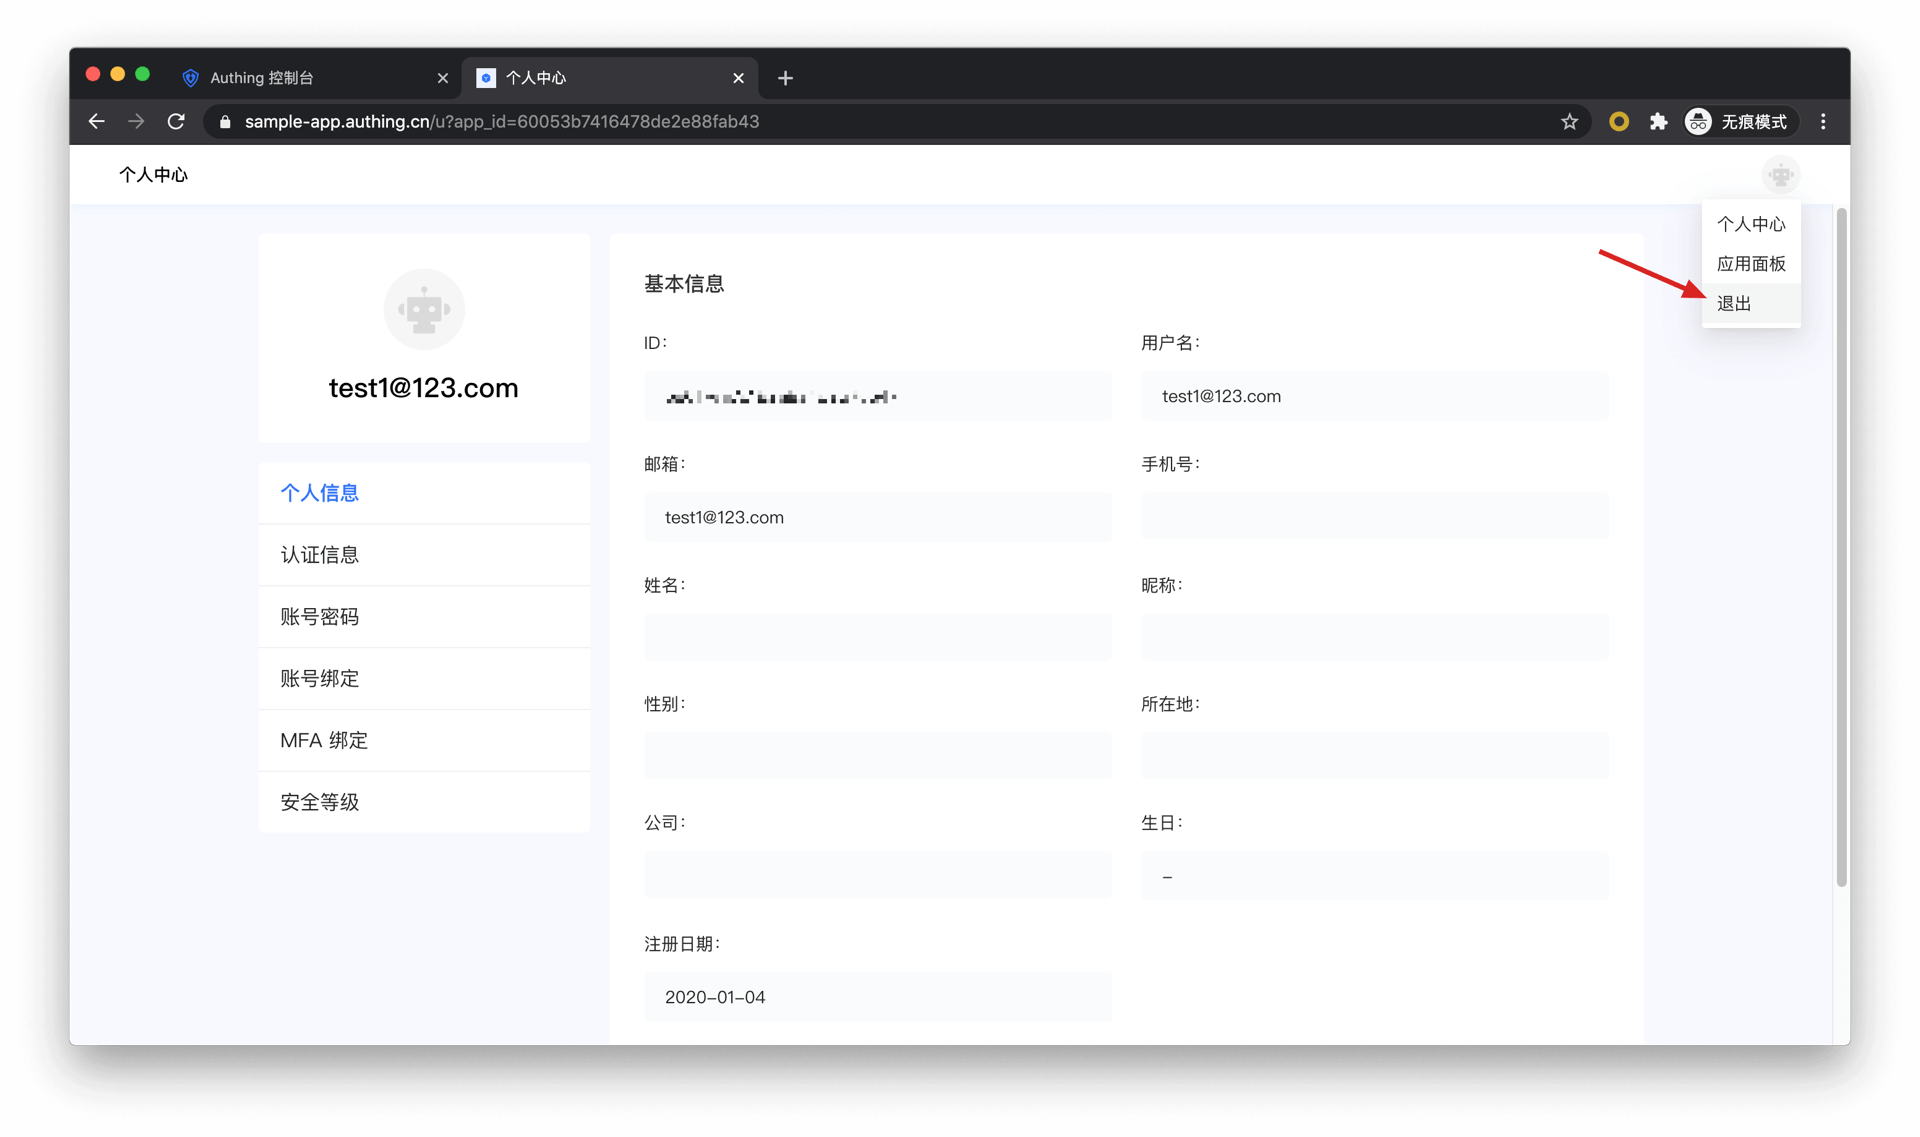
Logout from the personal center
End users can visit https://appdomain.genauth.ai/u to enter the personal center, click the avatar in the upper right corner, and click Logout.
Logout from the frontend
Guide your end users to log out by visiting https://appdomain.genauth.ai/login/profile/logout?redirect_uri={{CALLBACK_URL}}. redirect_uri can be filled with a callback address after logout, for example, you can jump to your business homepage.
Note ⚠️: You need to use
encodeURIComponentto URL Encode the callback link.
Logout from the backend
If you need to log out a GenAuth user in the backend, you need to access the following interface:
- Interface description: The user pool administrator logs out the GenAuth user in the backend.
- Interface address:
POSThttps://<your application domain name>.genauth.ai/api/applications/:appId/kick-active-users - Request header:
| Parameter | Type | Required | Description |
|---|---|---|---|
| x-authing-userpool-id | string | Yes | User pool ID. |
| Authorization | string | Yes | User pool administrator token |
- Request parameters:
| Parameter | Type | Required | Description |
|---|---|---|---|
| userIds | string[] | Yes | User ID array. |
| appId | string | Yes | Application ID. |
- Return data:
{
"code": 200,
"message": "Forced offline successful"
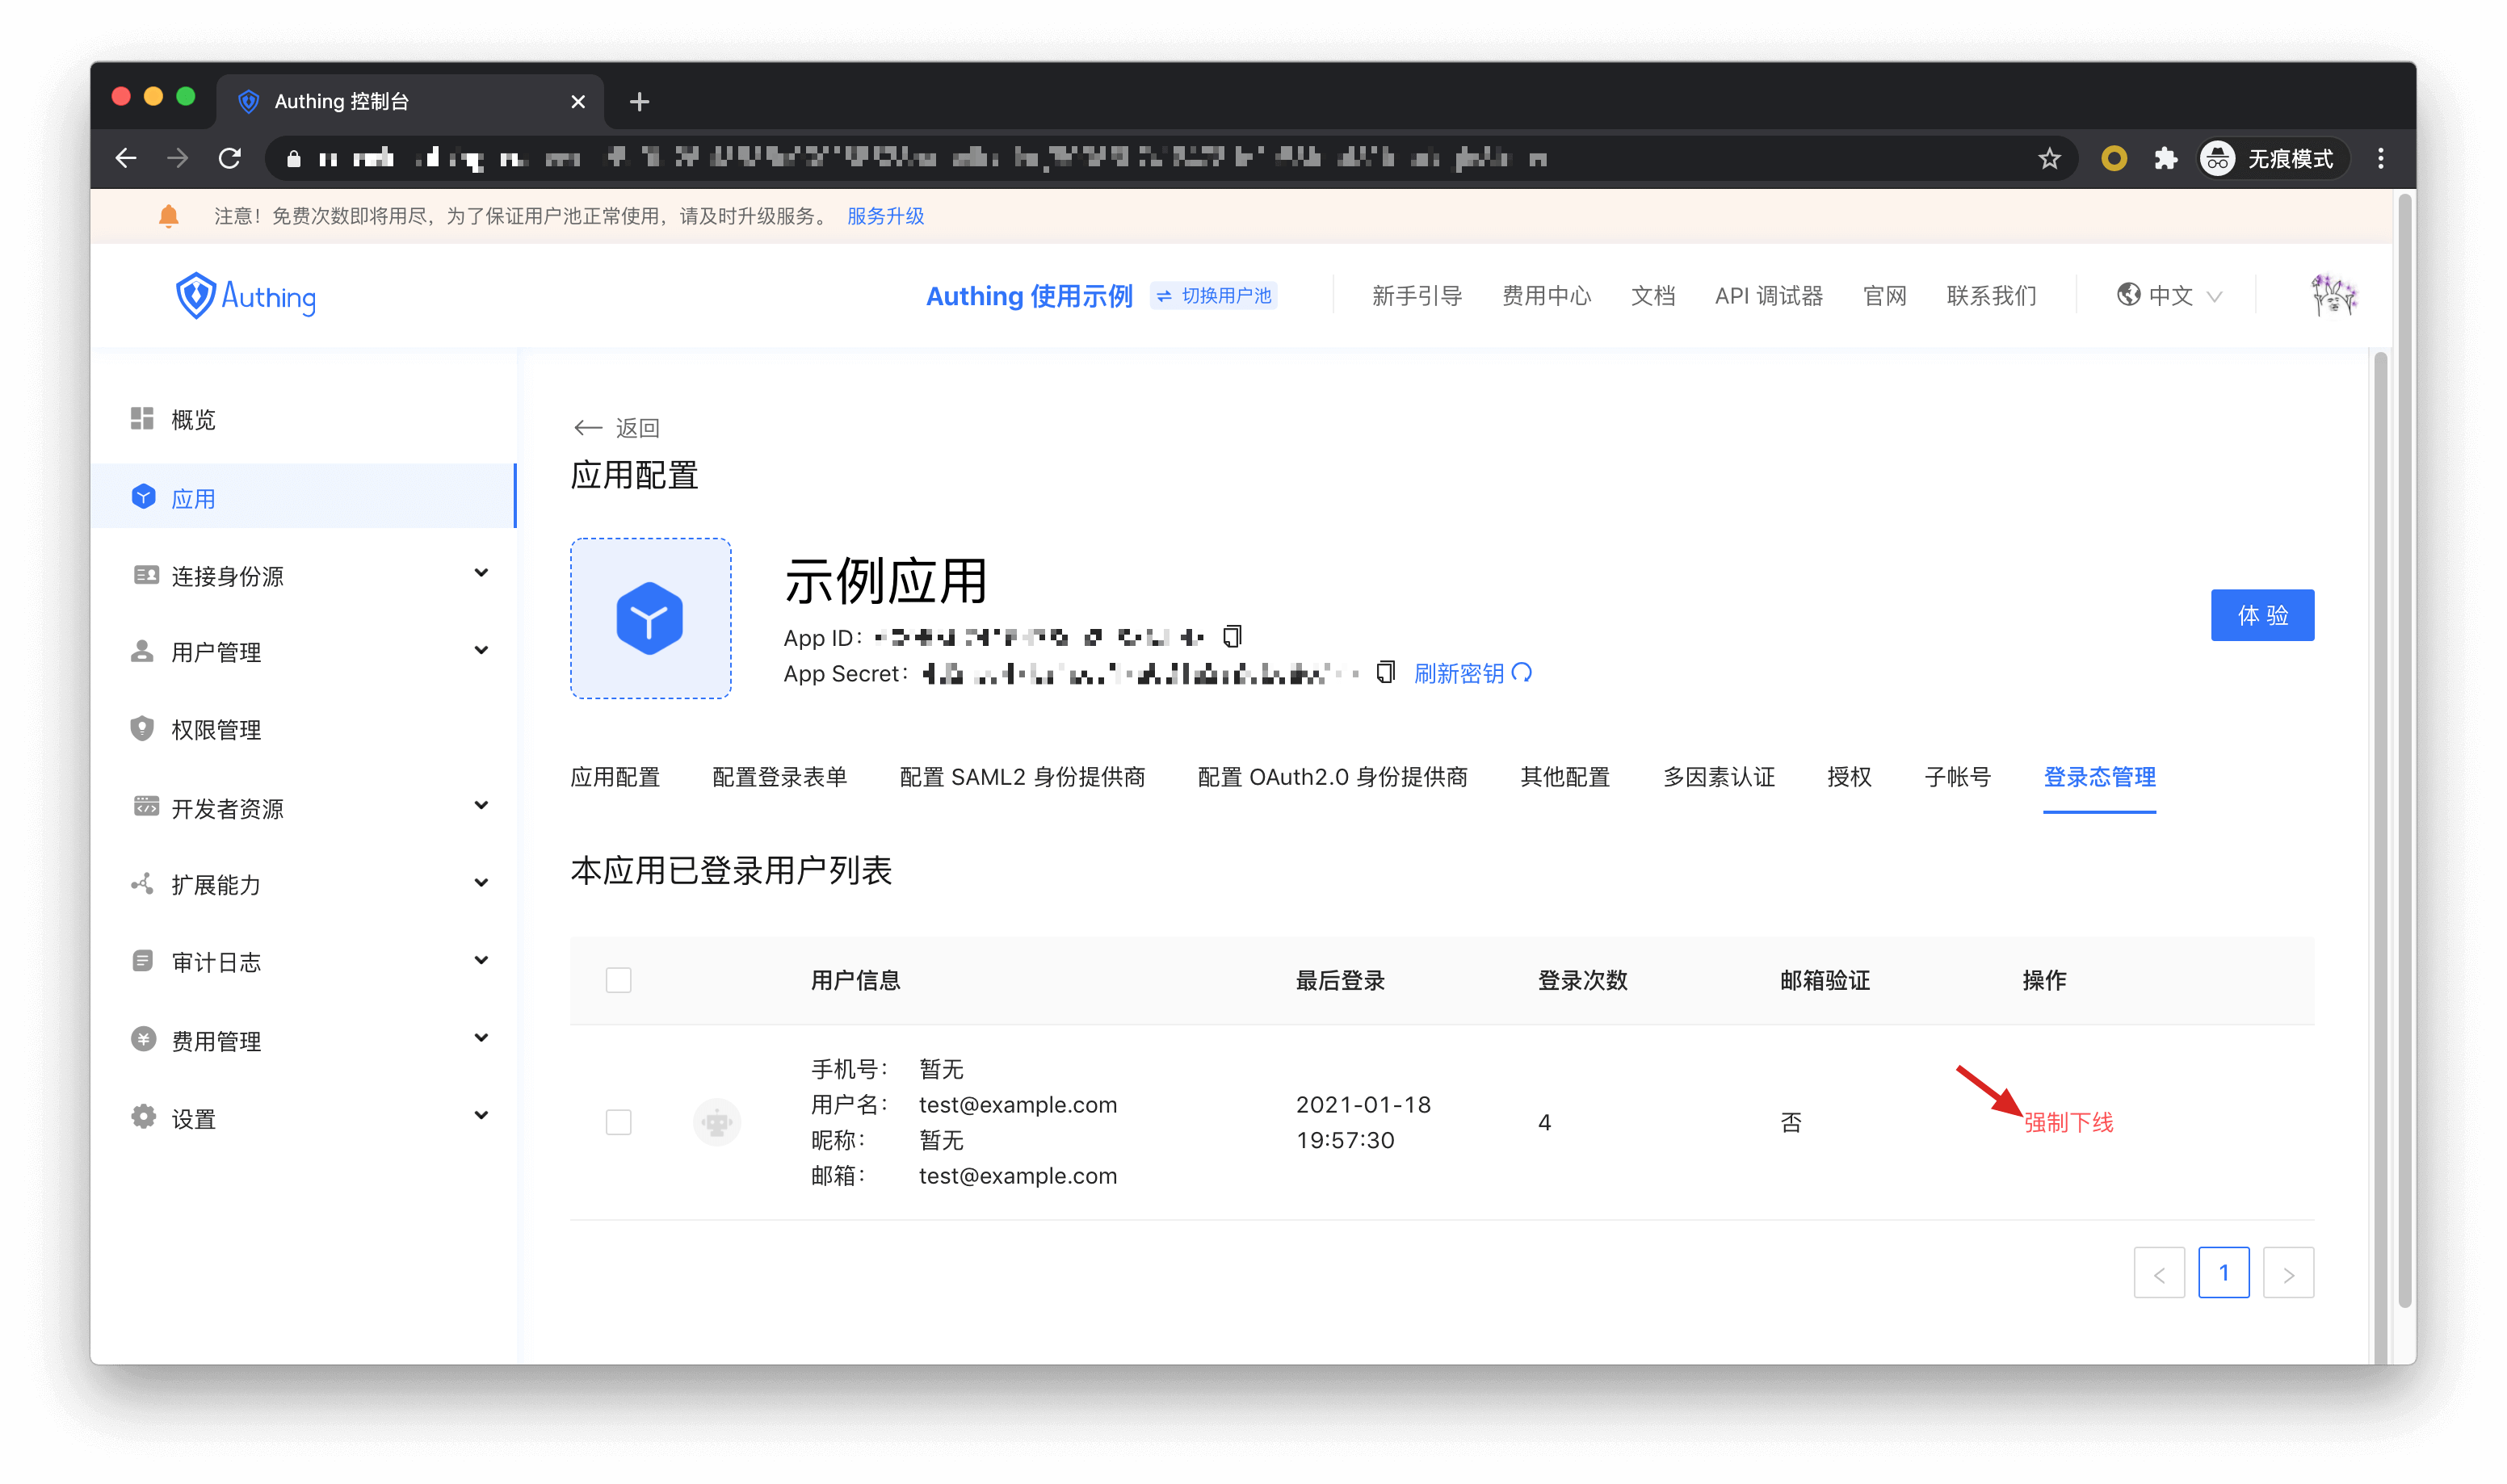
}Force user offline
User pool administrators can force users to log off through Console > Application > Login management.
Next you may need
Now that you have a basic understanding of how to use GenAuth, you can:
- Learn how to add social login to your app.
- Implement single sign-on between apps.
- Manage user permissions.
- Learn how to manage user directories.
- If you have users in your existing user system that need to be imported into GenAuth, be sure to read the instructions in this section.
Integrate GenAuth in a standard web application
This article takes the Node.js web framework Express as an example to introduce how to quickly access GenAuth in traditional web projects (such as Express MVC, Django, PHP Laravel, etc.) to implement functions such as login, logout, and obtaining user information.
There are three parties involved here: the end user browser, the application server, and the GenAuth server. The complete process is as follows:
- The end user browser requests the application service and finds that the user is not logged in, so it jumps to the login page hosted by GenAuth.
- After the user completes the login on this login page, the end user browser will carry the authorization code (Authorization Code) and other data in the request parameters to jump to the callback chain pre-configured by the application server.
- The application server uses the authorization code to request the GenAuth server in exchange for user information.
- After the application server obtains the user information, it establishes a session with the end user.
- The end user receives a successful login prompt, and the authentication process is completed.
The flow chart is as follows:

Configure in GenAuth
Before you start, you need to create an application in GenAuth. You can create an application on the application list page of the GenAuth console.
Configure callback link
Path: Application->Self-built application->Application details page->Application configuration->Authentication configuration
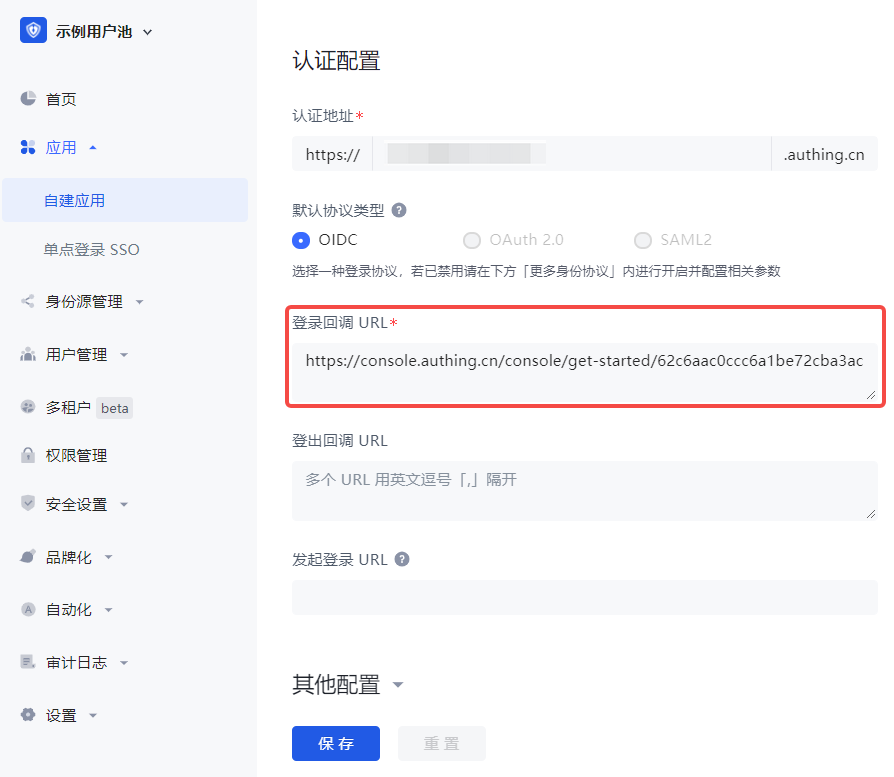
When the user successfully logs in at GenAuth, the browser will jump to the callback link (Callback URL) you configured. This callback link should be a route in your application, and you need to complete operations such as exchanging user information in this route. You must configure this callback link, otherwise the user will not be able to log in, and an invalid_redirect_uri error prompt will be displayed.
The callback link for this sample code is https://console.genauth.ai/console/get-started, copy it to the Login callback URL configuration item, and then click Save. For more information, see Application Configuration
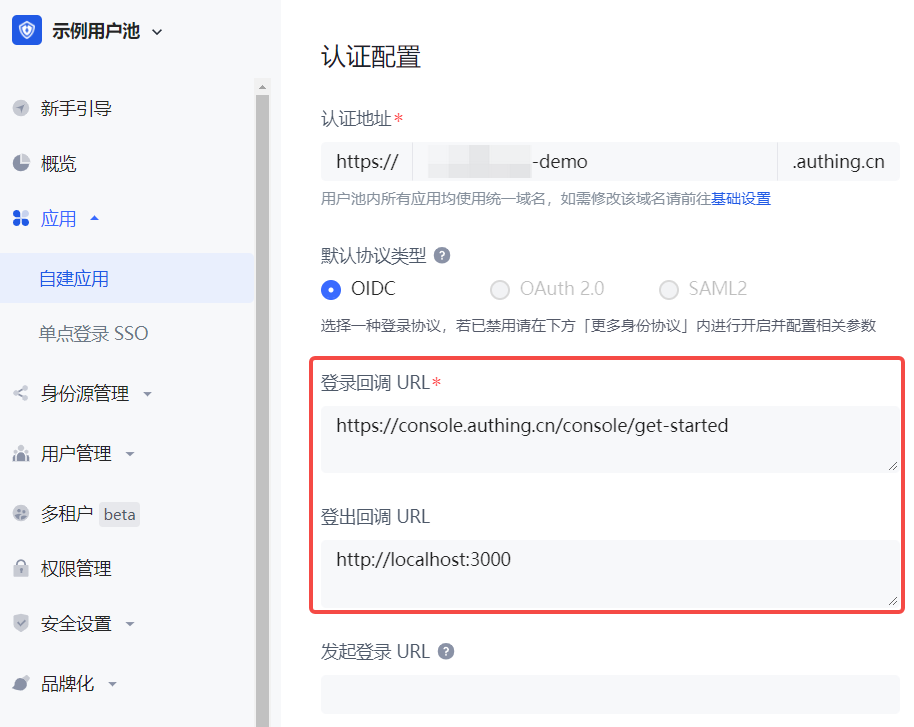
Configure logout callback link
You need to configure the callback address (Logout URLs) after logging out. The URL that users return to after logging out of the GenAuth hosted login page. You must configure this callback URL, otherwise users will not be able to log out and will be shown a misconfiguration error message. The callback URL for this sample code is http://localhost:3000, copy it to the Logout callback URL configuration item, and then click Save.
Integrate GenAuth into your system
Install dependencies
This is a node.js example, you need to install openid-client and passportjs that support the standard OIDC protocol.
yarn add express express-session passport openid-clientJava developers can use spring-security of the Spring framework. For detailed access process, please refer to the document.
Initialization
At the beginning of the project, we need to initialize the Issuer of openid-client. The initialization parameters are as follows:
- client_id: OIDC Client ID, which is your application ID in GenAuth;
- client_secret: OIDC Client Secret, which is your application secret in GenAuth;
- issuer: OIDC Issuer, which you can get in the endpoint information of the application.
The acquisition method is shown in the figure. You need to save these contents or remember the acquisition method, as you may use it frequently in the future:

For demonstration purposes, passport.serializeUser directly passes user to the callback function done, which will store the user information in req.session.passport.user. This is not recommended in a formal production environment, because if the user information is modified and session is not updated, data inconsistency will occur. The second parameter passed to the callback function done by passport.deserializeUser will be mounted on req.user. If you don't know enough about passport.js, it is recommended to read the passport.js official documentation first.
passport.serializeUser(function (user, done) {
  console.log("serializeUser", user);
  done(null, user.sub);
});
passport.deserializeUser(function (userId, done) {
  console.log("deserializeUser", userId);
  done(null, userId);
});
The detailed sample code is as follows:
const express = require("express");
const session = require("express-session");
const passport = require("passport");
const { Strategy, Issuer } = require("openid-client");

const OIDC_CLIENT_ID = "YOUR_APPLICATION_ID";
const OIDC_CLIENT_SECRET = "YOUR_APPLICATION_SECRET";
const OIDC_ISSUER = "YOUR_OIDC_ISSUER";
const REDIRECT_URI = "http://localhost:3000/auth/callback";

(async () => {
  const issuer = await Issuer.discover(OIDC_ISSUER);
  const client = new issuer.Client({
    client_id: OIDC_CLIENT_ID,
    client_secret: OIDC_CLIENT_SECRET,
    id_token_signed_response_alg: "HS256",
    token_endpoint_auth_method: "client_secret_post",
  });

  passport.use(
    "oidc",
    new Strategy(
      {
        client,
        params: {
          redirect_uri: REDIRECT_URI,
          scope: "openid profile email phone",
          grant_type: "authorization_code",
          response_type: "code",
        },
      },
      (tokenset, userinfo, done) => {
        return done(null, userinfo);
      }
    )
  );

  passport.serializeUser(function (user, done) {
    done(null, user);
  });
  passport.deserializeUser(function (user, done) {
    done(null, user);
  });

  const app = express();
  app.use(
    session({
      secret: "secret",
      resave: true,
      saveUninitialized: true,
    })
  );
  app.use(passport.initialize());
  app.use(passport.session());
  app.listen(3010, () =>
    console.log(`Example app listening at http://localhost:3010 🚀`)
  );
})();
Complete the login logic
First, we initialize a login route:
app.get("/login", passport.authenticate("oidc"));
app.get(
  "/auth/callback",
  passport.authenticate("oidc", {
    successRedirect: "/user",
    failureRedirect: "/403",
  })
);
When calling /login, passport.authenticate is called, and the system will jump to the online login address of the GenAuth OIDC Provider:
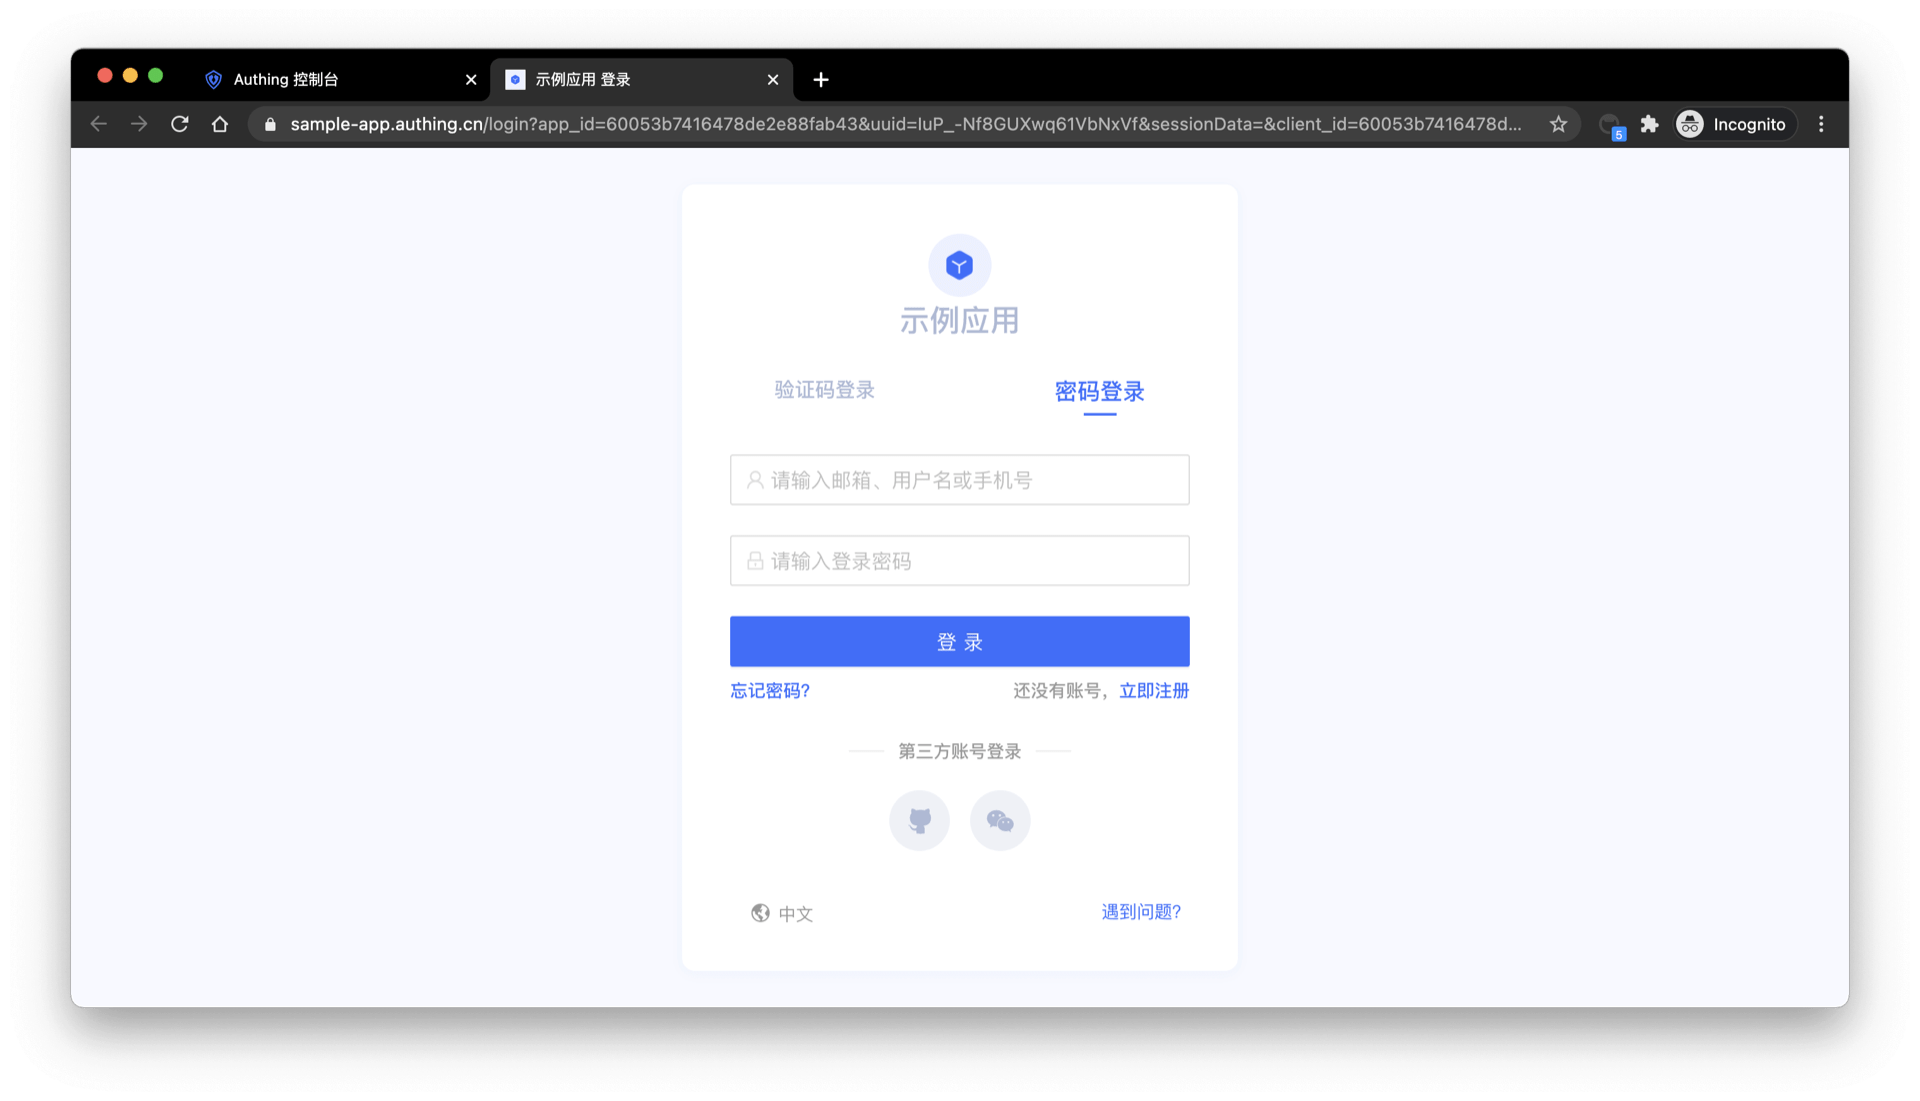
After logging in using any of the login methods, the browser will jump to http://localhost:3000/auth/callback (this is the callback link we configured in the application details in the first step), where it will obtain user information from the GenAuth server, and then jump to the /user route after successfully obtaining the user information.
Complete the logic of displaying user information
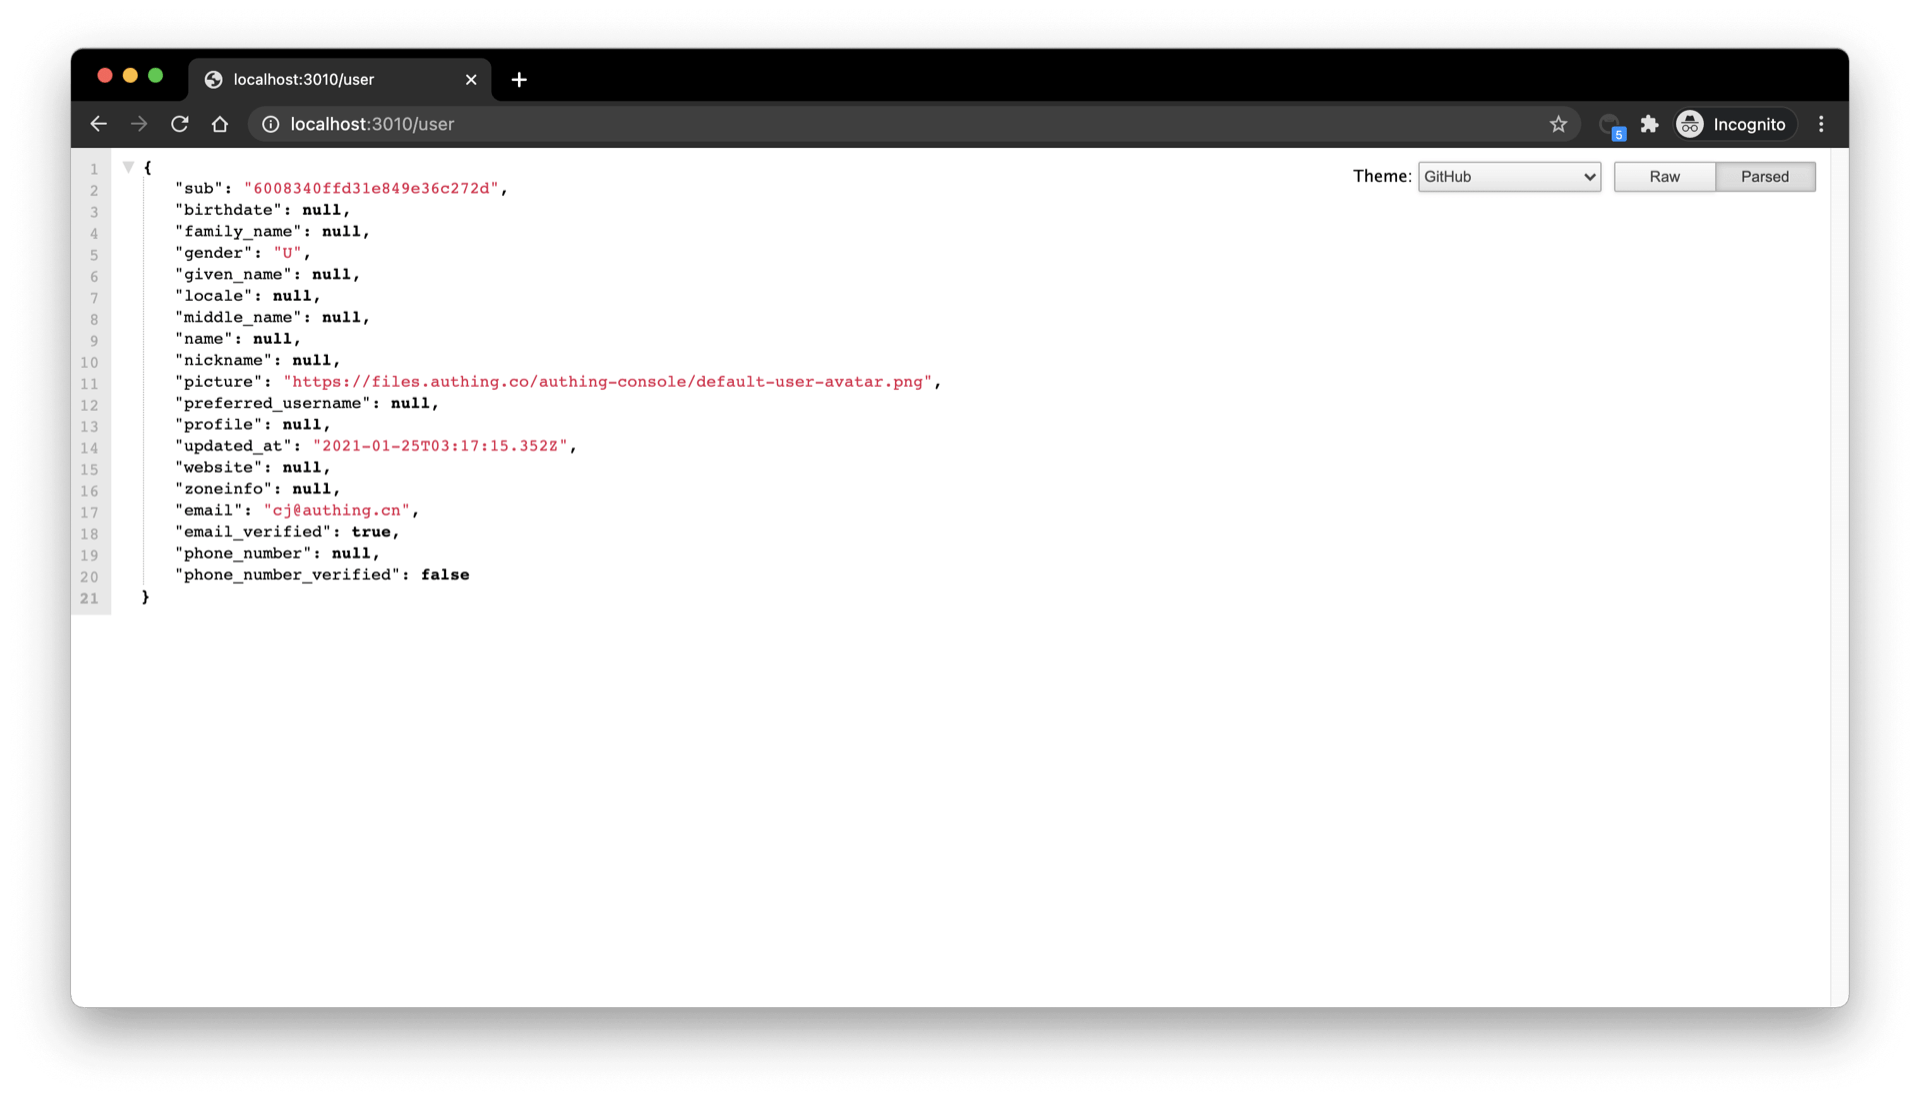
Next, we will implement the logic of the /user route. As mentioned earlier, after the user logs in successfully, the user information will be mounted on req.user, so here we add the following simple logic:
app.get("/user", (req, res) => {
res.send(req.user);
});
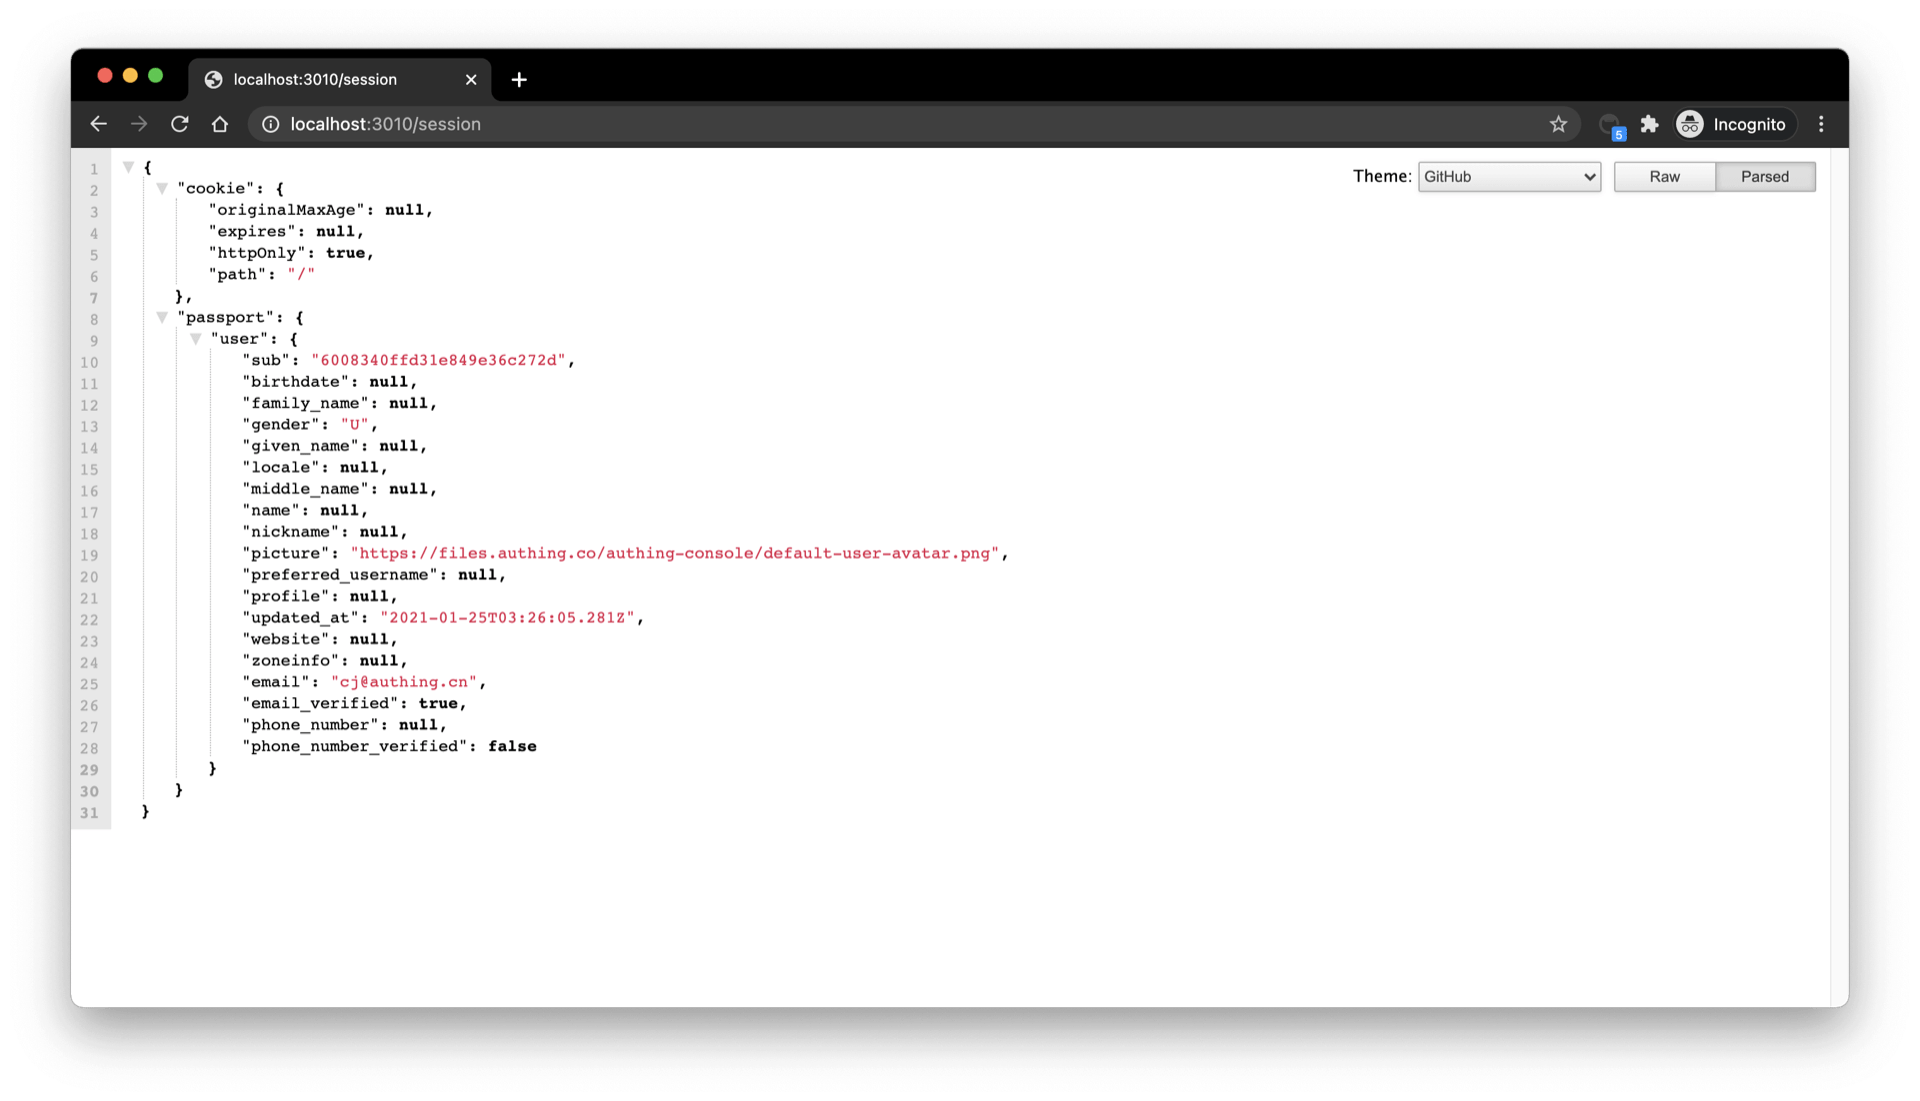
app.get("/session", (req, res) => {
res.send(req.session);
});Visit /user to see the user information of the currently logged in user:
Visit /session to see the session of the currently logged in user:
Complete the logout logic
Finally, we implement the logout logic:
- First, clear the current application through
req.session.destroy()session; - Jump to the logout link of the OIDC application.
const OIDC_LOGOUT_URL = "{{YOUR_APP_DOMAIN}}/login/profile/logout";
const LOGOUT_REDIRECT_URL = "http://localhost:3000";
app.get("/logout", (req, res) => {
  req.session.destroy();
  const logoutUrl = `${OIDC_LOGOUT_URL}?app_id=${OIDC_CLIENT_ID}&redirect_uri=${LOGOUT_REDIRECT_URL}`;
  res.redirect(logoutUrl);
});
Integrating GenAuth in a Single Page Web Application (SPA)
A single page web application (SPA) is a model of a web application or website that interacts with the user by dynamically rewriting the current page, rather than reloading a whole new page from the server. This approach avoids interrupting the user experience by switching between pages, making the application more like a desktop application. In a single page web application, all the necessary code (HTML, JavaScript, and CSS) is retrieved through the load of a single page, or appropriate resources are dynamically loaded and added to the page as needed (usually in response to user actions). Interaction with a single page web application usually involves dynamic communication with a backend server.
The easiest way to integrate GenAuth in a SPA application is to use the embedded login component and Javascript SDK provided by GenAuth for login and authentication. This article takes the React project as an example.
Get the application ID
After logging in to GenAuth, GenAuth will create a default user pool and application for you. You can also create your own application. In the application details, you can get the application ID. Click the copy button to copy it:

Integrate GenAuth into your SPA application
Install the GenAuth login component
yarn add @authing/react-ui-components

# OR

npm i @authing/react-ui-components --save
@authing/react-ui-components contains some React components provided by GenAuth and obtains AuthenticationClient APIs, including the AuthingGuard login component.
Configure AuthingGuard
import React from "react";
import ReactDOM from "react-dom";
import { Guard } from "@authing/react-ui-components";
// Import css file
import "@authing/react-ui-components/lib/index.min.css";

const App = () => {
  const appId = "GEN_AUTH_APP_ID";

  // Login successful
  const onLogin = (userInfo) => {
    console.log(userInfo);
    // You can redirect to other pages here
    // ...
  };

  return <AuthingGuard appId={appId} onLogin={onLogin} />;
};

ReactDOM.render(<App />, root);
By passing in appId, AuthingGuard can display the login box for login.
Logout
Now that you can log in, you need a way to log out, which can be achieved through AuthenticationClient .
// src/index.js

import { initAuthClient } from "@authing/react-ui-components";
// Initialize AuthenticationClient in the project entry file
initAuthClient({
  appId: "GEN_AUTH_APP_ID",
});import React from "react";
import { getAuthClient } from "@authing/react-ui-components";
const LogoutButton = () => {
return <button onClick={() => getAuthClient().logout()}>Logout</button>;
};
export default LogoutButton;Get user information
After the user logs in, you may also need to get the user information of the currently logged in user.
// src/index.js

import { initAuthClient } from "@authing/react-ui-components";
// Initialize AuthenticationClient in the project entry file
initAuthClient({
  appId: "GEN_AUTH_APP_ID",
});import React, { useState, useEffect } from "react";
import { getAuthClient } from "@authing/react-ui-components";
const UserInfo = () => {
const [user, setUser] = useState();
const [isAuthenticated, setIsAuthenticated] = useState(true);
useEffect(() => {
getAuthClient()
.getCurrentUser()
.then((userInfo) => {
if (userInfo) {
setUser(userInfo);
} else {
setIsAuthenticated(false);
}
});
}, []);
return isAuthenticated ? (
user ? (
<div>
<img src={user.photo} alt={user.username} />
<h2>{user.username}</h2>
<p>{user.email}</p>
</div>
) : (
<div>Loading...</div>
)
) : (
<h3>Not logged in yet</h3>
);
};
export default UserInfo;getCurrentUser can get the information of the currently logged in user. If not logged in, it will return null
Integrate GenAuth in mobile (iOS, Android)
GenAuth provides Android SDK and iOS SDK to help developers quickly integrate GenAuth in mobile apps.
The following takes the integration method of Android apps as an example.
Installation
- Download the jar package and import the jar package into lib
Jar package download address:
- https://download.genauth.ai/packages/jar/commons-codec-1.15-rep.jar
- https://download.genauth.ai/packages/jar/core.jar
Import the Jar package into lib, as shown below:

- Configure
build.gradle
implementation "com.google.code.gson:gson:2.8.6"
implementation "com.squareup.okhttp3:okhttp:4.8.0"
implementation files('libs/core.jar')
implementation files('libs/commons-codec-1.15-rep.jar')- Install GenAuth Java/Kotlin SDK
For detailed installation instructions, please see: GenAuth Java/Kotlin SDK .
Example
Java
- Initialize
AuthenticationClientwith the user pool ID. - Call
AuthenticationClientmethods.
// Initialize with AppId and appHost
AuthenticationClient authentication = new AuthenticationClient(APP_ID, APP_HOST);

client.registerByEmail(new RegisterByEmailInput("xxx@qq.com", "123456")).enqueue(new cn.authing.core.http.Callback<cn.authing.core.types.User>() {
    @Override
    public void onSuccess(cn.authing.core.types.User user) {

    }

    @Override
    public void onFailure(@Nullable GraphQLResponse.ErrorInfo errorInfo) {

    }
});
Kotlin
- Initialize
AuthenticationClientwith user pool ID. - Call
AuthenticationClientmethod.
val authenticationClient = AuthenticationClient("YOUR_USERPOOL_ID")

authenticationClient.registerByEmail(
    RegisterByEmailInput(
        "xxx@.qq.com",
        "123456"
    )
).enqueue(object : cn.authing.core.http.Callback<User> {
    override fun onFailure(error: ErrorInfo?) {

    }

    override fun onSuccess(result: User) {

    }
})
User registration and login
GenAuth Java SDK supports multiple registration and login methods such as mobile phone number verification code, email, and user name. Take mobile phone number verification code login as an example:
- Send verification code
String phone = "phone number";
authenticationClient.sendSmsCode(phone).execute();- Login using verification code
String phone = "phone number";
String code = "1234";
User user = authenticationClient.loginByPhoneCode(new LoginByPhoneCodeInput(phone, code)).execute();
For detailed documentation, please see: User Registration and Login API .
Integrate WeChat login
You can use the loginByWechat method of AuthenticationClient. The four required parameters are all parameters returned by WeChat:
| Field name | Required | Type | Description |
|---|---|---|---|
| code | REQUIRED | string | The code returned by WeChat to APP |
| country | OPTIONAL | string | The country returned by WeChat to APP |
| lang | OPTIONAL | string | The lang returned by WeChat to APP |
| state | OPTIONAL | string | The state returned by WeChat to APP |
val authenticationClient = AuthenticationClient("YOUR_USERPOOL_ID")

val code = "#returned code from wechat#";

authenticationClient.loginByWechat(code).enqueue(object: cn.authing.core.http.Callback<User> {
    override fun onFailure(error: ErrorInfo?) {

    }

    override fun onSuccess(result: User) {
        val user = result
    }
})
Get help
Please visit the GenAuth forum.
GenAuth Trial Period Benefits Strategy
Background
GenAuth adheres to the developer-friendly concept and is willing to open the functions that meet the basic rights of developers to all developers for free forever. However, this free version will not only limit the use of benefits (such as the number of active users allowed and the number of self-built applications), but also some advanced functions will not be available (such as enterprise identity connection, single sign-on, application panel, etc.). In order to allow developers to have a more comprehensive understanding of GenAuth capabilities, fully experience GenAuth functions, and choose the benefits that match their needs, GenAuth proposed the concept of "trial period", providing all functions to developers who open the trial period within a limited time to achieve a comprehensive experience.
Trial Period Features
The trial period has the following characteristics:
Limited to 30 days.
Provide a trial period for the three scenario user pools of ToB, ToC, and ToE. Each scenario can only be experienced once, and different scenarios provide different benefits and usage.
Open all benefits under the current user pool of GenAuth and limit the usage of benefits.
Provide a countdown reminder for the trial period.
Administrator-related operations
Administrators can open a trial period for a user pool, view the comparison of rights and interests of each version in the user pool, and upgrade the current user pool version.
Open a trial period
Both new and old users can open a trial period for user pools in different scenarios to experience all the rights and interests under the corresponding user pool. This section describes how to open a trial period for new and old users.
INFO
- Only new user pools can be opened for a trial period. Existing user pools cannot be opened for a trial period directly.
- Note: After the trial period expires, if the user pool is not upgraded, all rights and interests of the corresponding user pool will be closed and cannot be used anymore.
Open a trial period for new users
To open a trial period, administrators need to perform the following steps:
- New users register on the official website according to the prompts. After successful authentication, click the Start using button.
- Select the user pool type for which the trial period is to be opened (here ToB is used as an example), and click the Create User Pool button. It will be prompted that the trial period has been opened for the current user pool.
INFO
- According to different user usage scenarios, user pools can be divided into ToE (enterprise employees), ToB (customers), and ToC (end users). An account can be opened for each scenario during the free stage and can only open a trial period once.
- The prompt to open the trial period is checked by default at the bottom of the page. Select a user pool and click Create User Pool to open a 30-day trial period for the created user pool by default. If you uncheck it, a free version of the user pool will be created.

- Enter the user pool name, complete the current account mobile phone number information, enter the received verification code, and click Complete creation.
INFO
- New users need to provide a mobile phone number so that GenAuth can understand your experience and provide you with direct service.
- For users who register with a mobile phone number, there is no need to add a mobile phone number.
So far, the registration of new users has been completed and the trial period has been opened for the created user pool. New users enter the user pool homepage and can now start to experience all the benefits in the user pool.
Open trial period for old users
For registered users, you can create user pools for different scenarios and open trial periods for them.
To open a trial period for old users, follow these steps:
Click the user pool drop-down button in the upper left corner of the page.
Click + Create user pool.
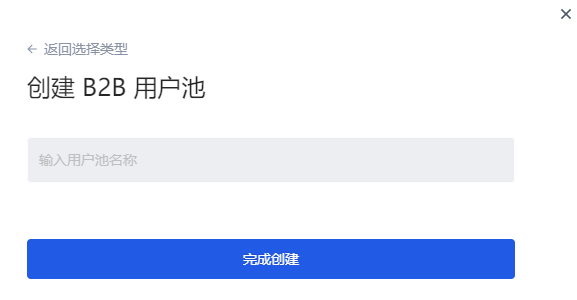
Select the user pool type and click the Create user pool button.
Enter the user pool name and click Finish creation.
INFO
The system will determine whether the old user has registered a mobile phone number. If so, there is no need to complete the mobile phone information here; otherwise, it is required.
User pool experience period prompt
After the experience period is activated, the experience period prompt appears in the following locations to help users quickly identify that the current user pool has activated the experience period and prompt the user experience period countdown:
- Top of all pages on the hosting page
INFO
For the user pool of each scenario, the same experience period strategy prompt is provided at the top of the page:
- Display the remaining days of the experience period (29->0 countdown).
- The prompt can be turned off in the first 20 days of the experience period; after 20 days, the prompt cannot be turned off.
- Click View the corresponding fee information to jump to the Settings->Fee Management page to view the current version information of the user pool (including the comparison list of benefits of each user pool version), usage information and order management information.
- Click the Click to Upgrade button in the prompt to jump to Settings->Expense Management->Version Information->Version Upgrade module to upgrade the user pool version.
- User pool drop-down list
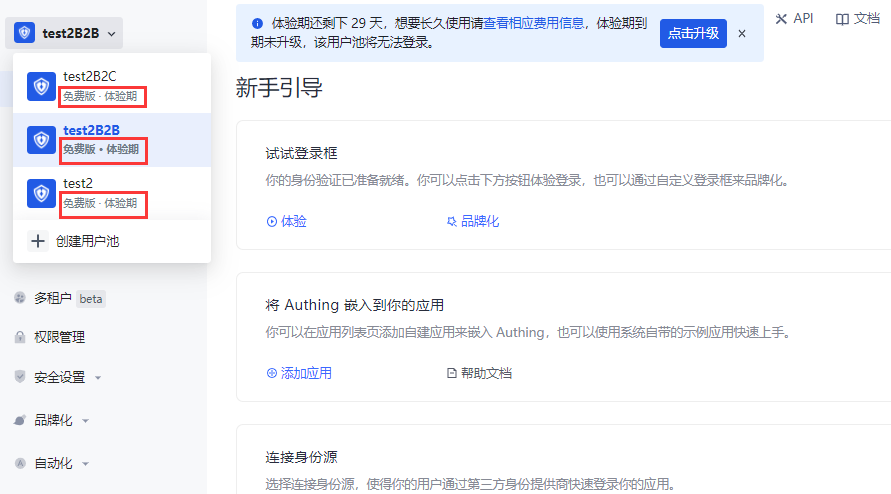
- User pool management page

View the comparison of benefits
Version information
Path: Settings->Expense Management->Version Information->Version Comparison
Each scenario user pool supports multiple benefit versions, and different versions provide different benefits and usage. During the trial period, all benefits of each version are integrated, and the usage of each benefit adopts the minimum usage in each version (i.e., tiered benefits), which will not exceed the limit of the higher version.
Under the Expense Management menu, a comparison of benefits between user pool versions is provided. Administrators can view the differences in benefits provided by each user pool version and the restrictions on the usage of each benefit authorization in each version.
INFO
- The following figure takes the ToB scenario user pool as an example to illustrate the rights and corresponding usage open to users when the trial period is based on the free version.
- If the rights are updated during the trial period, they will be updated synchronously for the current user pool, and the trial period strategy will not be affected.
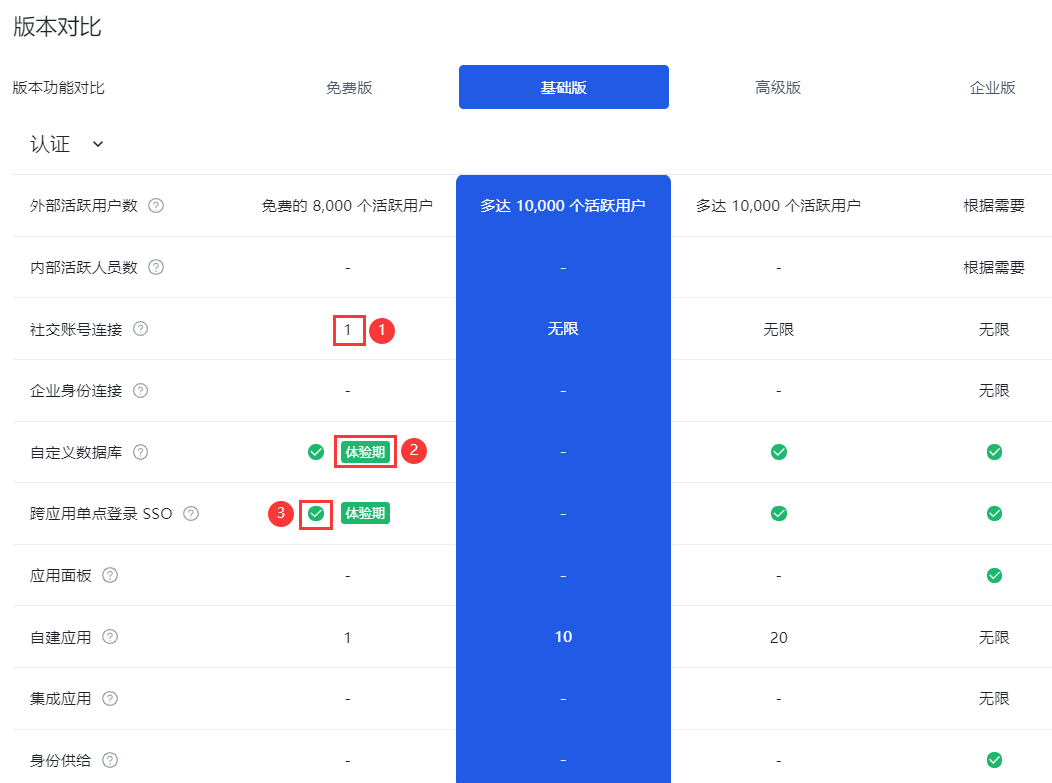
| Serial number | Description |
|---|---|
| 1 | Indicates the current rights limit, and the number is the authorized usage. |
| 2 | Indicates that the current function is a trial period right, and the free version does not have this right. |
| 3 | Indicates that the current rights are unlimited. |
Usage information
Path: Settings->Expense Management->Usage Information
Administrators can view the detailed usage information of each right enjoyed by the current user pool during the trial period on the Usage Information tab.
The benefit card marked with Trial Period indicates that the current benefit exceeds the free version benefit and is a trial benefit during the trial period.

User upgrade
End of trial period
The trial period is up to 30 days. If the user pool is not upgraded after the expiration, the trial period will automatically end.
If the user upgrades the user pool version before the 30-day trial period, the trial period will end in advance and the upgraded version will be charged. At this time, the overflow benefits (part of the premium version benefits enjoyed during the trial period) can no longer be used.
SMS and email notifications
On the day of creation, the administrator will receive an email and SMS to notify that the trial period has been opened.
On the seventh day, third day, day before expiration, and day of expiration, the administrator will receive SMS and email to remind the expiration.
System page prompts
There will always be a countdown reminder at the top of each system page ten days before expiration, which cannot be turned off.
Trial period expires without upgrade
When a new user registers, the current version is the free version. After the trial period expires, if there is no upgraded version, all benefits of the trial user pool will be deactivated (including the free benefits of the user pool).
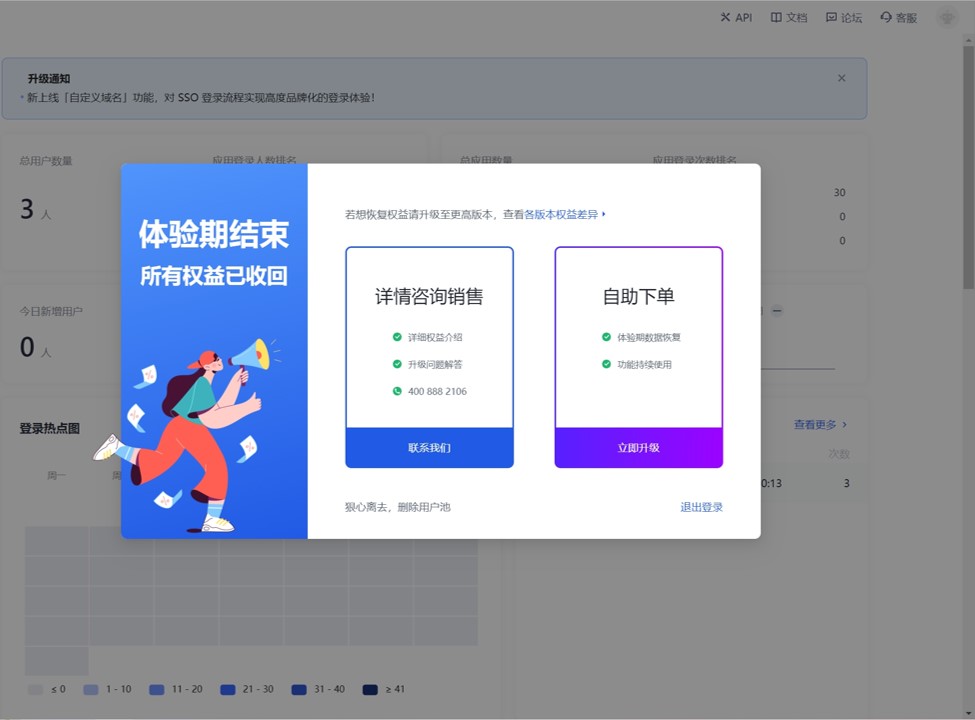
- Administrators can click Contact us, fill in contact information, and describe the problem.
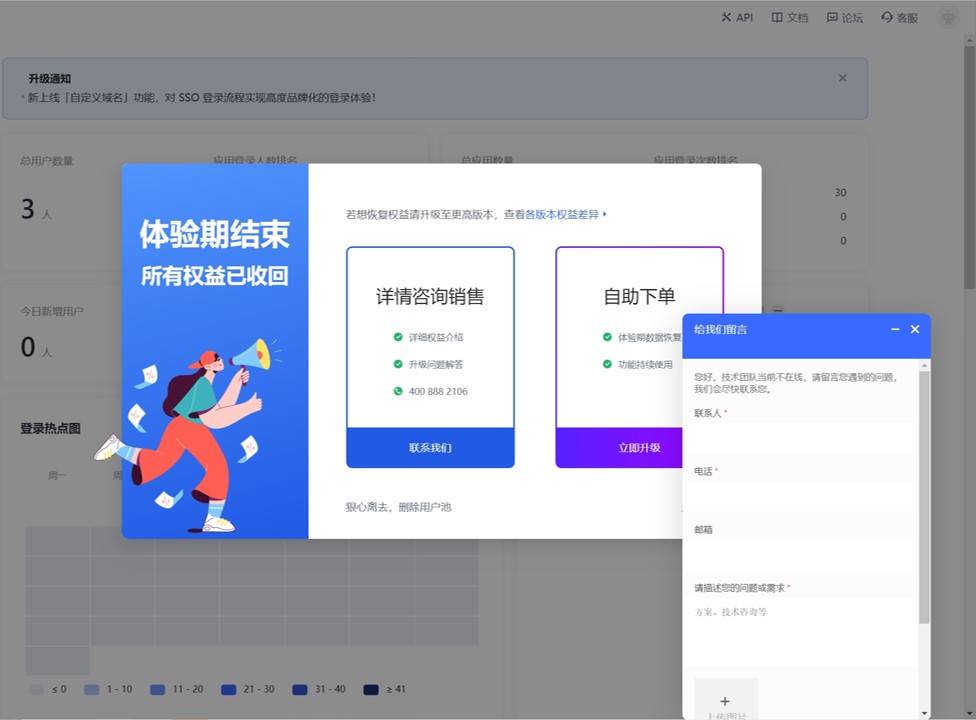
You can also click Upgrade now to jump to the Expense Management page and upgrade to a higher-level version to continue to enjoy the user pool benefits.
You can also click "Leave ruthlessly, delete user pool" at the bottom of the pop-up page to delete the current user pool.
INFO
After deleting the user pool, all data during the trial period will be deleted and cannot be restored!
User upgrade after the trial period expires
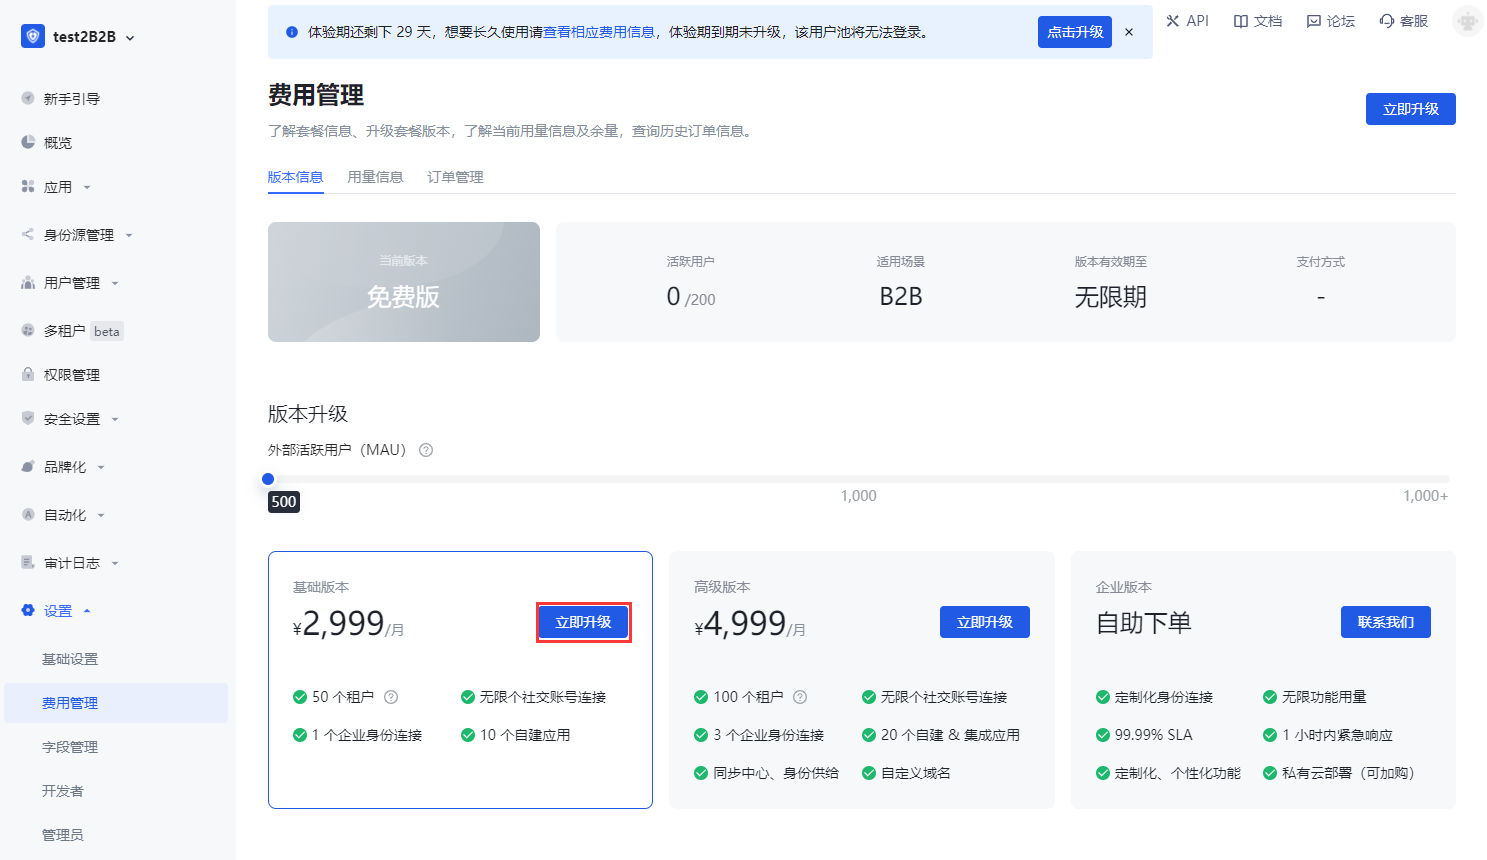
Path: Settings->Expense Management->Version Information->Version Upgrade
Upgrade to Basic Version
Applicable to: ToC, ToB scenarios
After the trial period expires, if the user pool is upgraded from the free version to the basic version, the overflow benefits will no longer be available (but will still be visible).
To upgrade to the basic version, follow these steps:
- In the Version Upgrade module, click the Upgrade Now button on the card where the Basic Version is located.
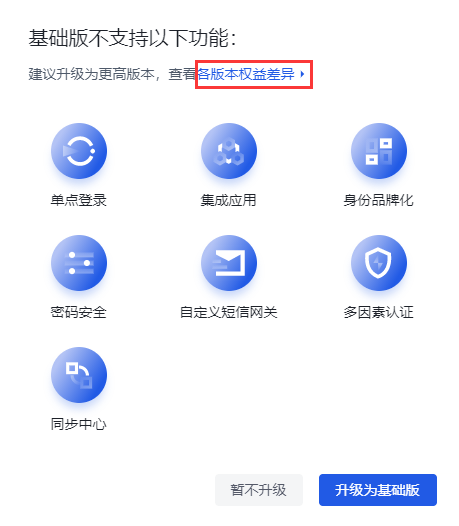
- In the pop-up prompt window, browse the overflow benefits that the premium version has but the basic version does not support. You can also click Differences in benefits between versions in the pop-up window to view the details of the benefits supported by each version (see [Version Comparison](#View Benefit Comparison) for details).
INFO
If you still need to use the overflow rights, you can exit the current operation and execute [Upgrade to Advanced Edition](#Upgrade to Advanced Edition).
Click the Upgrade to Basic Edition button. Click Do not upgrade for now to exit the version upgrade operation and give up upgrading to the Basic Edition.
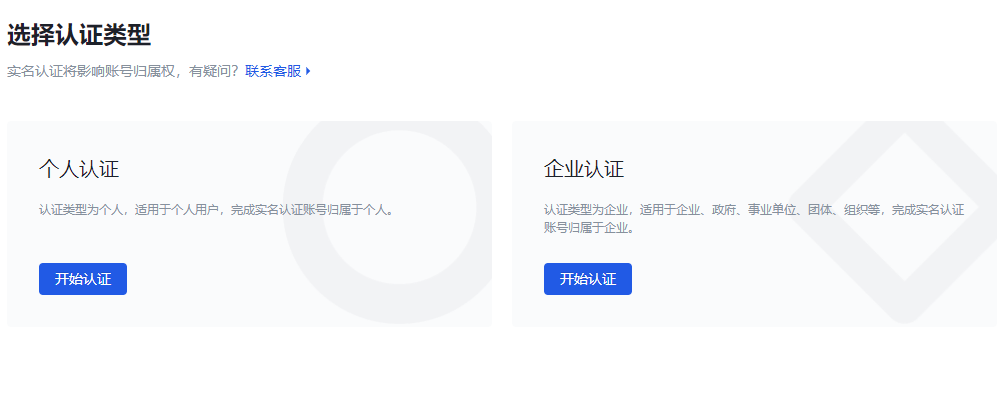
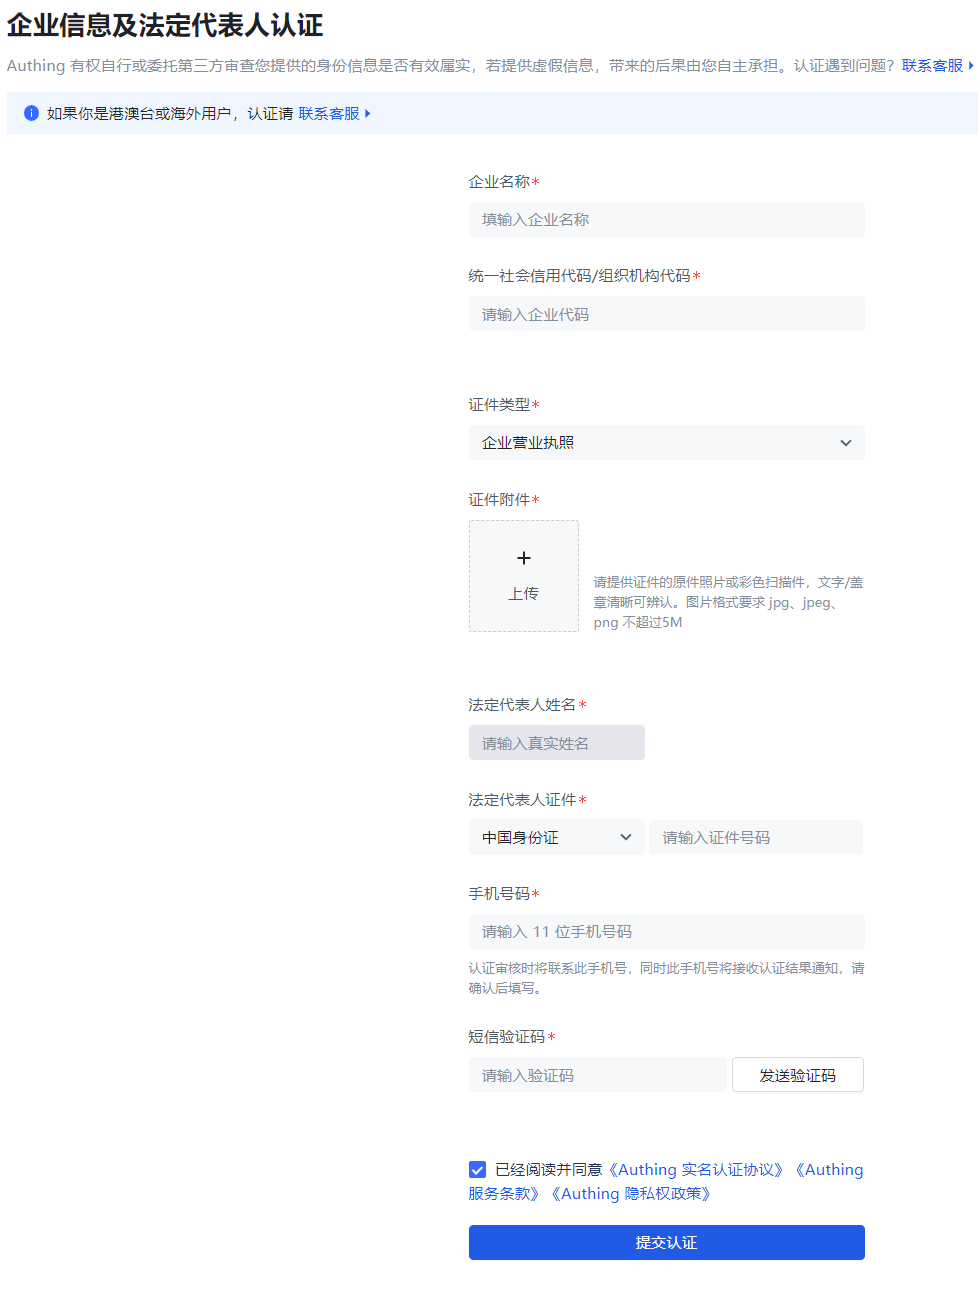
Click Go to real-name authentication.
INFO
According to relevant laws and regulations, personal or corporate real-name authentication must be completed before placing an order.
- Select the authentication type: Personal authentication or Corporate authentication, and click Start authentication.
- Fill in the authentication information and click Submit authentication.
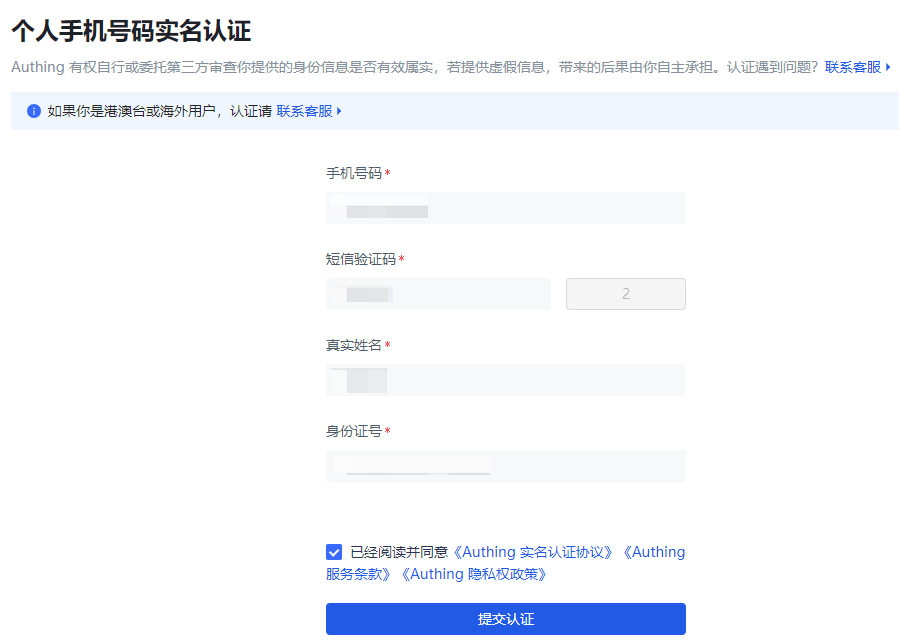
INFO
Personal real-name authentication
INFO
Enterprise authentication
The system prompts that the authentication is successful and returns to the Expense Management->Version Upgrade page after a few seconds.
- Click the Upgrade Now button on the Basic Version card again. Enter the payment page.
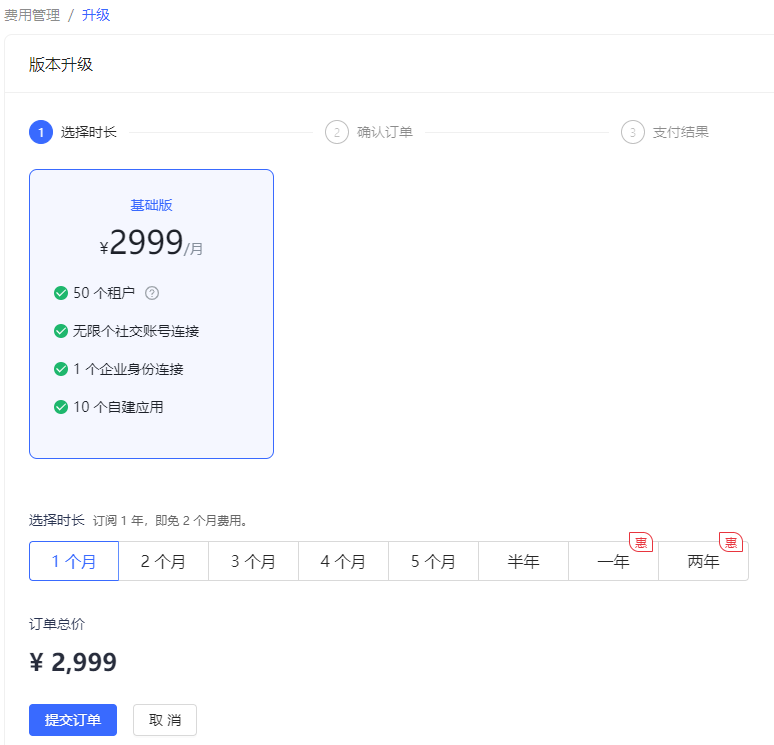
- You can select the usage period of the new version here and click Submit Order.
INFO
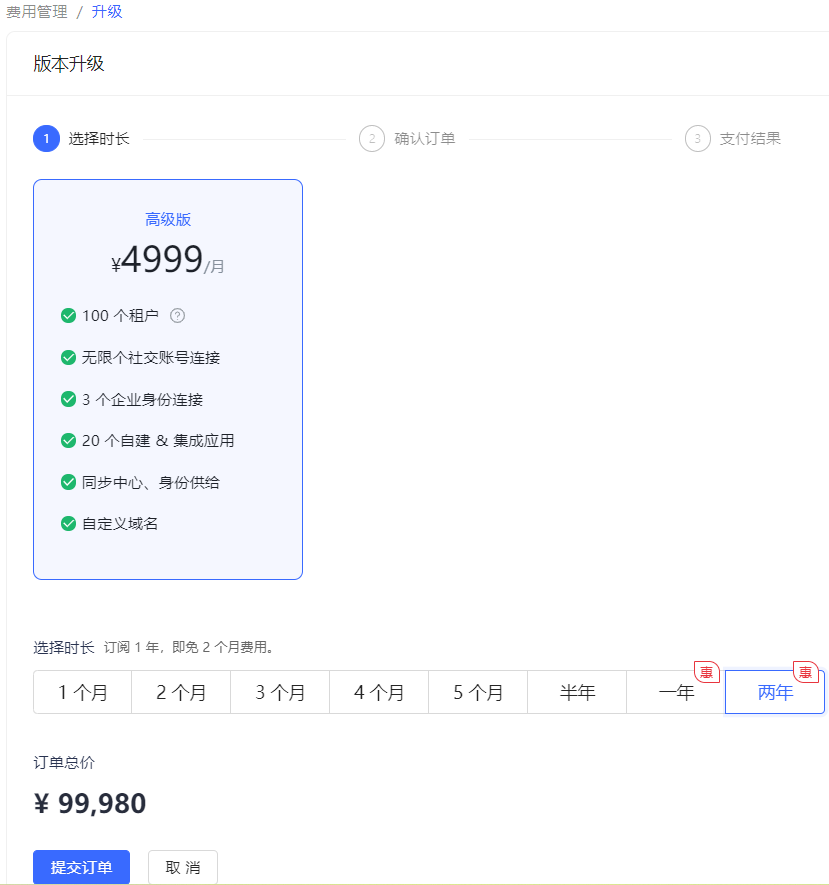
For usage periods exceeding one year, GenAuth provides a preferential policy: two months of free fees for every full year.
- Select Payment Method, check Service Agreement, and click Pay Now.
INFO
Users need to complete the payment within two hours, otherwise the transaction will be closed.
- Scan the QR code in the pop-up window to pay.
Upgrade to the advanced version
Applicable to: ToC, ToB, ToE scenarios
After upgrading to the advanced version, all benefits are available, and the usage of some benefits will increase.
INFO
After the trial period upgrade, the user data during the trial period is still visible.
To upgrade to the advanced version, perform the following steps:
In the Version Upgrade module, click the Upgrade Now button on the card where the Advanced Version is located.
If real-name authentication has not been performed, perform personal/enterprise real-name authentication as described in [Upgrade to Basic Version Steps 5, 6](#Upgrade to Basic Version).
Click the Upgrade Now button on the card where the Advanced Version is located again. Go to the payment page.
- Refer to [Upgrade to Basic Version Steps 8-10](#Upgrade to Basic Version) to make payment.
At this point, the upgrade to the advanced version is complete.
End-user related operations
During the trial period
During the trial period, end users can use the GenAuth capability to log in to the application and experience the corresponding application functions.
Outside the trial period
Outside the trial period, if the administrator has not upgraded, the user will be prompted that the trial has expired and cannot continue to use it. Unable to log in to the application.
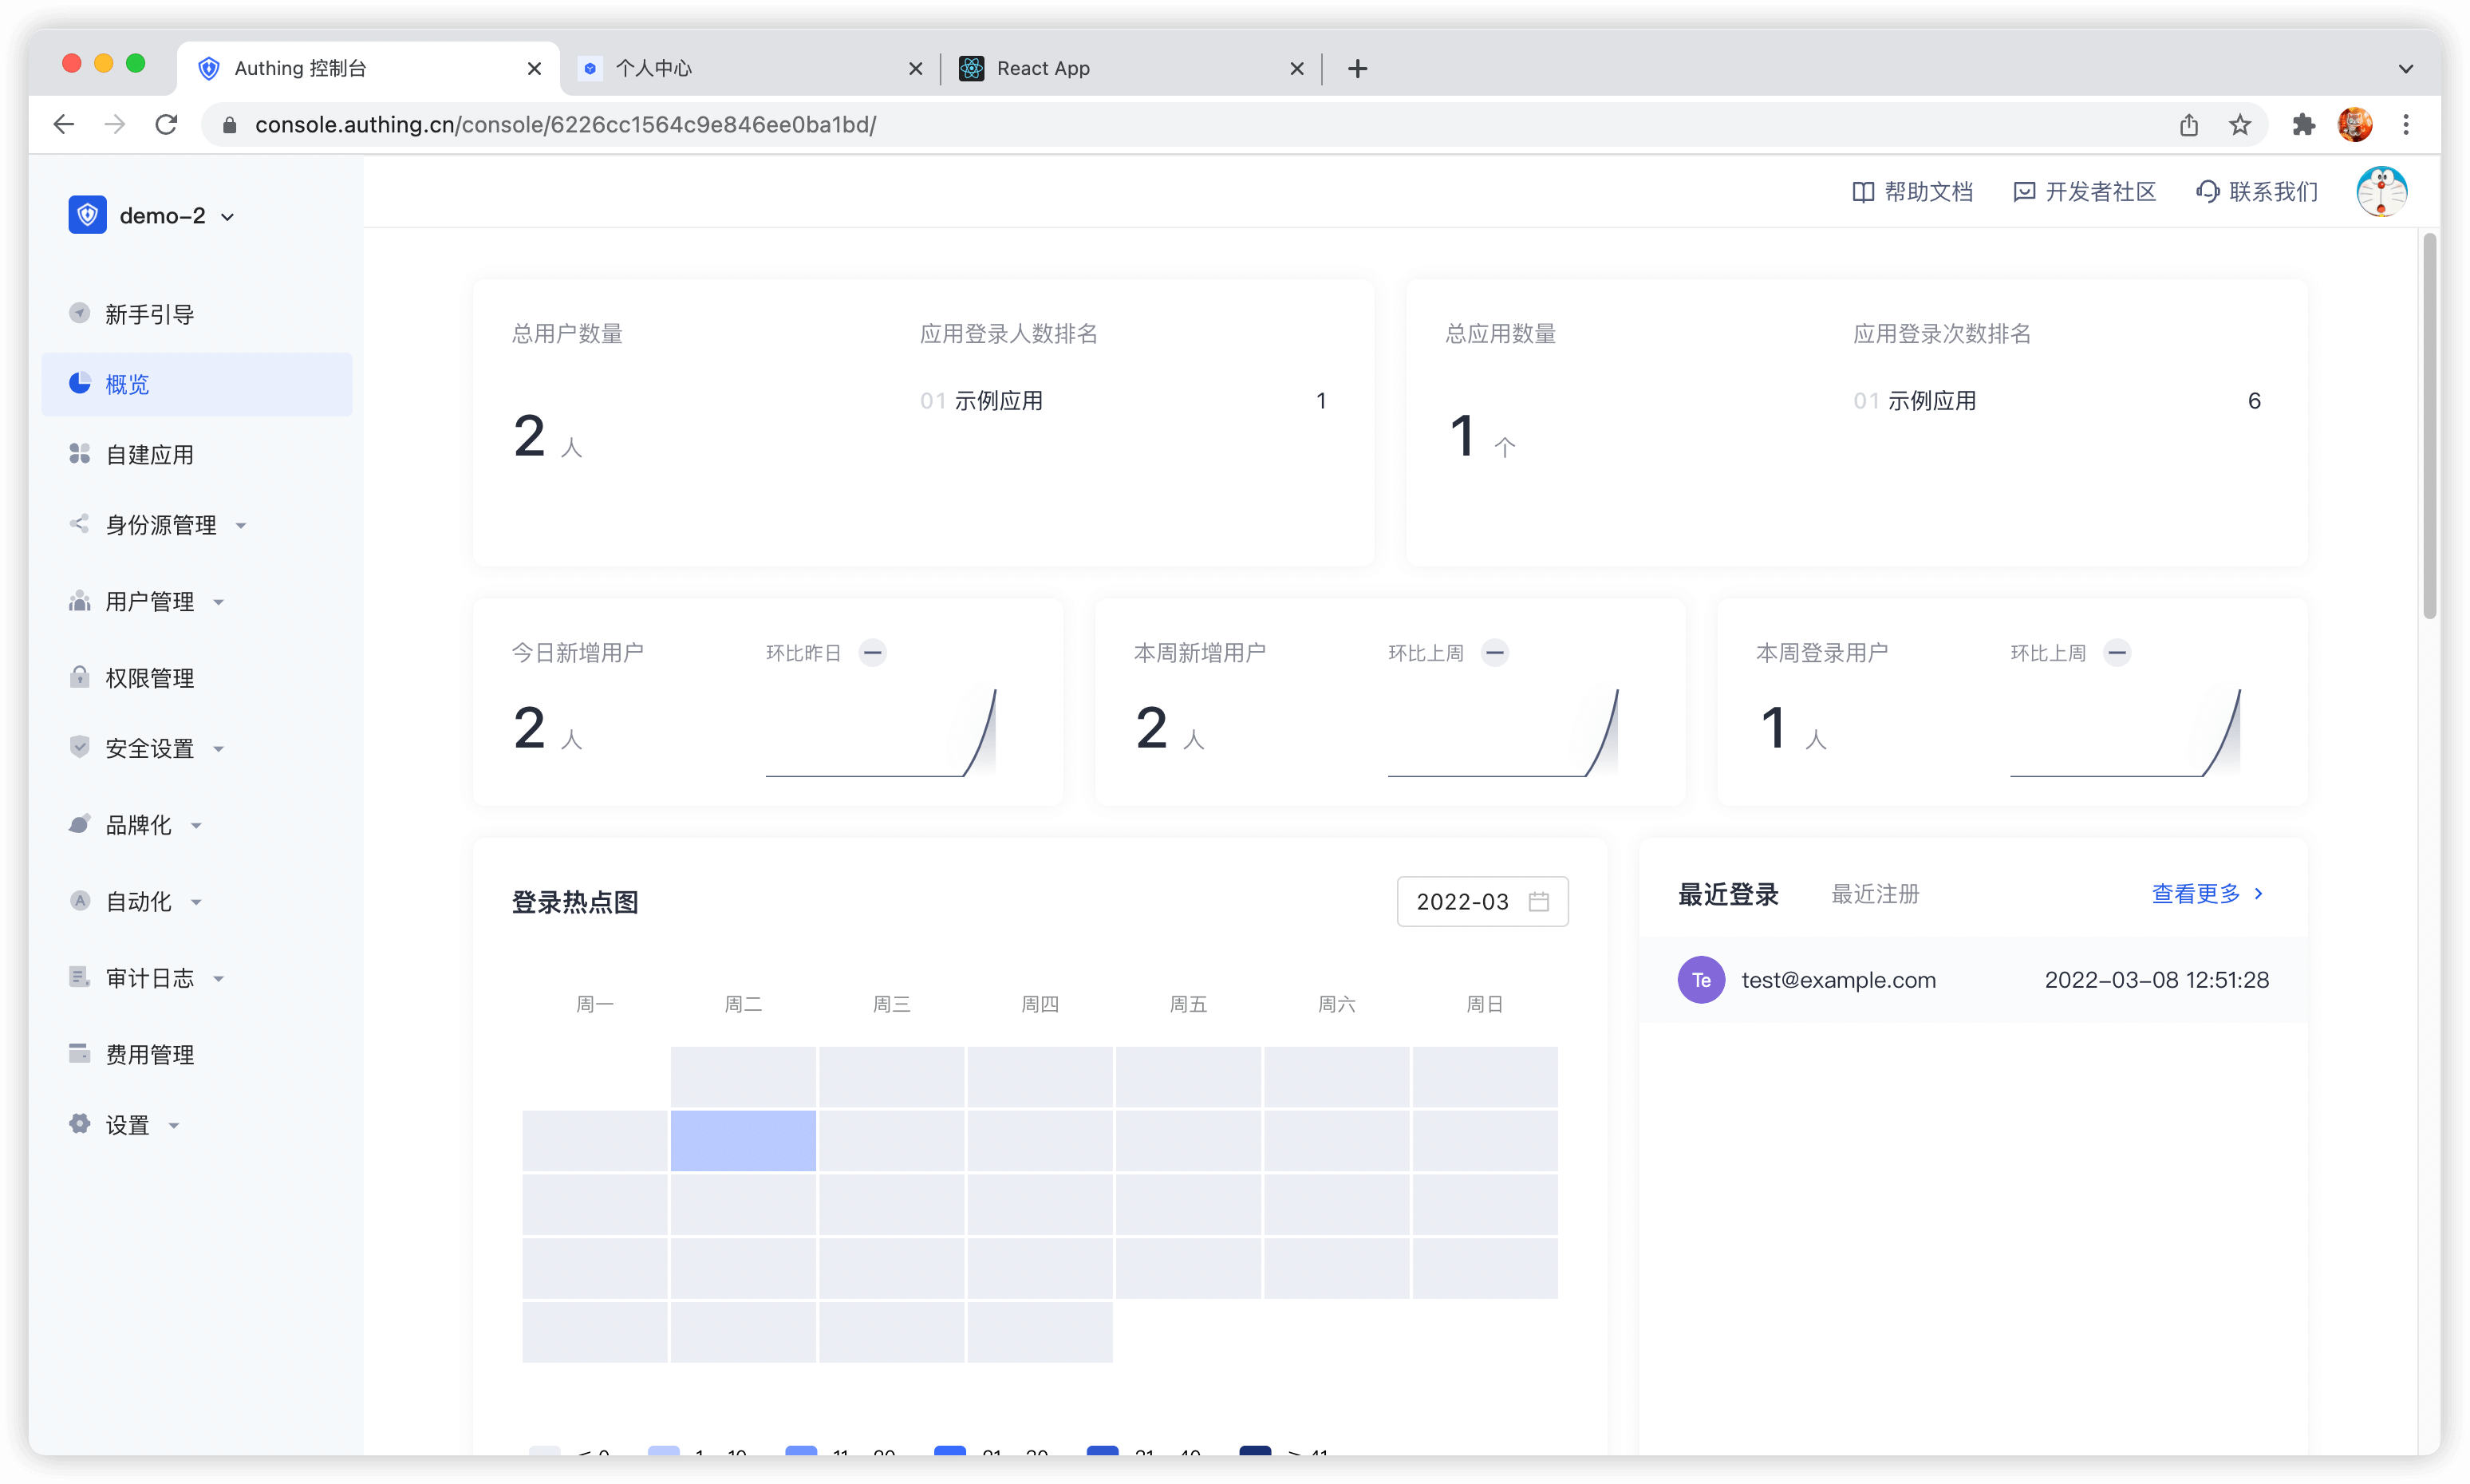
Console Overview
The console is where you manage and configure all GenAuth resources. This article will help you learn how to use the GenAuth console to improve your productivity!
In the GenAuth console you can configure and modify GenAuth resources, users and other information.
INFO
Overview of the console
The following will introduce each module of the console from top to bottom according to the navigation menu on the left side of the console:
Module Description Overview Display various statistics of the system and users, including:
- Display the total number of applications.
- Display the total number of users.
- Display login and new user statistics.
- View the number of user logins, changes in the number of logins, application login information, user distribution and other statistics over a period of time in a variety of graphical methods. Application You can configure single sign-on (SSO) in the Application module, including:
- Integrate third-party applications.
- As a service provider (SP), integrate APP into GenAuth:
- You can configure basic application information, default page display, and integrate OIDC / SAML2 / CAS / OAuth 2.0 / protocol for the application.
- Configure login method.
- Perform access authorization.
- Customize application login box, security rules, and identity branding.
- Perform tenant configuration.
- As an identity provider (IDP), it provides external authentication. Identity source management Connect to third-party identity sources, support applications to authenticate and authorize login through third-party identity sources, and support customer-defined databases to store user data, as follows:
- Connect to enterprise identity sources (OIDC, SAML, office applications such as DingTalk, WeChat for Enterprise).
- Configure social login.
- Customize database. User Management Manage all organization and user information in the system, including:
- Create and manage users.
- Create and manage user groups.
- Create and manage organizations.
- Create synchronization tasks to achieve upstream/downstream synchronization of organization information and user information.
- Use LDAP protocol to view, modify, add and delete user information.
- Configure registration whitelist. After enabling, only users in the whitelist can register. Permission management Refined permission management based on resources, RBAC (Role-Based Access Control) and ABAC (Attribute-Based Access Control), including:
- Add and manage resources, and configure resource operation types.
- Add and manage roles, assign users and organizations to roles, and authorize resource operations for roles.
- Grant resource access, modification and other permissions to certain subjects through certain authorization rules. Security Settings Configure security policies for the development process, password settings, and two-factor authentication, including:
- Configure user pool-level basic, registration, and login security rules. Security domains (Allowed Origins) are URLs that are allowed to make requests to the GenAuth API from JavaScript (usually used with CORS). By default, the system allows you to use all URLs (*). This field allows you to enter additional origins if needed. You can separate multiple valid URLs by line, and use wildcards at the subdomain level (for example: https://*.sample.com. . ) Query strings and hash information are not considered when validating these URLs. If query strings and hash information are included, the system will automatically ignore the entire domain name.
- Customize password strength, encryption method, and password rotation policy.
- Configure user pool-level secondary authentication. Branding You can customize the login panel and configure information completion according to different corporate brand requirements.
- Configure the login box style.
- Upload custom CSS.
- Configure login registration user agreement.
- Configure message email and SMS reminders. Automation GenAuth's Pipeline, Webhook, and custom password functions greatly improve the flexibility and scalability of the authentication process, enabling users to automatically handle complex scenarios.
- Pipeline
- Webhook Audit log You can view user operation logs and administrator logs here. Settings Edit or delete user pools, modify development environment variables, etc.:
- User pool basic information settings
- Expense managementService upgrades and order details can be viewed here.
- Extended fields
- Environment variablesEnvironment variables are a set of Key-Value pairs (similar to operating system environment variables). You can manage some constant values in environment variables for use in scenarios such as Pipeline, SAML field mapping, and custom data.
- Collaborative administratorInvite users in the user pool or developers in GenAuth's official user pool to help you manage the user pool. Authorized developers will see the user pool on the user pool list page.