Manage user accounts
INFO
For information about the GenAuth user pool version that supports the various benefits of the "User Management" function, please check the Official Website "Pricing" Page. If your version does not support this benefit and you want to try it, you can activate the trial period. For an introduction to the trial period and how to activate it, please check Trial Period.
This section mainly introduces the operations of managing a single user, such as binding an email address, associating an account, disabling an account, etc. If you want to learn how to manage the user directory, please see Manage User Directory.
User account management can be managed visually through the console and the user personal center, or with the help of SDK & API. You can choose the method that suits you according to your business needs.
User account management is divided into two modes: administrator operation and user self-service operation. User self-service operation requires user identity verification through mobile phone verification code, MFA, etc. Administrator operation only needs to provide Management Token (if using SDK, only user pool key).
The following content is in no particular order. You can choose the content you are interested in to read:
- Learn the meaning of all fields in the user profile;
- Learn how administrators create accounts;
- Learn how to manage user accounts, such as modifying user profiles, binding MFA, etc.;
- Learn how to bind accounts;
- Learn how to manage user custom data;
- Learn how to view a user's login history;
- Learn how to enhance the security of user accounts;
- Learn how to manage a user's login state;
- Learn how to control which apps users can access.
User field interpretation
All fields and their interpretations of the GenAuth user are as follows:
id: User ID, the example is5f927f5daa7ba859b6b5c21f, which is a unique ID automatically generated by GenAuth.arn: ARNstatus: User statustoken: User identity credential, the value is an OIDC IdToken. This field can be used to verify the user's identity and determine the user's login status. For details, please see Verification Token.userPoolId: User pool ID, for example5f927f5daa7ba859b6b5c21f, which is a unique ID automatically generated by GenAuth.username: User name, unique in the user pool, case-sensitive.email: Email address, unique in the user pool, case-insensitive, such asBob@example.comandbob@example.comwill be identified as the same email address.emailVerified: Whether the email address has been verified. By default, GenAuth will not prevent users with unverified email addresses from logging in. If you want to force users to verify their email addresses before logging in, see this.phone: The phone number is unique in the user pool.phoneVerified: Whether the phone number has been verified. This field istruefor users who register and log in using the phone number verification code, andfalsefor users manually created by the administrator.unionid: For users who use third-party identity sources or social login, this field is the user's ID in the third party.openid: For users of third-party identity sources, the returned openid.nickname: User nickname, this field is not unique.photo: User avatar.oauth: For users who register through social login, this field stores the original user information returned by the third-party social login service provider. For example, for users registered through github, this field is the original user information returned by the mini program after being parsed through JSON.tokenExpiredAt: Token expiration time, a time string that conforms to the ISO8601 format. (e.g. "2017-06-07T14:34:08.700Z", "2017-06-07T14:34:08.700 or "2017-06-07T14:34:08+04:00").loginsCount: The cumulative number of logins.lastLogin: The last login time, a time string in ISO8601 format. (e.g. "2017-06-07T14:34:08.700Z", "2017-06-07T14:34:08.700 or "2017-06-07T14:34:08+04:00").signedUp: The registration time, a time string in ISO8601 format. (such as "2017-06-07T14:34:08.700Z", "2017-06-07T14:34:08.700 or "2017-06-07T14:34:08+04:00").blocked: Whether the user account is locked. A locked account cannot log in.lastIP: The client IP of the user when last logged in.device: The device used when last logged in.browser: The browser used when last logged in.company: The company.name: OIDC standard field.givenName: OIDC standard field.familyName: OIDC standard field.middleName: OIDC standard field.preferredUsername: OIDC standard field.profile: The user's Profile Url, using GitHub For logged-in users, this field is the link to their GitHub personal homepage.website: personal websitegender: gender, M (Man) for male, F (Female) for female, U (Unknown) for unknown.birthdate: birthdayzoneinfo: time zonelocale: languageaddress: addressstreetAddress: street addresslocality: Localityregion: regionpostalCode: postal codecity: cityprovince: provincecountry: country
The following is a sample user information in JSON format:
{
  "id": "5f8d4c6ee7cbcaf59486c93d",
  "arn": "arn:cn:authing:59f86b4832eb28071bdd9214:user:5f8d4c6ee7cbcaf59486c93d",
  "userPoolId": "59f86b4832eb28071bdd9214",
  "username": "USERNAME",
  "email": null,
  "emailVerified": false,
  "phone": null,
  "phoneVerified": false,
  "unionid": "UNIONID",
  "openid": "OPENID",
  "nickname": null,
  "photo": "https://files.authing.co/user-contents/59f86b4832eb28071bdd9214/avatar/5c7cd4a4-4ea4-443c-9656-705f0b247a29.jpg",
  "oauth": "OAUTH",
  "token": "TOKEN",
  "tokenExpiredAt": "2020-10-19T16:21:02+08:00",
  "loginsCount": 1,
  "lastLogin": "2020-10-19T16:21:02+08:00",
  "lastIP": null,
  "signedUp": "2020-10-19T16:21:02+08:00",
  "blocked": false,
  "isDeleted": false,
  "device": null,
  "browser": null,
  "company": null,
  "name": null,
  "givenName": null,
  "familyName": null,
  "middleName": null,
  "profile": "https://github.com/shat810",
  "preferredUsername": null,
  "website": null,
  "gender": "U",
  "birthdate": null,
  "zoneinfo": null,
  "locale": null,
  "address": null,
  "formatted": null,
  "streetAddress": null,
  "locality": null,
  "region": null,
  "postalCode": null,
  "country": null,
  "createdAt": "2020-10-19T16:21:02+08:00",
  "updatedAt": "2020-10-19T16:21:04+08:00"
}
Administrator creates account
The differences and similarities between administrator creates account and user registers account:
- Administrator creates account and is not subject to "prohibit registration" configuration restrictions;
- Administrator creates account and is not subject to "registration whitelist" restrictions;
- Administrator creates mobile phone account and does not need verification code, but user registers by himself;
- The
phoneVerifiedfield of the mobile phone account created by administrator isfalse, while the field of the user registers by himself istrue; - Neither administrator creates account nor user registers by himself and cannot create duplicate email, mobile phone number, username.
Administrator can create user through [console](#Use console to create user) or [SDK](#Use -sdk- to create user).
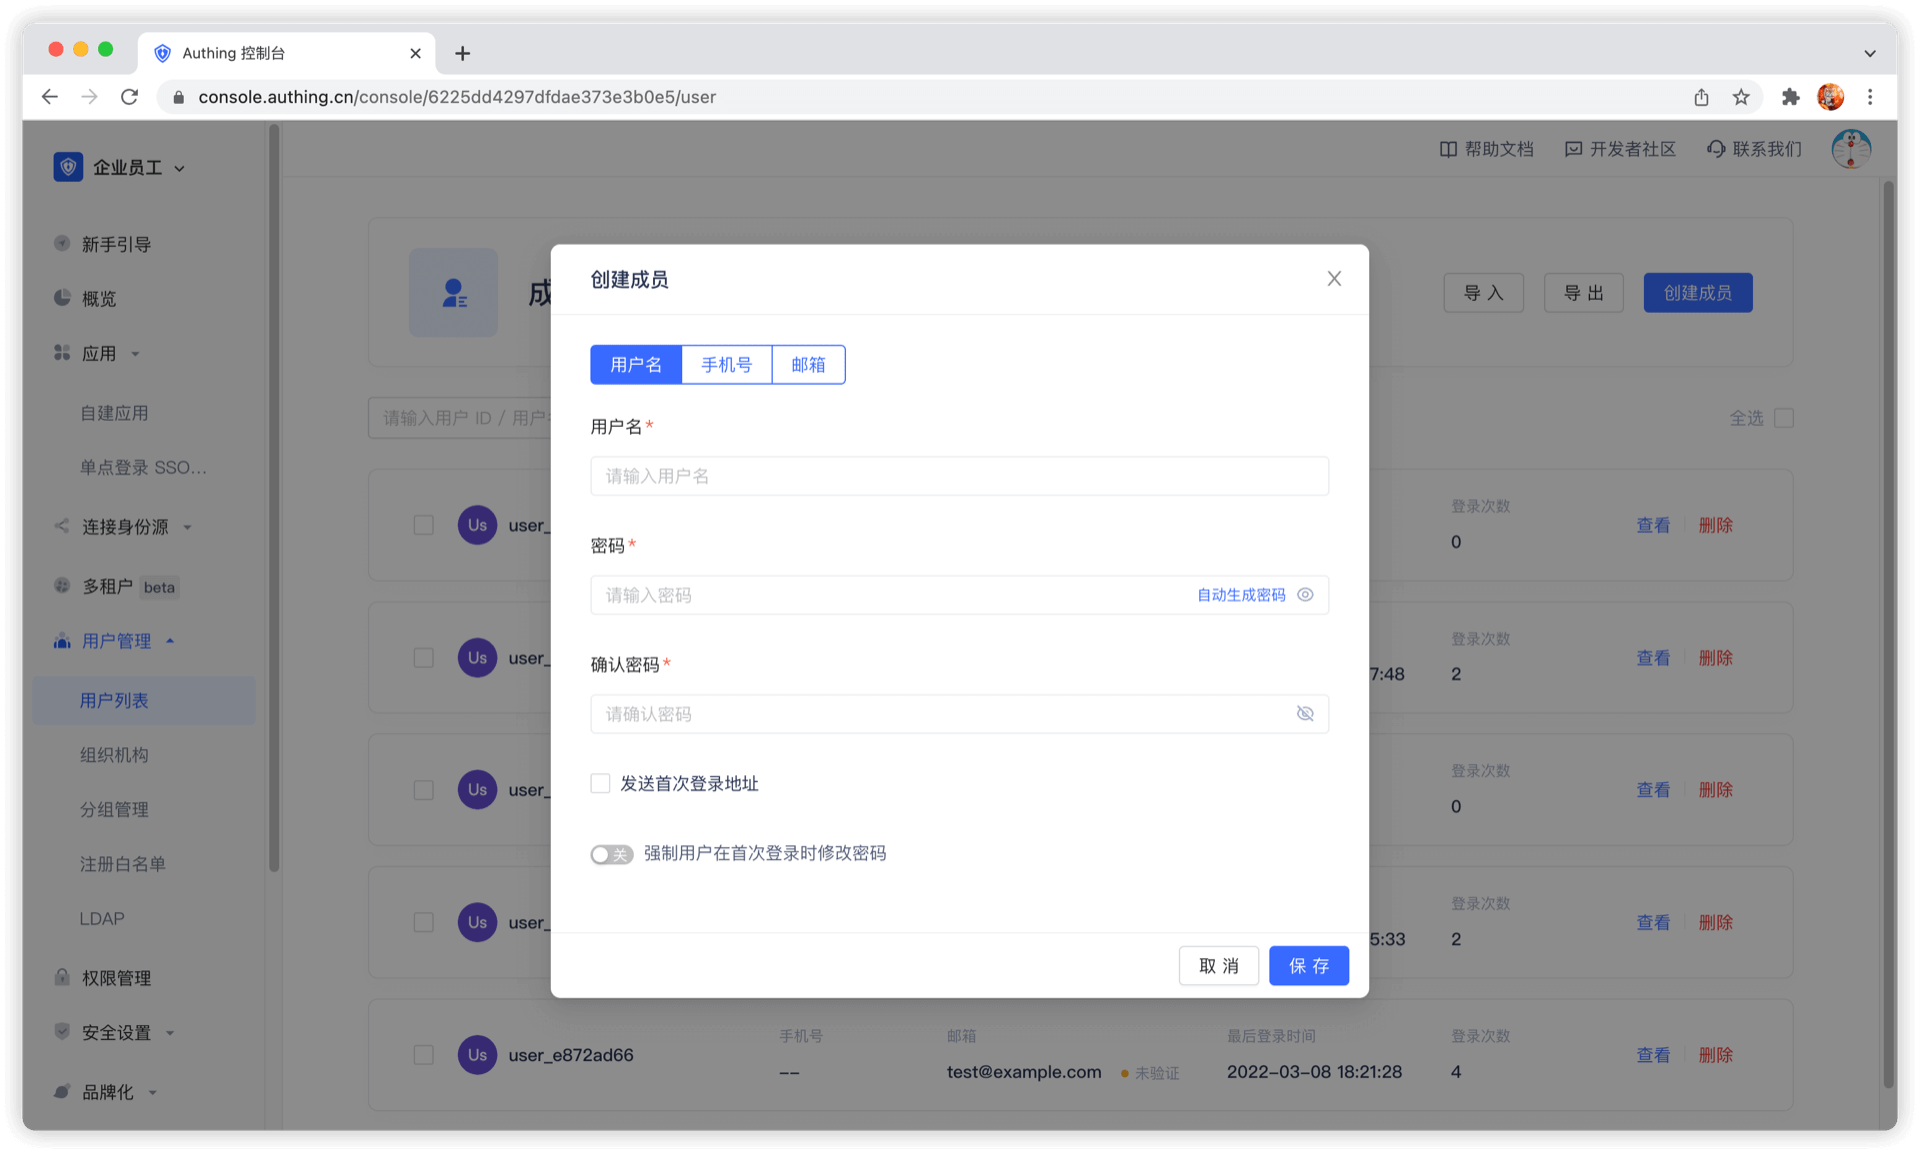
Use console to create user
You can manually create account in User Management - User List of console:
You can create account by email and mobile phone number.
Create a user using SDK
create-userCode snippet: create-user
Manage user accounts
Manage user accounts, including forgotten passwords, email verification, changing email addresses bound to mobile numbers, multi-factor authentication, as well as disabling user accounts, binding social logins, and account merging. If you use GenAuth, congratulations, all these features are built-in, and you only need to spend a very short time to complete them quickly.
Use hosted login page and personal center
GenAuth provides developers with a built-in, beautiful, highly configurable login form, which you can experience here (hereinafter we refer to this login form as Guard), the address is https://<YOUR_DOMAIN>.genauth.ai/:
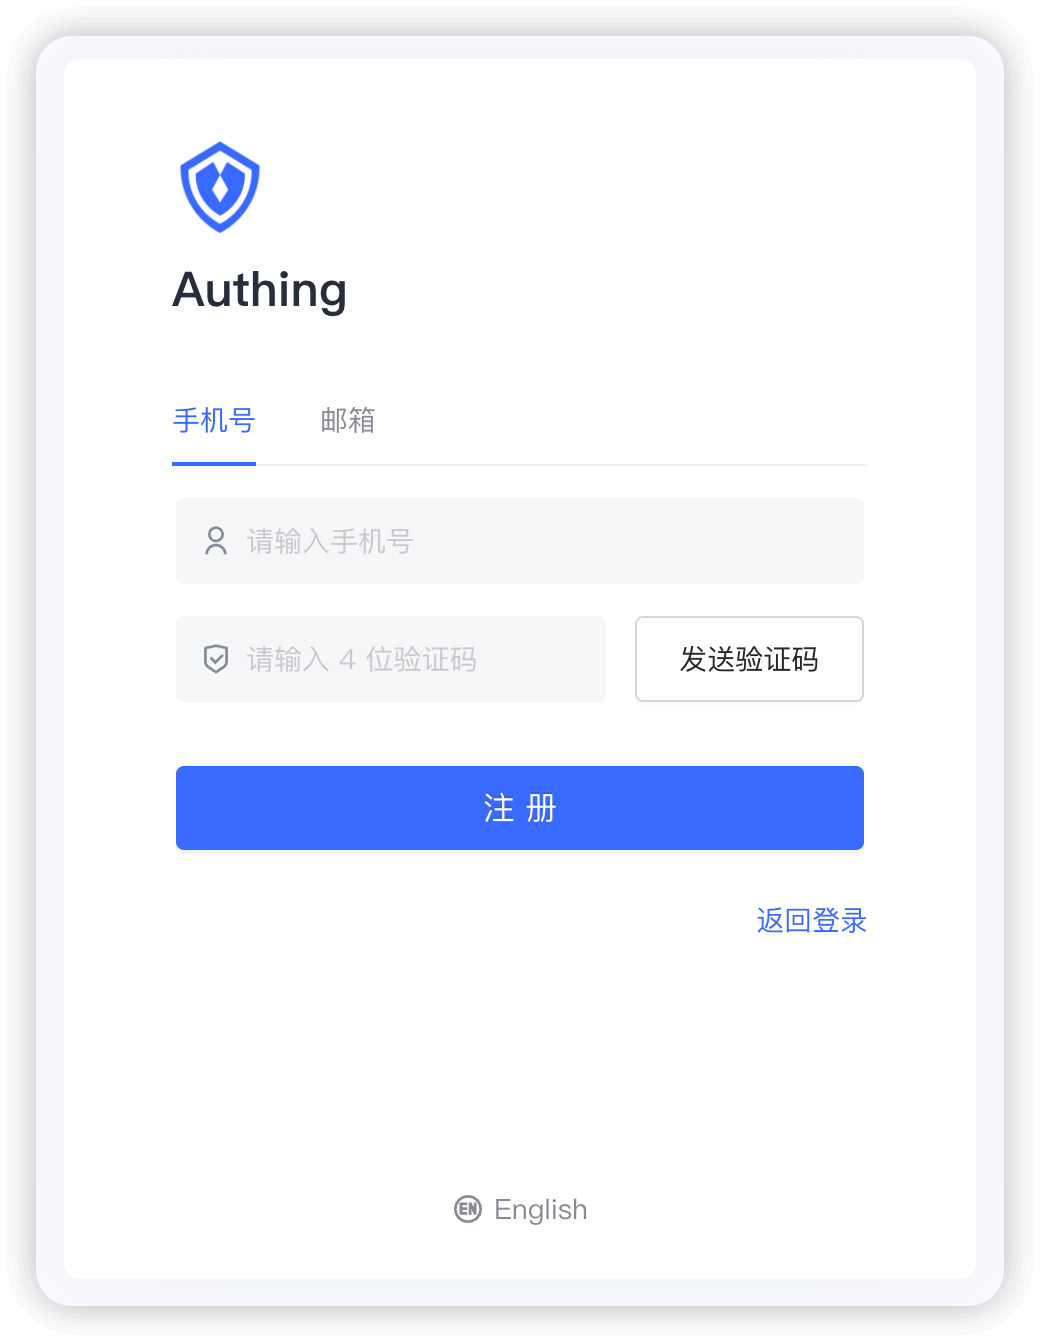
You can perform login registration, forget password, reset email, send SMS verification code, scan code login and other functions.
And a user personal center, you can experience here, the address is https://<YOUR_DOMAIN>.genauth.ai/u:
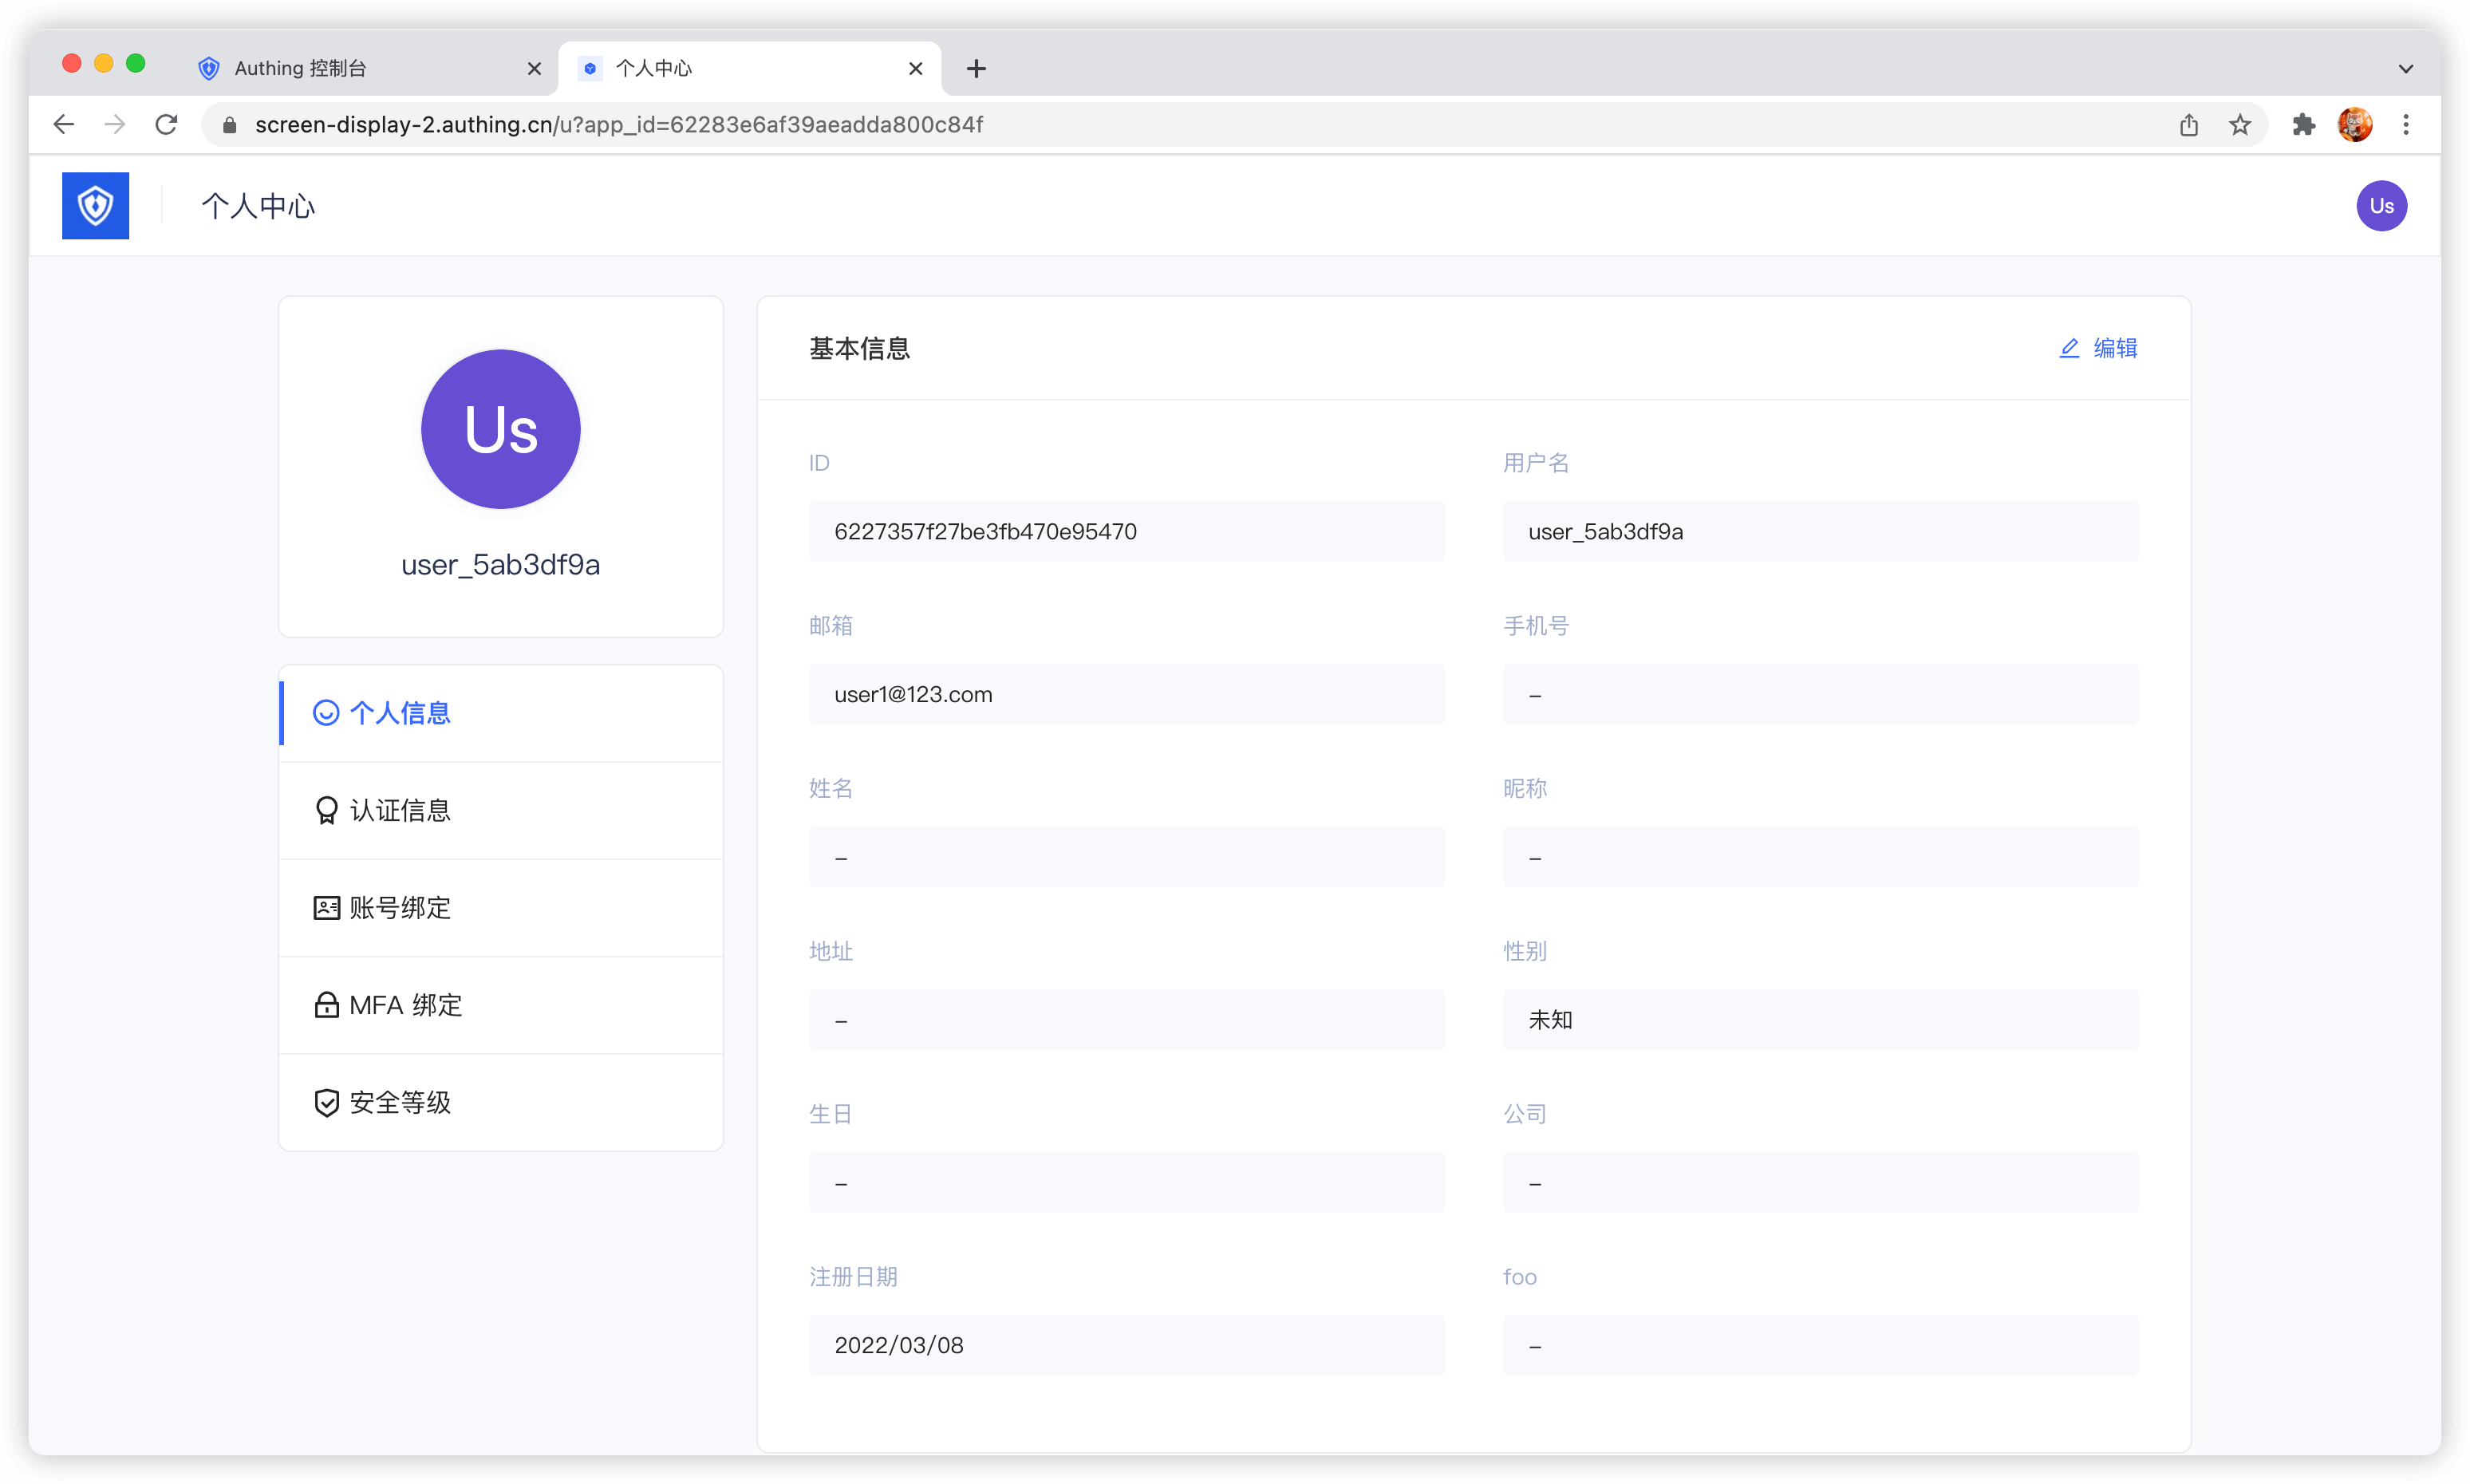
With the hosted login page and personal center, users can complete self-service personal information management.
Modify account information
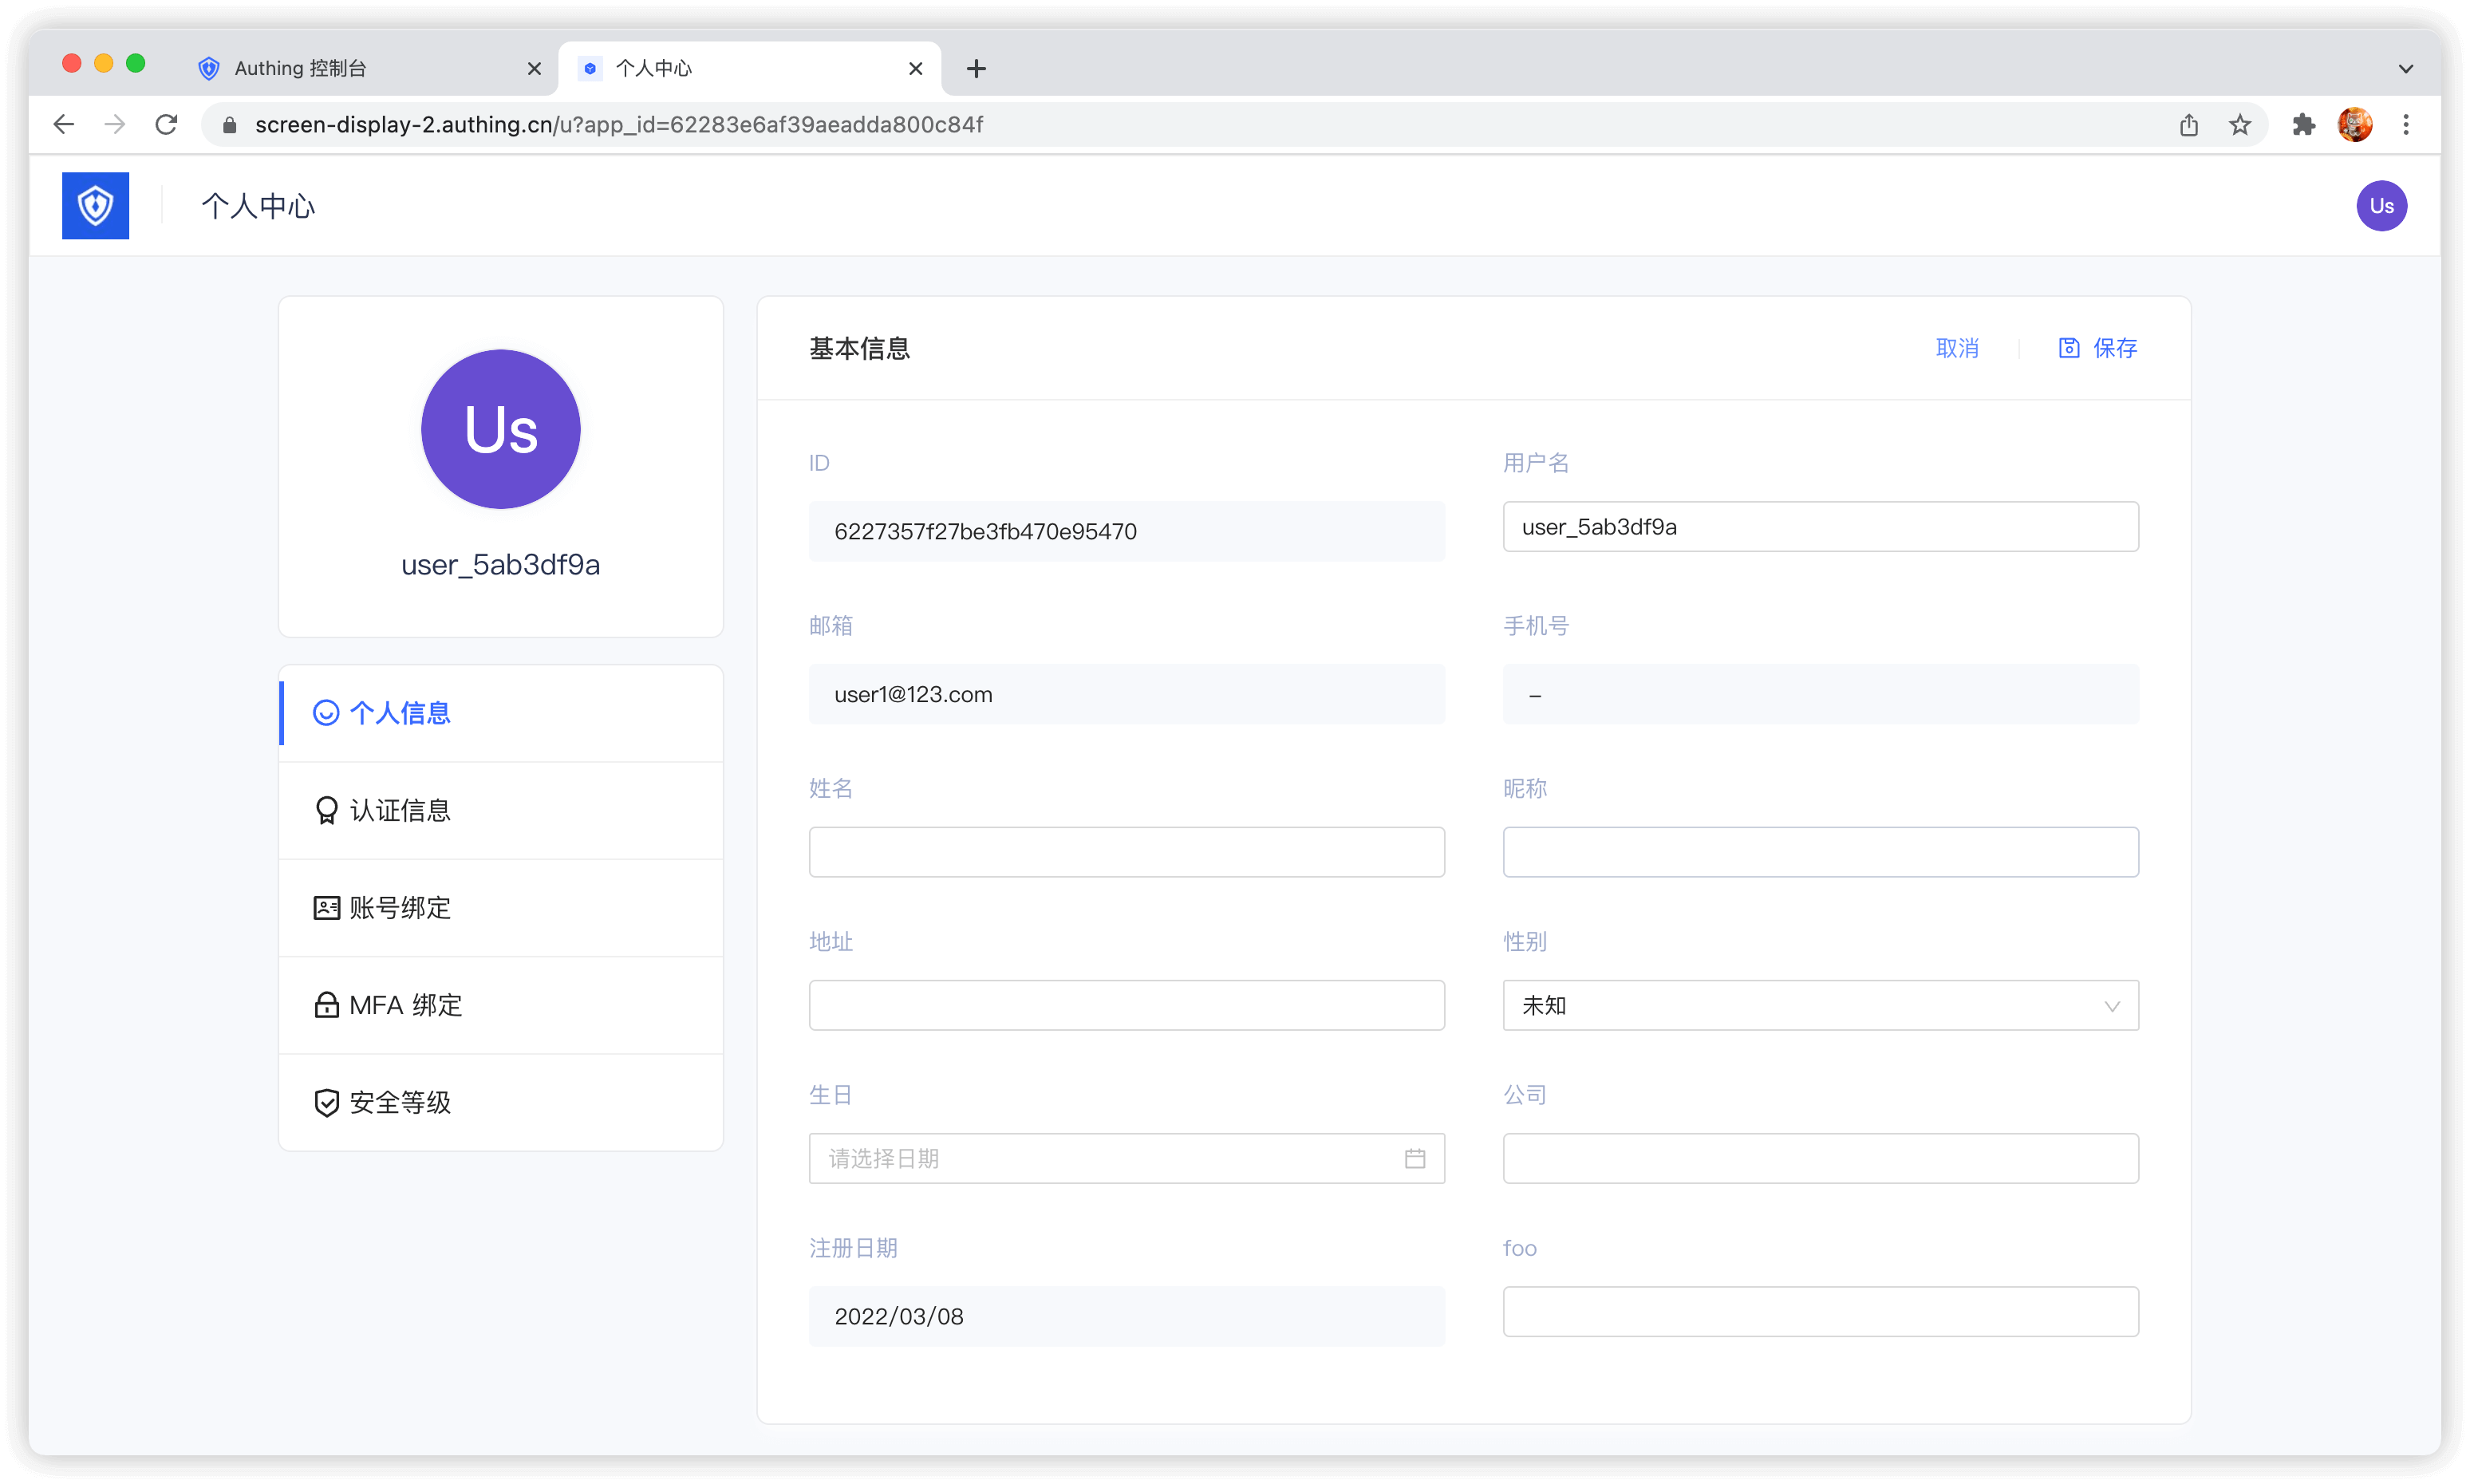
GenAuth provides a built-in user personal center page (address: https://<YOUR_DOMAIN>.genauth.ai/u), which can complete the modification of user basic information:
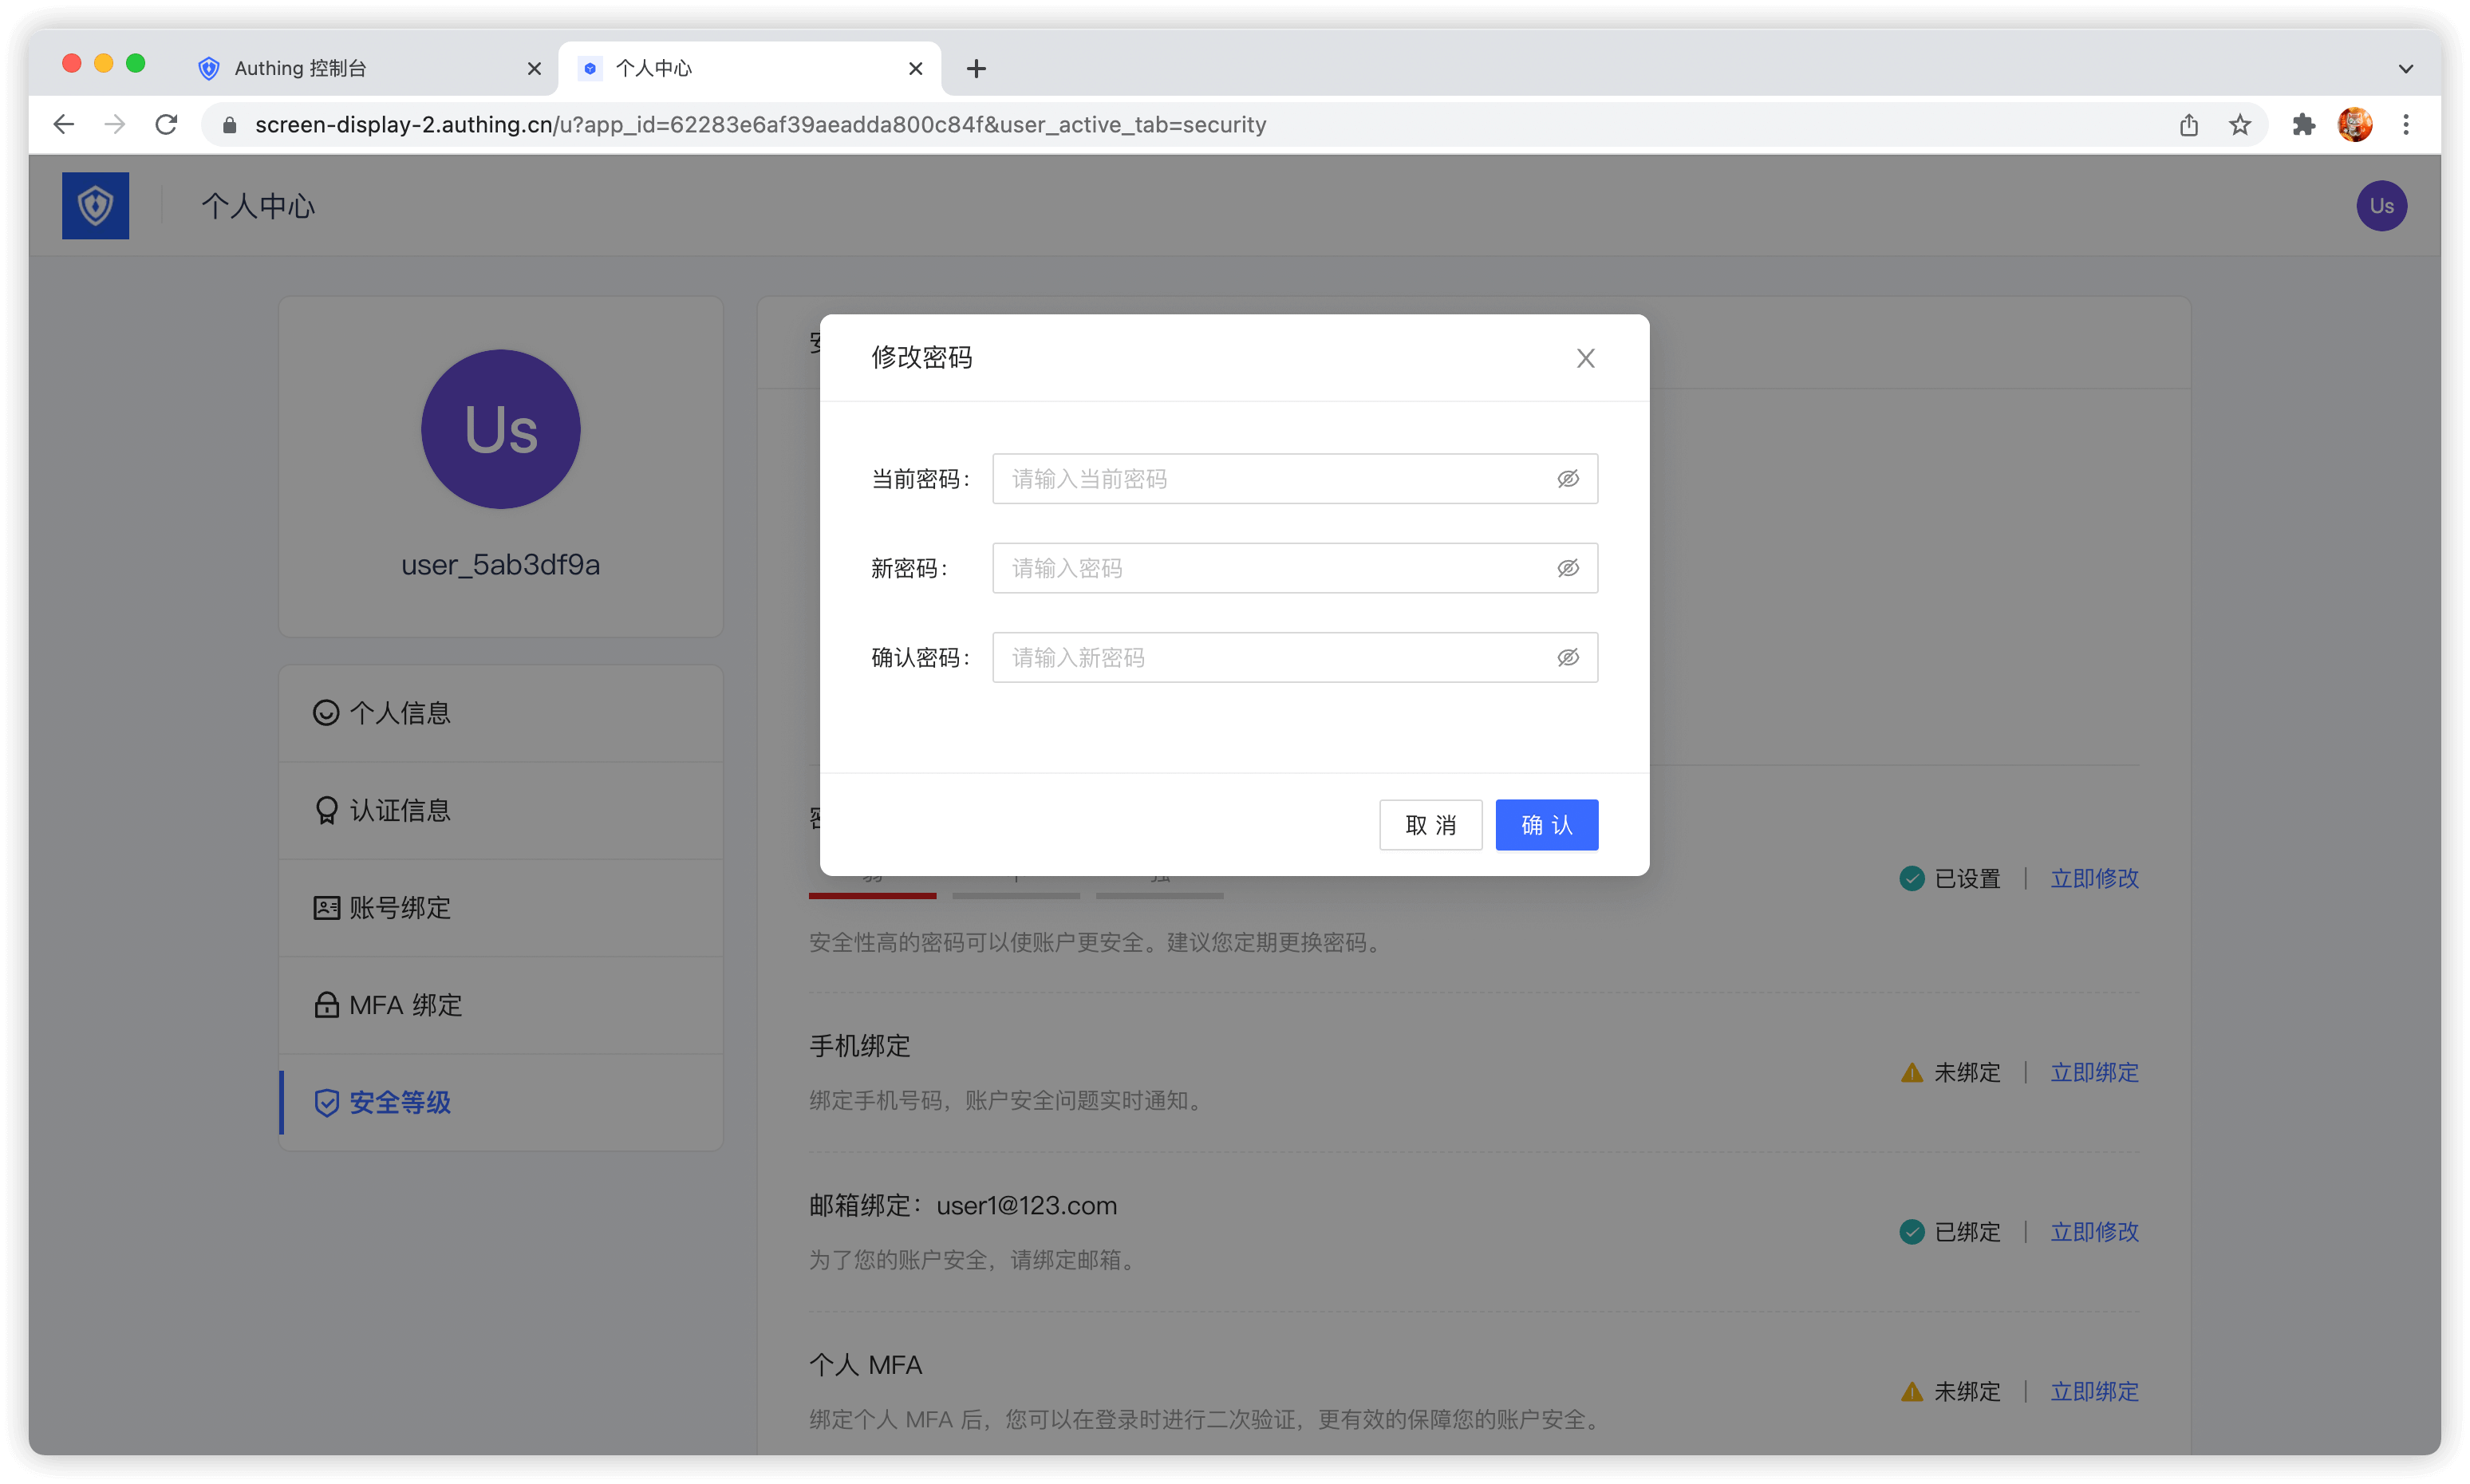
Modify password
When the user remembers the current password, he can modify the password by verifying the current password:
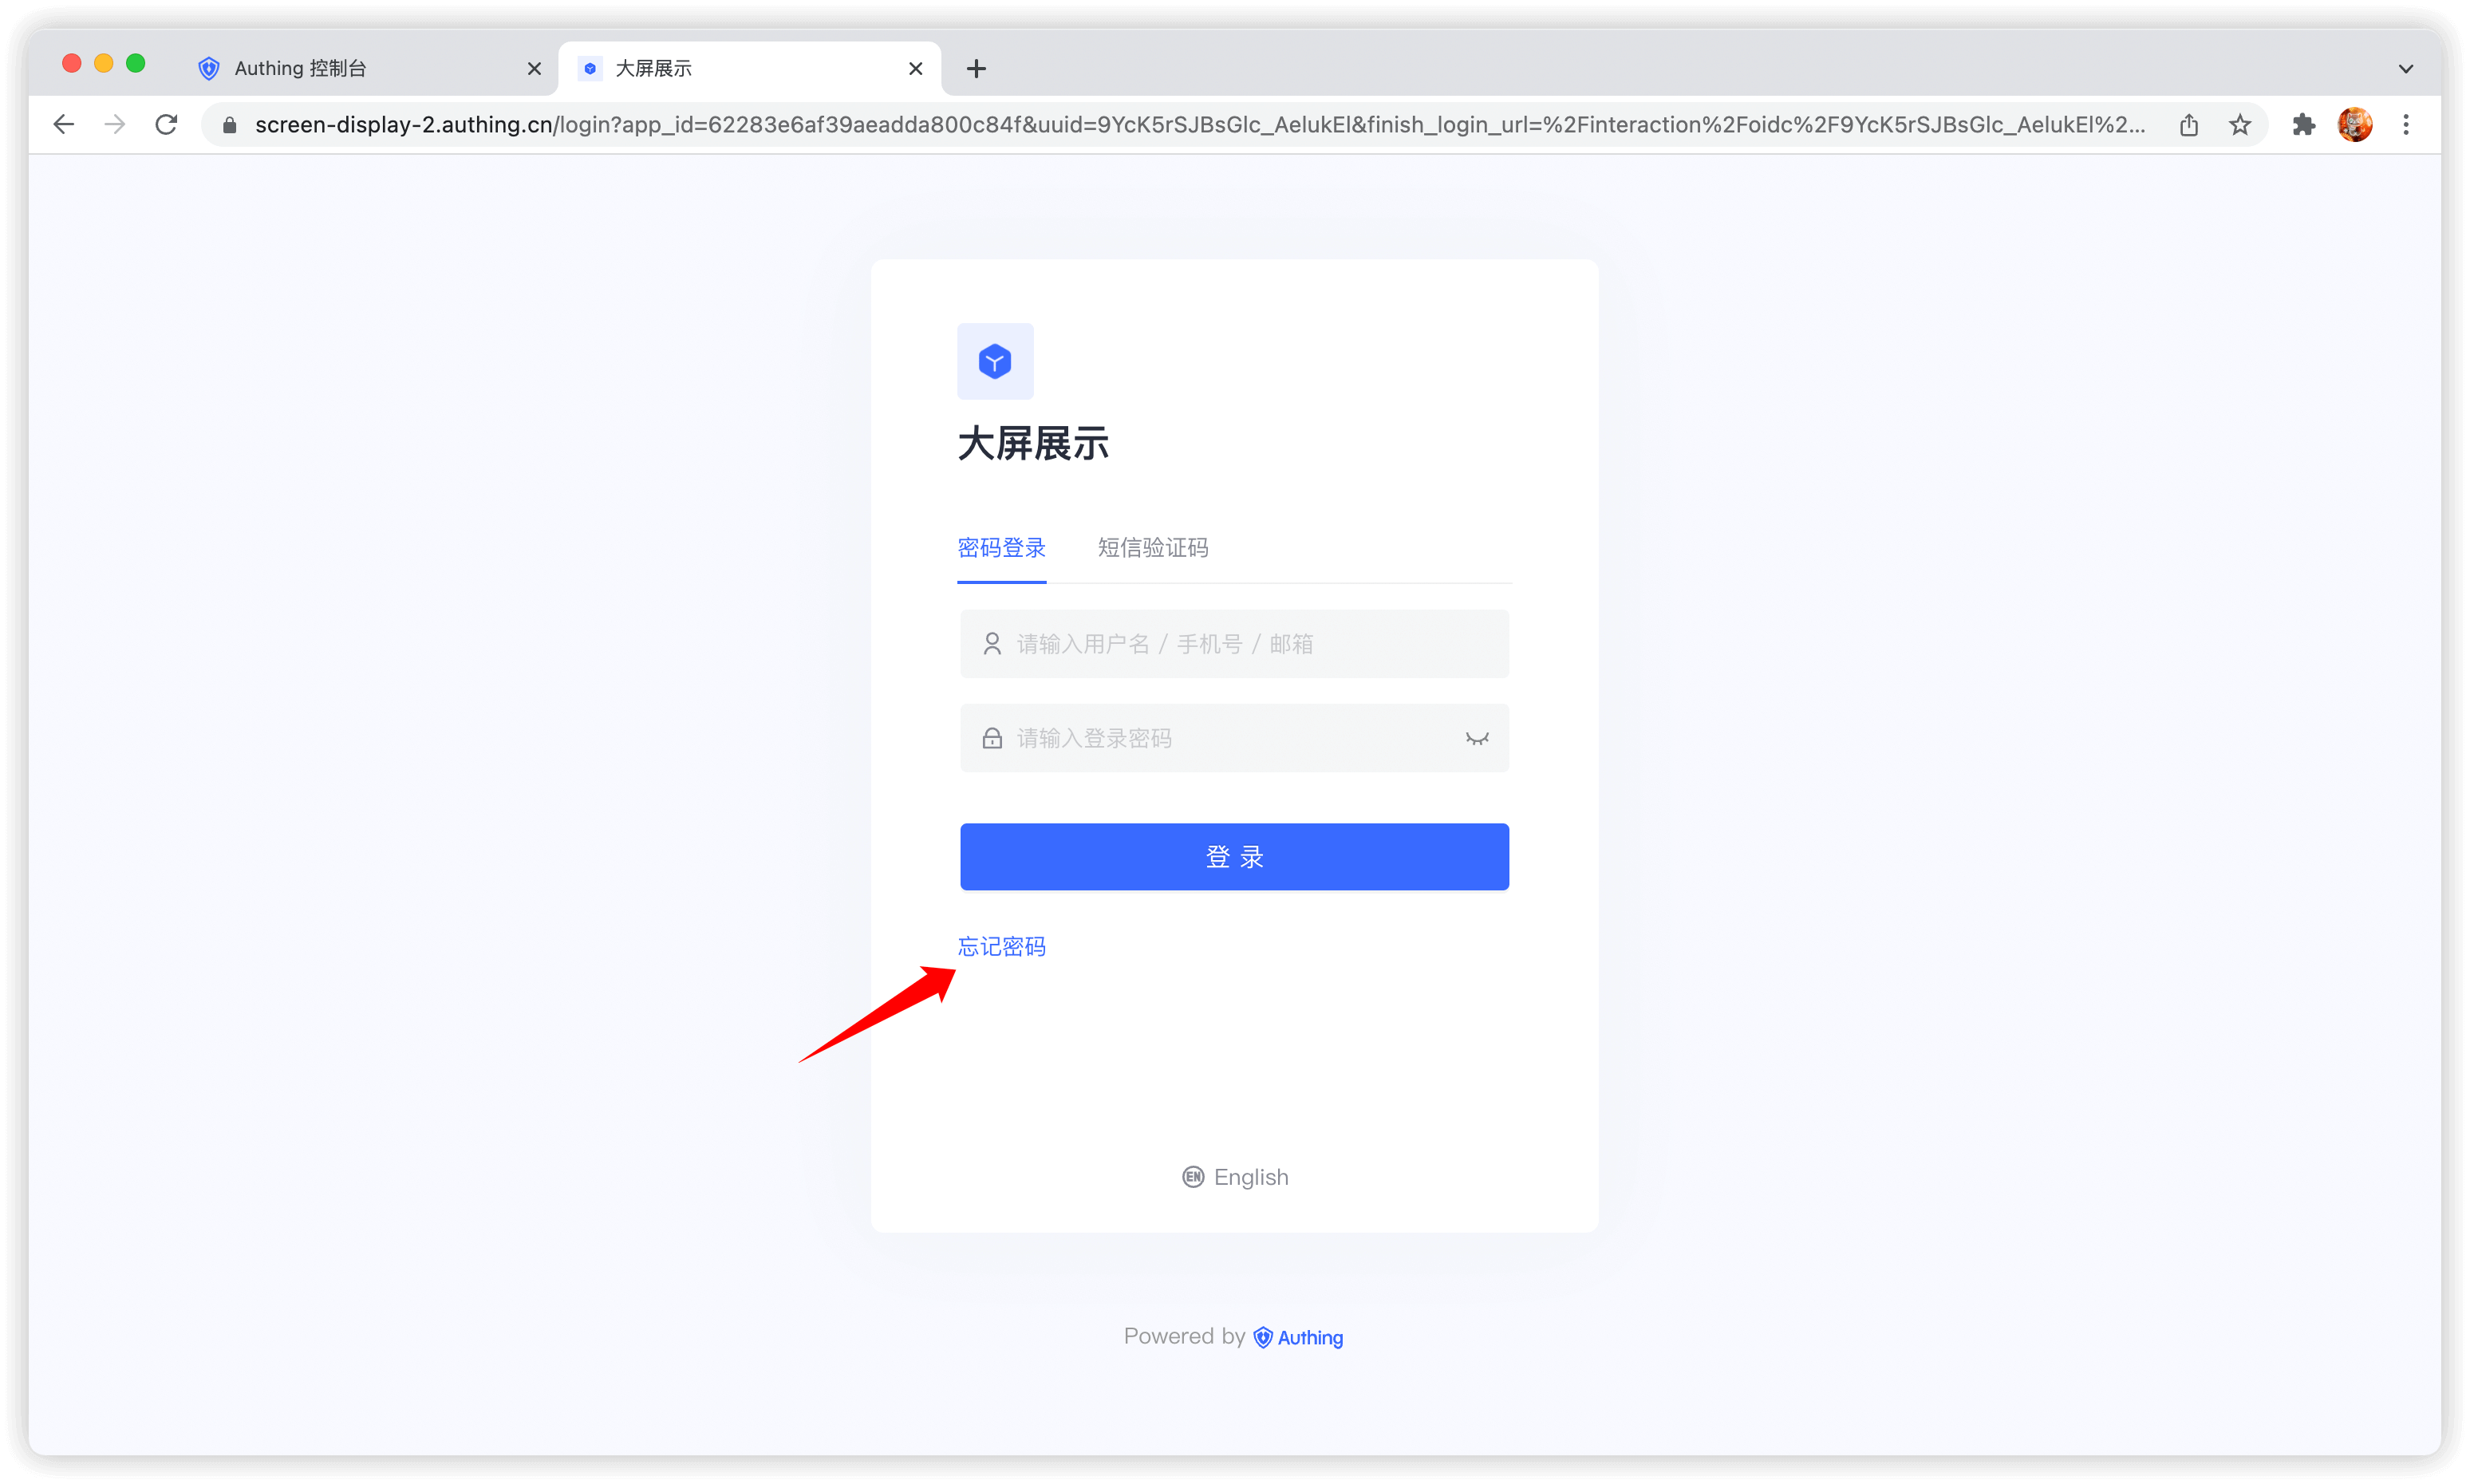
Forgot password
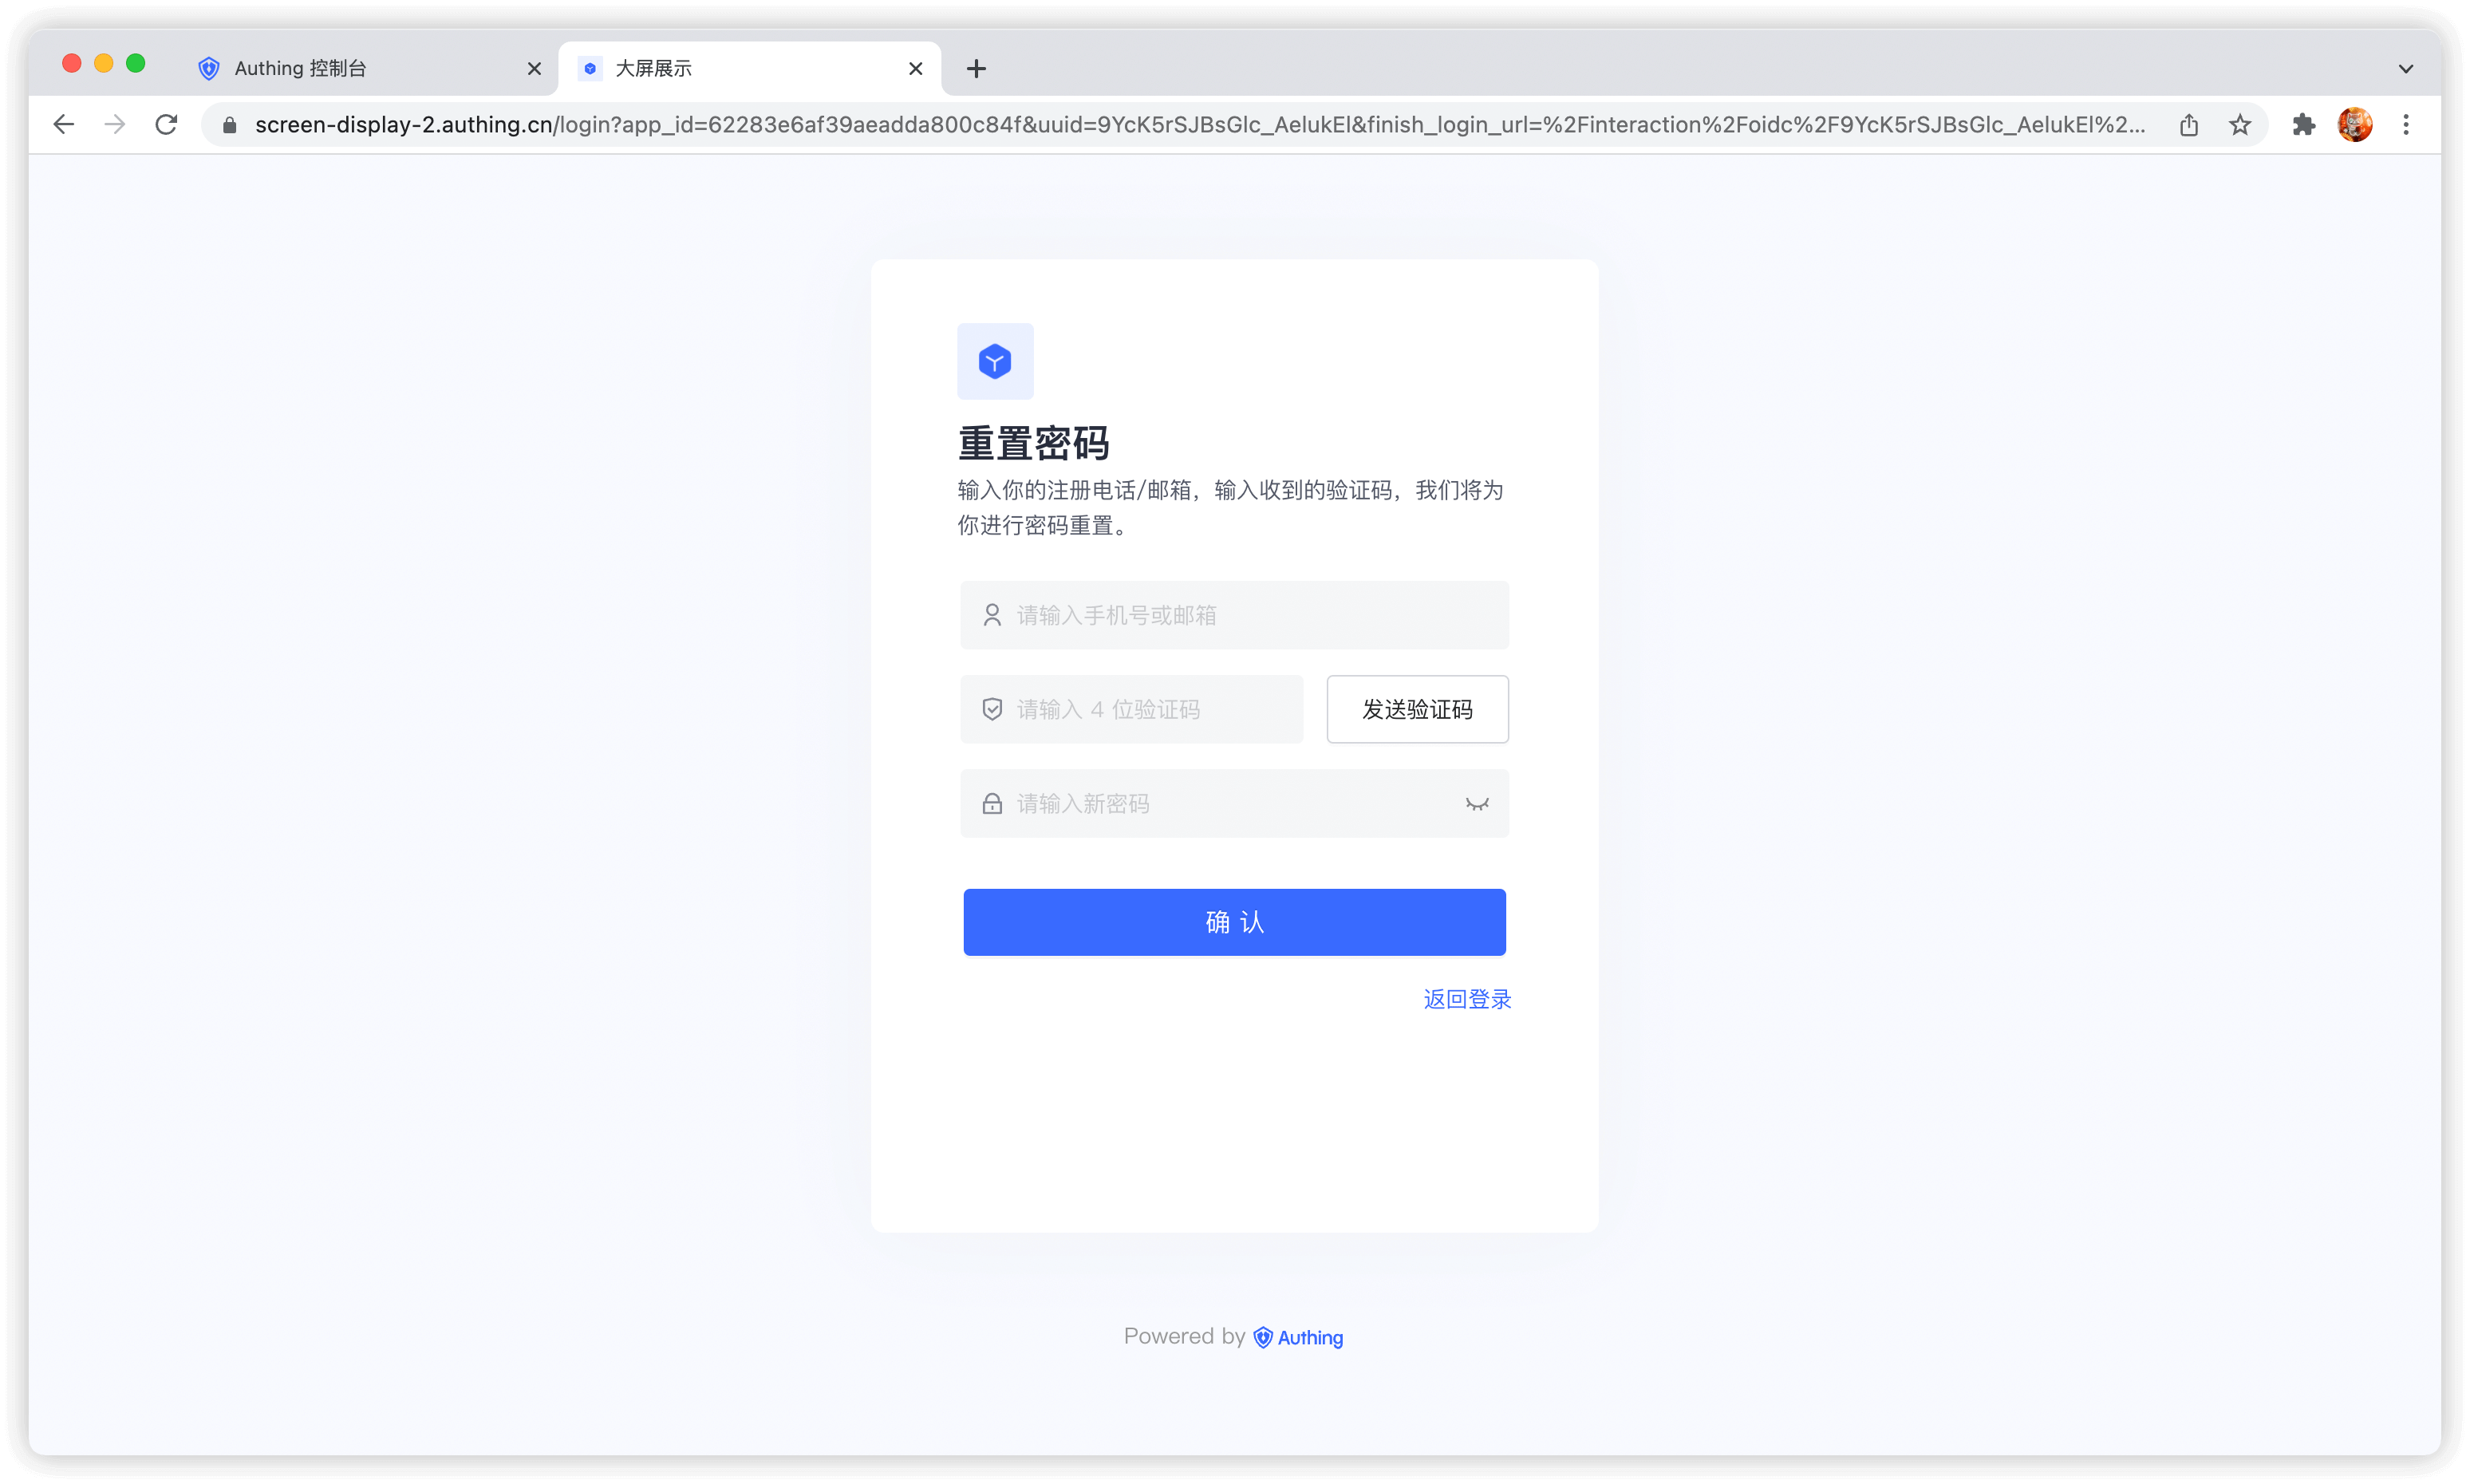
When the user forgets the current password, he can reset the password through the following process:
Click Forgot password
You can choose to use email or mobile phone number for verification:
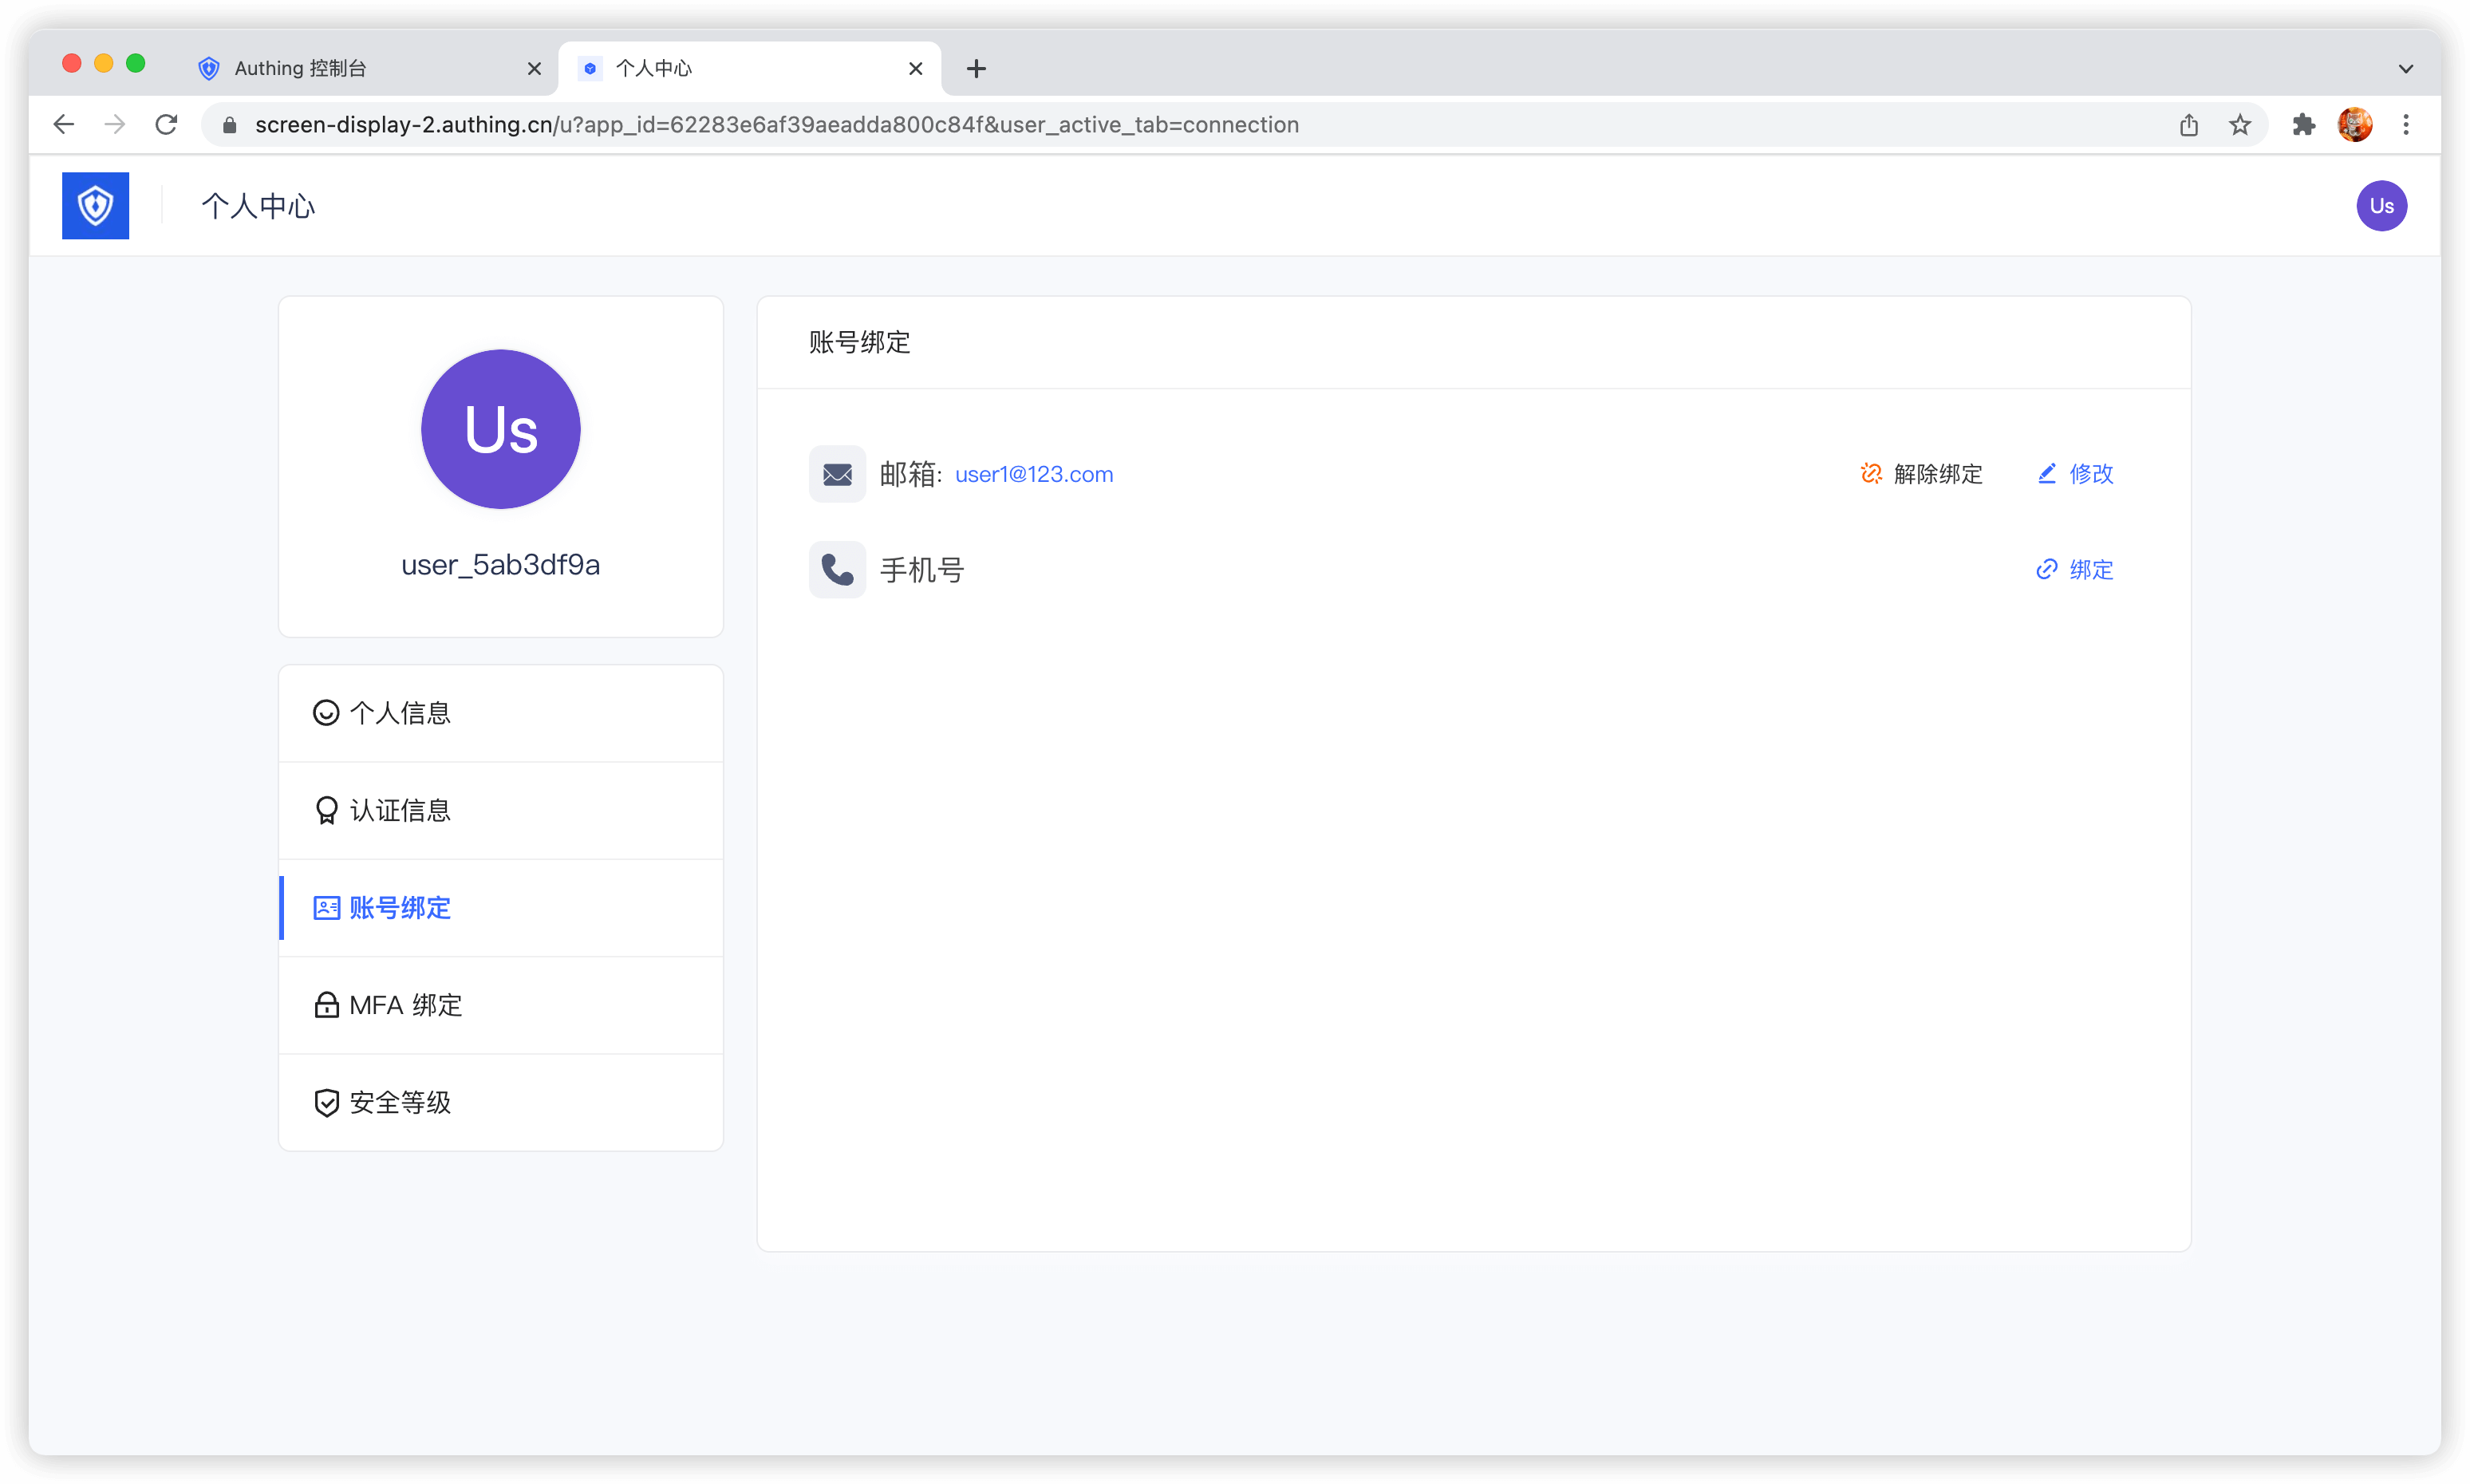
Bind email and mobile phone number
Terminal users can use the Account Binding Tab in the Personal Center Bind and unbind email or phone number in:
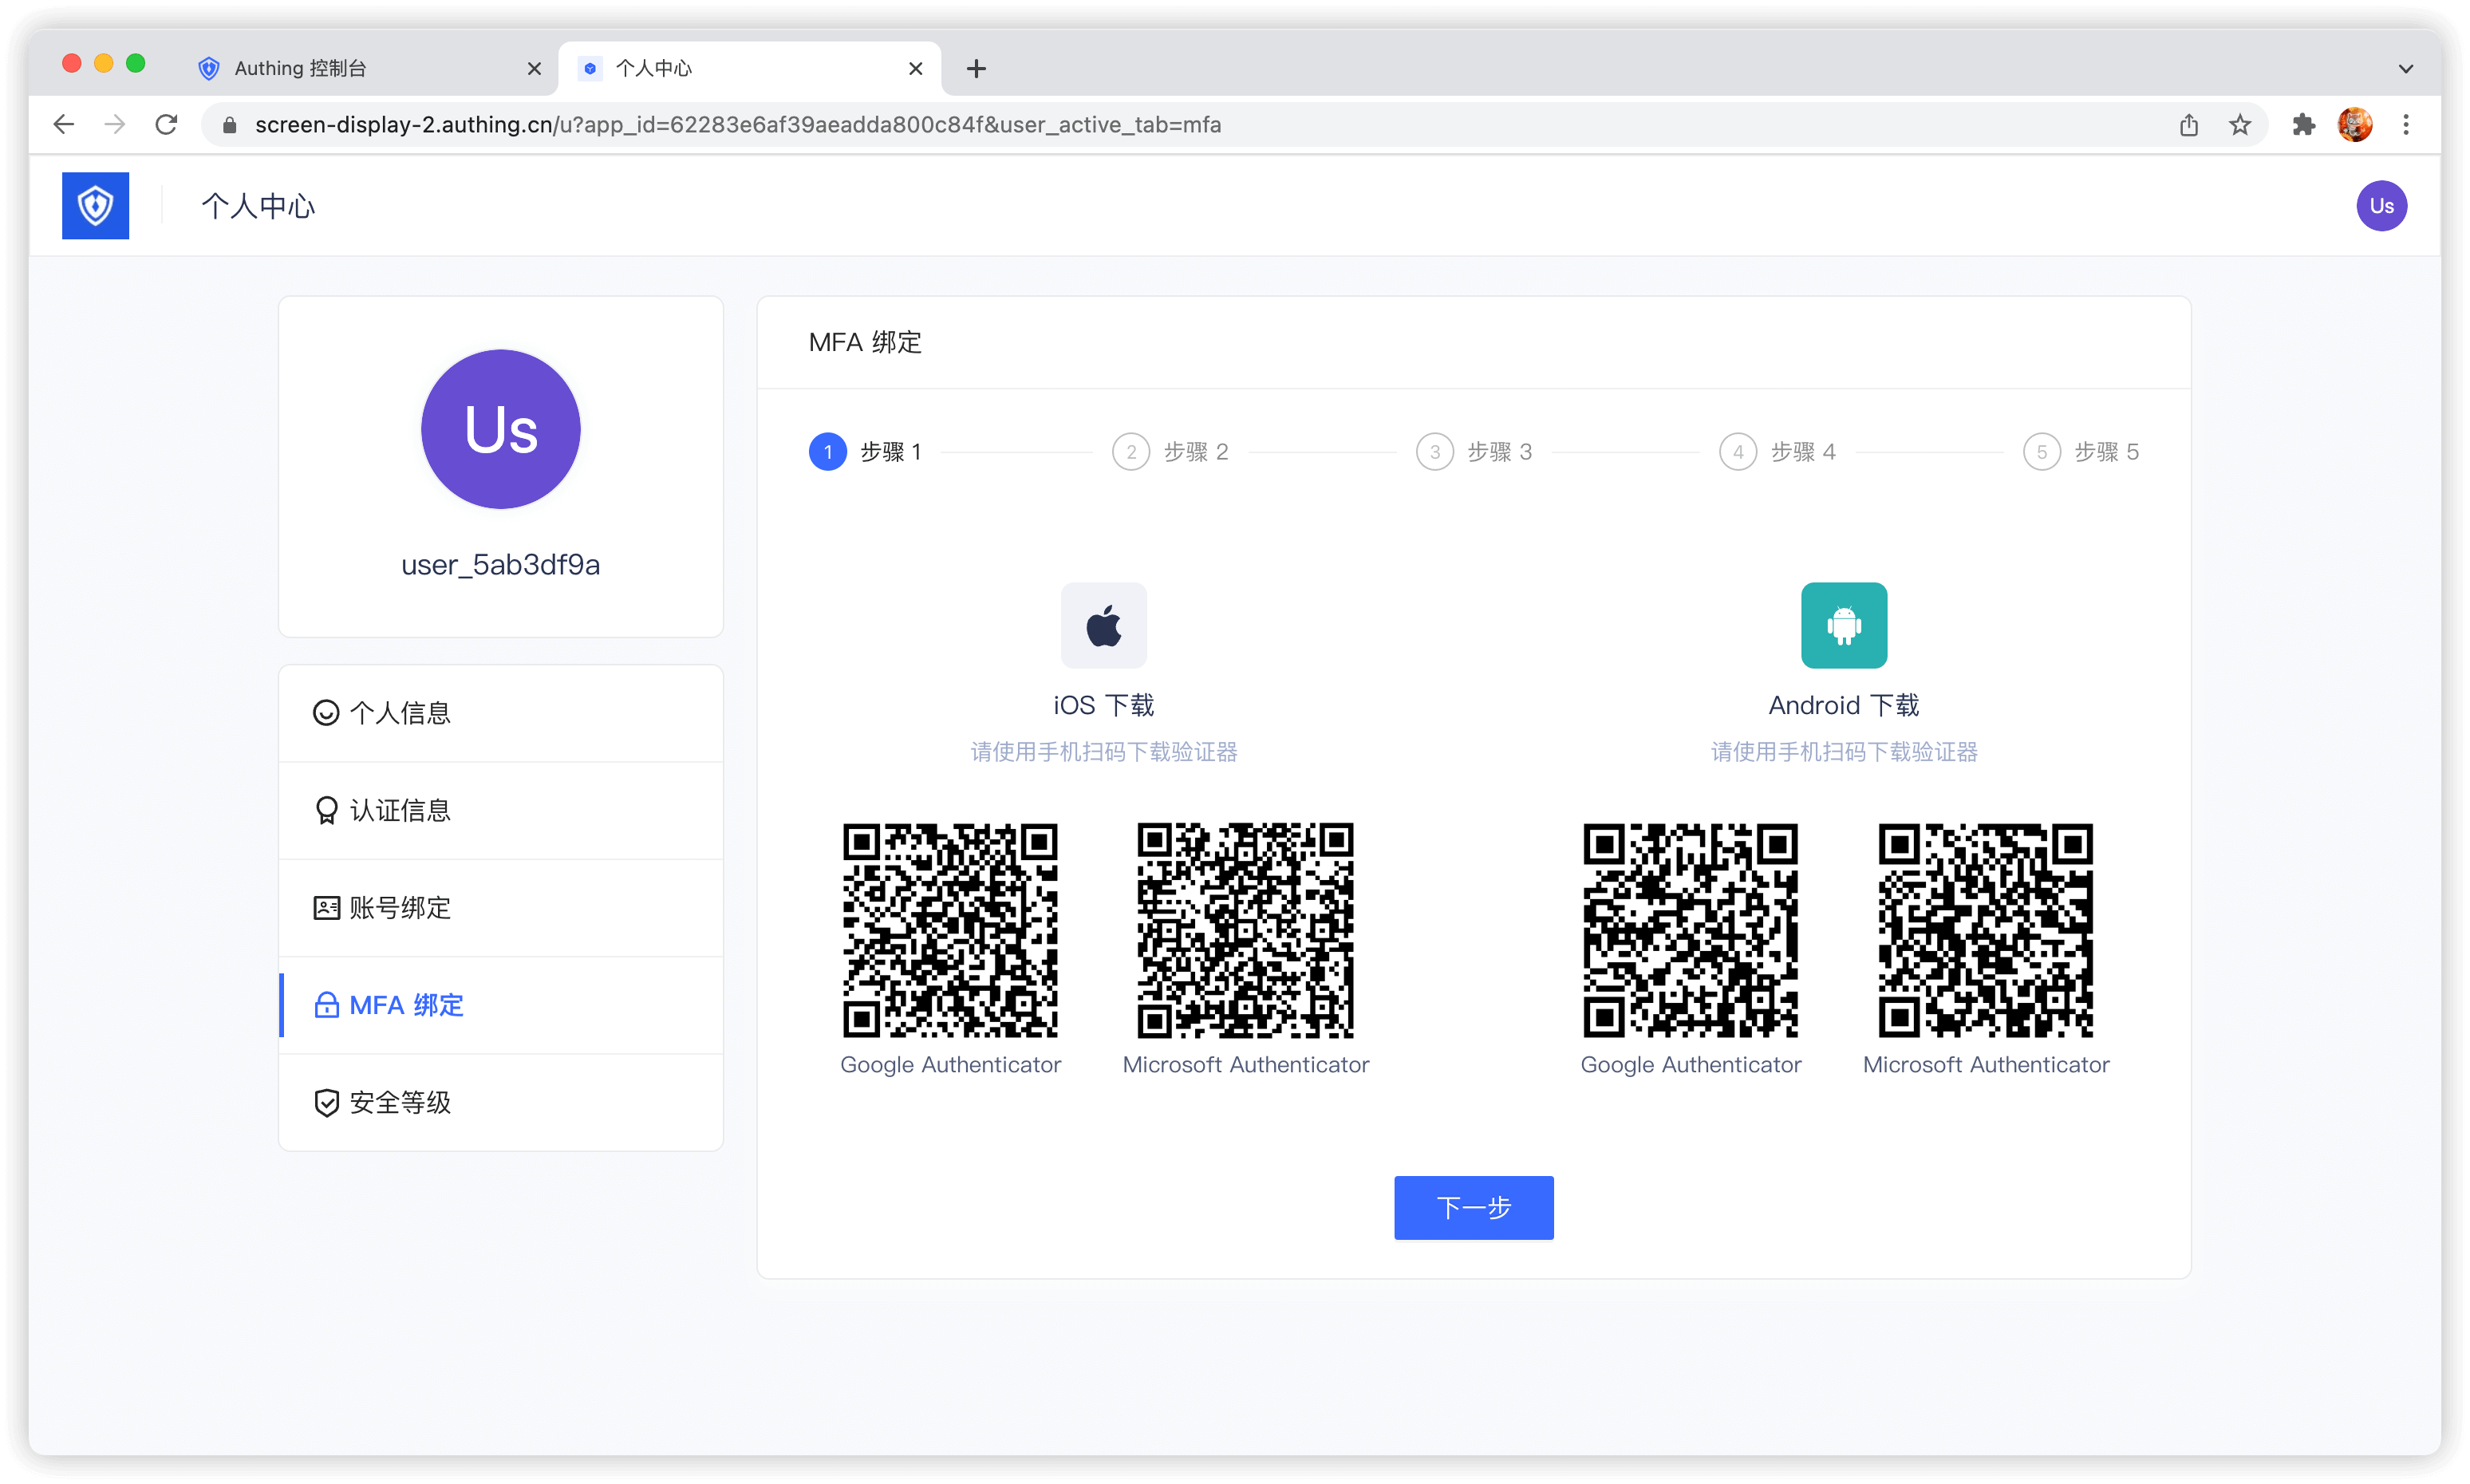
Bind MFA
End users can bind MFA in the MFA Bind Tab in the Personal Center:
Use the console
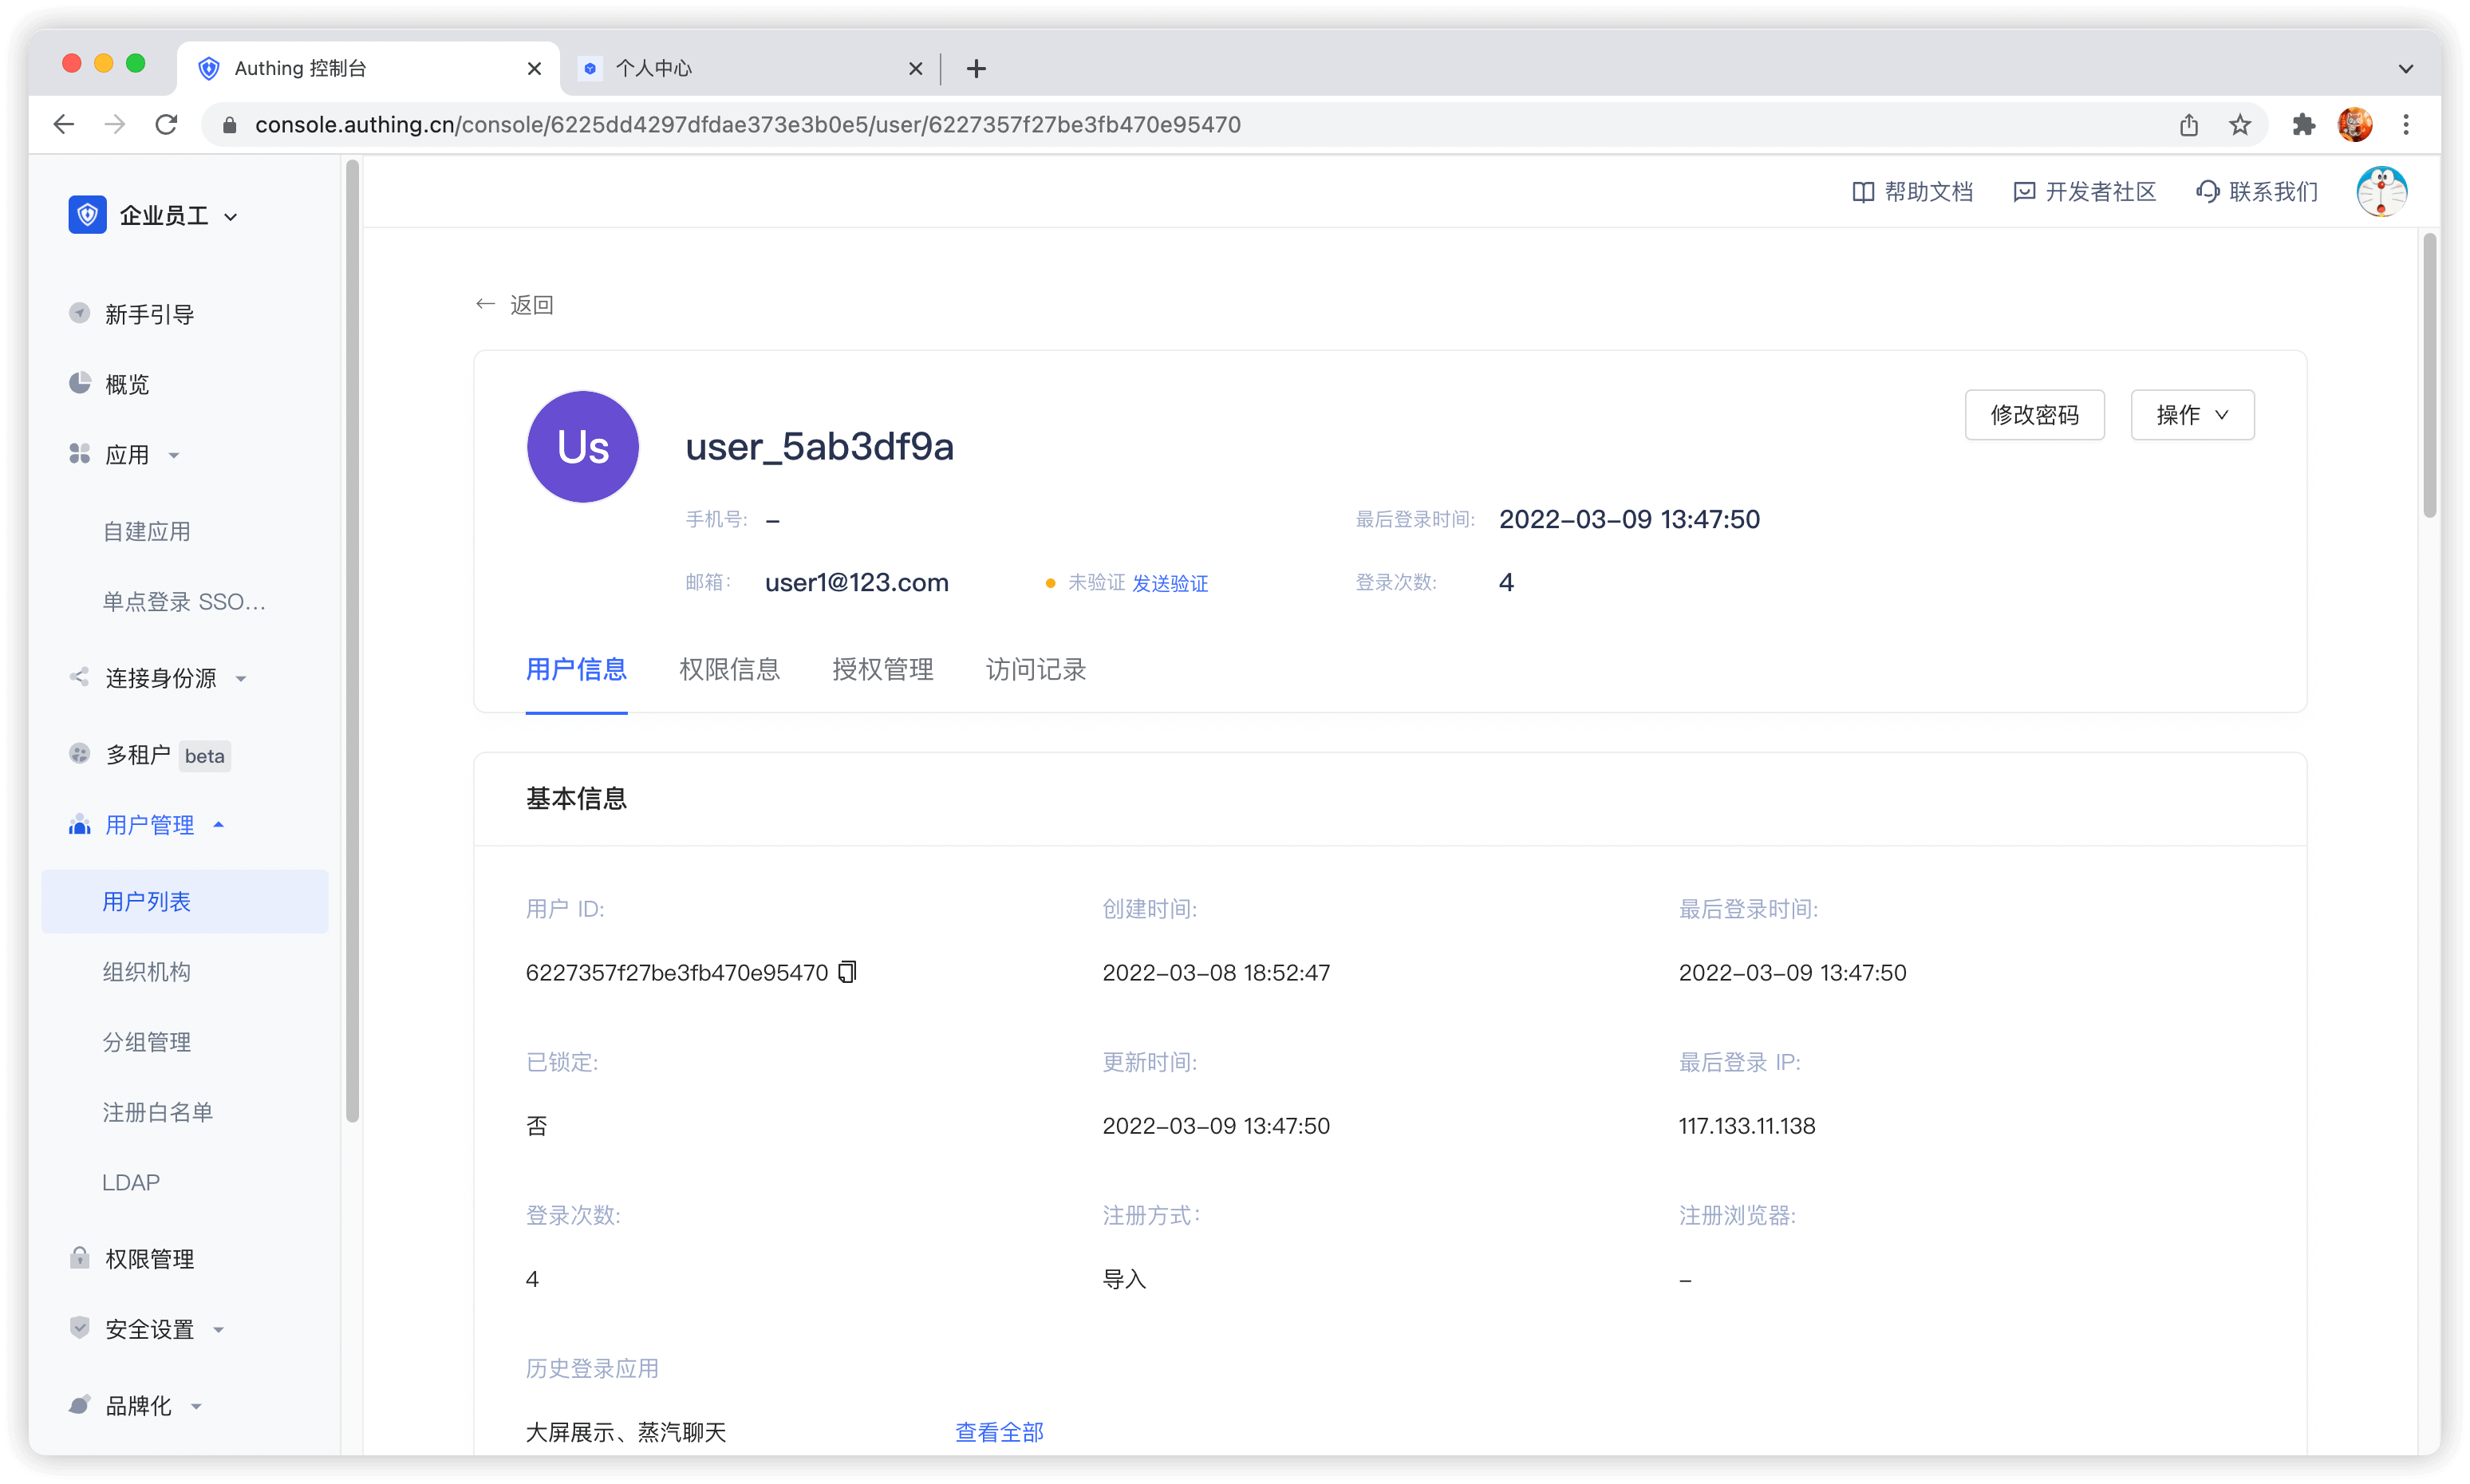
Administrators can use the console to visually manage user accounts.
Edit user information
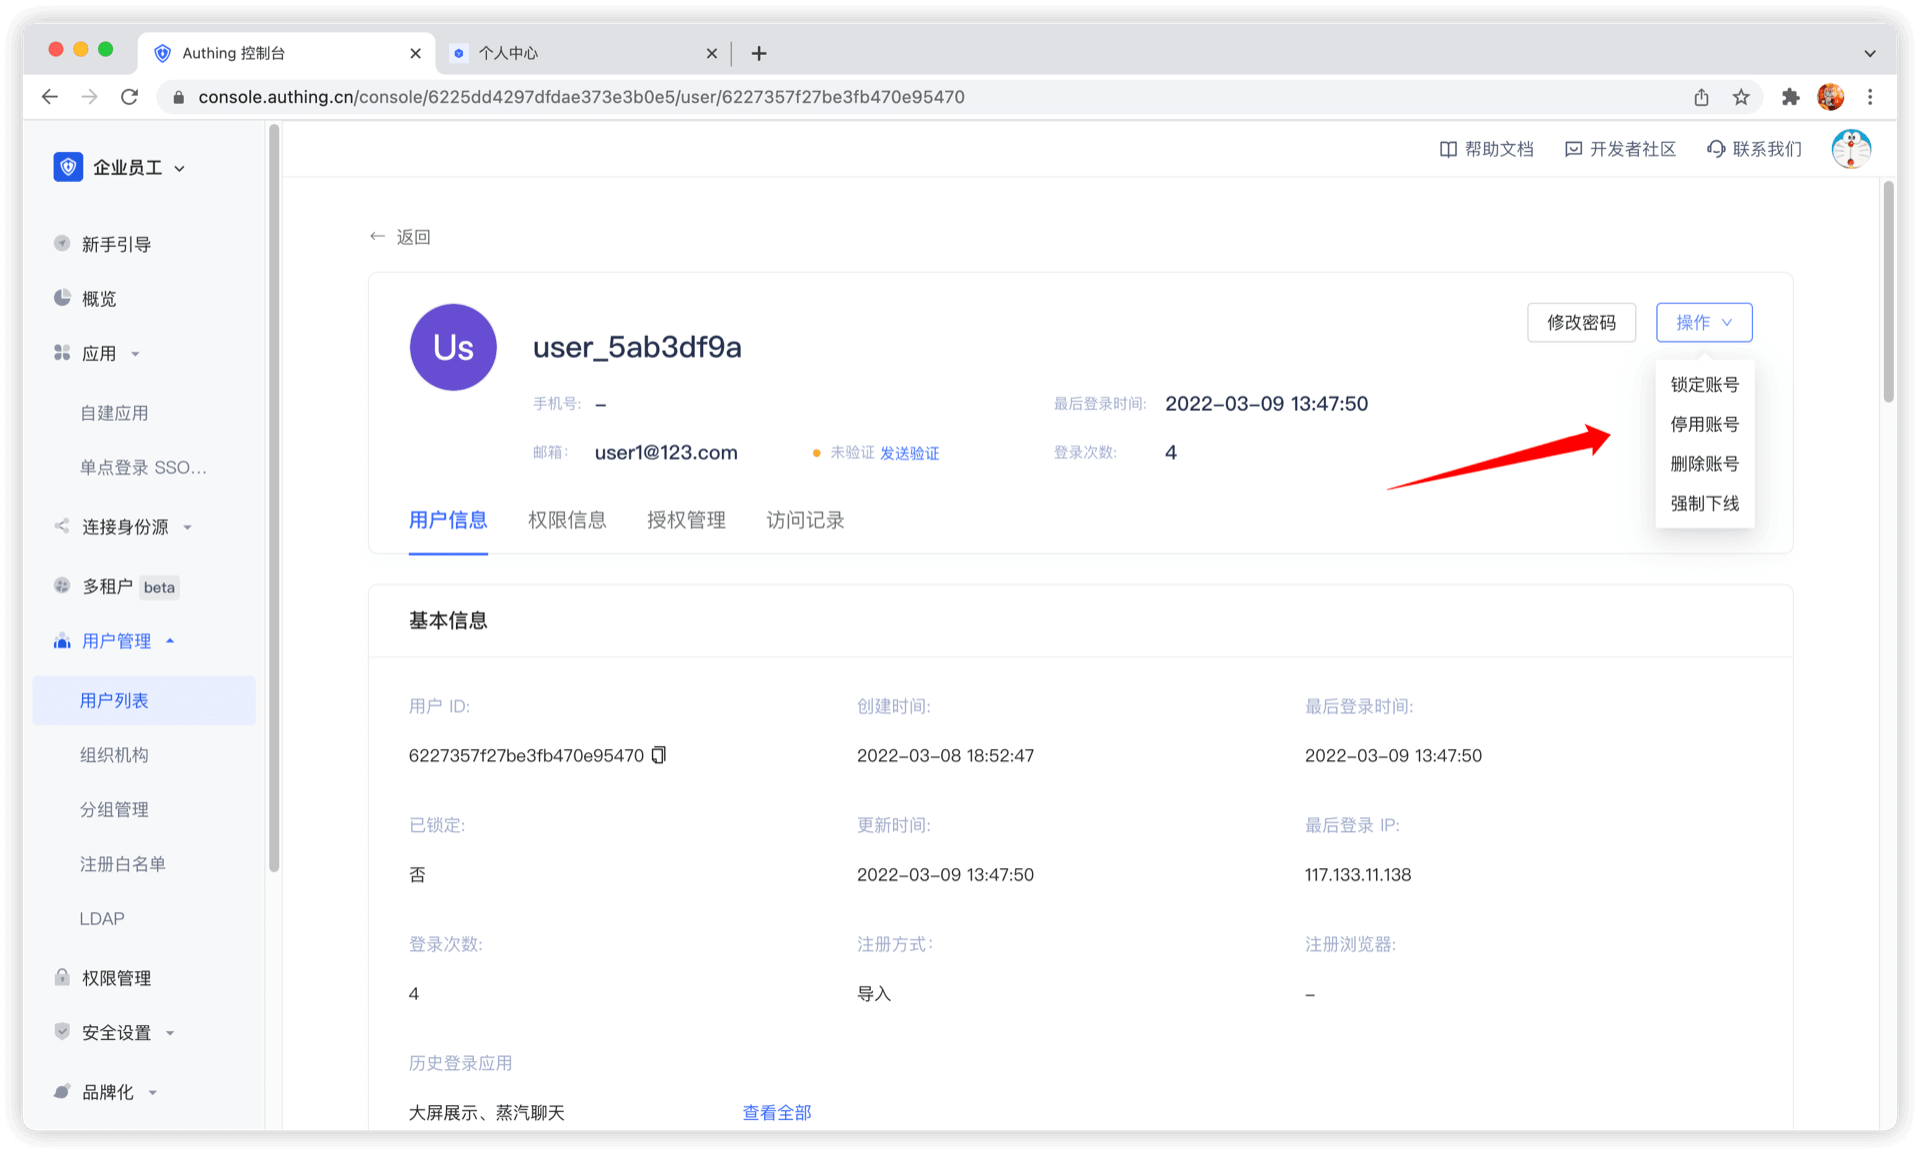
Disable account
Administrators can disable accounts on the user details page. Disabled accounts will not be able to log in again:
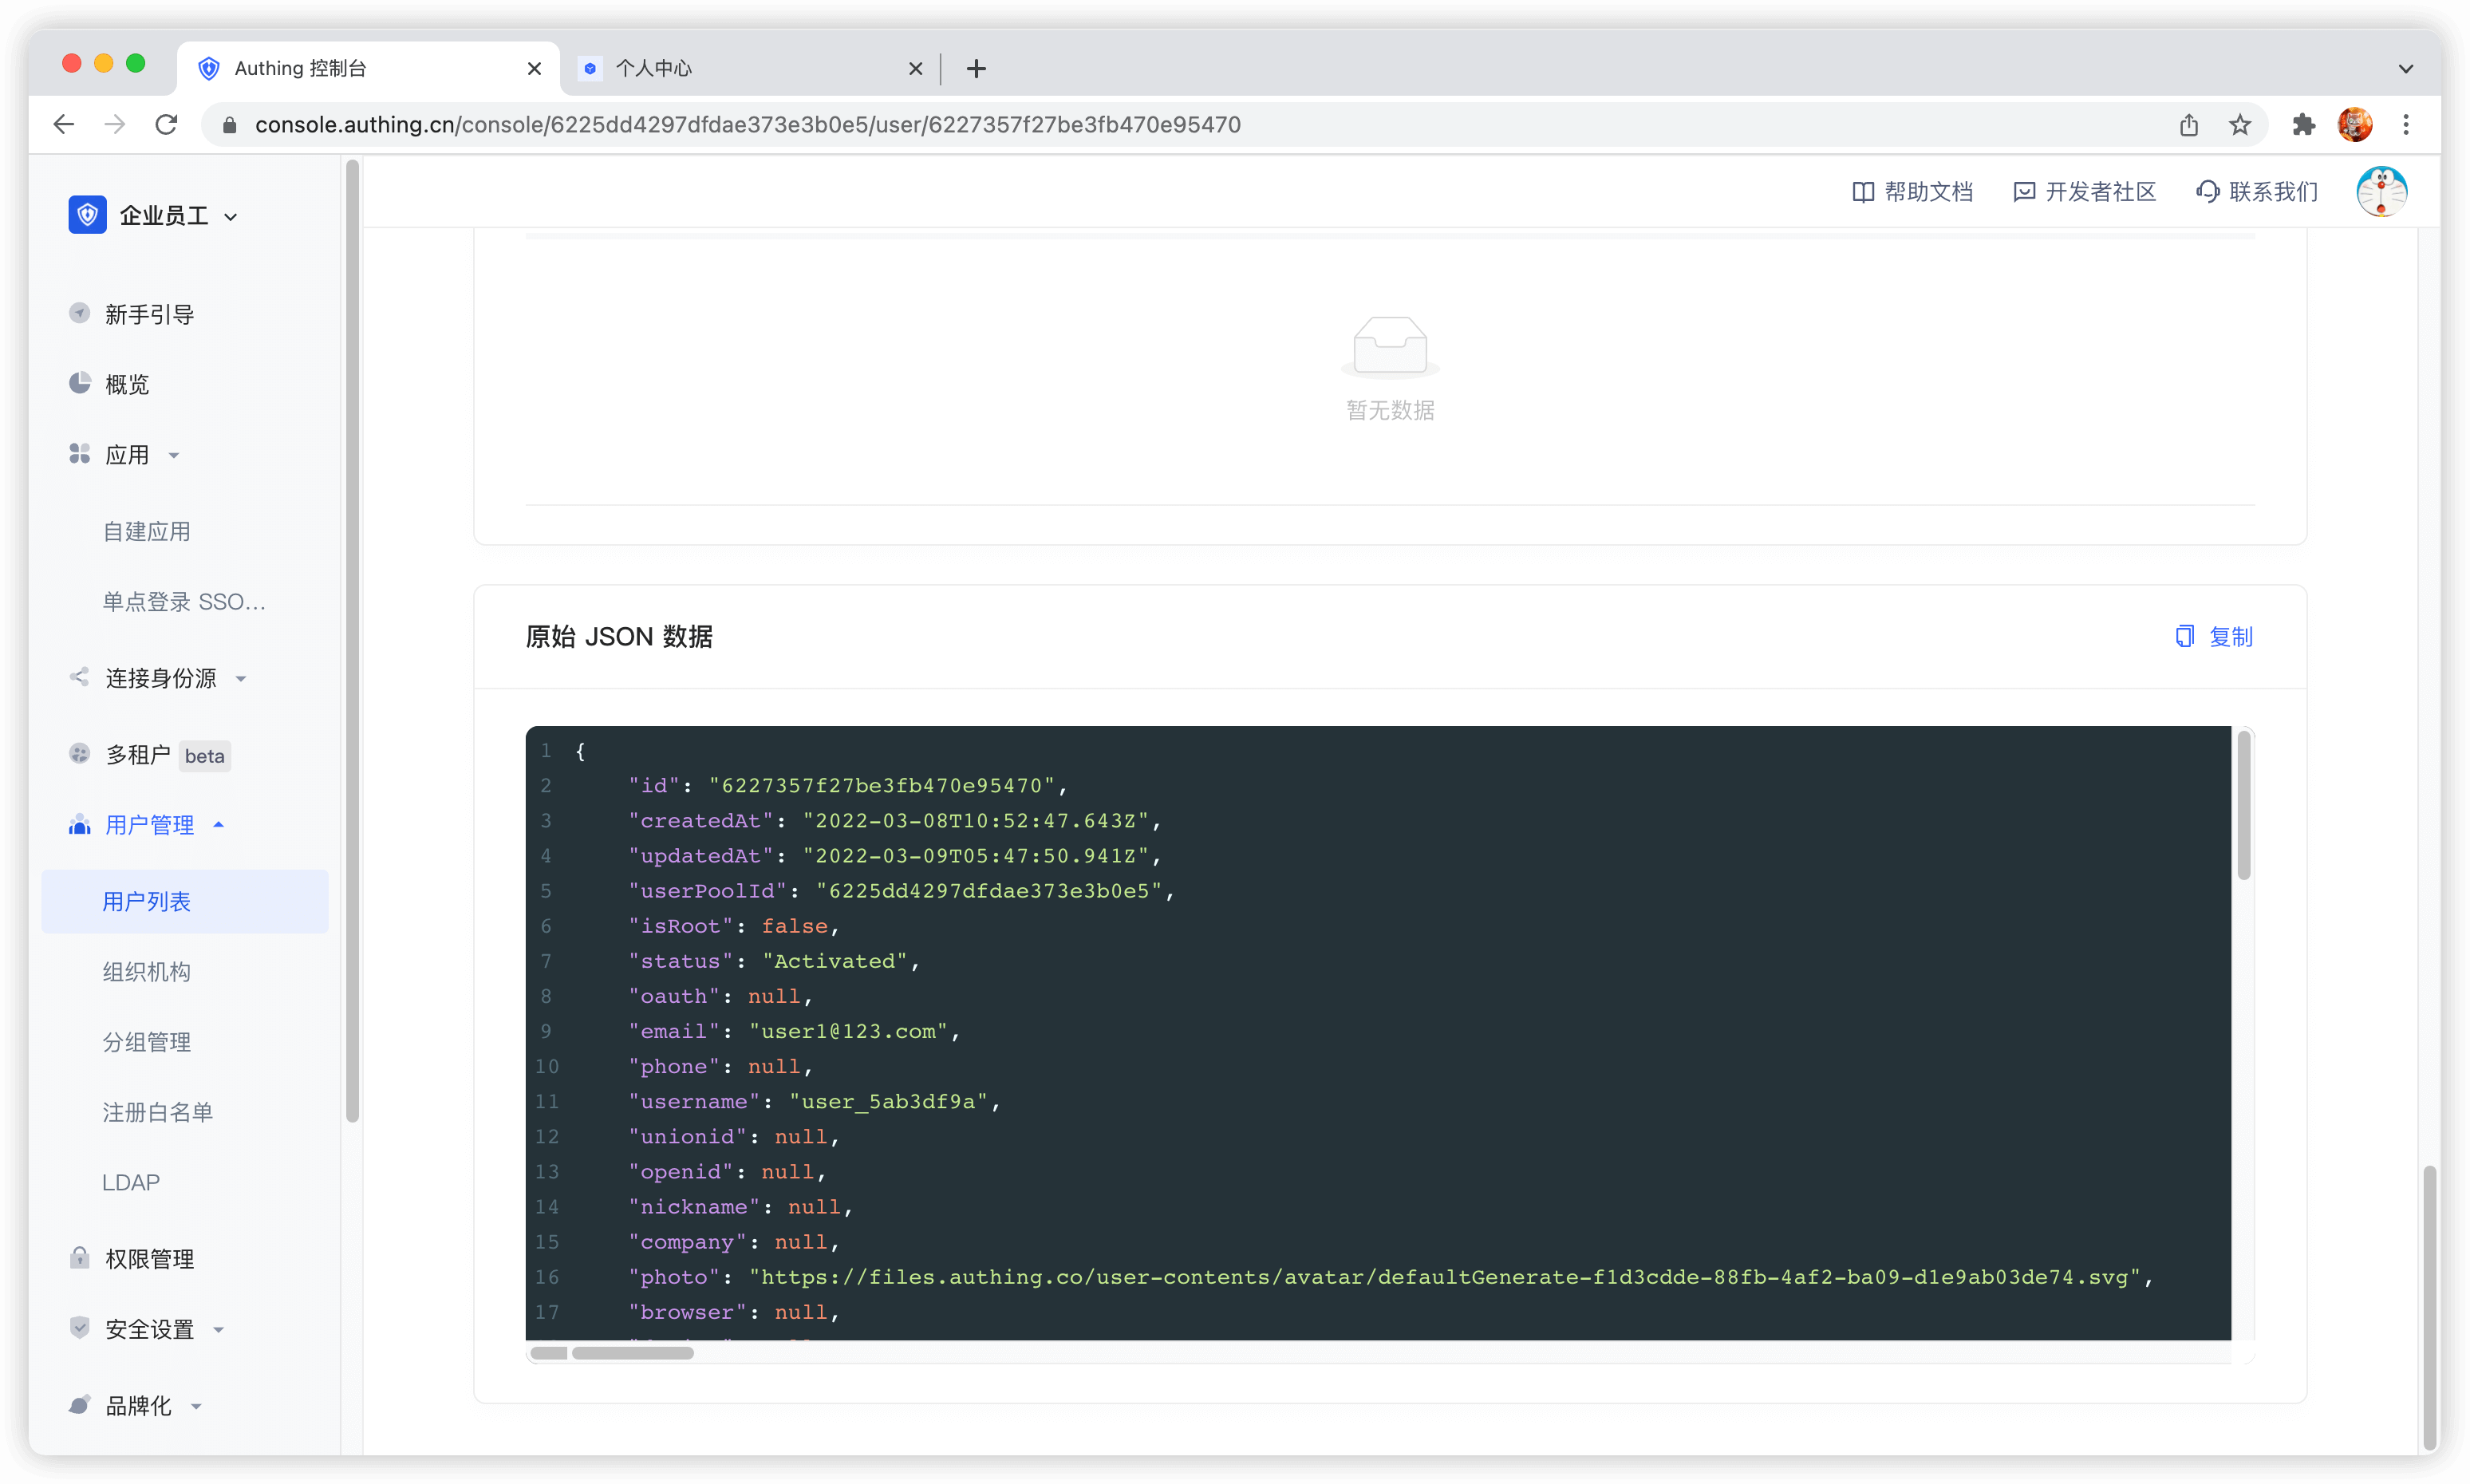
View raw user information
Use SDK/API
GenAuth provides Authentication SDK/API and Management SDK/API. You can use Authentication API and complete user self-service personal account information management. Use Management SDK/API to manage user information as an administrator. Operations performed as an administrator do not require verification methods such as mobile phone number verification code, email verification code, MFA, etc.
GenAuth supports SDKs in multiple programming languages including Java, JavaScript/Node.js, Python, PHP, C#, Swift, Go, Ruby, WeChat Mini Program, etc. You can choose the SDK you are familiar with:
Bind account
You may encounter such a scenario: your user registered an account with a mobile phone number and registered another account with WeChat. Now you want to bind the WeChat account to the mobile phone account, so that when the user logs in with WeChat in the future, he will log in to the mobile phone account and return the information of the mobile phone account.
You can bind the user's social account to his main account (mobile phone, email account) by calling the following interface:
https://core.genauth.ai/api/users/linkBind social account to main account
If you want to bind a social account to a main account, the end user must provide the credentials of the social account and the credentials of the main account to prove that he is the owner of these two accounts, and then bind them.
Headers
| Name | Type | Description |
|---|---|---|
Content-TypeREQUIRED | string | application/x-www-form-urlencoded |
Form Data Parameters
| Name | Type | Description |
|---|---|---|
primaryUserTokenREQUIRED | string | Primary Account Token |
secondaryUserTokenREQUIRED | string | Social Account Token |
Response
{
  "code": 200,
  "message": "Binding Successful"
}
WARNING
After completing the binding of the social account, the data corresponding to the original social account will be deleted, and you will not be able to log in to the original social account again.
Manage user custom data
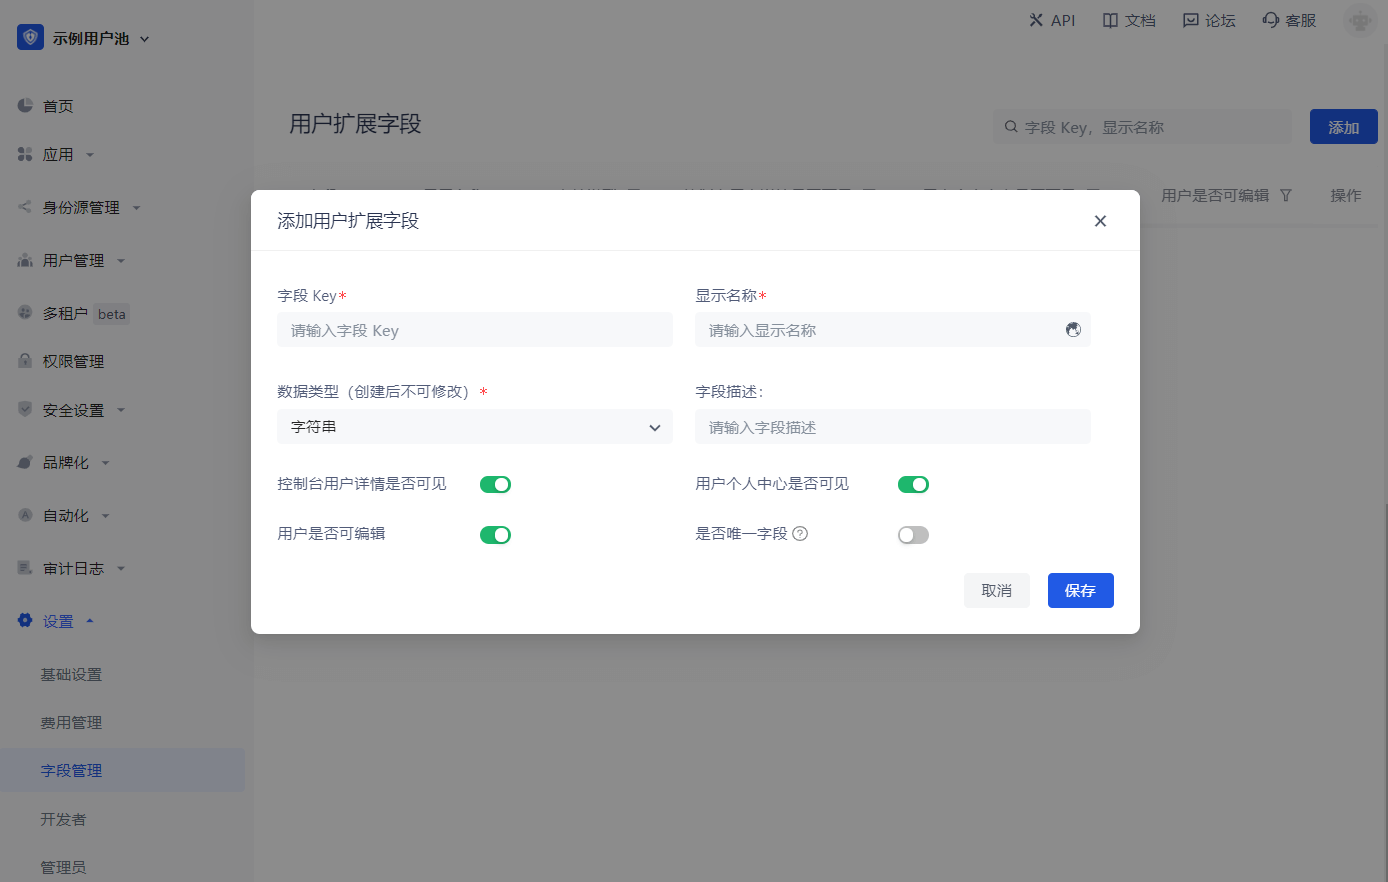
Path: Settings->Field Management->User Field Management->User Extended Field
User custom fields are additional fields that can be added to user objects in addition to basic user fields. Developers can store a small amount of business-related data by setting custom fields.
Configure custom user fields
You can define the following types of custom fields:
- String;
- Numeric;
- Date;
- Boolean;
- Enumeration;
- Create custom extended fields
You can configure custom user fields in the Add user extended field window:
When naming a newly created custom field, you can edit the display name of the field in multiple languages:
- Edit directly in the input box under "Display name" to get the default displayed field name
- Check "Chinese" and edit the field display name in the Chinese environment
- Check "English" and edit the field display name in the English environment
- Check "Traditional" and edit the field display name in the Traditional Chinese environment
- Check "Japanese" and edit the field display name in the Japanese environment
In particular, if the display environment of the field is not included in the range of the above four language environments, the "default displayed field name" you configured will be used for display. 
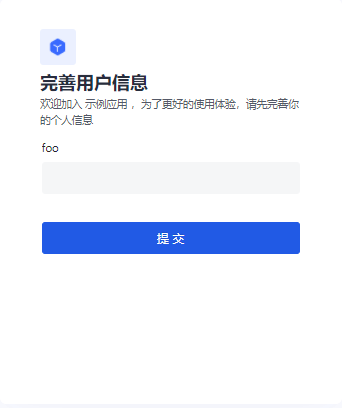
After configuring custom fields, you can open the registration information completion page of the application and let users complete the information of these custom fields.
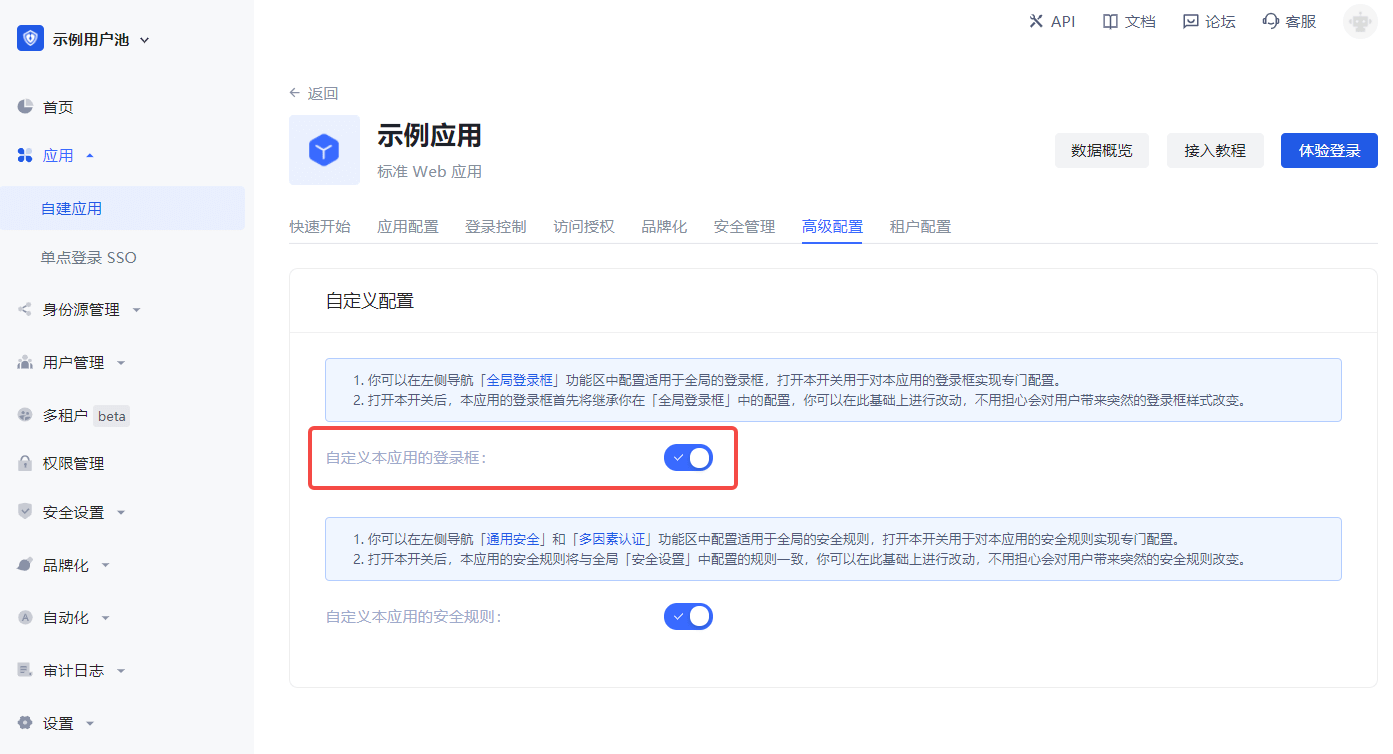
a. In Application->Self-built application->Application details page->Advanced configuration tab, turn on the Customize the login box of this application switch.
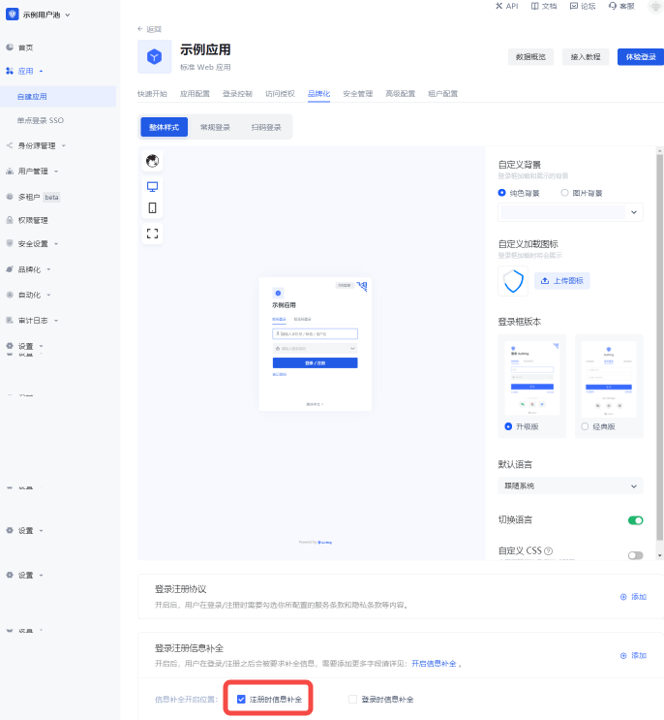
b. Then switch to Branding and check the Complete information during registration switch in the Login registration information completion module.
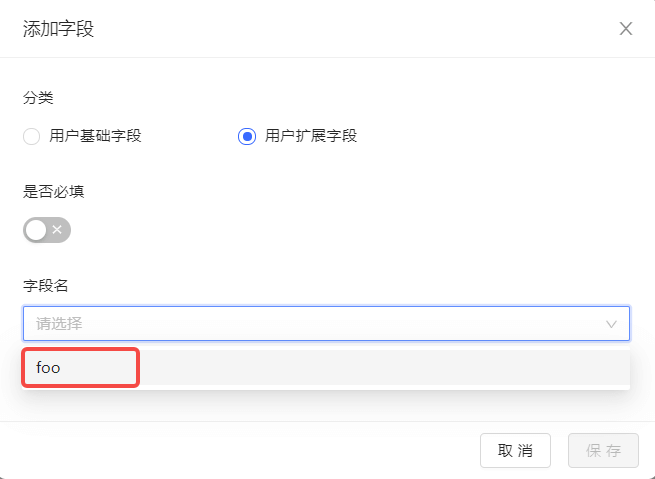
c. Add custom fields:
d. Click Save.
Visit the app's login page. After the user clicks register, he will jump to the following registration information completion page:
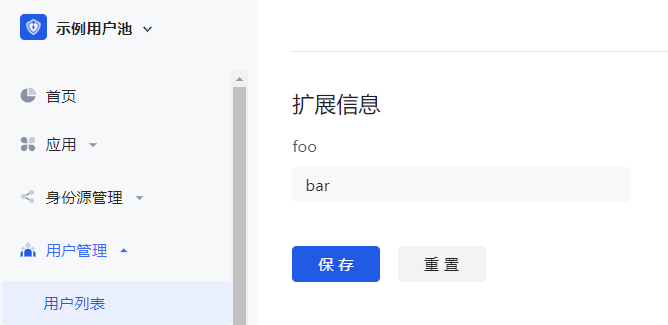
After the user successfully registers, you can see the custom field value just entered by the user on the user details page:
Use API & SDK to manage user custom data
GenAuth supports SDKs in multiple programming languages including Java, JavaScript/Node.js, Python, PHP, C#, Swift, Go, Ruby, WeChat Mini Program, etc. You can choose the SDK you are familiar with:
udfCode snippet: udf
View the user's login history
You can view the user's historical access records on the User Details page:
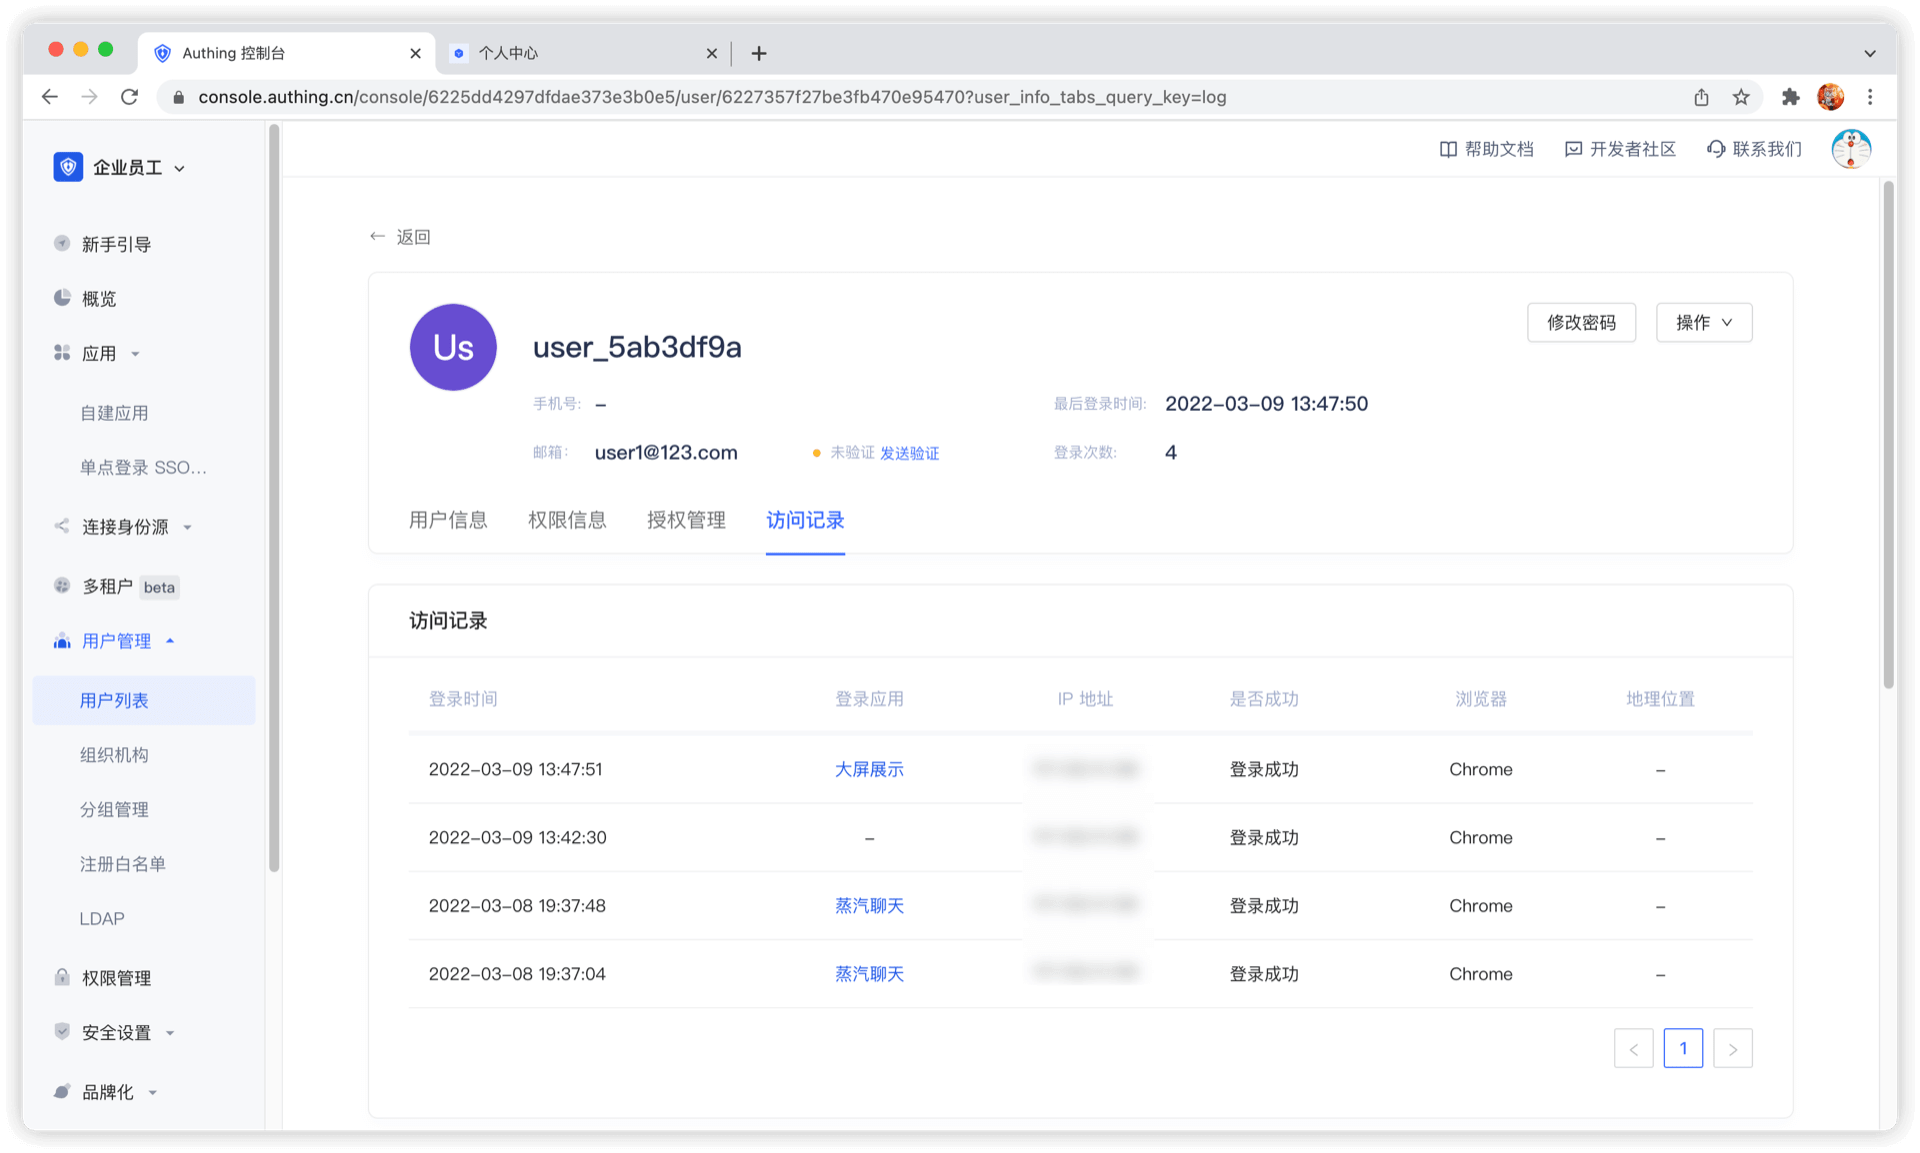
You can view login time, login application, IP address, login success, browser, geographic location and other information.
View the user's geographic location
You can view the user's most recent login location on the User Details page:

Enhance Account Security
The security of user accounts is extremely important. You can enhance the security of user accounts in the following ways.
Configure a stronger password
You can configure the password strength in the Security Settings->Password Security page. After setting the password strength, the system will require all users to register and modify their passwords to meet a certain complexity.
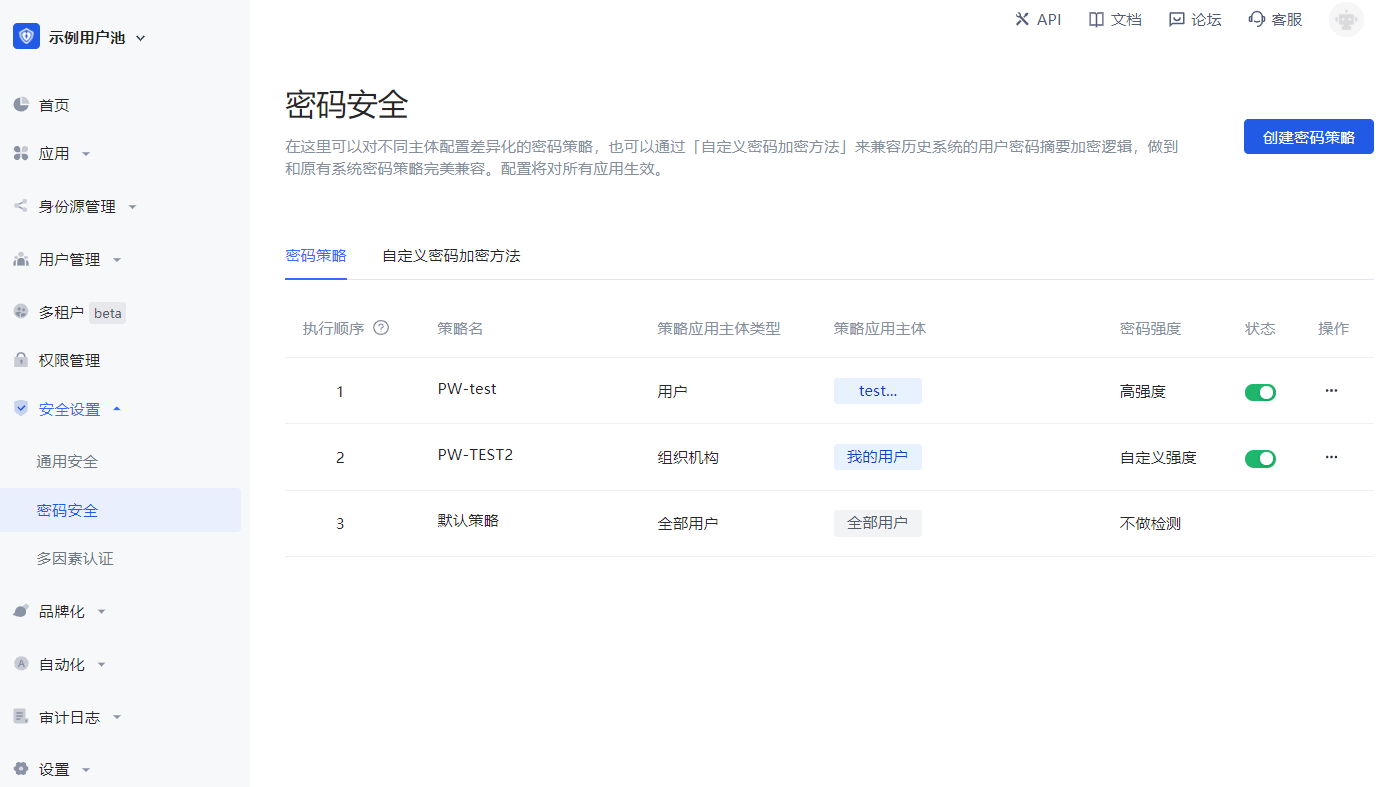
A highly secure password can make the account more secure. It is recommended that users change their passwords regularly.
Bind a mobile phone number
After binding a mobile phone number, you can use the mobile phone verification code to log in without entering a password, which is safer and more convenient. End users can bind their mobile phone numbers in the application personal center (address is https://<YOUR_APP_DOMAIN>.genauth.ai/u), or you can use [SDK](https://docs.genauth.ai/reference/sdk-for-node/authentication/AuthenticationClient#Bind a mobile phone number) to operate.
Bind personal MFA
After binding personal MFA, users need to perform secondary verification when logging in, which can more effectively protect the user's account security. End users can bind MFA in the application personal center (address is https://<YOUR_APP_DOMAIN>.genauth.ai/u), or you can use SDK to operate.
Manage user login status
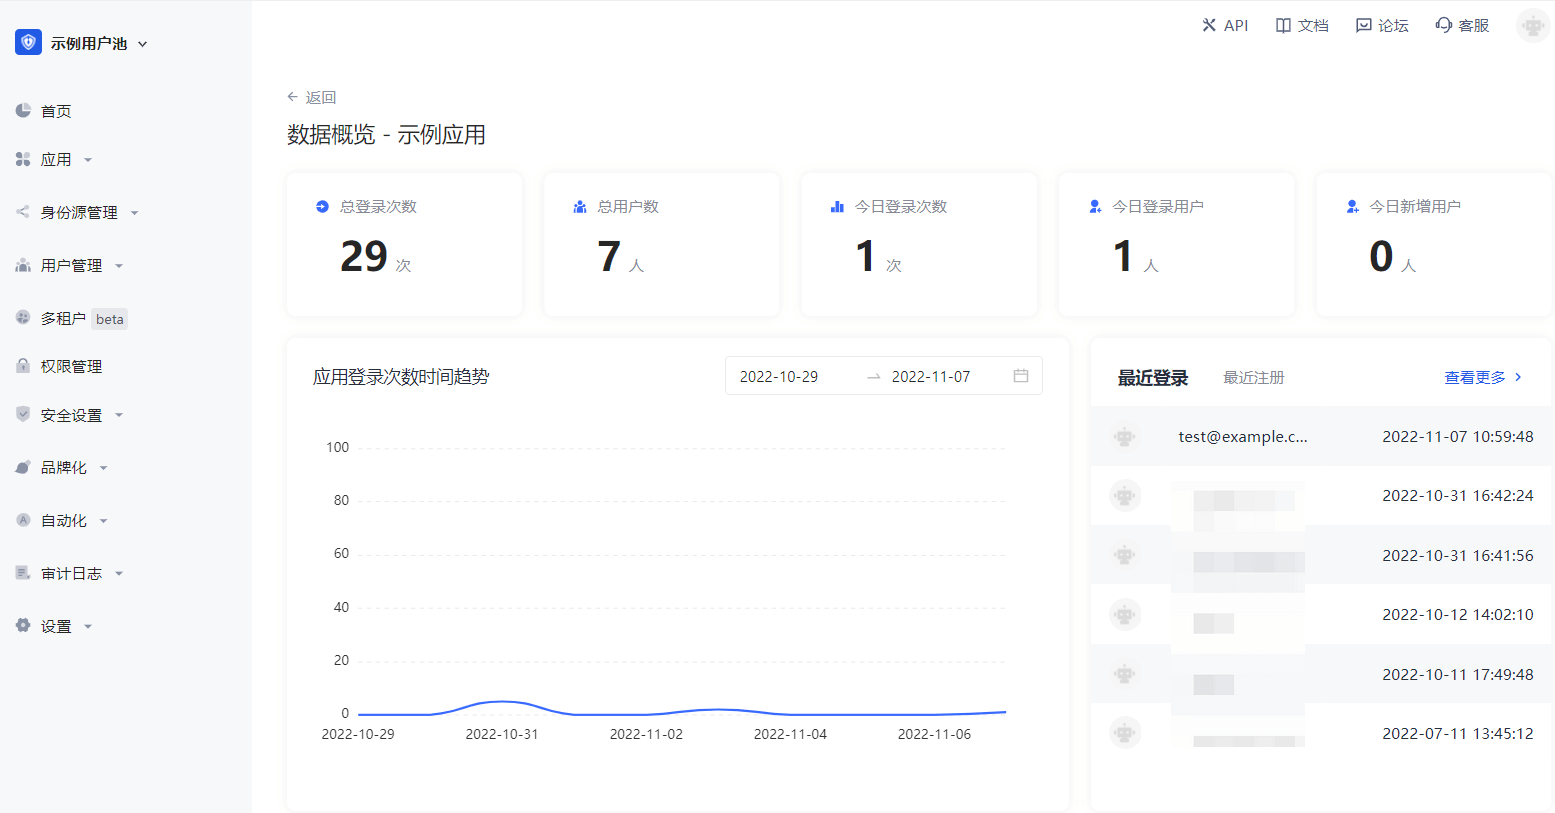
View currently logged in users
Path: Application->Self-built application->Application details page
You can click the Data Overview button in the upper right corner of the application details page to view all users currently logged in to the application, as well as their last login time and other information.
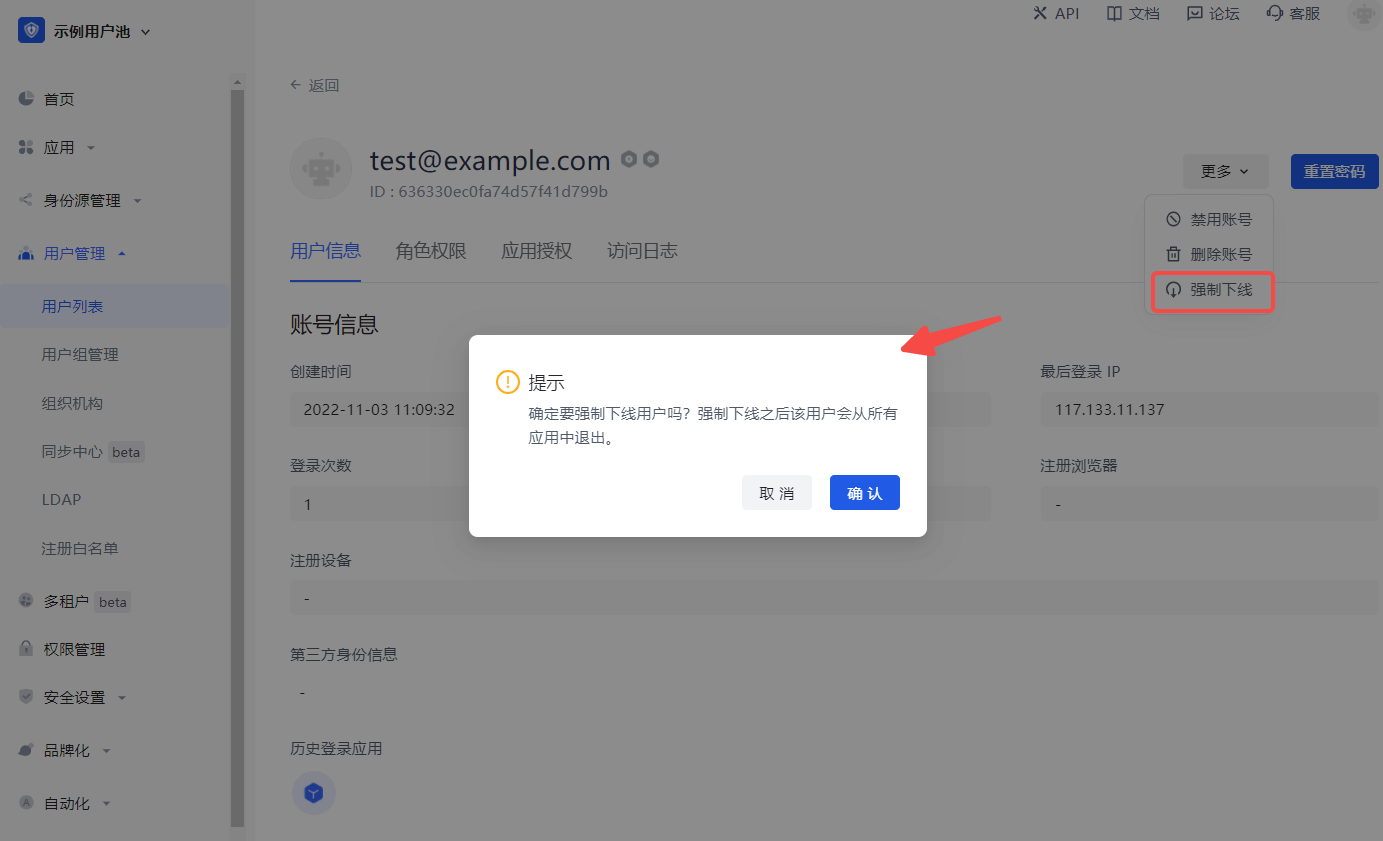
Force offline
Path: User management->User list->User details page->User information
You can also click the More button in the upper right corner of the User information tab to Force offline and confirm the offline.
This operation will force the user to exit all applications under this user pool.
Control which applications a user can access
Path: User Management->User List->User Details->Application Authorization
You can view all applications that the user can currently access on the Application Authorization tab of the user details page:
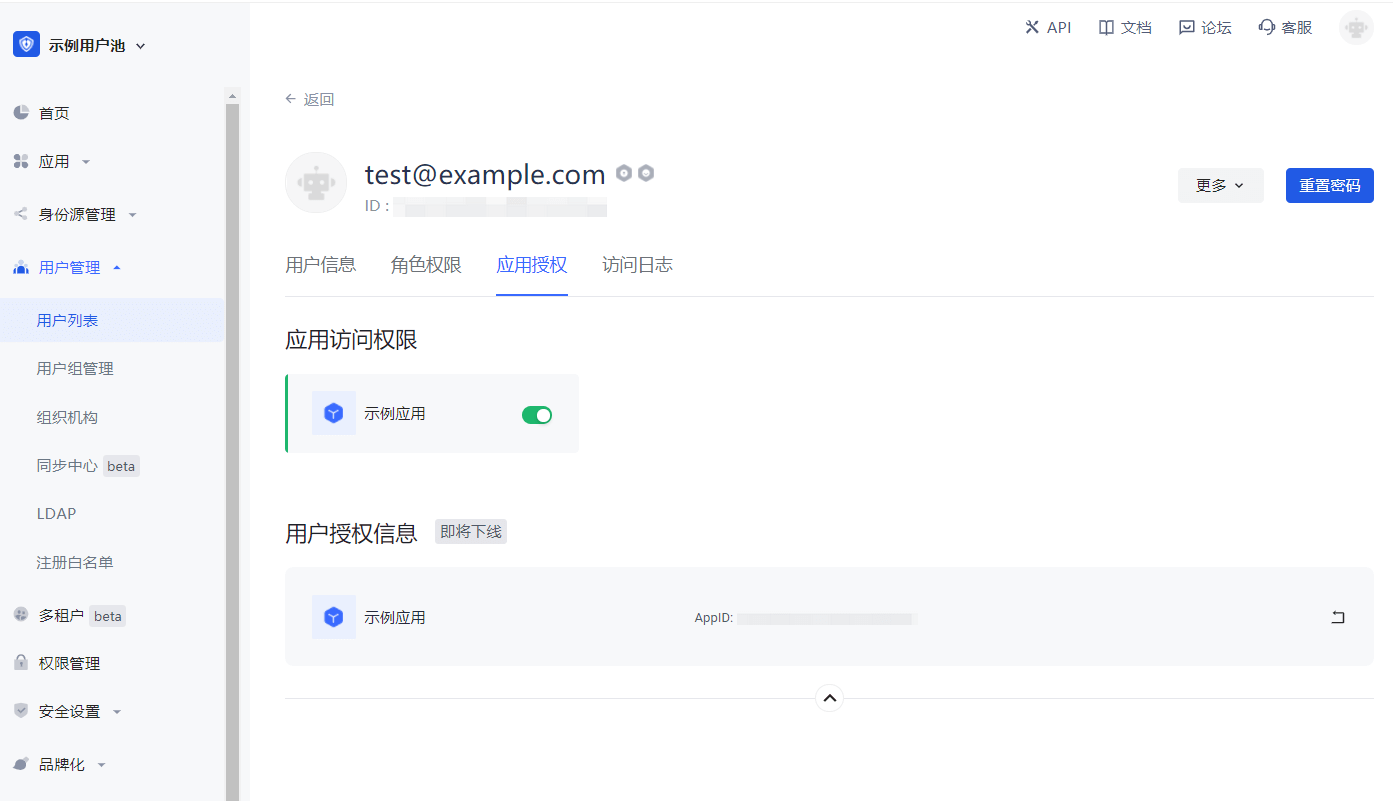
You can control whether the current user can access an application through the application access permission switch.
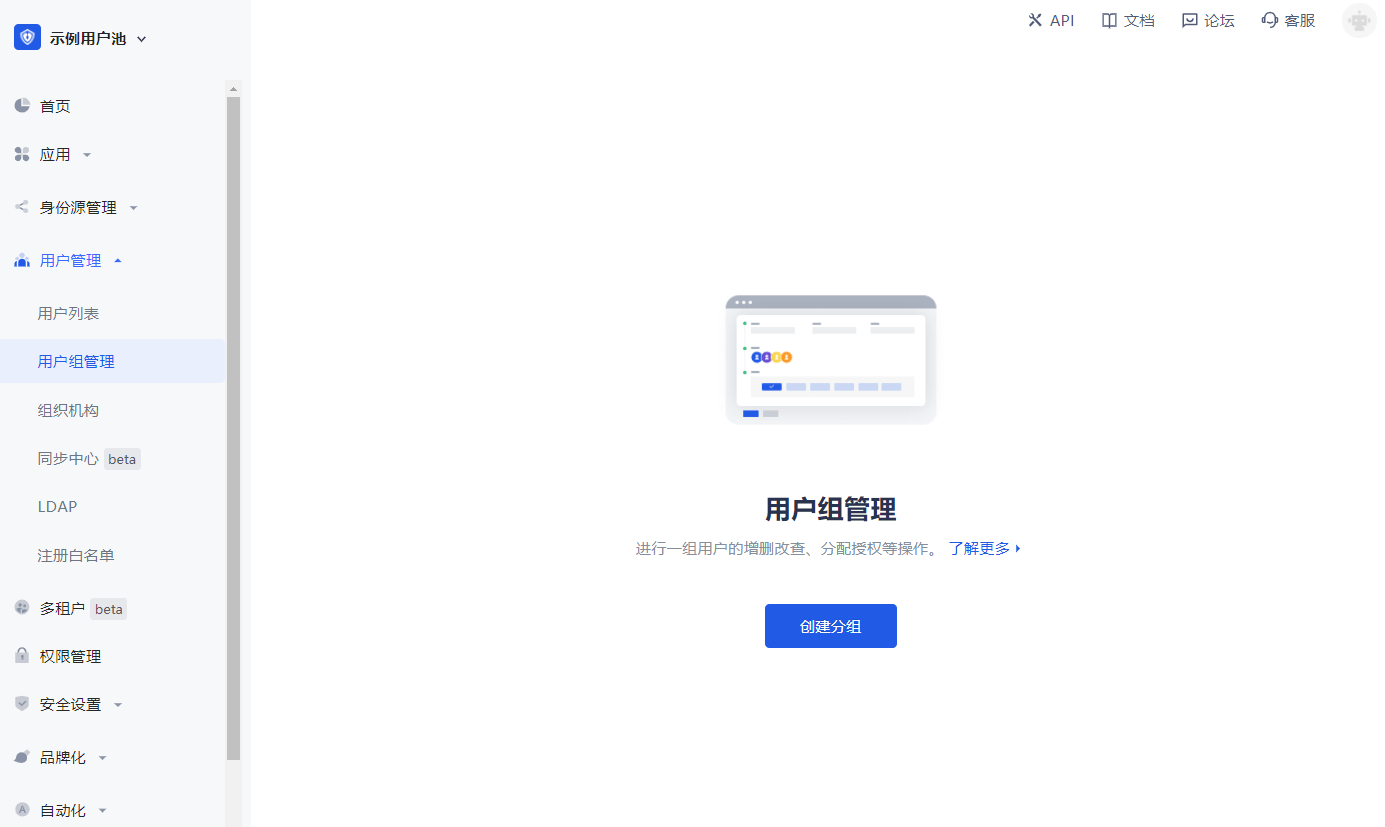
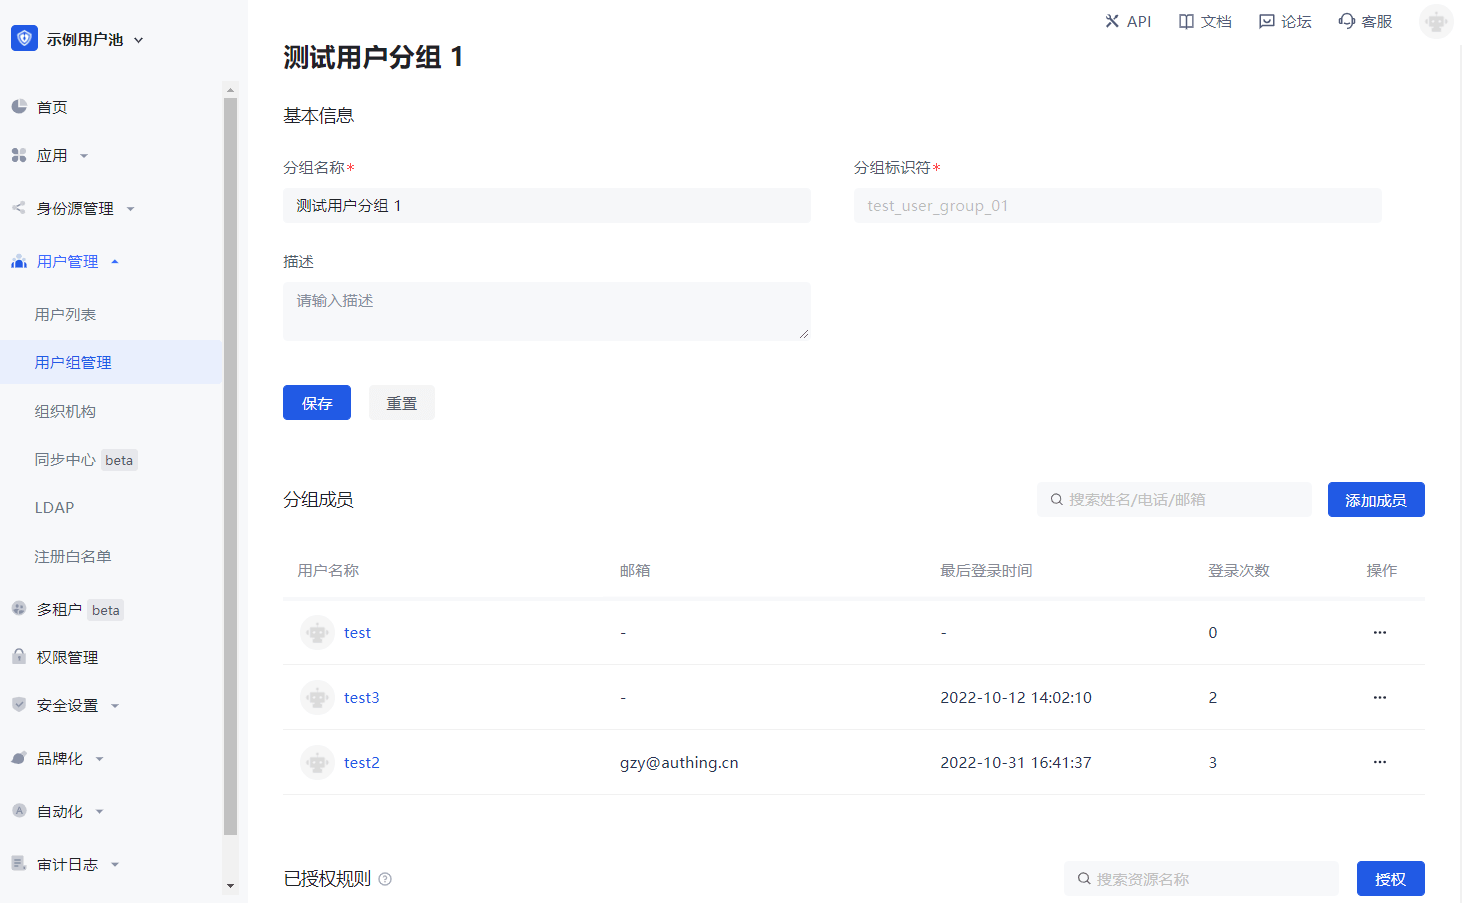
User Group Management
Path: User Management->User Group Management
Perform operations such as adding, deleting, modifying, and querying a group of users, and assigning authorizations.
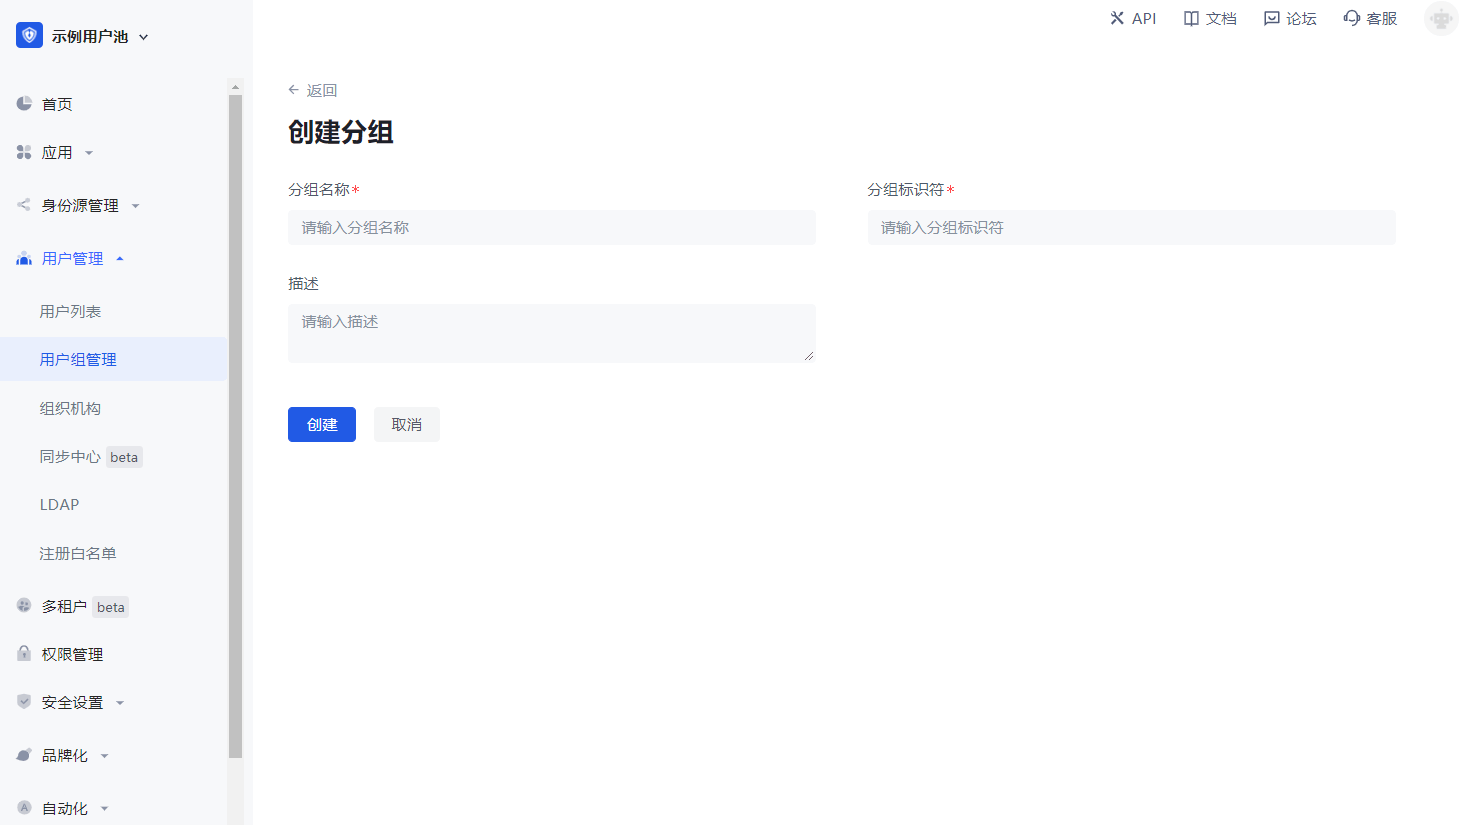
Create a group
Find User Management in the navigation bar and click the corresponding menu to enter the user group page
Fill in group information
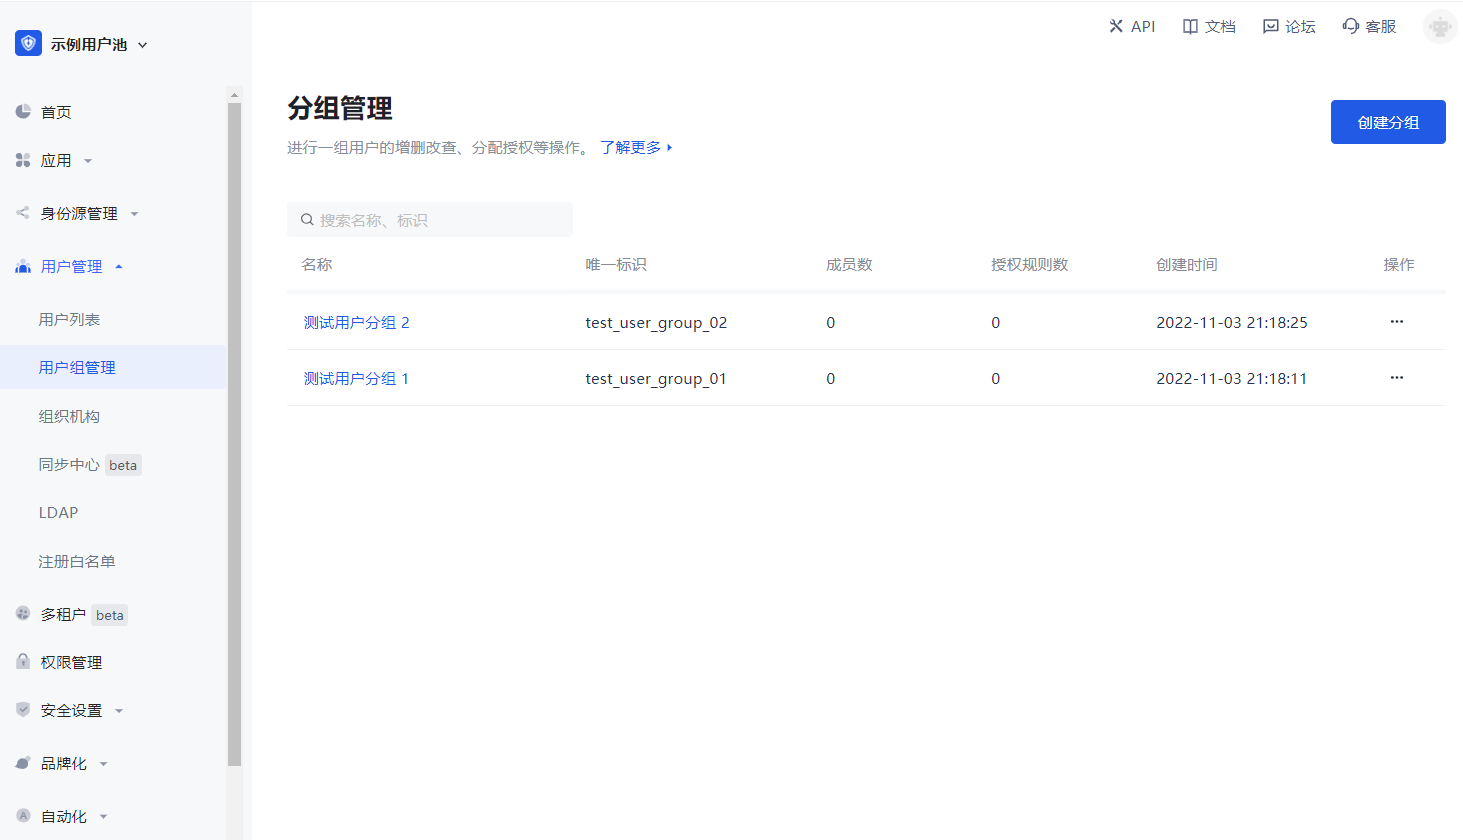
Group list
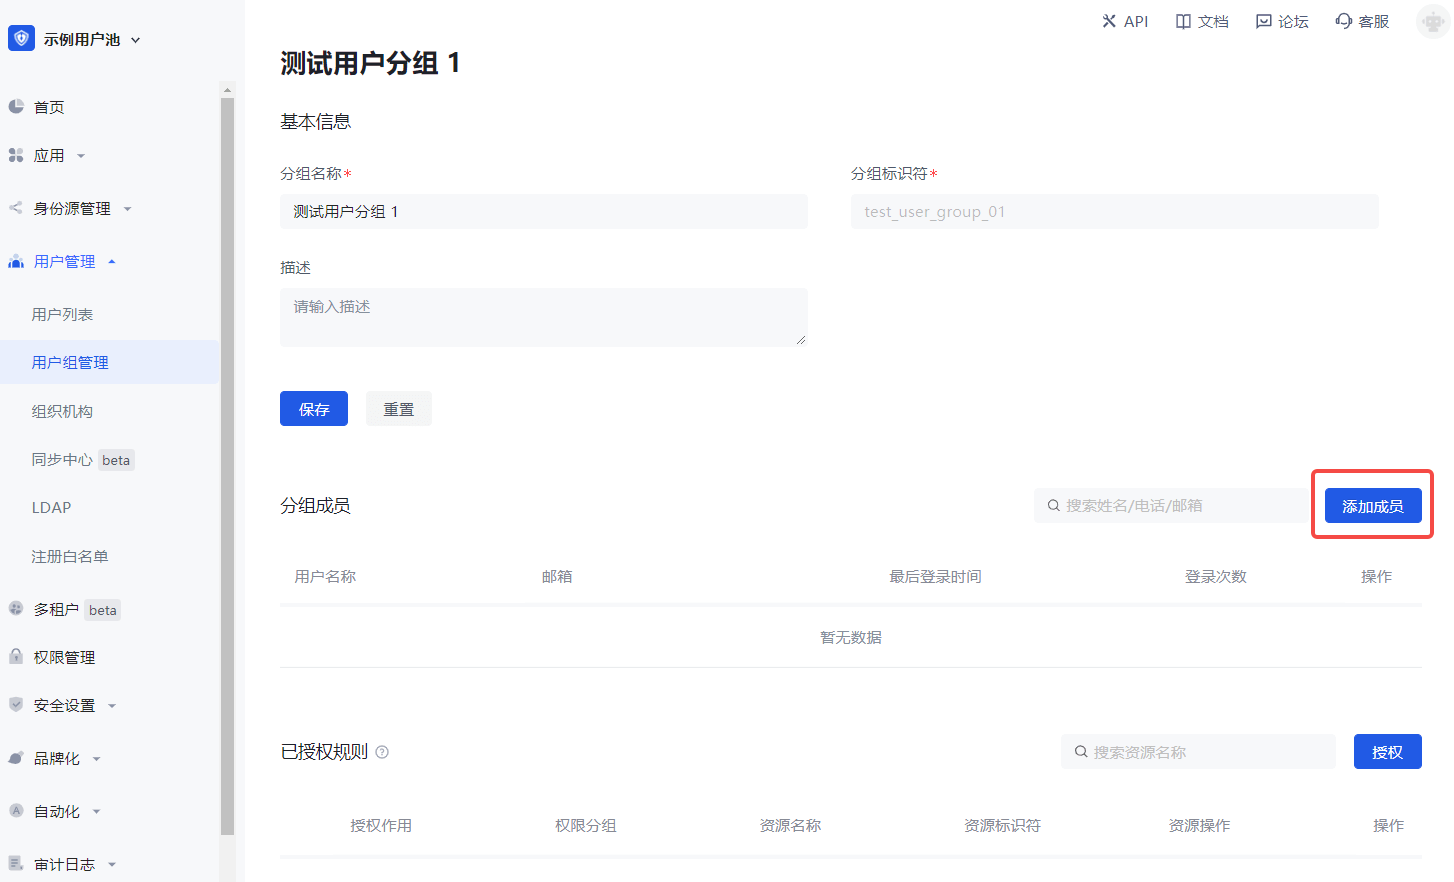
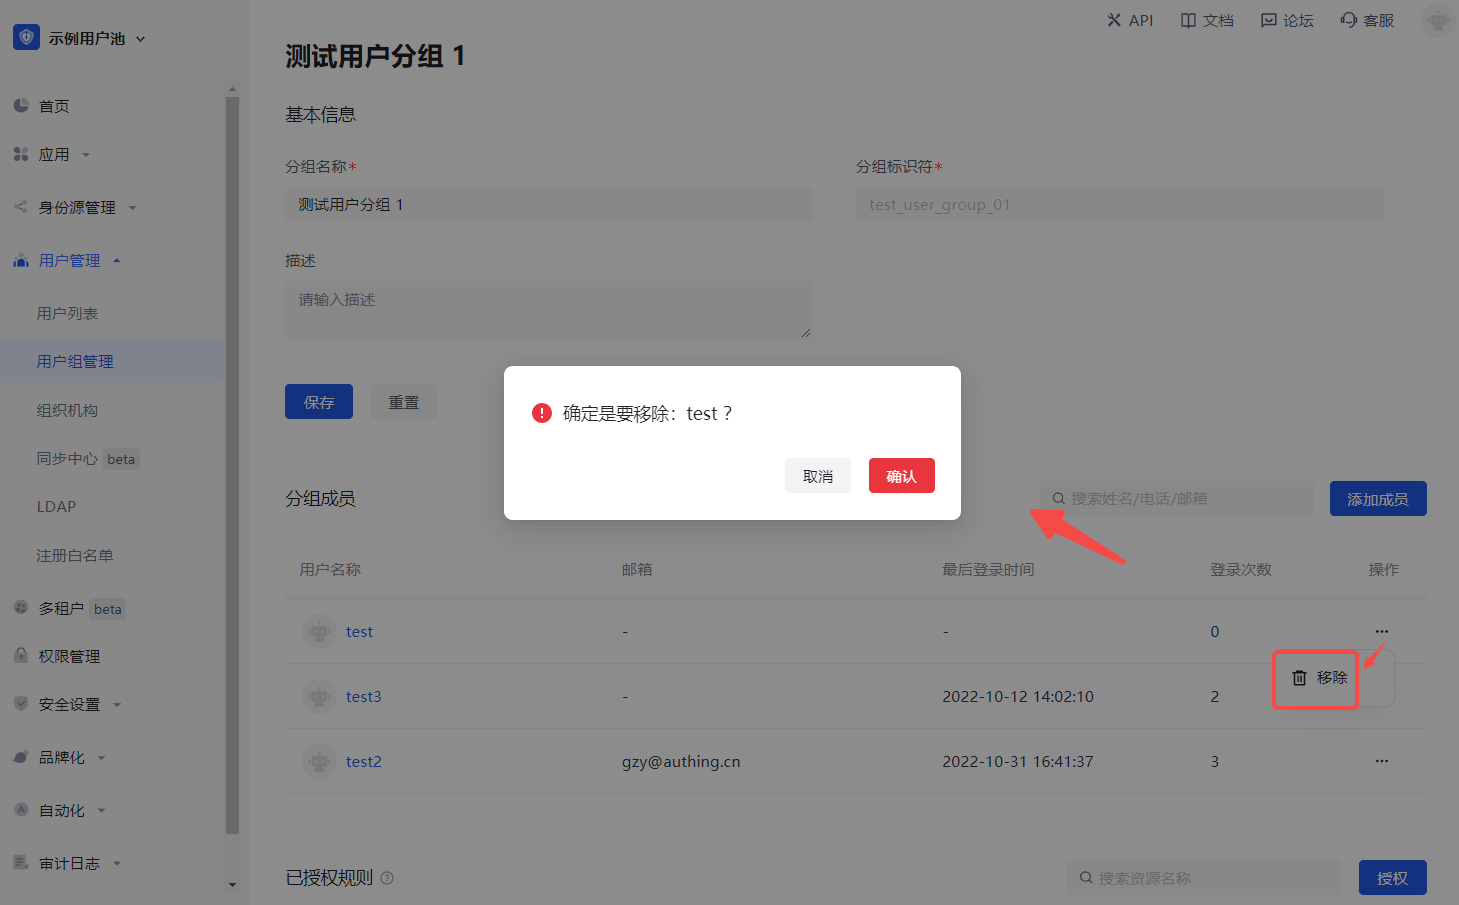
Group details
- Click Add Member.
- Select a member from the pop-up component or search for a member.
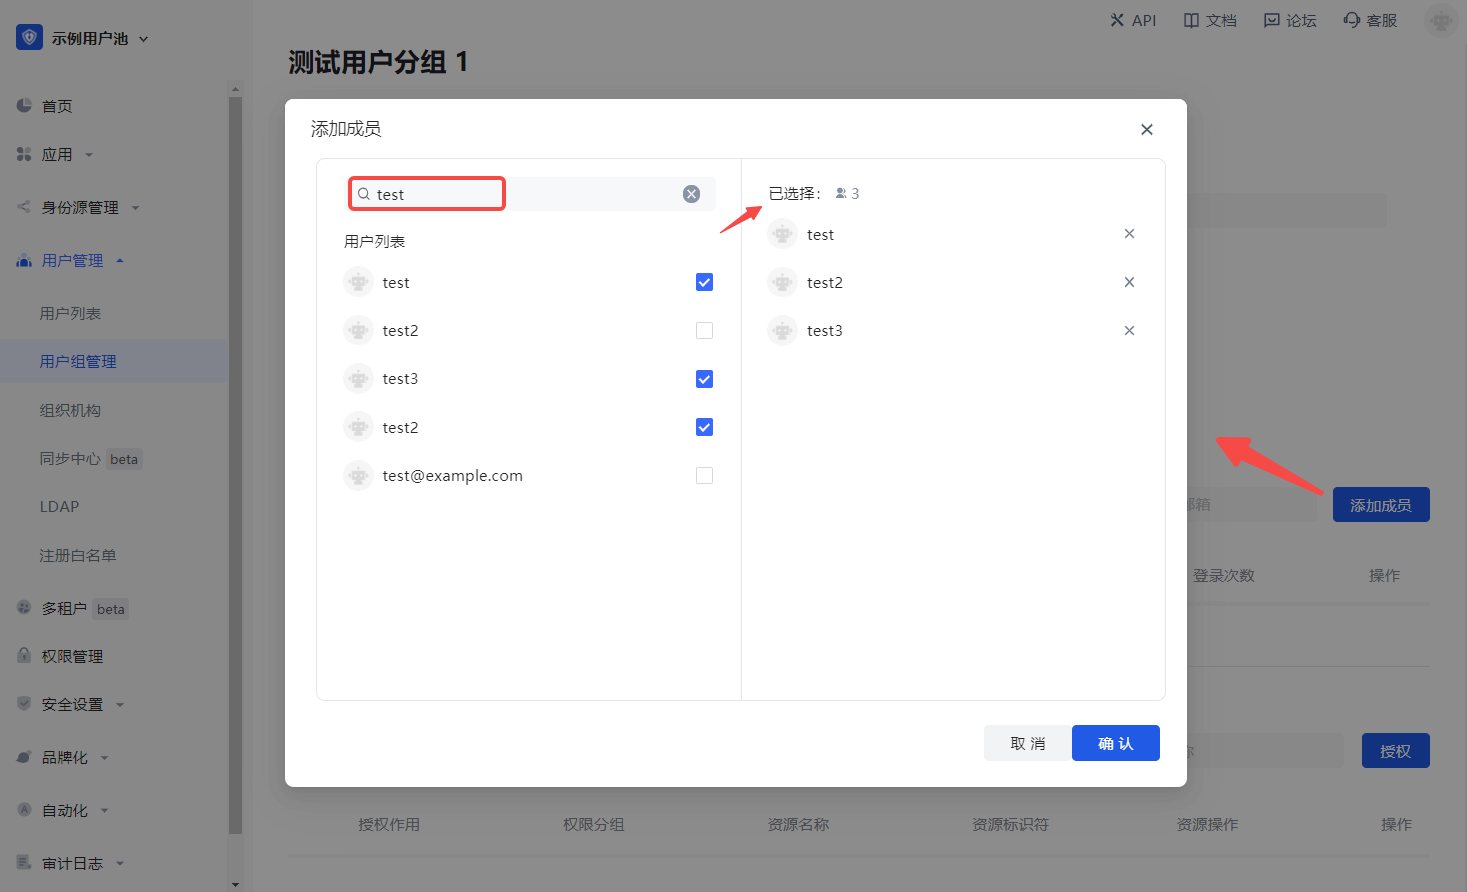
- Click Confirm to add successfully.
Assign permissions
To assign permissions to user groups, perform the following steps:
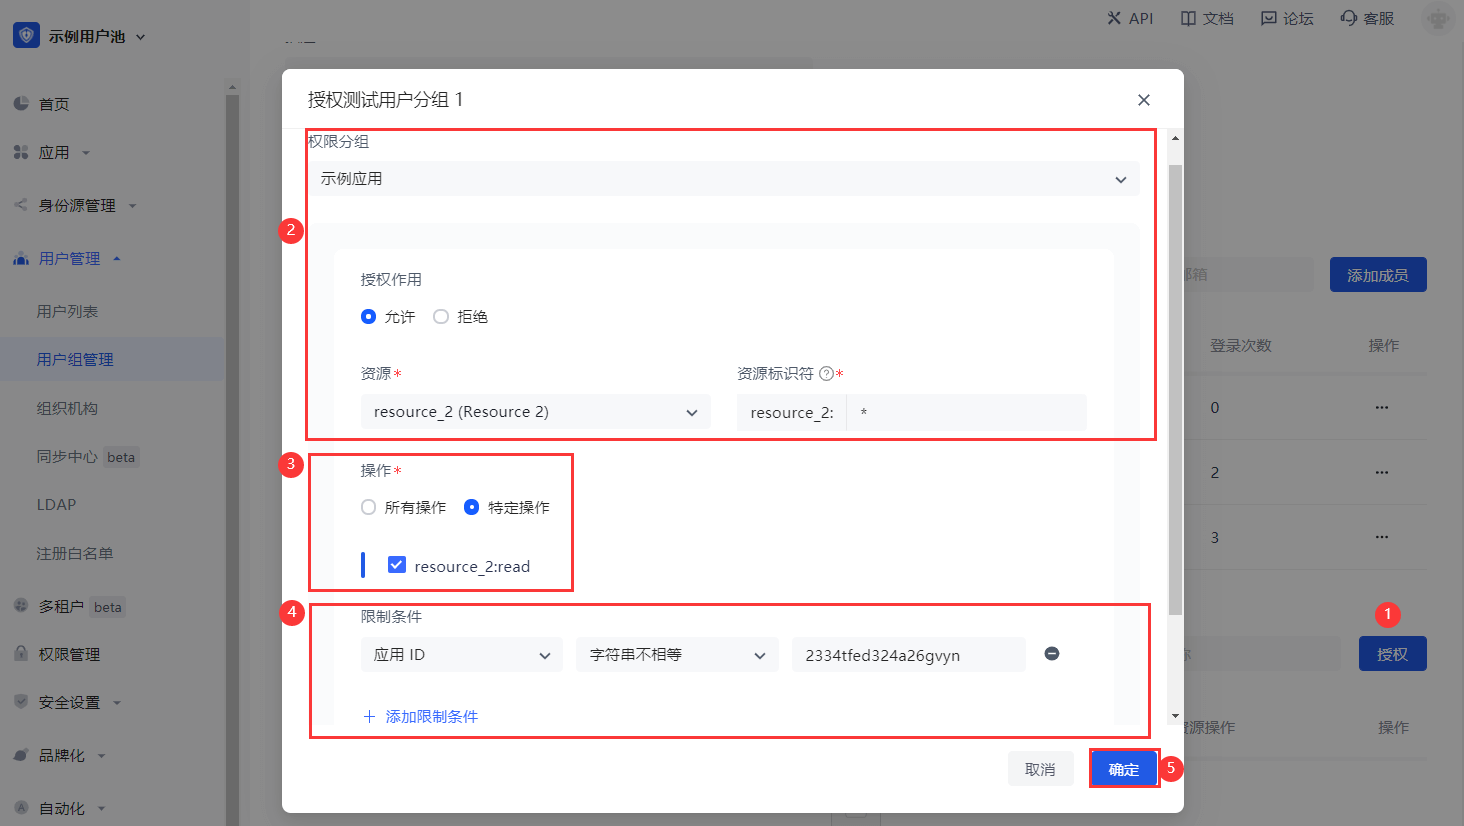
Click Add Authorization Rule.
Select Permission Group in the Authorization component, and specify Permission Role and Resource.
Specify the operation.
Add restrictions.
INFO
To add multiple authorization rules to the current user group (specify other Permission Group / Authorization Role / Resource / Operation / Restriction), click Add Authorization Rule below the pop-up window.
- Click OK. Authorization is successful.
INFO
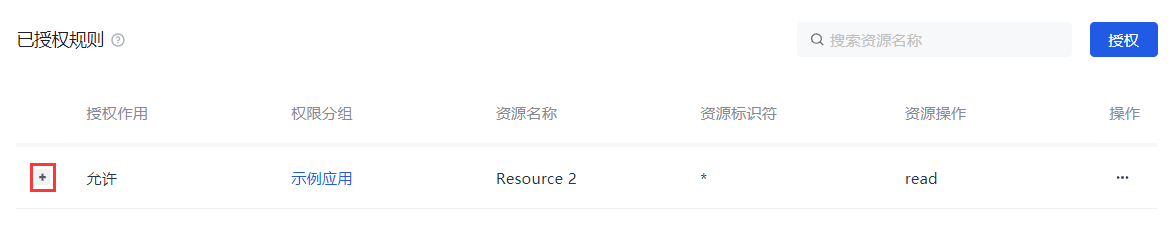
Click + to expand the current authorization rule and display the rule details.
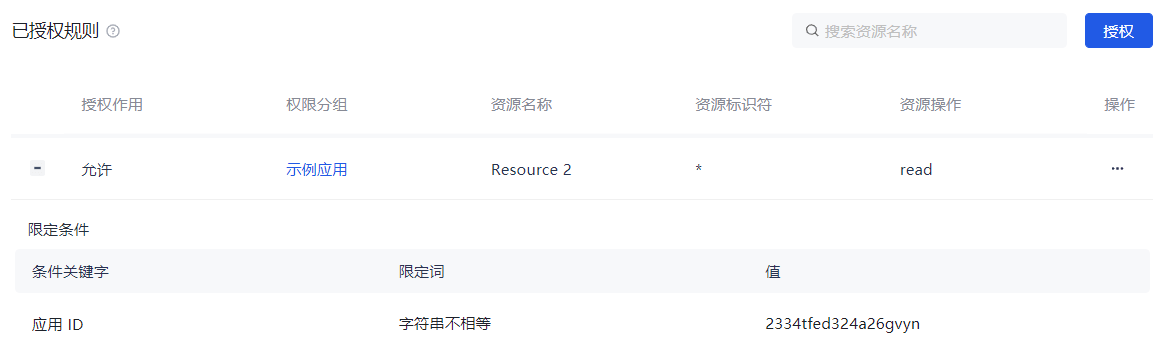
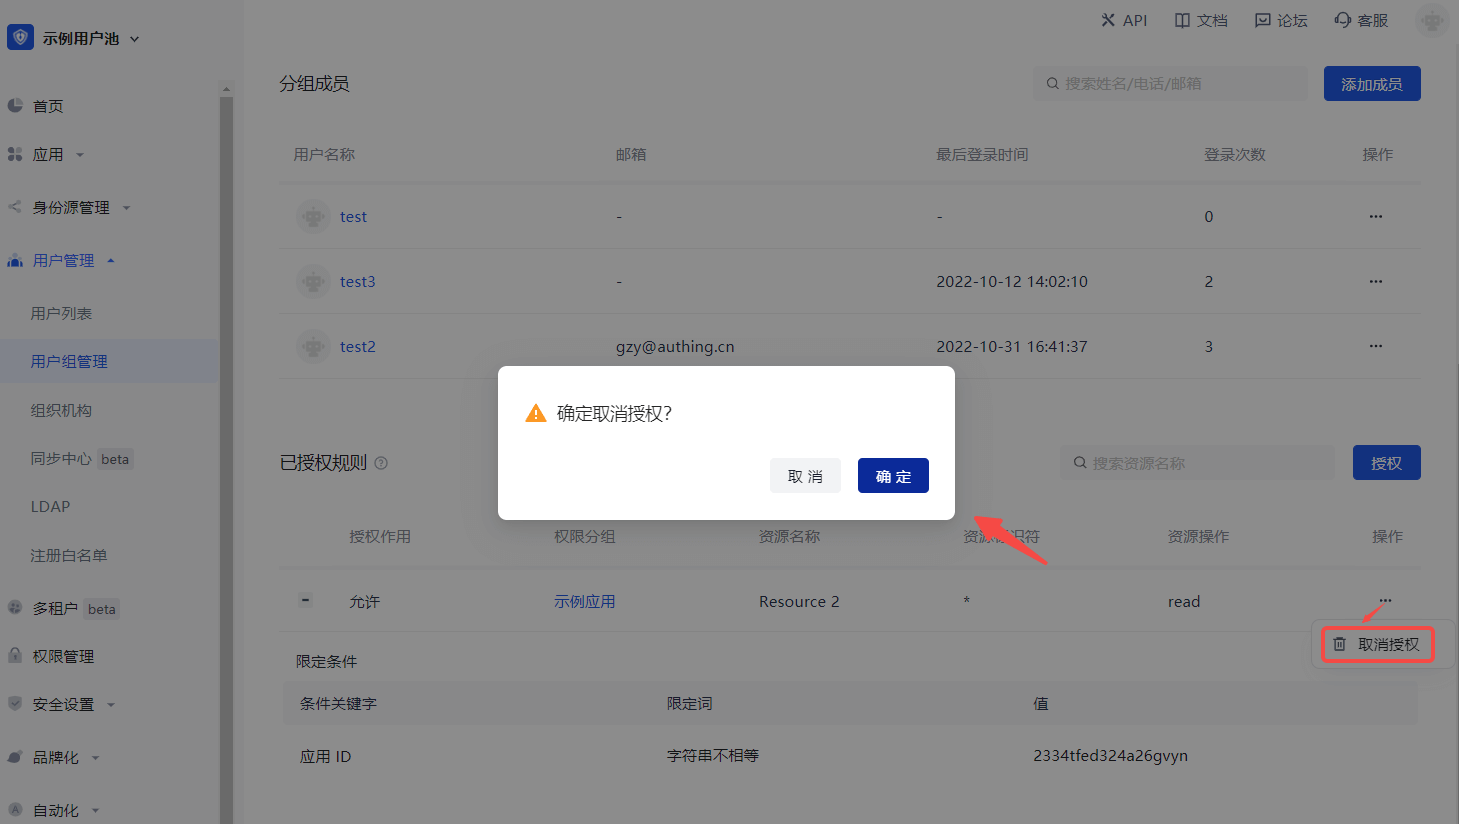
To cancel authorization, click the Cancel Authorization button in the Action column of the current authorization rule row:
Invitation Management
INFO
The user invitation function provided by GenAuth supports multiple scenarios and can meet the general invitation capabilities in most SaaS scenarios at home and abroad:
- Offline distribution of invitation links/QR codes, users apply to join by themselves;
Overview
- This update will support administrators to invite new users in the following ways:
- General invitation: When the administrator does not know the contact information (email) of the new user, you can generate and copy the invitation link on the "General Invitation" page and send it to the new user. See below for details. And ordinary users in the user pool can also generate and copy invitation links to invite new users;
- Support the "Quick Query" page to quickly query the status and locate the list of invitees by the name of the invitee; Based on GenAuth's existing personal user account system, GenAuth has launched the public account function. This function mainly helps enterprises in complex business and system systems to achieve the ability to access multiple public account resources after personal account authorization login by associating public accounts with personal users, departments, positions, user groups and roles.
Function details
General invitation
1. Set up a general invitation link
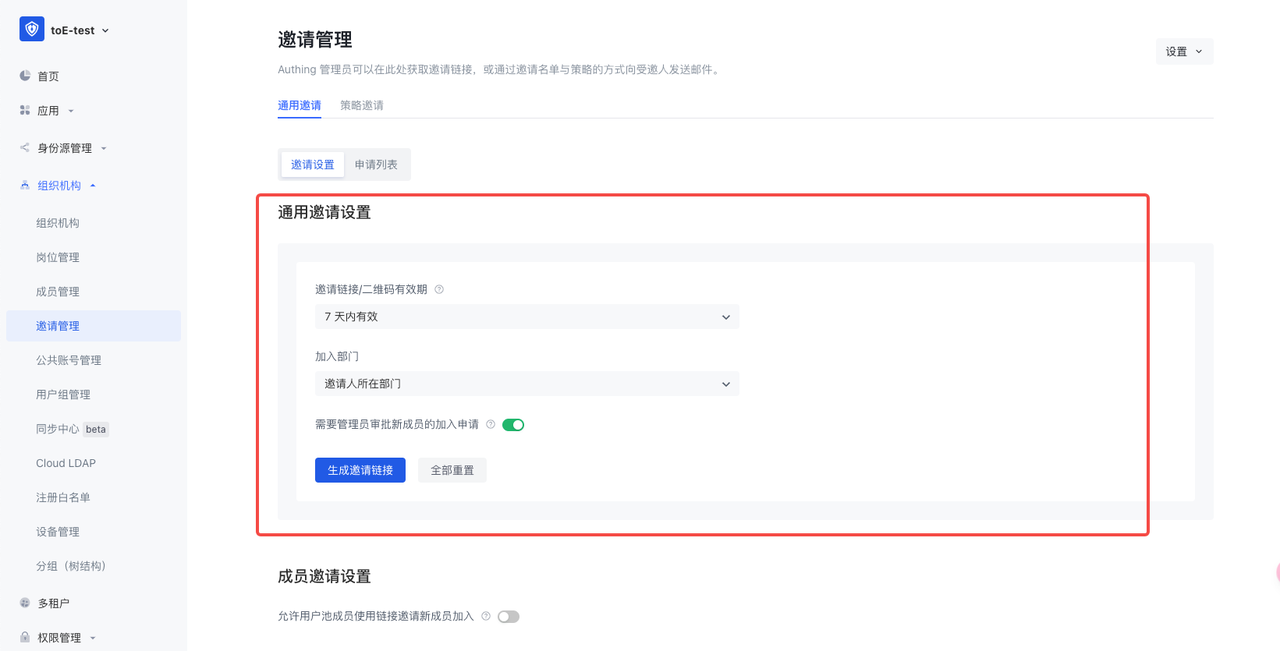
- Support setting the validity period of the invitation link;
- Support setting the department to which a new user belongs after joining the user pool;
- Support enabling the administrator approval function. After enabling it, a new user can successfully join only after the administrator agrees in the "application list" after submitting the application. If it is closed, it is deemed that the system agrees to the application and you can join directly;
- Click "Generate Invitation Link" to generate a link and QR code according to the settings above:
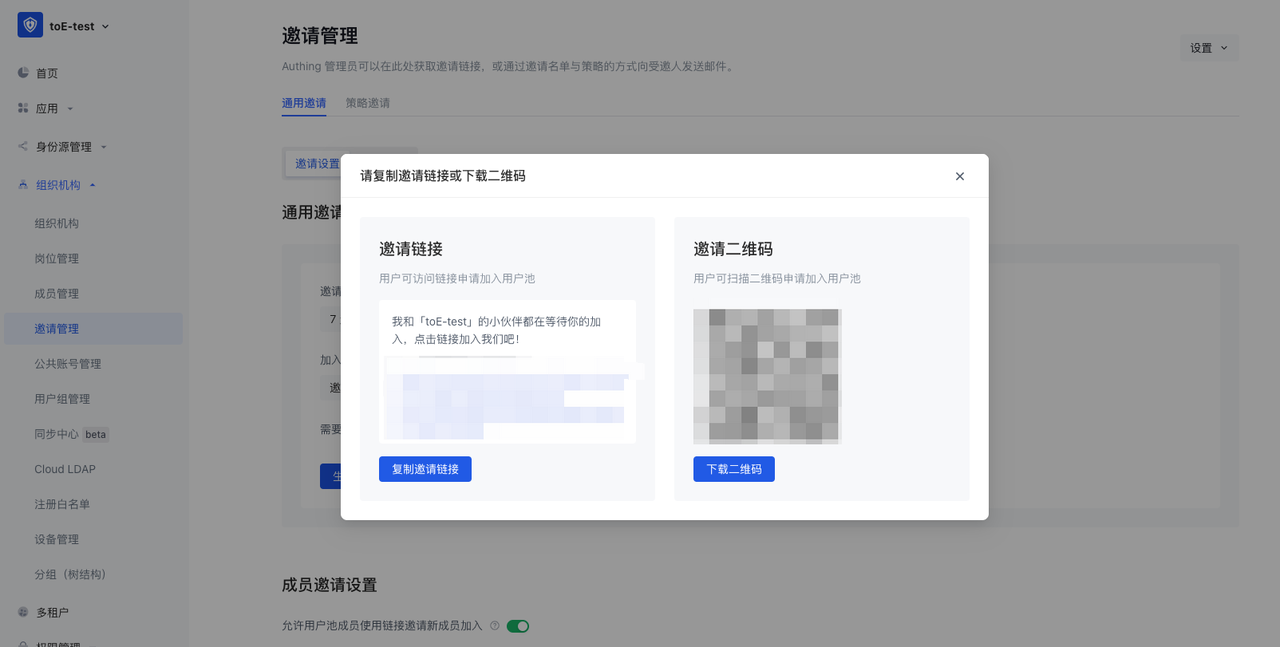
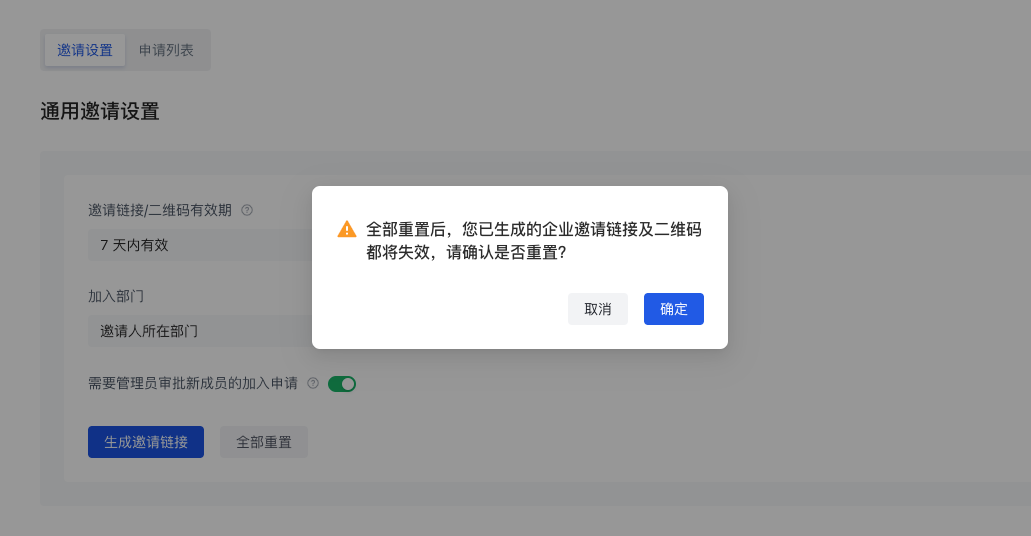
- After "Reset All", all invitation links generated by the current administrator will be invalid:
2. Set up ordinary user invitation links
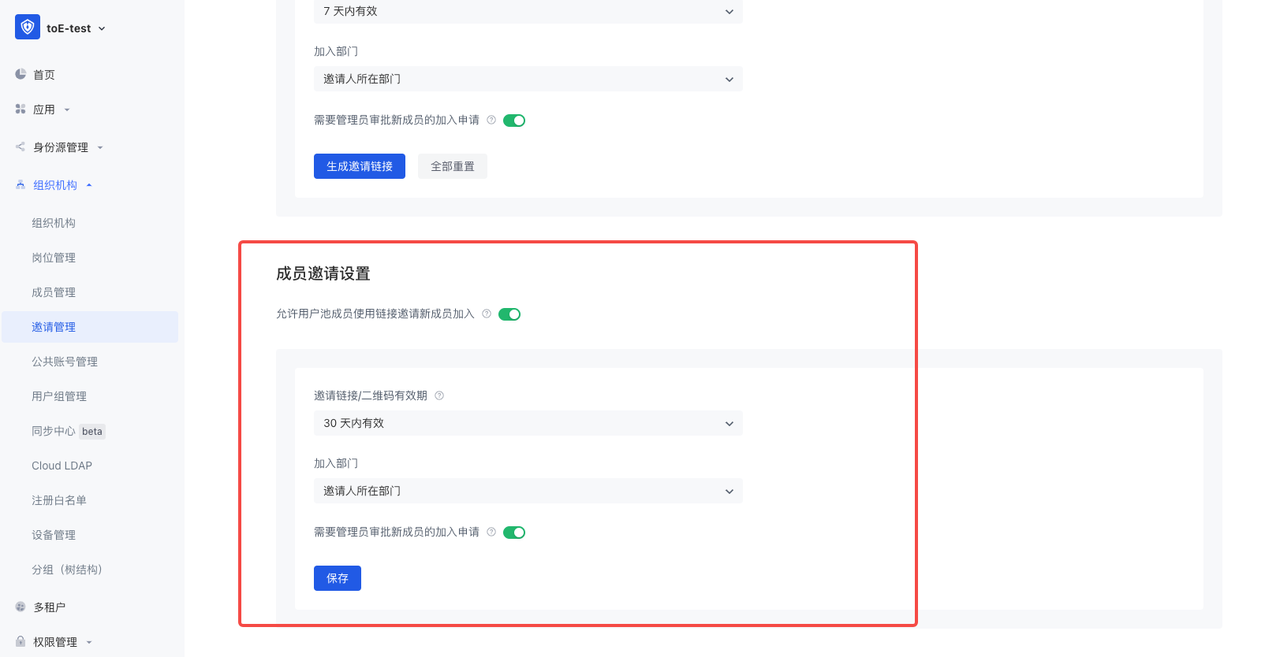
- After turning it on, you can add buttons and other interactive modes on the business system page for users to generate invitation links;
3. Invitation page
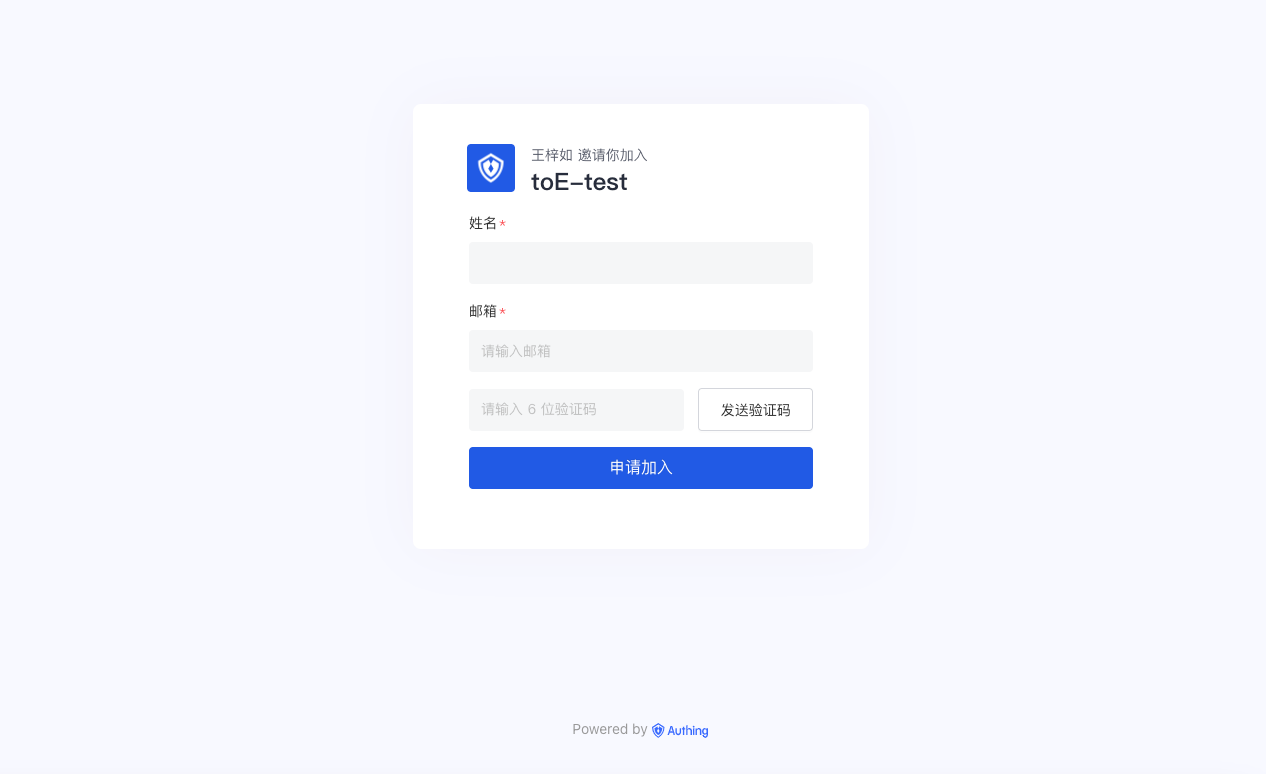
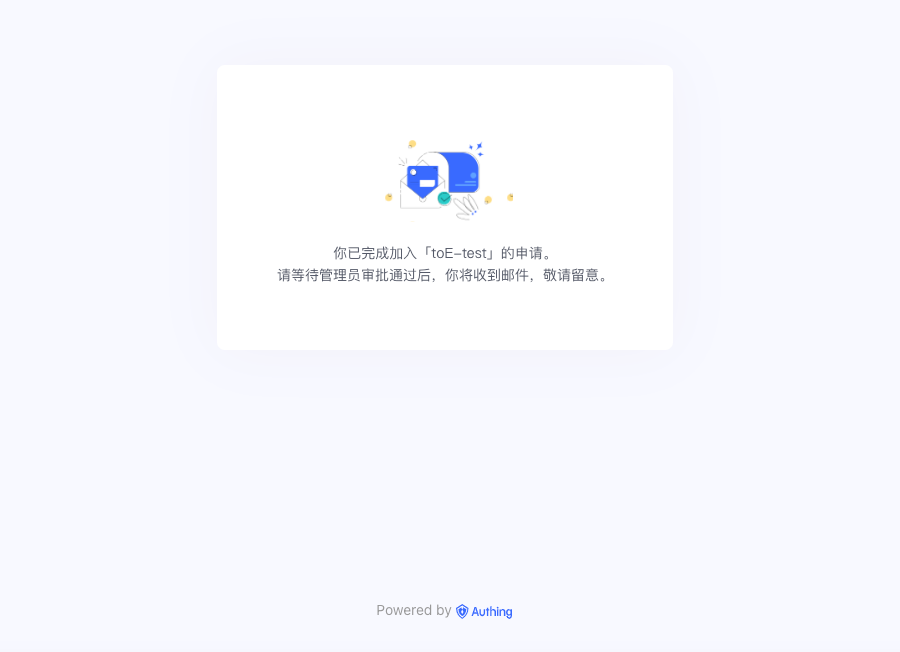
- Click the general invitation link to jump to the page above, where you need to fill in your name and email address to apply to join;
- After submitting the "Application to Join", you will receive a welcome email after approval, which includes: login address, login account, initial password and other information;
4. Application List
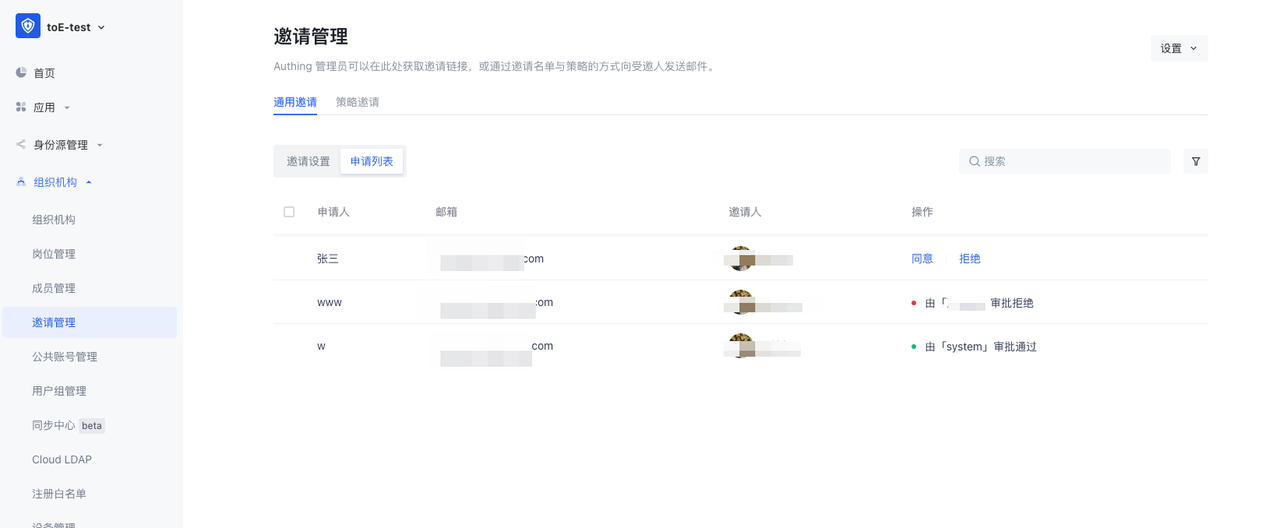
- Administrators can go to "Invitation Management-General Invitation-Application List" to approve new members' applications to join;
- The list can view the applicant's name, email address, inviter, approver, approval results, etc.;